Microsoft Defender Antivirus (Защитник) — это встроенный антивирус в Windows 10/11 и Windows Server, который включен и настроен по умолчанию. В этой статье мы рассмотрим, как полностью отключить Защитник в Windows 11 или временно (приостановить).
В Windows 11 и 10 при установке стороннего антивируса, встроенный стандартный Защитника Microsoft должен отключаться. В некоторых случаях это не происходит автоматически и вам может потребоваться ручное отключение Microsoft Defender.
Содержание:
- Временная приостановка защиты Microsoft Defender в Windows 11 и 10
- Как полностью отключить Защитник Defender в Windows 11 и 10?
Временная приостановка защиты Microsoft Defender в Windows 11 и 10
В некоторых случаях вам может понадобится временно отключить защиту Microsoft Defender, не затрагивая важные системные службы. Например, запуск или установка какой-то системной программы или утилиты блокируется Microsoft Defender. Чтобы запустить такое приложение, нужно остановить защиту Windows Defender в реальном времени.
- Перейдите в следующий раздел настроек Windows 11: Settings -> Privacy and Security -> Windows Security -> Open Windows Security (или выполните команду быстрого доступа к настройкам
ms-settings:windowsdefender
);Если приложение службы безопасности Microsoft Defender не запускается, его можно восстановить (под капотом находится UWP приложение
Microsoft.SecHealthUI
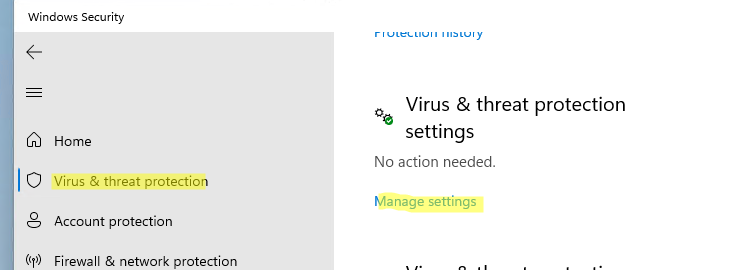
). - Откройте раздел Virus and threat protection, и нажмите на кнопку Manage Settings в разделе Virus and Threat protection settings;
- Переведите переключатель Real-time protection в положение Off;
- Подтвердите приостановку антивирусной защиты в окно с подтверждением повышения привилегий UAC.
Чтобы восстановить защиту компьютера Windows Defender, нужно включить переключатель. Также защита в реальном времени Microsoft Defender будет включена автоматически после перезагрузки компьютера.
Ранее мы рассматривали, как управлять настройками антивируса Windows Defender с помощью PowerShell. В статье была рассмотрена PowerShell команда для отключения защиты в реальном времени:
Set-MpPreference -DisableRealtimeMonitoring $true
Однако это команда не отрабатывает, как вы ожидаете в Windows 11 и последних билдах Windows 10. Дело в том, что в Windows 10, начиная с билда 1903, по умолчанию включена новая фича Defender, которая называется Microsoft Defender Tamper Protection (Защита от подделок).
Tamper protection обеспечивает дополнительную защиту основных элементов безопасности Microsoft Defender. В частности, она блокирует несанкционированное изменение настроек антивируса, приостановку защиты в реальном времени, отключение облачной защиты. Это означает, что при включенной Защите от подделок вы не сможете отключить Real Time Protection в Microsoft Defender с помощью PowerShell.
Отключить Tamper Protection можно только вручную из графической панели управления Windows Security.
Перейдите в раздел настроек Virus and threat protection settings, промотайте список компонентов и измените переключатель параметра Tamper Protection на Off.
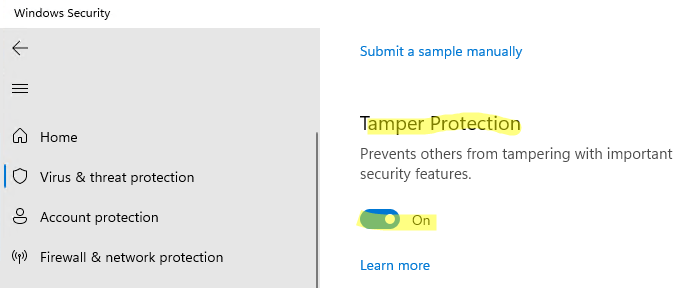
После отключение Tamper Protection вы сможете отключить защиту в реальном времени указанной выше командой PowerShell.
Как полностью отключить Защитник Defender в Windows 11 и 10?
В ранних билдах Windows 10 и в Windows Server 2016 можно было полностью отключить Windows Defender через параметр групповой политики Turn off Windows Defender Antivirus в разделе Computer Configurations -> Administrative Template -> Windows Component -> Windows Defender Antivirus редактора локальных групповых политик gpedit.msc. Или ключом реестра DisableAntiSpyware в HKEY_LOCAL_MACHINE\SOFTWARE\Policies\Microsoft\Windows Defender, соответствующий этому параметру GPO:
New-ItemProperty -Path “HKLM:\SOFTWARE\Policies\Microsoft\Windows Defender” -Name DisableAntiSpyware -Value 1 -PropertyType DWORD -Force
Для отключение защиты в реальном времени использовалась политика Turn on behavior monitoring или параметр реестра DisableBehaviorMonitoring =1 в указанной выше ветке реестра.
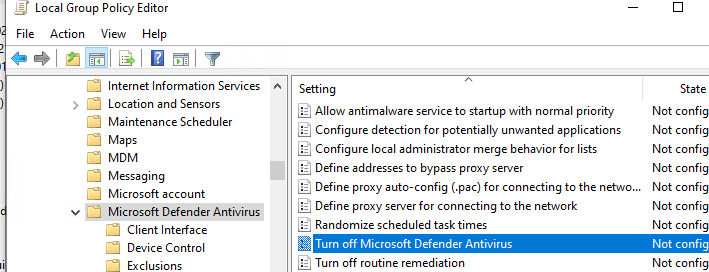
Во всех билдах, начиная с Windows 10 1903, и в Windows 11 эти параметры GPO и ключи реестра нельзя использоваться для отключения Microsoft Defender, так как его настройки защищены новой опцией Tamper Protections (рассмотрена выше). Методы, используемые ранее для отключения Microsoft Defender Antivirus, не работают в Windows 11.
Для полного отключения компонентов Windows Defender нужно загрузить ваш компьютер в безопасном режиме. Для этого:
- Запустите утилиту
msconfig
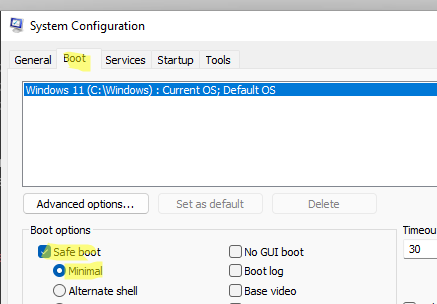
; - Перейдите на вкладку Boot;
- Выберите опцию Safe boot -> Minimal в разделе настройки параметров загрузки;
- Нажмите OK и перезагрузите компьютер;
- Ваш компьютер загрузится в безопасном режиме;
- Теперь нужно открыть редактор реестра (
regedit.exe
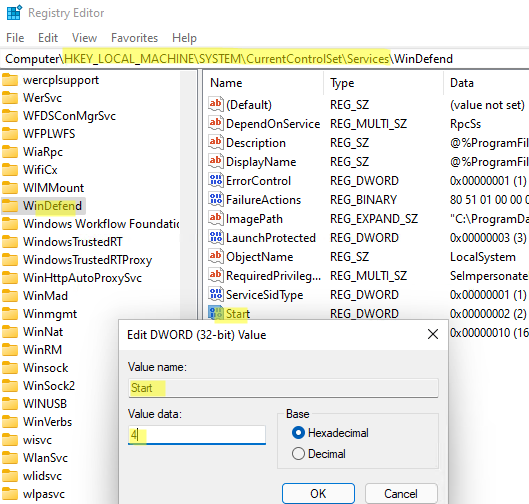
), перейдти в ветку HKEY_LOCAL_MACHINE\SYSTEM\CurrentControlSet\Services и отключить запуск следующих служб:- Sense
- WdBoot
- WdFilter
- WdNisDrv
- WdNisSvc
- WinDefend
Для этого нужно изменить значение параметра Start на 4;
Измените параметр Start для всех указанных служб вручную или воспользуйтесь скриптом PowerShell:
$regpath='HKLM:\SYSTEM\CurrentControlSet\Services'
Set-ItemProperty -Path ($regpath+"\WinDefend") -Name Start -Value 4
Set-ItemProperty -Path ($regpath+"\Sense") -Name Start -Value 4
Set-ItemProperty -Path ($regpath+"\WdFilter") -Name Start -Value 4
Set-ItemProperty -Path ($regpath+"\WdNisDrv") -Name Start -Value 4
Set-ItemProperty -Path ($regpath+"\WdNisSvc”) -Name Start -Value 4
Чтобы включить Microsoft Defender в Windows, нужно установить следующие дефолтные значение параметра Start в ветке каждой службы:
- Sense — 3
- WdBoot — 0
- WdFilter — 0
- WdNisDrv — 3
- WdNisSvc — 3
- WinDefend — 2
- Запустите msconfig и отключите безопасный режим, перезагрузите компьютер в обычном режиме;
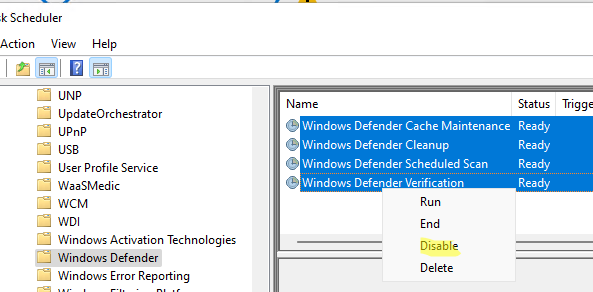
- Отключите все четыре задания в разделе Microsoft –> Windows –> Windows Defender Task Scheduler (
taskschd.msc
);Get-ScheduledTask “Windows Defender Cache Maintenance” | Disable-ScheduledTask
Get-ScheduledTask “Windows Defender Cleanup” | Disable-ScheduledTask
Get-ScheduledTask “Windows Defender Scheduled Scan” | Disable-ScheduledTask
Get-ScheduledTask “Windows Defender Verification” | Disable-ScheduledTask
Можно отключить задания планировщика с помощью PowerShell:
Запустите приложение Windows Security и убедитесь, что антивирус Microsoft Defender теперь отключен. Здесь должна появиться надпись Threat service has stopped. Restart it now (Служба работы с угрозами остановлена).

Итак, мы рассмотрели, как отключить защиту Microsoft Defender в Windows 10 и 11.
Microsoft Defender is a built-in antivirus software that comes pre-installed on all Windows 10 and 11 editions. Users can manage the Microsoft Defender antivirus from the Windows Security app GUI or using the PowerShell command line. This guide explains how to use PowerShell to enable/disable Microsoft Defender on Windows, how to manage various settings, and scan the computer for threats and viruses.
How to Check the Microsoft Defender Status with PowerShell
Only Windows desktop operating systems (such as Windows 11 or 10) have Microsoft Defender antivirus pre-installed. Open an elevated PowerShell prompt and check the current status of Microsoft Defender with the command:
Get-MpComputerStatus
Or quickly check if Microsoft Defender is on, which protection settings are enabled, and when antivirus definitions were last updated:
Get-MpComputerStatus | Select-Object -Property Antivirusenabled,AMServiceEnabled,AntispywareEnabled,BehaviorMonitorEnabled,IoavProtectionEnabled,NISEnabled,OnAccessProtectionEnabled,RealTimeProtectionEnabled,IsTamperProtected,AntivirusSignatureLastUpdated

If Defender Antivirus is disabled, check the following service statuses on a computer:
- Microsoft Defender Antivirus Service (WinDefend)
- Windows Security Service (SecurityHealthService),
- Security Center (wscsvc)
Get-Service Windefend, SecurityHealthService, wscsvc| Select Name,DisplayName,Status

How to Disable or Enable Microsoft Defender Protection using PowerShell
In Windows 10 and 11, you can temporarily pause Microsoft Defender protection or turn it off completely.
How to Temporarily Disable (Pause) the Defender Antivirus Protection on Windows
There is a built-in security feature called Tamper protection that is enabled by default in all modern versions of Windows (starting with build 21H2). This feature prevents users from modifying Defender security features through PowerShell, registry settings, or Group Policy.
Check the Tamper Protection state:
Get-MpComputerStatus | select IsTamperProtected

Tamper Protection can only be disabled from the Windows Security UI. Go to “Virus & Threat Protection” > click “Manage Settings” > scroll down to “Tamper Protection” and move the slider to the “Off” position.

Tamper protection is off. Your device may be vulnerable.

Now disable Microsoft Defender real-time protection with PowerShell:
Set-MpPreference -DisableRealtimeMonitoring $true
Disable the cloud-delivered protection:
Set-MpPreference -MAPSReporting Disabled

This will suspend antivirus protection in Windows until the next restart.
To restore real-time protection, run:
Set-MpPreference -DisableRealtimeMonitoring $false
Turn on cloud-delivered protection:
Set-MpPreference -MAPSReporting Advanced
Permanently Turn Off Microsoft Defender on Windows 11 or 10
If you have a third-party certified AV solution installed on the computer, Microsoft Defender antivirus will automatically switch to passive EDR or block mode. But in some cases, you may to completely disable Microsoft Defender on a computer without installing third-party AV.
In earlier versions of Windows, the Microsoft Defender Antivirus can be disabled using the GPO option Turn off Windows Defender Antivirus (Computer Configuration > Administrative Templates > Windows Components > Microsoft Defender Antivirus) or with the DisableAntiSpyware = 1 registry parameter. However, these options no longer completely disable Microsoft Defender Antivirus in the latest Windows 10 and 11 builds.

The only way to completely disable Microsoft Defender is to restart your computer in Safe Mode and prevent the Defender services from starting.
- To boot Windows into the Safe Mode, run:
bcdedit /set {current} safeboot minimal shutdown -r -t 0 - Open the Registry Editor (regedit.exe) after booting into Safe Mode
- Then open the following registry keys one by one and change the value of the Start registry parameter in each key to 4
- Now turn off the Safe Mode Boot mode and restart Windows:
bcdedit /deletevalue {current} safebootSign into Windows with your account and check that Microsoft Defender is now disabled.
| Registry key | Parameter | Default Value | New value (disable defender) |
| HKLM\SYSTEM\CurrentControlSet\Services\Sense\ | Start | 3 | 4 |
| HKLM\SYSTEM\CurrentControlSet\Services\WdBoot\ | Start | 0 | 4 |
| HKLM\SYSTEM\CurrentControlSet\Services\WdFilter\ | Start | 0 | 4 |
| HKLM\SYSTEM\CurrentControlSet\Services\WdNisDrv\ | Start | 3 | 4 |
| HKLM\SYSTEM\CurrentControlSet\Services\WdNisSvc\ | Start | 3 | 4 |
| HKLM\SYSTEM\CurrentControlSet\Services\WinDefend\ | Start | 2 | 4 |

Uninstall Windows Defender on Windows Server 2019/2016 using PowerShell
Microsoft Defender is not pre-installed by default on Windows Server 2019/2016 platforms. It can be installed as an additional feature:
Install-WindowsFeature -Name Windows-Defender
If you want to uninstall Windows Defender on a Windows Server, remove the feature:
Uninstall-WindowsFeature -Name Windows-Defender
Manage Microsoft Defender Using PowerShell
Microsoft.SecHealthUI is a graphical UWP app that can be used for the management of Microsoft Defender on Windows 10 and 11 (available via Settings > Privacy & Security > Windows Security or with the ms-settings:windowsdefender command).

All of the Microsoft Defender configuration settings that are available in the Windows Security app can be performed using the PowerShell cmdlets of the built-in Defender module. List available cmdlets in this module:
Get-Command -Module Defender

You can get help about a specific cmdlet from the Defender module:
Get-Help Start-MpScan –Full
Or only list examples:
Get-Help Add-MpPreference -Examples
The following are the most common Microsoft Defender management tasks that you can perform from the PowerShell prompt:
Turn certain Microsoft Defender security options on or off
The following Microsoft Defender features are disabled by default:
- DisableCatchupFullScan.
- DisableCatchupQuickScan.
- DisableCpuThrottleOnIdleScans.
- DisableEmailScanning.
- DisableRemovableDriveScanning.
- DisableRestorePoint.
- DisableScanningMappedNetworkDrivesForFullScan.
- EnableFileHashComputation.
- EnableFullScanOnBatteryPower.
- EnableLowCpuPriority.
For example, enable automatic scanning of removable drives:
Set-MpPreference -DisableRemovableDriveScanning $false

Disable real-time scanning of archive files (files (RAR, ZIP, CAB):
Set-MpPreference -DisableArchiveScanning $True
Enable protect against unwanted programs (Potentially Unwanted Program — PUP, Potentially Unwanted Application — PUA):
Set-MpPreference -PUAProtection 1
Manage Microsoft Defender antivirus exclusions
- Add paths to the antivirus exclusions:
Add-MpPreference -ExclusionPath C:\Video, C:\install
- Remove a folder exclusion:
Remove-MpPreference -ExclusionPath C:\install
- Exclude process from real-time antivirus scanning:
Set-MpPreference -ExclusionProcess "word.exe", "vmwp.exe"
- Exclude specific file extensions from Microsoft Defender scan:
Set-MpPreference -ExclusionExtension *.mp3,*.MP4,*.wav,*.EDB
Disable Microsoft Defender user interface (UI)
Set-MpPreference -UILockdown $true
‘Virus and threat protection’ section will be hidden from the Windows Security UI.

Update Microsoft Defender signatures
Update-MpSignature
Update antivirus definitions from a shared network folder on your LAN. Download the necessary definition update files and set an UNC path as the default update source:
Set-MpPreference -SignatureDefinitionUpdateFileSharesSources \\DESKTOP-V20E3PO\Updates
Update the virus and malware definitions:
Update-MpSignature -UpdateSource FileShares

Update-MpSignature
Run an on-demand antivirus scan
Start-MpScan -ScanType CustomScan -ScanPath ”C:\Program Files”
Perform a full computer scan:
Start-MpScan -ScanType FullScan
Or quick threats scan:
Start-MpScan -ScanType QuickScan
Run an offline scan by booting into an isolated WinPE environment.
Start-MpWDOScan

View threat history
Get-MpThreat
List of active and pass malware detections:
Get-MpThreatDetection

To remove all active threats:
Remove-MpThreat
Cyril Kardashevsky
I enjoy technology and developing websites. Since 2012 I’m running a few of my own websites, and share useful content on gadgets, PC administration and website promotion.
To disable Windows Defender using PowerShell, you can run the following command to turn off real-time protection:
Set-MpPreference -DisableRealtimeMonitoring $true
Understanding Windows Defender
What is Windows Defender?
Windows Defender is Microsoft’s built-in antivirus software that comes with Windows operating systems. Its primary role is to protect your system from malware, viruses, and other security threats. It runs in the background, providing real-time protection, scanning files, and automatically updating virus definitions to ensure your computer remains secure.
Reasons for Removing Windows Defender
While Windows Defender is a capable security solution, there are various reasons why users might opt to use PowerShell to remove Defender or disable it temporarily:
-
Conflicts with third-party antivirus software: Often, users install third-party antivirus solutions that might conflict with Windows Defender. To avoid performance issues or software conflicts, disabling Defender can be beneficial.
-
Performance concerns: Some users might find that having multiple security programs running simultaneously can slow down their system. Disabling Defender can help improve performance.
-
User preference: Some individuals simply prefer alternative security solutions that they feel are more effective or user-friendly.
PowerShell Remove Printer: A Quick Guide to Cleanup
Preparing Your Environment
Checking Windows Defender Status
Before making any changes, it’s wise to know the current status of Windows Defender. You can check whether real-time monitoring is enabled using the following command:
Get-MpPreference | Select-Object -Property DisableRealtimeMonitoring
This command returns a boolean value indicating the status of real-time protection. If the output is `True`, it means real-time monitoring is disabled.
Understanding PowerShell Execution Policy
When using PowerShell for system configurations, it’s essential to be aware of the execution policy, which determines the conditions under which PowerShell loads configuration files and runs scripts. You can check the current execution policy with:
Get-ExecutionPolicy
If you need to change it to execute your scripts, you can use the following command:
Set-ExecutionPolicy RemoteSigned
Ensure you run PowerShell as an administrator to execute these commands successfully.
Effortlessly Remove AD User with PowerShell Commands
Removing Windows Defender Using PowerShell
Disabling Real-time Protection
Disabling real-time protection is often a first step in managing Windows Defender. This feature actively monitors for threats, but if you want to disable it temporarily or permanently for some reason, you can do so with:
Set-MpPreference -DisableRealtimeMonitoring $true
This command turns off real-time monitoring, allowing third-party antivirus software to take over.
Uninstalling Windows Defender
It’s crucial to note that while you can disable Windows Defender, uninstalling it is generally not possible as it is a core component of Windows for certain editions like Windows 10 Home or Windows 11. In these cases, you have to rely on third-party software to disable its functionality completely.
Using Windows Features
To check if Windows Defender can be removed via Windows Features, you can run:
Get-WindowsFeature -Name Windows-Defender-Features
This command will show whether the Windows Defender features are available for uninstallation. If running a version of Windows that mandates Defender, you may not achieve complete removal but can attempt to disable most functionalities through PowerShell.
Temporarily Disabling Defender with PowerShell
If you need to stop Windows Defender’s services for a brief period, you can use this command:
Stop-Service -Name WinDefend -Force
This command stops the Windows Defender service, temporarily halting its operations. Remember that this is a temporary solution, and the service will restart upon system reboot or if initiated by Windows.
PowerShell Rename Folder: A Quick How-To Guide
Alternatives to Windows Defender
Third-Party Antivirus Solutions
If you’ve decided to disable or go beyond the default protection Windows provides, several third-party antivirus solutions are available. Some popular options include Norton, McAfee, and Bitdefender. These solutions often come with additional features such as enhanced firewalls, VPN services, and advanced malware protection.
Re-enabling Windows Defender
Should you decide to revert your changes and re-enable Windows Defender, you can easily do so with the following PowerShell command:
Set-MpPreference -DisableRealtimeMonitoring $false
This command reinstates real-time protection, ensuring your computer is monitored against potential threats.
Verifying Windows Defender Status After Changes
After you’ve made any changes, it’s a good practice to validate the status of Windows Defender:
Get-MpPreference | Select-Object -Property DisableRealtimeMonitoring
Executing this command will confirm whether real-time monitoring is currently enabled or disabled.
Mastering PowerShell Remote Registry: A Quick Guide
Troubleshooting Common Issues
If Defender Fails to Disable
If Windows Defender fails to disable, it could be due to several reasons:
- Group Policy settings: In enterprise environments, the Group Policy may enforce settings that prevent changes. Check with your IT administrator if you are in a managed environment.
- Running antivirus conflicts: Ensure that other security software is not blocking the operation.
Reverting Changes
If you need to restore default settings in PowerShell due to a misconfiguration, use the following command to revert:
Set-MpPreference -DisableRealtimeMonitoring $false
Mastering PowerShell: Remove User Profile with Ease
Conclusion
In managing Windows Defender, PowerShell provides an effective interface for enabling, disabling, or checking the status of your security settings. Understanding how to use these commands can help you tailor your Windows security to fit your personal or organizational needs. Whether you’re looking to disable Defender for third-party software or simply wishing to understand its operations better, this guide outlines essential commands and best practices for managing Windows Defender through PowerShell.
In this tutorial, I will explain how to disable Windows Defender using PowerShell. Windows Defender, now known as Microsoft Defender Antivirus, is a built-in security feature in Windows 10 and Windows 11 designed to protect your computer from malware and other security threats.
However, there are instances where you might need to disable it, such as when running certain applications or troubleshooting system issues. I will show you the steps to disable Windows Defender using PowerShell.
Note: Ensure you have administrative privileges on your computer. Disabling Windows Defender requires elevated permissions.
Now, let me show you step-by-step how to disable Windows Defender using PowerShell.
Step 1: Open PowerShell as Administrator
To disable Windows Defender, you need to run PowerShell with administrative privileges. Follow these steps:
- Press
Windows + Xand select Windows PowerShell (Admin) from the menu. - If prompted by User Account Control (UAC), click Yes to allow PowerShell to make changes to your device.
Step 2: Disable Real-Time Protection
Real-time protection is a key feature of Windows Defender that actively scans files and processes for malware. To disable it, use the following PowerShell command:
Set-MpPreference -DisableRealtimeMonitoring $trueThis command will turn off real-time protection, but Windows Defender will still be active in the background.
Read Install Snipping Tool in Windows 11 Using PowerShell
Step 3: Disable Windows Defender Antivirus
To completely disable Windows Defender Antivirus, you need to modify the system registry. Here’s how:
- Open PowerShell as Administrator.
- Run the following commands to disable Windows Defender services:
Set-MpPreference -DisableRealtimeMonitoring $true
Set-MpPreference -DisableBehaviorMonitoring $true
Set-MpPreference -DisableBlockAtFirstSeen $true
Set-MpPreference -DisableIOAVProtection $true
Set-MpPreference -DisablePrivacyMode $true
Set-MpPreference -SignatureDisableUpdateOnStartupWithoutEngine $true
Step 4: Disable Tamper Protection
Tamper Protection is a security feature that prevents unauthorized changes to Windows Defender settings. To disable it, follow these steps:
- Open the Windows Security app by searching for “Windows Security” in the Start menu.
- Navigate to Virus & threat protection > Virus & threat protection settings.
- Toggle off Tamper Protection.
Step 5: Modify the Registry to Disable Windows Defender Permanently
To disable Windows Defender permanently, you need to edit the Windows Registry. Here’s how:
- Press
Windows + R, typeregedit, and press Enter to open the Registry Editor. - Navigate to the following path:
HKEY_LOCAL_MACHINE\SOFTWARE\Policies\Microsoft\Windows Defender- Right-click on the Windows Defender key, select New > DWORD (32-bit) Value, and name it
DisableAntiSpyware. - Double-click on
DisableAntiSpywareand set its value to1.
Step 6: Restart Your Computer
After making these changes, restart your computer to apply the settings. Windows Defender should now be disabled.
Read Get an IP Address Using PowerShell in Windows
Re-enabling Windows Defender using PowerShell
If you need to re-enable Windows Defender, follow these steps:
- Open PowerShell as Administrator.
- Run the following command:
Set-MpPreference -DisableRealtimeMonitoring $false- Re-enable Tamper Protection via the Windows Security app.
- Modify the registry to delete the
DisableAntiSpywarekey or set its value to0. - Restart your computer.
Conclusion
In this tutorial, I explained how to disable Windows Defender using PowerShell. I have also shown how to re-enable Windows Defender using PowerShell as and when needed.
You may also like:
- How to Set Service to Automatic Using PowerShell?
- Change Windows 11 Desktop Background Color with PowerShell
- How to Install .NET Framework 3.5 Using PowerShell?
Bijay Kumar is an esteemed author and the mind behind PowerShellFAQs.com, where he shares his extensive knowledge and expertise in PowerShell, with a particular focus on SharePoint projects. Recognized for his contributions to the tech community, Bijay has been honored with the prestigious Microsoft MVP award. With over 15 years of experience in the software industry, he has a rich professional background, having worked with industry giants such as HP and TCS. His insights and guidance have made him a respected figure in the world of software development and administration. Read more.
Windows Defender is the security software solution provided with every Microsoft’s Windows operating system. It helps defend the system against ransomware, spyware, Trojans, viruses or other malicious software. It has low system requirements and can be updated through Windows updates.
Even though it was meant for defending system against suspicious software it can cause trouble with task which is safe to do. You can disable windows defender using PowerShell or from the Windows’s Setting menu. We have given you all the required steps to do so. Follow them thoroughly to disable it with ease.
Disable Windows Defender Real-time Protection Using PowerShell
Step 1: Open Start menu by clicking the Windows Icon on the taskbar.
Step 2: In the Search box type PowerShell and wait for the results to show.

Step 3: Right click on PowerShell and click Run as administrator option.
Step 4: Once the PowerShell opens with administrator privileges type the following command
Set-MpPreference –DisableRealtimeMonitoring $true

Press Enter key to execute the command and to disable Windows Defender Anti-Virus Protection service.
Disable Windows Defender Completely Using PowerShell
Step 1: Open PowerShell with admin rights using the above steps.
Step 2: Type the command and press Enter afterwards
New-ItemProperty –Path “HKLM:\Software\Policies\Microsoft\Windows Defender” –Name DisableAntiSpyware –Value 1 –PropertyType DWORD –Force

This will completely disable defender for the corresponding system
On operating system based on Windows Client like Windows 10 or Windows 8.1 you will not be able to uninstall this feature. Option available to disable it by using registry key set to DisableAntiSpyware = 1 or by using Local Group Policy Editor.
Step 1: Open gpedit.msc from the Run dialogue box.
Step 2: In the console go to the following section
Computer Configuration > Administrative Templates > Windows Components > Microsoft Defender Antivirus;
Step 3: Find Turn off Windows Defender Antivirus parameter.
Step 4: Change its value to Enabled.

In the same way find Turn off real time protection parameter and change its value to Disabled.
Step 5: To update local group policy setting type the following command and press Enter.
gpupdate /force
To disable Windows Defender manually through registry or GPO in Windows 11 then you have to disable Tamper Protection feature. This feature prevents changes made to Windows Defender via PowerShell, registry setting or Group Policy option. This is enabled my default in Windows 11 or you can check this using PowerShell Command
Type the following command and press Enter
Get-MpComputerStatus | select IsTamperProtected
If it’s enabled then you can only disable it using Windows Security application.
To Disable Tamper Protection
Step 1: Open Windows Security app through Start menu.
Step 2: Find Virus and Threat Protection setting and then click on Manage Setting.
Step 3: Scroll down and find Tamper Protection and disable it.

Step 4: Confirmed the action at UAC prompt
Run the following command in the elevated PowerShell Session to uninstall Windows Defender.
Uninstall-WindowsFeature –Name Windows-Defender –whatif
Or use the DISM Tool
Dism /online / Disable-Feature /FeatureName:Windows-Defender /Remove /NoRestart /quiet
Now in case if you ever feel like enabling Windows Defender again then type the following command in PowerShell with administrative privileges and press enter.
Set-MpPreference –DisableRealtimeMonitoring $false

Using PowerShell you can manage your entire defender feature using several commands and it be advantageous for you. For now we have enlisted all the steps you need to disable windows defender using PowerShell. Disabling Windows Defender can be advantageous with your need and could also be dangerous because it will leave your system open to malicious attacks and other troubles. Therefore we suggest you use our Anti-Malware Tool which will help you to remove and protect against all malicious activities automatically. Its comprehensive solution provide you both online and offline protection.

