
To disable User Account Control (UAC) using PowerShell, you can modify the registry value as shown in the following code snippet:
Set-ItemProperty -Path 'HKLM:\SOFTWARE\Microsoft\Windows\CurrentVersion\Policies\System' -Name 'EnableLUA' -Value 0;
Stop-Process -WindowName PowerShell -Force
Note: Disabling UAC can expose your system to security risks, so proceed with caution.
Understanding UAC
What is UAC?
User Account Control (UAC) is a security feature in Windows that helps prevent unauthorized changes to the operating system. By prompting users for permission or requiring an administrator password before allowing changes, UAC helps mitigate the risks associated with malware and unwanted modifications. This mechanism ensures that users are aware of changes that can affect system security or performance, effectively putting them in control.
Why Disable UAC?
While UAC serves a critical role in enhancing system security, there are scenarios where users may prefer to disable UAC to streamline their operations. For instance:
- Development Environment: Developers often require administrative privileges to test applications without the inconvenience of constant prompts.
- Legacy Applications: Some older applications may not function properly with UAC enabled, leading users to disable it for better compatibility.
However, it’s crucial to understand that disabling UAC can expose your system to potential risks. It may allow malicious software to execute tasks without your consent, hence weakening your defenses against attacks.

Disable NLA PowerShell: A Quick Guide to Simple Commands
Prerequisites
Required Permissions
To execute commands for disabling UAC using PowerShell, you will need administrative privileges. This is critical as the changes you are making affect the system-wide settings.
Systems Compatibility
Make sure you are using a supported version of Windows. UAC is part of Windows Vista and newer versions. Be aware that altering UAC settings on different Windows editions (like Home vs. Pro) can lead to differing experiences.
How to Disable PowerShell 2.0 Effectively
Disabling UAC via PowerShell
Accessing PowerShell
To begin, you need to open PowerShell as an administrator. Here’s how you can do it:
- Type «PowerShell» in the Windows search bar.
- Right-click on Windows PowerShell from the search results.
- Select Run as administrator.
This action opens PowerShell with the necessary permissions to modify UAC settings.
PowerShell Commands to Disable UAC
To disable UAC, you will need to execute the following command in the elevated PowerShell window:
Set-ItemProperty -Path HKLM:\SOFTWARE\Microsoft\Windows\CurrentVersion\Policies\System -Name EnableLUA -Value 0
Let’s break down this command:
- Set-ItemProperty: This cmdlet is used to change the properties of an item (in this case, a registry key).
- -Path: Specifies the path to the registry key responsible for UAC settings.
- -Name: Indicates the specific property you want to change, which is `EnableLUA`.
- -Value: Setting the value to `0` will disable UAC.
Confirming UAC is Disabled
To verify that UAC has been successfully disabled, you can run the following command:
Get-ItemProperty -Path HKLM:\SOFTWARE\Microsoft\Windows\CurrentVersion\Policies\System | Select-Object EnableLUA
The expected output should show `EnableLUA` set to `0`. If it does, you have successfully disabled UAC.
Invoke-PowerShell: Mastering Command Execution Effortlessly
Re-enabling UAC
Why Re-enable UAC?
Re-enabling UAC is crucial for maintaining system integrity and security. If you’ve disabled it, consider re-enabling it once you are finished with the tasks requiring elevated permissions. This will help protect your system against unnecessary risks associated with malware or incorrect changes.
Steps to Re-enable UAC via PowerShell
To restore UAC settings back to their default state, run the following command:
Set-ItemProperty -Path HKLM:\SOFTWARE\Microsoft\Windows\CurrentVersion\Policies\System -Name EnableLUA -Value 1
This command works similarly to the previous one but sets `EnableLUA` back to `1`, effectively turning UAC back on. After running this command, you should restart your computer for the changes to take effect automatically.
Splat PowerShell: Mastering Command Shortcuts
Troubleshooting
Common Issues
While using PowerShell to disable UAC might seem straightforward, users might encounter some issues such as:
- Permission Denied Errors: This usually happens when PowerShell is not running with administrative privileges. Always ensure you are in an elevated shell.
- Registry Access Problems: Confirm that the registry path is correct and that you have not changed any other critical settings unintentionally.
FAQs
-
Is it safe to disable UAC?
Disabling UAC can leave your system vulnerable to threats, as it removes the prompts that help prevent malicious actions. -
Will disabling UAC affect my administrative access?
While you will still be able to perform administrative tasks, you will lose the security prompts that confirm whether you want to proceed with risky changes. -
How do I reset UAC to default settings if I encounter issues?
Use the same command mentioned for re-enabling UAC above, ensuring you set `EnableLUA` back to `1`.
Mastering PsExec PowerShell: A Quick Guide
Conclusion
Understanding how to disable UAC using PowerShell can be a useful skill, especially for specific workflows or application compatibility scenarios. However, always consider the implications of operating without this security layer. Knowledge of when and how to control UAC settings allows you to maintain a balance between convenience and security. Always proceed with caution and ensure that you re-enable UAC when not needed to protect your system.
Mastering Selenium PowerShell: Quick Guide and Tips
Additional Resources
Recommended Reading
For more information, consider referring to:
- Microsoft’s official documentation on UAC and its implementation.
- Additional guides aimed at enhancing PowerShell skills.
PowerShell Community and Support
Engage with online communities dedicated to Windows and PowerShell, where you can ask questions and share experiences. These platforms can be invaluable for learning and troubleshooting.
Clear PowerShell: Your Quick Guide to a Clean Slate
Call to Action
For more tips on using PowerShell effectively, subscribe to our updates. Share your experiences or any questions in the comments section below, and let’s build a community of skilled PowerShell users together!
- UAC can be disabled from the Control Panel, Windows Registry, Group Policy, Command Prompt, and Windows PowerShell.
- Disable UAC from Command Prompt: reg.exe ADD HKLM\SOFTWARE\Microsoft\Windows\CurrentVersion\Policies\System /v EnableLUA /t REG_DWORD /d 0 /f
- Disable UAC from Control Panel by going to Control Panel >> User Accounts >> User Accounts >> Change User Account Control settings >> Drag slider to “Never Notify”
The Windows operating system is vulnerable to outside threats and unauthorized access, which is why it includes a User Account Control (UAC) feature.
Even if you are not aware of what UAC is, you must certainly have come across it if you are a Windows user. Ever seen that annoying confirmation dialog box that asks for administrative permission when you’re installing an app, running a setup, or uninstalling anything? That is the UAC prompt.
If it is getting too annoying for you and want to disable the UAC prompt, this article lists all the methods to do so on Windows 11. But before we show you how to do it, let us learn what it is, and whether it should be turned off or not.
Table of Contents
What is User Account Control (UAC)
 1")
The UAC is a Windows security feature that prevents the unauthorized execution of apps and processes with administrative privileges and also prevents malicious software from running on your computer.
When an app or a program is making changes to your computer, a popup emerges asking for user consent, as in the image above.
In simpler words, it is just an extra precautionary measure by Windows to ensure that no task is run without the user’s consent, and thus, you are prompted with a dialog box for confirmation.
Is it Safe to Disable UAC?
Now that we know the role of UAC, disabling UAC is not the smart choice. Although most tasks performed by the end user, like installing or uninstalling an app, are done with complete consciousness, a UAC prompt gives a second chance to the user to reconsider their action.
Not only that but any malicious action performed by software or piece of code could also be blocked by the UAC. Additionally, any occurrences happening in the background would be highlighted and brought to the user’s attention with the help of the UAC prompt.
Therefore, we recommend that you do not disable the UAC, and only do it when it is necessary. After that, you can re-enable it.
UAC Security Levels
If you read ahead, you will find that the UAC has different security levels. each of those security levels defines how the UAC will work, when the end user will be prompted with a UAC, and when the prompt will not be generated.
Here are the details of the 4 security levels of UAC:
-
Always notify
A UAC prompt will appear when an app or a program tries to make changes to your system. It will also notify you when you try to change Windows settings. Additionally, it freezes background tasks until the user responds.
-
Notify me only when apps try to make changes to my computer
This is the default Windows UAC level and only notifies you when an app tries to install or make changes to your PC. It also freezes background tasks until you respond.
-
Notify me only when apps try to make changes to my computer (do not dim my desktop)
This option will display the UAC prompt but it does not freeze the background tasks, nor does it dim the desktop.
-
Never notify
Selecting this option completely disables the UAC. No prompts will pop up.
Let us now continue to see the different methods to disable UAC when needed.
Disable UAC on Windows
Disable UAC from Control Panel
The following steps allow you to disable the UAC from the Control Panel:
-
Press Windows Key + R to open the Run Command box.
-
Type in “Control” and press Enter to open the Control Panel.
-
Click “User Accounts.”
 2")
Open User Account settings in Control Panel -
Click “User Accounts” again.
Click “User Accounts” again -
Click “Change User Account Control settings.”
Change UAC settings from Control Panel -
Drag the slider on the left to the bottom and click Ok.
 5")
Disable UAC from the Control Panel -
[Conditional] If UAC was already enabled, you will be prompted with a UAC. Click Yes.
 2")
 3")
 4")
 5")
UAC will now be disabled.
If you want to re-enable it again, simply return the slider inside the “Change User Account Control settings” page to its original UAC security level.
 6")
Disable UAC from Group Policy Editor
To disable the UAC prompts from the Group Policy editor, use these steps:
-
Press Windows Key + R to open the Run Command box.
-
Type in “gpedit.msc” and press Enter to open the Group Policy Editor.
-
Navigate to the following path from the left side of the Group Policy Editor:
Local Computer Policy > Computer Configuration > Windows Settings > Security Settings > Local Policies > Security Options
-
Double-click the policy “User Account Control: Run all administrators in Admin Approval Mode” in the right pane.
 7")
Open UAC Group Policy -
Select “Disabled” and then click Apply and Ok.
Disable UAC from Group Policy Editor -
Now press Windows Key + R again and type in “CMD“, then press CTRL + Shift + Enter to open the Command Prompt with elevated rights.
-
Execute the following command to implement the changes in the Group Policy Editor:
GPUpdate /Force 9")
Apply Group Policy changes
 7")
 8")
 9")
UAC will now be disabled.
However, if you want to enable it again, return to the “User Account Control: Run all administrators in Admin Approval Mode” Group Policy and enable it.
Disable UAC from Registry Editor
You can also disable the UAC from the Windows Registry Editor. Here is how:
Note: Misconfiguration of critical values in the system’s registry could be fatal for your operating system. Therefore, we insist that you create a system restore point or a complete system image backup before proceeding forward with the process.
You can also use our top selection of disk imaging and backup software so you never lose your data or operating system again.
-
Press Windows Key + R to open the Run Command box.
-
Type in “regedit” and press Enter to open the Registry editor.
-
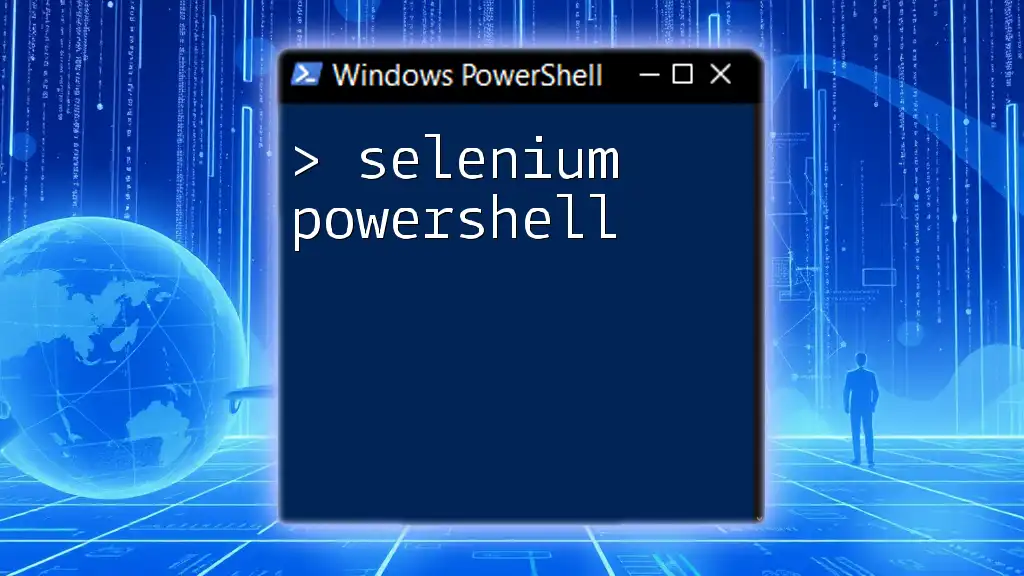
Navigate to the following path from the left pane:
Computer\HKEY_LOCAL_MACHINE\SOFTWARE\Microsoft\Windows\CurrentVersion\Policies\System
-
Double-click the DWORD “EnableLUA.”
 10")
Open the EnableLUA DWORD in Windows Registry -
Change the Value Data to 0 and click Ok.
Disable UAC from Windows Registry -
Restart the computer.
 10")
 11")
Once the computer restarts, you will notice that the UAC has been disabled.
To re-enable it, return to the System key using the Registry Editor, double-click the DWORD “EnableLUA,” and set its Value Data to 1.
Disable UAC from Command Prompt
If you are a fan of the Command Line Interface (CLI), then you can also disable UAC directly from the Command Prompt with a single command. Here are the steps to follow:
-
Press Windows Key + R to open the Run Command box.
-
Type in “CMD” and then press CTRL + Shift + Enter to open the Command Prompt with elevated rights.
-
Run the following command:
reg.exe ADD HKLM\SOFTWARE\Microsoft\Windows\CurrentVersion\Policies\System /v EnableLUA /t REG_DWORD /d 0 /f 12")
Disable UAC from Command Prompt -
Now restart the computer.
 12")
The steps above will make changes to the EnableLUA DWORD in the Windows Registry and disable UAC.
To re-enable UAC, run the following command in an elevated Command Prompt:
reg.exe ADD HKLM\SOFTWARE\Microsoft\Windows\CurrentVersion\Policies\System /v EnableLUA /t REG_DWORD /d 1 /fDisable UAC from Windows PowerShell
Similar to the Command Prompt, you can also disable UAC from PowerShell. Here is how:
-
Press Windows Key + R to open the Run Command box.
-
Type in “PowerShell” and then press CTRL + Shift + Enter to open PowerShell with elevated rights.
-
Run the following command:
Set-ItemProperty -Path REGISTRY::HKEY_LOCAL_MACHINE\Software\Microsoft\Windows\CurrentVersion\Policies\System -Name ConsentPromptBehaviorAdmin -Value 0 13")
Disable UAC from PowerShell -
Now restart the computer.
 13")
UAC will now be disabled when the computer restarts.
If you want to re-enable UAC, use this command in PowerShell:
Set-ItemProperty -Path REGISTRY::HKEY_LOCAL_MACHINE\Software\Microsoft\Windows\CurrentVersion\Policies\System -Name ConsentPromptBehaviorAdmin -Value 1These are all the methods you can disable (or enable) UAC on a Windows computer. Let us now show you how to do the same on a remote computer that is on the same network.
Disable UAC Remotely
You can disable the User Account Control on a remote computer as well using the Command Prompt. This method can be used by sysadmins to get the task done without having to leave their computer.
To disable UAC on a remote PC, we must use PsTools by SysInternals – which is a suite of command-line tools for the Windows operating system. Using the PsExec utility inside this suite, you can remote access the Command Prompt of the target PC and then run any command.
Use the following steps to disable UAC on a remote computer:
-
Start by downloading and extracting PsTools.
 14")
Extract PsTools -
Launch an elevated Command Prompt and use the
CDcmdlet to change the directory to the extracted folder:CD [PathToExtractedPsTools] 15")
Change directory to extracted PsTools folder -
Now use the following command syntax to connect to the remote computer:
PsExec -i \\[RemoteComputerName] -u [Username] -p [Password] cmdReplace [RemoteComputerName] with the name of the PC you want to connect to, [Username] with the account name, and [Password] with the account password. Make sure that the account you are logging in with has administrative rights.
Connect to remote PC using PsExec You will now be connected to the remote PC.
-
Now, use the following command to disable UAC on the remote PC:
reg.exe ADD HKLM\SOFTWARE\Microsoft\Windows\CurrentVersion\Policies\System /v EnableLUA /t REG_DWORD /d 0 /f
Disable UAC on the remote computer -
Now run the following command to restart the remote PC:
Shutdown /r
Restart the remote computer
 14")
 15")
 16")
 17")
 18")
When the remote computer restarts, UAC will be turned off.
To re-enable it, you will need to use the PsExec tool again. Connect to the remote computer again using the command given above, and then use this command to re-enable UAC:
reg.exe ADD HKLM\SOFTWARE\Microsoft\Windows\CurrentVersion\Policies\System /v EnableLUA /t REG_DWORD /d 1 /fNote that these are the exact same commands to disable or enable UAC on your local computer. This is because PsExec has launched a Command prompt instance on the remote computer and any commands running after establishing the connection will be on the remote PC.
Final Verdict
As mentioned earlier, it is not entirely safe to disable User Account Control. However, there are certain moments when it is absolutely necessary. That being said, we always recommend that you re-enable UAC when you no longer need it disabled.
This article lists multiple methods of disabling UAC on the local computer as well as on a remote computer on the same network.
Powershell — Disable UAC
Would you like to learn how to disable the User Account Control feature using Powershell? In this tutorial, we are going to show you how to use Powershell to disable UAC on a computer running Windows.
• Windows 2012 R2
• Windows 2016
• Windows 2019
• Windows 10
• Windows 7
Equipment list
The following section presents the list of equipment used to create this tutorial.
As an Amazon Associate, I earn from qualifying purchases.
Related tutorial — PowerShell
On this page, we offer quick access to a list of tutorials related to PowerShell.
Tutorial Powershell — Disable UAC
As an Administrator, start a new POWERSHELL command-line prompt.

Verify the current UAC configuration using Powershell.
Here is the command output.
Disable UAC using Powershell.
Verify the current UAC configuration using Powershell.
Here is the command output.
Verify the UAC configuration settings.

Congratulations! You are able to disabled UAC using Powershell.
VirtualCoin CISSP, PMP, CCNP, MCSE, LPIC22021-06-09T22:33:26-03:00
Related Posts
Page load link
Ok
This file contains hidden or bidirectional Unicode text that may be interpreted or compiled differently than what appears below. To review, open the file in an editor that reveals hidden Unicode characters.
Learn more about bidirectional Unicode characters
| function Disable-UAC(){ | |
| $numVersion = (Get-CimInstance Win32_OperatingSystem).Version | |
| $numSplit = $numVersion.split(«.«)[0] | |
| if ($numSplit -eq 10) { | |
| Set-ItemProperty «HKLM:\SOFTWARE\Microsoft\Windows\CurrentVersion\Policies\System« —Name «ConsentPromptBehaviorAdmin« —Value «0« | |
| } | |
| elseIf ($numSplit -eq 6) { | |
| $enumSplit = $numSplit.split(«.«)[1] | |
| if ($enumSplit -eq 1 -or $enumSplit -eq 0) { | |
| Set-ItemProperty «HKLM:\SOFTWARE\Microsoft\Windows\CurrentVersion\Policies\System« —Name «EnableLUA« —Value «0« | |
| } else { | |
| Set-ItemProperty «HKLM:\SOFTWARE\Microsoft\Windows\CurrentVersion\Policies\System« —Name «ConsentPromptBehaviorAdmin« —Value «0« | |
| } | |
| } | |
| elseIf ($numSplit -eq 5) { | |
| Set-ItemProperty «HKLM:\SOFTWARE\Microsoft\Windows\CurrentVersion\Policies\System« —Name «EnableLUA« —Value «0« | |
| } | |
| else { | |
| Set-ItemProperty «HKLM:\SOFTWARE\Microsoft\Windows\CurrentVersion\Policies\System« —Name «ConsentPromptBehaviorAdmin« —Value «0« | |
| } | |
| Write-Host «Successfully Disabled UAC!« | |
| } |

There are several ways to turn off UAC (User Account Control) . UAC means “User Account Control” and was introduced by Microsoft with Windows Vista a few years ago and has been developed ever since. We have already reported several times, including how you can switch the UAC on and off using the comming line command and how you can deactivate the UAC under Windows 7 .
Today we want to go into it again and show 2 other ways you can deactivate the user account control in Windows 10 .
Switch off the UAC using the PowerShell command
The Windows PowerShell plays an increasingly important role and you also can MSH turn off the UAC . To do this, you have to run PowerShell as administrator and issue the following command.
New-ItemProperty -Path HKLM: Software Microsoft Windows CurrentVersion poilicies system -Name EnableLUA -PropertyType DWord -Value 0 -Force

After you issue this PowerShell command , you only have to restart your PC once. You can do this right away using the PowerShell command ” Restart Computer “. After the restart, the user account control of your Windows 10 PC is switched off.
Switch off UAC via registry
You can also switch off the UAC user account control by intervening in the registry. To do this, you have to call up the registry editor “regedit.exe” and switch to the following key.
HKEY_LOCAL_MACHINE SOFTWARE Microsoft Windows CurrentVersion Policies System
You can use the Regjump tool , which comes from the Sysinternal forge, to jump to any registry key very quickly and easily.
There is value in this key
You have to set this to ” 0 ” if you want to switch off the UAC user account control , as you can see below.
Incidentally, the design of the UAC dialog has changed a bit visually and in terms of operation since Windows 10, we have already reported about it. If you would like to return to the classic view of the UAC dialog , you should have a look at the article ” Replacing the new Windows 10 UAC dialog with the Classic UAC prompt “. There is also the option of always displaying the UAC dialog in the foreground, and not as usual with a darkened desktop . You can find the appropriate contribution under ” Show UAC Dialog on Windows 10 Desktop “.