
Что такое тачпад
Тачпад — это сенсорная панель на клавиатуре. Она используется для управления курсором на экране ноутбука. Тачпад реагирует на прикосновения и движения пальцев и заменяет компьютерную мышь: под сенсорной панелью есть две кнопки, которые работают как левая и правая кнопки мыши. Это удобное решение обеспечивает мобильность, компактность и функциональность ноутбуков.
С помощью тачпада можно перемещать курсор по экрану, прокручивать страницы, вызывать контекстное меню. Современные тачпады поддерживают различные жесты, такие как увеличение или уменьшение масштаба (Pinch Zoom), переключение между окнами и другие.
Можно ли отключить тачпад на ноутбуке
Да, отключить тачпад можно. Такая необходимость появляется, если вы привыкли использовать c ноутбуком мышь и при наборе текста то и дело нечаянно касаетесь тачпада.
Отключить и включить сенсорную панель можно горячими клавишами, в настройках операционной системы и через BIOS.
Иногда в случае подключения мыши к ноутбуку тачпад может автоматически выключаться. И наоборот.
Как включить и выключить тачпад на ноутбуках HP
В некоторых ноутбуках от HP сенсорная панель выключается комбинацией клавиш Fn + функциональная клавиша с иконкой тачпада, обычно это F5, F7 или F9. Если специальное сочетание клавиш не предусмотрено, выключить и включить тачпад можно двойным нажатием по сенсору в левом верхнем углу либо долгим прикосновением к тому же месту — на протяжении пяти секунд.
Как включить и выключить тачпад на ноутбуках Asus
Обычно для переключения режима тачпада применяется сочетание Fn + F9. Также возможны комбинации Fn с клавишами F6 или F7.
Как включить и выключить тачпад на ноутбуках Acer
Используйте сочетание клавиш Fn + F7 или Fn + F8.
Как включить и выключить тачпад на ноутбуках Lenovo
Чаще всего встречаются комбинации клавиш Fn + F5 и Fn + F8. Но может быть и сочетание Fn с другой функциональной кнопкой. На эту кнопку, как правило, нанесено изображение тачпада или надпись touchpad или pad.
Как включить и выключить тачпад на ноутбуках Dell
У большинства моделей Dell можно управлять тачпадом нажатием Fn + F5 или просто F5. Но в некоторых сериях ноутбуков не предусмотрена комбинация клавиш — устройство выключается в параметрах мыши. Для этого необходимо зайти в «Параметры системы», далее — в «Свойства мыши», где и находится ползунок для отключения тачпада.
Если у вас нет мыши, а тачпад отключён, у вас могут быть сложности с тем, чтобы добраться до настроек. Но всё просто: нажмите клавишу Win с логотипом Windows — откроется меню «Пуск». Используйте для перемещения по нему и открытому окну клавиши со стрелками и Tab. Для нажатия на кнопку, ярлык или пункт меню используйте Enter. Кнопка для перехода к настройкам обычно обозначена шестерёнкой. Ну или доберитесь до поисковой строки и найдите панель управления через запрос.
Как включить и выключить тачпад на ноутбуках MSI
Нажмите сочетание Fn + F3.
Как включить и выключить тачпад на ноутбуках Xiaomi
Нужна комбинация Fn + F5.
При нажатии комбинации клавиш для переключения активности тачпада появится уведомление. Если этого не произошло, то не исключена аппаратная неисправность или сбой с драйверами тачпада.
Настройка тачпада посредством элемента «Свойства мыши» (Synaptics)
На большинстве ноутбуков используются сенсоры бренда Synaptics, поэтому управлять тачпадом можно через настройки этого элемента. Здесь же можно задать, чтобы тачпад работал, когда мышь выключена и наоборот.
Попасть в настройки можно через меню «Пуск» — «Панель управления» — «Мышь». В появившемся окне есть кнопки отключения и включения тачпада, а также пункт «Отключать внутреннее устройство при подключении внешнего устройства USB». Если поставить галочку на него, сенсор автоматически будет деактивироваться при подсоединении мыши.
Нажав в окне «Свойства мыши» кнопку «Параметры», можно настроить работу тачпада: скорость курсора, чувствительность, многопальцевые жесты и другое. После настройки убедитесь, что вы применили изменения, чтобы они вступили в силу.
Как отключить и включить тачпад через настройки Windows
Для выключения или включения тачпада можно воспользоваться настройками ОС.
- Зайдите в «Параметры», выберите «Устройства» и откройте «Сенсорную панель».
- Установите переключатель «Отключить/включить» в нужное положение.
Отключение и включение тачпада через BIOS
Загрузкой привычной вам операционной системы и базовыми настройками оборудования компьютера управляет BIOS — особая системная программа. Серди прочего именно через неё может быть отключён тачпад. И в таком случае средствами Windows его не включить. Если тачпад не включается и вообще не отображается в настройках ОС, проверьте в BIOS.
Будьте осторожны, меняя настройки BIOS. Не делайте того, чего не понимаете. Лучше обратитесь к более сведущему человеку за помощью.
Для входа в BIOS:
- Перезагрузите ноутбук.
- В процессе перезапуска, когда появится текст на экране, ещё до начала загрузки ОС нажмите Del либо F2 — на разных моделях по-разному (часто есть подсказка на экране).
Если вы зашли в BIOS:
- Найдите там пункт Internal Pointing Device — это и есть ваш тачпад. Часто этот пункт находится среди дополнительных настроек (Advanced).
- Переключите состояние тачпада в Enabled, чтобы включить устройство. Если этот параметр уже включён, значит, дело не в настройках BIOS.
- Если делали изменения в BIOS, сохраните их перед выходом из программы. И, наоборот, не сохраняйте, если запутались и хотите оставить всё так, как было до вашего вмешательства.
- После выхода из BIOS компьютер автоматически перезагрузится.
Как отключить и включить тачпад на Макбуке под управлением macOS
В Макбуках тачпад называется трекпадом. Вы не сможете отключить трекпад, пока не будет подключена мышь. После её подключения следуйте нашим инструкциям.
- В строке меню щёлкните значок Apple.
- Выберите «Системные настройки» в меню Apple.
- Прокрутите вниз, чтобы выбрать панель управления.
- Установите флажок для опции «Игнорировать встроенный трекпад при наличии мыши или беспроводного трекпада».
Если отключить мышь, трекпад автоматически включится снова.
У нас не прекращается сезон выгодных акций и скидок: в интернет-магазине МТС вы можете купить себе новый ноутбук для самых разных нужд.
Applies ToWindows 11 Windows 10
To enable or disable a touchscreen in Windows, follow these steps:
-
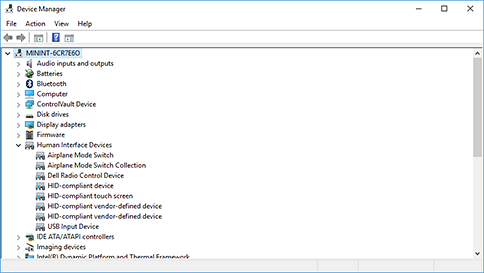
Right-click on the Start menu and select Device Manager.
-
In the Device Manager window that opens, select the arrow next to Human Interface Devices to expand it.

-
Under Human Interface Devices, right-click on HID-compliant touch screen and select either Enable device or Disable device depending on which action is desired.
-
If there are multiple HID-compliant touch screen devices listed, repeat the steps for each device.
If the touchscreen isn’t working, see What to try if a touchscreen doesn’t work in Windows.
Need more help?
Want more options?
Explore subscription benefits, browse training courses, learn how to secure your device, and more.
Как отключить тачпад на ноутбуке
Сегодня вполне разбирающийся в компьютерах человек, спросил меня о том, как отключить тачпад на его ноутбуке, так как он мешает при работе. Я подсказал, а потом посмотрел, многие ли интересуются этим вопросом в Интернете. И, как оказалось, очень многие, а потому имеет смысл подробно написать об этом. См. также: Не работает тачпад на ноутбуке Windows 10.
В инструкции поэтапно расскажу сначала про то, как отключить тачпад ноутбука с помощью клавиатуры, настройки драйвера, а также в диспетчере устройств или центре мобильности Windows. А потом пройдусь отдельно по каждой популярной марке ноутбука. Также может быть полезным (особенно если у вас есть дети): Как отключить клавиатуру в Windows 10, 8 и Windows 7.
Ниже в руководстве вы найдете сочетания клавиш и другие методы для ноутбуков следующих марок (но для начала рекомендую прочитать первую часть, которая подойдет почти для всех случаев):
- Asus
- Dell
- HP
- Lenovo
- Acer
- Sony Vaio
- Samsung
- Toshiba
Отключение тачпада при наличии официальных драйверов
Если на вашем ноутбуке стоят все необходимые драйвера с официального сайта производителя (см. Как установить драйвера на ноутбук), а также сопутствующие программы, то есть вы не переустанавливали Windows, а после этого не использовали драйвер-пак (чего для ноутбуков я не рекомендую), то чтобы отключить тачпад вы можете воспользоваться методами, предусмотренными производителем.
Клавиши для отключения
На большинстве современных ноутбуков на клавиатуре предусмотрены специальные клавиши для отключения тачпада — вы их найдете почти на всех ноутбуках Asus, Lenovo, Acer и Toshiba (на некоторых марках они есть, но не на всех моделях).
Ниже, где написано отдельно по маркам, есть фотографии клавиатур с отмеченными клавишами для отключения. В общих чертах, вам требуется нажать клавишу Fn и клавишу со значком включения/отключения сенсорной панели, чтобы отключить тачпад.
Важно: если указанные комбинации клавиш не срабатывают, вполне возможно, не установлено необходимое ПО. Подробно от этом: Не работает клавиша Fn на ноутбуке.
Как отключить тачпад в параметрах Windows 10
Если на вашем ноутбуке установлена Windows 10, а также есть все оригинальные драйверы для сенсорной панели (тачпада), то отключить его можно используя параметры системы.
- Зайдите в Параметры — Устройства — Сенсорная панель.
- Установите переключатель в состояние Откл.

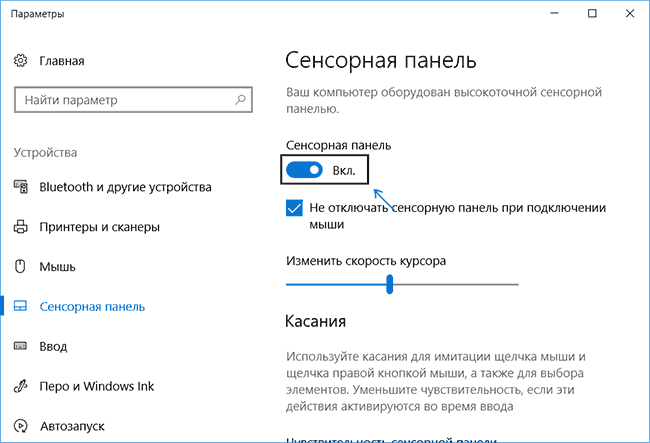
Здесь же в параметрах вы можете включить или отключить функцию автоматического отключения тачпада при подключении мыши к ноутбуку.
Использование настроек Synaptics в панели управления
Многие ноутбуки (но не все) используют сенсорную панель Synaptics и соответствующие драйвера к ней. С большой вероятностью, и ваш ноутбук тоже.
В этом случае, вы можете настроить автоматическое отключение тачпада при подключении мыши по USB (в том числе, беспроводной). Для этого:
- Зайдите в панель управления, убедитесь, что в пункте «Вид» установлено «Значки», а не «Категории», откройте пункт «Мышь».
- Откройте вкладку «Параметры устройства» с иконкой Synaptics.

На указанной вкладке вы можете настроить поведение сенсорной панели, а также, на выбор:
- Отключить тачпад, нажав соответствующую кнопку под списком устройств
- Отметить пункт «Отключать внутреннее указывающее устройство при подключении внешнего указывающего устройства к порту USB» — в этом случае, тачпад будет отключаться при подключении мыши к ноутбуку.
Центр мобильности Windows
Для некоторых ноутбуков, например, Dell, отключение тачпада доступно в Центре мобильности Windows, открыть который можно из меню по правому клику на значке батареи в области уведомлений.

Итак, со способами, которые предполагают наличие всех драйверов производителя закончили. Теперь перейдем к тому, что делать, оригинальных драйверов на тачпад нет.
Как отключить тачпад, если драйверов или программы для него нет
Если описанные выше методы не подходят, а устанавливать драйвера и программы с сайта производителя ноутбука вы не хотите, способ отключить тачпад все равно имеется. Нам поможет диспетчер устройств Windows (также на некоторых ноутбуках доступно отключение тачпада в БИОС, обычно на вкладке Configuration/ Integrated Peripherals следует установить Pointing Device в значение Disabled).
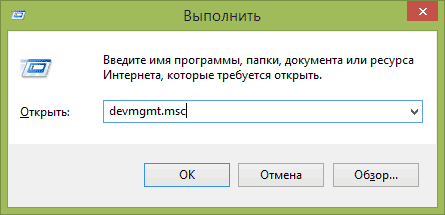
Открыть диспетчер устройств можно разными способами, но тот, который точно сработает вне зависимости от обстоятельств в Windows 7 и Windows 8.1 — это нажать клавиши с эмблемой Windows + R на клавиатуре, а в появившемся окне ввести devmgmt.msc и нажать «Ок».
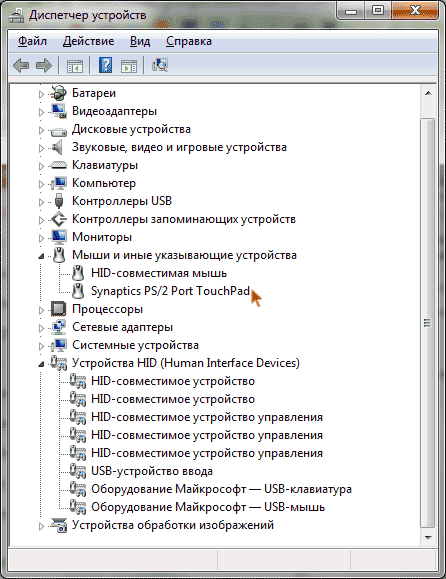
В диспетчере устройств постарайтесь найти ваш тачпад, располагаться он может в следующих разделах:
- Мыши и иные указывающие устройства (скорее всего)
- Устройства HID (там тачпад может называться HID-совместимая сенсорная панель).
Называться сенсорная панель в диспетчере устройств может по-разному: USB-устройство ввода, USB-мышь, а может и TouchPad. Кстати, если отмечено, что используется порт PS/2 и это не клавиатура, то на ноутбуке это, скорее всего и есть тачпад. Если вы точно не знаете, какое из устройств соответствует тачпаду, вы можете поэкспериментировать — ничего страшного не случится, просто включите это устройство обратно, если это не он.
Для отключения тачпада в диспетчере устройств, кликните по нему правой кнопкой мыши и выберите в контекстном меню пункт «Отключить».
Отключение сенсорной панели на ноутбуках Asus
Для отключения сенсорной панели на ноутбуках производства Asus, как правило, используются клавиши Fn + F9 или Fn + F7. На клавише вы увидите значок, с перечеркнутым тачпадом.

Клавиши для отключения тачпада на ноутбуке Asus
На ноутбуке HP
На некоторых ноутбуках HP нет специальной клавиши для отключения сенсорной панели. В этом случае, попробуйте сделать двойной тап (касание) по левому верхнему углу тачпада — на многих новых моделях HP он отключается именно так.

Есть еще один вариант для HP — удерживать верхний левый угол в течение 5 секунд для отключения.
Lenovo
На ноутбуках Lenovo используются различные комбинации клавиш для отключения — чаще всего, это Fn + F5 и Fn + F8. На нужной клавише вы увидите соответствующий значок с перечеркнутым тачпадом.

Также вы можете использовать настройки Synaptics для изменения параметров работы сенсорной панели.
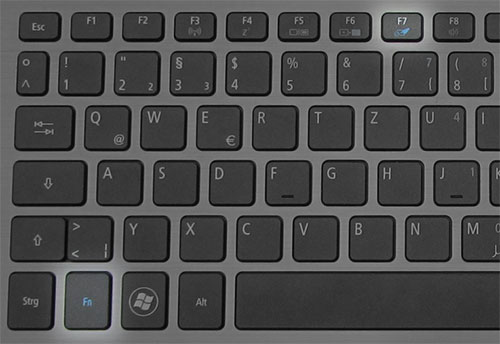
Acer
Для ноутбуков марки Acer наиболее характерное сочетание клавиш — Fn + F7, как на изображении ниже.
Sony Vaio
Стандартно, если у вас установлены официальные программы Sony, вы можете настроить тачпад, в том числе отключить его через Vaio Control Center, в разделе «Клавиатура и мышь».
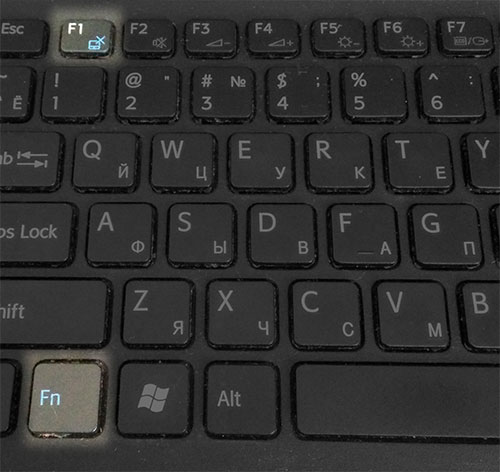
Также, на некоторых (но не на всех моделях) есть горячие клавиши для отключения сенсорной панели — на фотографии выше это Fn + F1, однако это также требует наличия всех официальных драйверов и утилит Vaio, в частности Sony Notebook Utilities.
Samsung
Почти на всех ноутбуках Samsung для того, чтобы отключить тачпад достаточно нажать клавиши Fn+ F5 (при условии, что есть все официальные драйвера и утилиты).

Toshiba
На ноутбуках Toshiba Satellite и других, обычно используется комбинация клавиш Fn + F5, которая обозначена значком отключения сенсорной панели.

В большинстве ноутбуков Тошиба используется сенсорная панель Synaptics, соответственно доступна настройка с помощью программы производителя.
Кажется, ничего не забыл. Если есть вопросы — задавайте.
How to Enable or Disable Touchpad in Windows 11/10
Most modern laptops come equipped with a touchpad, which serves as a primary input device when a mouse is not available. For many users, the touchpad is convenient and a simple way to navigate. However, there are instances when you might want to disable it, such as when using an external mouse, to prevent accidental clicks, or to save battery life. Conversely, you may also need to enable the touchpad if it has been accidentally turned off. In this article, we’ll explore various methods to enable or disable the touchpad in Windows 10 and Windows 11 effectively.
Understanding the Touchpad Settings
Touchpad settings in Windows allow you to customize how the touchpad behaves. These settings can differ slightly depending on your laptop’s manufacturer and the drivers installed. For example, touchpads from companies like Synaptics, ELAN, or Windows Precision have slightly different setting interfaces but usually offer similar functionality.
Checking Touchpad Functionality
Before making any changes, it’s essential to ascertain whether your touchpad is functioning correctly.
-
Test Basic Functions: Move your finger on the touchpad and check if the cursor responds. If it does not, it may be disabled or malfunctioning.
-
Hardware Check: Ensure that it isn’t a hardware issue. If your laptop has function keys (like F1-F12) that activate or deactivate the touchpad, check if you’ve mistakenly pressed such a key.
-
Connection Verification: If you are using an external mouse, sometimes the touchpad gets disabled automatically when the mouse is connected.
Enabling or Disabling the Touchpad in Windows 11
Method 1: Using Windows Settings
The simplest method to enable or disable the touchpad in Windows 11 is through the Settings app:
- Open Settings: Press
Windows Key + Ito open the Settings app. - Navigate to Devices: Click on ‘Devices’ from the left-hand menu.
- Select Touchpad: Click on ‘Touchpad’ in the sidebar.
- Toggle the Switch: You’ll see an option to enable or disable the touchpad. Simply toggle the switch as per your requirement.
Method 2: Using the Device Manager
If the touchpad is not functioning and there are no visible settings, you can check the Device Manager:
- Open Device Manager: Right-click on the Start button and select ‘Device Manager’ from the list.
- Locate Mice and other pointing devices: Expand this category to find your touchpad listed (it might be under a name like «Synaptics Touchpad» or «ELAN Touchpad»).
- Right-click: If you see the device there, right-click it.
- Enable/Disable Device: If it’s disabled, you will see the option to ‘Enable device’. If it’s enabled but you wish to disable it, you will see the ‘Disable device’ option.
Method 3: Touchpad Function Keys
Some laptops have dedicated function keys to enable or disable the touchpad. This is usually a key combination:
- Function Key: Look for a function key (like F6, F9, etc.) with a touchpad icon on it.
- Check Active Function: Hold the
Fnkey (if needed) and tap the corresponding F key to enable or disable the touchpad.
Method 4: Using Touchpad Software
On some laptops, especially those using Synaptics or ELAN drivers, you might have specific touchpad software installed:
- Open Control Panel: Type ‘Control Panel’ in the Windows search bar and select it.
- Look for Mouse Settings: Click on ‘Hardware and Sound’, then ‘Mouse’.
- Additional Tab: From the Mouse Properties dialog, look for a tab specific to your touchpad (like ‘Synaptics’ or ‘ELAN’).
- Toggle Settings: Here, you can find options to enable or disable the touchpad.
Enabling or Disabling the Touchpad in Windows 10
Method 1: Through Windows Settings
For Windows 10, follow these steps to access the touchpad settings:
- Open Settings: Press
Windows Key + I. - Devices: Click on ‘Devices’.
- Touchpad: Select ‘Touchpad’ from the left menu.
- Enable/Disable: Toggle the ‘Touchpad’ switch as you prefer.
Method 2: Device Manager
You can also manage your touchpad through the Device Manager:
- Access Device Manager: Right-click on the Start menu and select ‘Device Manager’.
- Expand Mice and other pointing devices: Find your touchpad type here.
- Right-click and enable/disable: Right-click to enable or disable the device.
Method 3: Using Keyboard Shortcuts
Just like Windows 11, many laptops in Windows 10 also have function keys that allow you to toggle the touchpad:
- Identify the Right Key: Look for the function key with the touchpad icon.
- Press it with the Fn Key: Hold
Fnand press the function key to toggle the touchpad.
Method 4: From Touchpad Settings Software
If your laptop uses specific touchpad software, access it through:
- Control Panel: Open Control Panel from the Start menu.
- Mouse Settings: Navigate to ‘Hardware and Sound’ then ‘Mouse’.
- Touchpad Tab: Select the tab relating to your touchpad model and adjust the settings accordingly.
Additional Tips for Touchpad Management
Updating Touchpad Drivers
Sometimes, issues with the touchpad stem from outdated or incompatible drivers:
- Open Device Manager: Right-click on the Start button and click on ‘Device Manager’.
- Locate your touchpad: Under ‘Mice and other pointing devices’, find your touchpad device.
- Update Driver: Right-click on the device and select ‘Update driver’. Choose the option to search automatically for updated driver software.
Touchpad Sensitivity and Features
Touchpad settings can vary widely from one manufacturer to another. Many touchpads offer advanced settings allowing you to change the sensitivity, scrolling options, and multi-finger gestures:
- Open Touchpad Settings: Navigate to the touchpad settings using the earlier methods discussed.
- Explore Options: Adjust sensitivity, enable multi-fingers taps for different functions, and explore various customization options to suit your needs.
Uninstalling Touchpad Drivers
If you find that your touchpad still isn’t functioning as intended, you might consider uninstalling it and letting Windows reinstall the driver:
- Go to Device Manager: Right-click on the Start menu and select ‘Device Manager’.
- Locate Your Touchpad: Under ‘Mice and other pointing devices’, right-click on your touchpad.
- Uninstall Device: Select ‘Uninstall device’ and confirm. After that, restart your laptop; Windows should automatically reinstall the driver.
Using Third-Party Software
There are several third-party utility programs available that give you enhanced control over your touchpad settings. These can provide additional customization options that might not be available through the standard Windows settings. Research and choose reputable software to avoid malware.
Conclusion
Managing your touchpad settings in Windows 10 and 11 is relatively straightforward, with multiple methods available to enable or disable it as needed. Knowing how to adjust these settings can significantly enhance your user experience, ensuring that your laptop integrates seamlessly into your daily tasks.
Whether you find the touchpad to be a helpful tool or a source of annoyance, the steps outlined above will empower you to take control of this essential input device. Familiarizing yourself with all available options can lead to a more productive computing experience, so take the time to explore the various settings and customize your environment. Whether it’s toggling the touchpad on or off, updating drivers, or making minor adjustments, a few simple steps can lead to a smoother and more satisfactory experience with your laptop.
When buying a new laptop, we highly value a sleek and smooth touchpad. However, there may be times when you wish to get rid of it altogether. The touchpad might be registering unintentional clicks when you type on the keyboard, you might want to use an external device, or there could be another reason.
It is not possible to disconnect it from the laptop physically, but you can disable it. Let’s take a look at six different ways you can disable the touchpad on your laptop.
1. Disabling the Touchpad in Windows Settings
In Windows, the Settings app is the first place you should go to make any changes in settings. So let’s look at how you can disable the touchpad in Windows settings before we move on to more complex methods of disabling it.
Right-click on the Windows Start button and go to Settings. Then, navigate to Devices and go to Touchpad from the left-sidebar. Turn off the Touchpad toggle to disable the touchpad.
You may only see the touchpad’s sensitivity settings, which means that you can’t disable it in the Settings app.
2. Disabling the Touchpad in the Control Panel
As an alternative, you can disable the touchpad in the Windows Control Panel. If you want to take this route, you have three options:
1. Disabling Touchpad Completely
Navigate to the Mouse category in Windows Control Panel. Head to the touchpad tab in Mouse Properties, which in this case is ELAN. Click on ELAN Touchpad and hit Stop Device. Tapping on Yes in the Disable Device warning popup will disable your touchpad.
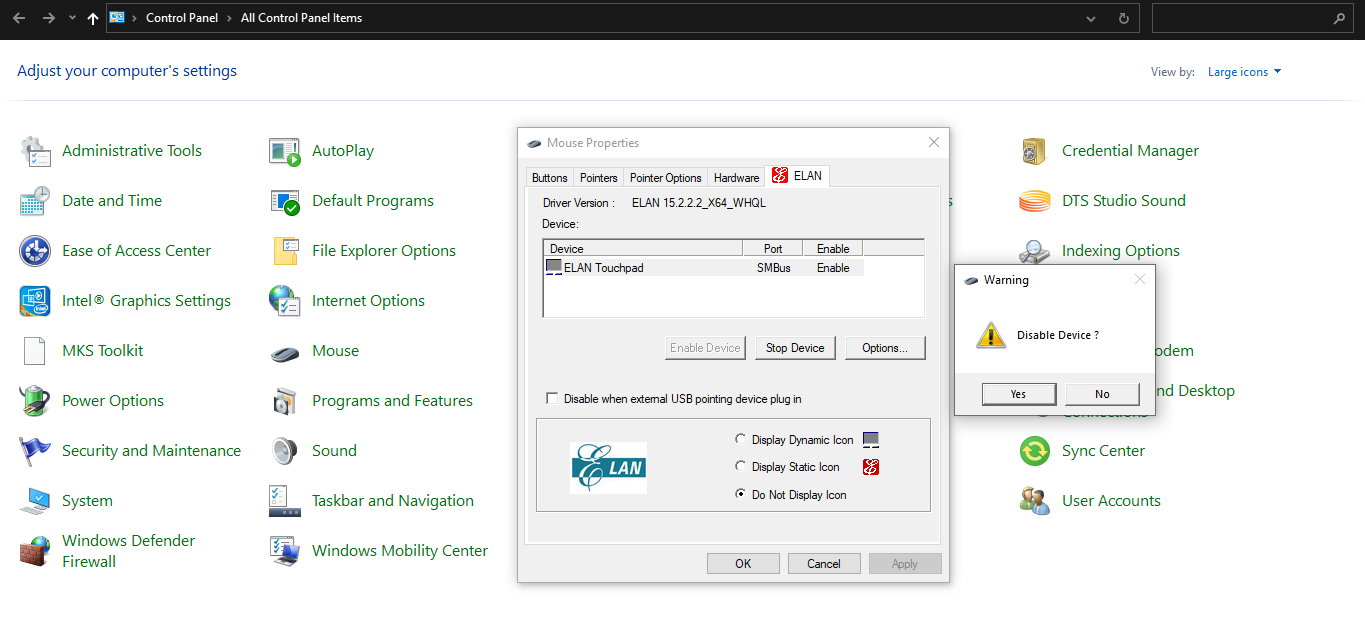
Note: Using an external mouse is the only way to get your touchpad working again, so keep it nearby if you don’t want to get stuck after disabling the touchpad.
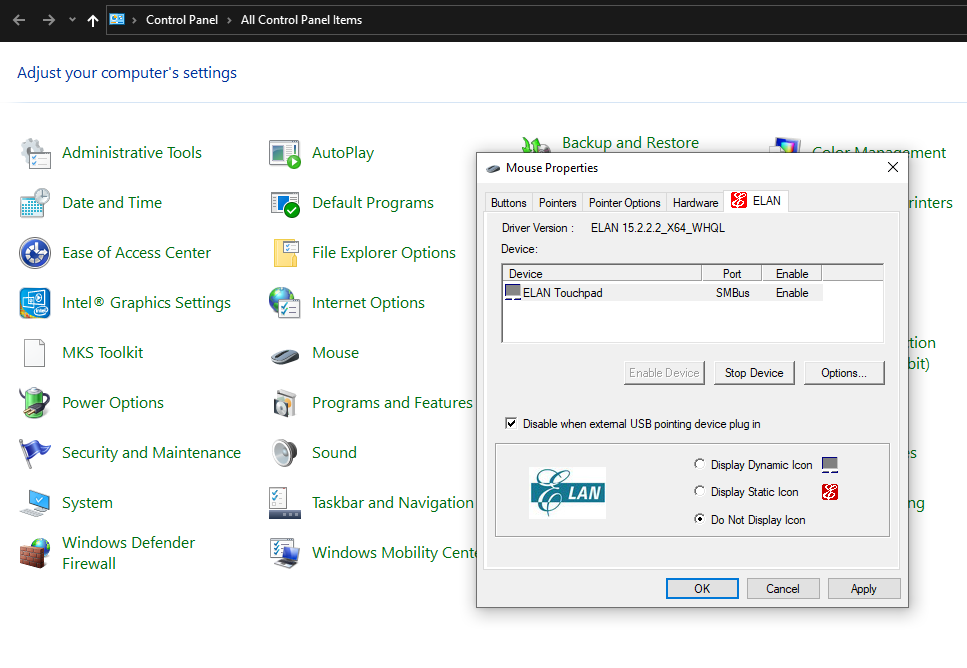
2. Disabling Touchpad When You Connect an External Device
In the same window, you can check the box for Disable when external USB pointing device plug in, which will disable the touchpad pad as soon as you connect an external pointing device.
After you unplug the external device, the touchpad will work again.
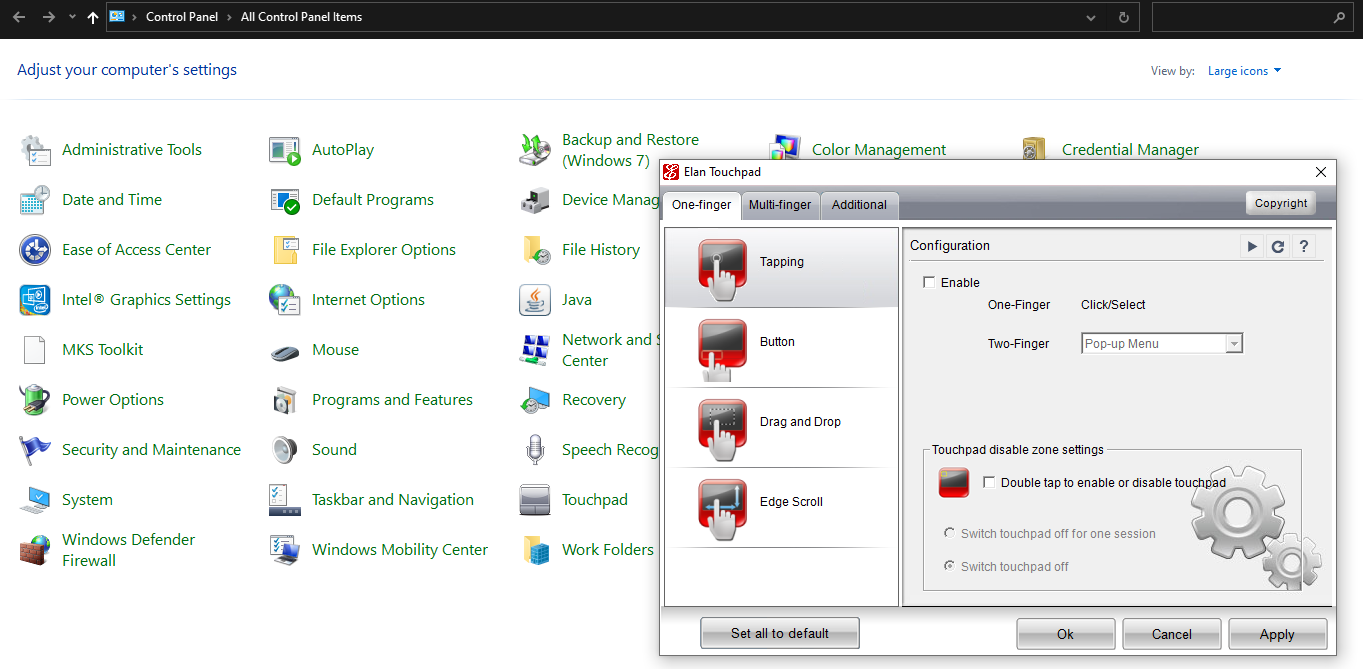
3. Disabling Touchpad Clicks While Keeping Its Scroll Functionality
Last but not least, if you want to disable clicks on the touchpad but keep the scrolling on the touchpad and its button working, there is another way out.
Go to Control Panel and this time head over to the Touchpad category. Go to Tapping configuration in One-finger settings. Unchecking the box for Enable will disable the clicks on the touchpad while keeping the rest of its functionality working.
To set your touchpad to your desired settings, you can choose from three options. Suppose these methods haven’t worked for you; move on to other methods of disabling the touchpad in Windows.
3. Disabling the Touchpad in Device Manager
If the above methods don’t work for you, the Device Manager should be your next stop to disable the touchpad. Here is how it works:
- Left-click on the Start button and head over to Device Manager.
- Expand the category for Mice and other pointing devices.
-
Right-click the driver for your touchpad and tap Disable device.

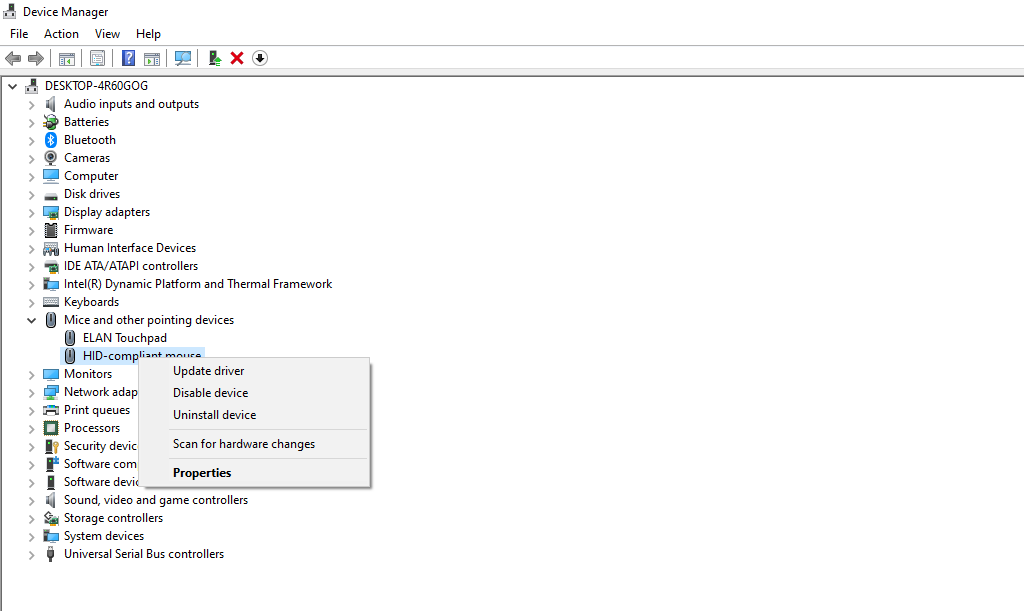
If you find both your external pointing device and touchpad with the same driver name, you may have to disable them one by one to see which one represents your touchpad.
This method is inapplicable in some instances when Windows doesn’t allow disabling the primary touchpad device via its driver.
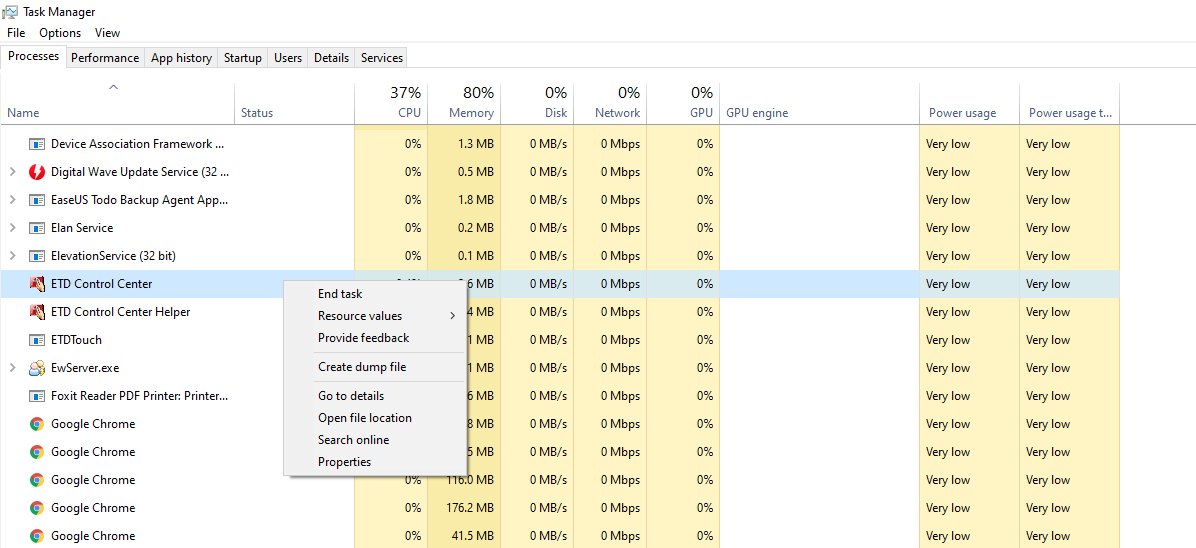
4. Disabling the Touchpad via ETD Control Centre
ETD Control Centre, known as Elan Trackpad Device Control Centre, is a program that runs in the background of your device, controlling your trackpad activity. Stopping this program will disable your trackpad.
The following instructions will help you disable this program if you have it installed on your device:
- Right-click on the taskbar and go to Task Manager.
- Locate the ETD Control Centre from the list of programs.
- Tap End Task (or Disable) by left-clicking on it.
Restart your computer once to apply the changes. Once it is disabled, it won’t run at bootup, preventing your touchpad from working. However, if your computer has its own touchpad driver, disabling ETD Control Centre won’t make any difference.
ETD Control Centre is also not available on all laptops, so if you don’t have this program controlling your touchpad activity, this fix won’t apply.
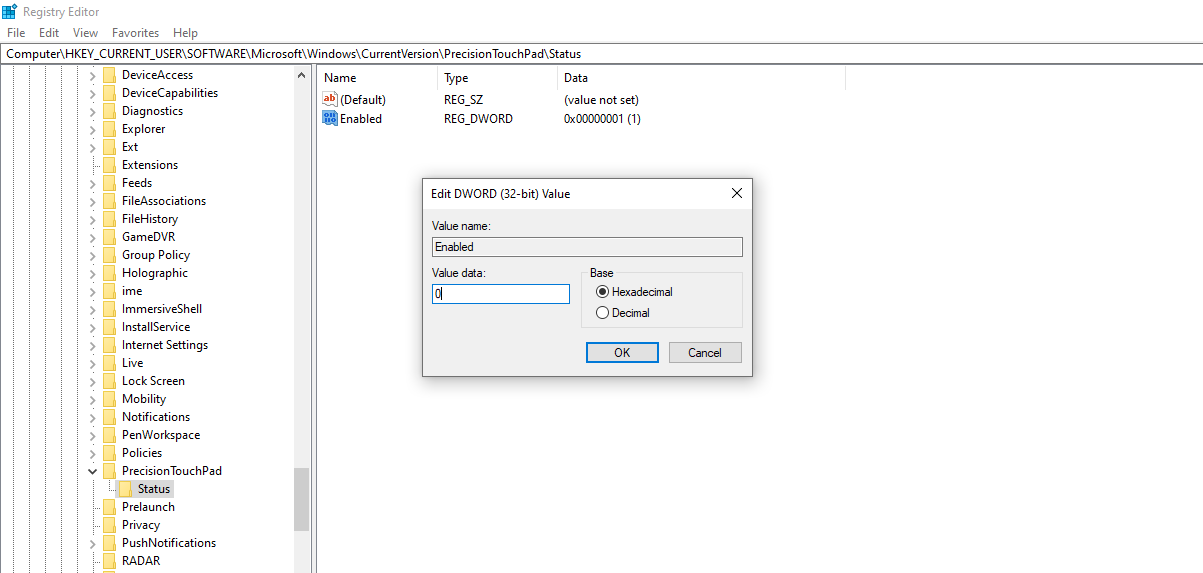
5. Disabling the Touchpad via the Windows Registry
Try modifying the registry if nothing seems to disable the touchpad. However, do this only when you know what you are doing. Even if you are familiar with such modifications, it is good to back up the registry. As a result, if your expertise fails you and you mess up something, you can restore it.
Here is what you need to do to disable the touchpad via Registry:
- Press Win + R to open the Run command box.
- Type «Regedit» and hit OK.
- Allow user control access by tapping Yes.
-
Navigate to the PrecisionTouchPad status folder using the following path. (You can also copy-paste it into the Registry.)
Computer\HKEY_CURRENT_USER\SOFTWARE\Microsoft\Windows\CurrentVersion\PrecisionTouchPad\Status - Double-tap on Enabled entry to change Value data.
- Set Value data to 0 instead of 1.
As a result, the touchpad will not work unless you change the data value back to 1. If you are still unable to disable the touchpad following these steps, consider using third-party apps.
6. Use Third-Party Software
If all else fails, you can use third-party apps. Touchpad Blocker is a great free tool for enabling or disabling the touchpad with a combination of keys. By default, they are set as CTRL + ALT + F9. You can turn the blocker on and off by pressing CTRL + F9 (no ALT).
To use this software, visit Touchpad Blocker’s official website. Download and install the Touchpad Blocker software. Once installed, press CTRL + F9 to activate it. Later, you can access the touchpad blocker either from the taskbar or from the list of hidden icons.
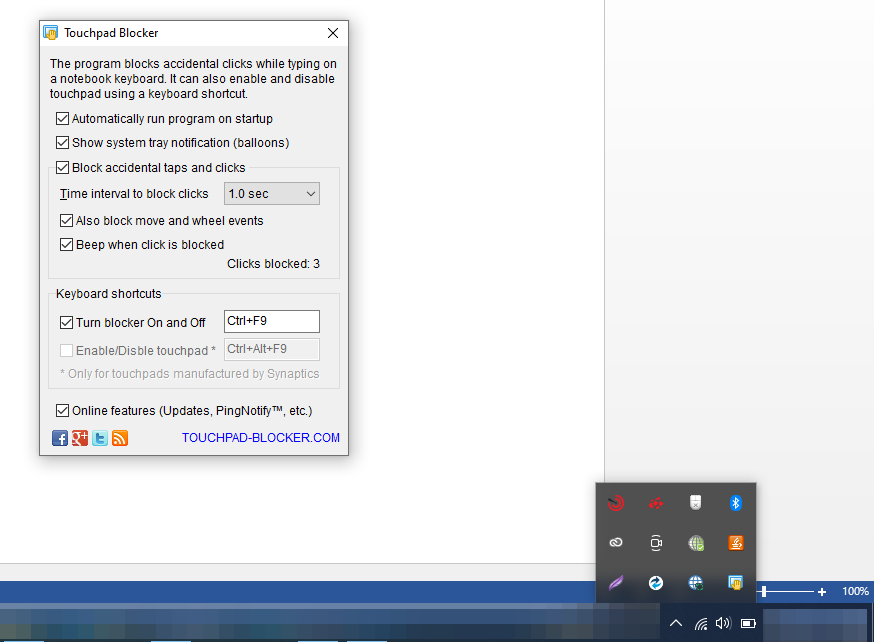
Apart from disabling the touchpad, you can also configure the program to run at startup automatically, make a beep sound when the click is blocked, and block move and wheel events when necessary.
Moreover, it allows you to stop accidental taps and clicks and set time intervals to block clicks. There are so many things you can do with Touchpad Blocker to control touchpad activity.
Deactivate Your Touchpad and Get Back to Work
Some of the fixes may work for you, while others may not. No matter what, the last option will work in every case if none of the other options has worked. Regardless of which version of Windows you are using, Touchpad Blocker is compatible with Windows XP/Vista/7/8 and 10.
If you face problems with the touchpad after reactivating it, you should update the driver, unplug any external pointing device, or reset other mouse settings.