
В Windows Server 2016 и 2019 по умолчанию установлен и включен “родной” бесплатный антивирус Microsoft — Windows Defender (начиная с Windows 10 2004 используется название Microsoft Defender). В этой статье мы рассмотрим особенности настройки и управления антивирусом Windows Defender в Windows Server 2019/2016.
Содержание:
- Графический интерфейс Windows Defender
- Удаление антивируса Microsoft Defender в Windows Server 2019 и 2016
- Управление Windows Defender с помощью PowerShell
- Добавить исключения в антивирусе Windows Defender
- Получаем статус Windows Defender с удаленных компьютеров через PowerShell
- Обновление антивируса Windows Defender
- Управление настройками Microsoft Defender Antivirus с помощью GPO
Графический интерфейс Windows Defender
В версиях Windows Server 2016 и 2019 (в том числе в Core редакции) уже встроен движок антивируса Windows Defender (Защитник Windows). Вы можете проверить наличие установленного компонента Windows Defender Antivirus с помощью PowerShell:
Get-WindowsFeature | Where-Object {$_. name -like "*defender*"} | ft Name,DisplayName,Installstate

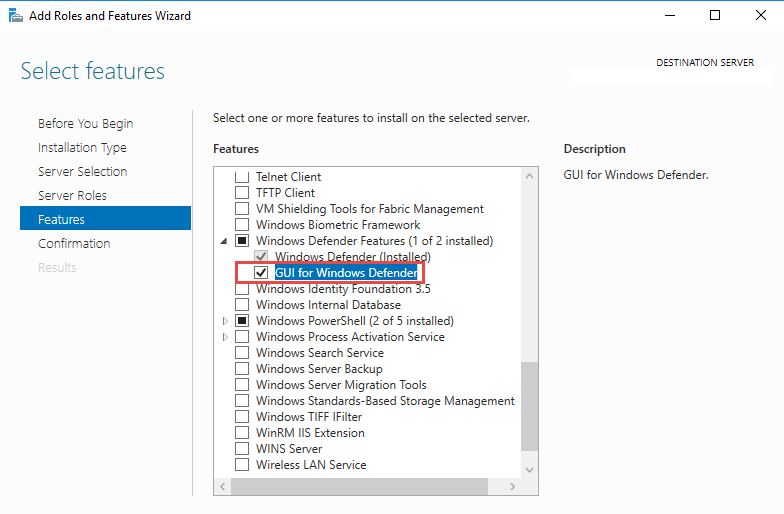
Однако в Windows Server 2016 у Windows Defender по-умолчанию нет графического интерфейса управления. Вы можете установить графическую оболочку Windows Defender в Windows Server 2016 через консоль Server Manager (Add Roles and Features -> Features -> Windows Defender Features -> компонент GUI for Windows Defender).
Установить графический компонент антивируса Windows Defender можно с помощью PowerShell командлета Install-WindowsFeature:
Install-WindowsFeature -Name Windows-Defender-GUI
Для удаления графического консоли Defender используется командлет:
Uninstall-WindowsFeature -Name Windows-Defender-GUI
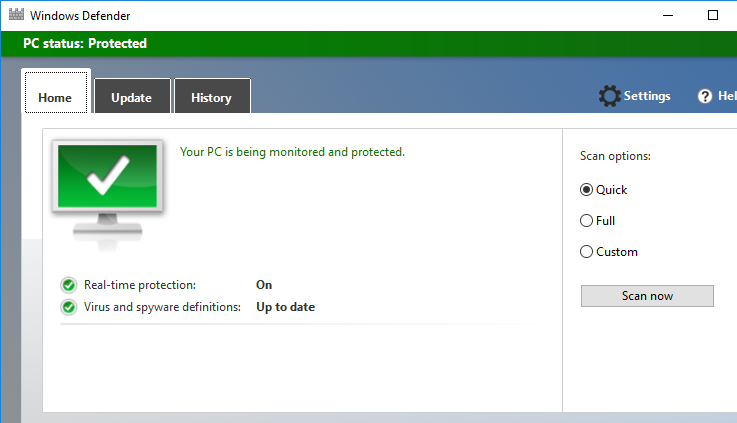
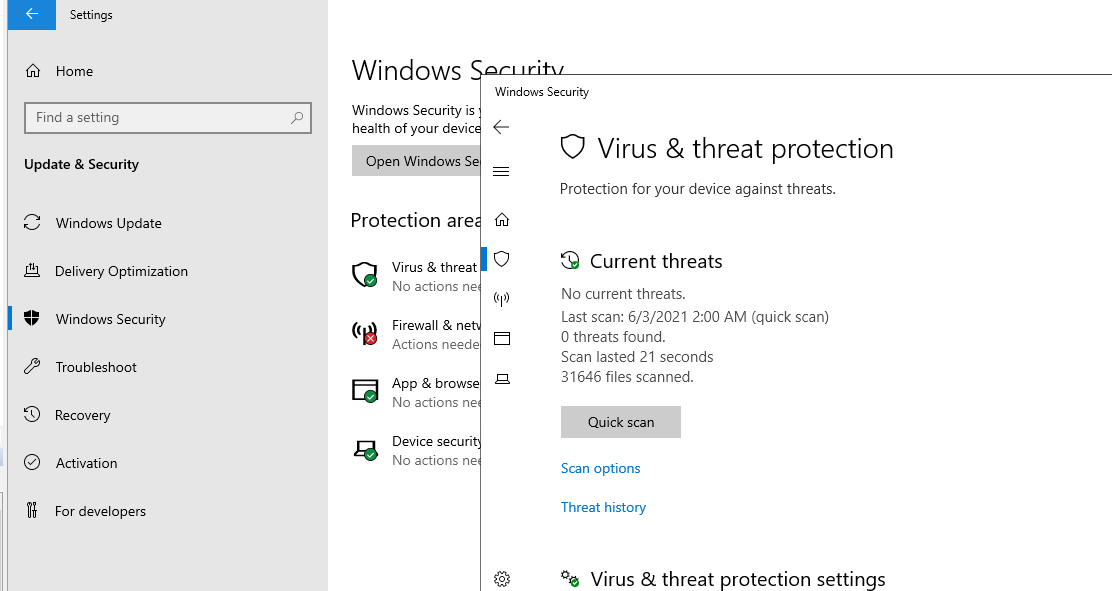
В Windows Server 2019 графический интерфейс Defender основан на APPX приложении и доступен через меню Windows Security (панель Settings -> Update and Security).
Настройка Windows Defender производится через меню “Virus and threat protection”.
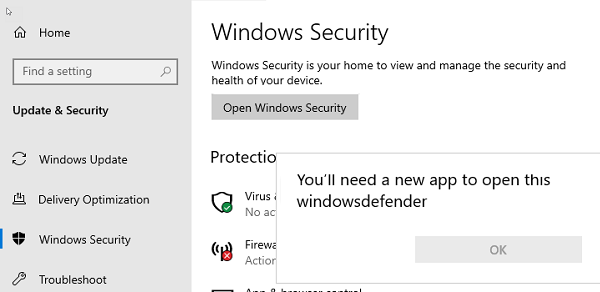
Если вы не можете открыть меню настроек Defender, а при запуске апплета Windows Security у вас появляется ошибка “You’ll need a new app to open this windowsdefender”, нужно перерегистрировать APPX приложение с помощью файла манифеста такой командой PowerShell:
Add-AppxPackage -Register -DisableDevelopmentMode "C:\Windows\SystemApps\Microsoft.Windows.SecHealthUI_cw5n1h2txyewy\AppXManifest.xml"
Если APPX приложение полностью удалено, можно его восстановить вручную по аналогии с восстановлением приложения Micorosft Store.
Удаление антивируса Microsoft Defender в Windows Server 2019 и 2016
В Windows 10 при установке любого стороннего антивируса (Kaspersky, McAfee, Symantec, и т.д.) встроенный антивирус Windows Defender автоматически отключается, однако в Windows Server этого не происходит. Отключать компонент встроенного антивируса нужно вручную (в большинстве случаев не рекомендуется использовать одновременно несколько разных антивирусов на одном компьютере/сервере).
Удалить компонент Windows Defender в Windows Server 2019/2016 можно из графической консоли Server Manager или такой PowerShell командой:
Uninstall-WindowsFeature -Name Windows-Defender
Не удаляйте Windows Defender, если на сервере отсутствует другой антивирус.
Установить службы Windows Defender можно командой:
Add-WindowsFeature Windows-Defender-Features,Windows-Defender-GUI

Управление Windows Defender с помощью PowerShell
Рассмотрим типовые команды PowerShell, которые можно использовать для управления антивирусом Windows Defender.
Проверить, запущена ли служба Windows Defender Antivirus Service можно с помощью команды PowerShell Get-Service:
Get-Service WinDefend
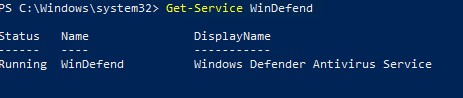
Как вы видите, служба запушена (статус –
Running
).
Текущие настройки и статус Defender можно вывести с помощью командлета:
Get-MpComputerStatus

Вывод комадлета содержит версию и дату обновления антивирусных баз (AntivirusSignatureLastUpdated, AntispywareSignatureLastUpdated), включенные компоненты антвируса, время последнего сканирования (QuickScanStartTime) и т.д.
Отключить защиту в реальном времени Windows Defender (RealTimeProtectionEnabled) можно с помощью команды:
Set-MpPreference -DisableRealtimeMonitoring $true
После выполнения данной команды, антивирус не будет сканировать на лету все обрабатываемые системой файлы.
Включить защиту в реальном времени:
Set-MpPreference -DisableRealtimeMonitoring $false
Более полный список командлетов PowerShell, которые можно использовать для управления антивирусом есть в статье Управление Windows Defender с помощью PowerShell.
Добавить исключения в антивирусе Windows Defender
В антивирусе Microsoft можно задать список исключений – это имена, расширения файлов, каталоги, которые нужно исключить из автоматической проверки антивирусом Windows Defender.
Особенность Защитника в Windows Server – он автоматически генерируемый список исключений антивируса, который применяется в зависимости от установленных ролей сервера. Например, при установке роли Hyper-V в исключения антивируса добавляются файлы виртуальных и дифференциальных дисков, vhds дисков (*.vhd, *.vhdx, *.avhd), снапшоты и другие файлы виртуальных машин, каталоги и процессы Hyper-V (Vmms.exe, Vmwp.exe)
Если нужно отключить автоматические исключения Microsoft Defender, выполните команду:
Set-MpPreference -DisableAutoExclusions $true
Чтобы вручную добавить определенные каталоги в список исключения антивируса, выполните команду:
Set-MpPreference -ExclusionPath "C:\Test", "C:\VM", "C:\Nano"
Чтобы исключить антивирусную проверку определенных процессов, выполните команду:
Set-MpPreference -ExclusionProcess "vmms.exe", "Vmwp.exe"
Получаем статус Windows Defender с удаленных компьютеров через PowerShell
Вы можете удаленно опросить состояние Microsoft Defender на удаленных компьютерах с помощью PowerShell. Следующий простой скрипт при помощи командлета Get-ADComputer выберет все Windows Server хосты в домене и через WinRM (командлетом Invoke-Command) получит состояние антивируса, время последнего обновления баз и т.д.
$Report = @()
$servers= Get-ADComputer -Filter 'operatingsystem -like "*server*" -and enabled -eq "true"'| Select-Object -ExpandProperty Name
foreach ($server in $servers) {
$defenderinfo= Invoke-Command $server -ScriptBlock {Get-MpComputerStatus | Select-Object -Property Antivirusenabled,RealTimeProtectionEnabled,AntivirusSignatureLastUpdated,QuickScanAge,FullScanAge}
If ($defenderinfo) {
$objReport = [PSCustomObject]@{
User = $defenderinfo.PSComputername
Antivirusenabled = $defenderinfo.Antivirusenabled
RealTimeProtectionEnabled = $defenderinfo.RealTimeProtectionEnabled
AntivirusSignatureLastUpdated = $defenderinfo.AntivirusSignatureLastUpdated
QuickScanAge = $defenderinfo.QuickScanAge
FullScanAge = $defenderinfo.FullScanAge
}
$Report += $objReport
}
}
$Report|ft

Для получения информации о срабатываниях антивируса с удаленных компьютеров можно использовать такой PowerShell скрипт:
$Report = @()
$servers= Get-ADComputer -Filter 'operatingsystem -like "*server*" -and enabled -eq "true"'| Select-Object -ExpandProperty Name
foreach ($server in $servers) {
$defenderalerts= Invoke-Command $server -ScriptBlock {Get-MpThreatDetection | Select-Object -Property DomainUser,ProcessName,InitialDetectionTime ,CleaningActionID,Resources }
If ($defenderalerts) {
foreach ($defenderalert in $defenderalerts) {
$objReport = [PSCustomObject]@{
Computer = $defenderalert.PSComputername
DomainUser = $defenderalert.DomainUser
ProcessName = $defenderalert.ProcessName
InitialDetectionTime = $defenderalert.InitialDetectionTime
CleaningActionID = $defenderalert.CleaningActionID
Resources = $defenderalert.Resources
}
$Report += $objReport
}
}
}
$Report|ft
В отчете видно имя зараженного файла, выполненное действие, пользователь и процесс-владелец.

Обновление антивируса Windows Defender
Антивирус Windows Defender может автоматически обновляться из Интернета с серверов Windows Update. Если в вашей внутренней сети установлен сервер WSUS, антивирус может получать обновления с него. Убедитесь, что установка обновлений одобрена на стороне WSUS сервера (в консоли WSUS обновления антивирусных баз Windows Defender, называются Definition Updates), а клиенты нацелены на нужный сервер WSUS с помощью GPO.
В некоторых случаях, после получения кривого обновления, Защитник Windows может работать некорректно. В этом случае рекомендуется сбросить текущие базы и перекачать их заново:
"%PROGRAMFILES%\Windows Defender\MPCMDRUN.exe" -RemoveDefinitions -All
"%PROGRAMFILES%\Windows Defender\MPCMDRUN.exe" –SignatureUpdate
Если на сервере нет прямого доступа в Интернет, вы можете настроить обновление Microsoft Defender из сетевой папки.
Скачайте обновления Windows Defender вручную (https://www.microsoft.com/en-us/wdsi/defenderupdates) и помесите в сетевую папку.
Укажите путь к сетевому каталогу с обновлениями в настройках Defender:
Set-MpPreference -SignatureDefinitionUpdateFileSharesSources \\fs01\Updates\Defender
Запустите обновление базы сигнатур:
Update-MpSignature -UpdateSource FileShares
Управление настройками Microsoft Defender Antivirus с помощью GPO
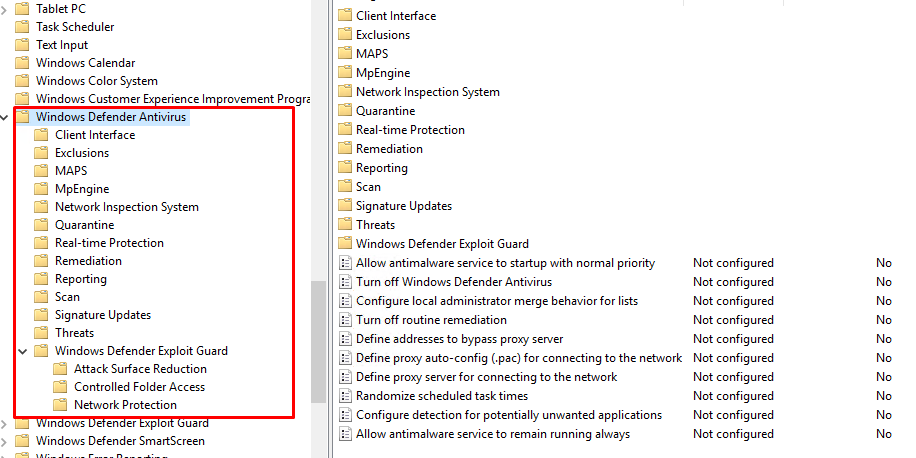
Вы можете управлять основными параметрами Microsoft Defender на компьютерах и серверах домена централизованно с помощью GPO. Для этого используется отдельный раздел групповых политик Computer Configurations -> Administrative Template -> Windows Component -> Windows Defender Antivirus.
В этом разделе доступно более 100 различных параметров для управления настройками Microsoft Defender.
Например, для отключения антивируса Microsoft Defender нужно включить параметр GPO Turn off Windows Defender Antivirus.
Более подробно о доступных параметрах групповых политик Defender можно посмотреть здесь https://docs.microsoft.com/en-us/microsoft-365/security/defender-endpoint/use-group-policy-microsoft-defender-antivirus
Централизованное управление Windows Defender доступно через Advanced Threat Protection доступно через портал “Azure Security Center” (ASC) при наличии подписки (около 15$ за сервер в месяц).
Как отключить Microsoft Defender на Windows Server 2019
Microsoft Defender (ранее известный как Windows Defender) — это встроенный антивирус и система защиты, разработанные компанией Microsoft для операционных систем Windows. Windows Server 2019 также включает в себя этот компонент для предотвращения и обнаружения вредоносного ПО. Однако, в некоторых ситуациях, администраторы могут захотеть отключить Защитник из-за конфликта с другим антивирусным программным обеспечением или для оптимизации производительности сервера.
В этой статье мы рассмотрим, как отключить Microsoft Defender на Windows Server 2019.
Метод 1: Отключение Microsoft Defender через групповую политику
Откройте «Проводник» и нажмите правой кнопкой мыши на значок «Этот компьютер». Затем выберите «Управление».
В открывшемся окне «Управление компьютером» перейдите в раздел «Службы и приложения» и выберите «Службы».
Найдите и дважды щелкните по службе «Защитник Windows», чтобы открыть ее свойства.
Во вкладке «Основное» измените тип запуска на «Отключено» и нажмите кнопку «ОК».
Теперь откройте «gpedit.msc» (редактор локальных групповых политик) с помощью поиска Windows или командной строки.
В редакторе локальных групповых политик перейдите по следующему пути: Конфигурация компьютера > Административные шаблоны > Компоненты Windows > Защитник Windows.
Найдите и дважды щелкните по параметру «Отключить защитник Windows».
В открывшемся окне выберите «Включено» и нажмите кнопку «ОК», чтобы сохранить изменения.
Перезагрузите сервер для применения изменений.
Метод 2: Отключение Microsoft Defender через реестр
-
Откройте «regedit» (редактор реестра) с помощью поиска Windows или командной строки.
-
В редакторе реестра перейдите по следующему пути: HKEY_LOCAL_MACHINE\SOFTWARE\Policies\Microsoft\Windows Defender.
-
Если ключ «Windows Defender» отсутствует, создайте его, щелкнув правой кнопкой мыши на «Microsoft» и выбрав «Новый» > «Ключ». Назовите новый ключ «Windows Defender».
-
Далее, щелкните правой кнопкой мыши на ключе «Windows Defender» и выберите «Новый» > «DWORD (32-битное значение)».
-
Назовите новое значение «DisableAntiSpyware» и установите его значение на «1».
-
Если вы хотите отключить также и облачную защиту, создайте еще одно значение DWORD (32-битное значение) с именем «DisableCloudProtection» и установите его значение на «1».
-
Закройте редактор реестра и перезагрузите сервер для применения изменений.
Обратите внимание: Редактирование реестра может привести к нестабильности системы, если выполняется неправильно. Перед внесением изменений рекомендуется создать резервную копию реестра или точку восстановления системы.
Заключение
В этой статье мы рассмотрели три способа отключения Microsoft Defender в Windows Server 2019 для начинающих пользователей. Отключение Защитника может быть полезным для улучшения производительности сервера или устранения конфликтов с другими антивирусными решениями. Однако, прежде чем отключать Microsoft Defender, убедитесь, что у вас установлено и настроено альтернативное антивирусное программное обеспечение для защиты сервера от вредоносного ПО и других угроз.
Также предлагаем рассмотреть другие полезные статьи:
- Как предоставить доступ к Windows Server по IP или диапазону IP
- Зачем нужно отключение UDP для RDP-подключений к Windows Server
- Как добавить правило в Брандмауэр Windows Server 2012, 2016, 2019
Hi! Windows Defender is the integrated security solution for Windows systems. In effect, it is the shield that protects the server from local or external threats. Specifically from network threats since they can harm the organization’s services. For that reason, Windows Defender is the ideal solution to safeguard the system. However, there are special circumstances where it is necessary to disable or even uninstall it. For example, in support tasks, configuration errors, or even the purchase of a firewall or external security system. Inattention to those cases, today we will see how to uninstall and disable Windows Defender in Windows Server 2016/2019.
How to disable Windows Defender from the Security settings
Windows Defender is integrated into the security section of the system. Therefore, you only have to access this section. With this intention, press the Win+Q combination and type Security in the search bar.

The security section will be deployed immediately. Please click on Virus & Thread protection settings. Specifically, in Manage settings.

Finally, you only have to deactivate the pin to remove the protection in real-time. This way, Windows Defender will be temporarily suspended.

Disable Windows Defender from PowerShell
Next, we’ll use the PowerShell console to temporarily disable Windows Defender. With this in mind, launch the console and run the following command:
Set-MpPreference -DisableRealtimeMonitoring $true

Once the work is done, you can reactivate Windows Defender using this command:
Set-MpPreference -DisableRealtimeMonitoring $false
How to uninstall Windows Defender from PowerShell
Next we will see how to uninstall Windows Defender. For this we will use again the PowerShell console. Once there, please execute the following command:
Uninstall-WindowsFeature -Name Windows-Defender

After a few seconds, the uninstallation will be complete. Please reboot the server to complete the changes.

A positive aspect of this method is that it is possible to reinstall the service. With this in mind, please execute the following command:
Install-WindowsFeature -Name Windows-Defender
How to uninstall Windows Defender from CMD
Next, we will use the Command Prompt to uninstall Windows Defender. Specifically, we will use the DISM command. In addition, this command allows you to manage the system image. Please proceed with caution, as you will be uninstalling the app and installation package. Consequently, it will not be possible to reinstall Windows Defender. Finally, If you are sure to proceed, run this command from CMD:
Dism /online /Disable-Feature /FeatureName:Windows-Defender /Remove /NoRestart /quiet

How to Uninstall Windows Defender from Server Manager
It is well known that the server administrator is a central console that allows managing multiple aspects. This time we will use it to uninstall Windows Defender. With this in mind, click on Manage. Then, select Remove Roles and Features

In the next window, please click next.

Now select the server.

A list of installed features will follow. Please check the box corresponding to Windows Defender. Once you have made your selection, you are ready to begin. Finally, confirm the selection and press Remove to start the process.

After a few moments, Windows Defender will be uninstalled from the system. Please note that to reinstall it, just repeat the process. However, in the wizard please select the Add Roles and Features option.
Conclusion
In the final discussion, we’ve seen numerous ways to disable and uninstall Windows Defender in Windows Server 2016/2019. As you could see, there are graphic and command-line options. The intention is that as an administrator, you have control over the system. Consequently, you will be able to better manage the interests of the company. Before I go, I invite you to see our post about disable automatic updates in Windows Server 2016/2019. Bye!
— Advertisement —
Everything Linux, A.I, IT News, DataOps, Open Source and more delivered right to you.
Subscribe
«The best Linux newsletter on the web»
Windows Server 2016 comes standard with built-in Anti-Malware called Windows Defender like Windows 10 Client. And per default, Windows Defender is active and has also turned on Real-Time Protection by default. In Windows Server 2016 Desktop Experience you can disable and configure Windows Defender using the UI or PowerShell, in the Windows Server 2016 Core version or on Nano Server you only have PowerShell available. Here are some quick command how you can configure or disable Windows Defender on Windows Server using PowerShell.
Check the Defender configuration and settings:
Turn off Windows Defender Real-Time Protection using PowerShell
Set-MpPreference -DisableRealtimeMonitoring $true
Turn on Windows Defender Real-Time Protection using PowerShell
Set-MpPreference -DisableRealtimeMonitoring $false
Add a File path exclusion:
Set-MpPreference -ExclusionPath "C:\temp", "C:\VMs", "C:\NanoServer"
Add process exclusion
Set-MpPreference -ExclusionProcess "vmms.exe", "Vmwp.exe"
I hope this helps you to easily configure Windows Defender on Windows Server 2016. Btw. This also works on Defender on Windows 10.
Tags: Antimalware, Antivirus, Defender, Microsoft, Nano Server, PowerShell, Security, Windows, Windows 10, Windows Defender, Windows Defender Windows Server, Windows Server, Windows Server 2016, Windows Server Core Last modified: January 12, 2019
About the Author / Thomas Maurer
Thomas works as a Principal Program Manager & Chief Evangelist Azure Hybrid at Microsoft (Cloud + AI). He engages with the community and customers around the world to share his knowledge and collect feedback to improve the Azure hybrid cloud and edge platform. Prior to joining the Azure engineering team (Cloud + AI), Thomas was a Lead Architect and Microsoft MVP, to help architect, implement and promote Microsoft cloud technology.
If you want to know more about Thomas, check out his blog: www.thomasmaurer.ch and Twitter: www.twitter.com/thomasmaurer
,
This tutorial shows how to remove or disable the Windows Defender Antivirus protection in Windows Server 2016. As you may know, the Server 2016 has built-in antivirus and malware protection through the Windows Defender Application.
In Server 2016, if you want to use another another antivirus program to protect your Server, the Windows Defender will not disable itself (as it happens in Window 10) in order to maximize the protection in Server 2016. So, if you want to remove or disable Defender Antivirus in Server 2016, you have to do that, manually.

How to Disable or Uninstall Windows Defender Antivirus in Server 2016.
Part 1. How to Disable Windows Defender Real Time Protection in Windows Server 2016.
Part 2. How to Uninstall Windows Defender in Server 2016.
Part 1. How to Turn OFF Real Time Protection in Windows Defender in Server 2016.
To temporarily turn off the Windows Defender Real Time Protection in Server 2016 though GUI, go to Settings –> Update & security –> Windows Defender and set the Real Time Protection to OFF. *

To permanently disable Windows Defender in Windows Server 2016:
1. Open PowerShell as Administrator.
2. Type the following command:
- Set-MpPreference -DisableRealtimeMonitoring $true

Note: To turn on again, the real time protection give the following command in Windows PowerShell (Admin) and then restart the server:
- Set-MpPreference -DisableRealtimeMonitoring $false
Part 2. How to Uninstall Windows Defender in Server 2016.
To completely remove Windows Defender from the Windows Server 2016, you can use one of the following methods:
- Method 1. Uninstall Windows Defender using PowerShell.
- Method 2. Remove Windows Defender in Server 2016 using DISM command prompt (DISM).
- Method 3. Remove Windows Defender using the Remove Roles & Features wizard.
Method 1. Uninstall Windows Defender using PowerShell.
To remove Windows Defender using PowerShell:
1. Open PowerShell as Administrator.
2. Type the following command and press Type the following command and press Enter:
- Uninstall-WindowsFeature -Name Windows-Defender

3. Restart the server. *
* Note: To reinstall the Windows Defender feature, then give the following command in PowerShell:
- Install-WindowsFeature -Name Windows-Defender
Method 2. Remove Windows Defender in Server 2016 using DISM in command prompt.
To remove Defender using DISM: *
* Advice: Do not use this way (DISM), to remove the Windows Defender Feature, because the command removes also the Windows Defender installation package and makes impossible to reinstall the Windows Defender (of you want) in the future.
1. Open Command Prompt as Administrator.
2. Type the following command and press Enter:
- Dism /online /Disable-Feature /FeatureName:Windows-Defender /Remove /NoRestart /quiet

3. Restart the server.
Method 3. Remove Windows Defender using the Remove Roles & Features wizard.
To Uninstall Windows Defender in Windows Server 2016.
1. Open Server Manager.
2. From Manage menu, click Remove Roles and Features.

3. Press Next at the first three (3) screens.

4. At Features options, uncheck the Windows Defender Features and click Next.

5. Click Remove to remove the Windows Defender.

6. Restart your server.
* Note: To reinstall Windows Defender Antivirus on Server 2016, follow the instructions below:
1. Open Server Manager and click Add Roles and Features.
2. Click Next at the first for (4) screens of the wizard.
3. At Features screen, check the Windows Defender Features, plus the ‘Windows Defender’ and the ‘GUI for Windows Defender’ checkboxes and click Next.
![image_thumb[33]_thumb](https://www.wintips.org/wp-content/uploads/2018/12/image_thumb33_thumb_thumb.png "image_thumb[33]_thumb")
4. At Confirmation screen click Install.

5. When the installation is completed click Close and restart your server.

That’s all folks! Did it work for you?
Please leave a comment in the comment section below or even better: like and share this blog post in the social networks to help spread the word about this solution.
If this article was useful for you, please consider supporting us by making a donation. Even $1 can a make a huge difference for us in our effort to continue to help others while keeping this site free:
- Author
- Recent Posts
Konstantinos is the founder and administrator of Wintips.org. Since 1995 he works and provides IT support as a computer and network expert to individuals and large companies. He is specialized in solving problems related to Windows or other Microsoft products (Windows Server, Office, Microsoft 365, etc.).