
Среди различных советов на тему оптимизации Windows 10 или работы системы с SSD вы можете встретить рекомендацию отключить индексирование. Сам метод оптимизации неоднозначный, но, если вы решили, что это требуется сделать, а поиск не используете, вполне можете применить его.
Отключение индексирования возможно путем изменения соответствующих параметров системы в панели управления, в том числе и для каждого диска отдельно, так и путем отключения соответствующей службы. В этой простой инструкции подробно о том, как отключить индексирование Windows 10 различными способами. Также может быть интересным: Настройка SSD для Windows 10, Программы для SSD.
- Отключение индексирования в панели управления Windows 10 и свойствах диска
- Отключить службу индексирования (Windows Search)
Отключаем индексирование Windows 10 в параметрах панели управления
Стандартный метод настройки и отключения индексирования Windows 10 — использование соответствующего раздела в панели управления:
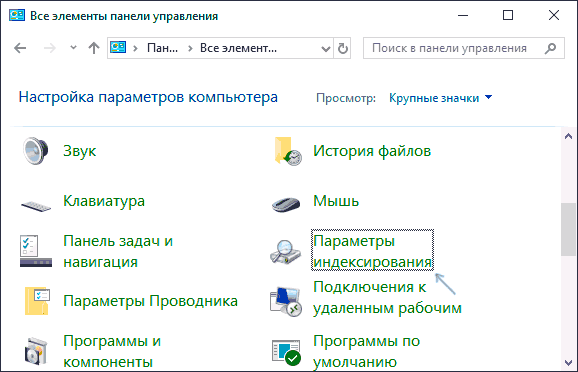
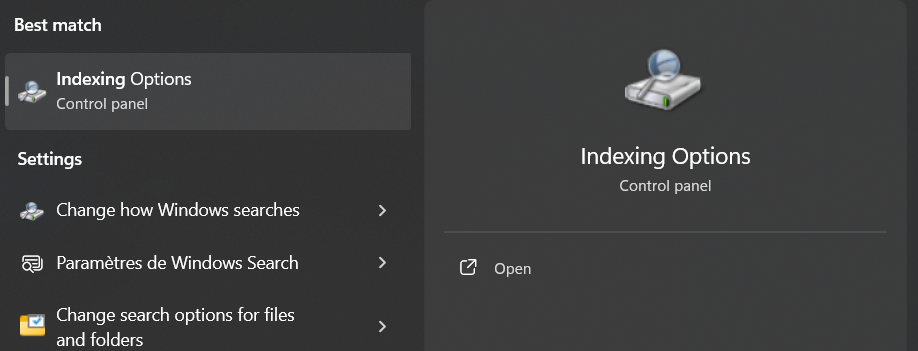
- Откройте панель управления, а затем — Параметры индексирования. Можно просто начать набирать в поиске на панели задач слово «Индексирование», чтобы быстро открыть нужный пункт.

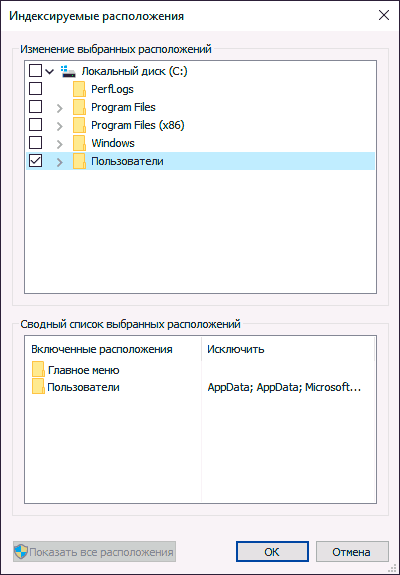
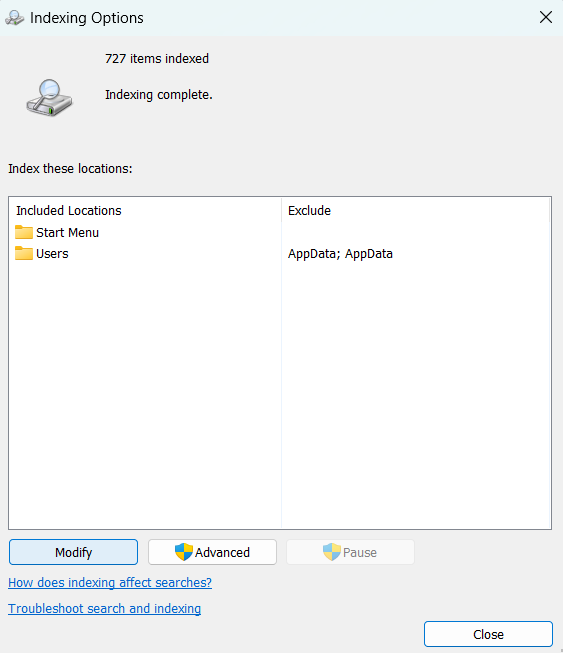
- В открывшемся окне вы увидите список расположений, для которых включено индексирование. Чтобы изменить этот список нажмите кнопку «Изменить».

- Снимите отметки с тех расположений, которые не требуется индексировать и примените настройки.


Дополнительно, вы можете отключить индексирование содержимого файлов на отдельных дисках (например, только для SSD) как самую затратную по ресурсам операцию индексирования. Для этого достаточно выполнить следующие шаги.
- Откройте свойства нужного диска.
- Снимите отметку «Разрешить индексировать содержимое файлов на этом компьютере в дополнение к свойствам файлам» и примените сделанные настройки.
Как видите, все сравнительно несложно, но при этом сама служба индексирования на компьютере продолжает работать.
Отключение службы индексирования Windows 10 (Windows Search)
Если вам требуется полностью отключить индексирование Windows 10, сделать это можно путем отключения соответствующей системной службы, которая называется Windows Search:
- Нажмите клавиши Win+R на клавиатуре, введите services.msc
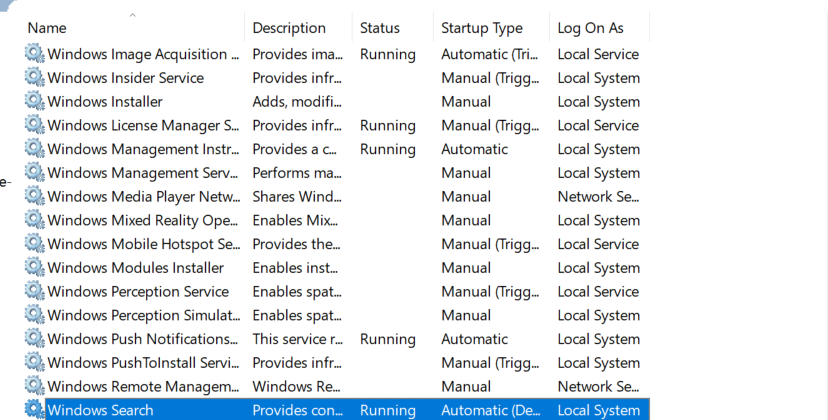
- Найдите в списке служб «Windows Search».

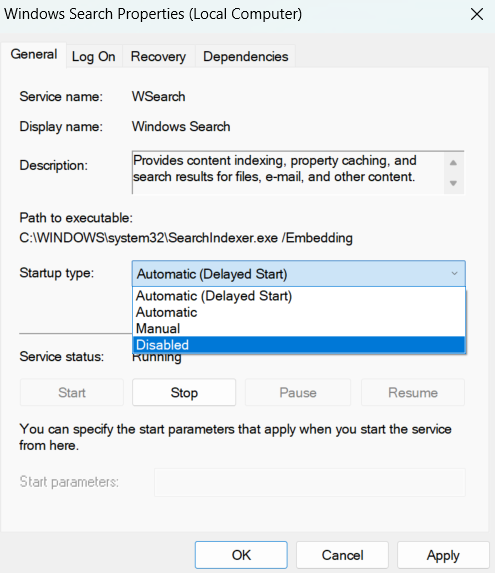
- В типе запуска установите «Отключена», примените настройки и перезагрузите компьютер (если просто отключить и остановить, она запустится снова).


После этого индексирование в Windows 10 будет полностью отключено, но поиск по параметрам, системным элементам и установленным программам в панели задач продолжит работать, равно как и поиск по файлам, если использовать окно поиска в проводнике (в последнем случае вы будете видеть уведомление о том, что поиск может быть медленным, так как индексирование не выполняется).
Служба Windows Search отвечает за поиск файлов и папок на устройстве. Она способна искать данные не только по наименованию файлов, но и по содержанию этих файлов (метаданным, свойствам и т.д.). Например, поиск по содержанию файлов по умолчанию активирован для текстовых и офисных документов (txt, doc, docx, xls, xlsx, pdf).
На компьютере может быть очень много файлов и папок. Чтобы поиск по устройству не занимал много времени, служба Windows Search использует индексацию файлов. Процесс индексирования представляет собой чтение диска с данными и запись информации о просканированных файлах в базу данных. Индексирование осуществляется в фоновом режиме. Когда вы сохраните новый документ в индексированном расположении, служба Windows Search проиндексирует его и сохранит собранную информацию о нём в своей базе.
Индексатор службы Microsoft Windows Search грузит процессор?
Обычно индексатор службы Microsoft Windows Search не грузит процессор. В нашем случае, когда все файлы проиндексированы, нагрузка на центральный процессор составляет 0%, а объём используемой оперативной памяти составляет порядка 80МБ.
-

На скриншоте видно, что Индексатор службы Microsoft Windows Search в Windows 10 не нагружает процессор, так как все файлы проиндексированы. -


Поэтому, если на вашем устройстве индексатор службы Microsoft Windows Search грузит процессор, это означает, что в настоящее время идёт индексирование файлов. Если вы активно пользуетесь устройством, нажимаете на клавиши клавиатуры, водите мышкой, служба Windows Search замедляет скорость сканирования. В нашем случае при сниженной скорости индексирования нагрузка на процессор составляет 0,6-1,2%.
-

На скриншоте видно увеличение нагрузки на процессор, так как идёт индексирование новых файлов (при сниженной скорости сканирования) -


Конечно, нагрузка будет больше, если процессор относительно старый и имеет одно-два логических ядра. Поэтому приведённые значения нагрузки индексатора службы Microsoft Windows Search на процессор следует считать условными.
Как можно уменьшить нагрузку службы Microsoft Windows Search на процессор?
Определяем папки, которые служба поиска должна индексировать
- Найдите и запустите «Параметры индексирования» в классическом варианте Панели управления.
Как открыть классическую Панель управления?
Несколько простых способов в отдельной статье

- В открывшемся окне нажмите кнопку «Изменить».

- Отметьте галочками папки или диски, которые вы хотите индексировать в фоновом режиме. Оставьте пустым квадрат, чтобы не индексировать папку или диск. После выбора индексируемых расположений нажмите кнопку «ОК».

Уменьшив количество папок и дисков в окне «Индексируемые расположения», вы сможете сократить нагрузку индексатора службы Microsoft Windows Search на процессор. Но имейте в виду, что поиск в исключенных расположениях будет долгим. А в случае использования кнопки поиска в панели задач поиск в неиндексированных расположениях осуществляться не будет. Поэтому не старайтесь исключать все папки. Оставьте папки, в которых вы часто используете функцию поиска.
Устанавливаем классический режим поиска
В Windows 10 предусмотрено 2 режима поиска: классический и расширенный. При классическом режиме поиск осуществляется только в библиотеках пользователя и на рабочем столе. Расширенный режим позволяет искать файлы по всему компьютеру, за исключением системных папок. Расширенный режим, как предупреждает операционная система, может снизить уровень заряда и увеличить нагрузку на центральный процессор. Особенно это актуально для владельцев ноутбуков, которым важно, чтобы их устройство проработало в автономном режиме как можно дольше.
- Перейдите в новые «Параметры Windows» (нажмите на клавиатуре кнопку с логотипом Windows + I ).
- Нажмите на раздел «Поиск».

- В левом боковом меню нажмите на «Поиск в Windows».
- Прокрутите список настроек и выберите параметр «Классический стиль».

Активируем привязку производительности индексатора к параметрам питания устройства
Изменять режим производительности индексатора стало возможным с момента появления Windows 10 версии 2004 (майское обновление 2020 года). Если включить параметр «Использовать параметры режима питания устройства», служба Windows Search будет оценивать, запущен ли на компьютере режим энергосбережения, пониженного электропотребления или игровой процесс. Если да, то служба поиска приостановит индексацию в фоновом режиме.
Также при включении производительности индексатора служба поиска приостановит индексацию файлов в фоновом режиме, если загрузка центрального процессора превысит 80% или загрузка жесткого диска поднимется свыше 70%.
- Перейдите в новые «Параметры Windows» (нажмите на клавиатуре кнопку с логотипом Windows + I ).
- Нажмите на раздел «Поиск».
- В левом боковом меню нажмите на «Поиск в Windows».
- Прокрутите список настроек и включите параметр «Использовать параметры режима питания устройства».

Отключаем службу Windows Search
Отключая службу Windows Search, вы отключите индексирование папок и файлов в фоновом режиме.
Вы сможете осуществлять поиск по устройству, но он будет медленным.
- Запустите приложение «Выполнить» (нажмите на клавиатуре кнопку с логотипом Windows + R ).
- Наберите текст
services.mscи нажмите кнопку «ОК».

- В открывшемся окне найдите службу Windows Search.

- Дважды нажмите на строку службы «Windows Search». Откроется окно с настройками.
- Выберите тип запуска «Отключена».
- Нажмите кнопку «Остановить», чтобы завершить активный процесс выполнения службы Windows Search.
- Нажмите кнопку «ОК», чтобы сохранить настройки службы.

А как у вас работает служба поиска в Windows? Испытываете ли вы проблемы при ее работе в фоновом режиме?
Расскажите о своем опыте в комментариях 😉
One of the most annoying things about Windows 11 (and 10) is how it shows web results when you’re just looking for local data. You might click on the Windows search box just because you want to find the shortcut to your favorite app or that Word doc you’ve been working on. But instead of getting a list of results from your computer, you’re shown search results in Bing. And these search results slow you down by pinging the Internet.
Even when you first click on the search box, you have to wait a few seconds while Windows pulls down a list of featured MSN.com news stories and search results. That’s extra time you’re wasting while waiting for the UI, just so Microsoft can promote its web content and service.
Fortunately, it’s easy enough to turn off Windows web search with a few quick registry tweaks. These steps will work in both Windows 11 and Windows 10.
How to Disable Web Search in Windows 11 or 10
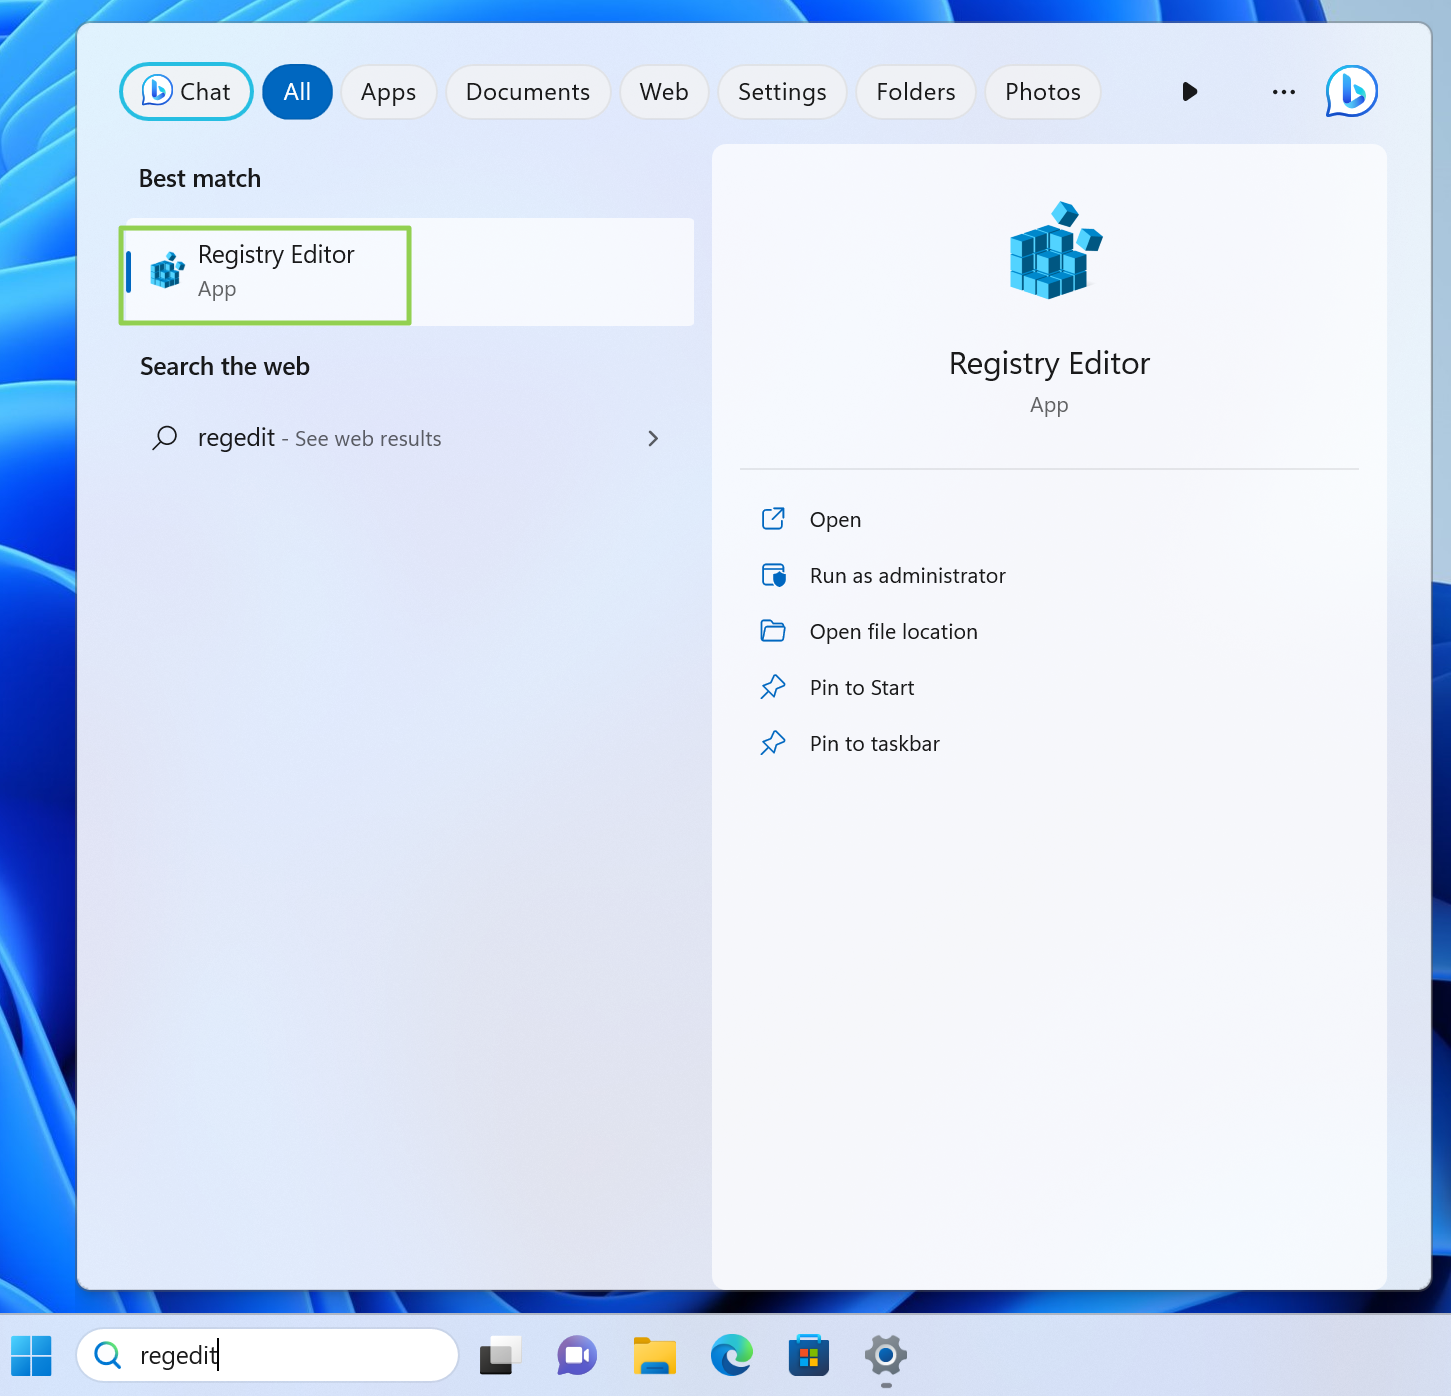
1. Open regedit. You can get there by searching for «regedit» and clicking the top result. Click yes if prompted User Account Control.
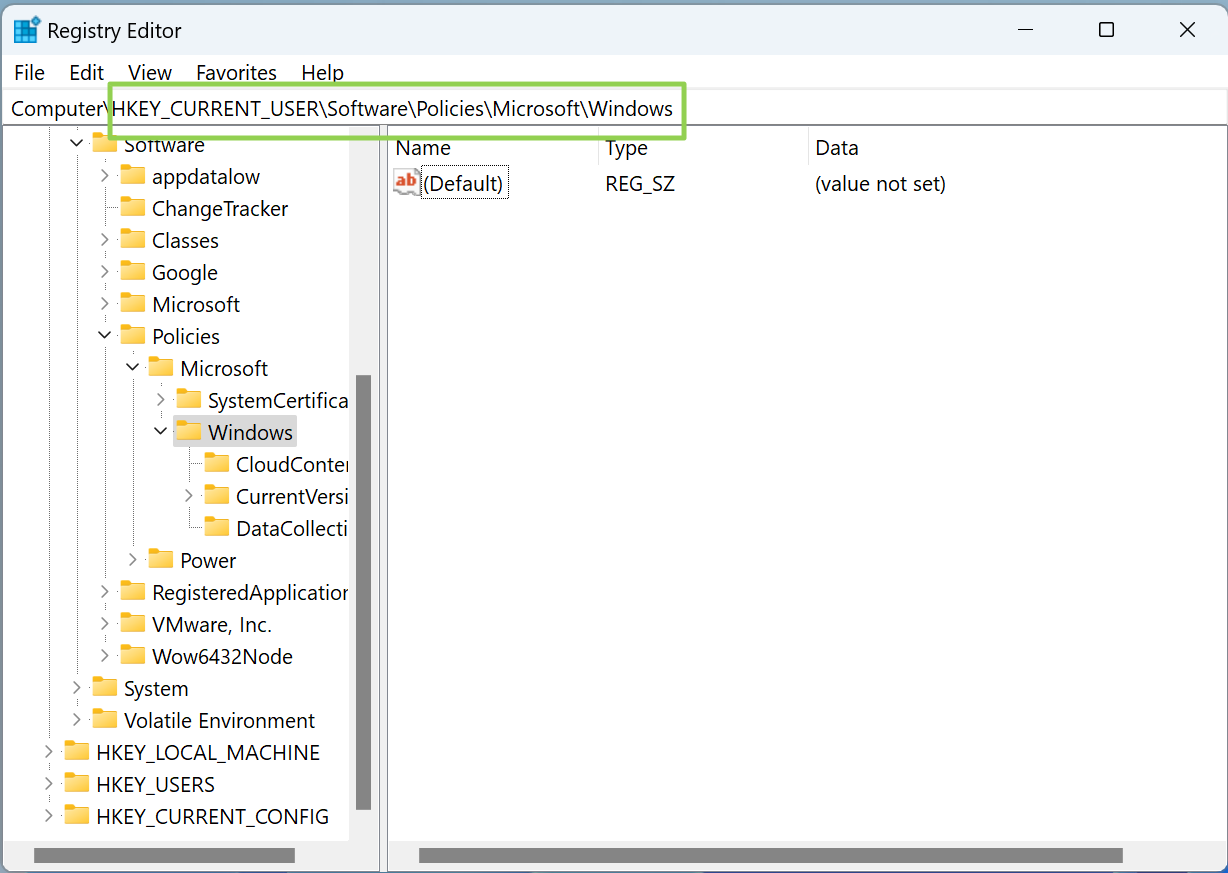
2. Navigate to HKEY_CURRENT_USER\Software\Policies\Microsoft\Windows
3. Create a new key (aka folder) called Explorer and navigate to it. You can create a key by right clicking in the right pane and selecting New->Key and renaming it to Explorer.
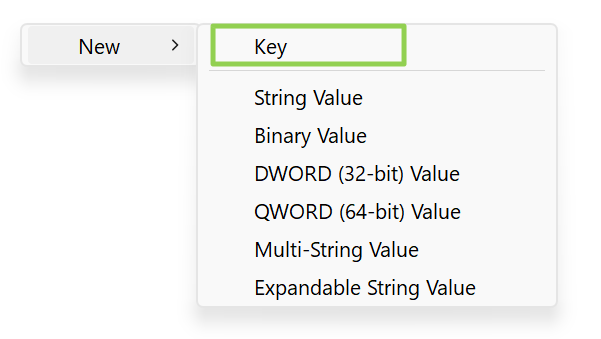
4. Create a new DWORD (32-bit) registry key and name it DisableSearchBoxSuggestions. You can create a new registry key by right clicking in the right window pane and selecting New->DWORD.
Get Tom’s Hardware’s best news and in-depth reviews, straight to your inbox.

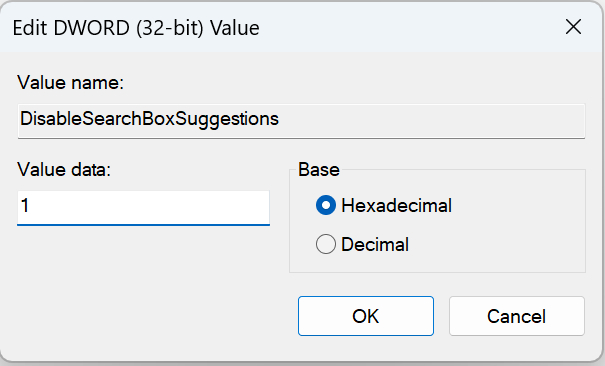
5. Double-click on DisableSearchBoxSuggestions to edit it and set the Value data field to 1and click OK.
6. Close Regedit and reboot.
From now on, you’ll have a fast loading search menu that doesn’t grab article promotions and thumbnails from MSN.
And if you search for something that doesn’t exist on your PC, you’ll get a straightforward answer that it’s not found rather than a list of web search results that Windows has take a few seconds to pull from the Internet.

Table of contents
- What Is Microsoft Windows Search Indexer?
- Should I Disable Windows Search Indexing on Windows 10/11?
- How to Disable Windows Search Indexing in Windows 10/11
- Method 1: Disable Windows Search
- Method 2: Use the Command Prompt
- Method 3: Disable indexing for specific areas
- Method 4: Disable Windows Search indexing by hard drive
- Method 5: Turn off indexing for Microsoft Outlook
- Method 6: Rebuild your index
- How to Disable Indexing in Windows 10/11: Explained
- FAQ
There’s an ongoing conversation about whether to disable Windows Search indexing or keep it running. Microsoft introduced Microsoft Windows Search Indexer in Windows 2000 and hasn’t thought about dropping it. While you had to enable it in Windows 2000, it now comes enabled by default.
So, if you’re one of those who are against the service, you’ll have to disable it. Thankfully, this article shows you how to do that.
However, if you’re wondering whether you should disable indexing or not, you’re also in the right place. We’ll explain the concept of Windows Search indexing and tell you when it’s ideal to keep or disable the feature.
What Is Microsoft Windows Search Indexer?
Microsoft Windows Search Indexer (or simply Windows Search indexing) is a background service that scans and catalogs files, emails, and other content on your computer to speed up search results. Basically, it saves you from looking through every file manually each time you search. Instead, Windows uses this index—like a digital table of contents—to deliver faster, more accurate results.
Here’s how it works:
⇢ When Windows builds an index, it registers information for email messages, files, documents, and other content on your PC. The info it catalogs for the index includes things like file data, metadata, and contents.
⇢ After indexing, when you search for something, your PC refers to the created index rather than going through the actual file locations—this way, you get faster results.
So, for example, if you’re looking for a file, Windows checks its indexed information and pulls it up instead of going through your hard drive.
⇢ As you add, delete, or modify files, the index is updated in real time, keeping it current. Windows attempts to track all the changes on your computer. So, whenever you create or delete a file, the indexing service notes the changes. The same goes for new downloads and app installation and uninstallation.
Download Auslogics BoostSpeed
Your one-stop PC maintenance and optimization tool, this program will clean, speed up, repair and tweak your system to ensure maximum speed and efficiency.
Should I Disable Windows Search Indexing on Windows 10/11?
The answer to this question depends on your system. If you’re using a low-end PC or notice high disk or CPU usage , disabling Microsoft Windows Search Indexer might improve performance. The constant indexing may use up processing power and slow down your computer.
Also, depending on the type, number, and size of files on your computer, indexing may take up a significant chunk of your hard drive . But if you often search for files, keeping Microsoft Windows Search Indexer enabled ensures faster results and may be the more convenient option.
For example, Outlook uses indexed data to search your emails. Microsoft Edge uses it to display browser history results when you type in the address bar. In addition, the Settings app depends on it to show up-to-date results.
More so, some apps you download through the Microsoft Store rely on indexed data to search for your files and other PC content. Disabling indexing will increase the time it takes for Windows and other apps to return search results. So, if you have a fast CPU and a standard hard drive, you can keep indexing on. Since hard drives are slow to read, Windows will take longer searching for files without indexed data.
And with a fast CPU, you won’t have to worry about continuous background indexing. However, if you don’t rely on search a lot and are using a slow CPU and an SSD , it will be a good idea to turn indexing off. Windows can quickly look up files on SSDs since these drives are fast.
Also read:SSD vs. HDD: What’s the Difference and What to Choose?
Note
Microsoft Windows Search Indexer uses your RAM and CPU, so you may have to turn off the service if your RAM is low and your CPU is slow.
Let’s sum this up:
Pros of disabling Windows Search indexing
- Improved performance on low-end PCs: It frees up system resources like CPU, RAM and disk, especially noticeable on older or slower machines
- Reduced disk usage: It can help reduce constant disk activity, particularly useful for HDD users
- Less background activity: You will be minimizing background processes, leading to smoother performance for gaming or intensive tasks
- Fewer heat and noise issues: Lower disk activity can mean cooler temperatures and less fan noise
Cons of disabling Windows Search indexing
- Slower file searches: Searching for files, emails, or apps may become noticeably slower without indexing
- Real-time results may lag: Newly added or changed files won’t show up as quickly in search results
- Limited search features: Some advanced search features in File Explorer or Outlook may not work properly
- Not ideal for frequent searchers: If you rely heavily on Windows Search, the experience may become frustrating
PRO TIP
You might be considering disabling search indexing because you believe it’s the reason for your system’s poor performance. While that may be true, it’s not always the case. Your computer could be running slow for lots of other reasons.
For example, the accumulation of junk files could clog your hard drive, unnecessary background applications could weigh down your CPU and RAM, and leftover or faulty registry keys could cause glitches. Fortunately, you can use an optimizer such as Auslogics BoostSpeed to manage these issues.
This way, you don’t necessarily have to turn off indexing. The program deletes junk and bad registry keys and protects your hard drive against spyware.
So, how do you disable search indexing? Let’s get right to it.
How to Disable Windows Search Indexing in Windows 10/11
There are different ways to manage search indexing. If you rely on it, you can limit the amount of system resources such as your RAM and CPU. For example, you can disable search indexing for specific folders and drives or partitions.
We’ll show the different ways to disable and modify Microsoft Windows Search Indexer.
Method 1: Disable Windows Search
If you don’t need Windows Search, you can disable it. However, once disabled, you will no longer be able to use search functions across the OS. These areas include the Settings app, Microsoft Store, and the Start menu. It also means Windows will no longer run indexing operations in the background. So, follow these steps to turn off the service:
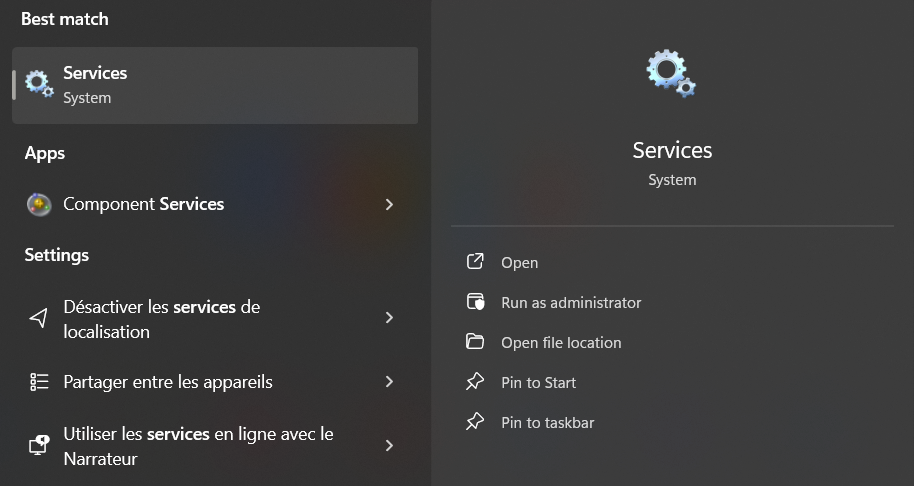
- Go to the Start menu and type services .
- Click on the Services application’s icon once the search panel brings it up.
- After the Services application opens, scroll down to the Windows Search entry and double-click it.
- The Windows Search Properties window will now open.
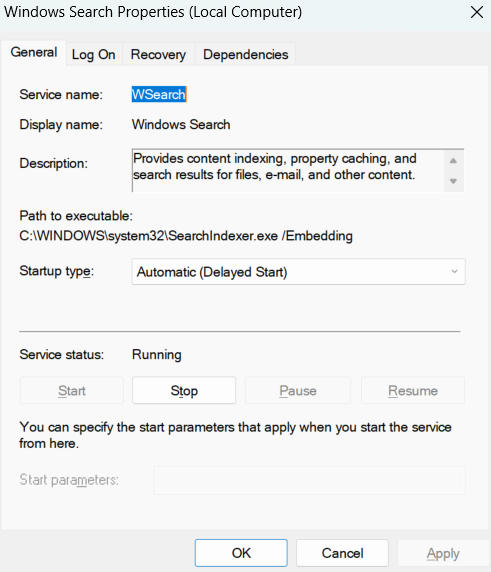
- Under the General tab, select Disabled in the Startup type drop-down.
- Click on the Stop button.
- Click OK .
- Restart your PC.
Method 2: Use the Command Prompt
You can enter a code in the Command Prompt to disable the Windows Search service and prevent it from launching on startup.
Note
This method is faster than going through the Services app. However, if you’re not comfortable using the Command Prompt, follow the steps above. You can also move on to the next solution to find a different method.
Follow these steps:
- Open the Run dialog window using the
Windows + Rcombo. - After the Run box opens, type CMD and tap
CTRL + Shift + Enteron your keyboard. - Click on Yes in the pop-up.
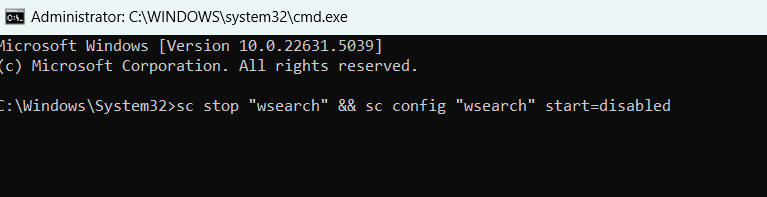
- Now, type the line below into the Administrator: Command Prompt window and hit the Enter key:
sc stop “wsearch” && sc config “wsearch” start=disabled
You can enable Windows Search again using this line:
sc config “wsearch” start=delayed-auto && sc start “wsearch”

That’s it.
PRO TIP
Ensure your PC runs smoothly and efficiently by keeping all your drivers updated. Auslogics Driver Updater automatically detects outdated drivers and installs the latest versions with just a few clicks. Prevent hardware issues and improve overall system performance.
Method 3: Disable indexing for specific areas
Windows provides the option to turn off indexing for specific folders. So, if there are areas where you don’t use search, you can disable indexing for them.
On the other hand, you can keep Microsoft Windows Search Indexer on for regularly used folders.
This option allows you to save RAM and CPU resources without completely getting rid of indexing.
Also, since the size of indexed data depends on the number and size of files Windows indexes, this option will reduce the storage strain.
So, follow these steps:
- Open the Start menu and type indexing .
- Click on Indexing Options.
Note
You can also go through the Control Panel to open the Indexing Options dialog:
Windows + R to open Run, then type control panel in the Run dialog box and hit Enter.) After the Control Panel opens, go to the top-right corner and select Large icons in the View by drop-down. Click on Indexing Options .
- Click on Modify in the Indexing Options dialog window.
- Your indexing locations will now show up. Click on Show all locations if you can’t see your hard drive.
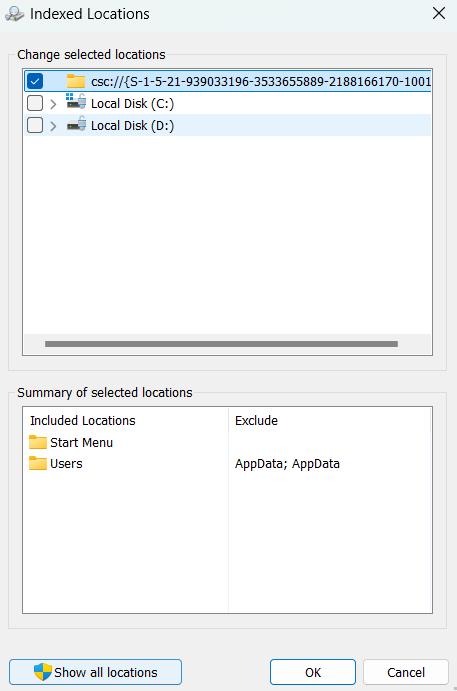
- Now, expand your hard drive by clicking on the arrow beside it.
Note
If you click on the checkbox beside the drive, you tell Windows to index the entire drive.
- After expanding the drive, navigate to the folders you don’t want Windows to index and check the boxes beside them.
- After completing this exercise, click on the OK button.
- You’ll see the included and excluded locations under corresponding columns in the lower segment of the Indexed Locations dialog window.
Method 4: Disable Windows Search indexing by hard drive
You can turn off indexing on a particular hard drive or partition if you don’t search for files on it. This substantially reduces the resources indexing takes from your CPU and RAM.
Follow these steps:
- Use the
Windows + Ecombo to open File Explorer. - Once File Explorer shows up, head over to the left pane and click on This PC .
- Now, click on the hard drive you want indexing turned off for and right-click it.
- Click on Properties .
- Under the General tab, uncheck the box next to Allow files on this drive to have context indexed and click on the OK button.
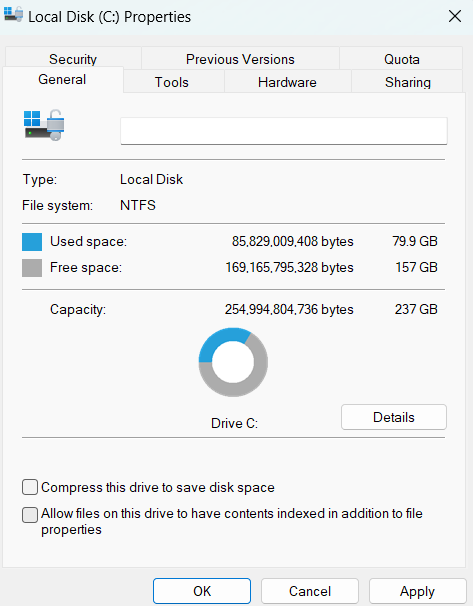
Windows will ask if you want the changes to apply to the root directory only or all the subfolders in the drive. Choose your option and select OK .
Download Auslogics BoostSpeed
Your one-stop PC maintenance and optimization tool, this program will clean, speed up, repair and tweak your system to ensure maximum speed and efficiency.
Method 5: Turn off indexing for Microsoft Outlook
As we mentioned, Microsoft Outlook uses indexed data to search for emails. If you don’t want that, you can turn off the feature for the program. And since Outlook doesn’t show up in the Indexed Locations dialog, you’ll have to make the changes in the app. Here’s how to disable Outlook’s indexing:
- Launch Outlook.
- Click on File and select Options .
- Once you get to the Options screen, go to the left pane and select Search .
- Now, go to the main page and click on Indexing Options .
- The Indexing Options dialog will now show up with Outlook included on the list.
- Next, click on Outloo k and click on the Modify button.
- After the Indexed Locations window appears, uncheck the box beside Outlook and click on the OK button.
What about apps like Microsoft Edge or apps from the Microsoft Store?
If they are installed and use indexing, they’ll usually appear in the Indexing Options window. Simply return to the Control Panel , go to Indexing Options , click Modify , and then uncheck any apps you don’t want indexed. Keep in mind that turning off indexing for certain apps may affect how quickly and accurately they return search results, especially for browsing history or in-app content.
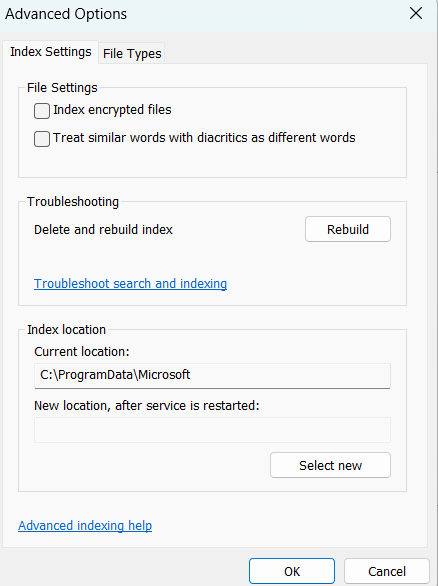
Method 6: Rebuild your index
If you use search regularly but keep getting slow results, something is wrong with your search index. The problem could be due to a corrupt or malfunctioning index. In this case, you need to rebuild the index.
Follow this guide:
- Open the Start menu and type indexing .
- Click on Indexing Options in the search results.
- After the Control Panel opens, go to the top-right corner and select Large icons in the View by drop-down. Click on Indexing Options .
- Click on Advanced in the Indexing Options dialog window.
- Click on the Rebuild button and select OK.
How to Disable Indexing in Windows 10/11: Explained
So, there you have it. If you have made up your mind to turn off indexing on Windows, there are several ways in which you can do that. Let’s recap:
- You can disable Windows Search via Services or the Command Prompt.
- You can also disable indexing for specific folders via Indexing Options or disable indexing on a specific hard drive via File Explorer.
- Additionally, you can turn off indexing for Microsoft Outlook and other specific apps.
There is also a chance that there may be an issue with your search index—if it’s working particularly slow. In this case, you can rebuild the search index using the steps above. Remember that you can always reverse your changes if you’re not comfortable with the way your search works. In the end, what matters is up to you. If you don’t mind waiting a few seconds—or minutes—more for your search results to show up, you can do without Windows indexing.
FAQ
Yes, it’s safe. Disabling indexing won’t harm your system, but it may slow down file searches.
In a lot of cases, yes. SSDs are already fast, so turning off indexing can reduce unnecessary wear and free up resources without affecting search speed too much.
No. You can still search for files, but the process will be slower and less efficient without the index.
Yes, it can. Start menu results may take longer to load, especially if you’re searching for apps, settings, or documents.
Yes. You can use third-party search tools like Everything or manually browse folders—but these may lack Windows integration.
Go to Control Panel > Indexing Options > Modify and uncheck the boxes for apps listed under your user profile. Not all Store apps use indexing, but those that do will appear there.
Try pausing or restarting the indexing service, limiting indexed locations, or disabling it entirely. You can also troubleshoot it under Settings > Search > Searching Windows in Windows 10 or Settings > Privacy & security > Searching Windows in Windows 11.