
How do I turn off automatic updates in Skype for Windows 10 & 11?
Automatic updates are the easiest way to keep Skype for Windows 10 and 11 (version 15) up-to-date. They’re turned on by default, but if you need to disable them:
-
On the Start screen, select
Microsoft Store
. -
Select your
Profile
picture, and then select
App settings
. -
Under
App updates
, turn the toggle off for
Update apps automatically
.
Note
: This will turn off automatic updating for all apps from the Microsoft Store. You can turn the automatic updates back on whenever you’d like.
Need more help?
Want more options?
Explore subscription benefits, browse training courses, learn how to secure your device, and more.
Skip to content
Skype for Windows 10 works in a slightly different manner than for the earlier versions of Windows. Skype for Windows 10 is installed as an app and you can download it from the Windows Store. As such, all the automatic updates for Skype in Windows 10 are handled by the Windows Store itself. If you want to disable the automatic updates for Skype in Windows 10, then you will have to disable the Windows Store automatic updates altogether. And here is how you can do that:
- Launch Windows Store by clicking on its icon from the Windows desktop taskbar. Sign in to your Microsoft account if needed in the Windows Store.
- Click on the user profile icon in the Windows Store window and then select Settings from the menu that appears.

- In the Windows Store settings window click on the Update apps automatically option to toggle it off.


By turning off the Windows Store app updates, you will stop Skype from receiving and initiating any updates but this will also stop other apps and games from receiving updates from the Microsoft server. The automatic updates for all the apps that you have installed from Windows Store should be disabled only for some special reasons that are temporary in nature.
Another problem that may arise when you have disable the Skype updates in Windows 10 is that Microsoft may force you to update Skype to the newer version when a newer version is released. If Microsoft servers detect that you are using an older version of Skype, they will forcibly sign you out and display a warning message regarding the older version of Skype that you have been using. It simply won’t let you use Skype unless you download the new version and for the new version you will have to enable the automatic updates in Windows Store once again.
We use cookies on our website to give you the most relevant experience by remembering your preferences and repeat visits. By clicking “Accept”, you consent to the use of ALL the cookies.
Как отключить автоматическое обновление Скайпа
Содержание
- 1 Отключаем обновление скайпа
- 1.1 Для версии из официального сайта
- 1.2 Для версии из Microsoft Store
- 1.3 На Android
Своевременное обновление скайпа позволяет пользователям быть в курсе всех свежих разработок. Однако, обновления бывают настолько критичны, что полностью изменяется интерфейс приложения, тогда как юзер только-только привык к недавнему дизайну.
В таких случаях многие приходят к тому, что нужно отключить обновление, дабы избежать подобных случаев. Далее мы поговорим о том, как отключить автоматическое обновление скайпа различными способами на компьютере и телефоне.
Отключаем обновление скайпа
Официально отключить обновление скайпа нельзя, с приходом 8-й версии данную функцию разработчики посчитали ненужной. Но несмотря на это, пользователи все же смогли найти лазейку и отключить обновления.
Сделать это можно как для версии из магазина Microsoft Store, так и для версии с официального сайта. Давайте рассмотрим более подробно оба случая.
Для версии из официального сайта
Для того, чтобы отключить обновления для данной версии, нам потребуется зайти в специальную папку с содержимым программы. Но для начала необходимо включить отображение скрытых папок и файлов. Чтобы это сделать, откроем любую папку на компьютере и в разделе «Вид» отметим пункт «Скрытые элементы».

Теперь можно воспользоваться инструкцией для отключения обновлений:
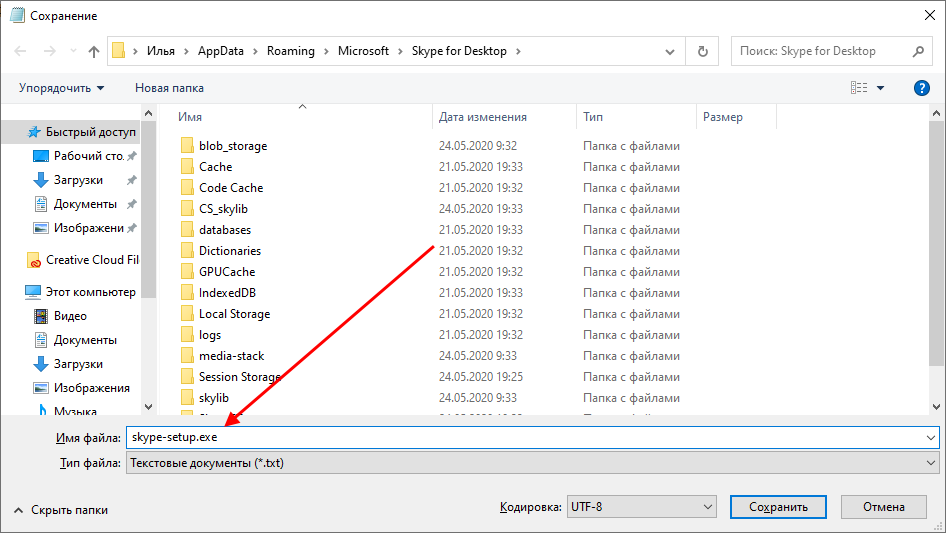
- Снова открываем папку и вводим в строку запроса следующий путь: C:\Users\User\AppData\Roaming\Microsoft\Skype for Desktop, где User – это имя пользователя ПК.

- После этого мы попадаем в папку, в которой нам нужно удалить файл под названием skype-setup.exe. Далее создаем текстовый файл с таким же названием. Для этого кликаем по пустому полю и выбираем «Создать» — «Текстовый документ».

- В результате у нас появляется новый файл с названием skype-setup. Открываем его и записываем туда любые символы. Затем в верхней части нажимаем на кнопку «Файл» и выбираем «Сохранить как…».

- Вводим названием с расширением .exe и сохраняем изменения.
- Затем переходим в свойства созданного файла.

- В завершении отмечаем пункт «Только чтение» и нажимаем «ОК».

Таким образом обновления скайпа больше не будут устанавливаться автоматически. Если вы захотите вернуть изначальное состояние, просто удалите созданный файл.
Для версии из Microsoft Store
Данный способ подойдет для тех, кто устанавливал скайп через магазин Microsoft Store. Чтобы отключить для него обновления, воспользуемся следующей инструкцией:
- Открываем меню «Пуск» и вводим запрос «Microsoft Store» – открываем первый появившийся запрос.

- В запущенной программе кликаем по кнопке в виде троеточия и открываем «Настройки».

- Затем в пункте «Обновлять приложения автоматически» переводим ползунок в режим «Выкл.».

На Android
Обновления приложений на платформе Android выполняется через официальный магазин Google Play, поэтому выключать автоматическое обновление мы будем там.
- Открываем Google Play и в левой части переходим в раздел «Настройки».

- Далее в пункте «Автообновление приложений» выбираем «Никогда».


Теперь вы знаете как отключить автоматическое обновление скайпа на компьютере и телефоне. Спасибо за внимание!
Оценка статьи:
Загрузка…
It happens all the time. You have an important business call scheduled for 2 p.m. At 1:57 p.m., you launch Skype for Windows and are greeted by an update message that says «Just a moment, we’re improving your Skype experience . . .» The program then takes several minutes to download and install a new version of itself, making you embarassingly late for your appointment.
On some systems, you’re given a choice before this happens, but on others, you are stuck waiting. Fortunately, there’s a way to turn off these time-consuming Skype updates. Here’s how.
1. Launch Skype for Windows if it’s not already open.
2. Navigate to Tools -> Options.
3. Select the Advanced tab in the left pane.
4. Select Automatic updates in the left pane.
5. Click the «Turn off automatic updates» button. If the button says «Turn on automatic updates,» the updates have already been disabled and you can stop here.
Sign up to receive The Snapshot, a free special dispatch from Laptop Mag, in your inbox.
6. Click Save.
After you make this change, Skype will no longer update itself. This means that, if you want to keep the program up-to-date on your computer, you’ll need to go download new versions manually from Skype.com.