
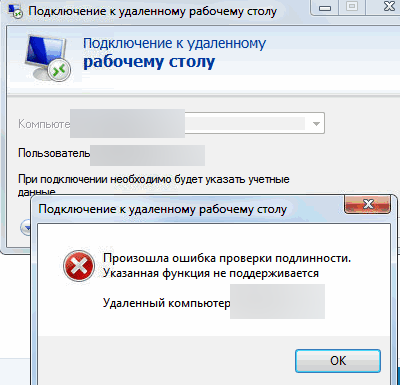
При подключении к рабочему столу удаленного компьютера с помощью встроенного RDP клиента (mstsc.exe) может появится ошибка:
Произошла ошибка проверки подлинности.
Указанная функция не поддерживается.
An authentication error has occurred.
 The function requested is not supported.
Данная ошибка связана с тем, что Windows по-умолчанию блокирует RDP подключения к удаленным компьютерам, на которых используется уязвимая версия протокола CredSSP (CVE-2018-0886). Протокол CredSSP (Credential Security Support Provider) используется для пре-аутентификации пользователей, когда для RDP доступа включен протокол NLA (Network Level Authentication / Проверка подлинности на уровне сети). Microsoft выпустило обновление для уязвимости CredSSP в 2018 г (https://support.microsoft.com/en-us/topic/credssp-updates-for-cve-2018-0886-5cbf9e5f-dc6d-744f-9e97-7ba400d6d3ea), но какой-то причине это обновление не установлено на удаленном хосте, к которому вы пытаетесь подключиться.
Как исправить ошибку проверки подлинности RDP?
Что нужно сделать, чтобы исправить ошибку и подключиться к вашему RDP/RDS серверу?
-
- (Рекомендованный способ) Самый правильный способ решения проблемы – установить последние кумулятивные обновлений безопасности Windows на удаленном компьютере/сервере, к которому вы подключаетесь по RDP. Скорее всего этот компьютер был недавно развернут из старого образа, или на нем отключено служба обновлений Windows. Проверьте последнюю дату установки обновлений Windows с помощью модуля PSWindowsUpdate или командой:
gwmi win32_quickfixengineering |sort installedon -desc

Обновления можно получить автоматически через Windows Update, или вы можете скачать и установить обновления Windows вручную. Нужно установить любое кумулятивное обновления для вашей версии Windows, выпущенное после 2019 года;
- (Не рекомендуется) Временный способ 1. Вы временно разрешить подключение к RDP серверам с небезопасной версией CredSSP на своем компьютере (клиенте). Для этого нужно изменить ключ реестра AllowEncryptionOracle командой:
REG ADD
HKLM\SOFTWARE\Microsoft\Windows\CurrentVersion\Policies\System\CredSSP\Parameters /v AllowEncryptionOracle /t REG_DWORD /d 2
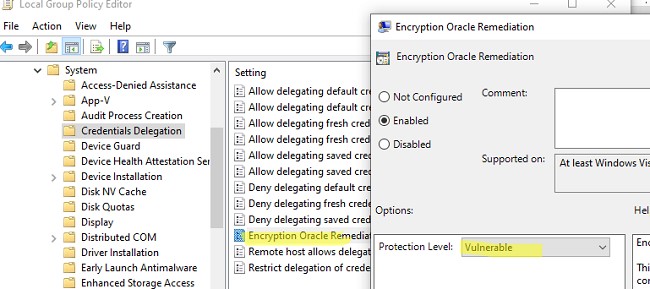
или можно изменить настройки локальной политики Encryption Oracle Remediation / Исправление уязвимости шифрующего оракула), установив ее значение = Vulnerable / Оставить уязвимость (см. описание в статье Ошибка RDP подключения: CredSSP encryption oracle remediation).
Это позволит вам подключиться к удаленному серверу по RDP и установить последние обновления безопасности (способ 1). После обновления сервера отключите политику или измените значение ключа AllowEncryptionOracle на 0 :
REG ADD HKLM\SOFTWARE\Microsoft\Windows\CurrentVersion\Policies\System\CredSSP\Parameters /v AllowEncryptionOracle /t REG_DWORD /d 0
- (Не рекомендуется) Временный способ 2. Можно отключить проверку подлинности на уровне сети (NLA) на стороне RDP сервера (описано ниже).
- (Рекомендованный способ) Самый правильный способ решения проблемы – установить последние кумулятивные обновлений безопасности Windows на удаленном компьютере/сервере, к которому вы подключаетесь по RDP. Скорее всего этот компьютер был недавно развернут из старого образа, или на нем отключено служба обновлений Windows. Проверьте последнюю дату установки обновлений Windows с помощью модуля PSWindowsUpdate или командой:

Отключить проверку подлинности уровня сети (NLA) для RDP в Windows
Если на стороне RDP сервера, которому вы подключаетесь, включен NLA, это означает что для преаутентификации RDP пользователей используется протокол CredSPP.
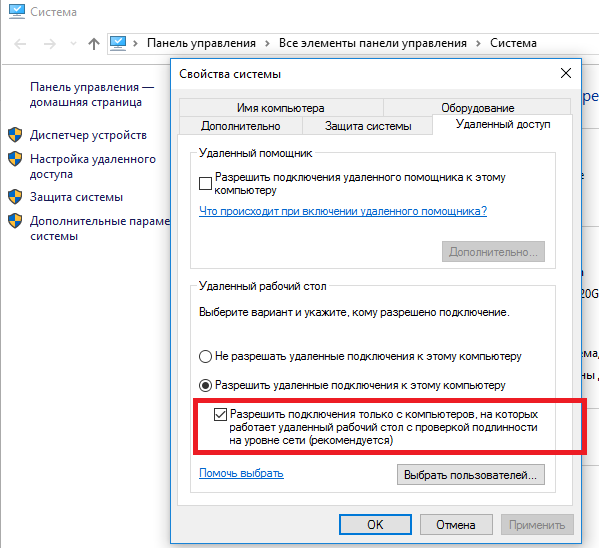
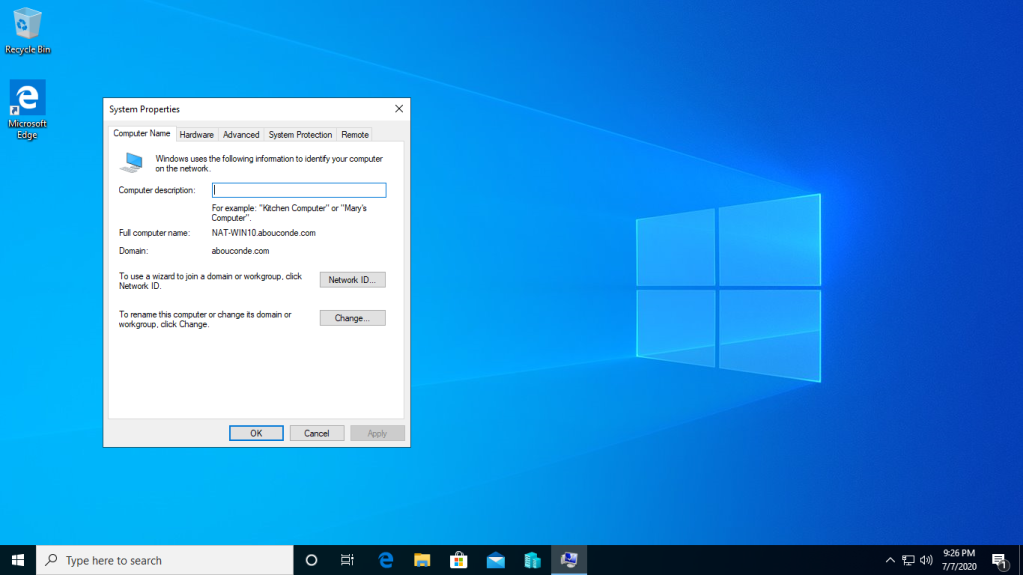
Вы можете отключить Network Level Authentication в свойствах системы (SystemPropertiesRemote.exe) на вкладке Удаленный доступ (Remote), сняв галку «Разрешить подключения только с компьютеров, на которых работает удаленный рабочий стол с проверкой подлинности на уровне сети / Allow connection only from computers running Remote Desktop with Network Level Authentication (recommended)».
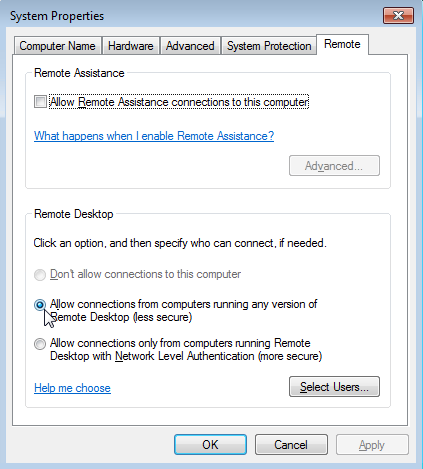
В Windows 7 эта опция называется по-другому. На вкладке Удаленный доступ нужно выбрать опцию «Разрешить подключения от компьютеров с любой версией удаленного рабочего стола (опасный) / Allow connections from computers running any version of Remote Desktop (less secure)».
Также можно отключить проверку подлинности на уровне сети (NLA) с помощью редактора локальной групповой политики.
Для этого перейдите в разделе Конфигурация компьютера –> Административные шаблоны –> Компоненты Windows –> Службы удаленных рабочих столов – Узел сеансов удаленных рабочих столов –> Безопасность (Computer Configuration –> Administrative Templates –> Windows Components –> Remote Desktop Services – Remote Desktop Session Host –> Security), отключите политику Требовать проверку подлинности пользователя для удаленных подключений путем проверки подлинности на уровне сети (Require user authentication for remote connections by using Network Level Authentication).

Также нужно в политике «Требовать использования специального уровня безопасности для удаленных подключений по протоколу RDP» (Require use of specific security layer for remote (RDP) connections) выбрать уровень безопасности (Security Layer) — RDP.
Для применения новых настроек RDP нужно обновить настройки групповых политик (
gpupdate /force
) или перезагрузить компьютер. После этого вы должны успешно подключиться к удаленному рабочему столу сервера.
This file contains hidden or bidirectional Unicode text that may be interpreted or compiled differently than what appears below. To review, open the file in an editor that reveals hidden Unicode characters.
Learn more about bidirectional Unicode characters
| Sometimes you try to open a remote desktop connection to a machine only to get an error message that «the password has expired». | |
| If the remote machine does not enforce NLA (Network Level Authentication), it is still possible to start a remote desktop session by disabling NLA on the client (currenlty not possible from the menu on my remote desktop client v.6.3.96000 that came with windows 8.1). | |
| Add the following setting to your .rdp file («C:\Users\<User>\Documents\Default.rdp» if you aren’t using a specific one). | |
| enablecredsspsupport:i:0 | |
| Optionally you might need to specify | |
| authentication level:i:0 |
This guide describes how to disable Network Level Authentication on various versions Windows Server with or without RD Session Host Role.
Windows 10 or Windows Server 2016 and Windows 8 or Windows Server 2012 without RD Session Host Role
Note: These steps do not apply to Windows Server 2012 and 2016 with the RD Session host role.
-
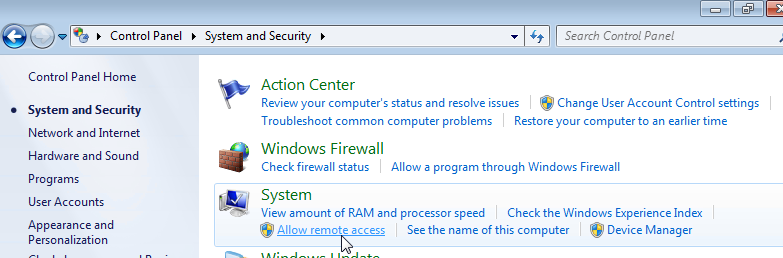
Open the Control Panel. Ensure that the control panel is showing items by Category. Click on System and Security and under System click on Allow remote access.

-
Under the Remote Desktop group un-tick the checkbox Allow connections only from computers running Remote Desktop with Network Level Authentication (recommended).
- Click OK.


Windows Vista or Windows 7 and Windows Server 2008 or Windows Server 2008 R2 without RD Session Host Role.
Note: These steps do not apply to Windows 2008 and Windows 2008 R2 with the RD Session host role.
-
Open the Control Panel. Ensure that the Control Panel is showing items by Category (i.e. not in Classic View). Click on System and Security and under System click on Allow remote access
-
Under the Remote Desktop group choose Allow connections from computers running any version of Remote Desktop (less secure).
- Click OK.
Windows Server 2016 and Windows Server 2012 with RD Session Host role
- On the RD Session Host server, open the Server Manager.
-
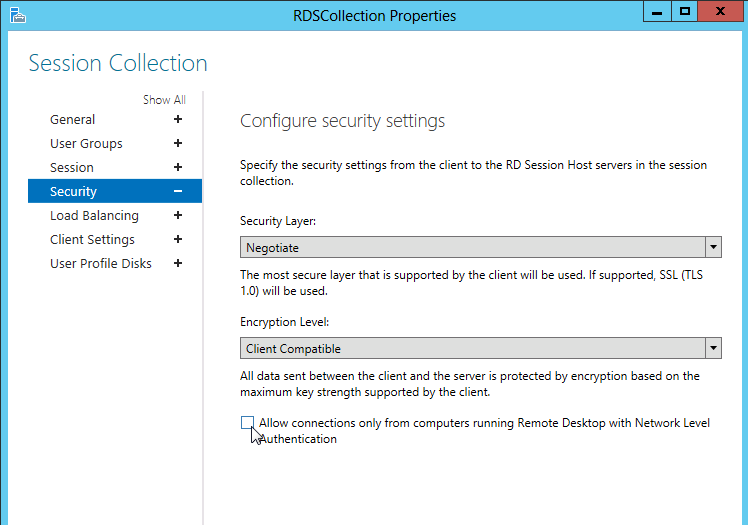
Click on Remote Desktop Services, then under Collections click on the name of the session collection name that you want to modify. Click on Tasks and select Edit Properties.
-
Under the Security tab un-tick the option Allow connections only from computers running Remote Desktop with Network Level Authentication. (For maximum compatibility ensure that Security Layer is set to Negotiate).
- If the Allow connections only from computers running Remote Desktop with Network Level Authentication check box is selected and is not enabled, the Require user authentication for remote connections by using Network Level Authentication Group Policy setting has been enabled and has been applied to the RD Session Host server.
- Click OK.

Windows 2008 and Windows 2008 R2 with RD Session Host Role
- On the RD Session Host server, open Remote Desktop Session Host Configuration. To open Remote Desktop Session Host Configuration, click Start, point to Administrative Tools, point to Remote Desktop Services, and then click Remote Desktop Session Host Configuration.
- Under Connections, right-click the name of the connection, and then click Properties.
-
In the General tab, un-tick the Allow connections only from computers running Remote Desktop with Network Level Authentication check box. (For maximum compatibility ensure that Security Layers are set to Negotiate).
- If the Allow connections only from computers running Remote Desktop with Network Level Authentication check box is selected and is not enabled, the Require user authentication for remote connections by using Network Level Authentication Group Policy setting has been enabled and has been applied to the RD Session Host server.
- Click OK.

Using Group Policies
Configure policies on Terminal Server:
-
Open gpedit.msc applet.
-
Navigate to Computer Configuration -> Administrative Templates -> Windows Components -> Remote Desktop Services -> Remote Desktop Session Host -> Security.
- Enable Require use of specific security layer for remote (RDP) connections and select RDP as Security Layer.
- Disable Require user authentication for remote connections by using Network Level Authentication policy.
- Reboot Terminal server.
-

The remote computer that you are trying to connect to requires network level authentication (NLA). If you are an administrator on the remote computer, you can disable NLA by using the options on the Remote tab of the System Properties dialog box.
Press Windows + R, type sysdm.cpl and press Enter. You will be in the systems properties.
Click on the Remote tab and uncheck “Allow connections only from computers running Remote Desktop with Network Level Authentication (recommended)”.

Press Apply to save to changes and exit. Now try logging into the remote computer again and check if the problem is solved.
When you connect remotely using Remote Desktop to any Windows computer. It appears even when Network Level Authentication (or NLA) is enabled on the computer.

In this article, we will show you some ways to fix the above problem
First access your VPS through the Console.
Solution 1. Disabling NLA using Registry
Step 1. Press WIN + R and then type in “regedit” to open the Registry Editor.
Step 2. Navigate here: HKEY_LOCAL_MACHINE > SYSTEM > ControlSet001 > Control > Terminal Server > WinStations > RDP-Tcp. On the right pane, find SecurityLayer and UserAuthentication.

Step 3. First double-click SecurityLayer and set its value to 0. Then repeat the same step to UserAuthentication.


Restart your server then try again,
Solution 2. Disabling NLA using Group Policy Editor
Step 1. Press Win + R and then type in “gpedit.msc” to open the Local Group Policy Editor.

Step 2. Navigate here: Computer configuration > Administrative Templates > Windows Components > Remote Desktop Services > Remote Desktop Session Host > Security. On the right pane, find and double-click Require user authentication for remote connections by using Network Level Authentication.

Step 3. Then set it to Disabled.

Restart your server then try again.
Solution 3. Disabling NLA using Properties
This way you would do it on your computer.
Step 1. Press Win + R to invoke the Run dialog box. Then type in “sysdm.cpl” and hit OK to open System Properties.
Step 2. Switch to the Remote tab and then uncheck Allow connections only from computers running Remote Desktop with Network Level Authentication (recommended).

Conclusion
In ours case after performing the above steps, we did not see the error again.
Hopefully this article will be useful for you. Good luck !