
Протокол TCP/IP версии 6 (IPv6) включен по умолчанию в актуальных версиях Windows, при этом редко используется и, в некоторых случаях, может приводить к проблемам с подключением к Интернету или ресурсам в локальной сети. Иногда отключение протокола позволяет решить такого рода проблемы.
В этой инструкции подробно о способах отключить IPv6 в Windows 11, Windows 10 и предыдущих версиях системы: с помощью настроек сетевых соединений, в редакторе реестра или командной строке и PowerShell.
Отключение IPv6 в свойствах сетевого подключения
Стандартный способ, одинаково работающий в Windows 11, 10, 8.1 и 7 — использование свойств сетевого подключения.
Шаги для отключения протокола IPv6 в свойствах подключения будут следующими:
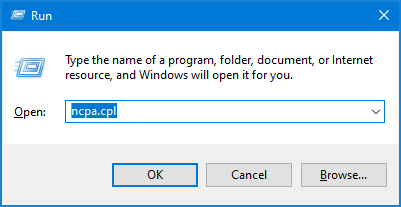
- Нажмите клавиши Win+R на клавиатуре, а в Windows 11 или 10 можно нажать правой кнопкой мыши по кнопке «Пуск» и выбрать пункт «Выполнить». Введите команду ncpa.cpl и нажмите Enter.

- Нажмите правой кнопкой мыши по подключению, для которого нужно отключить IPv6 — вашему Интернет-соединению или подключению по локальной сети, выберите пункт «Свойства».

- Снимите отметку с компонента «IP версии 6 (TCP/IPv6)» и нажмите кнопку «Ок».


Готово, протокол IPv6 для выбранного подключения больше не задействован. При необходимости повторите действие для других подключений.
Командная строка
Вы можете полностью отключить IPv6 на компьютере для всех подключений с помощью команды командной строки. По сути, всё что она делает — это вносит соответствующие изменения в параметры протокола в реестре Windows:
- Запустите командную строку от имени администратора (как это сделать).
- Введите команду
reg add "HKLM\SYSTEM\CurrentControlSet\Services\Tcpip6\Parameters" /v DisabledComponents /t REG_DWORD /d 255 /f
- Перезагрузите компьютер.
Если в дальнейшем вам потребуется откатить эти изменения, используйте команду
reg delete "HKLM\SYSTEM\CurrentControlSet\Services\Tcpip6\Parameters" /v DisabledComponents /f
Ещё один вариант полного отключения IPv6 в командной строке — набор следующих команд:
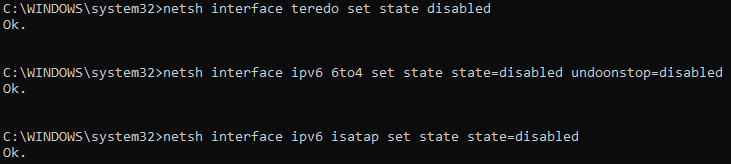
netsh interface teredo set state disabled
netsh interface ipv6 6to4 set state state=disabled undoonstop=disabled
netsh interface ipv6 isatap set state state=disabled
Отключение IPv6 в Windows PowerShell (Терминале Windows)
Ещё одна возможность — использование Windows PowerShell и имеющиеся команды для настройки сетевых адаптеров:
- Запустите PowerShell от имени администратора или Терминал Windows от имени администратора. В Windows 11 и Windows 10 это проще всего сделать с помощью контекстного меню кнопки «Пуск».
- Введите команду
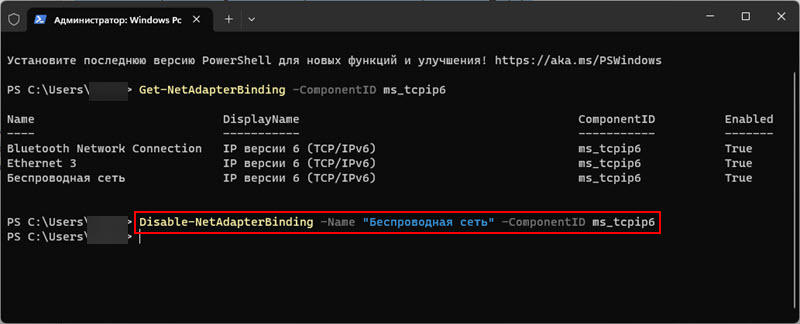
Get-NetAdapterBinding -ComponentID ms_tcpip6
и нажмите В результате вы увидите список имен (в столбце Name) подключений с включенным IPv6.

- Для отключения IPv6 для выбранного подключения, используйте следующую команду, изменив имя на нужное
Disable-NetAdapterBinding -Name "ИМЯ" -ComponentID ms_tcpip6

- Чтобы отключить IPv6 для всех подключений, вместо имени используйте символ «*» (звёздочка).


После выполнения указанных команд IPv6 будет отключен.
Параметры TCP/IPv6 в реестре
Первый способ с командной строкой вносил изменения в реестр для отключения IPv6, сделать это можно и вручную с помощью редактора реестра:
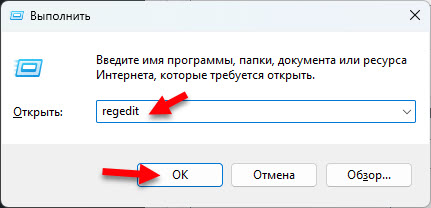
- Нажмите клавиши Win+R на клавиатуре, введите regedit и нажмите Enter — это откроет редактор реестра.
- Перейдите к разделу
HKEY_LOCAL_MACHINE\SYSTEM\CurrentControlSet\Services\Tcpip6\Parameters
- Нажмите правой кнопкой мыши в правой панели редактора реестра и создайте новый параметр DWORD (32-бит, даже для 64-бит Windows) и задайте имя DisabledComponents для него.
- Дважды нажмите по параметру и задайте значение — 255 в десятичной системе счисления или FF в шестнадцатеричной.

- Подтвердите изменения, закройте редактор реестра и перезагрузите компьютер — IPv6 будет отключен для всех соединений.

Упомянутый параметр DisabledComponents может иметь другие значения:
- Десятичное 32, шестнадцатеричное 20 — предпочитать IPv4 вместо IPv6
- Десятичное 16, шестнадцатеричное 10 — отключить IPv6 для всех нетуннельных интерфейсов
- Десятичное 1, шестнадцатеричное 1 — отключить IPv6 для всех туннельных интерфейсов
- Десятичное 17, шестнадцатеричное 11 — отключить IPv6 на всех интерфейсах, кроме петлевых
Дополнительная информация по настройке IPv6 для системных администраторов доступна на официальном сайте Майкрософт.
7769
В этой статье я покажу несколько простых способов, которые помогут вам отключить протокол IPv6 для беспроводного (Wi-Fi) или проводного (Ethernet) подключения в Windows 11 и Windows 10.
Несмотря на то, что протокол IPv6 существует уже достаточно долго, поддерживается многими интернет-провайдерами и роутерами, и имеет ряд преимуществ (лучшая безопасность, эффективность, контроль), многие по прежнему используют IPv4. А так как в Windows протокол IPv6 всегда включен по умолчанию, иногда возникает необходимость отключить его. В основном это одна из рекомендаций при решении каких-то проблем с подключением к интернету. Многих, например, пугает статус IPv6 без доступа к сети в свойствах подключения.
Отключение IPv6 через Сетевые подключения
Этот способ универсальный, подойдет как для Windows 11, так и для Windows 10. Все шаги будут одинаковые.
- Нажмите на клавиатуре сочетание клавиш Win+R. Откроется окно «Выполнить». Введите в нем команду ncpa.cpl (можете скопировать ее и вставить) и нажмите Ok.
- Откроется окно «Сетевые подключения». Нажмите правой кнопкой мыши на тот адаптер, для которого вы хотите отключить IPv6 и выберите Свойства. Ethernet – это проводное подключение (сетевая карта), а Беспроводная сеть – это Wi-Fi.

- В новом окне нужно убрать галочку возле пункта IP версии 6 (TCP/IPv6).
Нажмите на кнопку Ok.


Все готово, протокол IPv6 отключен для данного сетевого адаптера. Чтобы включить его обратно, просто установите галочку возле соответствующего пункта и нажмите Ok.
Через командную строку
- Запустите командную строку от имени администратора. Это можно сделать через поиск.

- В командной строке по очереди выполните эти команды:
netsh interface teredo set state disabled
netsh interface ipv6 6to4 set state state=disabled undoonstop=disabled
netsh interface ipv6 isatap set state state=disabled
Скопируйте команду, вставьте ее в командную строку и нажмите Enter.

- Перезагрузите компьютер.


Как отключить протокол IPv6 в терминале Windows 11, 10?
- Чтобы открыть Windows PowerShell можно нажать правой кнопкой мыши на меню Пуск и выбрать Терминал (Администратор).
- Выполните команду:
Get-NetAdapterBinding -ComponentID ms_tcpip6
Появится список подключений, для которых включен протокол IPv6. Нам понадобится имя (Name) сетевого адаптера.

- Дальше для отключения IPv6 мы будем использовать эту команду:
Disable-NetAdapterBinding -Name «NAME» -ComponentID ms_tcpip6
В этой команде вместо «NAME» нужно указать имя подключения (из списка, полученного выше), для которого вы хотите отключить протокол IPv6. Я, например, выполнил отключение для «Беспроводная сеть».

Чтобы выполнить отключение протокола для всех соединений, вместо имени введите «*».
- Для проверки вы может снова выполнить команду
Get-NetAdapterBinding -ComponentID ms_tcpip6
Если IPv6 отключился, то напротив данного подключения в последнем столбце Enabled будет написано False.


Изменение настоек IPv6 в редакторе реестра
Редактор реестра в Windows так же можно использовать для отключения сетевого протокола IPv6.
- Для запуска редактора реестра я рекомендую использовать окно Выполнить (открыть можно сочетанием клавиш Win+R) и команду regedit.
- Перейдите в эту ветку реестра: HKEY_Local_Machine\SYSTEM\CurrentControlSet\services\TCPIP6\Parameters
- Нужно создать новый параметр. Нажмите правой кнопкой на пустую область и выберите Создать – Параметр DWORD (32-разрядное). Задайте ему имя DisabledComponents.

- Откройте свойства этого параметра (двойной клик) и установите значение FF. Или 255 выбрав систему исчисления «Десятичная». Нажмите Ok.

Это способ отключает IPv6 для всех подключений.
- Перезагрузите компьютер.


На этом все. Надеюсь, моя инструкция вам пригодилась.
Both Windows 11 & 10 support IPv6 protocol by default. That means, if your ISP provides connectivity over IPv6, you don’t have to deal with the hassle of extra configuration. However, if you are primarily using IPv4, having IPv6 enabled in the background can sometimes cause problems. For example, some VPN connections, especially those provided in work environments are notorious when it comes to working alongside the IPv6. If you wish, you can disable IPv6 on Windows in several different ways. In this tutorial, we’ll show you four methods. Follow the one you like. Let’s get started.
Disabling IPv6 in Windows Using the Settings App
Windows 11 users can completely disable the IPv6 feature using the Settings app.
Press Windows key + I to open Settings.
Select Network & Internet on the sidebar of the Settings window.
Click on the Advanced Network Settings option on the right panel of the Network & Internet page.

In the Advanced Network Settings, you’ll find a list of your network adapters. Click on your network adapter and then click the Edit button.

Under the Networking tab, scroll down the list, uncheck the Internet Protocol Version 6 (TCP/IPv6), and click OK.
Close all open windows and restart your computer.
Turning Off IPv6 through the Control Panel
As an alternative method, you can also use the Control Panel to get rid of IPv6. The thing about this method is that it works in all the previous versions like Windows 10, 8, and 7.
Open Control Panel by searching for it in the Start menu.
In the Control Panel window, select Large Icons from the View by dropdown on the top-right corner.
Click on Networking and Sharing Center.

Click on the Change adapter settings option on the sidebar.

Right-click on the network adapter you want to configure and select Properties.

In the Networking tab, scroll down the list, uncheck the Internet Protocol Version 6 (TCP/IPv6), and click OK.
Close the Control Panel window and restart your computer.
Disabling IPv6 Using Command Line Tools
For command line geeks, Command Prompt and PowerShell offer a quick way to disable IPv6 on Windows 11, 10, 8, and 7. The best thing is that this method applies the changes to all adapters at once. If needed, you can even create custom scripts with the commands given below to deploy it on multiple computers at once.
Using Command Prompt:
Press the Windows logo key on your keyboard to open the Start menu.
Search for Command Prompt, right-click on the result, and select Run as Administrator.

Enter the following commands one after another in the Command Prompt window and press Enter.
netsh interface teredo set state disabled
- This command disables Teredo, a protocol that allows communication over IPv6 even when the network is using IPv4.

netsh interface ipv6 6to4 set state state=disabled undoonstop=disabled
- This command turns off the 6to4 functionality, another method for transmitting IPv6 packets over an IPv4 network.

netsh interface ipv6 isatap set state state=disabled
- This command disables ISATAP (Intra-Site Automatic Tunnel Addressing Protocol), which is used for connecting IPv6 hosts/networks over an IPv4 network.

Close the Command Prompt window and restart the computer.
That’s it.
Using PowerShell:
Open the Start menu.
Type PowerShell, right-click on the result, and select Run as administrator.

In the PowerShell window, run the following command to get the names of all the network adapters with IPv6 enabled.
Get-NetAdapterBinding -ComponentID ms_tcpip6

To display IPv6 on a specific network adapter, run the below command while replacing NetAdapterName with the actual network adapter name you got with the first command.
Disable-NetAdapterBinding -Name "NetAdapterName" -ComponentID ms_tcpip6

To turn off IPv6 on all network adapters, run the following PowerShell command.
Disable-NetAdapterBinding -Name "*" -ComponentID ms_tcpip6

Once done, close the PowerShell window and restart your computer.
That’s it.
And there you have it. It’s that simple to completely turn off IPv6 on Windows 11 & 10.
When introduced, IPv6 was set to eliminate the world’s insatiable appetite for more IPs. But IPv6 adoption has been slow, and some choose to disable IPv6 on Windows for troubleshooting purposes. Let’s learn how.
In this tutorial, you’ll learn how to disable IPv6 through various methods, both via GUI and command-line terminal.
Ready to take the leap? Let’s go!
Prerequisites
This tutorial comprises hands-on demonstrations. If you’d like to follow along, be sure you have the following:
- This tutorial uses Windows 10 build 20H2, but any build of Windows 10 will work.
- Log into Windows as a user with administrative access.
- The PowerShell example uses the Windows 10 built-in Windows PowerShell environment.
Disabling IPv6 via the GUI
First, you need to disable IPv6 via the Windows 10 Network Connections app. To do so, you must access your network adapter’s properties to disable IPv6.
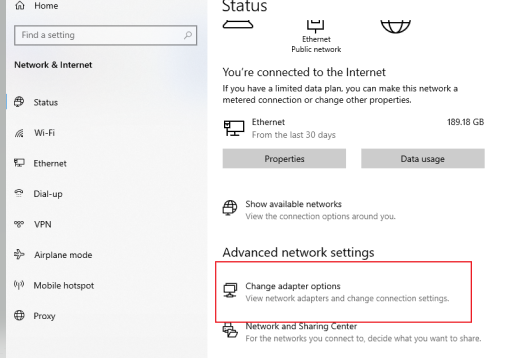
1. Right click on the network / Wi-Fi icon at the system tray and choose Open Network & Internet Settings to access your network settings.
2. Under Advanced Network Settings, select Change Adapter Options to see all the adapters (network cards) used on your computer.
3. Now, right-click your Ethernet adapter and select Properties. Doing so opens the “Properties” window for the network card you selected.
4. Find the Internet Protocol v6 (TCP/IPv6) option from the list under the Networking tab. If the option is checked, click on the check box to disable it, as shown below, then click on OK.
After disabling IPv6, you’ll notice no change in your computer’s internet connectivity since IPv4 adapter settings are configured by default.
Disabling IPv6 via PowerShell
Perhaps you prefer a command-line environment instead of a GUI when managing Windows network configuration. If so, run the following commands in PowerShell to disable IPv6 network adapters.
1. Open PowerShell as administrator, and run the Get-NetAdapterBinding command below to view the list of bindings for network adapters, their component ID, and status. Additionally, filter all adapters where the ComponentID equals the ms_tcpip6 with the Where-Object command.
Get-NetAdapterBinding | Where-Object ComponentID -EQ 'ms_tcpip6'In the returned values, note the DisplayName and ComponentID of the adapter that you want to disable; you’ll need them in the next step. In the example below, the Ethernet adapter is chosen.

2. Run the Disable-NetAdapterBinding command below to disable your network adapter.
Below, the Ethernet adapter with the ms_tcpip6 component is disabled, but replace the name and component ID with your intended target. If successful, no output is shown.
Disable-NetAdapterBinding -Name 'Ethernet' -ComponentID 'ms_tcpip6'
3. Finally, run the Get-NetAdapterBinding command below to verify if IPv6 for your network adapter is now disabled.
You can see below, the Ethernet adapter is shown, but replace it with your intended target.
Get-NetAdapterBinding -Name 'Ethernet' -ComponentID 'ms_tcpip6'
Perhaps you have no plans to keep IPv6 enable on any of your network adapters. If so, run this command instead
Disable-NetAdapterBinding -Name "*" -ComponentID ms_tcpip6to go nuclear and disable IPv6 on all network adapters.
Disabling IPv6 for all Network Adapters via Command Prompt
As an alternative to PowerShell, you can turn to the command prompt instead. The command prompt also lets you disable the IPv6 of your network adapters by running a different set of commands than PowerShell.
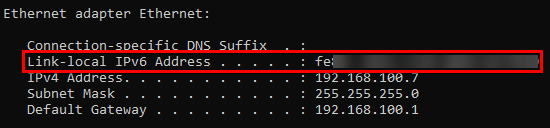
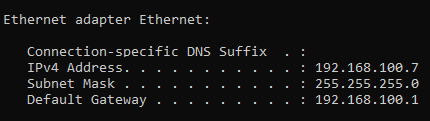
1. Open the command prompt as administrator, and run the ipconfig command. The ipconfig command displays all current TCP/IP network configuration values, so you can verify if IPv6 is enabled on your network adapter.
Below, you can see that IPv6 is enabled for the ethernet adapter.
2. Run the series of commands below to disable all IPv6 connectivity for every network interface.
The preceding
::before text indicate comments, just in case you copy-paste the commands into the terminal below.
:: Disables the Teredo tunneling. Teredo is a transition technology that gives
:: full IPv6 connectivity and host-to-host automatic tunneling
:: for unicast IPv6 traffic.
netsh interface teredo set state disabled

:: Disables the 6to4 tunnels that support communication with IPv6 internet
netsh interface ipv6 6to4 set state state=disabled undoonstop=disabled

:: Disables all IPv6 transition technologies
netsh interface ipv6 isatap set state state=disabled
If successful, you’ll get an Ok message after running each command, as shown below.
3. Finally, rerun the ipconfig command to see verify if you’ve successfully disabled IPv6.
Notice below that IPv6 is not listed, which indicates IPv6 is now disabled.
Conclusion
Throughout this tutorial, you’ve learned what IPv6 is and how to disable it in Windows. You’ve also learned commands that disable IPv6 both on command prompt and PowerShell.
Now would you include disabling IPv6 on your network troubleshooting routine?
August 20, 2020 updated by
Leave a reply »
IPv6 causes connectivity issues? IPv6 is the latest version of the Internet Protocol, which is supposed to replace IPv4. However, most websites or softwares don’t work with IPv6 yet. It is common for IT administrators to disable IPv6 to fix some unknown, networking-related issue. In this tutorial we’ll show you 3 easy methods to disable IPv6 in Windows 10 / 8 / 7.
Method 1: Disable IPv6 in Network Adapter Properties
- Press the Windows logo key + R to open the Run dialog. Type ncpa.cpl and hit Enter.

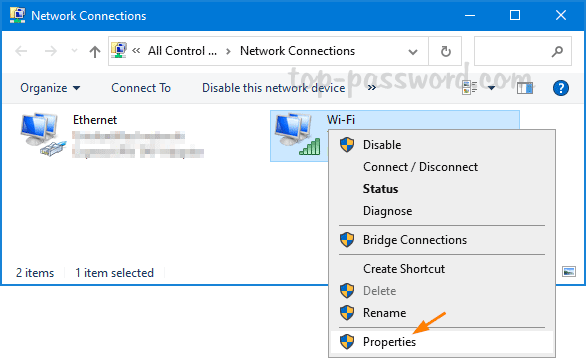
- It will open the Network Connections window. Right-click the network adapter you want to disable IPv6 on, and then select Properties.

- In order to disable IPv6, uncheck the box next to Internet Protocol Version 6 (TCP/IPv6). Click OK.
- You can use the same method to disable IPv6 for other network adapters.
Method 2: Disable IPv6 Using PowerShell
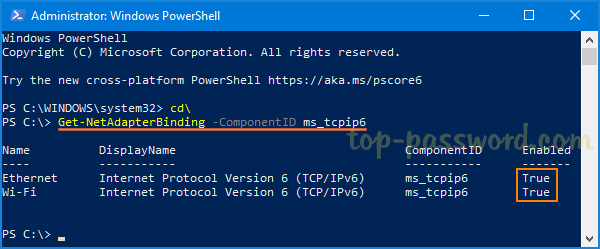
- First, you need to open Windows PowerShell as administrator. Next, run the following command to check the status of IPv6 for all network adapters available in your computer.
Get-NetAdapterBinding -ComponentID ms_tcpip6
In my example, “Wi-Fi” is the name of the network adapter I want to disable IPv6 on.
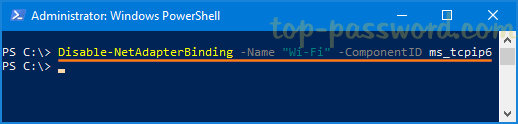
- To disable IPv6 on a specific network adapter only, type the following command. Replace “Wi-Fi” with the name of your network adapter card.
Disable-NetAdapterBinding -Name "Wi-Fi" -ComponentID ms_tcpip6
You can use the wildcard * to disable IPv6 on all network adapters, instead of disabling them one by one.
Disable-NetAdapterBinding -Name "*" -ComponentID ms_tcpip6 - Whenever you need to enable IPv6 again, just run this command:
Enable-NetAdapterBinding -name * -ComponentID ms_tcpip6
Method 3: Disable IPv6 Using Command Prompt
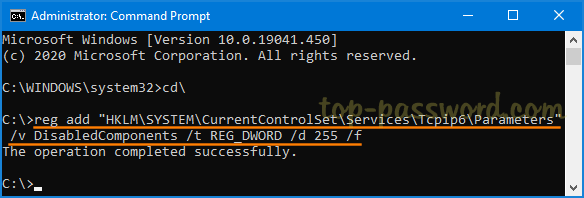
- Open the Command Prompt as administrator, and execute this command to disable IPv6 completely:
reg add "HKLM\SYSTEM\CurrentControlSet\Services\Tcpip6\Parameters" /v DisabledComponents /t REG_DWORD /d 255 /f
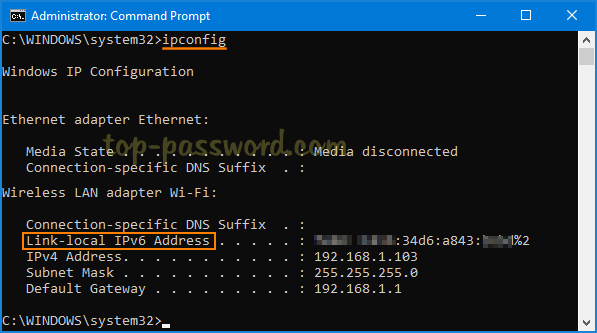
- Restart the computer for changes to take effect. To verify if IPv6 is disabled, run
ipconfig /alland see if the interface shows IPv6 address.
To revert and enable IPv6, you can delete DisabledComponents registry key with this command:
reg delete "HKLM\SYSTEM\CurrentControlSet\Services\Tcpip6\Parameters" /v DisabledComponents /f
That’s all there is to it.
- Previous Post: How to Enable the new Start Menu in Windows 10 version 2004
- Next Post: How to Update Extensions (add-ons) for Microsoft Edge