
Эта статья посвящена основам управления настройками и правилами встроенного Windows Defender Firewall из командной строки PowerShell. Мы рассмотрим, как включать/отключать брандмауэр для различных профилей, создавать, редактировать и удалять правила, экспортировать/импортировать правила Windows Firewall с помощью PowerShell.
Содержание:
- Как включить и отключить Windows Defender Firewall через PowerShell?
- Создать новое правило Windows Firewall
- Изменить правило Windows Firewall с помощью PowerShell
- Включить/отключить правило Windows Defender Firewall
- PowerShell: вывести список активных правил Windows Firewall
Для управления настройками Windows Firewall обычно используется отдельная графическая MMC оснастка
wf.msc
(Control Panel -> System and Security -> Windows Defender Firewall -> Advanced settings). Большинство операций по настройке и управлению параметрами Windows Firewall можно выполнять из командной строки PowerShell. Для этого, начиная с версии Windows PowerShell 5.1, можно использовать встроенный модуль NetSecurity
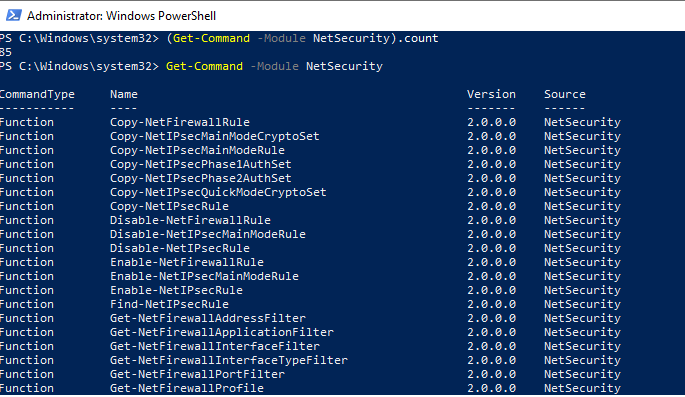
Полный список командетов в модуле NetSecurity можно вывести с помощью команды:
Get-Command -Module NetSecurity
Раньше для управления правилами и настройками Брандмауэра Windows использовалась команда
netsh advfirewall firewall
.
Как включить и отключить Windows Defender Firewall через PowerShell?
По умолчанию Defender Firewall в Windows включен.
Get-NetFirewallProfile | Format-Table Name, Enabled
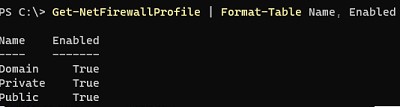
Как вы видите, в Windows Firewall есть три типа сетевых профилей:
- Domain (Доменный) – применяется к компьютерам, включенным в домен Active Directory;
- Private (Частный) – домашние или рабочие сети;
- Public (Общий) – общедоступные сети.
В настройках профилей по-умолчанию разрешены все исходящие подключения и блокируется входящие (кроме разрешенных).
Информация о типах сетей хранится службой Network Location Awareness (NLA) в базе данных. Вы можете изменить профиль сети в Windows, если он определился некорректно.
Каждый профиль может отличаться используемым набором правил файервола. По умолчанию все сетевые интерфейсы компьютера защищены фаейрволом и к ним применяются все три типа профилей.
Чтобы полностью отключить Firewall в Windows, выполните команду:
Set-NetFirewallProfile -All -Enabled False
Либо укажите конкретный профиль вместо All:
Set-NetFirewallProfile -Profile Public -Enabled False
Чтобы включить файервол для всех трех сетевых профилей, используется команда:
Set-NetFirewallProfile -All -Enabled True
Вывести тип профиля, который применяется к сетевому подключению:
Get-NetConnectionProfile
В этом примере к сетевому подключению Ethernet0 применяется доменный профиль (DomainAuthenticated).
Вы можете управлять правилами Windows Firewall на удаленных компьютерах, если на них настроен PowerShell Remoting (WinRM). В этом примере с помощью командлета Invoke-Command мы отключим файервол на удаленных компьютерах из списка:
$computers = @('PC01', 'PC02', 'PC03')
Invoke-Command -ComputerName $computers {Set-NetFirewallProfile -All -Enabled False}
Можно изменить действие по-умолчнию для профиля Public и заблокировать все входящие подключения.
Set-NetFirewallProfile –Name Public –DefaultInboundAction Block
Текущие настройки профиля можно вывести так:
Get-NetFirewallProfile -Name Public

Если вы управляете настройками Windows Firewall через GPO, вы можете вывести текущие результирующие настройки профилей так:
Get-NetFirewallProfile -policystore activestore
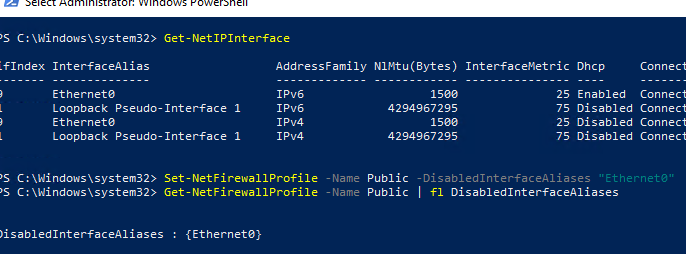
Проверим, что все параметры брандмауэра применяются ко всем сетевым интерфейса компьютера.
Get-NetFirewallProfile -Name Public | fl DisabledInterfaceAliases
Если все интерфейсы защищены, команда должна вернуть:
DisabledInterfaceAliases : {NotConfigured}

Можно отключить определенный профиль для интерфейса (вывести список имен интерфейсов можно с помощью командлета Get-NetIPInterface).
Set-NetFirewallProfile -Name Public -DisabledInterfaceAliases "Ethernet0"
Как вы видите, теперь профиль Public не применяется к интерфейсу Ethernet0:
DisabledInterfaceAliases : {Ethernet0}
С помощью командлета
Set-NetFirewallProfile
вы можете изменить параметры профиля (действие по-умолчанию, журналирование, путь и размер лог файла, настройки оповещений и т.д.).
Вы можете настроить параметры логирования сетевых подключений на уровне каждого профиля. По умолчанию журналы Windows Firewall хранятся в каталоге
%systemroot%\system32\LogFiles\Firewall
, размер файла – 4 Мб. Вы можете изменить включить журналирование подключений и увеличить максимальный размер файла:
Set-NetFireWallProfile -Profile Domain -LogBlocked True -LogMaxSize 20000 -LogFileName ‘%systemroot%\system32\LogFiles\Firewall\pfirewall.log’
Создать новое правило Windows Firewall
Для управления правилами брандмауэра используются 9 командлетов:
- New-NetFirewallRule
- Copy-NetFirewallRule
- Disable-NetFirewallRule
- Enable-NetFirewallRule
- Get-NetFirewallRule
- Remove-NetFirewallRule
- Rename-NetFirewallRule
- Set-NetFirewallRule
- Show-NetFirewallRule
Рассмотрим несколько простых примеров открытия портов в Windows Firewall.
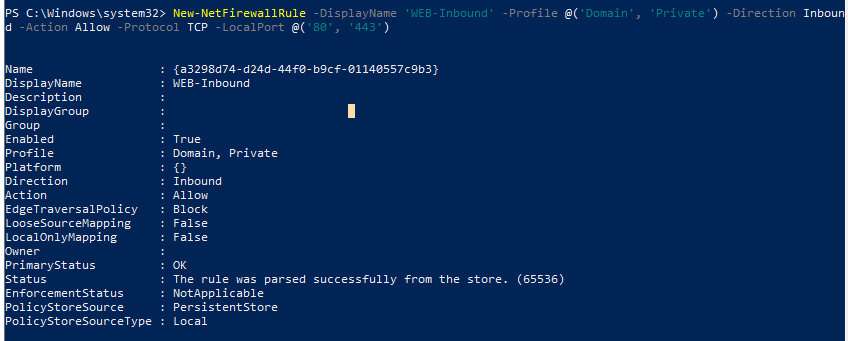
Например, вы хотите разрешить входящие TCP подключения на порты 80 и 443 для профилей Domain и Private. Воспользуйтесь такой командой:
New-NetFirewallRule -DisplayName 'WEB-Inbound' -Profile @('Domain', 'Private') -Direction Inbound -Action Allow -Protocol TCP -LocalPort @('80', '443')
Вы можете разрешить или заблокировать трафик для конкретной программы. Например, вы хотите заблокировать исходящие соединения для FireFox:
New-NetFirewallRule -Program “C:\Program Files (x86)\Mozilla Firefox\firefox.exe” -Action Block -Profile Domain, Private -DisplayName “Block Firefox” -Description “Block Firefox” -Direction Outbound
Разрешим входящее RDP подключение по стандартному порту TCP\3389 только с одного IP адреса:
New-NetFirewallRule -DisplayName "AllowRDP" –RemoteAddress 192.168.1.55 -Direction Inbound -Protocol TCP –LocalPort 3389 -Action Allow
Чтобы разрешить ICMP ping для адресов из указанных диапазонов IP адресов и подсети, используйте команды:
$ips = @("192.168.1.50-192.168.1.60", "192.165.2.22-192.168.2.200", ”10.10.0.0/16”)
New-NetFirewallRule -DisplayName "Allow inbound ICMPv4" -Direction Inbound -Protocol ICMPv4 -IcmpType 8 -RemoteAddress $ips -Action Allow
New-NetFirewallRule -DisplayName "Allow inbound ICMPv6" -Direction Inbound -Protocol ICMPv6 -IcmpType 8 -RemoteAddress $ips -Action Allow
Добавить в правило файервола список IP адресов из текстового файла (по одному IP в строке):
$ips=Get-Content C:\temp\ip.txt
Get-NetFirewallrule -DisplayName 'AllowRDP'|Set-NetFirewallRule -RemoteAddress $ips
В предыдущей статье мы показывали как с помощью PowerShell можно заблокировать доступ к сайтам не только по IP адресу, но и по DNS имени домена/сайта.
Разрешить все входящие подключения с указанного IP адреса (добавить адрес в белый список):
$IP = '192.168.1.20'
New-NetFirewallRule -DisplayName "Allow $IP" -Direction Inbound -Action Allow -RemoteAddress $IP
Изменить правило Windows Firewall с помощью PowerShell
Чтобы отредактировать правило брандмауэра, используется командлет Set-NetFirewallRule. Например, вы хотите разрешить входящие подключения с указанного IP адреса для ранее созданного правила:
Get-NetFirewallrule -DisplayName 'WEB-Inbound' | Get-NetFirewallAddressFilter | Set-NetFirewallAddressFilter -RemoteAddress 192.168.1.20
Если нужно добавить в правило файервола несколько IP адресов, используйте такой скрипт:
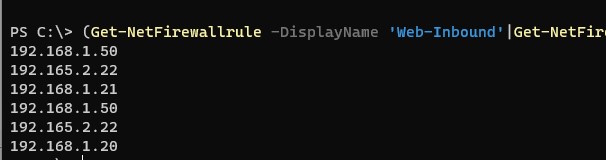
$ips = @("192.168.1.50", "192.165.2.22",”192.168.1.21”)
$current_ips = (Get-NetFirewallRule -DisplayName 'WEB-Inbound'| Get-NetFirewallAddressFilter).RemoteAddress
$current_ips += $ips
Get-NetFirewallrule -DisplayName 'WEB-Inbound'|Set-NetFirewallRule -RemoteAddress $current_ips
Вывести все IP адреса, которые содержатся в правиле брандмауэра:
(Get-NetFirewallrule -DisplayName 'Web-Inbound'|Get-NetFirewallAddressFilter).remoteaddress
Удалить один IP адрес из правила:
$removeip = "192.168.1.21"
$current_ips = (Get-NetFirewallRule -DisplayName 'WEB-Inbound'| Get-NetFirewallAddressFilter).RemoteAddress
$filterIP = $current_ips | Where-Object{ $_ -notin $removeip }
Get-NetFirewallrule -DisplayName 'WEB-Inbound'|Set-NetFirewallRule -RemoteAddress $filterIP
Включить/отключить правило Windows Defender Firewall
Вы можете включать/отключать правила файервола с помощью командлетов Disable-NetFirewallRule и Enable-NetFirewallRule.
Disable-NetFirewallRule –DisplayName 'WEB-Inbound'
Чтобы разрешить ICMP (ping), выполните команду:
Enable-NetFirewallRule -Name FPS-ICMP4-ERQ-In
Чтобы удалить правило брандмауэре используется командлет Remove-NetFirewallRule.
Remove-NetFirewallRule -DisplayName 'WEB-Inbound'
Чтобы сбросить все правила Microsoft Defender Firewall и восстановить настройки по умолчанию, выполните команду:
netsh advfirewall reset
или
(New-Object -ComObject HNetCfg.FwPolicy2).RestoreLocalFirewallDefaults()
Это очистит все пользовательские настройки и правила Microsoft Defender Firewall. В списке правил останутся только стандартные правила сетевого доступа Windows.
Перед сбросом можно экспортировать текущие настройки в файл.
netsh advfirewall export "C:\Backup\firewall-config.wfw"
В дальнейшем вы можете вернуть старые настройки файервола, импортировав файл с правилами:
netsh advfirewall import "C:\Backup\firewall-config.wfw"
PowerShell: вывести список активных правил Windows Firewall
Список активных правил для входящего трафика можно вывести так:
Get-NetFirewallRule | where {($_.enabled -eq $True) -and ($_.Direction -eq "Inbound")} |ft
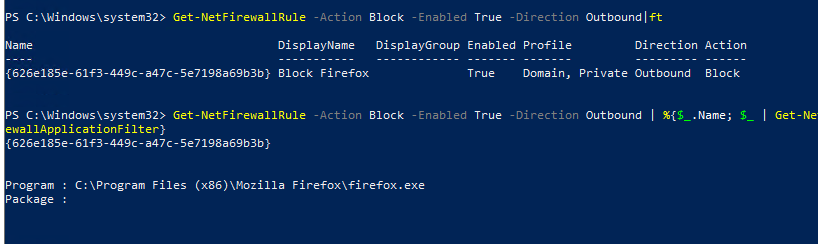
Если, например, нам нужно вывести список блокирующих исходящих правил:
Get-NetFirewallRule -Action Block -Enabled True -Direction Outbound
Если нужно отобразить имя программы в правиле:
Get-NetFirewallRule -Action Block -Enabled True -Direction Outbound | %{$_.Name; $_ | Get-NetFirewallApplicationFilter}
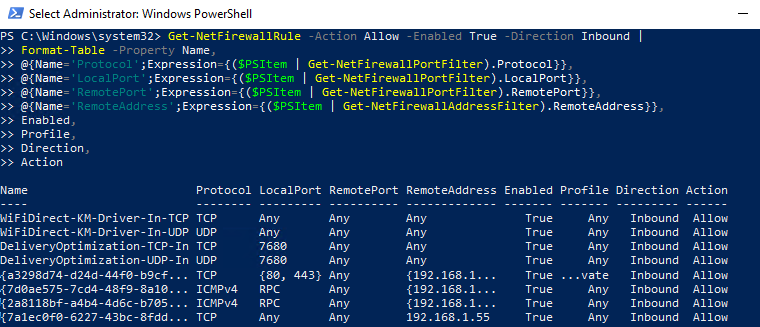
Как вы видите командлет Get-NetFirewallRule не выводит порты сетевые порты и IP адреса для правил брандмауэра. Чтобы вывести всю информацию о разрешенных входящих (исходящих) подключениях в более удобном виде с отображением номеров портов, используйте такой скрипт:
Get-NetFirewallRule -Action Allow -Enabled True -Direction Inbound |
Format-Table -Property Name,
@{Name='Protocol';Expression={($PSItem | Get-NetFirewallPortFilter).Protocol}},
@{Name='LocalPort';Expression={($PSItem | Get-NetFirewallPortFilter).LocalPort}},
@{Name='RemotePort';Expression={($PSItem | Get-NetFirewallPortFilter).RemotePort}},
@{Name='RemoteAddress';Expression={($PSItem | Get-NetFirewallAddressFilter).RemoteAddress}},
Enabled,Profile,Direction,Action
PowerShell предоставляет широкие возможности по управлению правилами Windows Firewall из командной строки. Вы можете автоматически запускать скрипты PowerShell для открытия/закрытия портов при возникновении определенных событий. В следующей статье мы рассмотрим простую систему на базе PowerShell и Windows Firewall для автоматической блокировки IP адресов, с которых выполняется удаленный перебор паролей по RDP на Windows VDS сервере.
To disable the Windows Firewall using PowerShell, you can execute the following command:
Set-NetFirewallProfile -All -Enabled False
Understanding Windows Firewall Functionality
What is Windows Firewall?
Windows Firewall is a critical component of the security framework in Windows operating systems. Functioning as a barrier between your computer and incoming threats from the internet, it regulates incoming and outgoing network traffic based on a set of pre-defined security rules. It helps in blocking unauthorized access while allowing legitimate communication.
The Pros and Cons of Disabling Windows Firewall
When considering whether to disable the firewall, it’s essential to weigh the advantages and disadvantages carefully.
Pros:
- Increased performance: Sometimes, security configurations can impede application performance, especially during testing phases. Temporarily disabling the firewall might enhance speed.
- Ease of testing configurations: Disabling the firewall can help in identifying whether it is the cause of connectivity issues.
Cons:
- Increased vulnerability: Turning off the firewall significantly opens your system up to unauthorized access, malware, and various cyber threats.
- Potential exposure of sensitive information: A disabled firewall can lead to data leakage, especially if you are connected to insecure networks.
PowerShell Disable BitLocker: A Quick Guide
What You Need to Know Before Disabling the Firewall
Requirements
To disable the Windows Firewall using PowerShell, you must have administrative privileges. This means that your user account needs to have sufficient rights to make system-level changes.
Risks and Considerations
Before opting to disable the firewall, it’s imperative to understand that doing so can pose risks, especially on public networks. Instead of completely turning it off, you might want to consider configuring specific rules or authorizing only certain applications. This approach allows more control over which connections are allowed while maintaining a baseline level of protection.
How to Disable a Network Adapter in PowerShell
PowerShell Basics for Firewall Management
How to Access PowerShell
To run PowerShell commands, you need to access it with administrator rights. This can be initiated with the following command:
Start-Process powershell -Verb runAs
This command ensures that PowerShell runs with elevated privileges, allowing you to execute commands that affect system settings.
List Current Firewall Status and Rules
Before disabling the firewall, it’s wise to check its current status. You can do this with:
Get-NetFirewallProfile | Format-Table Name, Enabled
This command displays the status for all firewall profiles—Domain, Private, and Public—so you’ll know what you’re working with.
Understanding Firewall Profiles
Windows Firewall manages different profiles depending on network conditions. Understanding how these profiles work is crucial:
- Domain Profile: Applied when connected to a domain network, typically in a corporate environment.
- Private Profile: Used when connected to a private network, like your home Wi-Fi.
- Public Profile: Engaged when you connect to a public network (e.g., in a coffee shop), offering a higher level of protection.
PowerShell: List Windows Updates Made Easy
Disable Windows Firewall for All Profiles
If you decide that disabling the firewall suits your needs, you can easily do so with the following command:
Set-NetFirewallProfile -All -Enabled False
This command disables the firewall across all profiles. Caution: Doing so will expose your computer to potential threats unless you’ve implemented alternate security measures.
Disable Firewall for Specific Profiles
Alternatively, if you prefer to keep some profiles active, you can disable the firewall only on specific profiles. For example:
Set-NetFirewallProfile -Profile Domain -Enabled False
Set-NetFirewallProfile -Profile Private -Enabled False
Set-NetFirewallProfile -Profile Public -Enabled False
Using this method allows you to selectively manage your firewall settings, providing flexibility in a mixed-security environment.
Verifying Firewall Status After Disabling
Once you’ve made the changes, it’s essential to verify the new status of the firewall with:
Get-NetFirewallProfile | Format-Table Name, Enabled
Interpretation of Output: If the output indicates «False» for the profile(s) you disabled, then your commands were successful.
How to PowerShell Disable AD User Quickly and Easily
Additional Tips and Considerations
Re-enabling the Firewall
If you need to restore your protection later, re-enabling the firewall can be done effortlessly with this command:
Set-NetFirewallProfile -All -Enabled True
It’s important to regularly re-enable the firewall after situations requiring it to be turned off. Always evaluate whether conditions still warrant the firewall being disabled.
Monitoring Firewall and System Security
Monitoring your firewall settings and overall system security is paramount. Regularly check firewall logs and use built-in Windows tools or third-party applications to keep track of unauthorized attempts and other potentially harmful activities.
PowerShell: Disable IPv6 in Just a Few Commands
Conclusion
Knowing how to effectively manage Windows Firewall with PowerShell is a valuable skill for any user or IT professional. While the command `powershell disable windows firewall` expresses a specific intention, it’s crucial to understand the broader implications of this action. Always practice responsible usage and keep your system’s security a top priority.
Set Window Title in PowerShell: A Quick Guide
FAQs
Can I disable the firewall without PowerShell?
Yes, you can disable the firewall via the Control Panel or the Windows Security interface. However, using PowerShell offers more flexibility and can be automated for batch processes.
What if I forget to enable the firewall?
If you forget to reactivate the firewall, your system will remain vulnerable to attacks. Consider using system scheduling to turn it back on automatically or employ notifications to remind yourself.
Are there scripts available for managing the firewall with PowerShell?
Many community contributors share scripts online that can help with automating firewall management tasks. Searching public repositories or forums dedicated to PowerShell can yield useful resources for firewall scripts and best practices.
Брандмауэр Windows 10, он же Windows Firewall – это некий сетевой экран, который берет на себя контроль за тем, какие приложения получают доступ к определенным сетям. Часто-густо брандмауэр Windows является причиной, по которой какое-то приложение не может выйти в сеть или не работает должным образом. Из-за этого многие пользователи задаются резонным вопросом относительно отключения или настройки брандмауэра в Windows 10.
Примечание: все действия, описанные в статье, должны выполняться с учетной записи с правами администратора. В противном случае вам понадобится пароль от таковой.
Предупреждение: мы не рекомендуем перманентно отключать сетевой экран Windows (брандмауэр). Выключайте его только на случай необходимости диагностики проблем в работе определенных приложений или других неполадок.
Как отключить брандмауэр через PowerShell или командную строку
Начнем, пожалуй, с самого простого метода, который займет у вас минимум времени и усилий. Этот способ позволит вам отключить брандмауэр Windows 10 с помощью PowerShell или командной строки. Если хотите, можете воспользоваться другими способами, описанными ниже в этой статье.
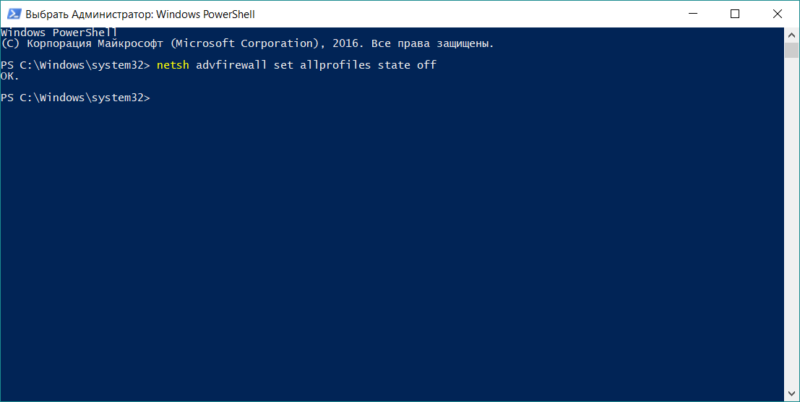
- Нажмите Win + X и выберите Windows PowerShell (Администратор). При желании вы можете использовать Командную строку (тоже от имени администратора), правда с выходом Windows 10 1703 ее найти стало сложнее, поэтому выполнение процедур в инструкциях будет происходить в PowerShell.

- В открывшемся окне введите команду:
netsh advfirewall set allprofiles state off
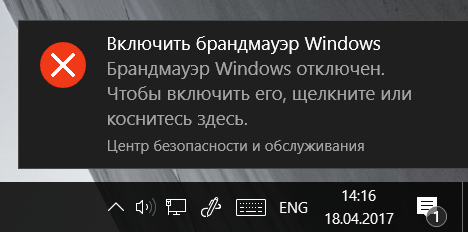
- После этого брандмауэр будет выключен, и вы получите соответствующее уведомление.

- Включить брандмауэр назад можно командой:
netsh advfirewall set allprofiles state on
- Альтернативно, просто нажмите на уведомление в центре уведомлений, и система все вернет назад, как было.
Как отключить брандмауэр Windows 10 через Службы
Брандмауэр Windows – это отдельная служба в операционной системе. Прекратить ее работу можно из раздела настройки служб Windows.
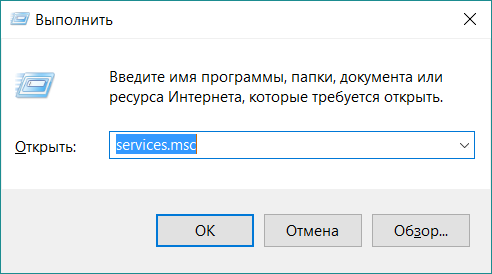
- Нажмите Win + R и введите services.msc. Откроется окно управления службами.

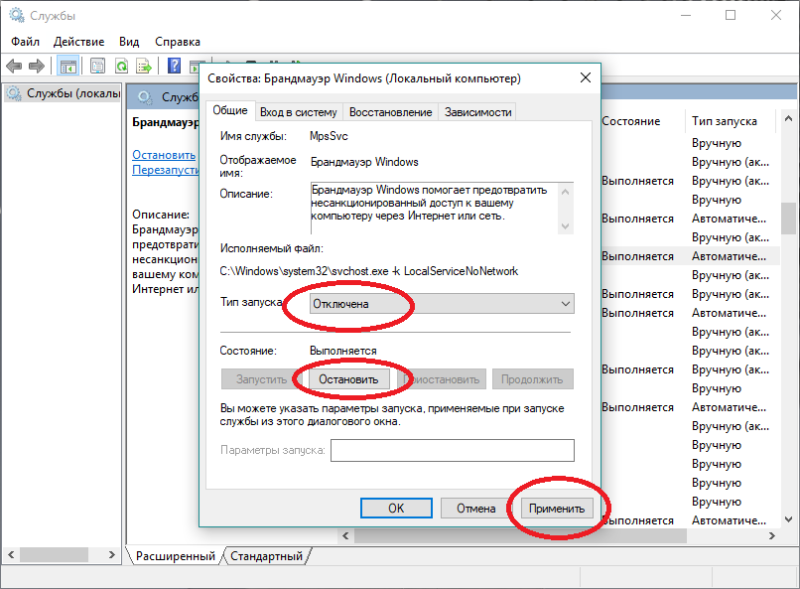
- Найдите в списке Брандмауэр Windows. Дважды кликните на нее.

- Установите Типа Запуска – Отключена, затем нажмите Применить.
- Нажмите Остановить и брандмауэр прекратит свою работу.

Из этого интерфейса активировать брандмауэр можно следующим образом:
- Выберите Тип Запуска – Автоматически, а затем Применить.
- Нажмите Запустить. Файерволл активируется.
Отключение брандмауэра Windows 10 в панели управления
Предельно простой способ. Пожалуй, самым сложным будет поиск Панели управления, так как ее Microsoft спрятала с обновлением Windows 10 Creators Update довольно-таки далеко.
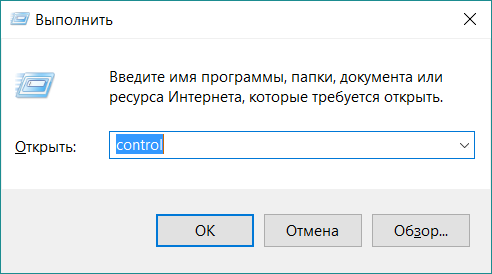
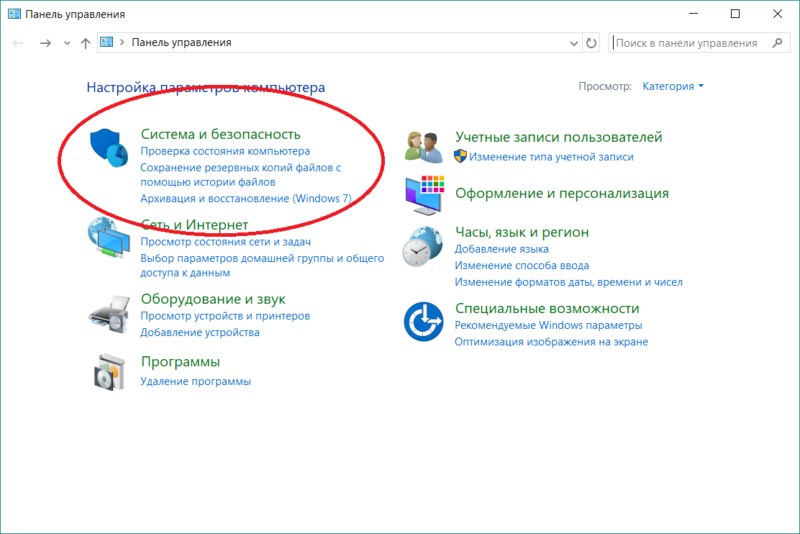
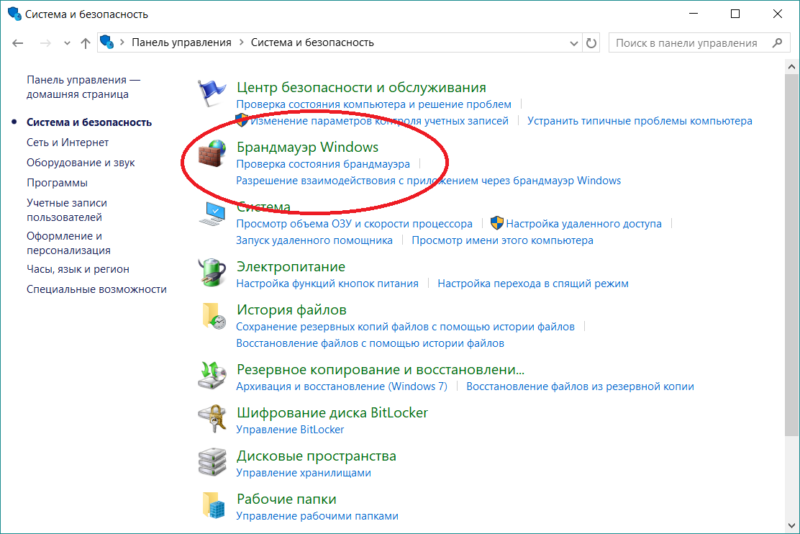
- Нажмите Win + R и введите control. Откроется панель управления.

- Выберите Система и безопасность – Брандмауэр Windows. Если у вас установлен режим просмотра по значкам, а не категориям, тогда сразу выберите Брандмауэр Windows, либо воспользуйтесь поиском в правом верхнем углу.
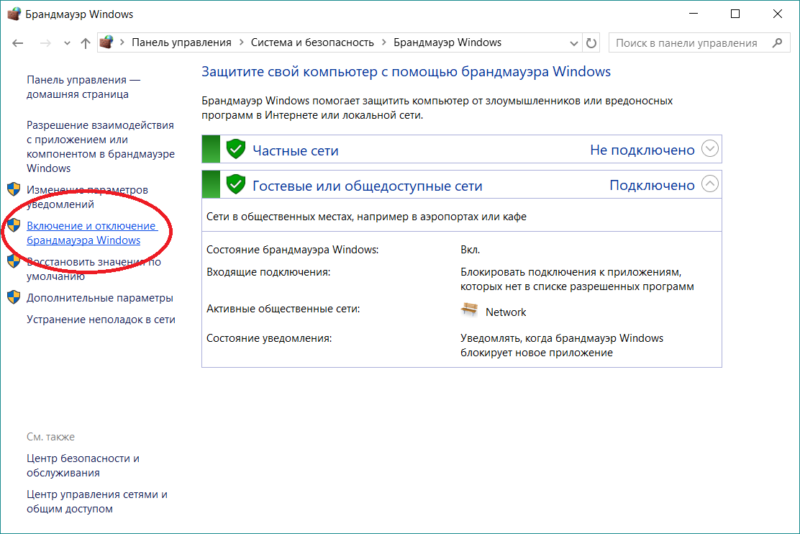
- В левой части экрана найдите пункт Включение и отключение брандмауэра Windows.
- Выберите, для каких сетей надо отключить брандмауэр – частные или общественные. Установите отметки возле Отключить брандмауэр Windows и нажмите Ок.
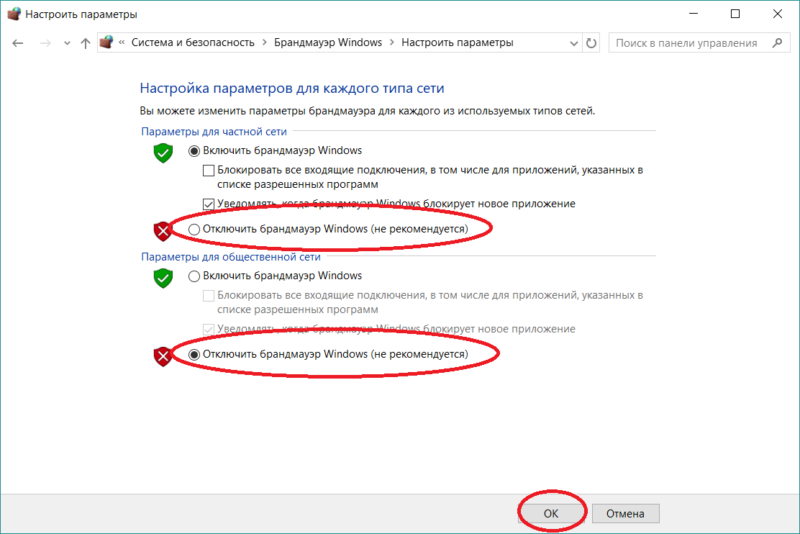
Брандмауэр вернется в свое рабочее состояние, если вы воспользуетесь командой для PowerShell / Командной строки в статье выше, нажмете на уведомление службы безопасности, либо проделаете все вышеописанные шаги, только в настройке параметром брандмауэра укажете Включить брандмауэр Windows.
Как отключить брандмауэр Windows 10 через Центр безопасности Защитника Windows
Это весьма простой способ, но актуален он только для тех устройств, которые работают на Windows 10 Creators Update (1703) и выше.
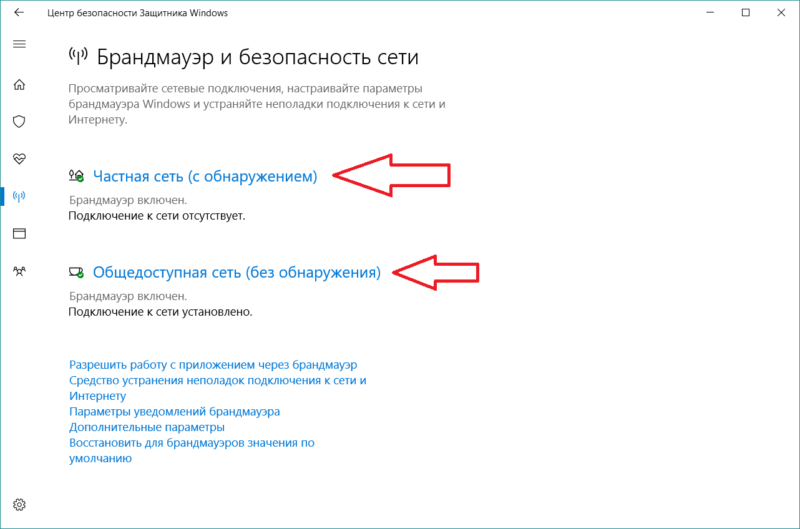
- Откройте Пуск и в списке программ найдите Центр безопасности Защитника Windows.

- В открывшемся окне выберите пункт Брандмауэр и безопасность сети.
- Выберите сеть, для которой надо изменить параметры файерволла — частная сеть, либо общедоступная сеть.
- Затем отключите брандмауэр Windows.

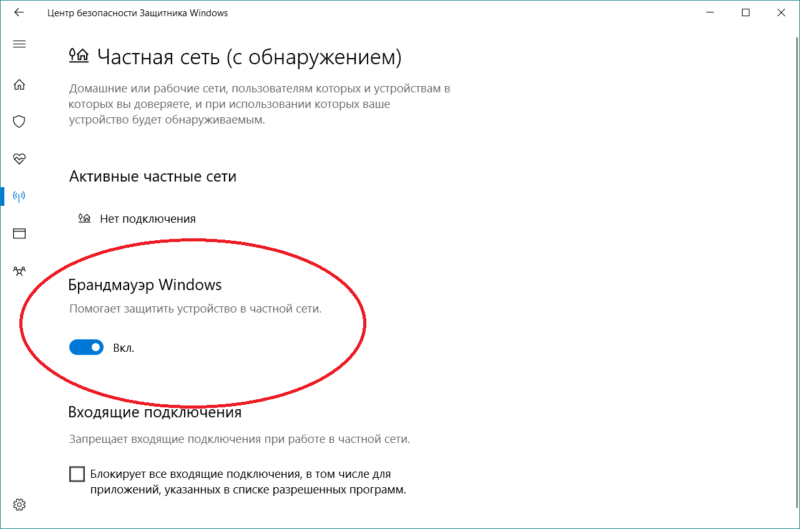
Повторная активация брандмауэра через Центр безопасности Защитника Windows осуществляется точно так само.
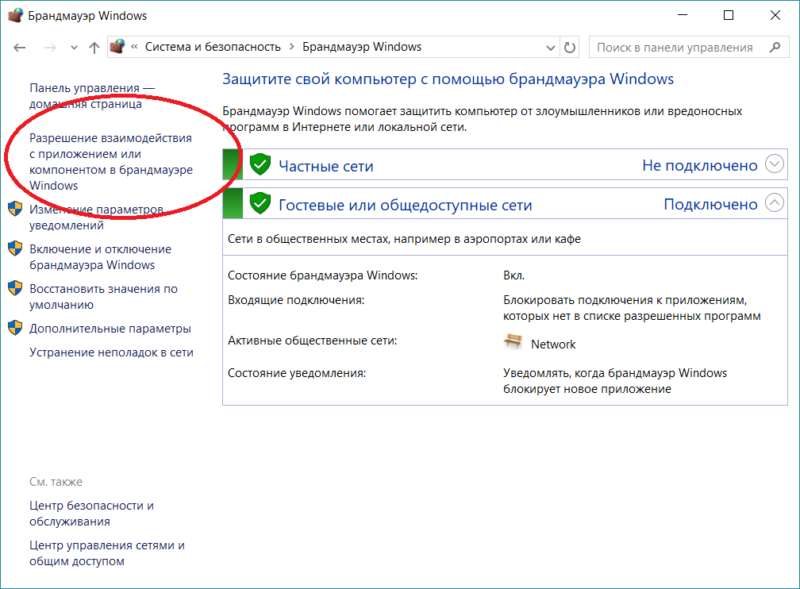
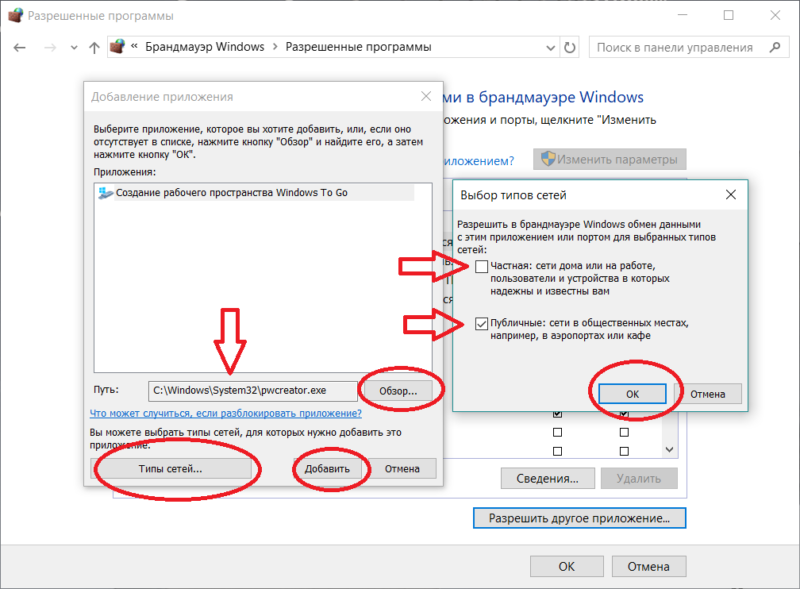
Как добавить программу в исключения брандмауэра Windows 10
Отключение брандмауэра — иногда слишком радикальный метод. Порой достаточно лишь прописать приложение в правила брандмауэра и разрешить ей подключения. По умолчанию Windows автоматически спросит вас о разрешении доступа к сети. Обычно этого достаточно, но бывает и так, что вы ошиблись кнопкой или надо изменить параметр. В таком случае вам надо будет проделать следующее:
- Откройте настроки брандмауэра в Панели управления, как это описано в инструкции выше.
- Выберите Разрешение взаимодействия с приложением или компонентом в брандмауэре Windows.
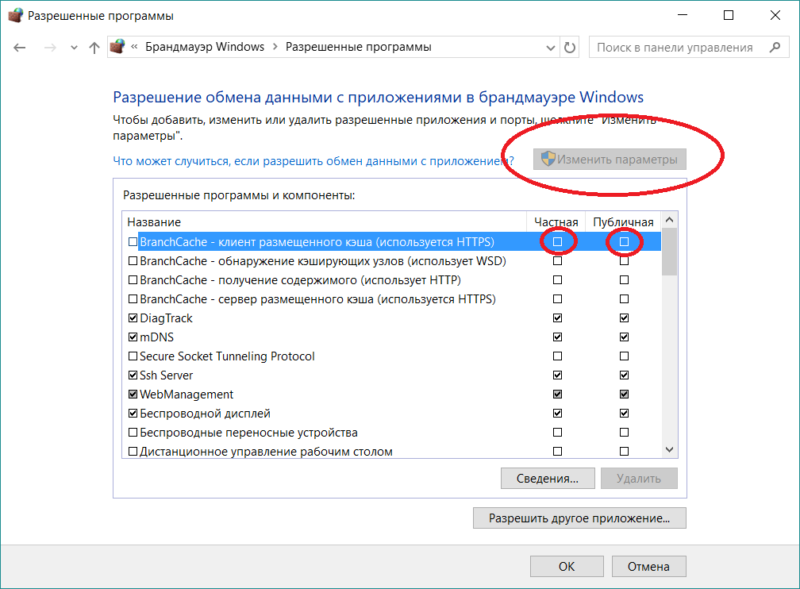
- На следующем окне нажмите Изменить параметры. В списке приложений найдите вам нужное и установите / снимите галочки возле частных или публичных сетей. Установленная галочка — доступ разрешен, нет галочки — доступ запрещен.
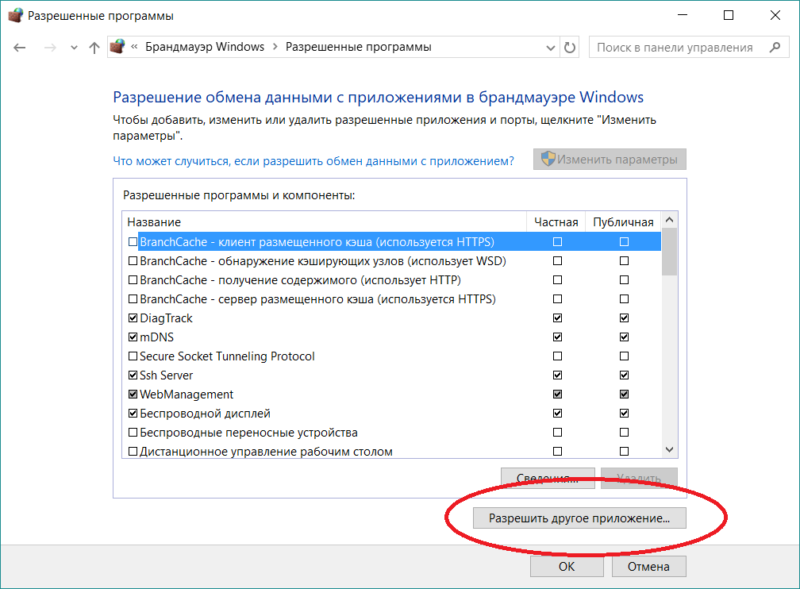
- Если в списке нет нужного вам приложения, тогда нажмите Разрешить другое приложение.
- В открывшемся окне выберите Обзор и укажите исполняемый файл приложения.
- Далее нажмите Типы сетей и укажите, к каким сетям у приложения будет доступ, а к каким нет.
- После этого нажмите Ок, затем Добавить, затем Ок.
На этом все.
“Why would you disable or turn off the Windows Firewall?”
Not a reader? Watch this related video tutorial!
Not seeing the video? Make sure your ad blocker is disabled.
There are many reasons one would disable the firewall in Windows. Not every reason is sound, of course, but there are legitimate ones.
In this article, you will learn the many ways to disable the Windows firewall. Whether you’re in a single-machine setup, home network, or a corporate environment, this article is for you.
You’re going to learn how to turn off the software firewall in Windows in just about every way possible!
- Using the Windows firewall management console
- The command-line (cmd.exe)
- PowerShell
- Group policy
- Even Azure Custom Script extension if you’re on an Azure virtual machines
Let’s dig in!
Prerequisites
Since this article is a how-to, there are some requirements that you need to follow along with the instructions. Some examples involve domain and non-domain environment.
For a Non-Domain Environment
- One or more computers that are running on Windows 10. You can do the examples here in just one computer, but some instructions are specific to remoting.
- And you must have administrator permissions on those Windows 10 computers.
For a Domain Environment
- A Windows 2019 server that is also a domain controller. A Windows 2016 server should also work.
- One or more Windows 10 computers in the same network and joined to the domain.
Using the GUI
Probably the quickest way to disable the firewall is using the included GUI tools in Windows. Using the GUI is probably the easiest way to turn off the Windows firewall for home users.
Using the Windows Security App
The first GUI tool to manage is the Windows Security App. The Windows Security app is available on Windows 10, version 1703, and later.
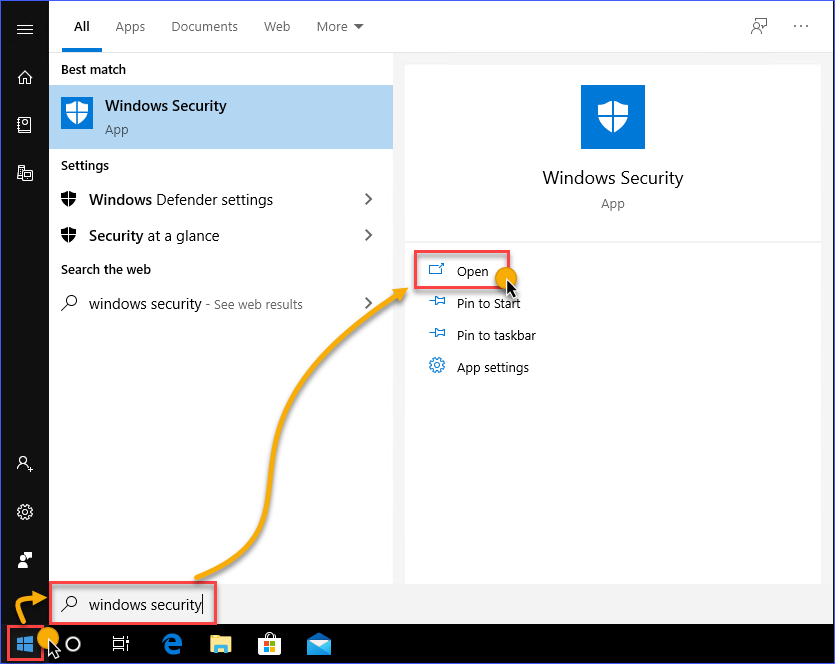
- Launch the Windows Security app by clicking on the Start button, and start typing Windows Security. The search result would show the Windows Security app, click on Open.
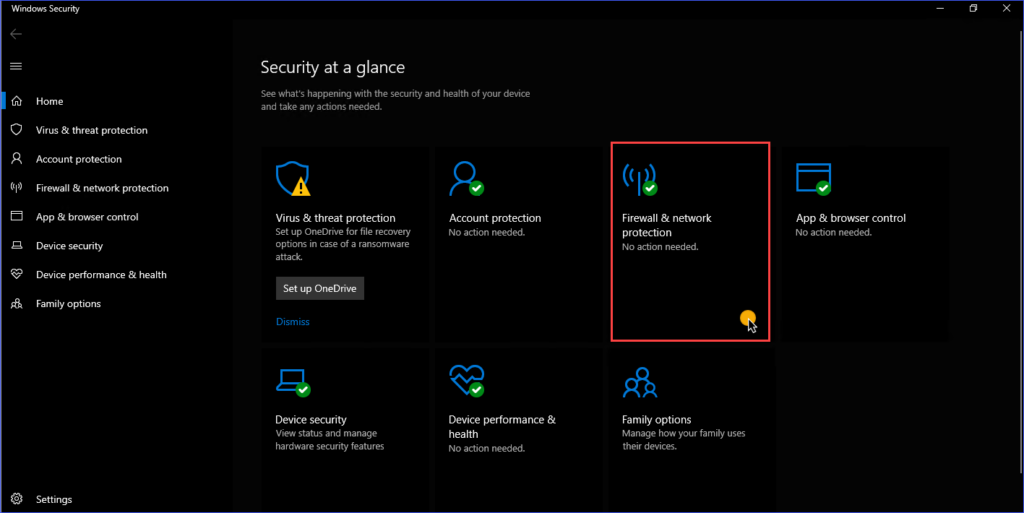
2. You will see different menu items in the Windows Security app home. Look for Firewall & network protection and click to open it.
3. On the Firewall & network protection page, you should see the different network profiles listed. These network profiles are Domain Network, Private Network, and Public Network. You can turn off the firewall for each of these network connection locations individually. In this example, you need to select the Private Network profile.
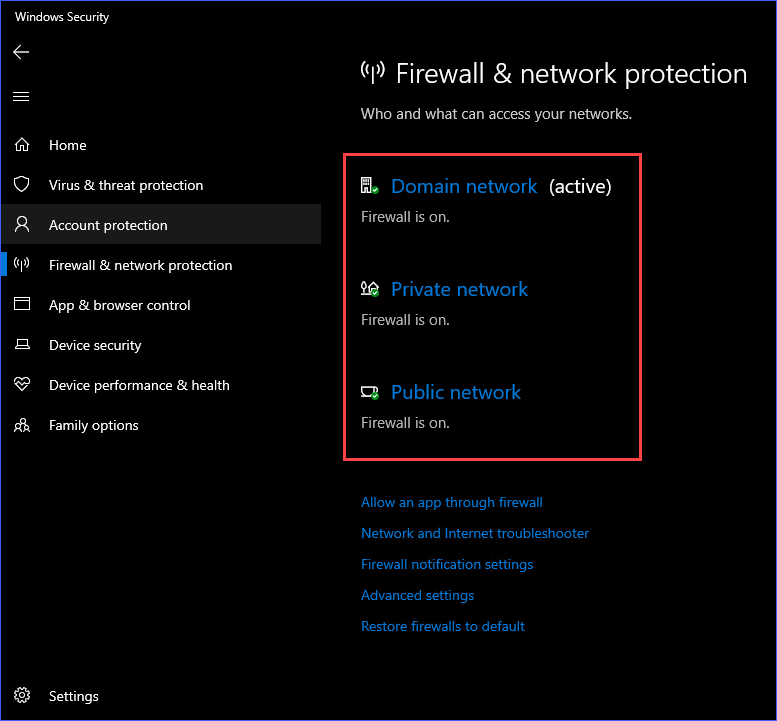
4. In this example, the Private Network profile is selected. Once inside the Private Network settings, click on the switch to turn off the Windows Defender Firewall.
Repeat the same steps for the other network profiles if you prefer.
Disable Windows Firewall Using the Windows Defender Firewall Control Panel
Another GUI tool is the Windows Defender Firewall Control Panel. As opposed to the Windows Security App which has the modern interface of a Windows 10 App, the Windows Defender Firewall Control Panel sports the same look of classic control panel items.
Below are several ways to launch the Windows Defender Firewall Control Panel
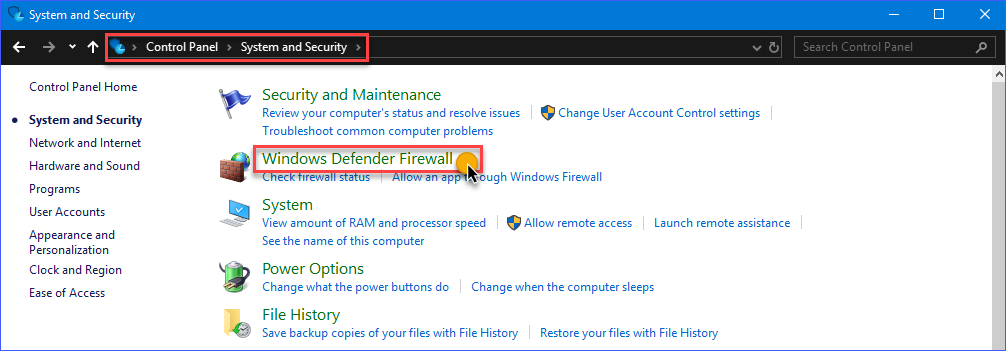
Method 1: Go to Control Panel —> System and Security —> Windows Defender Firewall.
Method 2: Open the Start menu and type windows defender firewall. Click on the Windows Defender Firewall link.

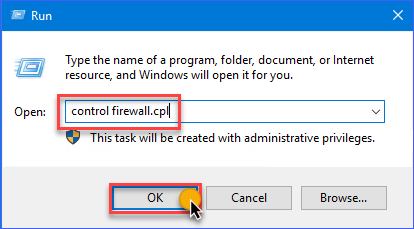
Method 3: Open the Run dialog box and type in the command control firewall.cpl and click OK.
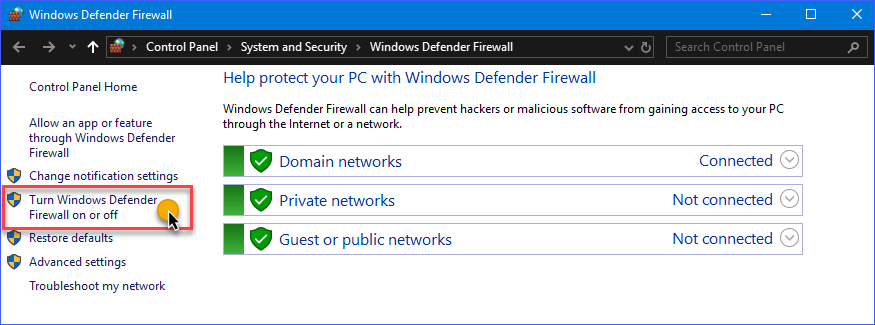
In the Windows Defender Firewall Control Panel, you should see a familiar list of network profiles; Domain networks, Private networks, and Guest or public networks. On the left-hand side, click on the Turn Windows Defender on or off link.
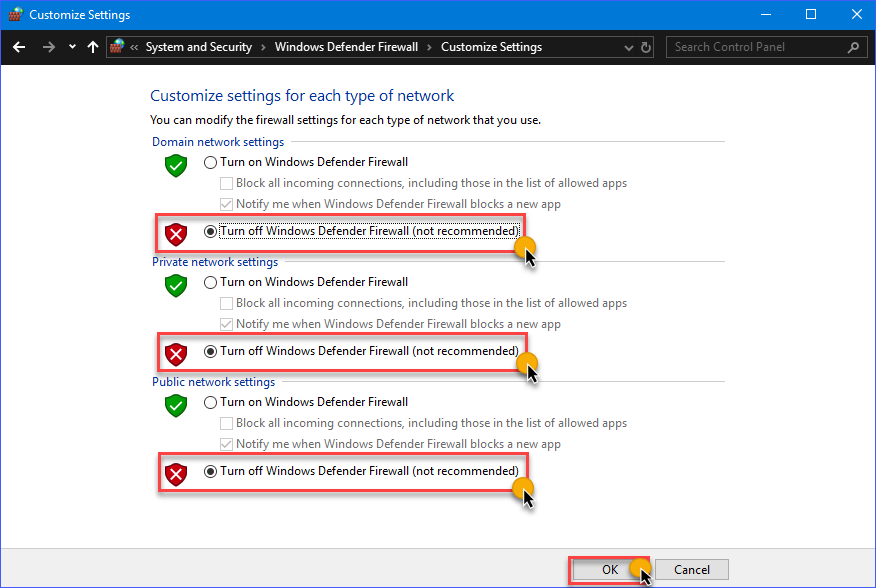
On the Customize Settings page, you’ll have the option to disable the Windows firewall for each network profile. In the example below, the Windows Firewall is turned off on all network profiles.
Using the Command-Line
As you may already know, most, if not all, of the GUI operations in Windows, have a command-line counterpart. Using the command-line is at times quicker, as opposed to going to different windows location when using the GUI options.
Additionally, the command-line options enable users to script or automate the task.
Turning off the Windows Firewall with the NETSH Command
An old but useful handy utility called netsh s ready for use to manage network configurations on a computer, or in this case, to disable the Windows Firewall.
Using netsh advfirewall set c you can disable the Windows Firewall individually on each location or all network profiles.
netsh advfirewall set currentprofile state off– this command will disable the firewall for the current network profile that is active or connected. For example, suppose the currently active network profile is Domain network. In that case, this command will the Firewall for that network profile.netsh advfirewall set domainprofile state off– disables on the Domain network profile only.netsh advfirewall set privateprofile state off– disables on the Private network profile only.netsh advfirewall set publicprofile state off– this command will disable on the Public network profile only.netsh advfirewall set allprofiles state off– this command will disable on all network profiles at once.
The demonstration below shows each of the commands above in action.

Learn more about Netsh Command Syntax, Contexts, and Formatting
Using the Set-NetFirewallProfile PowerShell Cmdlet
The NetSecurity PowerShell module is built-in to Windows 10, as well as Windows Server 2012, and above. This NetSecurity PowerShell module contains cmdlets related to network and network security configuration. One of these cmdlets is the Set-NetFirewallProfile which can be used to disable Windows Firewall.
The Set-NetFirewallProfile syntax is shown below.
# Disable Windows Firewall for each specified network profile
Set-NetFirewallProfile -Profile <PROFILE NAME> -Enabled False

# Disable Windows Firewall for ALL network profiles
Set-NetFirewallProfile -All -Enabled False
The command below will turn off the firewall on the Public, Private, and Domain network profiles.
Set-NetFirewallProfile -Profile Domain,Private,Public -Enabled False
The demonstration below shows how the Set-NetFirewallProfile works to disable Windows Firewall using the command above.

Without specifying any profile names, the example below shows how to disable Windows Firewall on all network profiles by using the -All parameter switch.

Turning off the Windows Firewall Remotely Using PowerShell
When you need to disable the firewall on many computers, it would be inefficient to manually login to each computer and run the commands. Especially in a network environment, you could disable remotely using PowerShell.
Note: This procedure requires that WinRM is already enabled on the target computer. In most cases, WinRM is already set up for domain-joined computers for remote management purposes.
Learn more: How to enable Windows Remote Shell
If you plan to disable Windows Firewall on one remote computer at a time, you can use the Enter-PsSession cmdlet to issue the commands to the remote computer.
In the example below, the command will be issued from the server named dc, and the remote computer name is desktop1. The command that will be used is shown below.
Enter-PsSession -ComputerName desktop1
Set-NetFirewallProfile -All -Enabled False
Running the code above in PowerShell would result in a similar output, as the demo below.

The above process is good only if you are working on a few remote computers. But, if you have a bulk of computers where you need to disable it, you will need an approach that is more adapted to scripting. For that, you can use the Invoke-Command cmdlet.
$computers = @('desktop1')
$computers | ForEach-Object {
	Invoke-Command -ComputerName $_ {
		Set-NetFirewallProfile -All -Enabled False
	}
}
As you can see from the above code, the name of the remote computers is stored in the $computers variable as an array. Then, PowerShell loops through each of the remote computers to run the Invoke-Command cmdlet and issue the Set-NetFirewallProfile -All -Enabled False command. Refer to the demo below for the expected result.

Using Group Policy
By deploying a GPO, systems admins can turn off the Windows Firewall for selected or all computers in the domain. Once deployed, disabling Windows Firewall will be automated as the configuration enforces it via policy on all computers that are in scope.
Creating the GPO
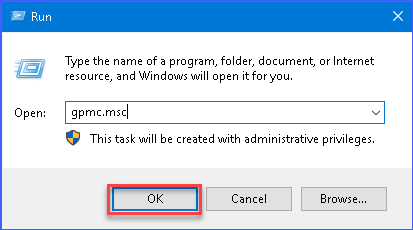
To create a GPO, you need to launch the Group Policy Management Console on the server. To do so, run gpmc.msc command in the Run dialog.
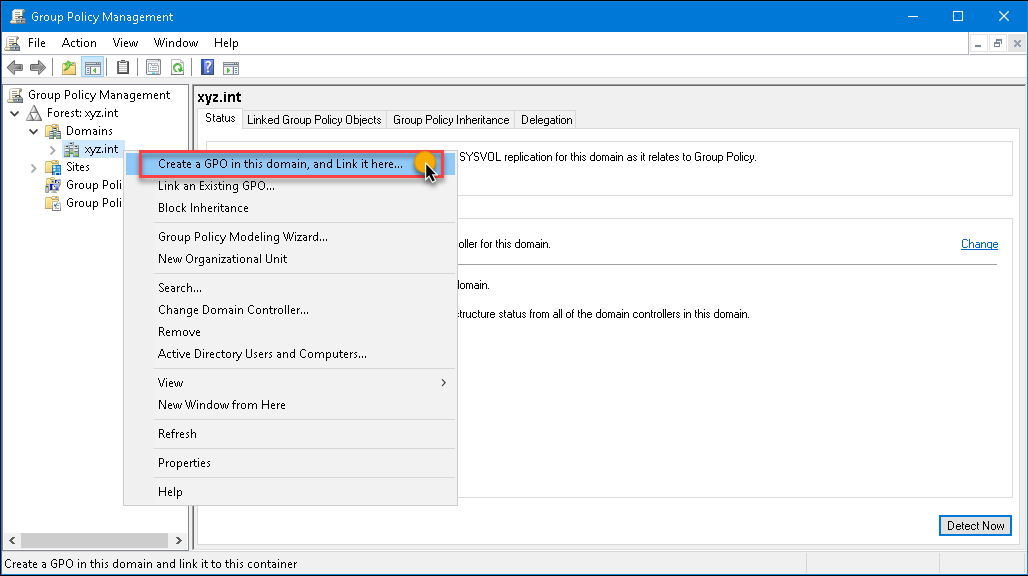
gpmc.msc command in the Run dialogIn the Group Policy Management console, expand the forest and then select the domain where you will create the GPO. In the image below, the GPO is created in the xyz.int domain. Right-click on the domain and click Create a GPO in this domain, and Link it here…
The New GPO dialog box will pop up. Type in Disable Windows Firewall in the Name box, then click on the OK button.
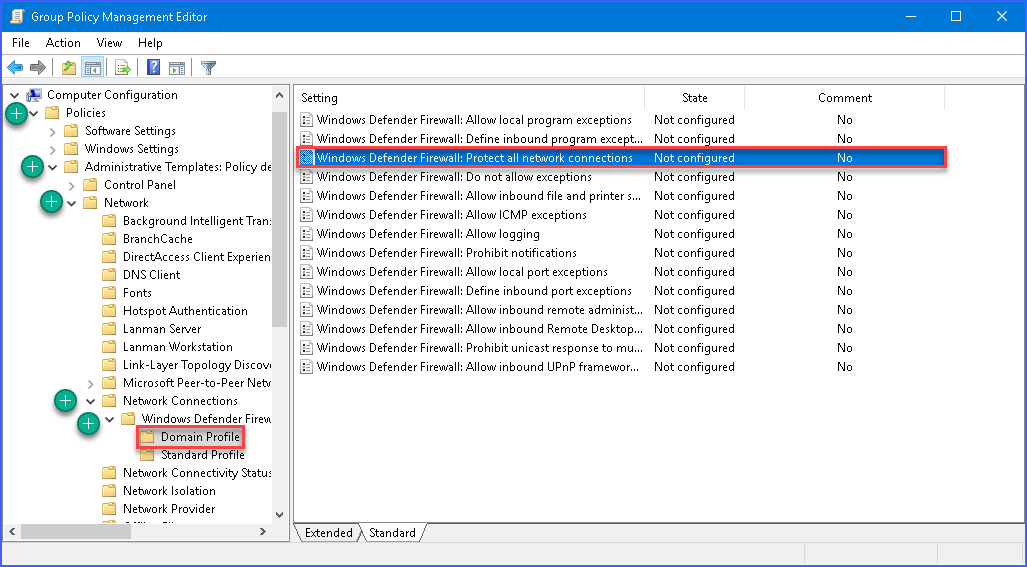
Next, right-click on the new GPO and click Edit. The GPO will open in the Group Policy Management Editor. Then, expand these folders Computer Configuration —> Policies —> Administrative Templates —> Network —> Network Connections —> Windows Defender —> Firewall —> Domain Profile.
In the settings list on the right pane, double-click on Windows Defender Firewall: Protect all network connections to open its properties.
Once the settings property is open, change the value by selecting Disabled, then click OK.
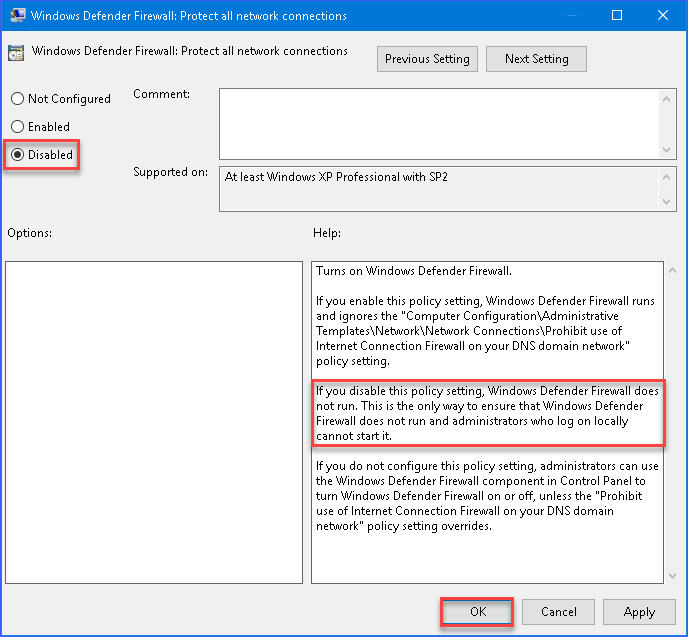
Repeat and apply the same option to the Standard Profile settings. Then, you can now exit the Group Policy Management Editor window.
Deploying the GPO to All Domain Computers
Now that you’ve created the GPO, you now need to deploy the GPO to the domain computers.
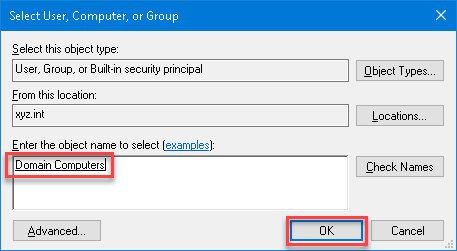
To apply the GPO, in the Group Policy Management, select the Disable Windows Firewall GPO. Then, in the Scope tab, click on Add button under the Security Filtering section.
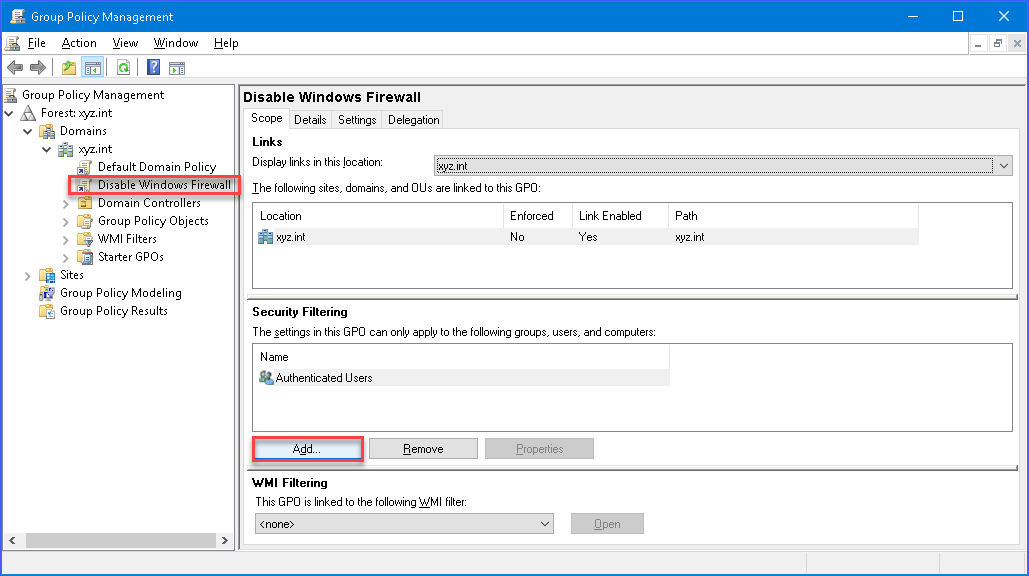
In the Select User, Computer, or Group dialog box, search for Domain Computers and click OK. Doing so will ensure that the GPO is applied to all computers that are members of the Domain Computers group.
And that’s it! The next time that the client computers get the policy update, the firewall will be turned off on those computers.
Now that the GPO has been created and deployed, you can test whether the GPO is working by forcing a policy update. Run the gpupdate /force on the client computer to test the policy update.

As you can see from the result above, as soon as the policy was applied on the client computer. The configuration to disable Windows Firewall was applied. Additionally, there is an information box saying that the settings are managed by the system administrator.
Note: The automatic update interval for Group Policy is every 90 minutes for regular users and computers. Additionally, Group Policy is also updated when the computer is started, or a user logs in.
Using The Custom Script Extension to Disable Windows Firewall on Azure Virtual Machines
If you have an Azure VM that you suddenly cannot access anymore because the Windows Firewall is blocking traffic, including RDP. Maybe you made changes to the Windows Firewall and inadvertently locked yourself out!
If you’ve tried all the ways previously discussed in this article and still no luck, there’s still hope. You can disable Windows Firewall inside an Azure VM’s guest OS by utilizing the Azure Custom Script Extension. The Azure Custom Script Extension works executing a script hosted in Azure Storage or GitHub against your Azure VM’s guest OS.
The high-level steps involve:
- Create a PowerShell script (*.PS1) containing commands to disable Windows Firewall.
- Install the Custom Script Extension on your Azure VM using the Azure Portal.
- Upload the PowerShell script to Azure Storage.
- The script will run automatically on the Azure VM’s guest OS one time only.
In this example, the test VM is named devmachine1 with the Windows Firewall in an enabled state.
Note: Before you proceed, make sure that you have the proper Azure RBAC role in your account.
Creating the Disable-Windows-Firewall.ps1 Script
In the previous sections, you’ve learned which commands are available to disable Windows Firewall. In this example, the netsh utility will be used.
Using the code or text editor of your choice, create a new file with name Disable-Windows-Firewall.ps1. Edit the script and add this line of code: netsh advfirewall set allprofiles state off. Save the script when done. Below is how to quickly do it in PowerShell.
'netsh advfirewall set allprofiles state off' | Out-File .\\Disable-Windows-Firewall.ps1
Installing the Custom Script Extension and Uploading the PowerShell Script
Now that your script is ready, the next step is to install the Custom Script Extension and upload the script to an Azure Storage location. And once the extension is installed, the script will automatically run against the Azure VM.
- First, log in to the Azure Portal and locate the Azure VM resource and open it. In this example, the Azure VM name is devmachine1. Then, go to the Extensions blade and click the Add button.
- In the New Resource page, locate and click on Custom Script Extension. Then, click on Create. In the Install extension page, click the Browse button next to the Script file (required) box.
- Select the Storage Account from the list. In this example, the storage account name is storagexyz01. Then a list of containers will be shown; click on the container where the script file will be uploaded. In this example, the container name is cont1.
Note: If you do not have an Azure storage account or container yet and need to create one, visit Create an Azure Storage account to learn how.
- After selecting the container, click on Upload and browse for the disable-windows-firewall.ps1 file that you created on your computer. Once you’ve selected the file, click the Upload button.
- You should see that disable-windows-firewall.ps1 file is now available inside the container. Click on disable-windows-firewall.ps1 from the list and click on Select. You will be brought back to the Install extension page, and you must click on OK to finally begin installing the extension.
At this point, you only need to wait for the extension to be deployed, which will also automatically execute the script that you uploaded. Refer to the demonstration below to see the whole process in action.

Summary
In this article, you’ve learned how to disable Windows Firewall using the built-in, available GUI tools in Windows. You’re also learned how to use commands using netsh and PowerShell to disable Windows Firewall locally or remotely.
Also, you’ve learned how to create and deploy a Group Policy Object that would disable Windows Firewall for domain computers. Lastly, you’ve learned how to use the Azure Custom Script Extension to disable Windows Firewall in Azure VM’s guest OS.
There surely are many different ways to disable Windows Firewall. Some of those methods were covered in this article. However, there are still other methods that you could explore on your own, such as using PsExec to remotely disable it.
Further Reading
- How to Generate an Azure SAS Token to Access Storage Accounts
- How To Manage Files Between Local And Azure Storage With AZCopy
- Using the Azure custom script extension Windows
In Powershell, you can easily enable or disable Windows Firewall using the Set-NetFirewallProfile command. This cmdlet is used to configure the Firewall’s advanced security settings for a particular, or all, network profile.
While you can also disable Firewall using GUI options like Control Panel/Windows Settings, doing it via CLI options like PowerShell/CMD is more efficient.
Note: Firewall is a key line of defense for your network against unauthorized access and malicious programs. While you can temporarily disable it for testing or other purposes, we advise enabling it afterward.
How to Enable Firewall via Powershell
- Press Windows + X to open the quick link menu.
- Press A and accept the prompt to launch Windows PowerShell (Admin).
- Use the following commands as required. Type them and press Enter after each.
- Enable Firewall entirely:
Set-NetFirewallProfile -Enabled True - Enable Firewall for a specific profile(s):
Set-NetFirewallProfile -Profile Domain,Public,Private -Enabled True
Check the Network Profiles section for more on this. - Check if Firewall is enabled:
netsh advfirewall show all

How to Disable Firewall via Powershell
- Press Windows + X to open the quick link menu.
- Press A and accept the prompt to launch Windows PowerShell (Admin).
- Use the following commands as required. Type them and press Enter after each.
- Disable Firewall entirely:
Set-NetFirewallProfile -Enabled False - Disable Firewall for a specific profile(s):
Set-NetFirewallProfile -Profile Domain,Public,Private -Enabled False
Check the Network Profiles section for more on this.
- Check if Firewall is disabled:
netsh advfirewall show all

Remotely Enable/Disable Firewall with Powershell
Note: WinRM needs to be set up beforehand on the target computer for remote disabling to work. Check out How to enable Windows Remote Shell for more on that.
Disable Firewall on One Remote Computer
Replace acer22 with the remote computer’s name and use the following commands:
Enter-PsSession -ComputerName acer22
Set-NetFirewallProfile -All -Enabled False

Disable Firewall On Multiple Remote Computers
Replace acer22 nitro15 dell and so on with the remote computers’ names and add or subtract more names as appropriate. Then use the following commands:
$computers = @(‘acer22', ‘nitro15’, ‘dell’)
$computers | ForEach-Object {
          Invoke-Command-ComputerName $_ {
                   Set-NetFirewallProfile-All -Enabled False
                           }
                 }

How to Enable/Disable Firewall Using Command Prompt?
In CMD, we’ll use the netsh advfirewall command to enable/disable the firewall. This command also allows for precise control of firewall rules for each of the profiles (Domain, Public, Private).
Enable Firewall via CMD
- Press Windows + R to launch Run.
- Type cmd and press CTRL + Shift + Enter to launch elevated Command Prompt.
- Use the following commands as required. Type them and press Enter after each.
- Enable Firewall entirely:
netsh advfirewall set allprofiles state on
- Enable Firewall for the current profile:
netsh advfirewall set currentprofile state on - Enable Firewall for a specific profile(s):
netsh advfirewall set publicprofile state on
Replace public with domain or private as appropriate. Check the Network Profiles section for more on this. - Check if Firewall is enabled:
netsh advfirewall show all

Disable Firewall via CMD
- Press Windows + R to launch Run.
- Type cmd and press CTRL + Shift + Enter to launch elevated Command Prompt.
- Use the following commands as required. Type them and press Enter after each.
- Enable Firewall entirely:
netsh advfirewall set allprofiles state off - Enable Firewall for the current profile:
netsh advfirewall set currentprofile state off - Enable Firewall for a specific profile(s).
netsh advfirewall set publicprofile state off
Replace public with domain or private as appropriate. Check the Network Profiles section for more on this. - Check if Firewall is disabled:
netsh advfirewall show all

Network Profiles
You can enable/disable the firewall for Domain, Public, Private profiles, or any combination of the three. Simply use the appropriate profiles in the commands above.
- Domain Profile: This applies to networks where the host system can authenticate to a domain controller. It’s applicable for business environments because of the high level of security and authentication.
- Private Profile: It is a user-assigned profile designed for trusted networks such as home or work networks. It’s generally safe to turn on Network Discovery and File sharing.
- Public Profile: It is the default profile, designed for public networks such as public Wi-Fi hotspots. We recommend turning off network discovery and file sharing for security reasons.
Related Questions
How to Enable/Disable Firewall Through GUI?
Enabling/Disabling the firewall via GUI is very simple. To do so:
- Press Windows + R to launch Run.
- Type
windowsdefender://network/and press Enter to open the Firewall and Network protection window. - Click on your active profile and press the switch to turn the firewall on/off.


How to Allow an App through Windows Firewall?
A firewall monitors your network traffic and blocks harmful/inappropriate content. Occasionally, it can block or interfere with a trusted app that you need. In such cases, you can allow an app through the firewall with the following steps:
- Press Windows + R to launch Run.
- Type
windowsdefender://network/and press Enter. - Click on Allow an App through Firewall.
- Press Change Settings.
- Check the tick box to allow the app through the app. Use Allow Another App if you don’t see your app on the list.

- Press OK to save the changes.

GUI vs. CLI. Which Is Better For Disabling Firewall?
You can use both GUI (Control Panel, Windows Settings) and CLI (Powershell, Command Prompt) to disable Firewall. It’s just a matter of preference.
Most users prefer GUI (Graphical User Interface) as it’s easier to understand and navigate. But CLI (Command Line Interface) is more efficient as you only need to enter a line of code to accomplish the same thing.
Is It Safe To Disable Windows Firewall?
A firewall is an important layer of security for your network. Ideally, you should use an antivirus along with Windows Firewall for proper protection.
It’s fine to disable the firewall temporarily. But we do not recommend keeping your firewall disabled in the long term. This would leave your network vulnerable to unauthorized access, malicious programs, and other cyber threats.
How to Change Sharing Settings for Network Profiles?
- Press Windows + I to launch Settings.
- Go to Network and Internet > Ethernet.
- Press Change Advanced Sharing Settings on the right.
- Adjust sharing settings as appropriate and click Save Changes.
