Отключить bitlocker windows 10 powershell

Процедура отключения шифрования BitLocker может отличаться в зависимости от того, заблокирован или разблокирован раздел в данный момент.

Способ 1: Штатный апплет

Удобнее всего для отключения шифрования БитЛокер использовать средства штатного одноименного компонента.

  1. Запустите апплет «Шифрование диска BitLocker», для чего выполните команду 
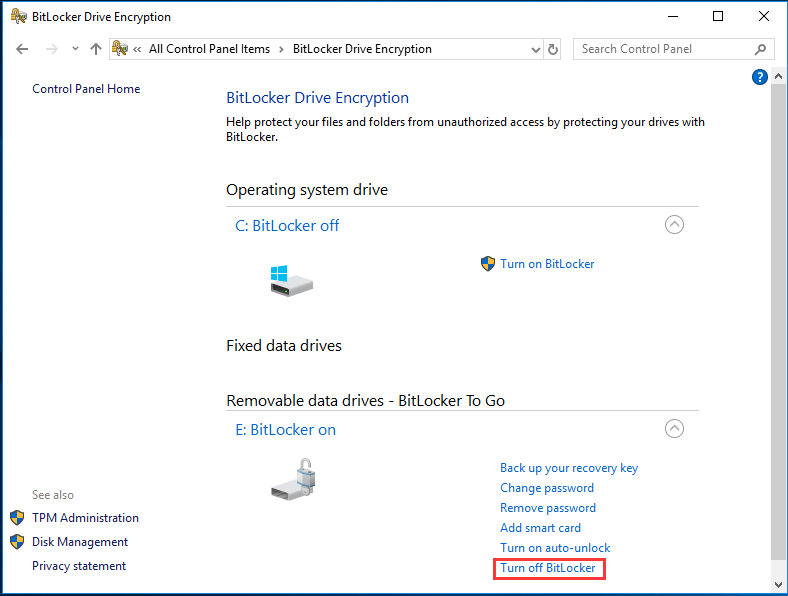
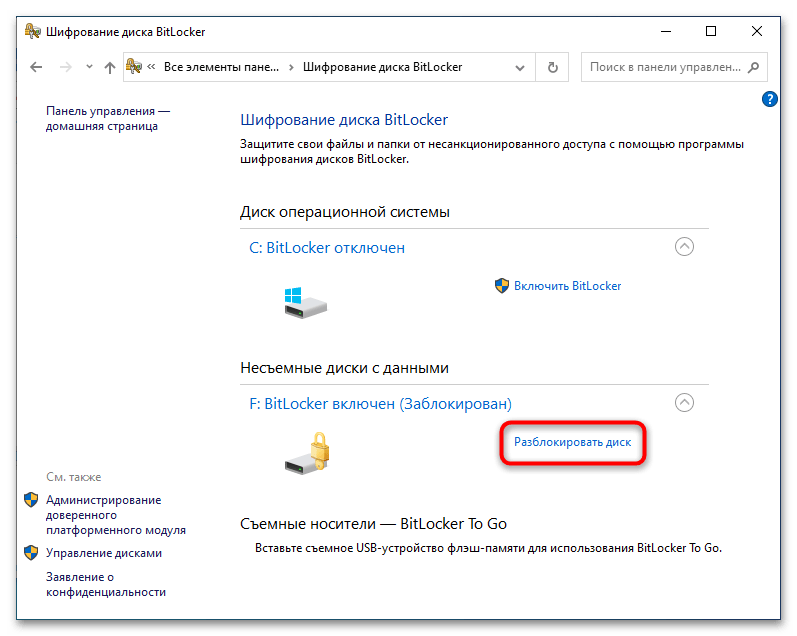
control /name Microsoft.BitLockerDriveEncryption в вызванном нажатием клавиш Win + R диалоговом окошке быстрого запуска приложений.
  2. Как отключить шифрование BitLocker в Windows 10-1

  3. Выберите зашифрованный диск. Если он заблокирован, доступна будет только одна опция – «Разблокировать диск». Кликните по ней.
  4. Как отключить шифрование BitLocker в Windows 10-2

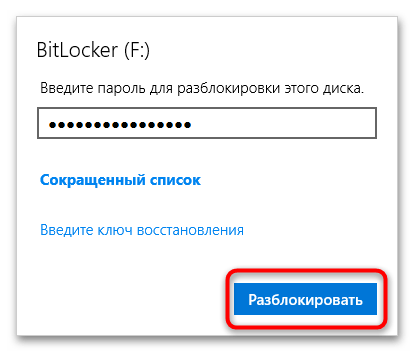
  5. Введите пароль БитЛокера или 48-значный код разблокировки, если пароль утерян.
  6. Как отключить шифрование BitLocker в Windows 10-3

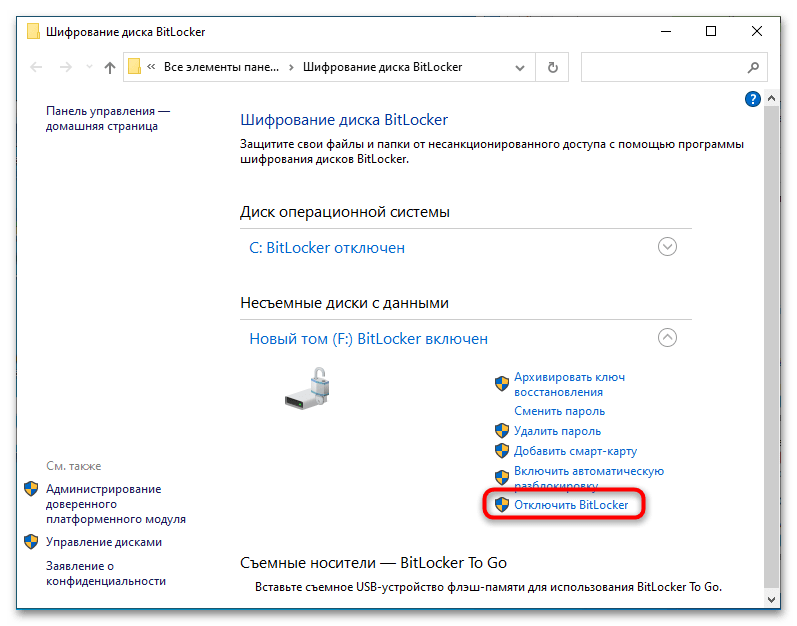
  7. После этого в окне апплета станут доступны и другие опции. Выберите «Отключить BitLocker» и подтвердите деактивацию функции в диалоговом окошке.
  8. Как отключить шифрование BitLocker в Windows 10-4

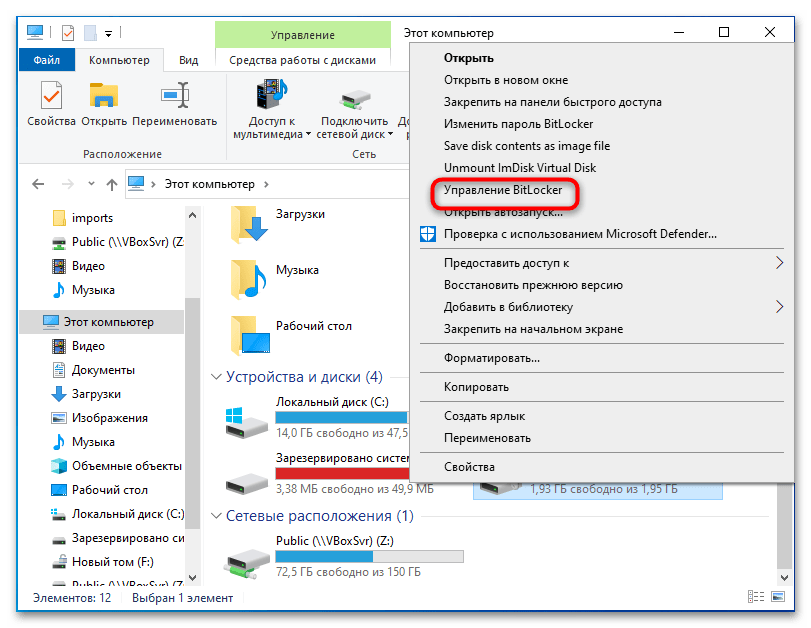
Если диск уже разблокирован, опция «Отключить BitLocker» будет доступна сразу после запуска апплета. В этом случае перейти к настройкам БитЛокера можно будет также непосредственно из контекстного меню диска.

Как отключить шифрование BitLocker в Windows 10-5

Процедура расшифровки диска займет некоторое время. Ее продолжительность будет зависеть от объема диска, его типа (SSD или HDD), метода шифрования и количества записанных данных.

Способ 2: «Командная строка»

Для отключения шифрования БитЛокер также можно использовать средства классической «Командной строки» или «PowerShell».

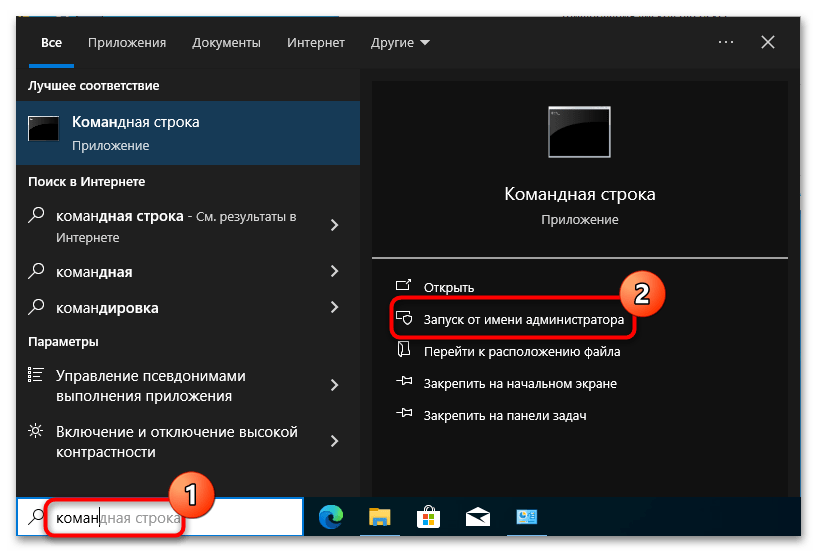
  1. Откройте «Командную строку» либо «PowerShell» с правами администратора из поиска Windows или другим известным способом.
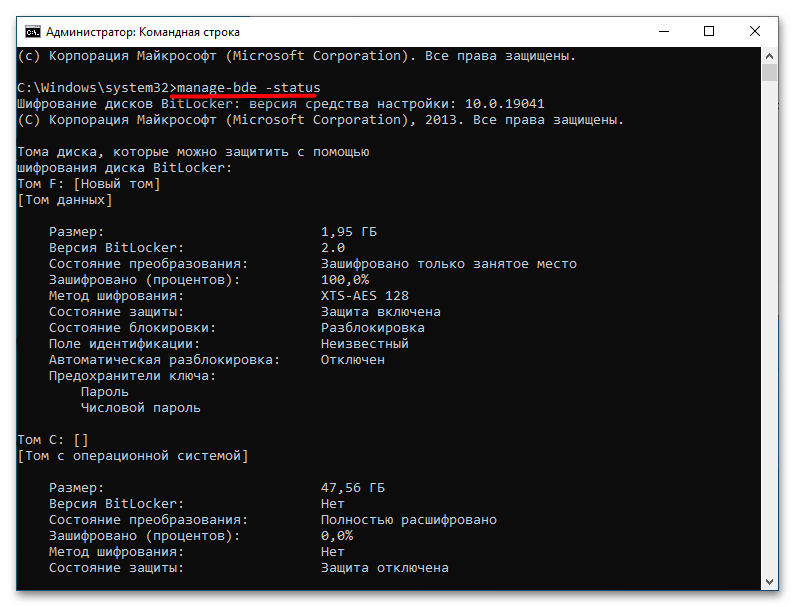
  2. Как отключить шифрование BitLocker в Windows 10-6

  3. Выполните команду 
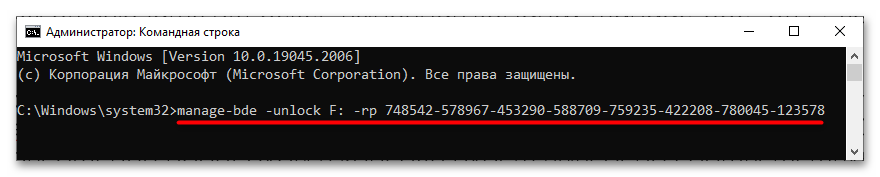
manage-bde -status, чтобы получить список всех зашифрованных томов.
  4. Как отключить шифрование BitLocker в Windows 10-7

  5. Если диск заблокирован, используйте команду следующего вида: manage-bde -unlock F: -rp key, где F – это буква диска, а key – 48-значный ключ разблокировки.
  6. Как отключить шифрование BitLocker в Windows 10-8

  7. Далее, чтобы отключить BitLocker, воспользуйтесь командой 
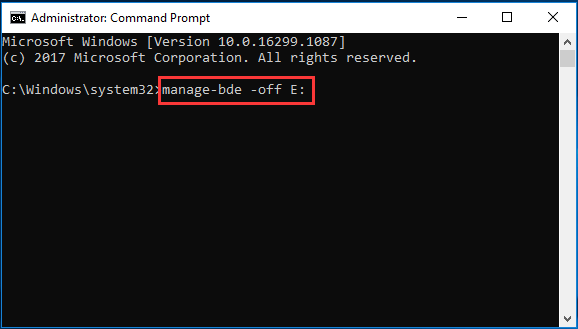
manage-bde -off F:, где F – буква диска.
  8. Как отключить шифрование BitLocker в Windows 10-9

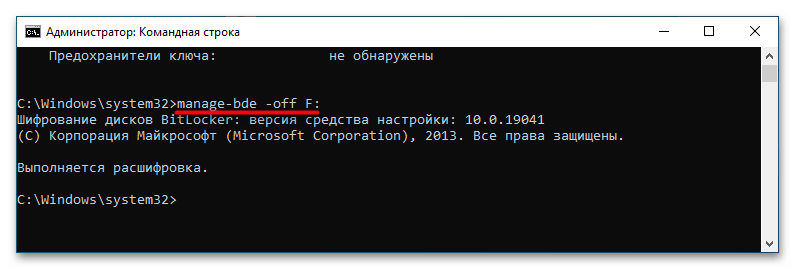
Если диск уже разблокирован, для отключения БитЛокера достаточно одной команды manage-bde -off F:. Начнется процедура расшифровки данных, которая займет некоторое время. По завершении в консоли будет выведено соответствующее уведомление.

Способ 3: «PowerShell»

С тем же успехом для отключения шифрования разделов в Windows можно использовать консоль «PowerShell». Ниже приведен способ отключения шифрования для уже разблокированного диска.

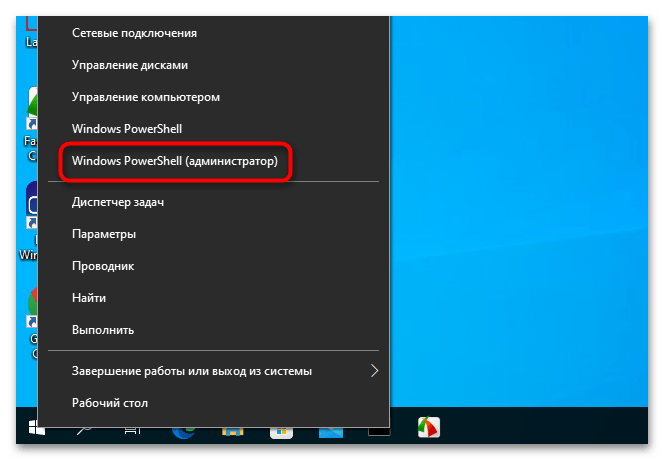
  1. Запустите «PowerShell» с правами администратора из контекстного меню кнопки «Пуск».
  2. Как отключить шифрование BitLocker в Windows 10-10

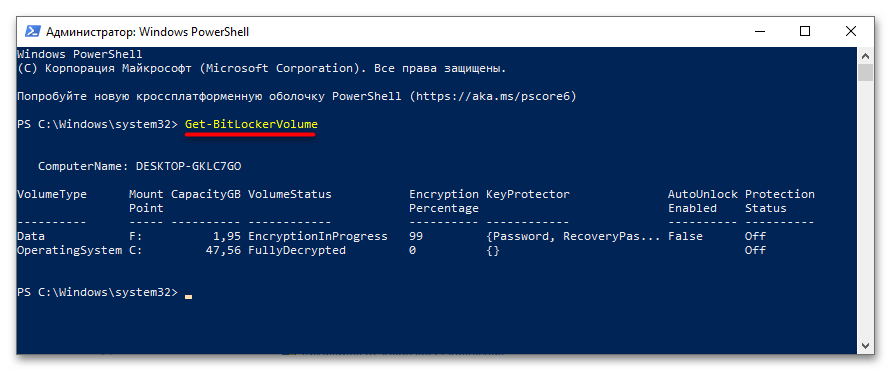
  3. Получите список дисков с указанием их статуса шифрования, для чего введите команду
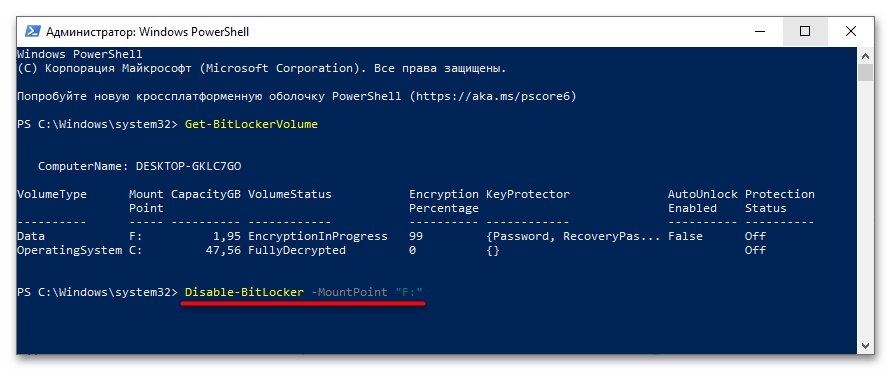
 Get-BitLockerVolume.
  4. Как отключить шифрование BitLocker в Windows 10-11

  5. Чтобы отключить шифрование выбранного раздела, выполните команду 
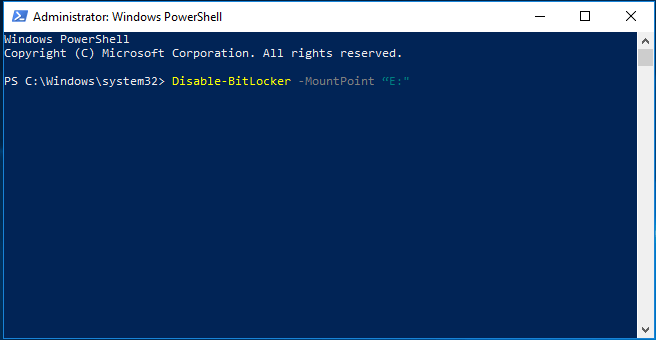
Disable-BitLocker -MountPoint "F:", где F – его буква. Подтвердите действие вводом Y и нажатием клавиши Enter.
  6. Как отключить шифрование BitLocker в Windows 10-12

Если диск заблокирован, используйте для его разблокировки те же команды, что и в Способе 2. Как и в приведенных выше примерах, на расшифровку данных потребуется некоторое время.

Наша группа в TelegramПолезные советы и помощь

Download Article

Quickly disable BitLocker using the Control Panel, Command Prompt, or Powershell

Download Article

  • Using Control Panel
  • |

  • Using the Command Prompt
  • |

  • Using PowerShell
  • |

  • Unlocking BitLocker
  • |

  • Video
  • |

  • Q&A
  • |

  • Tips
  • |

  • Warnings

Do you need to disable BitLocker? BitLocker is a data encryption feature that is built into Windows that allows you to encrypt data on your PC in order to protect it. BitLocker is a feature of Windows Pro, Windows Enterprise, and Windows Education editions. When a drive is encrypted through BitLocker, it can make the data hard to access from a different computer. This wikiHow teaches you how to turn off your Windows computer’s BitLocker encryption.

Things You Should Know

  • Open the Start menu and type «manage BitLocker.» Open the «Manage BitLocker» option and expand the drive you want to decrypt. Click «Turn off BitLocker.»
  • Open the Command Prompt as an Administrator and type «manage-bde -off <drive letter>:» and press Enter.
  • Open Powershell as an administrator and type «Disable-BitLocker -MountPoint «<drive letter>:» and press Enter
  1. Step 1 Open Start icon.

    Click the Windows logo in the bottom-left corner of the screen. The Start menu will pop up.

  2. Step 2 Type in manage BitLocker.

    This will display the «manage Bitlocker» Control Panel option in the Windows Start menu.

    Advertisement

  3. Step 3 Click Manage BitLocker.

    It should be at the top of the Start menu. It has an icon that resembles a hard drive with a set of keys over the top. Clicking this option opens the BitLocker Control Panel page.

  4. Step 4 Click icon to expand the correct hard drive.

    Scroll down until you find the drive for which you want to disable BitLocker. Click the icon that resembles a bracket pointing down to expand the drive you want to decrypt.

    • Skip this step if BitLocker is only encrypting one hard drive.
    • You can use BitLocker to encrypt and decrypt internal hard drives and removable USB drives.
  5. Step 5 Click Turn Off BitLocker.

    It’s a link below and to the right of the BitLocker heading.

  6. Step 6 Click Turn Off BitLocker when prompted.

    Doing so causes BitLocker to begin decrypting your drive. This can take several hours to complete.

    • You may be asked to enter your Administrator password or PIN before BitLocker will begin turning off.
    • It may take a while for Windows to completely decrypt the drive you want to decrypt. You can continue to use your computer in the meantime.
  7. Advertisement

  1. Step 1 Click the Windows Start menu icon.

    It’s the button with the Windows logo in the taskbar at the bottom of the screen. This displays the Windows Start menu.

  2. Step 2 Type CMD.

    This displays the Command Prompt in the Windows Start menu.

  3. Step 3 Right-click the Command Prompt icon icon and click {{MacButton|Run as Administrator.

    This opens the Command Prompt with administrative privileges.

    • If you are not signed in to an administrative account, you may be asked to enter an administrative password.
  4. Step 4 Type manage-bde -off <drive letter>: and press ↵ Enter.» src=»https://www.wikihow.com/images/thumb/4/40/Turn-Off-BitLocker-Step-10-Version-2.jpg/v4-460px-Turn-Off-BitLocker-Step-10-Version-2.jpg» width=»460″ height=»346″ loading=»lazy»></p>
<div class= Картинка с сайта: www.wikihow.com

Replace «<drive letter>» with the drive letter that you want to decrypt. This will decrypt that drive.[1]

  • For example, if you want to decrypt your C: drive, you would type manage-bde -off C: and press Enter.
  • To check the status of BitLocker in the Command Prompt, type manage-bde -status and press Enter.

Advertisement

  1. Step 1 Right-click the Windows Start menu icon.

    Right-clicking the Windows Start menu displays a context menu with a variety of system applications.

  2. Step 2 Click Windows Powershell (admin).

  3. Step 3 Type Disable-BitLocker -MountPoint "<drive letter>:"» src=»https://www.wikihow.com/images/thumb/1/1d/Turn-Off-BitLocker-Step-13-Version-2.jpg/v4-460px-Turn-Off-BitLocker-Step-13-Version-2.jpg» width=»460″ height=»344″ loading=»lazy»></p>
<div class= Картинка с сайта: www.wikihow.com

and press Enter. Replace «<drive letter>» with the letter of the drive you want to decrypt. This will decrypt the drive.

  • For example, if you want to decrypt your C: drive, you would type Disable-BitLocker -MountPoint "C:" and press Enter.
  • If you want to check the status of BitLocker, type Get-BitLockerVolume and press Enter.[2]
  • To decrypt all drives, type Disable-BitLocker -MountPoint $BLV and press Enter.[3]

Advertisement

  1. Step 1 Find your recovery key.

    When you set up BitLocker on your computer, you were given a 48-digit recovery key to use when you forget your BitLocker password. You’ll need to find this key before you can unlock BitLocker:[4]

    • If you printed out your recovery key, look for it in any location in which you keep important documents.
    • If you saved your recovery key as a text file on a USB drive, plug the USB drive into a different Windows computer to open the text file and view the key.
    • If your system administrator or IT professional set up BitLocker for you, contact them for specific instructions on getting back your key.
  2. Step 2 Start your computer if necessary.

    If your computer isn’t already turned on to the BitLocker screen, turn on your computer.

    • If your computer is turned on to the BitLocker screen, skip this step and the next one.
  3. Step 3 Wait for the BitLocker screen to load.

    It can take several minutes for the BitLocker login screen to open.

  4. Step 4 Press Esc.

    Doing so indicates that you want to enter the recovery key instead of your BitLocker password.[5]

  5. Step 5 Enter your BitLocker recovery key.

    Type the 48-digit recovery key into the provided text box at the top of the screen.

  6. Step 6 Press ↵ Enter.

    This will submit your key.

  7. Step 7 Follow the on-screen prompts.

    Depending on your computer, you may have additional options after submitting your key. Once you’ve navigated through any extra prompts, you’re free to turn off BitLocker from within Settings.

  8. Advertisement

Add New Question

  • Question

    What if this device can’t use a Trusted Platform Module?

    If your device does not have a TPM, you still can use BitLocker. It is just not possible to use Trusted Boot, meaning the TPM verifies the boot loader before booting. Secure Boot still works, but it is not as good as Trusted Boot.

Ask a Question

200 characters left

Include your email address to get a message when this question is answered.

Submit

Advertisement

Video

  • If you aren’t asked to enter a BitLocker password when booting up your computer, BitLocker probably isn’t enabled.

Thanks for submitting a tip for review!

Advertisement

  • BitLocker is not available for Windows 10 Home edition users, and some Windows 10 and 11computers may not have the proper hardware settings enabled to support BitLocker in the first place.

Advertisement

About This Article

Article SummaryX

1. Open your PC’s Settings.
2. Click System.
3. Click the Device encryption tab.
4. Click Turn off, then click Turn off when prompted.

Did this summary help you?

Thanks to all authors for creating a page that has been read 472,203 times.

Is this article up to date?

What is BitLocker? How to turn off BitLocker Windows 10 with ease? This post from MiniTool will demonstrate how to remove BitLocker Windows 10. Refer these 7 ways to turn off BitLocker Windows 10.

BitLocker is a Microsoft built-in feature in Windows Pro and Enterprise version starting with Windows Vista. The BitLocker feature is designed to protect data by providing encryption for entire volumes, such as password protect USB drive.

In addition, the BitLocker uses the AES encryption algorithm in cipher block chaining or XTS mode with a 128-bit or 256-bit Key.

However, some people don’t need the BitLocker feature and wonder how to turn off BitLocker Windows 10. In order to remove BitLocker Windows 10, you come to the right place. This post shows how to disable BitLocker Windows 10.

7 Way to Disable BitLocker Windows 10

In this part, we will demonstrate 7 ways to disable BitLocker Windows 10.

Way 1. Disable BitLocker Windows 10 via Control Panel

First of all, you can choose to disable BitLocker Windows 10 via Control Panel. 

Now, here is the tutorial.

  1. Open Control Panel.
  2. Choose BitLocker Drive Encryption.
  3. Expand the BitLocker-protected drive and choose Unlock drive.
  4. Then input the password.
  5. Then click Turn off BitLocker.

choose Turn off BitLocker

Way 2. Disable BitLocker via Settings

In order to turn off BitLocker Windows 10, you can also try removing BitLocker Windows 10 through the Settings app.

Now, here is the tutorial.

  1. Press Windows key and I key together to open Settings.
  2. In the pop-up window, choose System.
  3. In the pop-up window, choose About from the left panel.
  4. Then locate the Device encryption section in the right panel and choose Turn off button.
  5. Then in the confirmation window, click Turn off again.

After that, the BitLocker feature has been disabled on your computer.

Way 3. Disable BitLocker via Local Group Policy Editor

In order to turn off BitLocker Windows 10, you can choose to disable it via Local Group Policy Editor.

Now, here is the tutorial.

  1. Press Windows key and R key together to open Run dialog.
  2. Type gpedit.msc in the box and click OK to continue.
  3. In the pop-up window, navigate to the following path: Computer Configuration -> Administrative Templates -> Windows Components – > BitLocker Drive Encryption -> Fixed Data Drives.
  4. Then select Deny write access to fixed drives not protected by BitLocker.
  5. In the pop-up window, choose Not Configure or Disabled. Then click Apply and OK to confirm the changes.

choose Disabled or Not Configured

After that, the BitLocker feature has been disabled from the computer.

Way 4. Disable BitLocker via CMD

As for how to turn off BitLocker Windows 10, you can choose to disable BitLocker via CMD.

Now, here is the tutorial on how to disable BitLocker CMD.

  1. Open Command Prompt as administrator.
  2. In the pop-up window, type the command manage-bde -off X: and hit Enter to continue. Please replace X with the actual hard drive letter.
  3. Then the decryption process will begin. It will take some time and please do not interrupt it.

type the command and wait for it to be finished

When it is finished, you have finished the process of disabling BitLocker cmd.

Way 5. Disable BitLocker via PowerShell

In order to turn off BitLocker Windows 10, you can also choose to disable it through PowerShell.

Now, here is the tutorial.

  1. Type PowerShell in the search box of Windows and choose the best-matched one.
  2. Then right-click it to choose Run as administrator.
  3. In the pop-up window, type the command Disable-BitLocker -MountPoint “X:” and hit Enter to continue. Please replace the X with the actual encrypted hard drive letter.

type the command

When it is finished, the BitLocker feature of the encrypted hard drive has been disabled.

In addition, you can also choose to disable BitLocker for all volumes. Just input the following commands to continue.

$BLV = Get-BitLockerVolume
Disable-BitLocker -MountPoint $BLV

After that, you are able to remove BitLocker Windows 10.

Way 6. Disable BitLocker Service

There is another way for you to remove BitLocker Windows 10. You can choose to disable BitLocker service.

 Now, here is the tutorial.

  1. Press Windows key and R key together to open Run dialog.
  2. In the pop-up window, type services.msc in the box and click OK to continue.
  3. In the Services window, find the BitLocker Drive Encryption Service and double-click it.
  4. Then change its Startup type to Disabled.
  5. Then click Apply and OK to save the changes.

change Start up type to Disabled

When it is finished, you have disabled BitLocker Windows 10.

Way 7. Format Encrypted Hard Drive

There is an available way for you to remove BitLocker Windows 10. If there is no important file on the hard drive, you can choose to format it and remove BitLocker Windows 10. If there are important files on it, it is not recommended to use this way.

Now, here is the tutorial.

  1. Right-click the encrypted hard drive, then choose Format.
  2. In the pop-up window, set the file systems and check the option Quick format. Then click Start to continue.

After that, you have removed BitLocker from the hard drive Windows 10. If you have lost data after formatting, you can read the post to How To Recover Files From Formatted Hard Drive (2020) – Guide to learn more.

Final Words

To sum up, this post has introduced 7 ways to turn off BitLocker Windows 10. If you want to disable BitLocker, try these ways. If you have any better way on how to turn off BitLocker Windows 10, you can share it in the comment zone.

In windows 10 if you are using BitLocker fir security reasons and you want to disable it, then you can do it easily by following several methods by using PowerShell, using group policy and by bit locker services, you can disable BitLocker in windows 10 using command prompt as well with admin permission. So lets see in detail how to disable BitLocker in windows 10 below.

Disable BitLocker in windows 10

Use PowerShell to disable bitlocker in windows 10:

Step 1: Right click on windows 10 start menu and
click on windows PowerShell (admin).

Note: Make sure you run PowerShell with
administrative privileges.

Step 2: Now in PowerShell type in following command
-> manage-bde -status and hit enter.

INFO: you will get the list of all encrypted volumes
(if protection is ON) and status of protection.

Step 3: Now type this command in PowerShell ->
Disable-BitLocker -MountPoint “D:” and press enter.

Info: Above PowerShell command will disable bitlocker
protection for drive D.

That’s it, this is how you disable bitlocker using PowerShell
command in windows 10 without any issues bitlocker will be disabled.

Disable BitLocker in windows 10 using Group Policy:

Step 1: Press windows key + R on your windows 10
keyboard.

Step 2: Windows run will prompt on you windows
screen.

Step 3: In run type in gpedit.msc and press ok.

Info: gpedit.msc will open group policy edit settings

Step 4: On the left side pane-> Click on
Administrative templates in windows group policy editor settings.

Step 5: Click on windows component.

Step 6: Now, Expand -> BitLocker Drive Encryption.

Step 7: Click on Feed Data Drives

Step 8: Now, on the right side pane -> Double
click on -> Deny Write access to fixed drives not protected by bitlocker.

Step 9: Select Disable or not configured and click
apply and ok.

Step 10: Close group policy settings.

Once, you change settings and disable bitlocker go ahead and
restart your computer to make these changes reflect on you windows 10 computer
and that’s it, this is how you disable bitlocker in windows 10 using group
policy editor.

Disable BitLocker Services:

Step 1: Press windows + R key on your keyboard and open
run.

Step 2: In Run -> type in services.msc and press
ok

Step 3: In windows 10 services -> right side
pane->Select BitLocker Drive Encryption Service and double click on it.

Step 4: Change the start-up type from manual or automatic
to Disabled
.

Step 5: Click Apply and ok and close windows 10
service settings.

Close all open settings and restart your windows 10 computer
to make changes to apply. That’s it, this is how you disable bitlocker using
services settings in windows 10.

How to check bitlocker status PowerShell?

Step 1: Open PowerShell admin in windwos 10

Step 2: In PowerShell type in -> manage-bde
-status and press enter.

That’s it, this will return bit locker status is enabled for
which drive and all bit locker enabled folders and protection is on or not.

Disable bitlocker windows 10 command line

Step 1: Open windows command prompt as administrator.

Step 2: Now, identify for which drive bit locker is
enabled.

Step 3: In windows 10 command prompt -> enter Disable-BitLocker
-MountPoint “D:”
and press enter.

That’s it, after running above command in windows 10 command
prompt, bitlocker for drive D will be disabled.

PowerShell commands for bitlocker?

To check status of protection enable for which drive and
bitlokcer protection is enable or not use this powershell command: manage-bde
-status and hit enter.

To disable bitlocker PowerShell command is : Disable-BitLocker
-MountPoint “D:”
and press (for drive D here)

How to disable bitlocker without admin rights?

In windows 10 bit locker is used to protect drive with
encryptions enabled, you need admin rights to disable bitlocker, if you want
you can reinstall windows 10 on your computer or you can try to recover admin
password or change admin password and disable bitlocker. BitLocker is more
secure built in windows 10 offline attacks and make your drive secure.

Can I disable bitlocker in windows 10?

Yes! You can disable BitLocker in windows 10.

Disable bitlocker using PowerShell commands?

Open PowerShell as run as administrator and in PowerShell enter -> Disable-BitLocker -MountPoint “D:” and press enter to disable bitlocker.

How to check status of bitlocker using PowerShell?

Open PowerShell and enter -> manage-bde -status and press enter to know protection status of bitlocker.

PowerShell Commands for bitlocker?

manage-bde -status and press enter to know status and to disable enter -> Disable-BitLocker -MountPoint “D:”.

Ramanahttps://www.asavvyweb.com

Ramana Tula is a — Technical Content Writer and he is a Full stack Web and Android Developer also — SEO Manager and also manages Digital Marketing.

You want to make sure your valuable data is safe and secure. The last thing you want to hear is that your data has fallen into the wrong hands, especially if you lose your precious device. 

BitLocker provides an easy way for Windows 10 users to protect their data using encryption. The program creates a secure environment for all your files without any extra effort on your part.

How to Turn Off or Disable Bitlocker on Windows 10 image 1

If you don’t need BitLocker anymore, you can turn it off in a few quick steps. However, when you disable BitLocker on Windows 10 it will decrypt all your files, and your data won’t be protected anymore.

What Is BitLocker?

BitLocker is a native feature built into PCs running Windows 10 Pro or Enterprise versions. The feature encrypts your whole hard drive to protect your data from unauthorized tampering and prying eyes.

Not sure what version of Windows you’re using? Check out our guide on how to tell what version of Windows you have installed.

Note: While Windows 10 Home doesn’t have BitLocker, you can still use device encryption to protect your files from unauthorized access if your device gets lost or stolen. You can also put your important files in the OneDrive Personal Vault.

How to Turn Off or Disable Bitlocker on Windows 10 image 2

BitLocker uses your Windows login to secure your data without requiring extra passwords. The feature encrypts your data by scrambling it so that no one can access or read it without using a recovery key. 

BitLocker only protects your data in case your device is stolen or lost. If you want to protect your files from ransomware or other malware, check out our top picks for the best malware and virus scanners guaranteed to nuke any virus. 

BitLocker is a discrete method of protecting your data from unauthorized access. Turning off the feature won’t erase any of your files, but it’s still good practice to keep backup copies of your files. 

There are different ways you can disable BitLocker on Windows 10, such as through Settings, Control Panel, the Windows search box, or via PowerShell and Command Prompt. Below are the steps to take when using each of these methods to disable BitLocker. 

There are some sites that suggest you should disable the BitLocker Windows Service or use Group Policy to disable BitLocker, but those methods don’t really work and could end up causing misconfigurations and errors.

How to Disable BitLocker in Windows 10 Via Windows Search

The Windows search tool allows you to perform narrow searches to find specific items from File Explorer, Start menu, or the Settings menu. You can also run web searches from here without opening your browser and access the files or apps you use most frequently. 

If you want to disable BitLocker, you can easily do so through the Windows search box.

  1. Sign in to your PC using an administrator account, type Manage BitLocker into the Windows search box, and then select it from the list of results.
  1. Next, select Turn off BitLocker
How to Turn Off or Disable Bitlocker on Windows 10 image 4

How to Turn Off BitLocker in Windows 10 Via the Settings Menu

The Windows Settings menu houses basic settings that you can use to make app-specific changes on your PC. Here’s how to turn off BitLocker via the Settings menu. 

  1. Select Start > Settings
  1. In the Settings window, select System
How to Turn Off or Disable Bitlocker on Windows 10 image 6

  1. Select About on the bottom left side, find the Related Settings section on the right pane, and select BitLocker Settings
How to Turn Off or Disable Bitlocker on Windows 10 image 7

Note: If you still don’t see the tab, it means that your PC doesn’t have BitLocker.

  1. Next, select Turn off BitLocker
How to Turn Off or Disable Bitlocker on Windows 10 image 8

  1. If prompted, select Turn off BitLocker again. BitLocker will encrypt your hard drive, after which Windows will prompt you to enter your password before the feature is disabled.
How to Turn Off or Disable Bitlocker on Windows 10 image 9

How to Remove BitLocker in Windows 10 Via Control Panel

The Windows 10 Control Panel contains settings that control nearly everything about how Windows looks and works. Here’s how to turn off BitLocker via the Control Panel. 

  1. Open Control Panel from the Start menu or type Control Panel in the search box and select it from the search results.
How to Turn Off or Disable Bitlocker on Windows 10 image 10

  1. Select System and Security
How to Turn Off or Disable Bitlocker on Windows 10 image 11

  1. Next, select BitLocker Drive Encryption > Manage BitLocker.
How to Turn Off or Disable Bitlocker on Windows 10 image 12

  1. Select the Turn off BitLocker link.
How to Turn Off or Disable Bitlocker on Windows 10 image 13

  1. A popup will appear with the message: Your drive will be decrypted. This might take a long time, but you can keep using your PC during the decryption process. Select Turn off BitLocker to confirm the action.
How to Turn Off or Disable Bitlocker on Windows 10 image 14

Note: If BitLocker encrypted one hard drive, it will begin the decryption process for that drive. If there are different drives, you’ll need to choose the drive for which you want to turn off BitLocker.

How to Turn Off BitLocker Using PowerShell and Command Prompt

Finally, if you’re having issues using the GUI interface or you can only access the command line tools, you can turn off BitLocker using PowerShell or Command Prompt. For both tools, make sure to run them as Administrator.

For PowerShell, the command is below, but you will replace X with the drive letter of the encrypted drive.

Disable-Bitlocker –MountPoint “X:”

How to Turn Off or Disable Bitlocker on Windows 10 image 15

The volume status should be FullyDecrypted and Protection Status should be Off.

If you’re using the command prompt, you will first need the recovery key that you either saved to your Microsoft account or to a file when you first setup BitLocker. It is normally a set of eight numbers that are each six digits separated by dashes. Once you have that, you’ll you need to type the following command, replacing X with the drive letter on your PC:

manage-bde -unlock X: -RecoveryPassword Recovery-Key

How to Turn Off or Disable Bitlocker on Windows 10 image 16

Note that this unlocks the drive, but doesn’t turn off BitLocker fully. If you want to turn it off completely, use this command:

manage-bde -off X:

How to Turn Off or Disable Bitlocker on Windows 10 image 17

If you want to enable BitLocker again later, turn to our guide on how to set up full disk encryption on Windows with BitLocker. 

Safely Disable BitLocker on Windows 10

Disabling BitLocker will decrypt all of your files, meaning your data won’t be protected anymore. However, you can still encrypt your text files or encrypt all your online and offline data.

Whatever you decide to do, make sure your files are protected. If your data falls into the wrong hands, hackers can use your data against you. 

Related Posts

  • How to Fix a “This file does not have an app associated with it” Error on Windows
  • How to Fix an Update Error 0x800705b4 on Windows
  • How to Resolve “A JavaScript error occured in the main process” Error on Windows
  • How to Fix the Network Discovery Is Turned Off Error on Windows
  • How to Change Folder Icons in Windows

Понравилась статья? Поделить с друзьями:
0 0 голоса
Рейтинг статьи
Подписаться
Уведомить о
guest

0 комментариев
Старые
Новые Популярные
Межтекстовые Отзывы
Посмотреть все комментарии
  • Как установить windows 11 на macbook через bootcamp
  • Как сменить комбинацию клавиш для смены языка в windows 11
  • Настройка принт сервера windows 2012
  • Активация сервера лицензий rds в windows server
  • Bluesoleil windows 7 x32