

This tutorial will show you how to enable or disable the automatic mounting and assigning of a drive letter when a new drive is connected for all users in Windows 10 and Windows 11.
Windows will automatically mount new basic volumes that are added to the system, and assign them drive letters by default.
Reference:

automount
Reference article for the automount command, which enables or disables the automount feature.
learn.microsoft.com
mountvol
Reference article for the mountvol command, which creates, deletes, or lists a volume mount point.
learn.microsoft.com
If wanted, you can disable Windows from automatically mounting any new basic volumes that are added to the system.
You must be signed in as an administrator to enable or disable the automount feature.
Contents
- Option One: Check if Automount is Currently Enabled or Disabled
- Option Two: Enable or Disable Automount using «automount» command
- Option Three: Enable or Disable Automount using «mountvol» command
- Option Four: Enable or Disable Automount using REG file
Option One
Check if Automount is Currently Enabled or Disabled
1 Open Windows Terminal (Admin), and select either Windows PowerShell or Command Prompt.
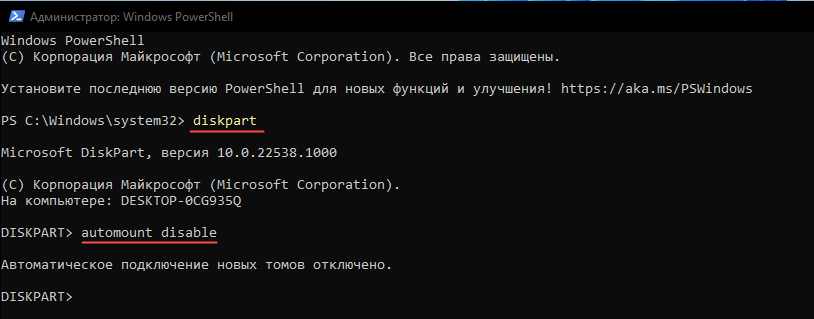
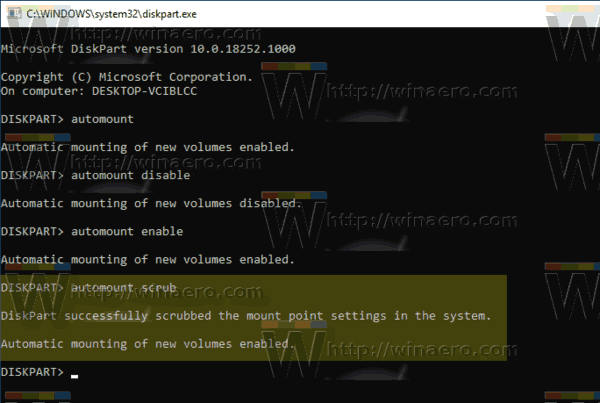
2 Copy and paste diskpart into Windows Terminal (Admin), and press Enter. (see screenshots below)
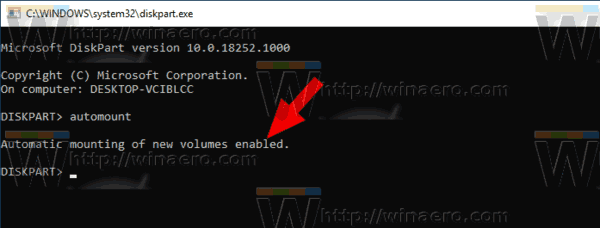
3 Copy and paste automount into Windows Terminal (Admin), and press Enter.
4 The command will now return with a Automatic mounting of new volumes enabled or disabled message for the current status.
5 You can now close Windows Terminal (Admin) if you like.


Option Two
Enable or Disable Automount using «automount» command
1 Open Windows Terminal (Admin), and select either Windows PowerShell or Command Prompt.
2 Copy and paste diskpart into Windows Terminal (Admin), and press Enter. (see screenshots below)
3 Copy and paste the command below you want into Windows Terminal (Admin), and press Enter.
(Enable automount — default)
automount enable
OR
(Disable automount)
automount disable
4 Close Windows Terminal (Admin).
5 Restart the computer to apply.

Option Three
Enable or Disable Automount using «mountvol» command
1 Open Windows Terminal (Admin), and select either Windows PowerShell or Command Prompt.
2 Copy and paste the command below you want into Windows Terminal (Admin), and press Enter. (see screenshots below)
(Enable automount — default)
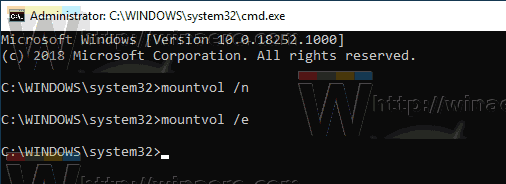
mountvol /e
OR
(Disable automount)
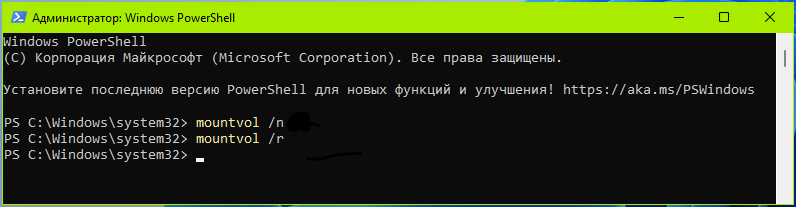
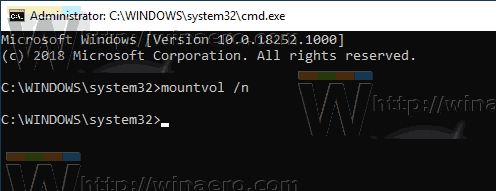
mountvol /n
3 Close Windows Terminal (Admin).
4 Restart the computer to apply.

Option Four
Enable or Disable Automount using REG file
1 Do step 2 (enable) or step 3 (disable) below for what you would like to do.
2 Enable Automount
This is the default setting.
A) Click/tap on the Download button below to download the file below, and go to step 4 below.
Enable_automatic_mounting_of_new_volumes.reg
(Contents of REG file for reference)
Code:
Windows Registry Editor Version 5.00
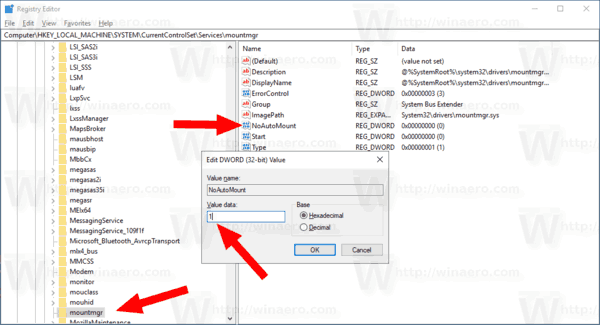
[HKEY_LOCAL_MACHINE\SYSTEM\CurrentControlSet\Services\mountmgr]
"NoAutoMount"=dword:000000003 Disable Automount
A) Click/tap on the Download button below to download the file below, and go to step 4 below.
Disable_automatic_mounting_of_new_volumes.reg
(Contents of REG file for reference)
Code:
Windows Registry Editor Version 5.00

[HKEY_LOCAL_MACHINE\SYSTEM\CurrentControlSet\Services\mountmgr]
"NoAutoMount"=dword:00000001
4 Save the .reg file to your desktop.
5 Double click/tap on the downloaded .reg file to merge it.
6 When prompted, click/tap on Run, Yes (UAC), Yes, and OK to approve the merge.
7 Restart the computer to apply.
8 You can now delete the downloaded .reg file if you like.
That’s it,
Shawn Brink
-
Disable_automatic_mounting_of_new_volumes.reg
Disable_automatic_mounting_of_new_volumes.reg
626 bytes
· Views: 279
-
Enable_automatic_mounting_of_new_volumes.reg
Enable_automatic_mounting_of_new_volumes.reg
626 bytes
· Views: 331
При подключении к компьютеру нового диска последний распознается автоматически, если, конечно, Windows удается распознать его файловую систему. Также при этом подключенным носителям автоматически присваиваются буквы, благодаря чему пользователь может к ним обращаться непосредственно из интерфейса Проводника. Это полезная функция позволяет экономить время и силы, которые при иных обстоятельствах пользователям пришлось бы тратить на инициализацию дисков.
Но в некоторых случаях может понадобиться как раз обратное, то есть сделать так, чтобы Windows более не распознавала подключаемые к компьютеру накопители.
А поможет вам в этом встроенная консольная утилита Diskpart.
Откройте от имени администратора классическую командную строку или PowerShell, запустите в ней одноименной командой утилиту Diskpart и выполните команду:
automount disable
Это действие отключит автоматическое подключение новых томов, но, заметьте, речь здесь идет только о новых томах. Диски, которые подключались до выполнения этой команды, будут по-прежнему инициализироваться Windows, так как их ID сохранены в отдельном системном кэше.
Чтобы знакомые Windows накопители не монтировались, нужно заставить систему о них позабыть, сбросив параметры точек подключения.
Для этого, не выходя из Diskpart, выполняем команду:
automount scrub
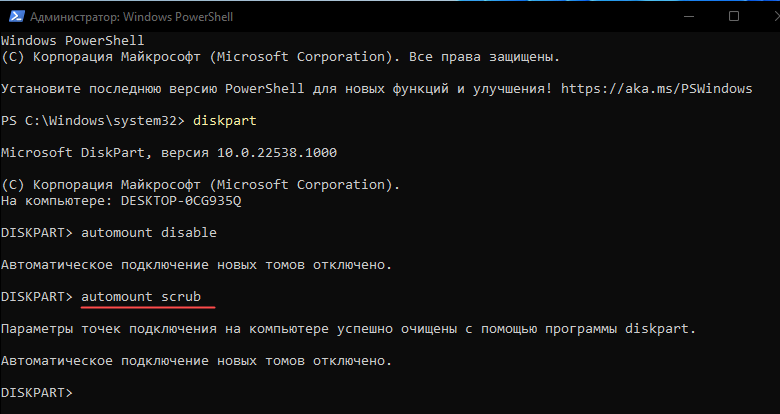
Закрываем консоль и перезагружаем компьютер.
В будущем, если вы захотите включить автомонтирование томов с присвоением им букв, выполните команду:
automount enable
Не забыв предварительно открыть в командной строке Diskpart.
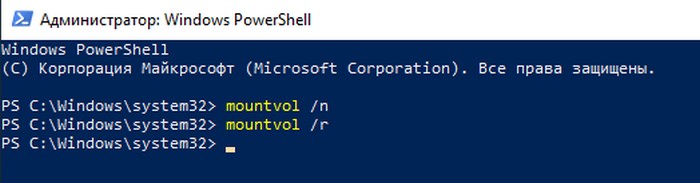
Напоминаем также, что отключить/включить автомонтирование томов в Windows можно с помощью другой штатной консольной тулзы mountvol.
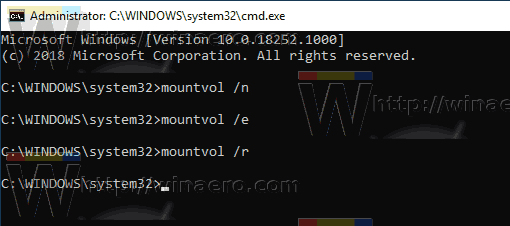
Одноименная команда выполняется в запущенной от имени администратора командной строке или PowerShell, при этом используются ключи /n (отключение автомонтирования) и /r (очистка кэша точек подключения).
Если же выполнить команду mountvol с ключом /е, автоподключение томов будет восстановлено.
By default, Windows 10 mounts a new disk you have connected to the computer. If the OS is able to recognize its file system, it will assign a drive letter to the drive. It is possible to change this behavior and prevent the OS from recognizing newly connected drives automatically.
The change will affect new drives only. Devices you had connected to the computer earlier will continue getting recognized automatically and will get their drive letters. If you are unhappy by this, you can apply a special ‘scrub’ option which will clear the drive letter cache and eliminate the drive information for all currently disconnected drives. After that, they will no longer be recognized by the OS.
You must be signed in with an administrative account to continue.
To disable automount of new drives in Windows 10, do the following.
- Open a new command prompt as Administrator.
- Type the command
diskpart. - In diskpart, type
automountand hit the Enter key. You will see the current state of the feature. In my case, it is enabled.
- To disable automout, execute the command
automout disablein diskpart.

You are done. The automount feature is now disabled.
To re-enable it later, run diskpart as described above and type automount enable.

Now, let’s see how to clear the drive history and remove drive letters for previously connected drives.
Remove Drive Letters for Previously Connected Drives (Scrub)
The automount command of diskpart supports a special option that allows removing drive letters of previously connected drives. This can be done as follows.
- Open a new command prompt as Administrator.
- Type the command
diskpart. - In diskpart, type
automount scruband hit the Enter key.
- Exit diskpart with the
exitcommand and close the command prompt. - Restart Windows 10 to apply the change.
It is worth mentioning that you can enable or disable the drive automount feature with the classic mountvol utility.
Using Mountvol
With mountvol, you can enable or disable the automount feature, and clear the drive letter history. Here is how it can be done.
- Open an elevated command prompt.
- Type
mountvol /nto disable the drive automount feature.
- Type
mountvol /eto enable it.
- The command
mountvol /rwill remove drive letters for previously connected drives.
Finally, it is possible to disable the drive automount feature using a Registry tweak.
Disable Drive Automount with a Registry Tweak
- Open the Registry Editor app.
- Go to the following Registry key.
HKEY_LOCAL_MACHINE\SYSTEM\CurrentControlSet\Services\mountmgr
See how to go to a Registry key with one click.
- On the right, create a new 32-Bit DWORD value NoAutoMount. Note: Even if you are running 64-bit Windows you must still create a 32-bit DWORD value.

Set its value data to 1 in decimal to disable the feature.
- Restart Windows 10.
That’s it.
Support us
Winaero greatly relies on your support. You can help the site keep bringing you interesting and useful content and software by using these options:
If you like this article, please share it using the buttons below. It won’t take a lot from you, but it will help us grow. Thanks for your support!
Когда вы подключаете к компьютеру внешний носитель, Windows 10, если ей удается распознать файловую систему, автоматически присваивает носителю букву и предлагает выполнить то или иное действие, например, открыть его в Проводнике. Функций, безусловно, полезная, но иногда может потребоваться обратное — сделать так, чтобы система не инициализировала подключенные диски, оставляя это действие на усмотрение пользователя.
Как в Windows 10 отключить автоматическое присваивание букв подключаемым дискам и томам
Если дело касается исключительно новых, ранее не подключавшихся к компьютеру накопителей, можно обойтись деактивацией функции automount. Откройте от имени администратора командную строку или PowerShell и запустите в ней утилиту Diskpart. За сим введите команду automount disable
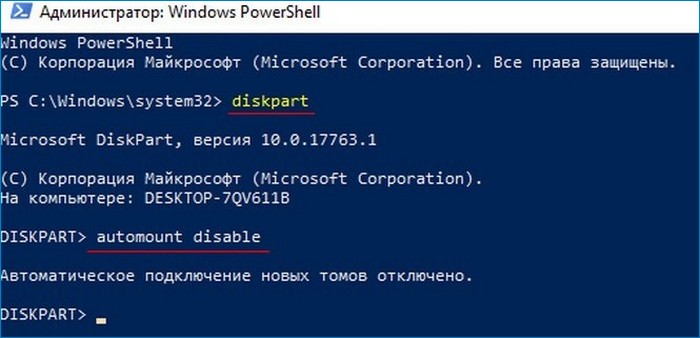
и нажмите ввод. Автоматическое подключение томов будет отключено. Проверить состояние функции можно командой automount без параметров.
Изменение настроек затронет только новые носители, те диски, которые раньше подключались к данному компьютеру, Windows 10 будет распознавать по-прежнему и присваивать им буквы. Чтобы это предотвратить, нужно очистить кэш букв дисков. Для этих целей будем использовать ту же встроенную утилиту Diskpart.
Запускаем ее в открытой в повышенными привилегиями командной строке и выполняем команду automount scrub
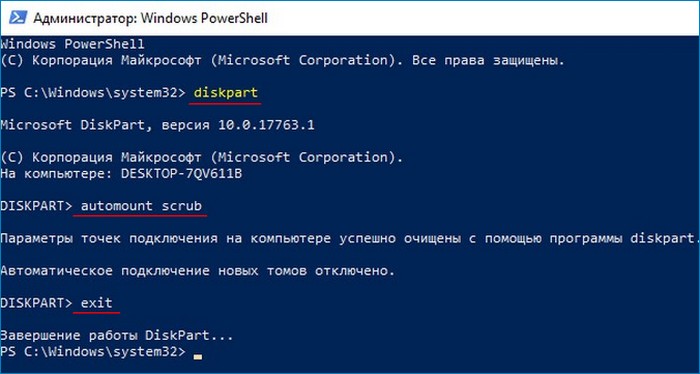
Сообщение «Параметры точек подключения на компьютере успешно очищены…» укажет на очистку кэша. Теперь, чтобы настройки вступили в силу, выходим из Diskpart командой exit перезагружаем компьютер.
Для отключения автомонтирования томов можно использовать другой инструмент командной строки — утилиту mountvol. Она может принимать несколько параметров. Ключ /n отключает функцию автоматического распознавания новых дисков, ключ /r удаляет записи о всех ранее подключаемых к ПК томах, ключ /e восстанавливает настройки по умолчанию, то есть включает автомонтирование.
Есть еще один способ отключить оную функцию, но он не столь удобен. В редакторе реестра нужно развернуть ветку
-
Windows
-
USB-флеш-накопители
Есть флешка с несколькими разделами. На одном из разделов нужно отключить автомонтирование. Пробовал так:
diskpart
list volume
select volume 2
attributes volume set nodefaultdriveletter
После чего выдаёт ошибку:
Ошибка службы виртуальных дисков:
Эта операция не поддерживается на сменных носителях.
Как можно отключить автомонтирование определённого раздела на флешке?
-
Вопрос задан
-
362 просмотра
6
комментариев
Подписаться
2
Простой
6
комментариев
-
А винда разве умеет несколько разделов на флэшке? Вроде даже семерка видит только первый раздел.
-
Vindicar, 11 видит и монтирует все разделы
-
Может у USB Safely Remove есть такой функционал? Что-то я видел в нем, на эту тему.
-
-
Vindicar, в смысле даже семерка? Вы бы еще XP в пример привели или 98. Морально устаревшие ОС нет смысла обсуждать.
Работу с несколькими разделами на флешке добавили еще лет 5 назад, если не больше, в Windows 10. -
Alexander, ну кому морально устаревшая, а кому старая добрая.
Меня и в десятке многое раздражает, а на 11 переходить вообще не планирую, пока её не приведут в божеский вид. Т.е. скорее всего никогда. Уж лучше на никсы.А вообще это я к тому, что игнор разделов на флэшках выглядит как один из микрософтовских обратно-совместимых косяков, который добросовестно воспроизводится из версии в версию. Впрочем, если хоть это починили, рад за них.
Решения вопроса 1
А если через какой нибудь менеджер дисков сделать раздел скрытым?
Не знаю на сколько это с флешками работает.
-
скрытый в смысле повесить аттрибут hide? будет та же ошибка
-
У флешек, которые делаются через Ventoy второй раздел с загрузчиком не монтируется. Можно сделать флешку, а потом пытаться понять от обратного, что там для этого делается.
-
Alexander, загрузчик от ventoy на флешке так же монтируется. Не монтируется только если он на жёстком диске так как к нему применяются аттрибуты hide и nodefaultdriveletter
-
Виктор Фамильевич, не знаю, у меня на нескольких флешках Ventoy и монтируется только основной один раздел.
P.S. Windows 10 22H2 с последними обновлениями, но и ранее не помню, что бы он монтировался. -
Alexander, к другому компу подключите флешку, раздел сразу смонтируется.
-
Alexander, извиняюсь, проверил на новой флешке, действительно раздел VTOYEFI не монтируется.
В общем разобрался, нужно разделу присвоить аттрибут
gpt attributes=0x4000000000000000
тогда он станет скрытым и не будет монтироваться автоматически. Спасибо за наводку)DISKPART> detail partition Раздел 1 Тип : ebd0a0a2-b9e5-4433-87c0-68b6b72699c7 Скрытый : Да Обязательный: Нет Атрибут : 0X4000000000000000 Смещение в байтах: 1048576
Пригласить эксперта
Ваш ответ на вопрос
Войдите, чтобы написать ответ
Похожие вопросы
-
Показать ещё
Загружается…
Минуточку внимания
Войдите на сайт
Чтобы задать вопрос и получить на него квалифицированный ответ.
Реклама