
Go to Local Computer Policy -> Computer Configuration -> Administrative Templates -> Windows Components -> Windows Update. Double-click on «Re-prompt for restart with scheduled installations» «No auto-restart for scheduled Automatic Update installation» Disable it!
- How do I stop a server from restarting after update?
- How do I turn off forced restarts after Windows Update?
- How do I stop automatic restart?
- How do I stop Windows 10 from restarting automatically?
- Why does Windows need to restart after updates?
- What happens if I disable automatic restart on system failure?
- Can I restart during Windows Update?
- Why is Windows 10 stuck restarting?
- How do I disable automatic restart on system failure?
- Why system restart automatically again and again?
- How do I stop a restart?
How do I stop a server from restarting after update?
In the «Local Group Policy Editor», navigate to Computer Configuration > Administrative Templates > Windows Components > Windows Update. Enable the «Configure Automatic Updates» policy and set it to «2». Enable the «No auto-restart with logged on users for scheduled automatic updates installations» policy.
How do I turn off forced restarts after Windows Update?
To do this:
- Go to the start menu and type gpedit. msc. …
- This opens the Local Group Policy Editor. …
- Double-click No auto-restart with automatic installations of scheduled updates”
- Select the Enabled option and click “OK.”
- Close the local Group Policy editor.
How do I stop automatic restart?
Open Control Panel and navigate to Control Panel\System and Security\System (copy paste in the Control Panel address bar) Click ‘Advanced system settings’ and click ‘Settings…’ under the Startup and Recovery section. Under System Failure, uncheck Automatically Restart. Click ‘OK’ and ‘OK’ again to close the window.
How do I stop Windows 10 from restarting automatically?
Disable the automatic restart option to prevent Windows 10 from restarting:
- Click the Search button, search for and open View advanced system settings.
- Click Settings in the Startup and Recovery section.
- Remove the check mark next to Automatically restart, and then click OK.
- Restart the computer.
Why does Windows need to restart after updates?
Whether it’s for Windows updates or just when installing, uninstalling, or updating software, Windows will often ask to reboot. Windows generally has to reboot because it can’t modify system files while they’re being used. Those files are locked, and can only be modified when they’re not being used.
What happens if I disable automatic restart on system failure?
The problem with this default behavior is that it gives you less than a second to read the error message on the screen. … After you disable automatic restart on system failure, Windows will hang on the error screen indefinitely, meaning that you’ll need to restart your computer manually to escape the message.
Can I restart during Windows Update?
It is critical to perform Windows updates for security and enhancements. It is crucial that you do not reboot or restart your PC during one of these updates. The longer you wait to do your updates, the longer your updates will take to download and install.
Why is Windows 10 stuck restarting?
The reason why the restart is taking forever to complete might be an unresponsive process running in the background. … If the issue is there because an update cannot be applied, you can restart the update operation in this way: Press Windows+R to open Run.
How do I disable automatic restart on system failure?
In control panel home on the left, click the Advanced system settings link. Locate the Startup and Recovery section near the bottom of the window and click on the Settings button. In the Startup and Recovery window, locate and uncheck the check box next to Automatically restart.
Why system restart automatically again and again?
There could be multiple reasons for the computer to keep restarting. It could be because of some hardware failure, malware attack, corrupted driver, faulty Windows update, dust in the CPU, and many such reasons. Follow this guide for the fixes to the problem.
How do I stop a restart?
To cancel or abort system shutdown or restart, open Command Prompt, type shutdown /a within the time-out period and hit Enter. It would instead be easier to create a desktop or keyboard shortcut for it. The /a argument will abort a system shutdown and can only be used during the time-out period.
Delaying or Disabling Automatic Reboots in Windows Server 2016 and 2019
Last Updated On
You are here:
Introduction
This guide provides details on how to delay or prevent windows from carrying out automatic reboots on servers by either making changes to group policy or to the registry.
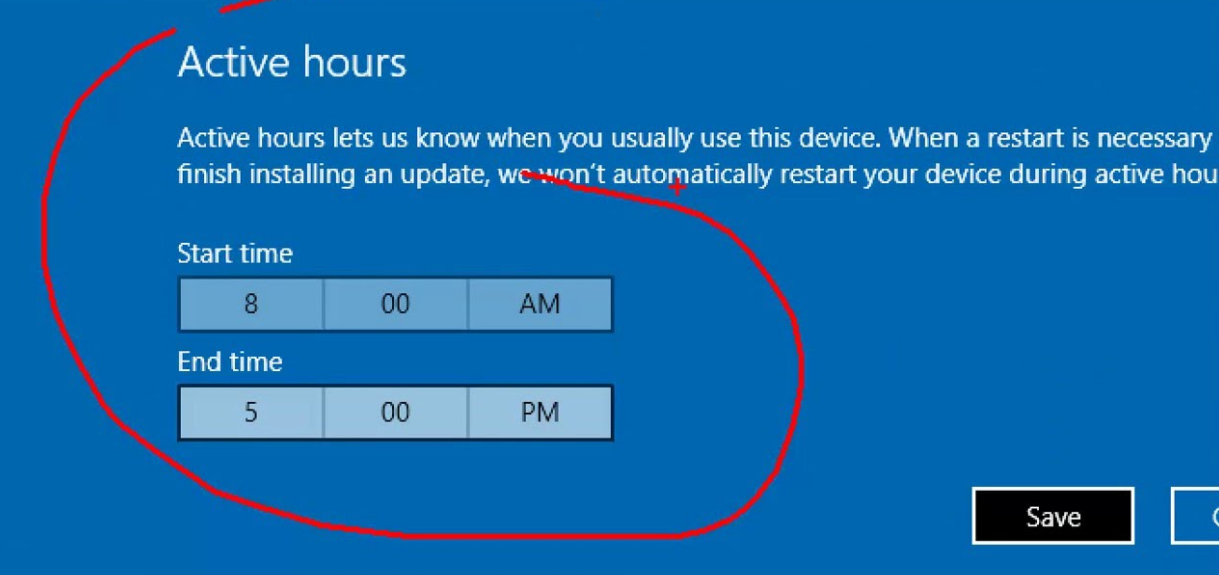
Limit Reboots to Outside of Active Hours
The first option allows you to limit reboots to outside of active hours, follow the below steps to set active hours for update protection.
- Open “Edit group policy” from the start menu
- Navigate to Computer Configuration > Administrative Templates > Windows Components > Windows Updates > Turn-Off Auto-Restart for Updates During Active Hours
- Select Enabled
- In the options in the bottom left, configure desired option from the dropdown menu and select the hours that you would like to protect from reboots (must be 18 hours or less)

Increase the active hours to longer than 18 hours
In some cases where we want longer than 18 active hours, then we need to apply a registry change.
- Open “RegEdit” from the start menu
- Navigate to HKEY_LOCAL_MACHINE > SOFTWARE > Microsoft > WindowsUpdate > UX > Settings
- Set Start Hour ( 5 would equal 5AM )
- Set End Hour (End time is in hexadecimal and are the hours not the actual end time )
| Active Hours | Hexadecimal Values |
| 19 hours | 13 |
| 20 hours | 14 |
| 21 hours | 15 |
| 22 hours | 16 |
| 23 hours | 17 |
Permanently Disable Automatic Reboots
Follow the below steps to permanatly disable windows automatic updates and make the process fully manual.
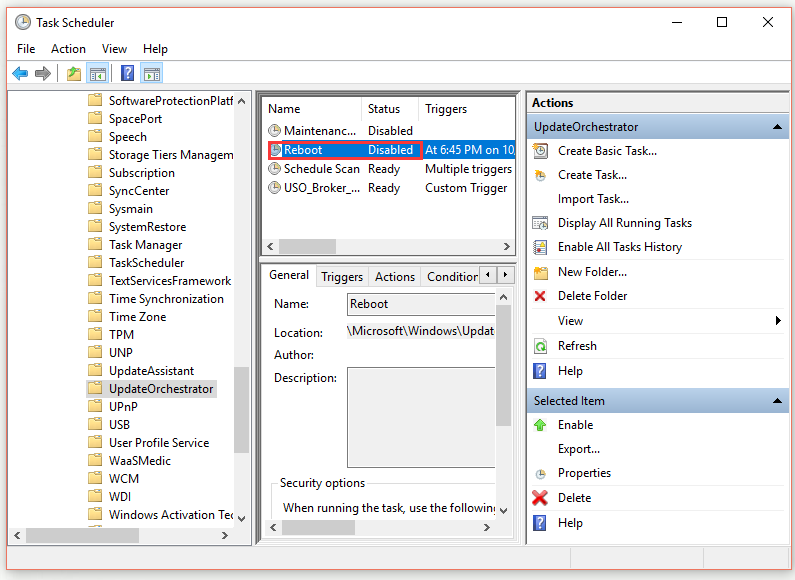
- Open Task Scheduler.
- Navigate to Task Scheduler > Task Scheduler Library > Microsoft > Windows > UpdateOrchestrator
- Right-click Reboot and choose Disable
Then, forbid all users and groups from your computer to access this file
Hello! Microsoft’s product update policy is well known. That is, they are programmed to receive updates periodically and install them automatically. This mechanism is very useful for desktop systems, since it avoids making manual searches for updates. However, in the server environment this can have non-functional consequences. Since some of these updates may cause the system to reboot. In addition, rebooting the server is critical, since many services, processes and folders depend on server activity. Well, in today’s post we’ll see how to disable automatic updates in Windows Server 2019/2016.
How to disable automatic updates in Windows Server 2019/2016
All right, to do this you need to enter the server settings. With this intention, press the Win+X combination and launch a PowerShell with administrator privileges.
Then execute the following command:
SCONFIG

Pressing enter will display an options console to manage the system parameters.

In this case, please select option 5. This option is related to the configuration of Windows Update. Well, once you select the number 5 and press Enter, two values will be displayed:
- The current status of Windows Update.
- The different options to be set.

Below are the available options:
- A: Automatic. This sets up Windows Update to automatically download and install updates on your computer
- D: Download Only. With this option, the updates will be downloaded, but will not be installed on the server. Consequently, the user will decide when to install it.
- M: Manual. This is one of the most ideal options since no available updates will be downloaded. In effect, the administrator will determine when to download and install any updates.
In this case, please enable this option. With this in mind, enter the letter M and press Enter. The change will be applied immediately. Back to the previous screen, press the number 5, and validate that the updates are now manual.

Conclusion
All right, this simple way we’ve seen how to disable automatic updates in Windows Server 2019/2016. As mentioned, it is highly recommended maintaining control over this aspect on the server. Since some updates force a reboot of the system. Additionally, the nature of the system means that it must always be kept active. And this is because a great number of resources depend on the constant activity of the server. All right, that’s it for now. Sometimes, these little tips can make a difference in the optimal functioning of the system. I hope you find it useful. Before saying goodbye, I invite you to see our post about Shadow Copies in Windows Server 2019/2016. Bye!
— Advertisement —
Everything Linux, A.I, IT News, DataOps, Open Source and more delivered right to you.
Subscribe
«The best Linux newsletter on the web»
17 July 2019,
by ,
in IT Support, Windows, Comments off

Windows server 2016 and 2019 by default make you set ‘Active Hours’ and will reboot automatically outside of these hours.
In a 24/7 world I’ve no idea why Microsoft implemented this solution, since most servers need to be running all the time and admins prefer to manually reboot rather than rely on the built in software.
We can fix this by changing the system to DOWNLOAD ONLY, allowing you to then install and reboot when required.
This is done via the SCONFIG command.
1) Open Windows Powershell by right click > run as administrator
2) Type: SCONFIG and hit enter
3) Press 5 (Windows Update Settings)
4) Press D (Download Only mode)
5) Close Powershell
If you were to run SCONFIG again your option 5) should look like this:
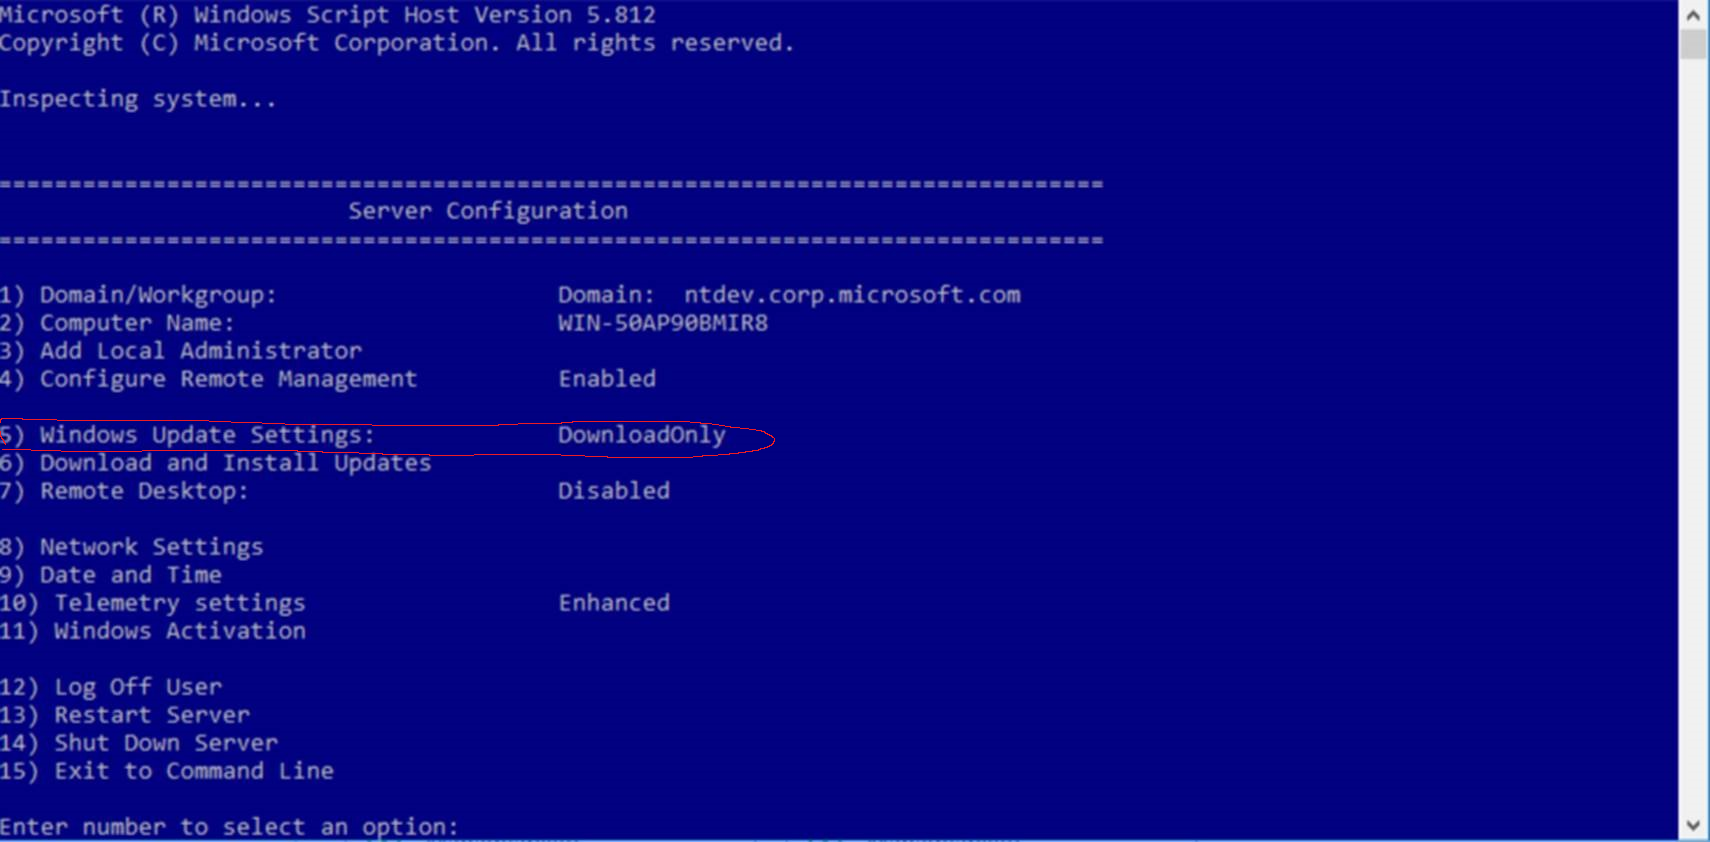
You can now leave your servers on 24/7 and install the updates/reboot when it suits you and not be dictated by the Active Hours option.
Note that the GUI for Windows Server 2016 will not reflect these changes, this is normal and you can ignore what the GUI is saying about Active Hours.
По умолчанию в настройках Windows включена автоматическая перезагрузка ОС при возникновении стоп ошибки (BSOD). При этом Windows создает минидамп памяти, который можно в дальнейшем проанализировать с помощью WinDbg или BlueScreenView. Но кроме дампа памяти на BSOD экране отображается код ошибки, которого иногда бывает достаточно для определения проблемы. Но пользователь не всегда успевает увидеть код ошибки на BSOD экране, т.к. компьютер уходит в перезагрузку слишком быстро. В этой статье мы рассмотрим, как включить/отключить функцию автоматической перезагрузки при отказе системы (Automatic Restart on System Failure) в Windows 10 и 11.
Включить/отключить автоматическую перезагрузку Windows при сбоях можно несколькими способами
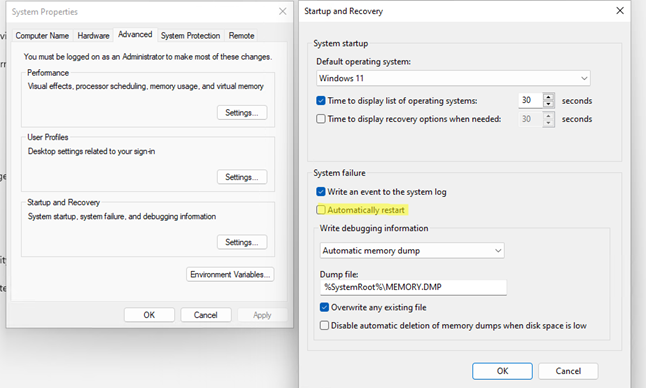
- Через графический интерфейс свойств компьютера. Выполните команду
SystemPropertiesAdvanced.exe
-> Advanced -> снимите чекбокс Automatic Restart (Выполнить автоматическую перезагрузку) в секции System Failure (Отказ системы).
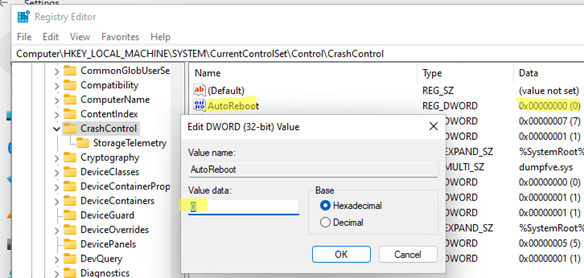
- Можно отлючить автоматическую перезагрузку через ключ реестра AutoReboot (типа REG_DWORD) в ветке HKEY_LOCAL_MACHINE\SYSTEM\CurrentControlSet\Control\CrashControl. Можно изменить значение этого ключа вручную через
regedit
или из командной строки. Чтобы отключить перезагрузку компьютера, измените значение параметра на
0
:
reg add «HKEY_LOCAL_MACHINE\SYSTEM\CurrentControlSet\Control\CrashControl» /v AutoReboot /t REG_DWORD /d 0 /f
- Также для отключения перезагрузки Windows при сбоях можно воспользоваться утилитой командной строки wmic:
wmic RecoverOS set AutoReboot = False
Для включения авто-перезагрузки при BSOD, используйте:
wmic RecoverOS set AutoReboot = True

Если вам нужно отключить автоматическую перезагрузку только один раз (при следующей загрузке компьютера), перезагрузите компьютер в режиме расширенных параметров загрузки (командой shutdown:
shutdown /r /o /f /t 00
, либо с зажатой клавишей
Shift
щелкните по кнопке перезагрузки в стартовом меню Windows).
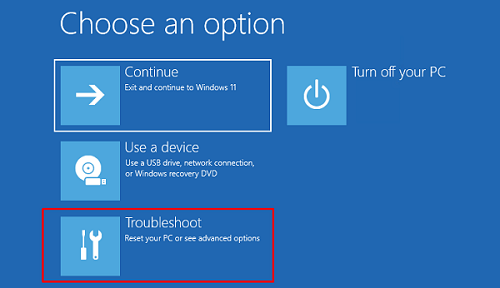
Выберите Troubleshoot.
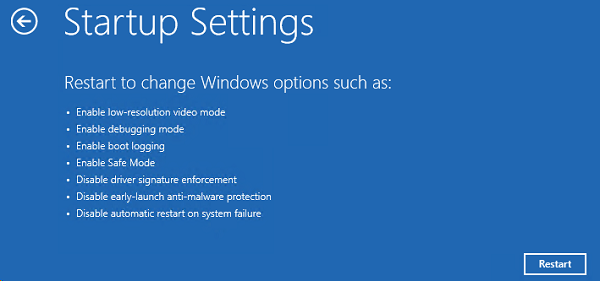
Затем выберите Advanced options -> Startup Settings -> Restart.
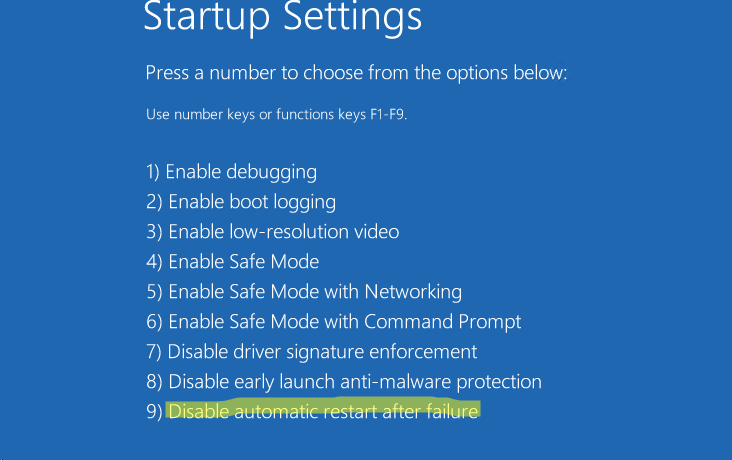
После перезагрузки компьютера в режиме Startup Settings нажмите клавишу F9 или 9 для загрузки компьютера с опцией Disable automatic restart after failure.
Если Windows бесконечно перезагружается и не позволяет внести изменения в свои настройки, вы можете аналогичным образом однократно отключить автоматическую перезагрузку. Для этого достаточно трижды прервать загрузку Windows по питанию.
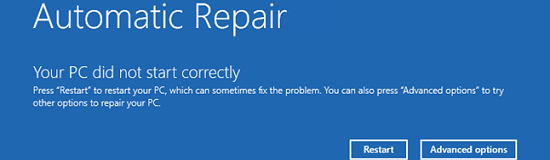
В результате Windows попытается загрузиться с образа восстановления WinRE в режиме автоматического восстановления (Preparing Automatic Repair).
В этом режиме также перейдите в Advanced options -> Startup Settings -> Restart -> F9 для загрузки Windows с отключенной перезагрузкой при сбоях.
Если вам нужно отключить перезагрузку при сбоях для установленного образа Windows в офлайн режиме, нужно загрузится с установочного диска Windows и отредактировать файл реестра
..\Windows\System32\Config\System
. Изменив значение параметра
AutoReboot
в ветке
HKLM\SYSTEM\CurrentControlSet\Control\CrashControl
на
0
и сохраните файл реестра на диск.
Пример офлайн редактирования реестра есть в статье “Компьютер неожиданно перезагрузился, или возникла непредвиденная ошибка. Невозможно продолжить установку Windows”.