
Quick Tips
- Ensure MSC files are configured to open with Microsoft Management Console on your PC.
- Run the System Maintenance Troubleshooter and scan your computer for corrupt system files.
- Try re-registering the DLL files associated with the Services app to see if that solves the problem.
Fix 1: Check Default File Association for MSC Files
MSC (Microsoft Saved Console) files on your computer store information about various systems and third-party services. If these MSC files are not configured to open with the Microsoft Management Console, the Services app may fail to open. Here’s what you can do to fix it.
Step 1: Press the Windows key + I to open the Settings app and head to Apps > Default apps.

Step 2: Type .msc in the search box and click the current default app.
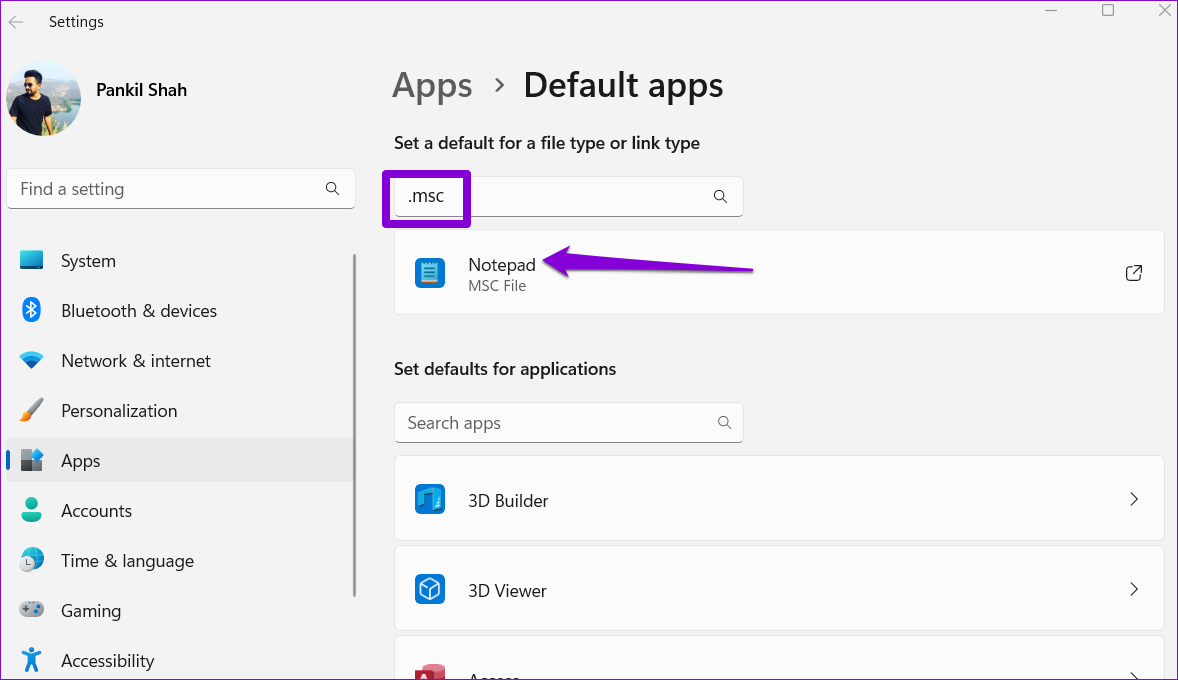
Step 3: Select Microsoft Management Console and click the Set default button at the bottom.

Fix 2: Run System Maintenance Troubleshooter
You can always rely on Windows’ built-in troubleshooters whenever you encounter system-level issues. In this case, you can run the System Maintenance troubleshooter to fix issues with unused files, shortcuts, disk errors, and other system-related issues.
Step 1: Press the Windows key + R to open the Run dialog box. Type msdt.exe -id MaintenanceDiagnostic in the Open field and press Enter.
Step 2: In the System Maintenance window, click Next and follow the on-screen instructions to run the troubleshooter.

Fix 3: Check for Corrupt System Files
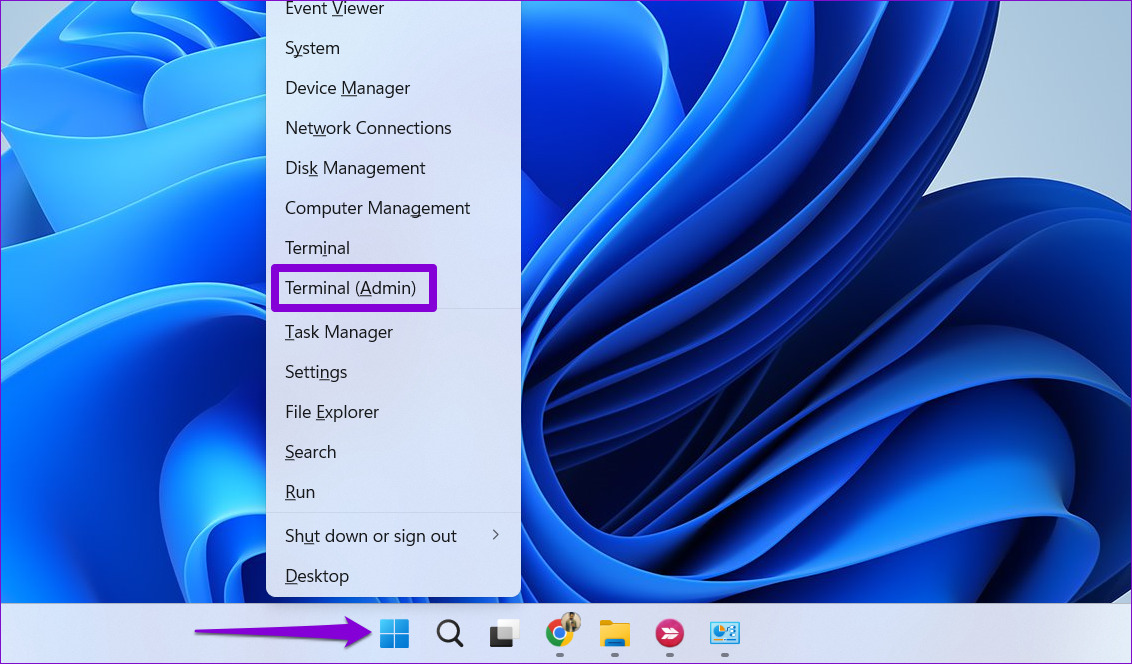
At times, important Windows system files can corrupt and prevent Windows from opening your apps. The System File Check (SFC) and DISM (Deployment Image Servicing and Management) tools can automatically find and fix damaged system files on your computer. Here’s how you can run them.
Step 1: Right-click on the Start icon and select Terminal (Admin) from the list.
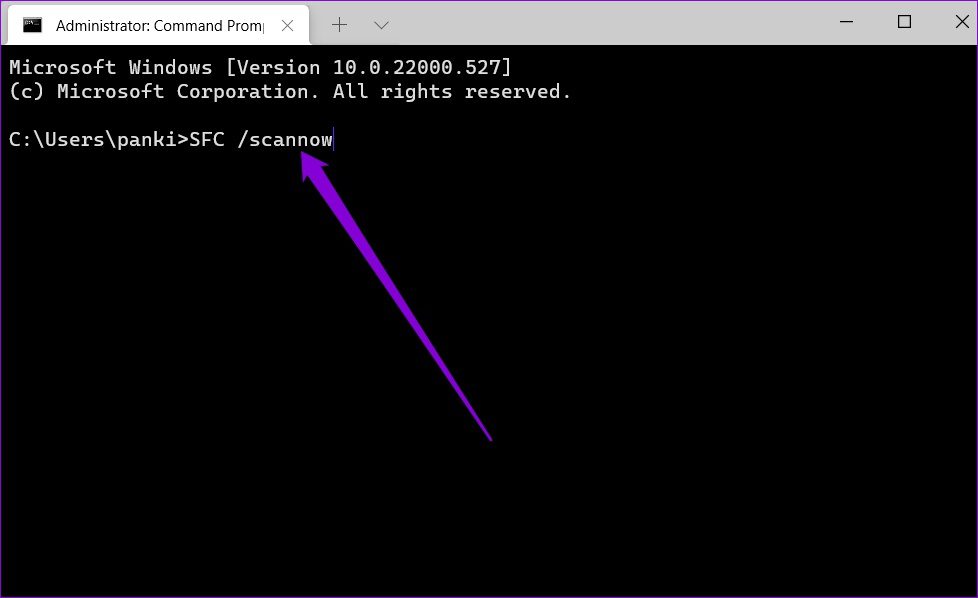
Step 2: In the console, type the following command and press Enter.
SFC /scannow
Step 3: Run the following commands one by one for the DISM scan.
DISM /Online /Cleanup-Image /CheckHealth
DISM /Online /Cleanup-Image /ScanHealth
DISM /Online /Cleanup-Image /RestoreHealth
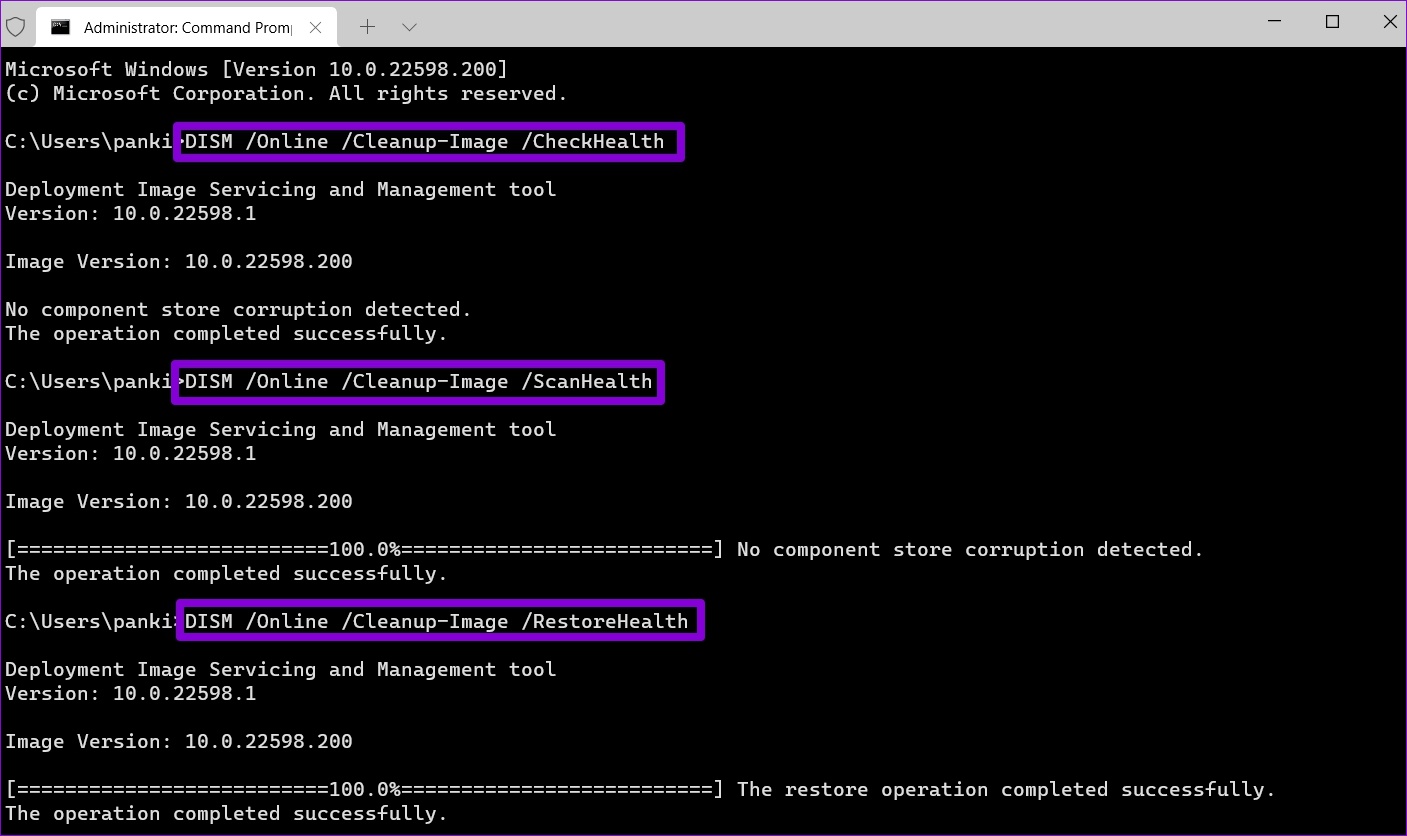
After running the above commands, restart your PC and try to access the Services app again.
Fix 4: Re-Register DLL Files Using Command Prompt
If the SFC and DISM scans fail to find any issues, you can re-register the DLL files associated with the Services app. Here’s how to do it.
Step 1: Press the Windows key + S to open the search menu. Type terminal in the box, right-click on the first result and select Run as administrator.

Step 2: In the console, run the following commands individually and press Enter after each command.
regsvr32 msxml.dll

regsvr32 msxml2.dll

regsvr32 msxml3.dll
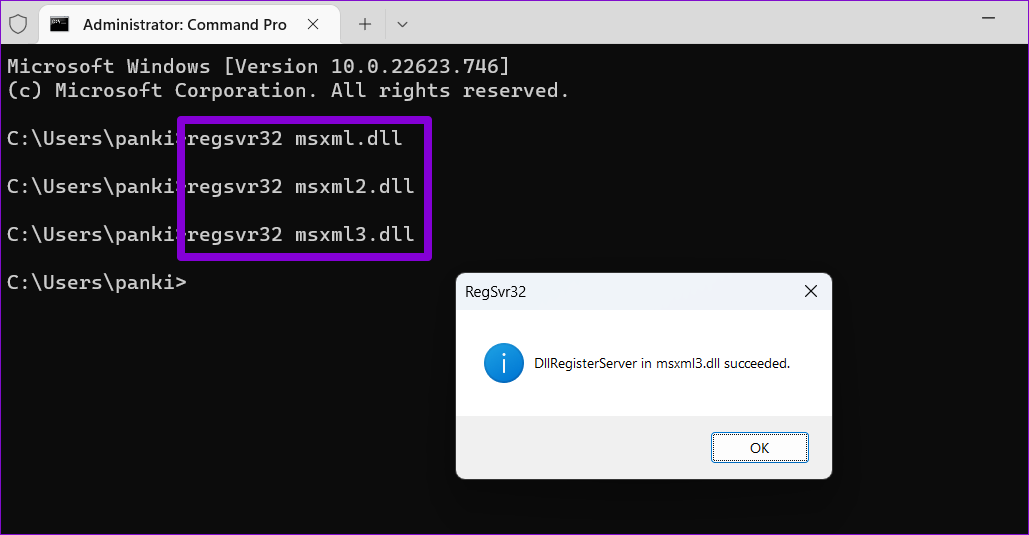
Restart your PC and see if you can open the Services app after that.
Fix 5: Try Clean Boot
There’s a chance that a third-party app or program is interfering with Windows and preventing it from opening the Services app. You can boot your PC in a clean boot state to check for this possibility by following the steps below.
Step 1: Press the Windows key + R to open the Run dialog, type msconfig.msc in the box, and press Enter.
Step 2: Under the Services tab, mark the box that reads Hide all Microsoft services and then click the Disable all button.

Step 3: Switch to the Startup tab and click Open Task Manager.
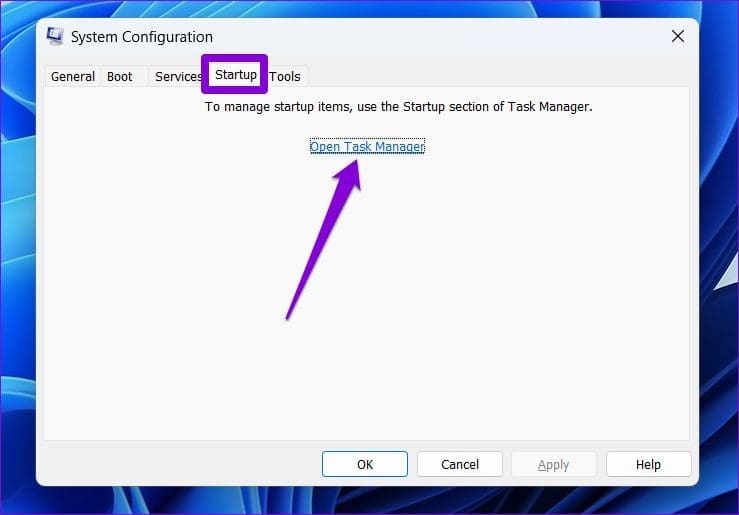
Step 4: On the Startup apps tab, select a third-party app and click the Disable button at the top. Repeat this step to disable all the third-party startup apps.

Restart your PC to enter the clean boot state. If the Services app opens as usual during a clean boot, one of the third-party apps or programs is to blame. You’ll need to review any recently installed apps and programs and remove them to resolve the issue.
Was this helpful?
Thanks for your feedback!
The article above may contain affiliate links which help support Guiding Tech. The content remains unbiased and authentic and will never affect our editorial integrity.
Проверка статуса служб в оснастке управления services.msc – типичная процедура, рекомендуемая в рамках проведения диагностики ошибок в работе разных системных компонентов. Если вам уже приходилось иметь дело с этой оснасткой, то вы уже знаете, что системная или сторонняя служба может быть запущенной и незапущенной и иметь тип запуска «Автоматически (Отложенный запуск)», «Автоматически», «Вручную» и «Отключена».
Наличие этих опций уже предполагает, что работой службы можно управлять, однако в Windows имеется целый ряд служб, для которых эти настройки недоступны. В таких случаях кнопки «Запустить» и «Остановить», а также меню «Тип запуска» неактивны и имеют бледно-серый цвет. Это далеко не всегда указывает на наличие проблемы, поскольку данное состояние является естественным для многих критически важных системных служб.
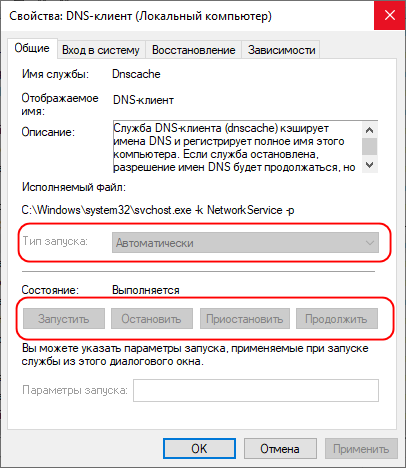
О наличии потенциальной проблемы можно говорить только в том случае, если указанные опции неактивны для остановленной службы. Почему так может быть и что в этом случае можно предпринять?
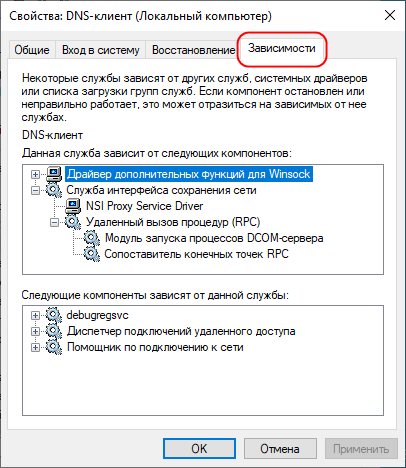
Проверьте зависимости
Служба может не работать по причине отключенных зависимостей – других служб, драйверов и прочих компонентов. Эти зависимости указываются на одноименной вкладке в свойствах службы, например, служба клиента DNS зависит от работы драйвера дополнительных функций для Winsock и служб сохранения интерфейса сети. Убедитесь, что необходимые службы и компоненты запущены.
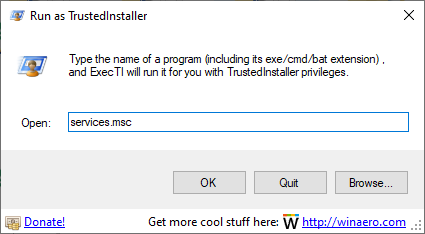
Запустите оснастку с правами системы
Попробуйте запустить оснастку services.msc с системными правами, используя ExecTI или аналогичную утилиту. Это решение может быть эффективно, если проблема вызвана изменением прав доступа.
Используйте конфигурацию системы
Управлять системными и сторонними службами можно не только из оснастки services.msc, но и из интерфейса штатной утилиты «Конфигурация системы». Запустите ее командой msconfig, переключитесь на вкладку «Службы», отыщите в списке службу, которую хотите включить, отметьте ее флажком (если не отмечена), сохраните настройки и перезагрузите компьютер.
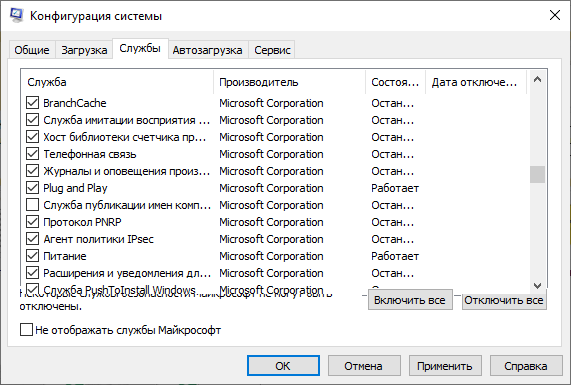
Примечание: аналогичным способом в msconfig можно отключить требуемую службу, не забывая при этом о возможных последствиях.
Используйте редактор реестра
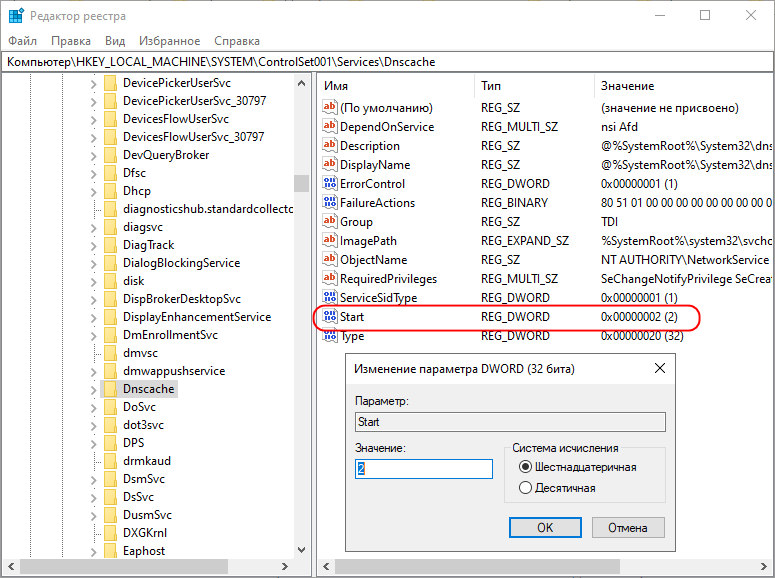
Для изменения типа запуска служб вы также можете использовать редактор реестра.
Запустите его командой regedit и перейдите в раздел HKLM\SYSTEM\CurrentControlSet\Services.
Отыщите в нем подраздел, имеющий то же название, что и служба (английское имя в свойствах), которую вы хотите запустить. В правой колонке найдите параметр Start и установите для него одно из значений:
- 2 – автоматически.
- 3 – вручную.
- 4 – отключено.
Если нужно задать тип «Автоматически (Отложенный запуск)», параметру Start присвойте значение 2, затем в этом же разделе создайте DWORD-параметр DelayedAutostart и установите в качестве его значения 1.

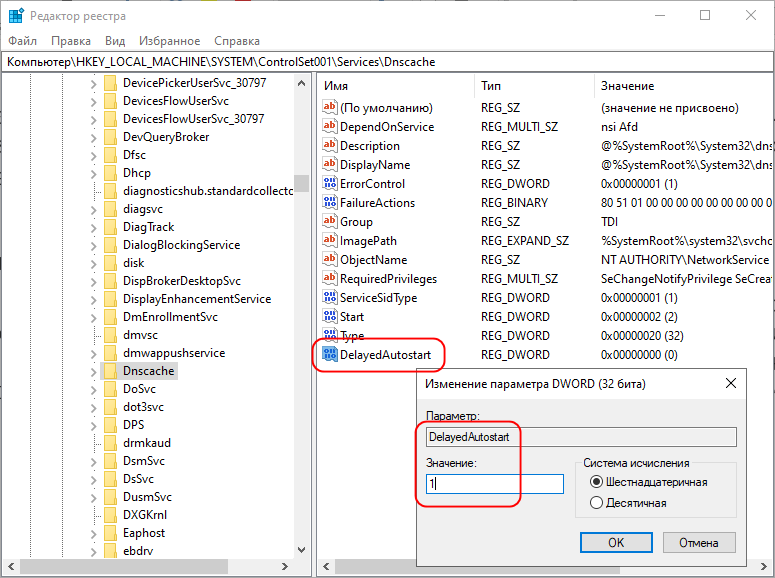
Перезагрузите компьютер и проверьте состояние службы.
Также не стоит забывать, что проблемы со службами могут быть вызваны повреждением связанных файлов библиотек и ключей реестра. Поэтому не будет лишним проверить Windows на предмет целостности командой sfc /scannow, а если это не поможет – экспортировать ключ реестра службы с рабочего компьютера или VM с той же версией системы.
POCO, ACE, Loki и другие продвинутые C++ библиотеки
NullReferenced 13.05.2025
В C++ разработки существует такое обилие библиотек, что порой кажется, будто ты заблудился в дремучем лесу. И среди этого многообразия POCO (Portable Components) – как маяк для тех, кто ищет. . .
Паттерны проектирования GoF на C#
UnmanagedCoder 13.05.2025
Вы наверняка сталкивались с ситуациями, когда код разрастается до неприличных размеров, а его поддержка становится настоящим испытанием. Именно в такие моменты на помощь приходят паттерны Gang of. . .
Создаем CLI приложение на Python с Prompt Toolkit
py-thonny 13.05.2025
Современные командные интерфейсы давно перестали быть черно-белыми текстовыми программами, которые многие помнят по старым операционным системам. CLI сегодня – это мощные, интуитивные и даже. . .
Конвейеры ETL с Apache Airflow и Python
AI_Generated 13.05.2025
ETL-конвейеры – это набор процессов, отвечающих за извлечение данных из различных источников (Extract), их преобразование в нужный формат (Transform) и загрузку в целевое хранилище (Load). . . .
Выполнение асинхронных задач в Python с asyncio
py-thonny 12.05.2025
Современный мир программирования похож на оживлённый мегаполис – тысячи процессов одновременно требуют внимания, ресурсов и времени. В этих джунглях операций возникают ситуации, когда программа. . .
Работа с gRPC сервисами на C#
UnmanagedCoder 12.05.2025
gRPC (Google Remote Procedure Call) — открытый высокопроизводительный RPC-фреймворк, изначально разработанный компанией Google. Он отличается от традиционых REST-сервисов как минимум тем, что. . .
CQRS (Command Query Responsibility Segregation) на Java
Javaican 12.05.2025
CQRS — Command Query Responsibility Segregation, или разделение ответственности команд и запросов. Суть этого архитектурного паттерна проста: операции чтения данных (запросы) отделяются от операций. . .
Шаблоны и приёмы реализации DDD на C#
stackOverflow 12.05.2025
Когда я впервые погрузился в мир Domain-Driven Design, мне показалось, что это очередная модная методология, которая скоро канет в лету. Однако годы практики убедили меня в обратном. DDD — не просто. . .
Исследование рантаймов контейнеров Docker, containerd и rkt
Mr. Docker 11.05.2025
Когда мы говорим о контейнерных рантаймах, мы обсуждаем программные компоненты, отвечающие за исполнение контейнеризованных приложений. Это тот слой, который берет образ контейнера и превращает его в. . .
Micronaut и GraalVM — будущее микросервисов на Java?
Javaican 11.05.2025
Облачные вычисления безжалостно обнажили ахиллесову пяту Java — прожорливость к ресурсам и медлительный старт приложений. Традиционные фреймворки, годами радовавшие корпоративных разработчиков своей. . .
Если после каких-либо действий по оптимизации работы служб Windows 10 вы столкнулись с проблемами, может потребоваться восстановить параметры служб в состояние «по умолчанию». В зависимости от ситуации сделать это можно разными способами.
В этой инструкции подробно о различных методах восстановить службы по умолчанию в Windows 10 и дополнительная информация, которая может оказаться полезной.
- Конфигурация системы
- Точки восстановления
- Файл реестра
- Тип запуска служб по умолчанию
- Другие методы восстановления
- Видео
- Дополнительная информация
Конфигурация системы — способ, который может помочь, но не восстанавливает первоначальную конфигурацию всех служб
Самый часто рекомендуемый способ случай восстановления запуска служб — использовать «Конфигурация системы». По факту он не восстанавливает тип запуска всех служб, но в некоторых случаях может сработать и исправить возникшие из-за неполадок служб проблемы, поэтому рекомендую начать с него:
- Нажмите клавиши Win+R на клавиатуре (Win — клавиша с эмблемой Windows), введите msconfig и нажмите Enter.
- На вкладке «Общие» выберите пункт «Обычный запуск» и нажмите «Применить».

- Перезагрузите ваш компьютер.

После этого проверьте, была ли решена проблема.
Обратите внимание: если вы снова зайдёте в msconfig после перезагрузки, с большой вероятностью вы увидите, что отметка вновь установлена в состоянии «Выборочный запуск» — это нормально и как-то это исправлять не следует.
Точки восстановления — самый быстрый метод восстановления работы служб
Если на вашем компьютере сохраняются точки восстановления и в наличии есть точки восстановления, созданные на момент, предшествующий появлению проблем, это будет самым быстрым способом восстановления работоспособности служб.
В случае если Windows 10 запускается и работает:
- Нажмите клавиши Win+R на клавиатуре, введите rstrui.exe и нажмите Enter. Используйте предложенную точку восстановления или отметьте пункт «Выбрать другую точку восстановления».

- Выберите точку восстановления на дату, когда проблема не проявила себя.
- Запустите восстановление и дождитесь его завершения.


Если Windows 10 не запускается:
- Если отображается синий экран с кнопкой «Дополнительные параметры», вы можете перейти в них, а затем в дополнительных параметрах восстановления системы использовать точки восстановления.

- Можно загрузиться с загрузочной флешки Windows 10, перейти на второй экран программы установки и внизу слева нажать «Восстановление системы», затем перейти к восстановлению из точки восстановления.
REG-файл с параметрами работы служб Windows 10 по умолчанию
Это не лучший способ (и потенциально что-то может пойти не так), так как набор служб и их параметров отличается от версии к версии Windows 10 и в зависимости от редакции системы. Важно: если вы решите использовать этот способ, предварительно создайте точку восстановления Windows 10.
Но при желании и на свой страх и риск, вы можете использовать файл реестра со всеми параметрами служб по умолчанию (кроме сторонних служб) для Windows 10 Pro 20H2 — скачайте этот ZIP-файл — https://yadi.sk/d/cw1yhXAIU-Sq0A, распакуйте его, «запустите» REG-файл и согласитесь с добавлением параметров в реестр Windows 10 после этого перезагрузите компьютер.
Учитывайте, что при добавлении данных в реестр вы с большой вероятностью получите сообщение «Не удается импортировать, не все данные были успешно записаны в реестр». Это связано с тем, что изменение параметров некоторых служб запрещено в Windows 10 и изменения для них произведены не будут.
Тип запуска различных служб Windows 10
На скриншотах ниже — типы запуска служб по умолчанию для Windows 10, представлены только встроенные системные службы в Профессиональной редакции системы (в Домашней некоторые службы могут отсутствовать).


Другие методы восстановления типа запуска и других настроек служб на значения по умолчанию
Если какие-либо методы восстановления работы служб не позволяют решить проблемы, вы можете:
Видео
Дополнительная информация
Настройки запуска и другие параметры служб Windows 10 располагаются в реестре в разделе HKEY_LOCAL_MACHINE\SYSTEM\CurrentControlSet\Services — этот раздел реестра при желании можно импортировать для редактирования даже в случае, когда система не загружается (пример импорта и редактирования в несколько ином контексте в инструкции Как сбросить пароль Windows 10 в разделе про сброс без программ).
В этом разделе присутствуют подразделы с именами, соответствующими «коротким именам» служб Windows. Внутри — параметры этих служб. Тип запуска задаётся параметром Start, обычно он принимает значения 2 (автоматически), 3 (вручную), 4 (отключена).
MSCONFIG or System Configuration is a utility in Windows computers that lets users manage startup processes and troubleshoot startup issues. You can view, enable, and disable Windows and third-party services via MSCONFIG. Moreover, MSCONFIG also helps you troubleshoot issues in a Clean Boot State. The process to disable third-party services via MSCONFIG is simple. Launch MSCONFIG, then navigate to the Services tab. After that, select the Hide all Microsoft Services option and then uncheck the third-party service that you want to disable. What if you disable all the services in MSCONFIG by mistake? In this article, we will talk about what you can do if you have accidentally disabled all services in MSCONFIG.

Disabling all the services will make your system unstable. If you have accidentally disabled all services in MSCONFIG on your Windows computer, the solutions provided in this article may help you resolve the issue. The users who disabled all the services accidentally reported that they got stuck on the sign-in screen.
- Try other ways to log in
- Perform an Automatic Repair
- Perform a System Restore
- Reset your PC
- Repair Windows using an Installation Media.
Let’s see all these fixes in detail.
1] Try other ways to log in
According to users’ feedback, most of them got stuck on the login screen. Because you have disabled all the services in MSCONFIG, the PIN will not work to sign in because the respective service is not running. In this case, you can try other ways to sign in to your computer. If you have set a password as an additional option to sign in, you can use that option and see if it works. Some users have tried to log in using their old password, and it worked.
You can also try signing in using your Microsoft account password (if you have added your Microsoft account to your Windows PC). If you have created another user account that does not have a password or PIN, sign in to your computer via that account. If this works, you can sign in to your computer. Now, launch MSCONFIG, enable all the disabled services, and restart your computer. This will fix the problem.
Also, see if you can enter Safe Mode; if you can, you can reverse the changes in MSCONFIG. If not, read on.
2] Perform an Automatic Repair
Automatic Repair was called Startup Repair earlier. The Startup Repair or Automatic Repair fixes the problems like missing or damaged system files, Windows startup issues, etc. To run Automatic Repair, you have to enter into Windows Recovery Environment.
Windows RE or Windows Recovery Environment is an advanced recovery mode. To enter Windows RE, shut down your computer. After that, turn on your computer by pressing and holding the Shift key. This will take you into the Windows Recovery Environment. If this does not work, there is one more way that you can try. Shut down your computer by pressing and holding the power button. Now, turn on your computer and press and hold the power button when you see the Windows or computer manufacturer’s logo. This will turn off your computer again. Do this three to four times. Interrupting the normal boot process three to four times will start Windows RE automatically.
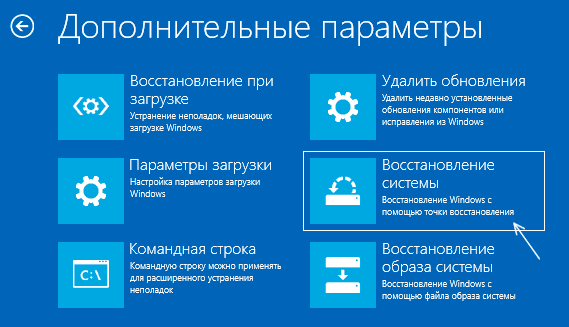
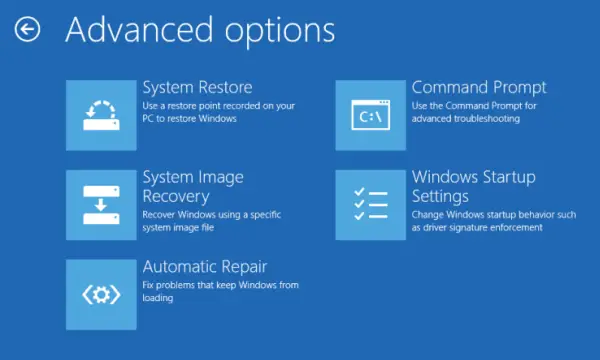
After entering the Windows Recovery Environment, go to “Troubleshoot > Advanced Options > Automatic Repair.” Do not interru[pt the automatic repair process, as it will damage your system files and put you in trouble. After the completion of the automatic repair process, the problem should get fixed.
3] Perform a System Restore
System Restore is a tool designed by Microsoft to protect and repair computer software. It is recommended to turn on System Restore on a Windows computer. If you have turned it on, Windows automatically creates a System Restore Point that contains a snapshot of the Windows Registry and system files. You can use the Restore Points to restore your system if a problem occurs.

Perform a System Restore and select the restore point that is created before the date you have disabled all the services using the MSCONFIG. This will fix the issue but do note that it will also delete or uninstall the programs you have installed after the date on which the Restore Point was created.
Because you are not able to log in to your computer, you have to enter Windows Recovery Environment to restore your system. We have already talked about how to enter Windows RE earlier in this article.
When your enter Windows Recovery Environment, you will see the Preparing automatic repair message. On the Automatic Repair screen, click Advanced options. Now, go to “Troubleshoot > Advanced Options > System Restore.”
4] Reset your PC
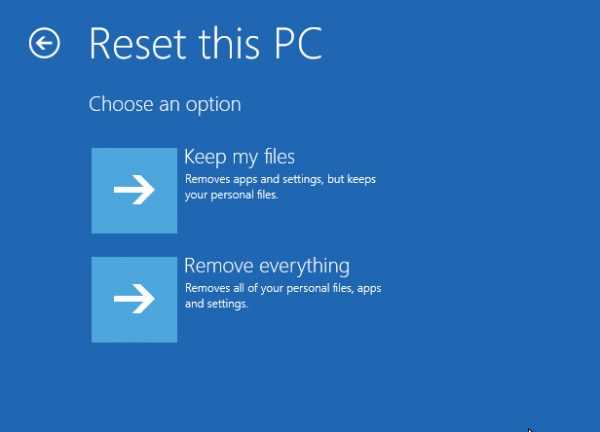
If your problem is not resolved after trying the above fixes, resetting your PC can help. When the Windows operating system is not performing properly or giving you problems, you can reset your PC. When you perform this action, you will see the following two options:
- Keep my files
- Remove everything
If you select the Keep my files option, Windows will remove your apps and settings but your personal files and data will not be deleted. So select this option. To reset your PC, you have to enter Windows Recovery Environment because you cannot log in to your computer. We have already talked about how to enter Windows RE.
After entering Windows Recovery Environment, go to “Troubleshoot > Reset this PC.” Follow the instructions on your screen to reset your PC. After resetting your computer, the issue should get fixed.
This post will show you in detail Reset Windows using Advanced Startup Options when the PC won’t boot.
5] Repair Windows using Installation Media
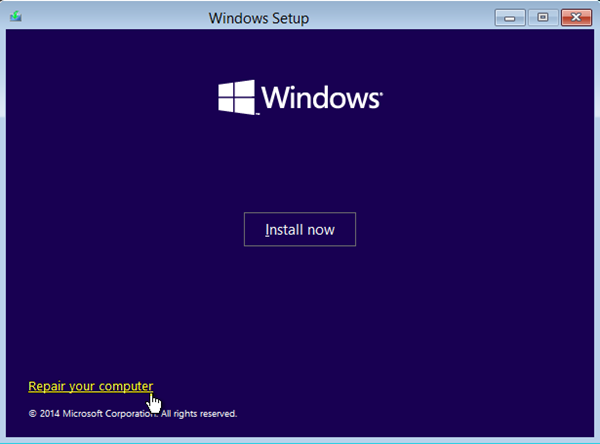
You can repair Windows using Installation Media – that is sure to help you.
Read: Windows Biometric Service stopped working [Fixed].
Can I disable all services in MSCONFIG?
You can disable all services in MSCONFIG but it is not recommended to disable all the services. When you start your system, both Windows and third-party services start automatically and keep running in the background. Windows services are important for the proper functioning of a system. If you disable all the services, your system will become unstable and you will not be able to use it.
If you have disabled all the services in MSCONFIG by mistake, you can try the solutions provided in this article.
How do I enable services in MSCONFIG?
The Services tab of MSCONFIG lets you manage Windows and third-party services You can enable and disable services from there. The Services which show a checkmark are enabled. To disable a service, simply clear the checkbox and then click Apply. This will disable that service. But you have to restart your computer for the changes to take effect. To enable services, open the MSCONFIG app and navigate to the Services tab. After that, enable the checkbox adjacent to the service that you want to enable, then click Apply. Restart your computer.
I hope this helps.
Read next: Windows could not start the Remote Desktop Services.