
Have you ever needed to step away from your computer for an indefinite period but didn’t want to shut it down? This could be for various reasons; maybe you have some work that you wish to get right back into post your lunch break or your PC boots on like a snail. The sleep mode in Windows OS lets you do just that, but what if I told you there’s a better power-saving feature than the usual sleep mode?
Hibernation mode is a power option that lets Windows users exploit the features of both a complete system shut down and the sleep mode. Just like Sleep, users can configure when they want their systems to go under Hibernation, and if they wish, the feature can be entirely disabled, too (although keeping it active does make for a better overall experience).
In this article, we will be explaining the difference between sleep and hibernation modes, and also show you how to enable or disable hibernation on Windows 10.
Table of Contents
What is Hibernation?
Hibernation is a power-saving state primarily made for laptops, although it is available on certain computers as well. It differs from Sleep in terms of power usage and where your currently open (before you left your System); files are saved.
The sleep mode is activated by default when you leave your computer without shutting it down. In the sleep state, the screen is turned off, and all the foreground processes (files and applications) are saved in the memory (RAM). This allows the System to be in a low-power state but still be running. You can get back to work by a single click of the keyboard or by simply moving your mouse. The screen boots on within a few seconds, and all your files & applications will be in the same state as they were when you left.
Hibernation, pretty much like Sleep, also saves the state of your files & applications and is activated after your System has been under Sleep for a prolonged period. Unlike Sleep, which stores files in the RAM and therefore requires a constant power supply, Hibernation doesn’t require any power (like when your System is shut down). This is made possible by storing the current state of the files in the hard drive instead of the temporary memory.
When in an extended sleep, your computer automatically transfers the state of your files to the hard disk drive and switches to Hibernation. As the files have been moved to the hard drive, the System will take a little extra time to boot on than required by Sleep. Although, the boot on time is still faster than booting your computer after a complete shutdown.
Hibernation is particularly useful when the user doesn’t want to lose the state of his/her files but also won’t have the opportunity to charge the laptop for some time.
As obvious, saving the state of your files requires reserving some amount of memory and this amount is occupied by a system file (hiberfil.sys). The reserved amount is roughly equal to 75% of the System’s RAM. For example, if your System has 8 GB of RAM installed, the hibernation system file will take up almost 6 GB of your hard disk storage.
Before we move on to enabling Hibernation, we will need to check if the computer has the hiberfil.sys file. If absent, the computer can not go under Hibernation (PCs with InstantGo do not have the hibernation power option).
To check if your computer can hibernate, follow the below steps:
1. Launch File Explorer by double-clicking on its icon on the desktop or pressing the keyboard shortcut Windows Key + E. Click on Local Drive (C:) to open C Drive.

2. Switch to the View tab and click on Options at the end of the ribbon. Select ‘Change folder and search options’.

3. Again, switch to the View tab of the Folder Options window.
4. Double click on Hidden files and folders to open a sub-menu and enable Show hidden files, folders, or drives.

5. Uncheck/untick the box next to ‘Hide protected operating system files (Recommended).’ A warning message will appear when you try to untick the option. Click on Yes to confirm your action.

6. Click on Apply and then OK to save changes.

7. The Hibernation file (hiberfil.sys), if present, can be found at the root of the C drive. This means your computer is eligible for hibernation.

Enabling or disabling Hibernation is quite easy, and either action can be achieved in a couple of minutes. There are also multiple methods via which one can enable or disable Hibernation. The easiest one is executing a single command in an elevated command prompt while other methods include editing Windows Registry Editor or accessing advanced power options.
Method 1: Enable or Disable Hibernation using Command Prompt
As mentioned, this is the easiest way to enable or disable Hibernation on Windows 10 and, therefore, should be the first method you try.
1. Open Command Prompt as an administrator using any of the listed methods.
2. To enable Hibernation, type powercfg.exe /hibernate on, and press enter.
To disable Hibernation, type powercfg.exe /hibernate off and press enter.

Both the commands do not return any output, so to check if the command you entered was executed properly, you will need to head back to the C drive and look for the hiberfil.sys file (Steps are mentioned earlier). If you find the hiberfil.sys, it implies you were successful in enabling Hibernation. On the other hand, if the file is absent, Hibernation has been disabled.
Method 2: Enable or Disable Hibernation Via Registry Editor
The second method has the user editing the HibernateEnabled entry in the Registry Editor. Be careful when following this method as Registry Editor is an extremely powerful tool, and any accidental mishap can lead to a whole other set of problems.
1. Open Windows Registry Editor using any of the following methods
a. Open Run Command by pressing Windows Key + R, type regedit and press enter.
b. Press Windows Key + S, type regedit or registry editor, and click on Open when the search returns.

2. From the left panel of the registry editor window, expand HKEY_LOCAL_MACHINE by double-clicking on it or by clicking on the arrow to its left.
3. Under HKEY_LOCAL_MACHINE, double-click on SYSTEM to expand.
4. Now, expand CurrentControlSet.
Follow the same pattern and navigate to Control/Power.
The final location indicated in the address bar should be:
HKEY_LOCAL_MACHINE\SYSTEM\CurrentControlSet\Control\Power

5. In the right-hand panel, double click on HibernateEnabled or right-click on it and select Modify.

6. To enable Hibernation, type 1 in the text box under Value Data.
To disable Hibernation, type 0 in the text box under Value Data.
7. Click on the OK button, exit registry editor, and restart your computer.
Again, head back to the C drive and look for the hiberfil.sys to ensure if you were successful in enabling or disabling Hibernation.
Also Read: Disable Windows Pagefile and Hibernation To Free Up Space
Method 3: Enable or Disable Hibernation Via Advanced Power Options
The final method will have the user enable or disable Hibernation through the Advanced Power Options window. Here, users can also set the time frame after which they want their system to go under Hibernation. Like the previous methods, this one is also quite simple.
1. Open Advanced Power Options by any of the two methods
a. Open Run command, type powercfg.cpl, and press enter.
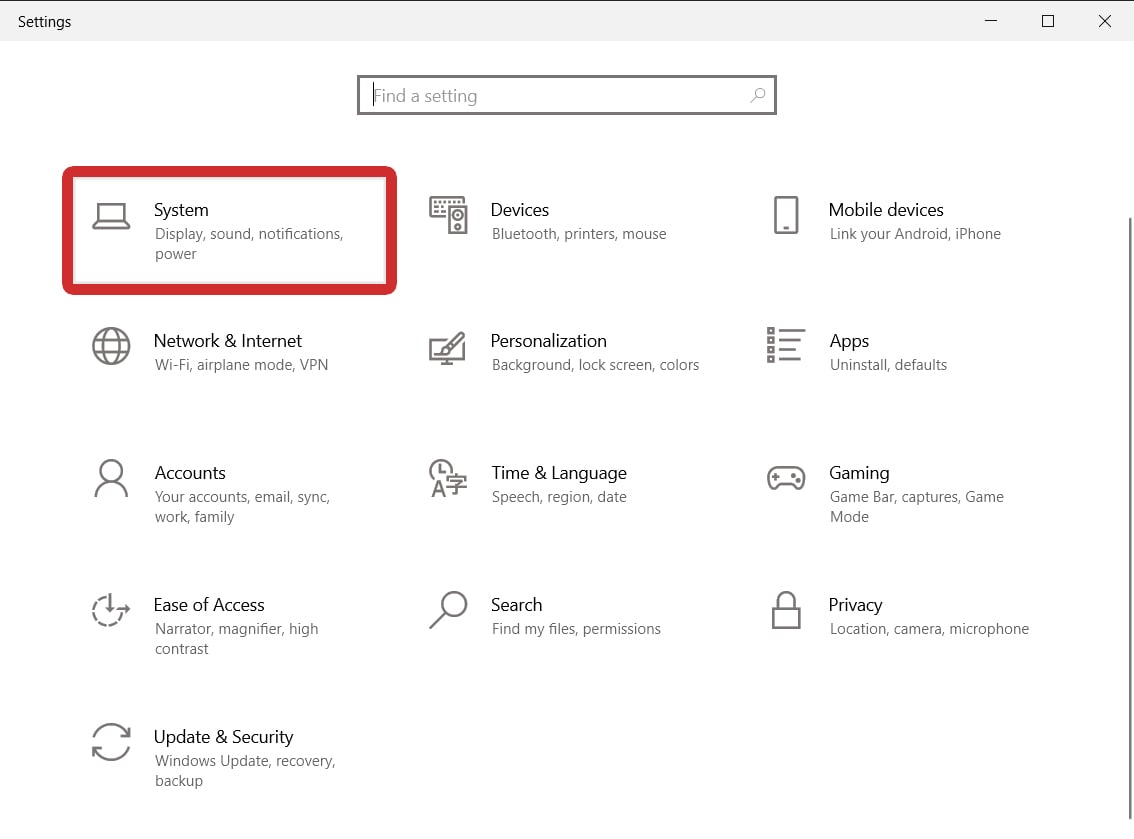
b. Open Windows Settings (Windows Key + I) and click on System. Under Power & Sleep settings, click on Additional power settings.
2. In the Power Options window, click on Change plan settings (highlighted in blue) under the Selected plan section.

3. Click on Change advanced power settings in the following Edit Plan Settings window.

4. Expand Sleep by clicking on the plus to its left or by double-clicking on the label.
5. Double-click on Hibernate after and set the Settings (Minutes) to how many minutes you would like your System to sit idle for before going into Hibernation.
To disable Hibernation, set the Settings (Minute) to Never and under Allow hybrid sleep, change the setting to Off.
6. Click on Apply, followed by OK to save the changes you made.
Recommended:
- How to Enable Google Feed in Nova Launcher
- 5 Ways to Remove Hyperlinks from Microsoft Word Documents
- How to Identify different USB Ports on your Computer
We hope you were successful in enabling or disabling Hibernation on Windows 10. Also, let us know which one of the three above methods did the trick for you.
While both Sleep and Hibernate Mode are Power Saving Modes, the Hibernate Mode is specifically designed to conserve more battery life on Windows Laptops.
When a Windows 11/10 computer goes into Hibernate mode, it offloads its data to a hidden file (hiberfil.sys) located on the hard disk and goes into a state of deep sleep mode, without using any power.
In comparison, when a computer goes into Sleep Mode it offloads its data to RAM and still keeps using a small amount of power, in order to keep the data in the RAM alive.
Enable or Disable Hibernatation Mode in Windows 11/10
You can find below the steps to Enable or Disable Hibernation Mode on a Windows 10/11 computer.
Advertisement
1. Enable/Disable Hibernate Mode By Using PoweShell
The easiest way to enable or disable Hibernate Mode in Windows 10/11 is by using PowerShell or Command Prompt.
1. Type PowerShell in the Search bar > right-click on PowerShell and click on Run as Administrator option.

2. On the PowerShell screen, type powercfg –h off and press the Enter key on the keyboard of your computer.

Once the Command is executed, Hibernate Mode will be disabled and “hiberfil.sys” file will be removed from the hard disk of your computer.
Note: Disabling Hibernate Mode will also disable Windows 10 “Fast Boot” feature on your computer. Fast Boot uses the same technology and does not work without Hibernate.
At any time you can Enable Hibernatation by opening PowerShell (Admin) and using powercfg –h on command.

Once the Command is executed, your computer will be able to Hibernate.
3. Enable/Disable Hibernation Using Advanced Power Settings
1. Right-click on the Start button and click on Run.
2. In the Run Command window, type Powercfg.cpl and click on OK.
Advertisement
3. From the Power Options screen, go to Change Plan Settings > Change Advanced Power Settings.
4. On Advanced Power Settings screen, expand the Sleep entry > expand Hibernate After entry and set both On Battery and Plugged in to Never.

5. To Enable Hibernation, set On Battery & Plugged-in to 90, 120 minutes or any other time that suites your own requirements.
3. Enable/Disable Hibernatation Using Registry
Another way to enable or disable Hibernate mode in Windows 10/11 is by using Registry Editor.
1. Right-click on the Start button and click on Run.
2. In the Run Command Window, type regedit and click on OK.
3. On Registry Editor screen, navigate to HKEY_LOCAL_MACHINE\System\CurrentControlSet\Control\ Power and double-click on HibernateEnabled DWORD in the right-pane.

4. On the next screen, you can enable Hibernate Mode by changing the Value Data to 1 and disable Hibernate Mode by changing Value Data to 0.
5. Click on OK to close the registry editor and save the changes on your computer.
Your Windows 10 computer will automatically sleep after a certain amount of time in order to help conserve power or your laptop’s batteries. However, it can be annoying if your computer keeps going to sleep when you don’t want it to. Here’s how to turn off sleep mode on your Windows 10 PC and prevent your computer from sleeping in the future.
How to Turn Off Sleep Mode on a Windows 10 PC
To turn off sleep mode on a Windows 10 PC, press the Windows + I keys to open a settings window. Then, go to System > Power & sleep and select the drop-down menus under Sleep. Finally, choose Never to completely turn off sleep mode on your computer.
- Press the Windows + I keys on your keyboard. When you press these keys at the same time, a settings window will open. Alternatively, you can open settings by clicking the Windows logo at the bottom of your screen, typing “settings” into the search bar, and clicking Open.
- Then, go to System.

- Next, click Power & sleep. You will see this in the left sidebar. If you don’t see this option, try expanding the window by clicking the square icon in the top-right corner.
- Finally, click the drop-down boxes under Sleep and change them to Never. Your computer will not enter sleep mode anymore. You can also choose to adjust the time it takes before your computer goes to sleep.
Note: You will only see two drop-down menus under Sleep if you are using a laptop.
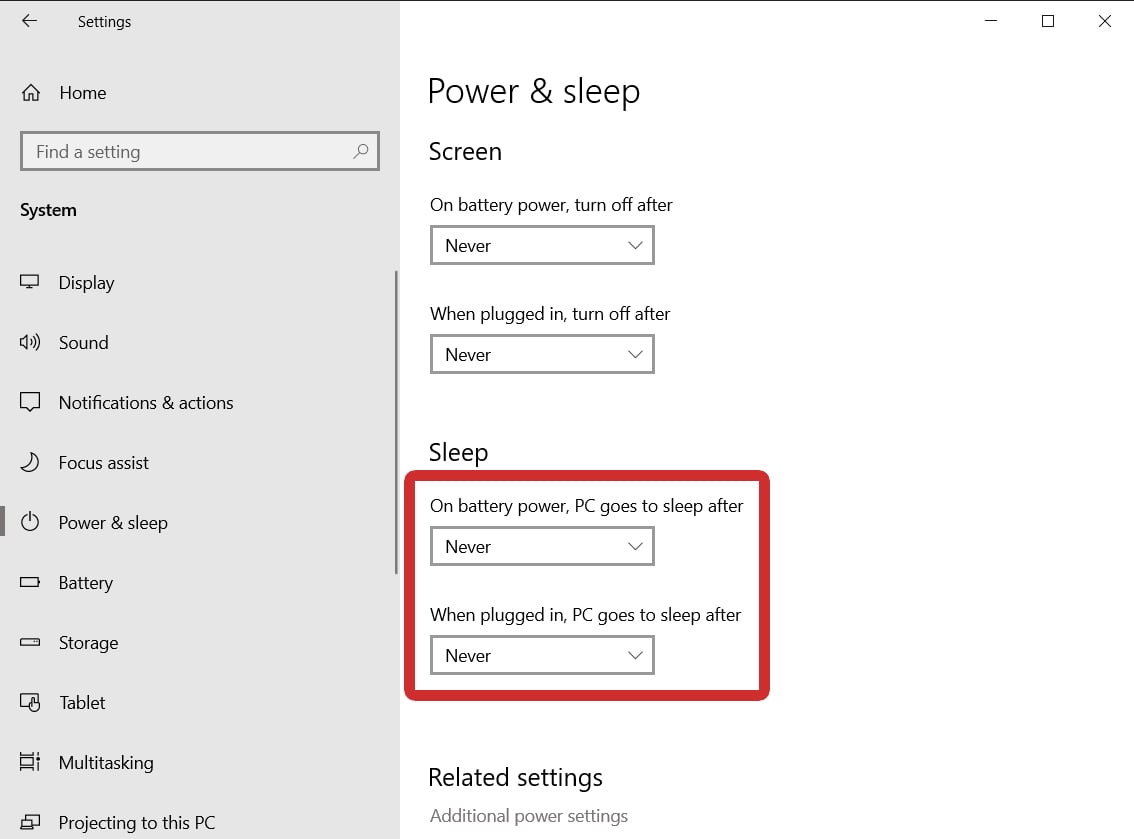
From here, you can also set how long it takes for your screen to turn off. Under the Screen section above Sleep, set the options to Never if you want to keep your screen on whenever your computer is running.
Read More: How to set up dual monitors on Windows 10
If these steps don’t work, you might have to change other settings in the Control Panel instead. Here’s how:
How to Prevent Your Windows 10 PC from Sleeping
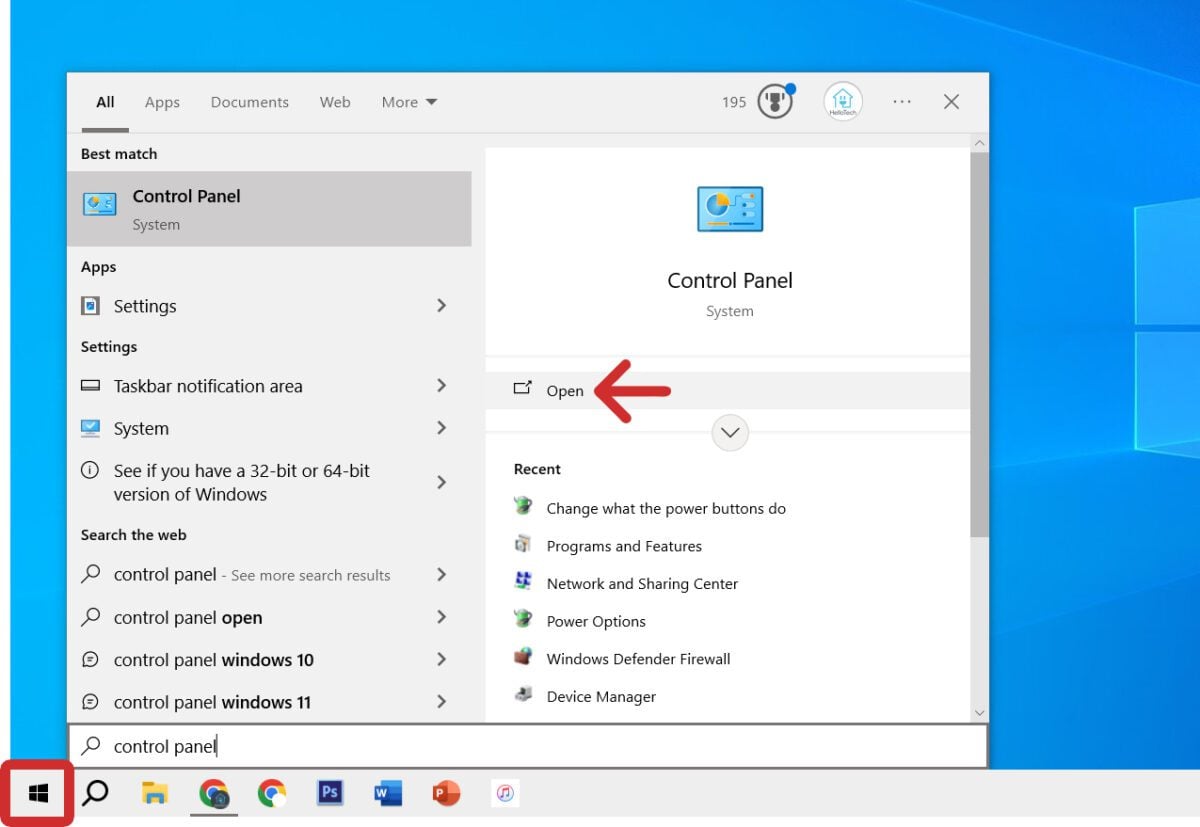
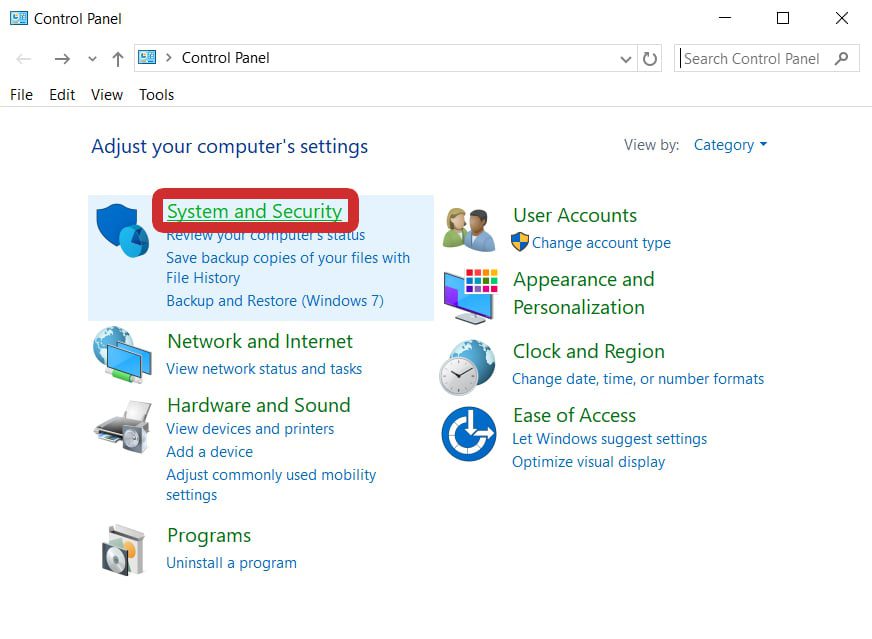
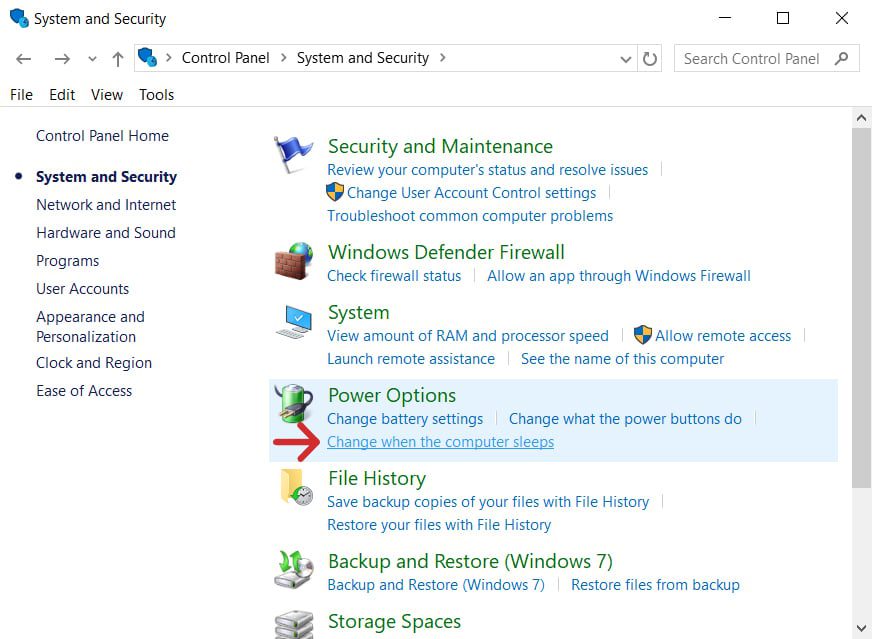
To prevent your Windows 10 PC from entering sleep mode, click the Windows logo at the bottom of your screen, type “Control Panel,” and click Open. Then go to System and Security > Change when the computer sleeps. Finally, set all values to Never and click Save changes.
- Left-click the Windows logo at the bottom of your screen. This will open the Windows Start menu.
- Then, type “Control Panel.” When you start typing, a search bar will appear. You won’t have to type the whole phrase to see the right option appear.
- Next, click Open. You will see this on the right side of the pop-up window. Alternatively, you can press Enter on your keyboard.
- Then select System and Security.
- Next, click Change when the computer sleeps. You will see this under Power Options.
Note: If you want to prevent your computer from sleeping when you press the power button, click Change what the power buttons do under Power Options.
- Then, set all options to Never to turn off sleep mode.
- Finally, click Save changes.
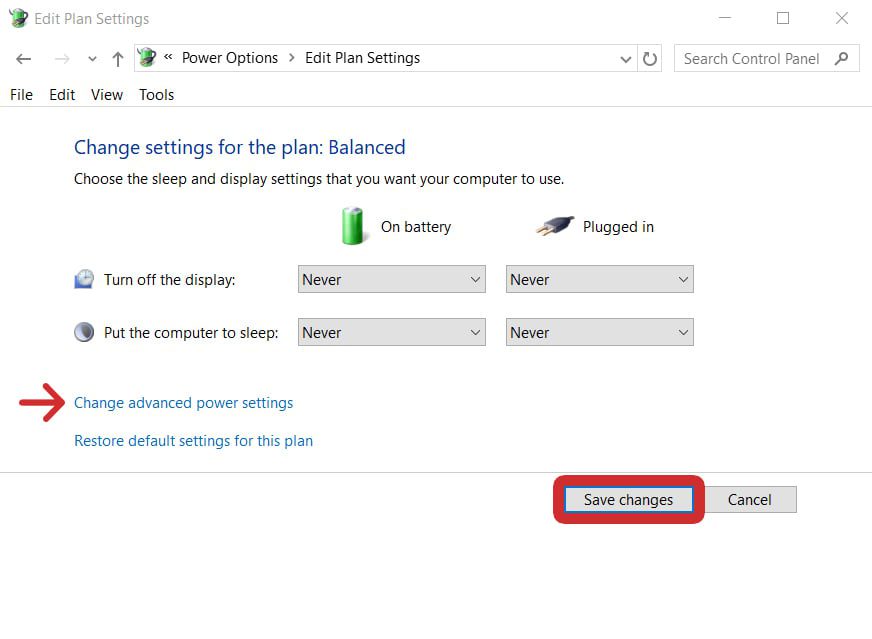
If you want to make sure sleep mode is off everywhere, click Change advanced power settings just above the Save changes button. This will open a menu with all the settings you can change for sleep, hibernation, and more.
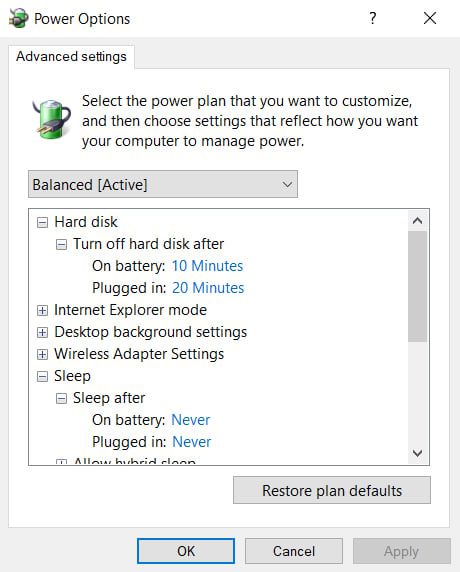
Note: Don’t forget to click Apply when you’re done changing settings.
Read More: How to keep your computer on when it’s closed
Windows 10, как и предыдущие версии системы, обладает несколькими встроенными режимами энергосбережения. Режим ожидания появился ещё в Windows XP, но в последующих версиях Windows разработчики Microsoft пересмотрели принцип его работы. С тех пор в ОС от Microsoft доступно 3 режима ожидания:
- Спящий режим.
- Гибернация и связанная с ней функция — быстрый запуск.
- Гибридный спящий режим.
В этой статье мы разберёмся, чем отличаются указанные режимы, как их можно включить или выключить.
Поддерживает ли компьютер сон, гибернацию и гибридный спящий режим
Сначала отметим, что эти режимы работают не на всех устройствах. Компоненты компьютера должны соответствовать определённым требованиям, а его производитель должен обеспечить поддержку режимов энергосбережения в BIOS. Проверить, какой из режимов поддерживает ваш компьютер, можно следующим способом:
- Нажмите Win + S. Введите в поисковую строку Командная строка.
- Кликните по результату правой клавишей мыши и выберите Запустить от имени администратора.
- Введите следующую команду и нажмите Enter: powercfg -a

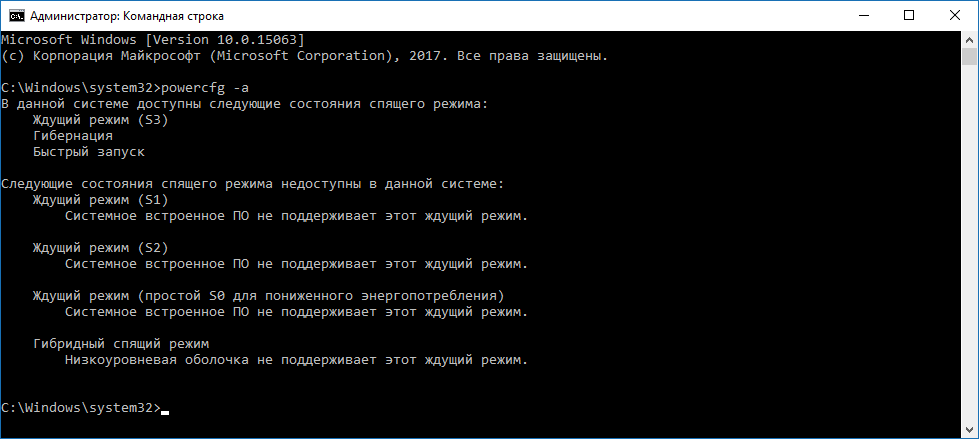
Вы получите список функций, которые поддерживает ваше устройство. Здесь ждущий режим (S3) — это сон.
Спящий режим в Windows 10
Что такое спящий режим (сон)
При переходе в сон система отключает экран, жесткий диск и процессор. Остаются работать лишь оперативная память и небольшое количество связанных с ней компонентов. Благодаря этому выход из спящего режима занимает буквально пару секунд и возвращает Windows с приложениями в то же состояние, в котором пользователь перевел ПК в сон. Минусом этого режима является довольно большое потребление энергии по сравнению с выключением компьютера. Отметим, что при отключении от сети (к примеру, если аккумулятор разрядится) все данные о состоянии системы и приложений будут потеряны.
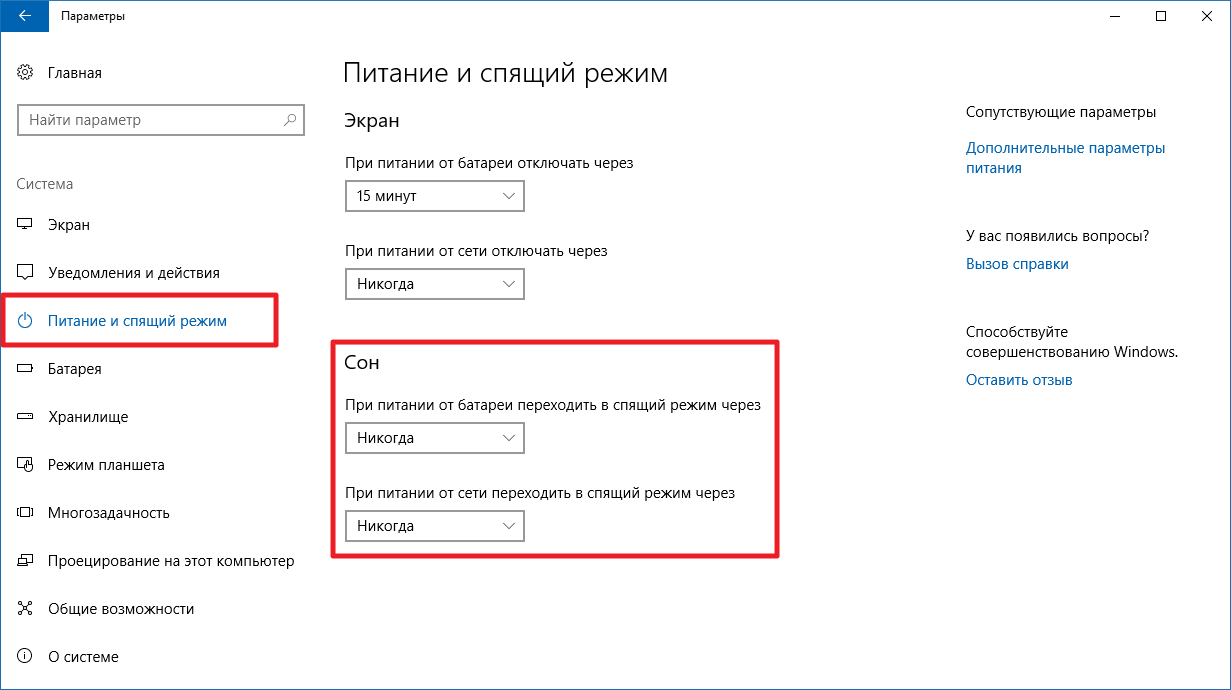
Как настроить или отключить автоматический переход в спящий режим в Параметрах
- Откройте приложение Параметры.
- Перейдите в категорию Система — Питание и спящий режим.
- В разделе Сон выберите нужные вам значения с помощью соответствующих меню.

Как настроить или отключить спящий режим в Панели управления
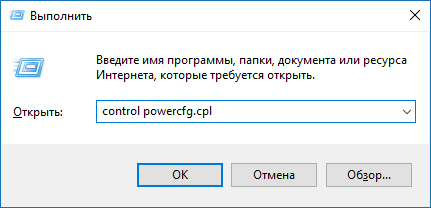
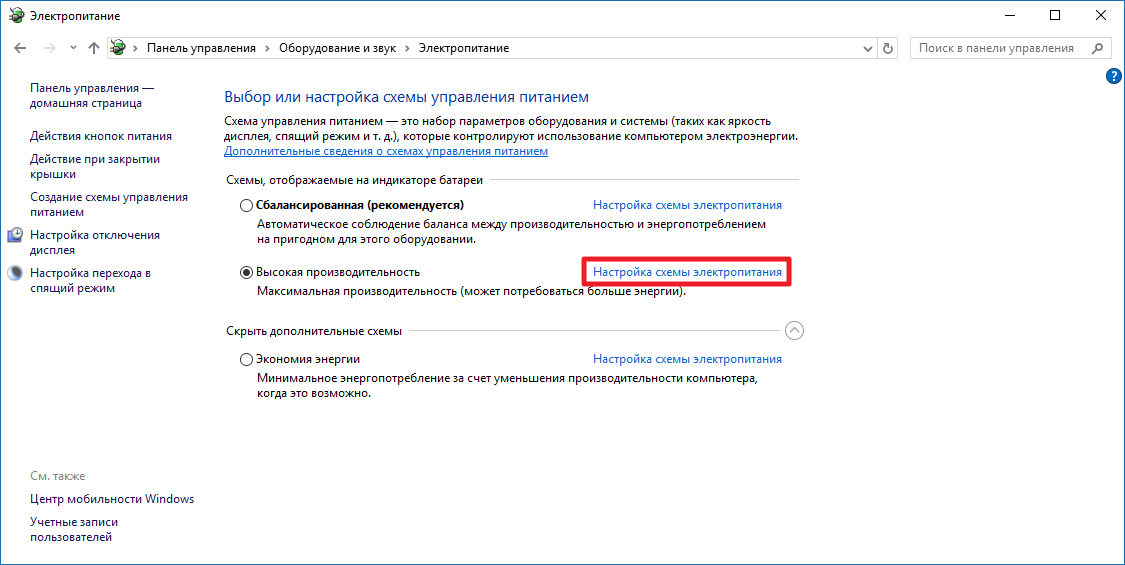
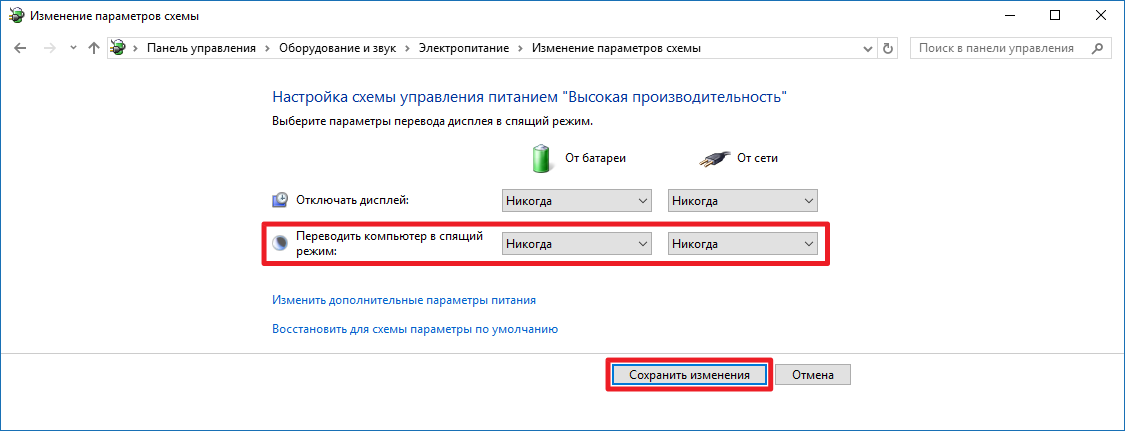
- Нажмите Win + R. Введите команду control powercfg.cpl и нажмите Enter.

- Кликните на надпись Настройка схемы электропитания напротив активного плана.

- Измените параметр Переводить компьютер в спящий режим по своему усмотрению и нажмите Сохранить изменения.

- Если вы периодически переключаетесь между различными планами, повторите операцию для остальных схем питания.
Как отключить переход в спящий режим по закрытию крышки ноутбука
Настройки, которые мы разобрали выше, влияют лишь на автоматический переход в спящий режим. Вы наверняка замечали, что ноутбуки также засыпают при закрытии крышки, а планшеты — по нажатию кнопки питания.
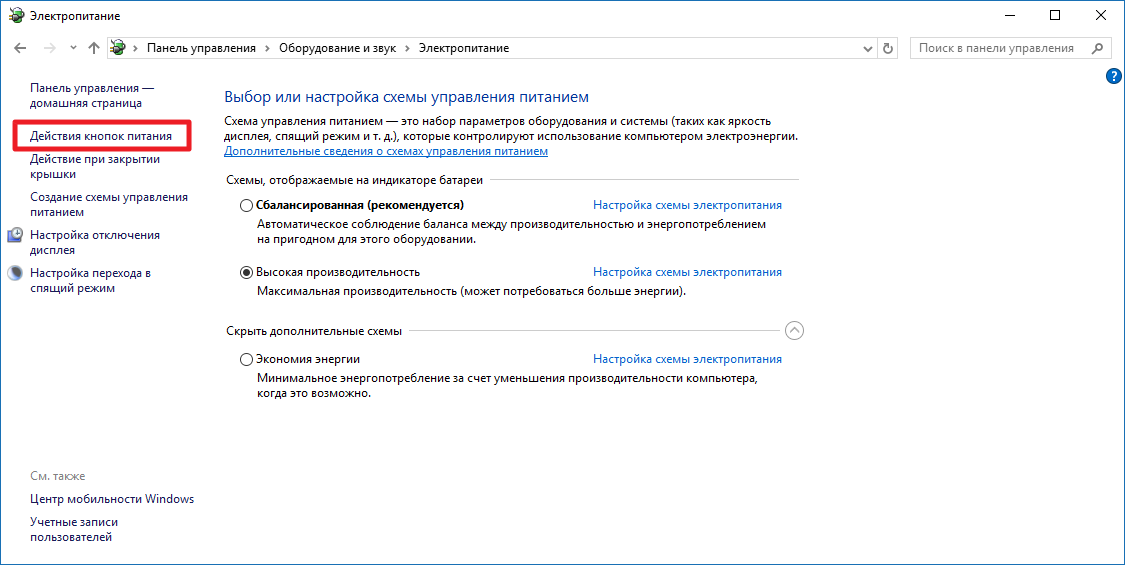
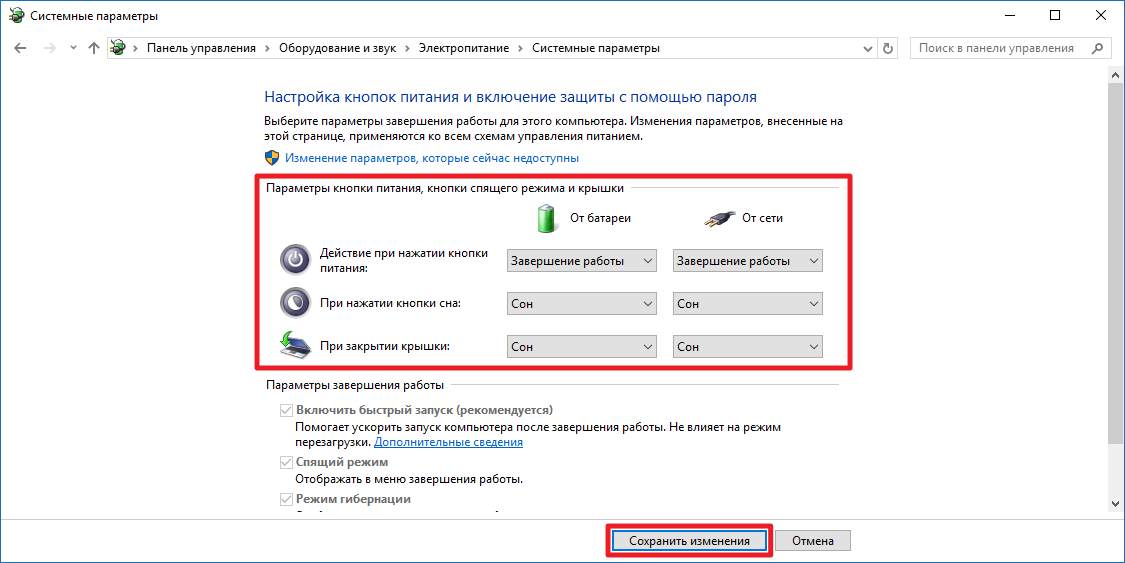
- Нажмите Win + R. Введите команду control powercfg.cpl и нажмите Enter.
- Нажмите на надпись Действия кнопок питания слева.
- Измените Параметры кнопки питания, спящего режима и крышки и кликните Сохранить изменения.

Как добавить или убрать пункт Сон в меню Пуск
По умолчанию кнопка Завершение работы в меню Пуск отображает лишь выключение и перезагрузку. При желании, туда можно добавить и переход в спящий режим.
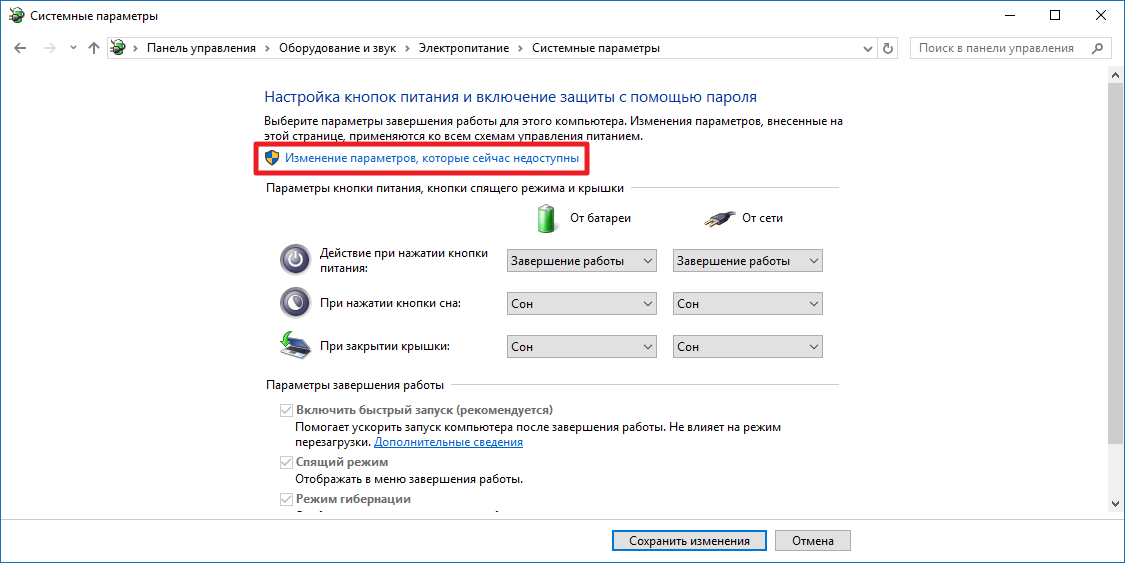
- Нажмите Win + R. Введите команду control powercfg.cpl и нажмите Enter.
- Нажмите на надпись Действия кнопок питания слева.
- Кликните на Изменение параметров, которые сейчас недоступны.
- Поставьте галочку напротив Спящий режим и нажмите Сохранить изменения.

Гибернация в Windows 10
Что такое гибернация
При активации данного режима система перезаписывает все данные из оперативной памяти на жесткий диск, после чего устройство выключается. При включении компьютера загрузка занимает до пары десятков секунд, зависимо от скорости накопителя. В это время данные с диска переписываются обратно в оперативную память, что позволяет полностью восстановить состояние системы и приложений. Несомненный плюс этого режима — нулевое энергопотребление и возможность восстановления данных даже при отключении сети. Из минусов можно отметить долгую загрузку и постоянные операции записи на диск, что не рекомендуется на SSD-накопителях.
Самую важную роль в обеспечении работы гибернации играет файл hyberfil.sys, расположенный в корне системного раздела. Именно в него Windows записывает состояние системы и программ. Его размер обычно — около 70% объёма оперативной памяти.
Что такое быстрый запуск и как его отключить
В последних версиях Windows по умолчанию включена тесно связанная с гибернацией функция быстрого запуска. Система сохраняет некоторые важные файлы в hyberfil.sys, что позволяет заметно ускорить загрузку Windows. Минусом этого режима являются проблемы со входом в меню загрузки или BIOS, а также возникновение подтормаживаний и ошибок Windows 10, если долго не перезагружать ПК.
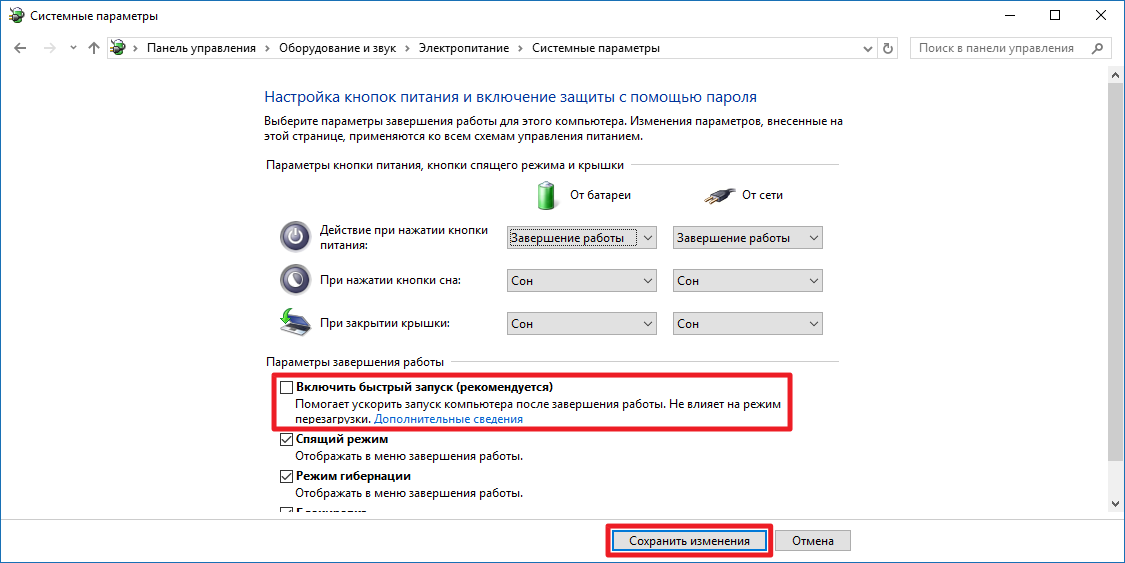
Вы можете отключить быстрый запуск следующим образом:
- Нажмите Win + R. Введите команду control powercfg.cpl и нажмите Enter.
- Нажмите на надпись Действия кнопок питания слева.
- Кликните на Изменение параметров, которые сейчас недоступны.
- Снимите галочку напротив пункта Включить быстрый запуск (рекомендуется) и нажмите Сохранить изменения.
Как включить гибернацию в Windows 10
- Нажмите Win + S. Введите в поисковую строку Командная строка.
- Кликните по результату правой клавишей мыши и выберите Запустить от имени администратора.
- Введите следующую команду и нажмите Enter: powercfg -h on

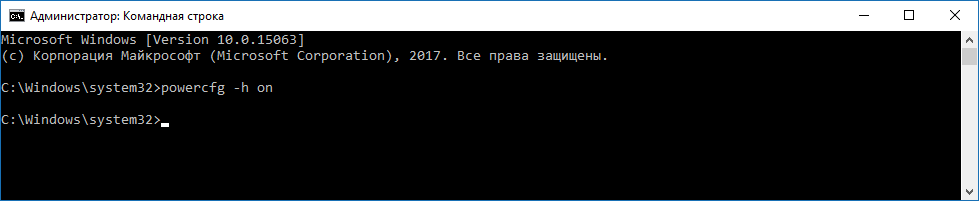
Система создаст файл hyberfil.sys и добавит опции, связанные с гибернацией, в настройки электропитания. Учтите, что пункт Гибернация в меню Завершение работы автоматически добавлен не будет.
Настройки автоматического перехода в гибернацию, её активации при закрытии крышки и добавления пункта в меню завершения работы абсолютно аналогичны спящему режиму. Единственное отличие заключается в том, что они будут отображаться только в Панели управления, не в Параметрах.
Как отключить гибернацию в Windows 10
- Нажмите Win + S. Введите в поисковую строку Командная строка.
- Кликните по результату правой клавишей мыши и выберите Запустить от имени администратора.
- Введите следующую команду и нажмите Enter: powercfg -h off

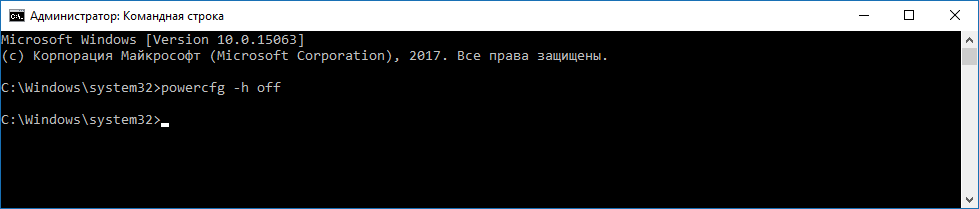
Файл hyberfil.sys будет удалён. Функция быстрого запуска системы также станет недоступна. Если вы хотите оставить возможность быстрого запуска, но отключить гибернацию, вы можете уменьшить размер файла hyberfil.sys.
Как уменьшить размер файла hyberfil.sys
- Нажмите Win + S. Введите в поисковую строку Командная строка.
- Кликните по результату правой клавишей мыши и выберите Запустить от имени администратора.
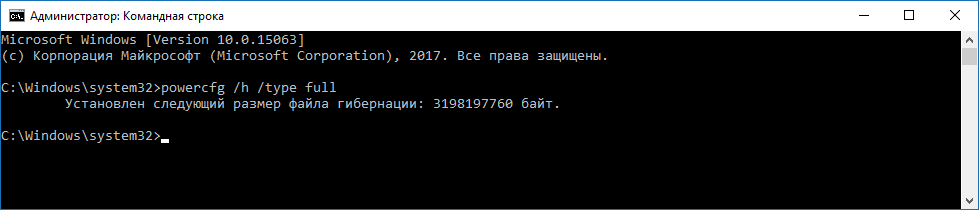
- Введите следующую команду и нажмите Enter: powercfg /h /type reduced

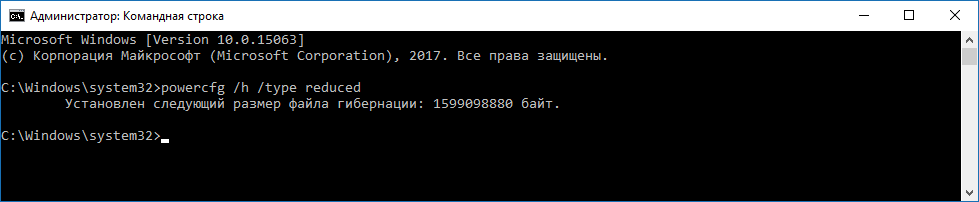
Функция гибернации будет отключена, но возможность быстрого запуска останется. Если вы захотите вернуть всё обратно, воспользуйтесь следующей командой: powercfg /h /type full.
Гибридный спящий режим в Windows 10
Этот режим — смесь сна и гибернации. Система ведёт себя так же, как и при переходе в спящий режим, но при этом создаёт резервную копию данных из оперативной памяти на жёстком диске. После отключения питания Windows попытается восстановить состояние приложений и системы.
Гибридный спящий режим включён по умолчанию на поддерживаемых устройствах. В принципе, никаких его настроек не предусмотрено и он просто заменяет спящий режим. Все рассмотренные ранее параметры сна работают и с ним. Тем не менее, из-за некоторых минусов вы можете захотеть отключить гибридный сон:
- Интенсивная нагрузка на жёсткий диск. Это противопоказано на SSD-накопителях.
- Отсутствие возможности использования гибернации при включённом гибридном спящем режиме. Чтобы активировать функцию гибернации, придётся отключить гибридный сон и наоборот.
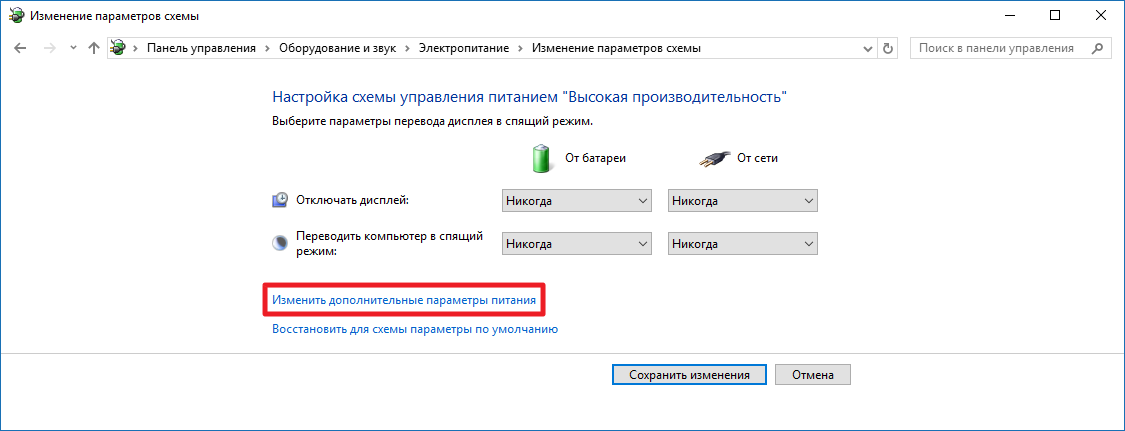
Как отключить гибридный спящий режим в Windows 10
- Нажмите Win + R. Введите команду control powercfg.cpl и нажмите Enter.
- Кликните на надпись Настройка схемы электропитания напротив активированного плана.
- Нажмите на Изменить дополнительные параметры питания.
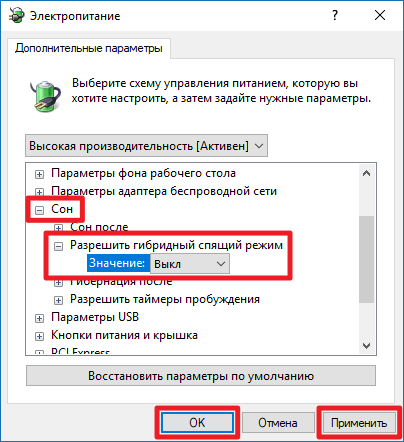
- Найдите пункт Сон и подпункт Разрешить гибридный спящий режим.
- Измените значения опций на Выкл.

- Нажмите Применить и ОК.
Проблемы спящего режима и гибернации
Иногда при использовании режимов ожидания у вас могут возникать какие-либо проблемы. Разберём самые частые из них.
Экран выключается, когда спящий режим, гибернация и отключение дисплея не активированы
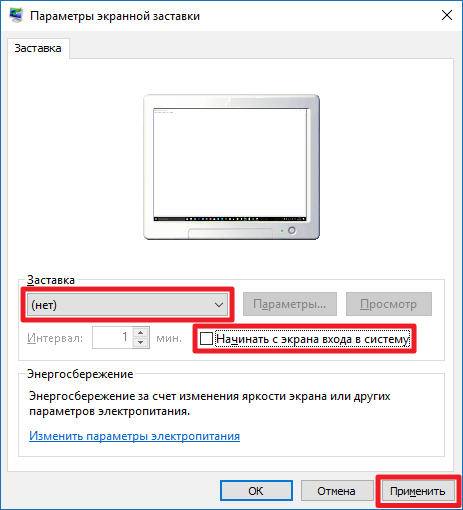
Вероятно, проблема возникает из-за включённой заставки.
- Нажмите Win + R. Введите следующую команду и нажмите Enter: control desk.cpl,,@screensaver
- Убедитесь, что в выпадающем списке выбран пункт (нет), который соответствует отключенной заставке.
- Снимите галочку Начинать с экрана входа в систему.

- Нажмите Применить и ОК.

Компьютер сам включается или выходит из спящего режима
Такая ситуация может возникать из-за включённых таймеров пробуждения или подключенной периферии. Подробно этот вопрос описан в соответствующей статье.
Компьютер не выходит из спящего режима
Такая проблема может возникать из-за неполадок в драйверах чипсета. Зайдите на сайт производителя устройства, загрузите и установите последние доступные версии драйверов.
While we are working on our machines without moving the mouse or pressing any keys on the keyboard, like when reading eBooks, an article, or watching a show or movie, our monitor screen turns off. The system goes to sleep according to the configured power plan which causes hindrance in our activity and pulls out our attention.
You can disable the Sleep Mode in Windows 10 and 11. We can do this by configuring our power plan so that it won’t let our machine sleep even when there is inactivity.
You can do this through built-in settings in Windows, from the Control Panel, from the Command Prompt, or by using a Microsoft or a third-party tool. Continue to read through the article to find a suitable way to keep your computer from sleeping.
Learn how to disable hibernation mode.
Table of Contents
Turn Off Sleep Mode on Windows
Disable Sleep Mode from Settings App
Perform the following steps to prevent your Windows computer from going into sleep mode from the built-in Settings app:
Turn Off Sleep from Settings in Windows 11
-
Navigate to the following:
Settings app >> System >> Power & battery
Alternatively, you can also open the Power & Battery settings from the Windows Key + X (Power User) menu, and then click “Power Options.”
-
Click “Screen and sleep” to expand the options.

Expand screen and sleep settings -
Select “Never” from the drop-down menus in front of:
- On battery power, put my device to sleep after
- When plugged in, put my device to sleep after
Disable sleep from Windows 11 Settings app


Turn Off Sleep from Settings in Windows 10
-
Navigate to the following:
Settings app >> System >> Power & sleep
-
In the Sleep section, select “Never” from the drop-down menus under:
- On battery power, PC goes to sleep after
- When plugged in, PC goes to sleep after

Disable sleep from Windows 10 Settings app

Your computer will now never go into sleep mode unless the settings are changed.
Disable Sleep Mode from Control Panel
Similar to the Settings app method, you can also solve the issue of the computer entering sleep mode by performing the following steps through the Control Panel:
-
Open the Power Options applet by typing in “powercfg.cpl” in the Run Command box.
Open the Power Options applet -
Click “Change plan settings” in front of the selected power plan.

Change power plan settings -
Select “Never” from the drop-down menus in front of “Put the computer to sleep” under “On Battery” as well as “Plugged in.”
Disable sleep mode in Windows from Control Panel -
Click “Save changes.”
Save changes


You just changed the settings for only one power plan, if you have more than one plan then you need to change the settings for each plan when selected as the “Current plan.”
Disable Sleep Mode from Screen Saver Settings
If the above configurations have not worked for you, you can also perform the steps given below that will turn off sleep mode on your PC, or refer to the given third-party tools below as an alternative method.
This also involves the Settings app but gets the task done using the Screen Saver settings page.
-
Navigate to the following:
Settings app >> Personalization >> Lock Screen >> Screen saver
-
Select “None” from the drop-down menu in the Screen saver section, and uncheck the box next to “On resume, display logon screen.”
Disable sleep mode from screen saver settings -
Then click Apply and Ok.

This will prevent the screen saver from appearing when the computer goes into sleep mode, which it no longer should.
Disable Sleep Mode from Command Line
You can also disable the sleep mode directly from the Command Prompt as well as Windows PowerShell. You will need to run 2 simple and almost identical cmdlets to disable sleep mode for both battery power and also for when the laptop is plugged in. Moreover, both the cmdlets work in Command Prompt and PowerShell.
Follow these steps to disable sleep mode in Windows using the command line:
-
Launch an elevated Command Prompt or PowerShell instance.
-
Run the following cmdlets to disable sleep mode for both AC and DC power (in the case of laptops):
powercfg /x -standby-timeout-ac 0
powercfg /x -standby-timeout-dc 0
Disable sleep mode from Command Prompt

Sleep mode will now be disabled.
If you want to re-enable it later on, you can use the same cmdlets above while replacing “0” with the number of minutes you want the computer to go to sleep after inactivity.
The methods discussed till now disable the sleep mode permanently unless the settings are changed back through the Windows-native tools. However, using other tools, you can allot specific times when the sleep mode should be disabled, and when it is automatically enabled.
Disable Sleep Mode using Microsoft PowerToys
Microsoft PowerToys is a suite of powerful tools and utilities using which end-user can manage the different administrative components of the Windows OS and increase their productivity. One of the utilities inside PowerToys, named “Awake,” is a tool designed to do precisely what its name is – keep your system awake.
This is a convenient method to prevent your computer from going to sleep, on-demand, and can be used to schedule when your PC can and can’t go to sleep mode.
Use the following steps to download, install, and then use Microsoft PwoerToys to disable the sleep mode on your Windows PC:
-
Start by downloading and installing PowerToys.
You can download PowerToys from GitHub, from Microsoft Store, or by running the following command in Command Prompt:
winget install --id Microsoft.PowerToys -
Run the application and click “Awake” on the left.
Open Awake in PowerToys -
Toggle the slider in front of “Enable Awake” into the On position.
Enable Awake -
Click on the drop-down menu in front of “Mode” and select “Keep awake indefinitely.”
Keep the PC awake using PowerToys -
Now, toggle the slider in front of “Keep screen on” into the On position.
Always keep the screen on


Now, your computer won’t go into sleep mode.
You can also set the computer to not enter sleep mode for a specific time by selecting “Keep awake for a time interval,” after which the PC will return to its previous settings. You may also select “keep awake until expiration” and set a date and a time after which the previous power plan applies.
You define the time interval in the first one and a date and time in the second option; but in both options, the PC returns to its original power settings once the deadline is crossed.
Disable Sleep Mode using Third-Party Tools
Don’t Sleep
Download Don’t Sleep from here
Don’t Sleep is a small portable tool that doesn’t allow your system to restart, shut down, hibernate, or go to sleep.

The advantage of using this tool is that it can provide you with a timer, which helps you to make your settings automatically change. If you want to keep your system awake during specific hours, just add that time limit to the timer and switch it on.
Don’t Sleep saves you time by not having to reconfigure your settings over and over again for different sleep mode requirements.
Insomnia
Download Insomnia from here
Insomnia is available in both 32 Bit and 64 Bit architecture. It is a very small and simple utility.
Upon installation, a small window will appear on your screen that says “The computer can’t go to sleep while this window is open.” As long as we open the window, your machine will stay awake and will not go to sleep.
So you don’t have to set any timer or anything else regarding the settings to keep your system awake.
Noise
Download Noise from here
This is another simple tool. When you install it, a window will open that asks you to enter any key from the keyboard, and then after every 60 seconds it sends the same keystroke to the processor automatically so that it thinks that someone is using and pressing the keys.
This way, the system won’t go to sleep and the screen will remain on. Users can easily use any key by opening this little window. It won’t create any obstacles or stop the user from doing their work.
Noise is accessible through the system tray. You can easily open it by clicking its icon and entering any key, or changing it as required. You can also add combinations of numbers and characters.
Closing Words
These are all simple and easy ways to stop your system from going to sleep or turning your system’s screen off while watching a movie, reading an eBook, or downloading a large file. These tools will provide you with simple installation and ease of use.