
Все способы:
- Способ 1: Запуск консоли от имени администратора
- Способ 2: Работа с конфликтными процессами
- Способ 3: Отключение шифрования каталога
- Способ 4: Изменение владельца директории
- Способ 5: Проверка ПК на наличие вирусов
- Способ 6: Проверка целостности системных файлов
- Способ 7: «Чистая» загрузка Windows
- Способ 8: Сброс Windows до заводских настроек
- Вопросы и ответы: 0
Способ 1: Запуск консоли от имени администратора
Если вы работаете с «Командной строкой» в одном из расположений или запускаете ее просто удобным для вас методом, попробуйте дополнительно предоставить права администратора. Часто это позволяет решить все проблемы, особенно если речь идет про использование локальной учетной записи, у которой по умолчанию этих прав нет.
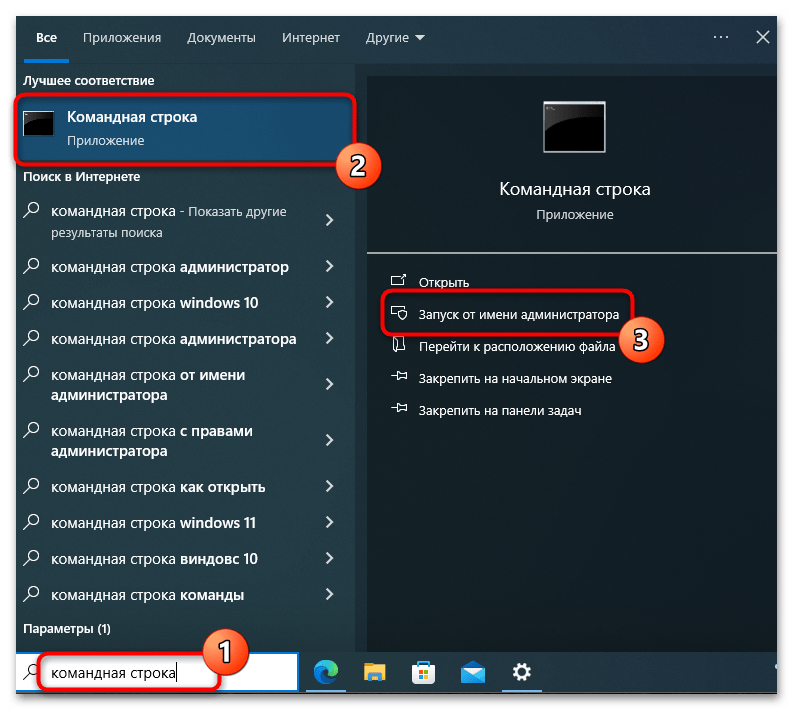
Выбрать можете совершенно любой метод запуска консоли, который поддерживает получение прав администратора. Самым удобным все еще остается поиск через «Пуск», поскольку сразу же справа отображается список доступных действий, среди которых можно выбрать требуемое.
Способ 2: Работа с конфликтными процессами
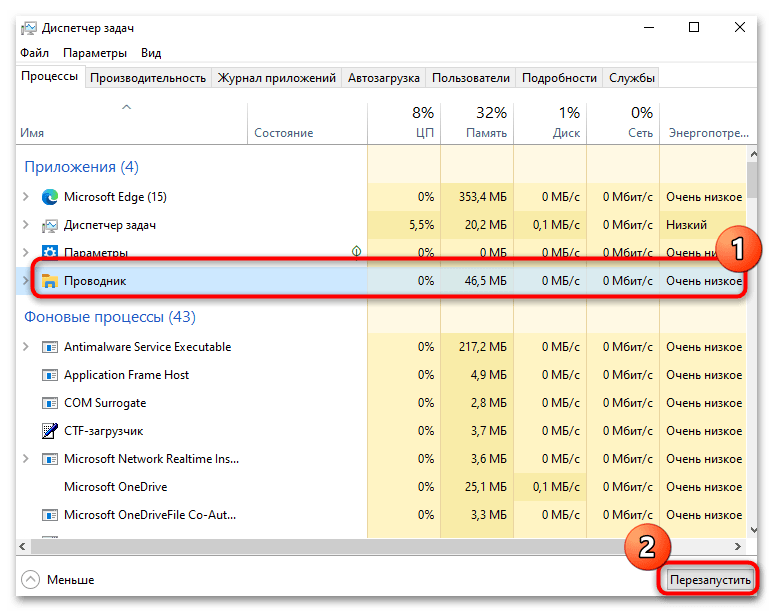
Возможно, один из запущенных процессов мешает открытию «Командной строки», поэтому в Windows 10 и появляется ошибка «Отказано в доступе». Самостоятельно обнаружить конфликтную программу можно только если вы изначально пытаетесь открыть консоль из конкретного расположения и знаете, какие приложения в нем находятся и могут быть запущены. Однако начать стоит с простого перезапуска «Проводника», чтобы исключить мелкие сбои.
- Щелкните правой кнопкой мыши по «Пуску» и из появившегося контекстного меню выберите пункт «Диспетчер задач».
- В списке отыщите «Проводник», выделите его и воспользуйтесь кнопкой «Перезапустить», расположенной справа внизу.
- Вернитесь к директории и попробуйте запустить «Командную строку». Если ошибка сохраняется, отыщите процесс, который может быть связан с программами, находящимися по целевому расположению. Снимите все задачи и снова проверьте возможность взаимодействия с консолью.

Способ 3: Отключение шифрования каталога
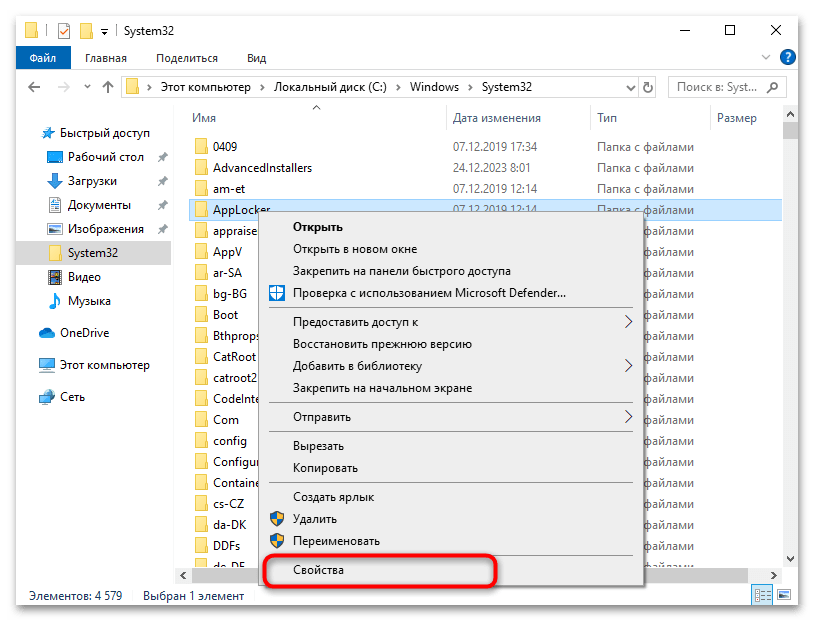
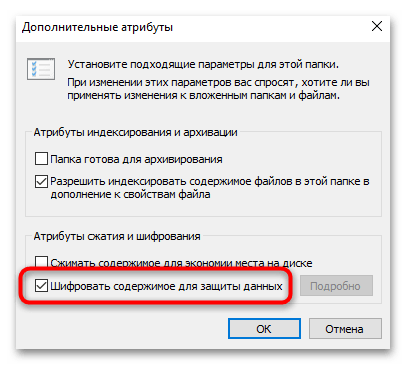
Поскольку ошибка «CMD: отказано в доступе» в большинстве случаев появляется, если «Командная строка» открывается для работы из конкретного расположения, то сосредоточимся именно на связанных методах решения. В первую очередь советуем проверить наличие шифрования папки, откуда запускается консоль. Если оно присутствует, отключение может помочь исправить ситуацию.
- Щелкните по каталогу правой кнопкой мыши и перейдите в «Свойства».
- На вкладке «Общие» нажмите кнопку «Другие».
- Если присутствует галочка возле пункта «Шифровать содержимое для защиты данных», снимите ее, примените изменения и приступайте к открытию CMD.
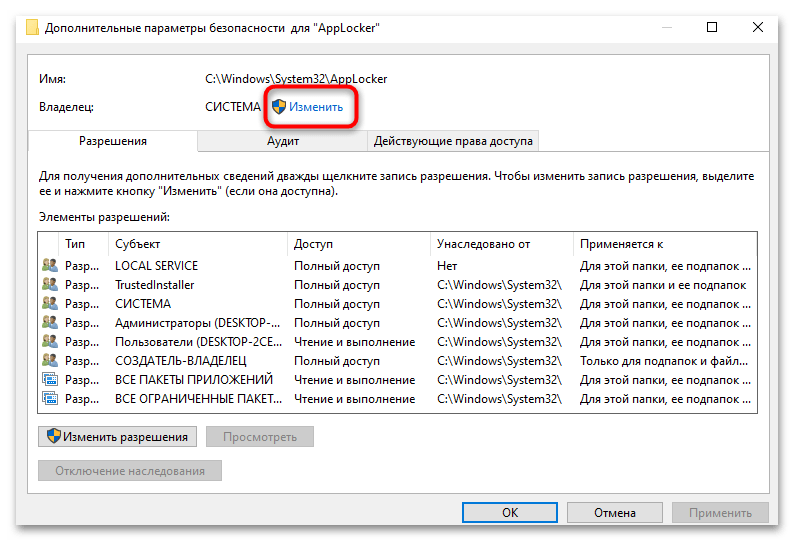
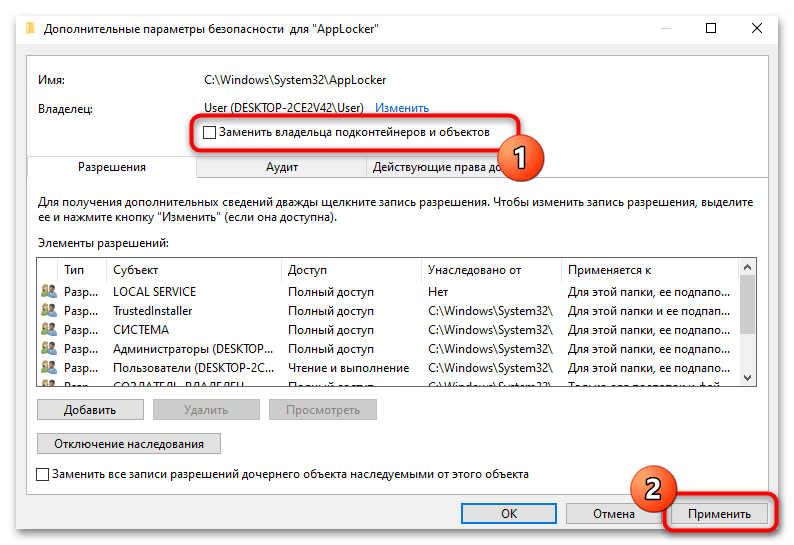
Способ 4: Изменение владельца директории
Ошибка с отказом в доступе еще может появиться по причине отсутствия прав на чтение или внесение изменений в той директории, из которой запускается консоль. Решение тут одно — выдать полные права на текущую учетную запись, что вполне реализуемо через свойства каталога. Необходимо пошагово выполнить следующие действия:
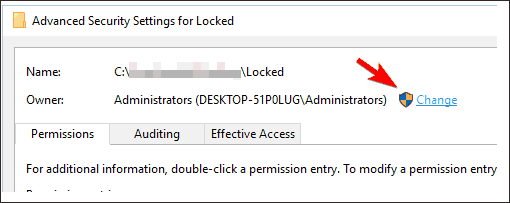
- Снова перейдите в «Свойства» папки так, как это было показано в предыдущем методе. Перейдите на вкладку «Безопасность» и нажмите кнопку «Дополнительно».
- В новом окне вы видите текущего владельца папки. Это может быть несколько разных системных учетных записей, но необходимо назначить именно себя, поэтому нажмите по ссылке «Изменить».
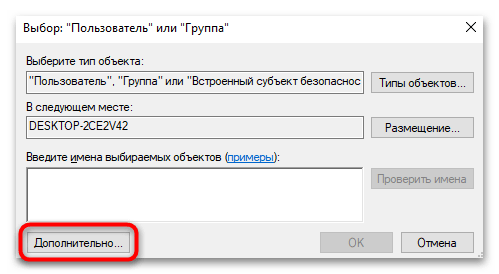
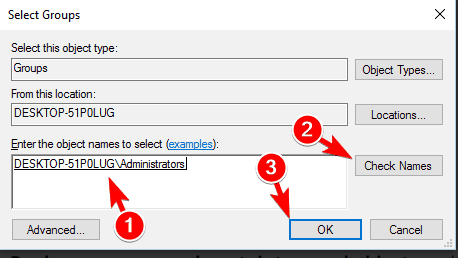
- В следующем окне можно самостоятельно указать нового владельца вместе с его расположением, но тут легко ошибиться, поэтому лучше сначала кликнуть по «Дополнительно».
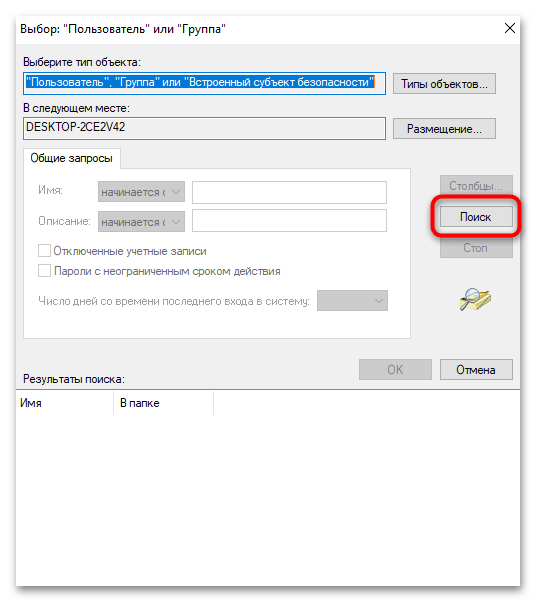
- Используйте кнопку «Поиск», чтобы отобразить список всех доступных учетных записей в разных расположениях.
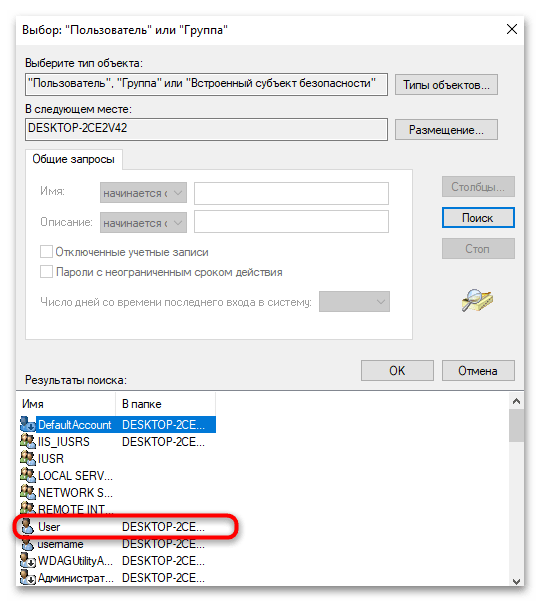
- Среди них найдите свою и дважды кликните по ней для выбора.
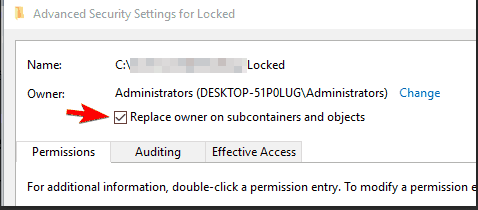
- Подтвердите изменение владельца, затем в предыдущем окне поставьте галочку возле пункта «Изменить владельца подконтейнеров и объектов» и примените настройку.
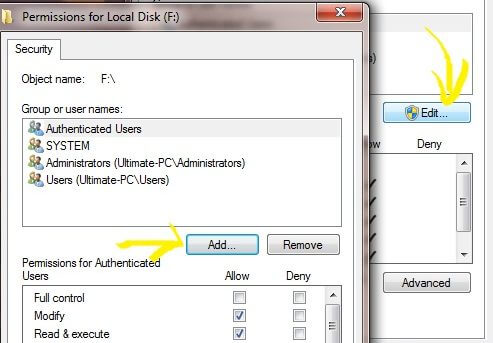
- Однако это еще не все, поскольку нужно выдать учетной записи полный доступ. Для этого на вкладке «Безопасность» используйте кнопку «Изменить».
- Найдите свой профиль, а при его отсутствии нажмите на «Добавить» и отыщите учетную запись точно так же, как делали это ранее.
- Далее отметьте свой аккаунт и предоставьте для него полный доступ, установив галочку возле соответствующего пункта. Примените изменения и попробуйте снова запустить «Командную строку».
Способ 5: Проверка ПК на наличие вирусов
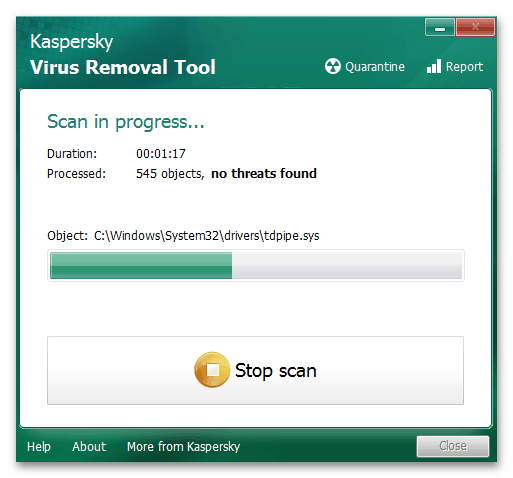
Одна из вероятных причин появления рассматриваемой ошибки — заражение компьютера вирусами. Угроза может блокировать выполнение разных процессов, включая и запуск «Командной строки» отдельно или в конкретном расположении. Если стандартный Защитник не справился со своей задачей и уже пропустил вирус на ПК, то для дальнейшего сканирования и удаления угроз лучше использовать сторонние антивирусы. Более детально об этой теме читайте в материале от другого нашего автора по ссылке ниже.
Подробнее: Борьба с компьютерными вирусами
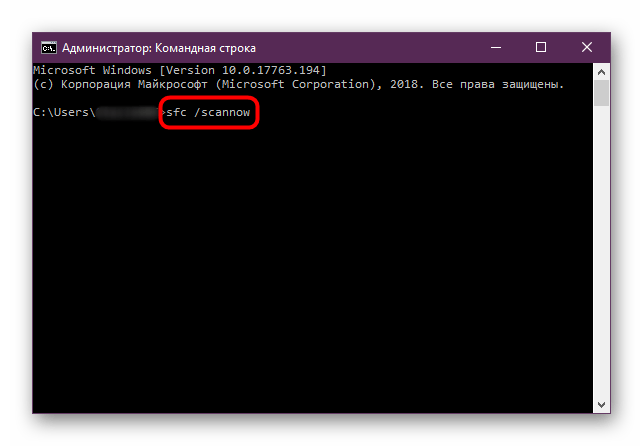
Способ 6: Проверка целостности системных файлов
При отсутствии прогресса в решении проблемы на помощь может прийти проверка целостности системных файлов. Возможно, в ОС случился сбой или какие-то важные компоненты были повреждены, из-за чего появляется текущая ошибка или даже в дополнение к ней другие, о которых вы еще не знаете или не замечали. Нужно самостоятельно запустить сканирование при помощи стандартных утилит и проверить, чем завершится данный процесс. Отметим, что сделать это удастся только в том случае, если «Командная строка» все-таки запускается без привязки к конкретному проблемному расположению.
Подробнее: Как проверить целостность системных файлов в Windows 10
Способ 7: «Чистая» загрузка Windows
Существует вероятность, что ситуация с «CMD: отказано в доступе», которая возникла в вашей Windows 10, связана с действием сторонних программ. Они могут блокировать вызов разных процессов или обращение к файлам. Тут уже стоит отталкиваться от того, что именно вы хотите реализовать через консоль и из какого расположения ее запускаете. Если так быстро определить виновника не получается, обратитесь к «чистой» загрузке Windows, которая отключает все пользовательские службы и программы.
- Щелкните правой кнопкой мыши по «Пуску» и выберите из меню пункт «Выполнить».
- Введите команду
msconfigи нажмите Enter, чтобы подтвердить переход к нужному приложению. - В нем выберите вкладку «Службы» и поставьте галочку возле пункта «Не отображать службы Майкрософт», чтобы скрыть их и случайно не отключить.
- Теперь отключите все оставшиеся службы, используя кнопку с соответствующим названием.
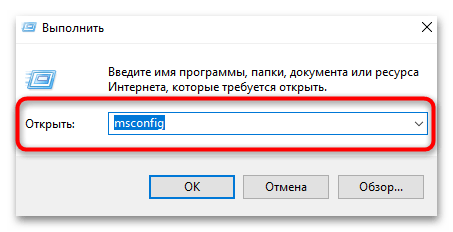
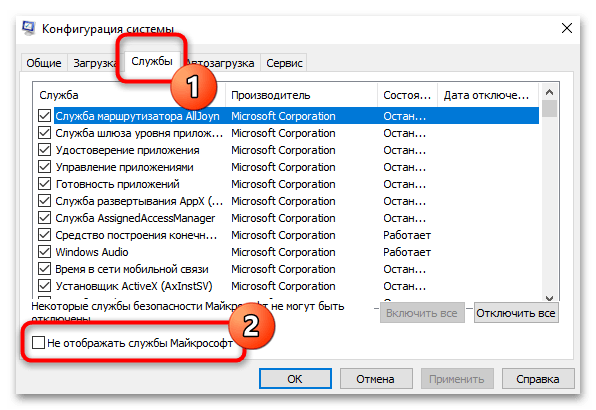
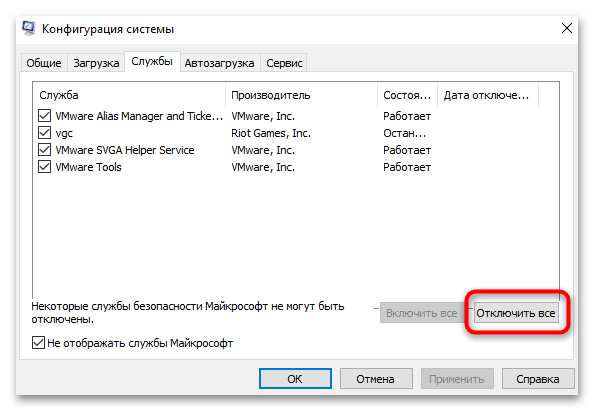
Подтвердите внесение изменений и перезагрузите компьютер. Попробуйте выполнить те же самые действия с «Командной строкой» и проверьте, исправлена ли ошибка. Если да, нужно по очереди запускать каждую из сторонних служб и смотреть, на каком этапе проблема снова даст о себе знать. Это позволит определить конфликтную программу и далее сделать выводы: отключить ее, попытаться исправить или вовсе удалить.
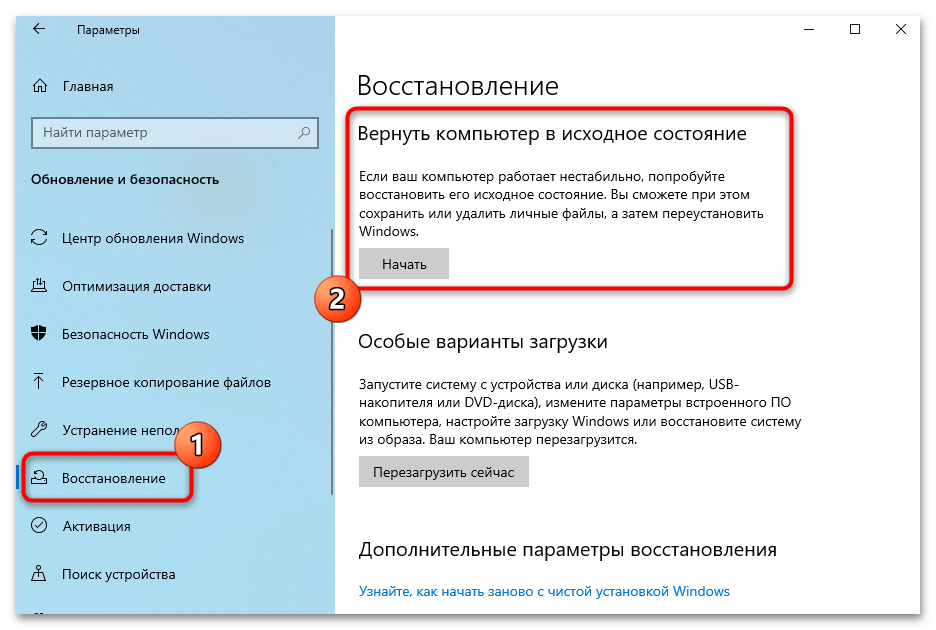
Способ 8: Сброс Windows до заводских настроек
Бывает, что ничего из перечисленного выше так и не помогло исправить ситуацию с «CMD: отказано в доступе». Тогда ничего не остается, кроме как использовать самые радикальные методы. Можно полностью переустановить Windows 10, но есть более удобный вариант — сброс до заводских настроек, что осуществляется непосредственно через настройки, без использования загрузочных флешек с образом ОС.
Подробнее: Возвращаем Windows 10 к заводскому состоянию
Наша группа в TelegramПолезные советы и помощь
При выполнении команд net user, net stop, net start и других в командной строке Windows 11 или Windows 10 вы можете получить сообщение: «Системная ошибка 5. Отказано в доступе». Начинающему пользователю не всегда ясно, чем вызвана ошибка и как решить проблему.
В этой инструкции подробно о том, почему возникает системная ошибка 5 при запуске и остановке служб или работе с учетными записями пользователе в командной строке.
Методы решения для «Системная ошибка 5. Отказано в доступе» при выполнении команд net stop, net start, net user

Причина того, что в результате выполнения команд сообщается о системной ошибке 5 «Отказано в доступе» в том, что командная строка (Терминал Windows или Windows PowerShell) запущен не от имени администратора. Или, в некоторых случаях — в том, что ваш пользователь и вовсе не имеет прав администратора на компьютере.
В первом случае решение будет простым: запустите командную строку от имени Администратора, для этого вы можете:
- Начать набирать «Командная строка» в поиске на панели задач Windows 11 или Windows 10, а затем в результатах поиска нажать «Запуск от имени Администратора».

- Нажать правой кнопкой мыши по кнопке «Пуск» и выбрать «Терминал Windows (Администратор)» или «Windows PowerShell (Администратор)»
- Использовать инструкции Как запустить командную строку от имени Администратора в Windows 11 и Как запустить командную строку от имени Администратора в Windows 10.

Ошибка не будет появляться после того, как вы запустите командную строку с соответствующими правами.
Если ваш пользователь не имеет прав администратора на компьютере, но вы имеете доступ к учетной записи с правами администратора, вы можете зайти под ней, а потом сделать текущего пользователя администратором: Как сделать пользователя администратором в Windows 10 (в Windows 11 действия аналогичны).
В сценарии, когда компьютер контролируется не вами, права администратора вам предоставить не готовы, команды вы выполнить не сможете (разве что обходными путями, такими как сброс пароля для учетной записи администратора).
Seeing the error message Access denied in command prompt is recently reported by various Windows 10 & Windows 11 users. The error is likely to open while accessing the particular path or location and prevent the users from accessing it.
Therefore we come up with this article and shortlisted the potential solutions that work for many users to solve the CMD access denied error in their case.
Access denied is a common error encountered by Windows users. The error message including access denied signifies that something went wrong with certain apps, files, directories, or some commands in the Command prompt in the Windows system and prevents you from accessing the one facing a problem.
So, before starting with the solutions here have a look at the common culprits responsible for the error.
To fix various Windows errors, we recommend Advanced System Repair:
This software is your one stop solution to fix Windows errors, protect you from malware, clean junks and optimize your PC for maximum performance in 3 easy steps:
- Download Advanaced System Repair rated Excellent on Trustpilot.
- Click Install & Scan Now to install & scan issues causing the PC problems.
- Next, click on Click Here to Fix All Issues Now to fix, clean, protect and optimize your PC effectively.
What Causes Command Prompt Access Denied Error?
The main cause responsible for seeing the access denied in command prompt error is a conflict of rights and permission.
For example, if you are operating a file that is not approved by the Admin of a profile, there is a good chance of you seeing the message often.
On the contrary, there are several other reasons like malfunctioning system files or corrupted drive partitions, or even some critical third-party software that can cause the error.
Now you are aware of the common culprits causing the error here it is suggested to follow the fixes I n the given order.
How to Fix Command Prompt Access Denied Windows Error?
Solution 1 – Pin the Command Prompt to Start Menu
If you are unable to launch the command prompt due to an access denied error then many users managed to fix the problem by pining the Command prompt to start the menu.
- So, it is worth giving it a try to do so simply click on Windows + S key and in the search box type Command Prompt.
- Now right-click on the Command Prompt from the results and select the option Pin to Start menu
- And then try launching the Command Prompt simply from the Start Menu.
Solution 2 – Transferring Ownership
If you change the folders or file ownership, this would help in removing all the warning messages. Although you need an Admin privilege, this plays a key role to solve the problem as stated in the official Microsoft community.
Here is how you do it,
- Right-click on the file or folder that’s causing the issue
- Then from the menu shown, choose Properties
- Visit the Security Tab and choose the Advanced option here
- Now from the Advanced Security Settings, tap on the Change option
- Next up, you would see a page where you need to add admin-level credentials and proceed to the next step
- Choose the User or Group dialogue box and tap on Advanced once you see the pop-up
- Choose the Find Now option and check for all the accounts coming out on the Search Results
- Enter your Account Name next
- Once you choose the account, you would come across the account name under the “Enter the object name to select” segment. Tap OK to proceed further
- Verify the checkbox right next to the “Replace owner on Sub containers and objects’
- Also, make sure to “Replace all child object permission entries with inheritable permission entries from the object” and tap on Apply and Ok to save the final changes
With this, you would acquire the ownership of a file or even a folder. Try accessing once again and verify if you are still getting the “Access is denied” command prompt error or not.
Solution 3 – Get Authorization of the File or Folder
Access Denied problem arises when you run out of basic authorization to enter. Therefore, follow these to know how to check permissions on these files and folders,
- On the Folder, right-click and find Properties
- Choose the Security tab
- Tap on your name in “Group or User Names” while finding the permission you are granted
- Verify the permission you are granted. If you find a checkbox contains “Deny” or you don’t have that authorization, you need to log in from the Admin side and change the same
Solution 4 – Un-Encrypt the Folder or the File
For the sake of protection, Encryption is a good option that can be applied to both the folders and files of the users. For those intending to access these files, a certificate is needed that was used to encrypt. Here is how you check the files or folders are encrypted or not,
- Right-click on the Folder/ File and tap on Properties
- Tap on the General tab
- Tap on the Advanced button and check if the option of “Encrypt Content to Secure Data” is on or not.
- If it is on, you would require a Certificate to open.
You May Also Read: How to Fix Bootrec /Fixboot Access Is Denied Windows 10 Error?
Solution 5 – Reset Permissions with Command Prompt
In some cases, OneDrive creates conflicts when it gets access to the Pictures folder and eventually malfunctions. This in turn leads to getting the Access denied in command prompt Windows 10 message. Here is how you fix it,
- Right-click on the OneDrive icon
- Choose the Settings from the Menu
- Find the Auto Save tab and set Documents and Pictures to This PC
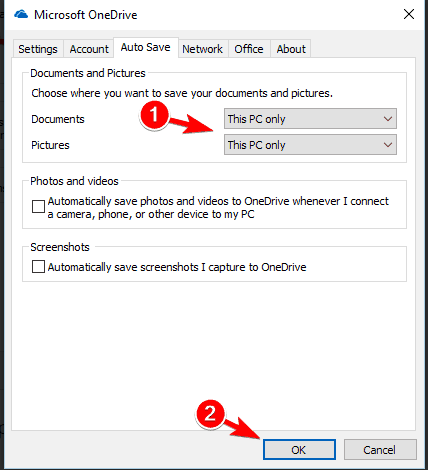
- Tap on OK to save the changes
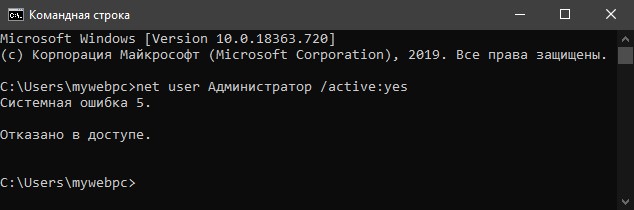
Solution 6 – Adding your account to the Admin Group
One of the key features of Windows 10 comes with an in-built Administrator account. Using this, it is possible to access all your protected and open files and folders. However, the account is protected and not an easy means to access them. Here is what to do and access them,
- Hold the Windows Key and press the R key to open the Run box
- Here type Command Prompt and hit Enter
- Type the following in Command Prompt:
net user administrator/ active: yes
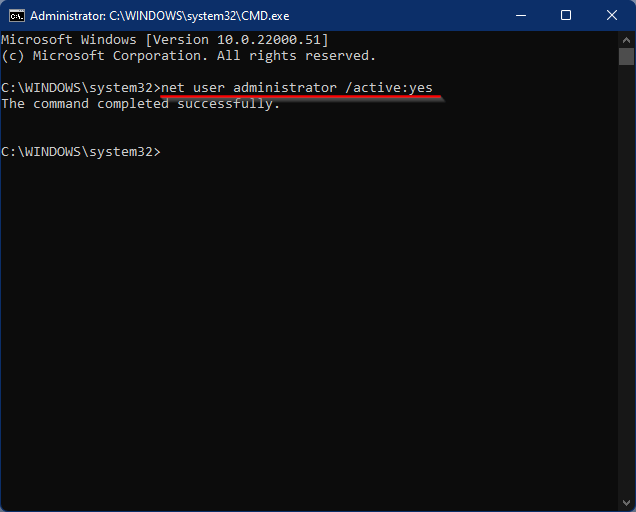
- Tap Enter and this unlocks the Admin account
- Log off your current account and shift to the Admin account
- Get easy access to your folders and files without a problem
- Once you are done using the admin account open Command Prompt once again
- Type the following:
net user administrator/ active: no
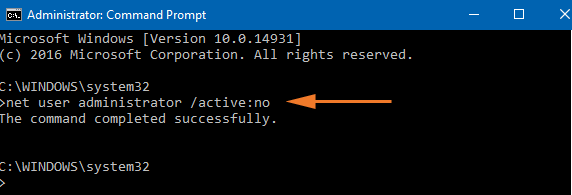
- Tap Enter to disable the Admin account
Solution 7 – Modify the Registry
With a few critical modifications in the Registry, you can fix the problem of “CMD Access is denied” in Windows 10. The key here is to keep a backup of your registry since any modification might just delete vital information about the OS installed. With that said, here is how you modify the registry,
- Hold the Windows +R key to open the Run box
- And type regedit and hit Enter
- Inside the Registry Editor, Navigate to the following destination:
- HKEY_LOCAL_MACHINE\SYSTEMCurrentControlSet\Services\LanmanWorkstation\Parameters
- Inside the path, right-click on the vacant space on the right frame
- Go to New and select DWORD (32-bit) Value
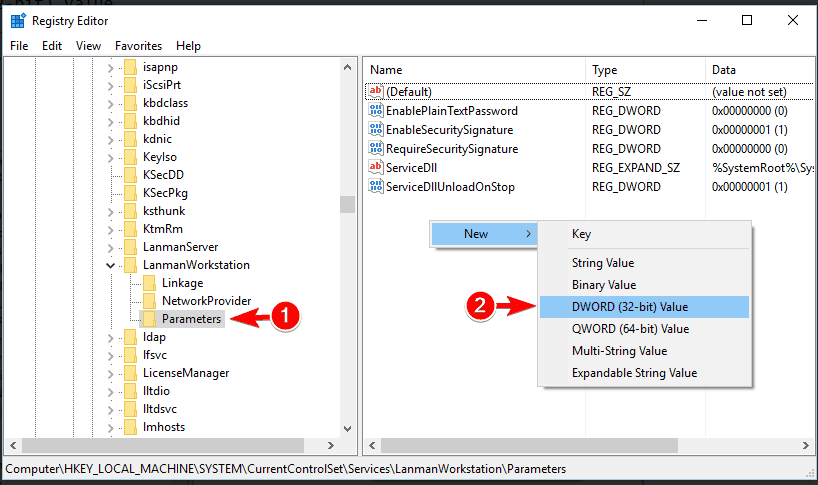
- Double tap on AllowInsecureGuestAuth and modify its Value to 1
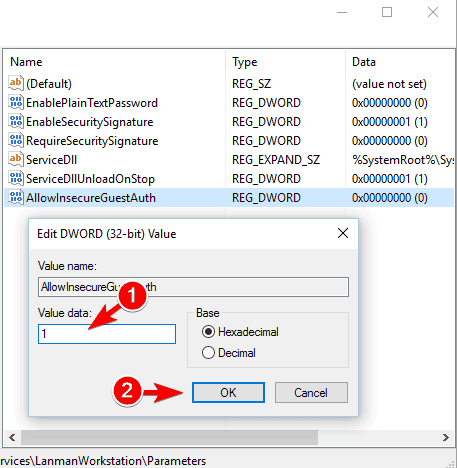
- Tap on OK to save changes
- Close the editor and restart your PC to check new changes.
Visit the particular folder or file that was causing the error. Check if you see any new set of errors.
FAQ Related to Command Prompt Access Denied Error
1: How do I fix error 5 access denied in the command prompt?
Follow these steps to resolve error 5 access denied as follows,
- Press the Windows+X key on the Keyboard and choose Command Prompt (Admin) option
- You would see a prompt on the screen requesting a command prompt app to make changes on your device. Tap on Yes to move forward.
- If the error persists, try running the command in the Command prompt:
- net local administrator
- You shall receive the names of the Admins of the device
- If your name doesn’t feature or is incorrect, it means you are not the administrator. Try changing the privilege to being an Admin and re-check with these steps mentioned.
2: How to fix Windows as unable to open the service control manager database on access is denied?
Follow these steps to fix Windows as unable to open the service control manager database on access is denied error.
- Tap on the Start menu
- Search Event Viewer and tap Enter
- Check the Windows logs out of the left menu
- Check System Logs
- Inside, tap on the Event ID column to sort down in numerical order
- Tap on any event with an ID value over 7000 and check if The service could not start due to a logon failure or not
3: What does it mean access is denied in cmd?
This means your privilege to access a specific file or folder is denied. This is caused due to various reasons including corrupted or malfunctioning files or folders.
Recommended Solution to Fix Various Windows Errors
If you are looking for an easy way to resolve Windows PC errors and issues, I suggest you use the PC Repair Tool.
This tool can fix common PC errors and issues, including corrupted registries, saving you from sudden file loss and keeping your PC safe from virus/malware infection.
So, this is all about the Command Prompt Access Denied error in Windows 10/11.
Here I tried my best to list down the potential fixes that worked for many users to solve the error access denied in Command Prompt error.
Follow the fixes given one by one and solve the problem.
I hope the article helped you to circumvent the error. If there is anything that I missed out on, or you have any queries or suggestions, then you can write to us on our Facebook Page. Also, don’t forget to shoot the like button.
Good Luck..!
Hardeep has always been a Windows lover ever since she got her hands on her first Windows XP PC. She has always been enthusiastic about technological stuff, especially Artificial Intelligence (AI) computing. Before joining PC Error Fix, she worked as a freelancer and worked on numerous technical projects.
Некоторые пользователи Windows 10 и Windows 11 натыкаются на сообщение «Системная ошибка 5 отказано в доступе» при выполнении определенных команд в Командной строке.
Причина ошибки заключается в том, что пользователь пытается выполнить команды, требующие наличия прав учетной записи Администратора системы, которых у него, по той или иной причине, нет.
Решение «Системная ошибка 5 отказано в доступе»
Достаточно запустить Командную строку (PowerShell/Терминал) от админа.
- Нажмите WIN+S, чтобы открыть системный поисковик.
- Пропишите запрос «Командная строка».
- Кликните ПКМ на найденный результат и выберите «Запуск от имени администратора».
Альтернативный способ:
- Нажмите WIN+R для вызова окошка «Выполнить».
- Пропишите в пустой строке значение CMD.
- Нажмите комбинацию CTRL+SHIFT+ENTER.
Также можно выдать права админа текущей учетной записи.
Для Windows 10:
- Нажмите WIN+I, чтобы открыть системные параметры.
- Перейдите в раздел «Учетные записи» и во вкладку «Семья и другие люди».
- Рядом с именем учетной записи нажмите на кнопку «Изменить тип учетной записи».
- В ниспадающем меню выбрать «Администратор».
Для Windows 11:
- Нажмите WIN+I, чтобы открыть системные параметры.
- Перейдите в разделы «Учетные записи» → «Другие пользователи».
- Кликните на стрелочку рядом с текущей учетной записью и нажмите на «Изменить тип учетной записи».
- В ниспадающем меню выбрать «Администратор».
После запуска Командной строке от админа (или изменения типа учетной записи) сообщение «Системная ошибка 5 отказано в доступе» больше не будет появляться.
Home
Windows
By
Abhishek Silwal

Command Prompt is the default command line tool on Windows that you can use to perform different tasks. Users especially use it to run various command line programs, whether built-in or otherwise.
However, sometimes while running such programs or modifying/deleting a file/folder with this tool, you may encounter the “Access is denied” error message. It may show an error code or tell you the reason for the issue, but usually, it doesn’t provide additional information.
In this article, we have listed all possible causes for the issue along with their corresponding solutions.
Causes for Command Prompt Access Denied
Here are the potential causes for the Access is Denied error on Command Prompt:
- Lack of admin privilege.
- Misconfigured permissions.
- Encryption of folders and files.
- Malware infection.
- Restriction due to third-party security software.
How to Fix Command Prompt Access Denied?
Below mentioned are the possible solutions to resolve the access error on Command Prompt:
Open Command Prompt as Admin
While the usual Command Prompt is enough for most purposes, you can’t run certain looks, like SFC, DISM, etc., using the program. To do so, you need to run Command Prompt as admin, which elevates its permission level.
You can use either of these methods to open Command Prompt as admin:
- Open Run by pressing Win + R, type
cmd, and press Ctrl + Shift + Enter.
- Search for
cmdorcommand prompton the search bar (Win + S), right-click on it, and select Run as administrator. - (In Windows 11) Press Win + X, select Windows Terminal (Admin), and press Ctrl + Shift + 2.

Look for and Close the Program Locking the File
You won’t be able to modify or delete files that some other program is using at that moment. If you try doing so, you’ll get the above error message. You can usually close the program by searching for it on the Task Manager or Process Explorer to resolve this issue.
If you know which process or app is responsible, you can use Task Manager.
- Press Ctrl + Shift + Esc to open the Task Manager.
- Search for the app under the Processes tab and right-click on it.
- Select End task.


If you don’t know the process, it’s better to use Process Explorer.
- Download the Process Explorer from Microsoft’s platform.
- Extract the archive and open the program depending on your system architecture.
- Press Ctrl + Shift + F to search for the handle.
- Type the file, folder, or handle due to which you are experiencing this error and press Enter.

- Then, check the list to determine the process involved.
- Close the search box and look for the process.
- Right-click on it and select Kill Process or Kill Process Tree.


However, there may be other possible reasons for the file to be locked. We recommend you refer to our article, File is Open in Another Program to find the necessary solutions for all cases of this issue.
Change Permissions of Current Working Directory (CWD)
Windows uses the NTFS partition, which includes two different types of permissions. One of those is the Access Control List (ACL) which specifies users and groups permissions for a folder/file.
You can also experience this error if you don’t have ownership of the current working directory (the directory you see before the ‘>’ sign) or the file, as well as ACL permissions to read/write inside the directory. It can even happen for system folders like System32 if a malware changes the ACL permissions.
Here’s how you can manually change these permissions and resolve the issue:
- Open the File Explorer (Win + E) and navigate to the directory.
- Right-click on the folder and select Properties.
- Go to the Security tab and click on Advanced.

- Select Change next to Owner.

- Click on Advanced and then Find Now.
- Select Administrators or your user account from the list and click OK > OK.

- Click on Apply.
- Then, check Replace all child object permission entries with inheritable permission entries from this object.
- Select Add under the Permissions tab.
- Click Select a principal and follow steps 4-6.
- Check Full control and click OK.

- Add your user account as a principal if it is not an admin account using the same process. Also, make sure to check Full control for that as well.
- Keep clicking OK to close Properties while saving the changes.


You can also use the Command line for this purpose if you find it daunting to navigate the graphical interface. To do so,
- Sign in to an administrator account.
- Open Command Prompt as Admin.
- Enter the following commands while replacing “Path of file or folder” to the path you need:
takeown /f “Path of file or folder”icacls “Path of file or folder” /Grant Administrators:f

Scan with Antivirus
As we mentioned earlier, some malware scripts can modify the ACL permissions of your files and folders, leading to this error. You can resolve the issue by manually changing the permissions. However, you also need to detect and remove the malware to prevent such issues from occurring again. To do so,
- Open Run.
- Type
ms-settings:windowsdefenderto open Windows Security. - Go to Virus & threat protection and click on Scan options.

- Check Full scan and select Scan now.


Remove Encryption
If a file is encrypted, you won’t be able to access it if you don’t have the necessary certificate keys stored on your user account. In such cases, trying to move or modify the file through the Command Prompt displays “Access is denied.” You need to remove the encryption to perform those tasks. To do so,
- Navigate to the file/folder on File Explorer.
- Check if the icons have a lock sign, which signifies that they are encrypted.
- If they have the sign, right-click on the folder/file or the root folder and select Properties.

- Click Advanced on the General tab.
- Uncheck Encrypt Content to Secure Data and click OK > OK.

- Check Apply changes to this folder, subfolders, and files and click OK.


Check File Corruption
It is also possible that your files or folders are corrupted, and your system is protecting itself by denying access. If your CWD is a system directory, you can run the System File Checker (SFC) and Deployment Image Servicing and Management (DISM) to repair such corruption. To do so,
- Open the Elevated Command Prompt (Prompt as Admin).
- Enter the following commands:
dism /online /cleanup-image /restorehealthsfc /scannow

Uninstall Third-Party Security Software
It is also possible that some security software like a personal firewall or antivirus is blocking access to a third-party executable file. In such a situation, you will get the Access denied error while trying to run this program.
First, ensure the file is not harmful in any way. Then, you can temporarily disable your third-party firewall or antivirus before using the Command Prompt to run the file. After you are done, don’t forget to re-enable your security apps.
Clean Install OS
If you are unable to resolve the issue after performing all these steps, your only remaining option is to make a clean install of Windows. Below mentioned are the steps to do so. However, depending on your Windows version, there might be a few minor differences.
- First, create a Windows bootable or installation USB.
- Then, restart your PC while keeping the installation USB connected to the device.
- Get to your BIOS using the BIOS key or any other method. You can check official sources to know the BIOS key for your motherboard.
- There go to Boot Priority or Order setting and make sure USB is at the top of the list. You should be able to see the instructions to do so on the BIOS interface.

- Save the changes and exit the BIOS.
- Now, boot using the USB media, set your language preferences, and click Next.
- Select Install now on the Install screen.

- Click on I don’t have a product key, accept the license agreements and click Next.
- Pick your OS version and then click Custom: Install Windows only (advanced).
- Select your system partition and click on Next.
- Follow the on-screen instructions.


