
When you try to press and hold CTRL+ALT+DEL and change the administrator password, you may run into the access denied changing password pop-up window. This is because of some settings in your Windows computer preventing you from attempting to change the password, even though you know the right password.

Therefore, in this article, we will show you how to change your Windows password successfully when you receive «Windows cannot change the password» or «Access denied«.
In this article:
- Method 1. Remove the Password Directly and Set a New One
- Method 2. Uncheck User Cannot Change Password Settings
- Method 3. Using Command Prompt and Allow to Change Password
Method 1. Remove the Password Directly and Set a New One
This is a universal method because no matter what error you are facing, you can use this method to change the admin or users’ password on your Windows computer, and it works 100%. That is to use the program: imyPass Windows Password Reset, to remove the password directly.
4,000,000+ Downloads
Remove your Windows admin and user passwords.
Reset Windows admin and user passwords without the previous one.
Works on Windows 7/8/10/11/XP (SP2 or later)/Vista.
Easy to use without any tech skills and safe without any virus.
24/7 free online support is available.
Let’s see how to remove password directly regardless of the access denied error.
Step 1
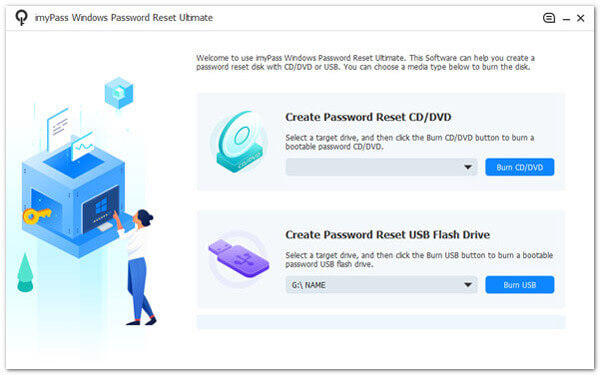
Install this program on a normal Windows computer. Plug in an empty DVD or USB disk to this computer. The program will start to create a bootable drive using the disk you plugged in.
Step 2
Reboot the computer that denies you access to change the password, and plug the bootable drive you just created into this computer.
Step 3
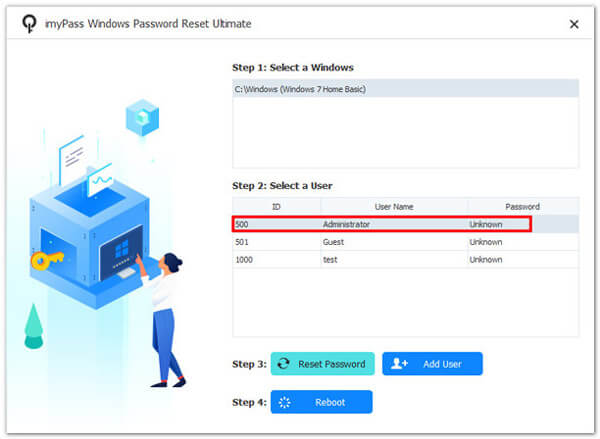
You will see the program interface on this computer. Choose the account you want to change password.
Step 4
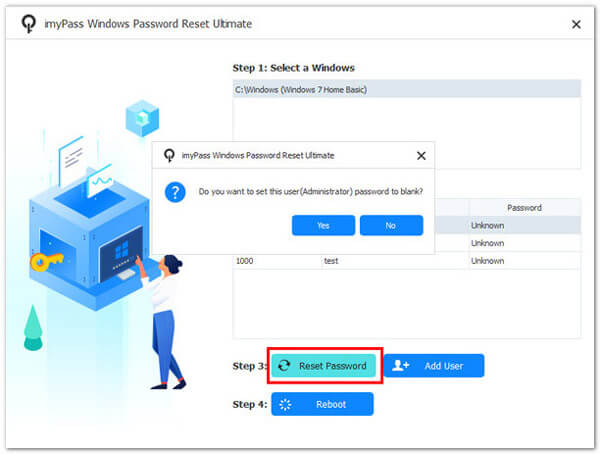
Click Reset Password.
Step 5
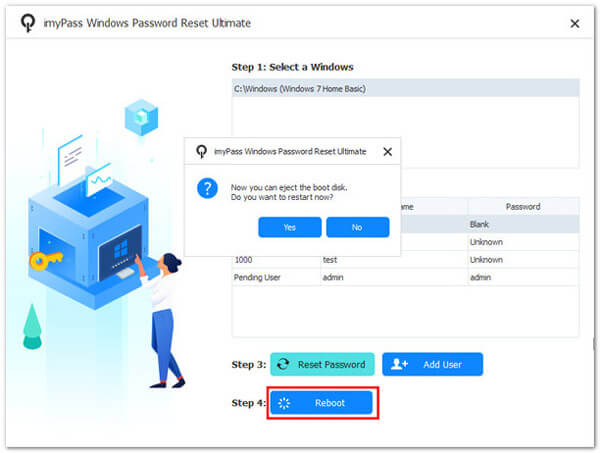
Hit Reboot. After the computer restarts again, the password will be forcibly removed. Now, you can set a password directly rather than change it.
Apart from fixing the «Windows change password access denied administrator» error, you can also use this program to access your computer again when you forget your Windows password.
Method 2. Uncheck User Cannot Change Password Settings
If you try to change the Windows password and are denied, the most likely reason is that the administrator account you are attempting to change the password for is set so that users cannot change the password. The solution is also easy; follow the instructions and change the setting.
Step 1
Press Windows + R to open the Run dialogue. Input lusrmgr.msc and click Open or press Enter.
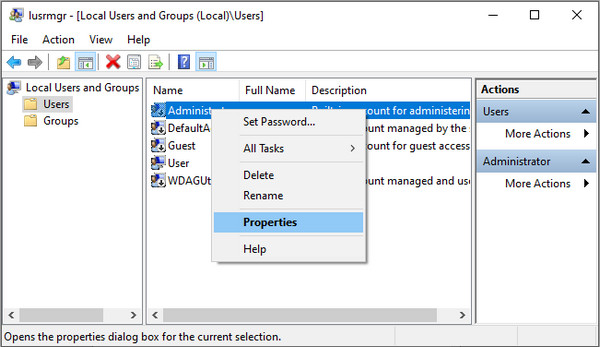
Step 2
In the Local Users and Groups window, select Users on the left. Right the account you are trying to change the password and click Properties.
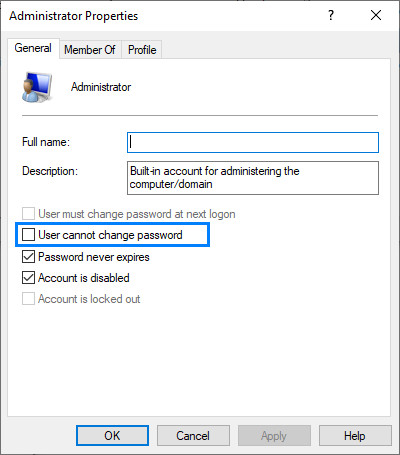
Step 3
On the user properties window and under the general tab, uncheck the User cannot change password option and click Apply.
Step 4
Now you can try to change the account password again.
Method 3. Using Command Prompt and Allow to Change Password
If you can’t change the setting using method 2, it indicates you are also denied access to do that operation. Therefore, you should use another to enable users to change the admin password. Let’s run the Command Prompt to do that.
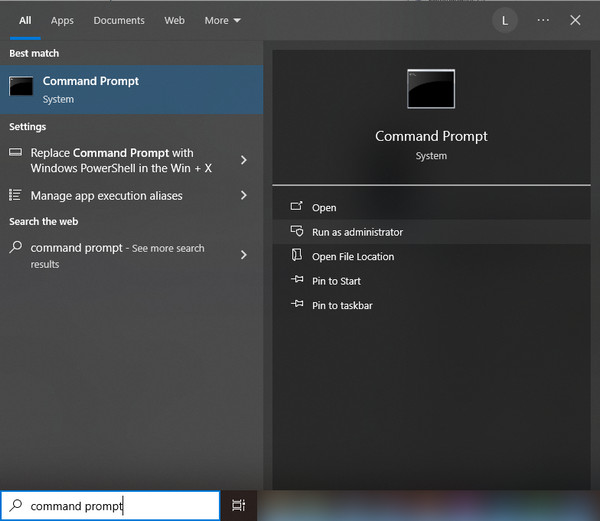
Step 1
Search Command Prompt in the search bar on the bottom. Click Run as administrator.
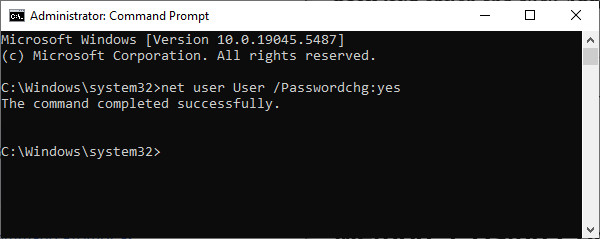
Step 2
Input net user [username] /Passwordchg:yes and press Enter. After you see: The command completed successfully, you can try to change the password again.
You can do many advanced operations using the Command Prompt, such as showing the administrator password as long as you know the command. Therefore, you can change the admin password after you set the «Passwordchg» as yes using the Command Prompt.
Don’t close the administrator Command Prompt, input net user [username] * and press Enter. You will be asked to type a new user password and retype it again. Press Enter after each typing and the password will be changed successfully.
Please note that if you don’t see the password you typed appear in the Command Prompt window, don’t worry or try to type the same letter for another time. The password won’t show in the Command Prompt by default to protect your privacy, and you have input the password into the Command Prompt. Just input the password twice and keep it in your mind.
Conclusion
Facing the Windows Change Password Access Denied Administrator error? I hope the three methods have solved your problem. Please remember the password you reset in case you forget it. But don’t worry if you unfortunately forget it. You can use imyPass Windows Password Reset to remove it.
Samuel Spenser
Samuel Spenser, a senior editor from imyPass, is an expert on password unlocking and recovery. He has more than 3-year experience in writing tutorials about password recovery for Windows.
Содержание
- Почему пишет отказано в доступе?
- Что делать если пишет отказано в доступе?
- Проверка атрибута, запретить смену пароля пользователем
- Отказано в доступе при смене пароля на локальном компьютере
- Проверка ключей реестра
Добрый день! Уважаемые читатели и подписчики, крупного IT блога рунета Pyatilistnik.org. Сегодня мне нужно было протестировать одну настройку гранулированных паролей PSO. Я создал политику и стал на тестовой виртуальной машине менять у пользователя пароль. Какого же было мое удивление, что я увидел сообщение «Отказано в доступе» в момент смены пароля. В данной заметке я бы вам хотел подробнее рассказать из-за чего это может быть. Уверен, что начинающим администраторам, данный материал будет полезен.
Почему пишет отказано в доступе?
По умолчанию в операционной системе Windows, абсолютно любой пользователь по умолчанию может менять пароль без каких либо ограничений, при условии, что он знает текущий пароль.
Как сменить пароль учетной записи Windows, я подробно уже описывал
Все было как обычно, я взял своего любимого, тестового пользователя Барбоскина Геннадия и решил ему поменять его текущий пароль на другой, мне нужно было протестировать записи аудита в журнал безопасности на контроллере домена. Я вбил текущий пароль и два раза новый пароль, который соответствовал политике PSO.
В результате я получил на действие «Сменить пароль» я получил, что в доступе отказано.
Причин такого поведения несколько:
- Если у вас учетная запись является участником домена Active Directory, то есть вероятность, что она попадает под политику или для нее включен атрибут PASSWD_CANT_CHANGE (Запретить смену пароля пользователем)
- Если у вас обычная, локальная учетная запись, то так же могут действовать запрещающие локальные политики в вашей операционной системе Windows
- Не правильное значение в реестре Windows
Что делать если пишет отказано в доступе?
Почему пишет отказано в доступе я вам описал выше, осталось все теперь поправить и разрешить менять пароль, мы же с вами радеем за безопасность.
Так как у меня в моей тестовое локальной сети развернут домен Active Directory, то я первым белом хотел посмотреть параметр PASSWD_CANT_CHANGE в свойствах учетной записи. Открываете оснастку ADUC (Active Directory – пользователи и компьютеры). Найдите вашего пользователя и откройте у него свойства. Перейдите на вкладку «Учетная запись». В разделе «Параметры учетной записи» удостоверьтесь, что не установлена галка «Запретить смену пароля пользователя» именно из-за нее у меня при попытке сменить пароль и выскакивало уведомление «Отказано в доступе».
Этот же параметр можно увидеть в редакторе атрибутов Active Directory. Открывает соответствующую вкладку и находим в самом низу атрибут «userAccountControl», у которого будет значение 0x-10200 = ACCOUNTDISABLE|PASSWD_CANT_CHANGE
Примечание: Данное разрешение невозможно назначить при помощи прямой правки атрибута UserAccountControl. https://support.microsoft.com/ru-ru/help/305144/how-to-use-the-useraccountcontrol-flags-to-manipulate-user-account-pro
Тут значение значение 0xчисло, складывается из количества установленных атрибутов для UserAccountControl. В десятичном виде, число будет выглядеть более привычно.
Этот же атрибут, можно проверить открыв PowerShell и введя команду:
Get-ADUser -Identity barboskin.g -Properties *
Вы получите все атрибуты нужного вам пользователя. Нас будет интересовать параметр «CannotChangePassword», если стоит «False», то он выключен, если стоит «True», то он включен.
Отказано в доступе при смене пароля на локальном компьютере
С доменной инфраструктурой мы разобрались, теперь давайте я покажу, что нужно проверить, если у вас обычный домашний компьютер.
Откройте окно выполнить в вашей операционной системе, напоминаю, для этого нажмите одновременно клавиши WIN и R. Введите там имя оснастки локальной групповой политики:
У вас откроется локальный редактор групповой политики. В нем вам необходимо перейти по такому пути:
Конфигурация пользователя — Административные шаблоны — Система — Варианты действий после нажатия CTRL+ALT+DEL
Тут вам необходимо проверить, какой статус у политики «Запретить изменение пароля», если она включена, именно она вызывает сообщение об отказе доступа к изменению вашего пароля. Чтобы это исправить, вам нужно ее либо отключить, либо сделать статус «Не задано», после чего либо перезагрузить вашу системы или же обновить групповую политику через командную строку.
Проверка ключей реестра
Со вторым способом мы разобрались, если у вас в локальной групповой политике ничего нет, то проверим определенный ключ реестра, который может запрещать изменения пароля пользователя в Windows. Открываем окно выполнить и пишем в нем regedit.
Переходим в ветку:
HKEY_CURRENT_USER\Software\Microsoft\Windows\CurrentVersion\Policies\
Вам необходимо убедиться, что в политиках нет ключа реестра DisableChangePassword со значением 1. Если ключ DisableChangePassword присутствует, то его либо нужно удалить, либо изменить его значение на 0. Изменения вступают в силу сразу, перезагрузка не потребуется.
Вот такие вот есть варианты решения проблемы с отказом доступа при изменении пароля пользователя Windows, а с вами был Иван Семин, автор и создатель IT портала Pyatilistnik.org.
Method 1: Using Command Prompt
Step 1: Press Win+X keys and from the Power user menu select Command Prompt(Admin) option.
Step 2: Execute the following command in command prompt.
net user username /Passwordchg:yes
Step 3: In the above command replace username with your username. If your username contain space then put your username inside the double-quotes.
Method 2: Using Computer Management
First of all, open Computer Management on your Windows PC with the following methods.
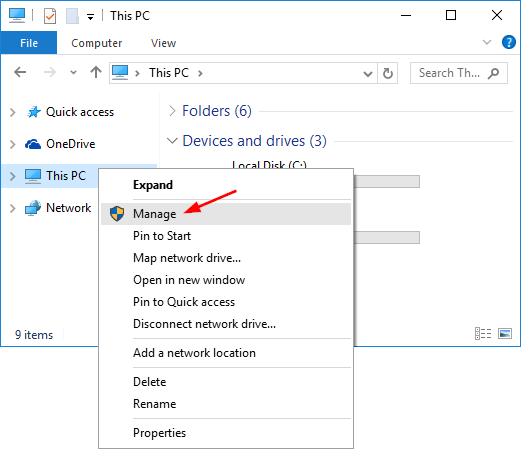
Step 1: Right click on Computer icon and then click on Manage button present in the ribbon.
Step 2: Execute compmgmt.msc command in Runbox.
Step 3:Now go to Local users and Groups > users section.
Step 4: In the next screen click on user account which is not allowing to change the password from the right side pane and this will open properties window.
Step 5: Then you need to uncheck the User cannot change password checkbox and apply the changes.
That’s it, the problem is fixed and you’re allowed to change the password again.
If the above method doesn’t work then follow this method, you can try Windows Password Recovery tool to fix windows cannot change the password error on Windows 10. This excellent Windows password recovery tool allow you bypass, recover and reset administrator or other user password on Windows 10/8.1/8/7/XP/Vista.
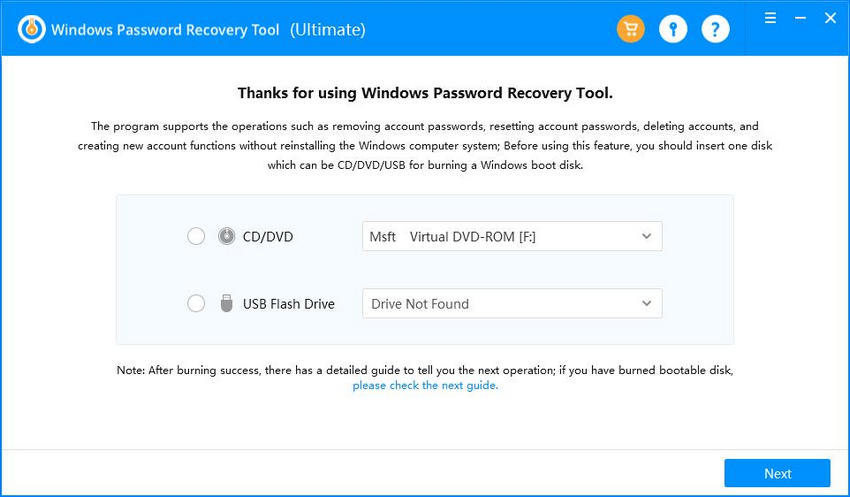
Step 1: First of all, download and install Windows Password Recovery Tool Ultimate on any PC you’re able to access to
Free Try Windows Password Recovery Tool
World’s 1st Windows Password Recovery Software to Reset Windows Administrator & User Password.
Free Download
Free Download
Step 2: Select «CD/DVD» and specify the CD burning drive from the pull-down list. Insert a blank CD/DVD/USB disk into the computer. Click «Burn» to start burning. After burning successfully completes, click «OK» and eject CD/DVD.
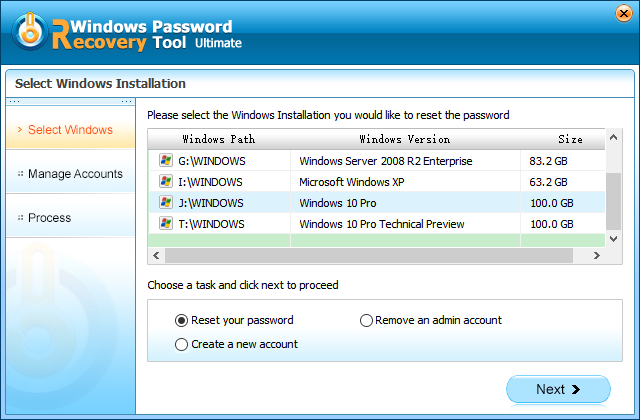
Step 3: Insert the bootable CD/DVD or USB Flash Drive you just burned into your locked computer and reboot your computer. Then select the Windows installation you would like to remove the password, and then choose «Reset your password». Click «Next» to proceed.
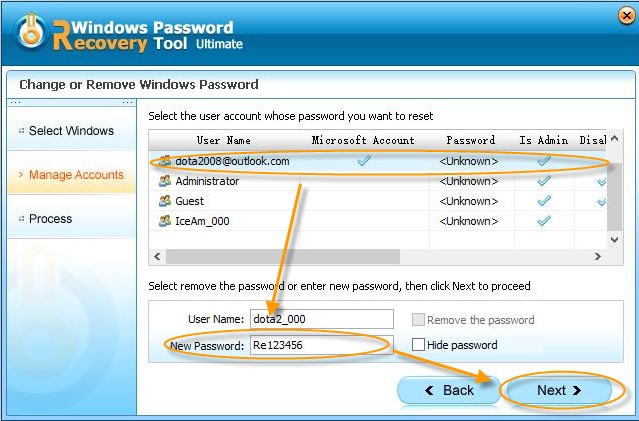
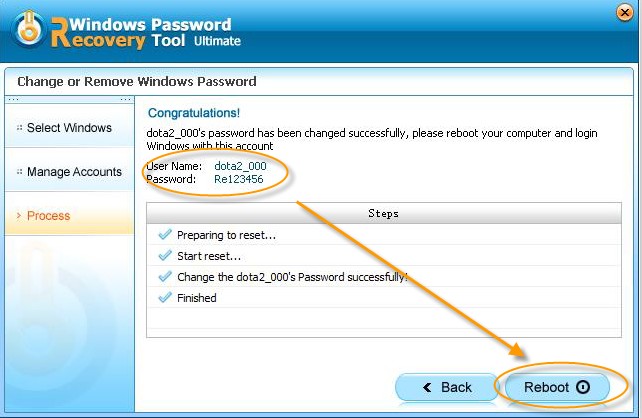
Step 4: Select the target user account you want to reset. After that, edit the password in the «New Password» box. New password was changed to Re123456 in default, you can edit it by yourself.
Step 5: Click on «Reboot» button to reboot the computer, you can then log back into your computer with a new password..
All in all, these three methods are very useful in fixing unable to change Windows password error on Windows 10 when you have met the same situation. You just need to pick one according to your real situation.
Free Try Windows Password Recovery Tool
World’s 1st Windows Password Recovery Software to Reset Windows Administrator & User Password.
Free Download
Free Download
Given the importance of digital security, adding a password to open your Windows 10 computer is a common practice. However, what to do if Windows 10 stops recognizing your password? What if you cannot login to Windows 10 with correct password?
This Windows 10 not accepting password problem can be perplexing and frustrating. Not knowing why your Windows 10 computer suddenly refuses to accept the correct password is concerning. However, there is no need to panic as this guide will thoroughly examine this issue. EaseUS Software will provide you with multiple effective methods to resolve the Windows 10 not accepting password problem.
Emergency Plan: Remove Windows 10 Password via Password Reset Tool
For the first solution to address the issue of not being able to log into the computer with the correct password, we delve into a powerful tool that can make the process remarkably simple. Introducing EaseUS Partition Master, a comprehensive software renowned for its multifaceted capabilities. Among its impressive array of features, EaseUS Partition Master boasts a «Password Reset» functionality that can be a game-changer in scenarios like this one.
This feature allows you to effortlessly remove or reset the original Windows 10 password, granting you access to your computer without the need for complex procedures. EaseUS Partition Master is designed with user convenience in mind, ensuring that even those with limited technical expertise can navigate the tool seamlessly.
Follow the simplified step-by-step instructions guided below to resolve Windows password not working with the help of EaseUS Partition Master:
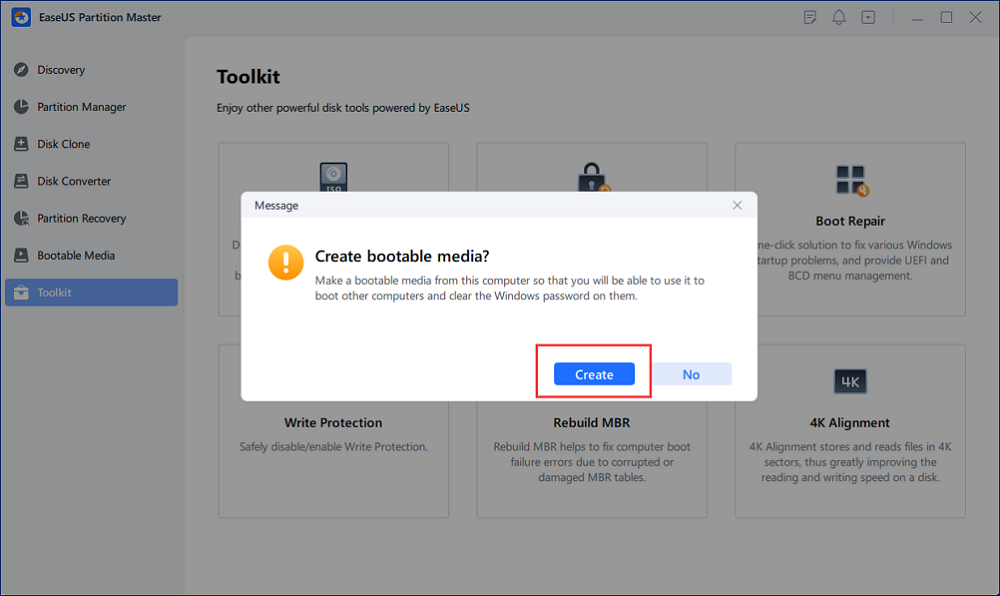
Step 1. Insert the target USB disk into the computer, download and run EaseUS Partition Master, and click «Toolkit» > «Password Reset.»

Step 2. A small window will pop up. After reading it carefully, click «Create».
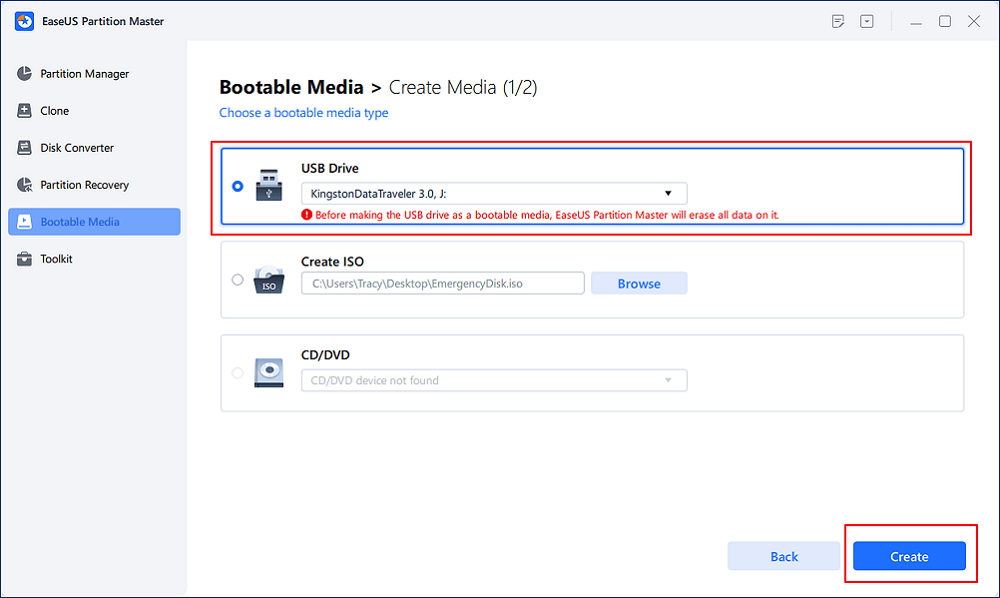
Step 3. Select the correct USB flash drive or external mobile hard disk and click «Create» again. Wait patiently. After the password reset USB flash drive is created, click «Finish.»
Step 4. Remove the password reset USB, insert it into the locked PC, and restart. You will be asked to change the boot drive to boot the PC from USB. Once completed, the system will automatically boot from USB.
Step 5. After restarting, find EaseUS Partition Master again and go to «Password Reset.» All accounts on the PC will be displayed in the interface; click on the target account and check «Reset & Unlock.»
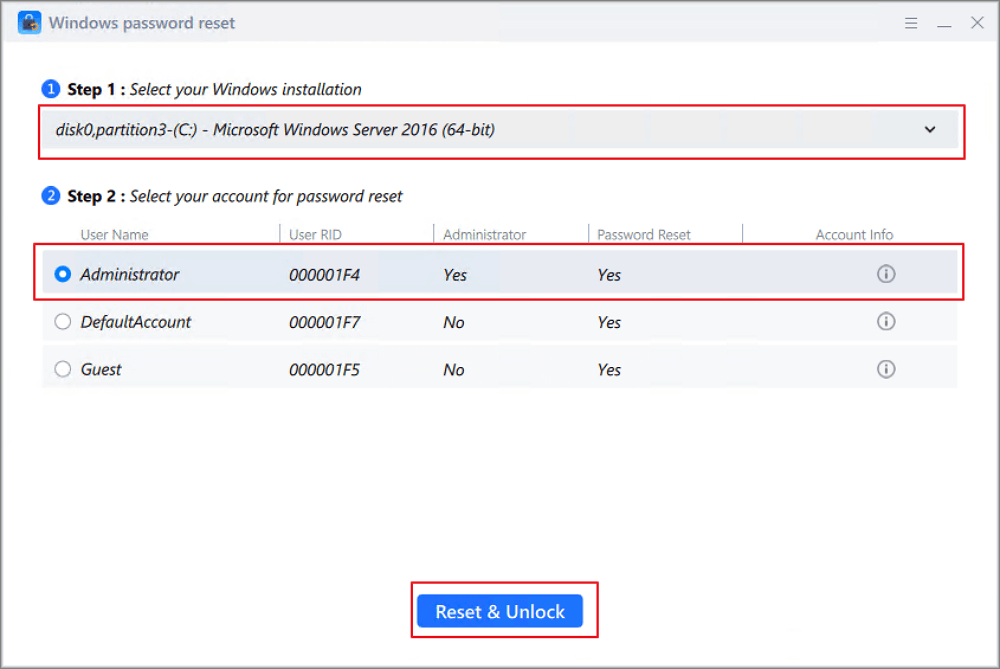
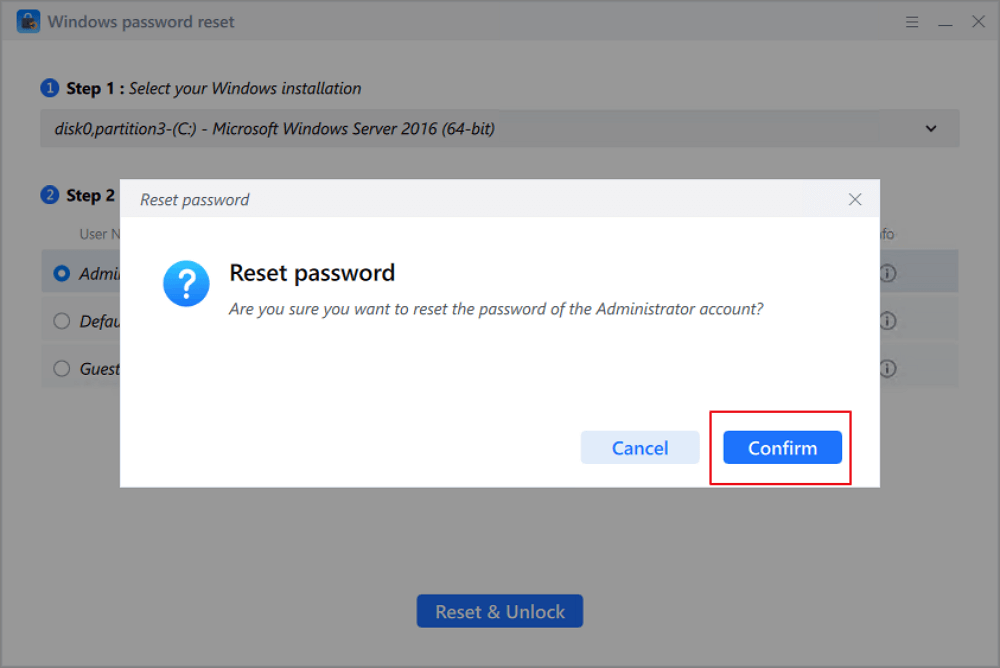
Step 6. When you receive this prompt, click «Confirm» to continue. Your password will be erased.
Beyond password resetting, EaseUS Partition Master offers a wide range of partition and disk management features to optimize your computer’s performance.
If you’re facing the challenge of Windows 10 not recognizing your password, we highly suggest considering EaseUS Partition Master as your initial solution. Utilizing this tool, which you should download, may offer the most efficient and effective means of regaining access to your computer, such as:
- Create bootable USB
- Make a password reset USB for another computer
- Fix Your PIN is no longer available
- Unlock laptops without passwords
- Remove the Windows 10 password with simple clicks
- Reset Windows 10 forgotten password
Nevertheless, for those who prefer to explore alternative approaches, don’t worry; we will also delve into additional methods for addressing this complex problem.
There are multiple ways through which you can fix the Windows 10 not accepting password problem. Given below are six quick fixes that can help you get out of this messy situation:
Fix 1. Reboot Windows 10 Once or Several Times
What should you do if your laptop won’t accept the password Windows 10? The simplest way is to restart your computer or PC once or several times. Sign out and sign in again to see if you can boot into your Windows 10 PC with your current password.
Rebooting your Windows 10 helps flush out temporary bugs and reset all processes. If rebooting one time doesn’t help, try doing it several times. Here is how to reboot your Windows 10 computer:
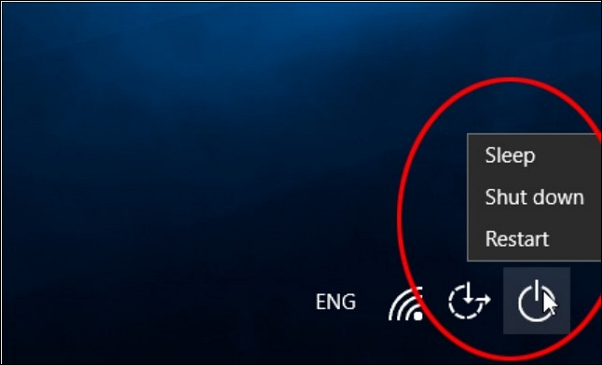
Instructions: Click the Power button from the bottom right corner and select «Restart.» Once the computer is rebooted, try to log in. If it fails, go through the procedure multiple times.
If you are running Windows 11, you can click the following link to learn more.
Fix 2. Connect to the Internet
In specific scenarios, Windows 10 may necessitate an active internet connection to verify your password, particularly when employing a Microsoft account for authentication. To resolve the ‘Windows 10 Password Authentication Failure’ problem, adhere to these instructions:
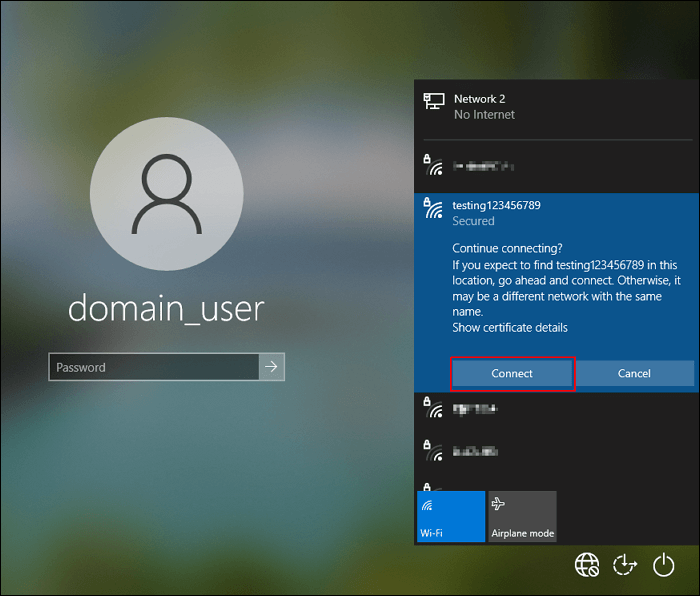
Instructions: If you’re not connected to the internet, locate the «Network» icon in the lower right corner and click it. Next, choose your Wi-Fi network and enter your Wi-Fi password. Afterward, attempt to log into Windows 10 once more.
Fix 3. Use the Virtual Keyboard
If you suspect that there might be a problem with your physical keyboard preventing you from entering your password correctly on Windows 10, you can utilize the virtual keyboard as a solution. Follow these instructions to address the problem of «Windows 10 Not Accepting Password»:
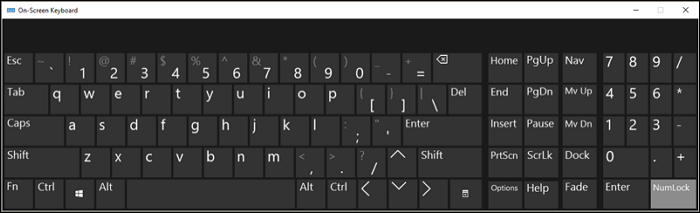
Step 1: Start by finding the «Ease of Access» icon positioned at the lower-right corner of the login screen, then give it a click. A menu will pop up; from within this menu, opt for «On-Screen Keyboard.» This action will open the virtual keyboard on your display.
Step 2: Employ your mouse or touch screen to click on the virtual keys and enter your password. Once you’ve input your password using the virtual keyboard, click the «Sign In» button and check if the problem has been resolved.
Fix 4. Boot Windows 10 into Safe Mode
Booting Windows 10 into Safe Mode can be a valuable troubleshooting step when you encounter the «Windows 10 Not Accepting Password» error. Safe Mode loads only essential drivers and services, which can help bypass potential issues causing login problems. Proceed with these instructions to initiate Safe Mode:
Step 1: When on the login screen, click the «Power» button and tap «Restart» while holding the «Shift» key. This combination will take you to the Advanced Startup Options.
Step 2: Here, select «Troubleshoot» and then proceed by clicking on «Advanced Options.» Next, navigate to «Startup Settings» and choose the option labeled «Enable Safe Mode.»
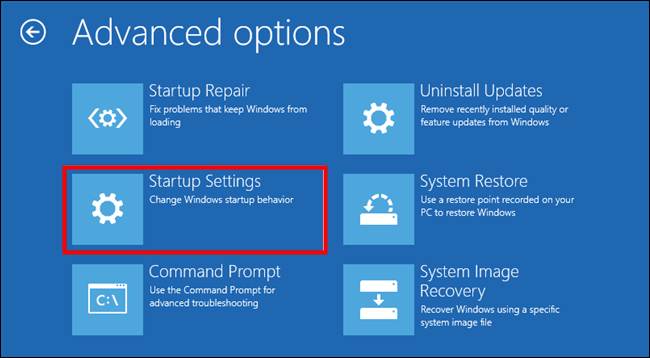
Step 3: After Windows 10 enters Safe Mode, your computer will load only essential drivers and services. This can help determine if a third-party application or driver is causing the login problem.
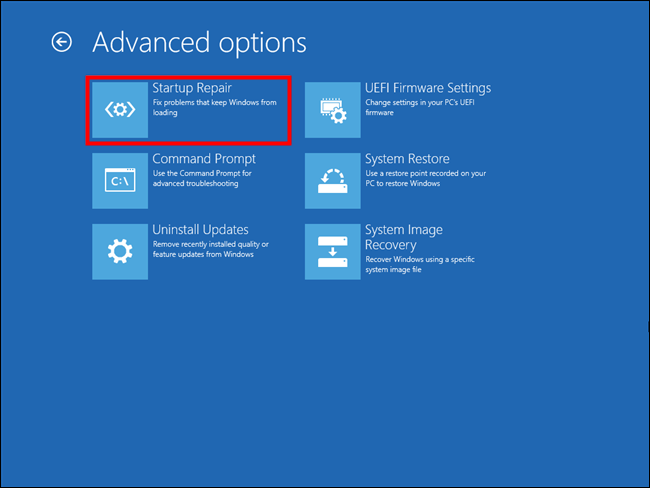
Fix 5: Use the Startup Repair Tool
If your Windows 10 computer still does not accept your password, you can use the built-in Startup Repair tool. It can identify and fix potential issues that might be causing the login problem. This is the method for utilizing the Startup Repair tool:
Step 1: Begin by pressing the «Shift» key and click on «Restart» within the «Power» options. This will grant you entry to the «Advanced Startup Options,» where you should proceed by selecting «Troubleshoot.»
Step 2: Here, click «Advanced Options» and follow it by tapping «Startup Repair» or «Automatic Repair.» It will commence the repair operation, after which you can try to re-login.
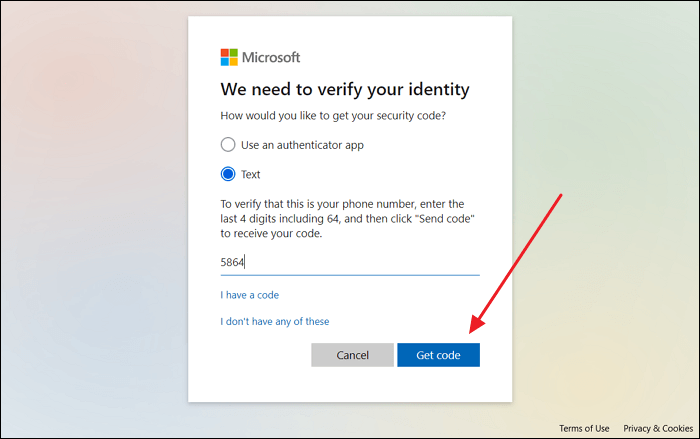
Fix 6. Recover Original Microsoft Account Password Online
Utilizing a Microsoft account for Windows 10 login? If you’ve misplaced your password or suspect it’s responsible for the ‘Windows 10 Not Accepting Password’ issue, there is a way. You can initiate the process of resetting your Microsoft account password online. Here are the essential procedures for this operation:
Step 1: Use a device to access the «Microsoft Account Reset Page.» Here, type in your email ID or phone number associated with the Microsoft account.
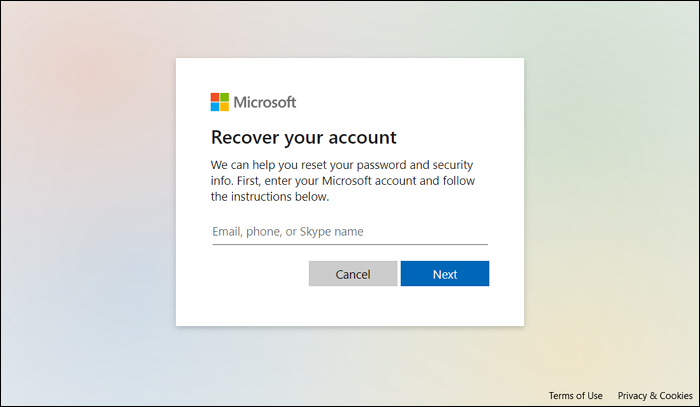
Step 2: On the following screen, proceed with the verification step and establish a new password. After successfully setting the password, employ it to access your Windows 10 computer.
Or, you can follow the guide video to reset forgotten Windows password with the mentioned methods:
Why Won’t Windows 10 Accept Password
The frustration of encountering a «Windows 10 Not Accepting Password» error can be overwhelming. Nonetheless, delving into the possible causes of this problem can assist you in troubleshooting and discovering a viable resolution. Below, you’ll find some prevalent factors that could impede Windows 10 from recognizing your password:
- Incorrect Password: Human error is a common culprit. Ensure that you’re entering your password correctly, paying attention to capitalization, special characters, and any potential typos.
- Keyboard Issues: Physical keyboard problems or a malfunctioning key can result in incorrect password entry. Try using an on-screen keyboard or an external keyboard to rule out this possibility.
- Forgotten Password: Forgetting a password can happen quite easily. Consider a scenario where your password hasn’t been used for an extended period. In such cases, exploring solutions like initiating a password reset is recommended.
- Microsoft Account Issues: If you use a Microsoft account to log in to Windows 10, issues with your Microsoft account can prevent login. These include a forgotten password or a locked account.
- Network Connection: An internet connection may be necessary for Windows. This applies when utilizing a Microsoft account. Thus, ensure that your computer is currently connected to the internet.
- Software Conflicts: Third-party software, especially security or password management tools, can sometimes interfere with the login process. Uninstalling or disabling such software temporarily might help.
Share this article to help others facing the same issues and needing help.
Conclusion
To sum it up, encountering the frustrating «Windows 10 Not Accepting Password» error can be a daunting experience. Nonetheless, this article offers a thorough handbook to empower you in effectively addressing this issue. We’ve delved into six solutions, each tailored to target various facets of the problem.
While all these solutions have their merits, we highly recommend EaseUS Partition Master as an exceptional tool to address the «Windows 10 Not Accepting Password» error. EaseUS Partition Master offers a specialized «Password Reset» feature that simplifies the process of removing or resetting your original Windows 10 password. Its intuitive interface, robust data protection measures, and versatile disk management functionalities render it a valuable asset within your arsenal for troubleshooting.
Windows Not Accepting Password FAQs
If you’re still encountering issues or have specific questions related to Windows 10 passwords, we’ve compiled some frequently asked questions to provide further guidance:
1. How do I fix Windows 10 not accepting my password?
One straightforward and frequently successful remedy involves restarting your computer following these steps:
Instructions: Locate the «Power» button in the lower right corner and choose «Restart.» This action will initiate a computer reboot.
2. Why does it say my password is incorrect when it’s right?
Several factors could contribute to this issue, but to avoid this, make sure that the Caps Lock key isn’t inadvertently activated since Windows passwords are sensitive to letter cases. Second, thoroughly review your password for any typographical mistakes or capitalization errors. If you’ve recently modified your Microsoft account password and haven’t yet synchronized it with your computer, utilize the local password of your device.
3. How to bypass Windows 10 password?
Use the following simplified steps to bypass the Windows 10 password:
Step 1: Begin by initiating a restart of your laptop. Once it completes the reboot, proceed by pressing the «F8» key. This action will navigate you to the Administrator login screen on your laptop.
Step 2: While on the Administrator login screen, simultaneously press the «Ctrl + Alt + Del» keys. Among the available options, select «Switch User» and input «Administrator» as your username.
Step 3: Leave the password field empty and press the «Enter» key. This will grant you access to your laptop without the need for a password.
Нередко пользователи Windows 10 сталкиваются с необходимостью в изменении состояния службы. Процесс не всегда проходит гладко, и нередко возникает ошибка «Отказано в доступе». Обычно она связана с программным сбоем, но есть и другие причины. О них и способах решения проблемы мы расскажем в данном материале.
Неполадка сообщает, что у пользователя нет прав на просмотр конкретного файла или приложения. Главной задачей является обход данного ограничения или его деактивация. Рассмотрим способы, позволяющие это сделать.
Запуск программы от имени администратора
Первый вариант — возвращение прав суперпользователя посредством использования полномочий администратора.
Источник скриншота: CQ / Запуск от имени администратора
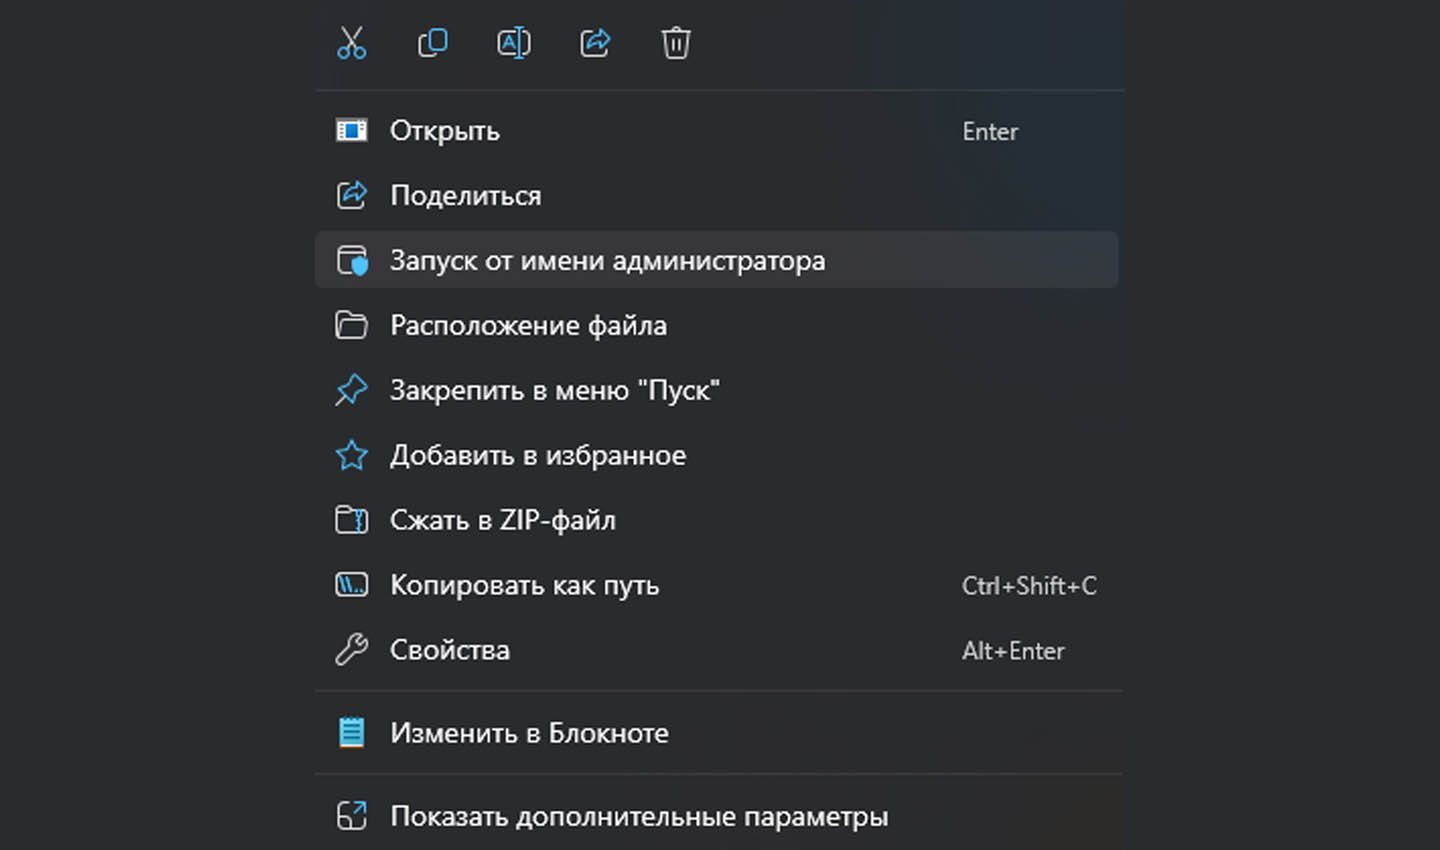
Делается это так:
- Ищем нужный файл или программу через любой файловый менеджер. Лучшее решение — проводник.
- Нажатием правой клавиши мыши (ПКМ) открываем перечень доступных действий.
- Из списка выбираем пункт «Запуск от имени администратора».
Открытие доступа к папкам для всех профилей
Если на компьютере несколько учеток, необходимо предоставить им равные права для использования хранящейся информации.
Источник скриншота: CQ / Профили Windows
Делается это следующим образом:
- Откройте командное окно, вызвав его комбинацией клавиш «Win + R».
- Введите в строку команду: «%USERPROFILE°/o\AppData\Local\» (без кавычек).
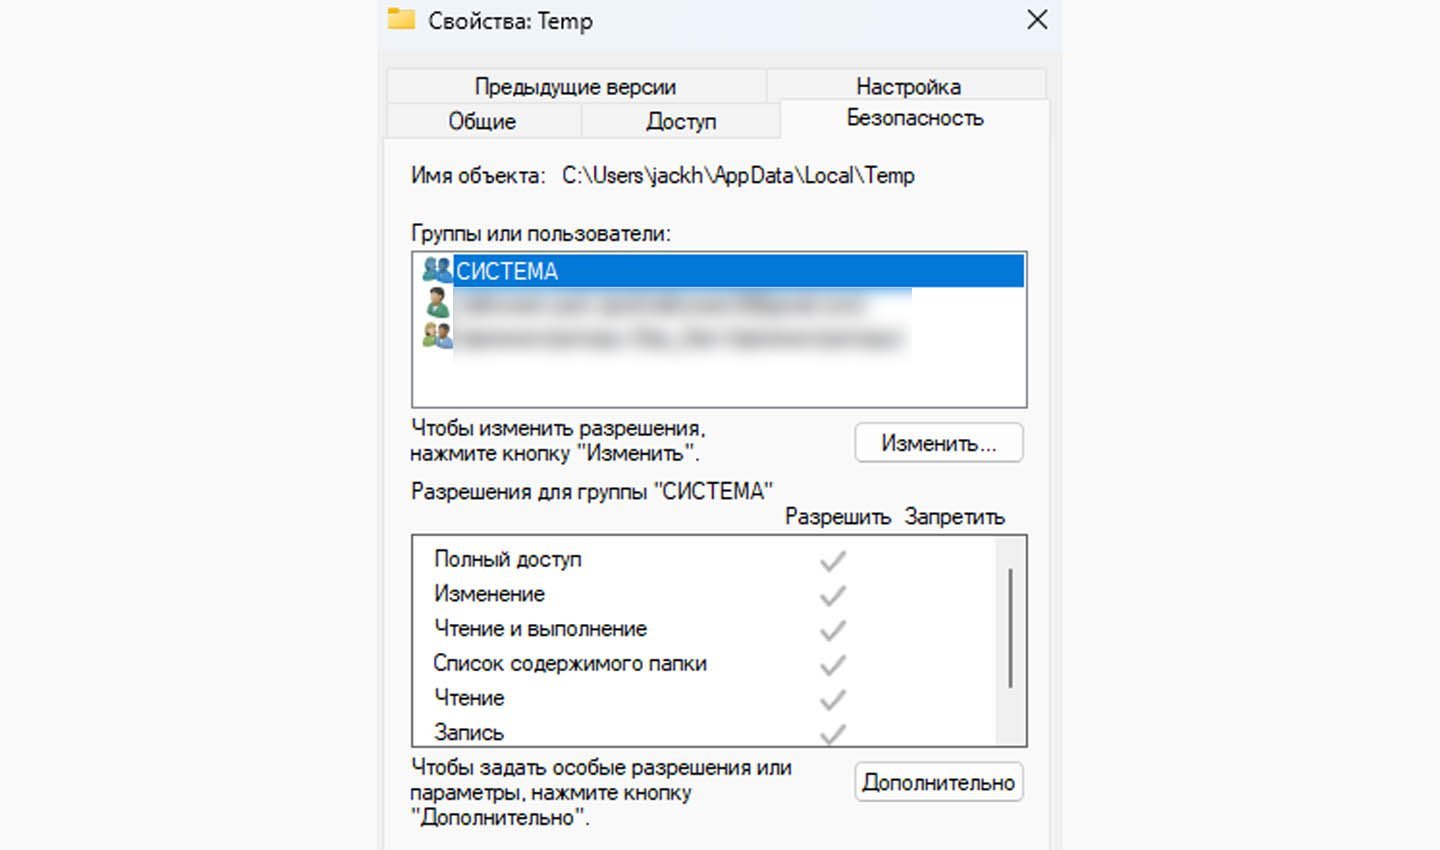
- Отыщите каталог под названием Temp, щелкните по нему ПКМ для открытия меню.
- Выберите раздел «Свойства», далее перейдите в «Безопасность».
- Нажмите кнопку «Добавить», расположенную под графой «Группы или пользователи».
- В окне ввода имени напишите «Все», нажмите «Проверить имена».
- Если система не отыщет имя, то вновь нажмите на окно ввода имени и напишите «All».
- В блоке ниже «Разрешения для группы» проставьте галочки в столбце «Разрешить».
- Нажмите «Применить», после «ОК», перезагрузите устройство.
Использование командной строки
Иногда ошибка возникает из-за сбоев в работе служб Windows.
Источник скриншота: CQ / Использование командной строки
В таких ситуациях действуем следующим образом:
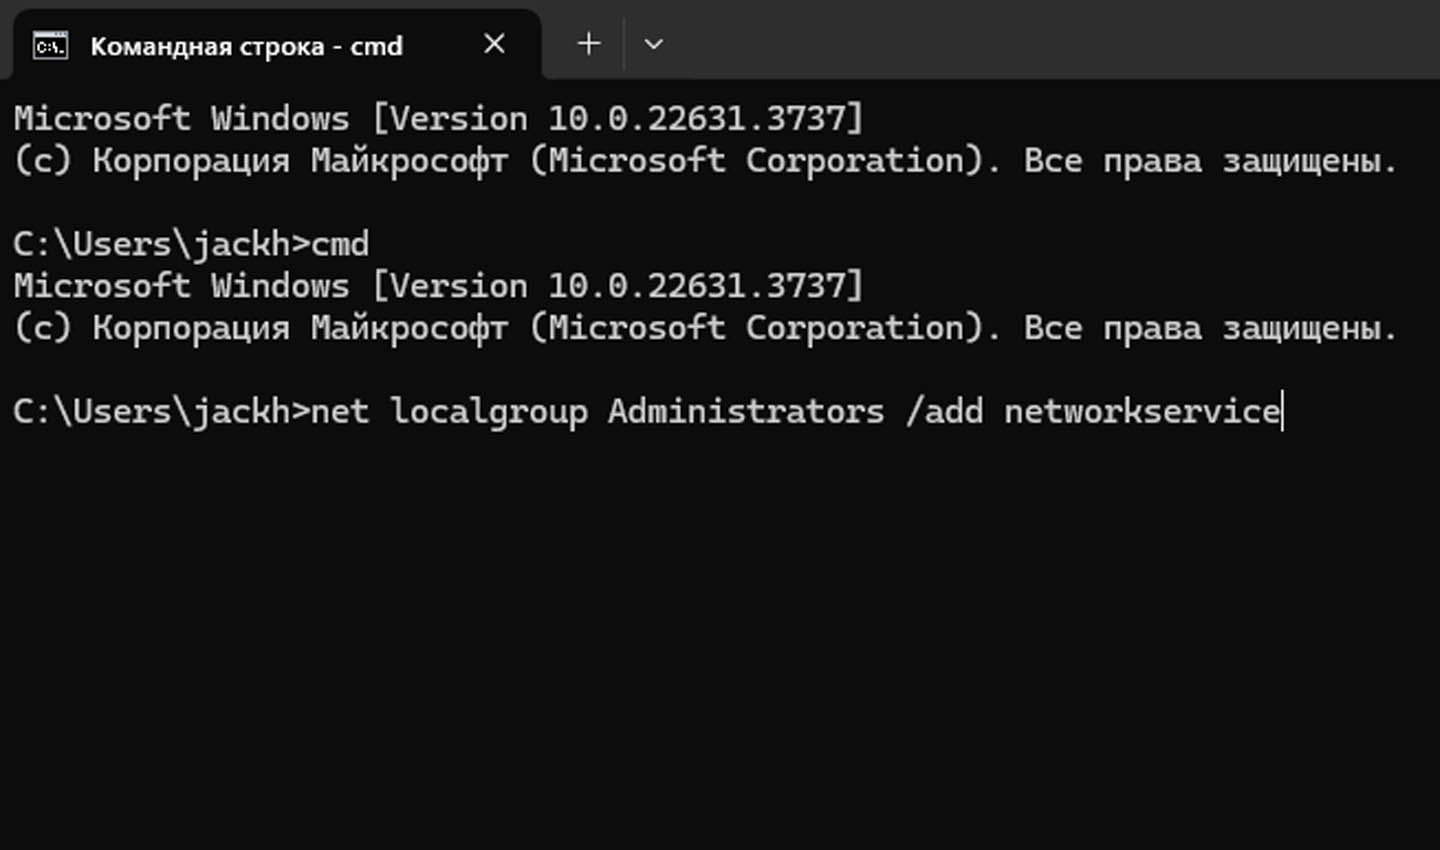
- Откройте кнопку «Пуск», наберите в поиске «Командная строка».
- Щелкните ПКМ на приложении cmd.exe. Перед вами появится контекстное меню.
- Выберите из списка пункт «Запуск от имени администратора».
- В открывшемся черном окне напечатайте следующее: «net localgroup Administrators /add networkservice» (без кавычек). Нажмите «Enter». Дождитесь надпись «Команда выполнена успешно».
- В появившейся строке ввода напишите следующую команду: net localgroup Administrators /add localservice». Нажмите «Enter». Дождитесь надписи о выполнении и закройте командную строку.
- Перезагрузите устройство. Если проблема решена, доступ к папкам восстановится.
Использование системной учетной записи
Во всех «десятках» есть встроенная учетка, называющаяся «LOCAL SERVER». Это системный аккаунт, отвечающий за определенные функции, в том числе и работу со службами. Если перечисленные ранее варианты не сработали, можно попробовать дать привилегии системной учетке. Для этого необходимо:
- Откройте «Этот компьютер». Отыщите «Локальный диск (С:)». Нажмите на него ПКМ и выберите пункт «Свойства».
- В открывшемся окне нажмите на раздел «Безопасность». Выберите «Изменить».
- Нажмите на кнопку «Добавить» под блоком «Группы и пользователи».
- В следующем окне выберите «Дополнительно».
- Отыщите необходимую учетную запись в списке. Выберите ее.
- После предоставьте ей полный доступ к системным операциям, проставив галочки в столбце «Разрешить».
- Последовательно нажмите «Применить», «ОК», перезагрузите устройство.
Проверка наличия вирусов
В редких случаях система отказывает в доступе из-за внешнего вмешательства — вредоносного ПО. Это вариант на случай, если все предыдущие способы не помогли. Сделать это можно так:
- Откройте «Пуск», введите в поиск «Защитник Windows».
- Перейдите в программу, запустите проверку. Дождитесь ее окончания.
Если будут обнаружены вредоносные ПО, удалите их, а после перезагрузите устройство.
Заглавное фото: freepik