
Все способы:
- Откат драйвера видеокарты NVIDIA
- Способ 1: «Диспетчер устройств»
- Способ 2: «Установка и удаление программ»
- Способ 3: Переустановка драйвера в GeForce Experience
- Заключение
- Вопросы и ответы: 2
Видеокарта – один из важнейших компонентов любого компьютера, ведь именно она отвечает за вывод изображения на экран. Но это устройство не будет работать стабильно и в полную мощь, если в системе будет отсутствовать актуальный драйвер. При этом в редких случаях именно обновление программного обеспечения становится причиной всевозможных проблем – ошибок, сбоев и просто некорректного функционирования графического адаптера. Единственное решение в таком случае – откат драйвера, и в этой статье мы расскажем, как это сделать для продукта «зеленых».
Читайте также: Что делать, если слетает графический драйвер NVIDIA
Откат драйвера видеокарты NVIDIA
Обычно все работает так – разработчик выпускает обновление драйвера, которое должно повысить производительность видеоадаптера, устранить недочеты предыдущих версий, исключить возможные ошибки. Однако иногда эта налаженная схема дает сбой – например, появляются артефакты на экране, вылетают игры, тормозит видео, требовательные к графике программы перестают справляться с возлагаемыми на них задачами. Если проблемы в отображении визуального контента появились после обновления драйвера, его следует откатить до предыдущей (стабильной) версии. Как это сделать, читайте ниже.
Читайте также: Устранение проблем с установкой драйвера NVIDIA
Примечание: Инструкция по откату драйвера видеокарты универсальна, она применима не только к продуктам NVIDIA, но и к конкурентным AMD, а также интегрированным адаптерам от Intel. Более того, точно таким же образом можно откатить драйвер любого аппаратного компонента компьютера или ноутбука.
Способ 1: «Диспетчер устройств»
«Диспетчер устройств» — стандартный компонент операционной системы, название которого говорит само за себя. Здесь отображаются все установленные в компьютере и подключенные к нему устройства, указаны общие сведения о них. В числе возможностей этого раздела ОС – обновление, установка и необходимый нам откат драйвера.
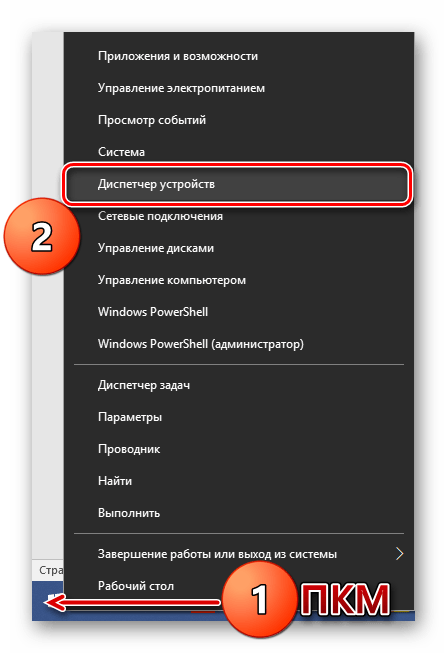
- Откройте «Диспетчер устройств». Сделать это можно по-разному, например, через правый клик мышкой по кнопке «Пуск» и последующий выбор необходимого пункта. Универсальное решение для всех версий ОС: Win + R на клавиатуре – ввод команды
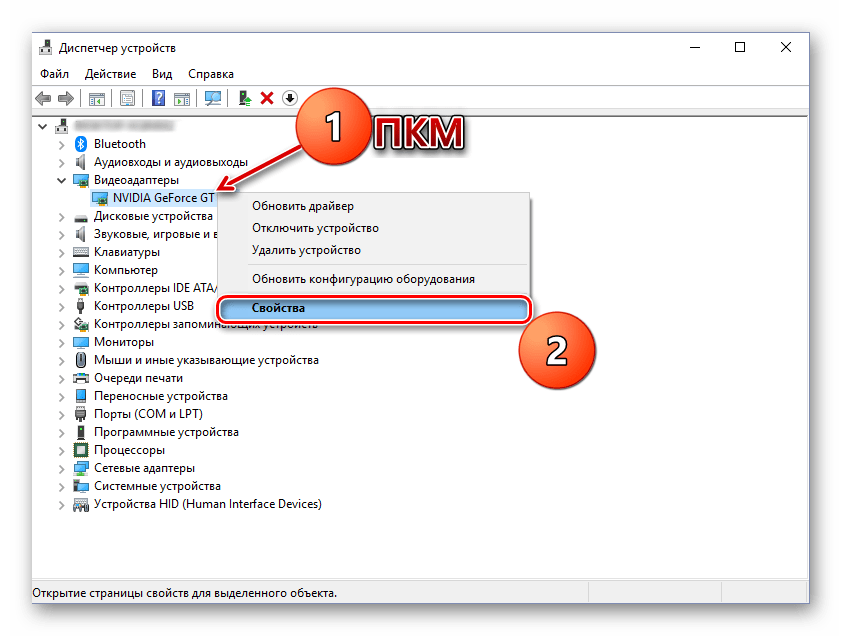
devmgmt.mscв строку окна «Выполнить» — нажатие «ОК» или «Enter». - Оказавшись в окне «Диспетчера», найдите там раздел «Видеоадаптеры» и разверните его, кликнув ЛКМ по направленному вправо указателю.
- В списке подключенных устройств найдите видеокарту NVIDIA и кликните по ней правой кнопкой мышки для вызова контекстного меню, а затем выберите пункт «Свойства».
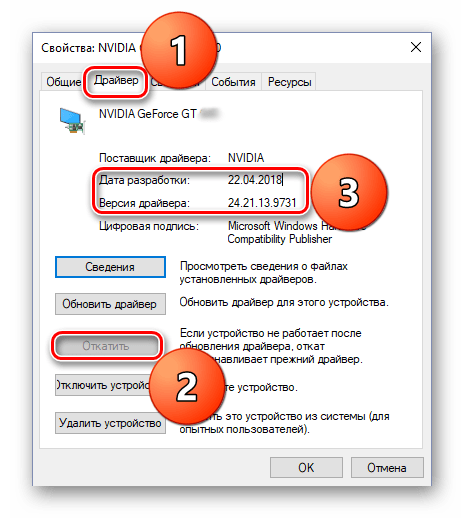
- В появившемся окне свойств графического адаптера перейдите во вкладку «Драйвер» и нажмите там кнопку «Откатить». Она может быть неактивной как потому, что ранее драйвер не устанавливался вовсе или устанавливался начисто, так и по другим причинам. Если вы столкнулись с такой проблемой, переходите ко второму Способу этой статьи.
- Если потребуется, подтвердите свое намерение откатить драйвер во всплывающем окне. После нажатия в нем кнопки «Да» актуальная версия ПО видеокарты будет удалена, а ее заменит предыдущая. Убедиться в этом можно, обратив внимание на сведения в пунктах «Дата разработки:» и «Версия разработки:».
- Нажмите «ОК» для закрытия окна свойств графического адаптера, закройте «Диспетчер устройств».
Читайте также: Как запустить «Диспетчер устройств» в Windows

Вот так просто можно откатить драйвер видеокарты NVIDIA. Теперь вы можете пользоваться ПК так же стабильно, как и до обновления. Скорее всего, возникшая с этой версией проблема будет устранена разработчиком уже со следующим апдейтом, так что не забудьте его своевременно инсталлировать.
Читайте также: Как установить драйвер графического адаптера NVIDIA
Способ 2: «Установка и удаление программ»
Как уже было сказано выше, возможность отката драйвера графического адаптера не всегда доступна в его свойствах. Благо, помимо «Диспетчера устройств», имеется и другой раздел системы, который нам поможет в решении поставленной задачи. Ниже речь пойдет об «Установке и удалении программ» (не путать с «Программы и компоненты»), доступной в ОС Windows 10.
Примечание: Для более ранних версий операционной системы этот метод не подойдет.
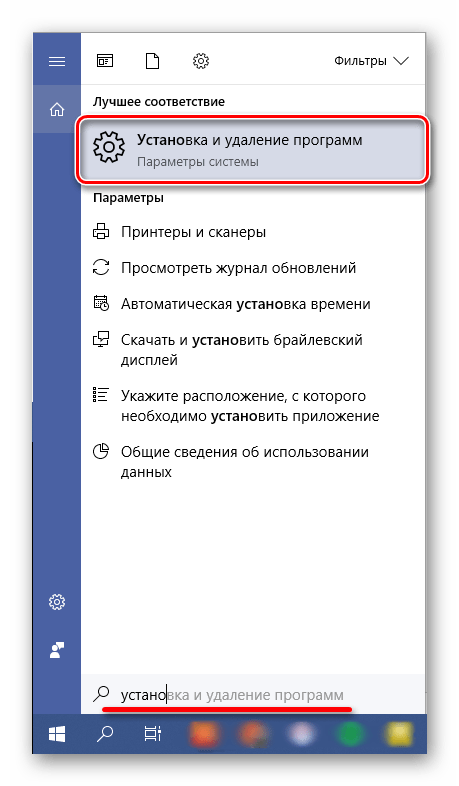
- Откройте системный раздел «Установка и удаление программ», просто начав вводить его название в поисковую строку (Win + S). Когда в списке результатов появится необходимый нам компонент, кликните по нему левой кнопкой мышки.
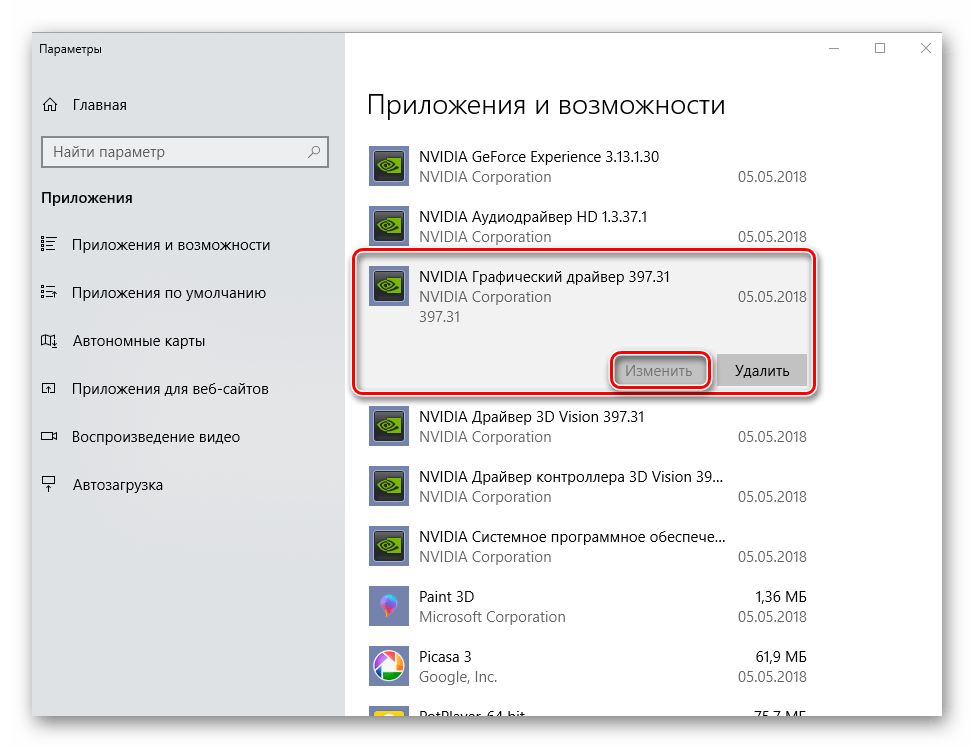
- В перечне установленных на компьютере приложений найдите «NVIDIA Графический драйвер» и нажмите ЛКМ по этому пункту, чтобы развернуть список доступных параметров. Нажмите кнопку «Изменить».
- Далее вам потребуется подтвердить свои намерения и придерживаться подсказок пошагового Мастера.
Примечание: Как и в случае с «Диспетчером устройств», если ранее в вашей системе не был установлен драйвер видеокарты или он инсталлировался начисто, с удалением предыдущих версий и всех программных компонентов, эта возможность не будет доступной. Именно так обстоят дела в нашем примере.
Этот способ в сравнении с предыдущим хорош тем, что требует от пользователя немного меньше действий. Правда, недостаток у обоих вариантов один – в некоторых случаях столь необходимая возможность отката попросту отсутствует.
Читайте также: Удаление драйвера графического адаптера
Способ 3: Переустановка драйвера в GeForce Experience
Как уже было сказано в начале статьи, основной причиной, по которой может потребоваться выполнить откат драйвера видеокарты, является некорректная работа последней после обновления. Возможное и весьма эффективное решение в таком случае – полная переустановка ПО вместо возвращения к предыдущей версии.
NVIDIA GeForce Experience – фирменное приложение разработчика – позволяет не только скачивать и устанавливать апдейты драйвера, но и выполнять его переустановку. Как раз данная процедура и способна помочь в случае возникновения тех же проблем, что и после неудачного обновления.
Читайте также: Как обновить драйвер видеокарты через NVIDIA GeForce Experience
- Запустите NVIDIA GeForce Experience из системного трея, сначала кликнув левой кнопкой мышки по указывающему вверх треугольнику (справа на панели задач), а затем правой кликните по иконке приложения. Из появившегося меню выберите название необходимой нам программы.
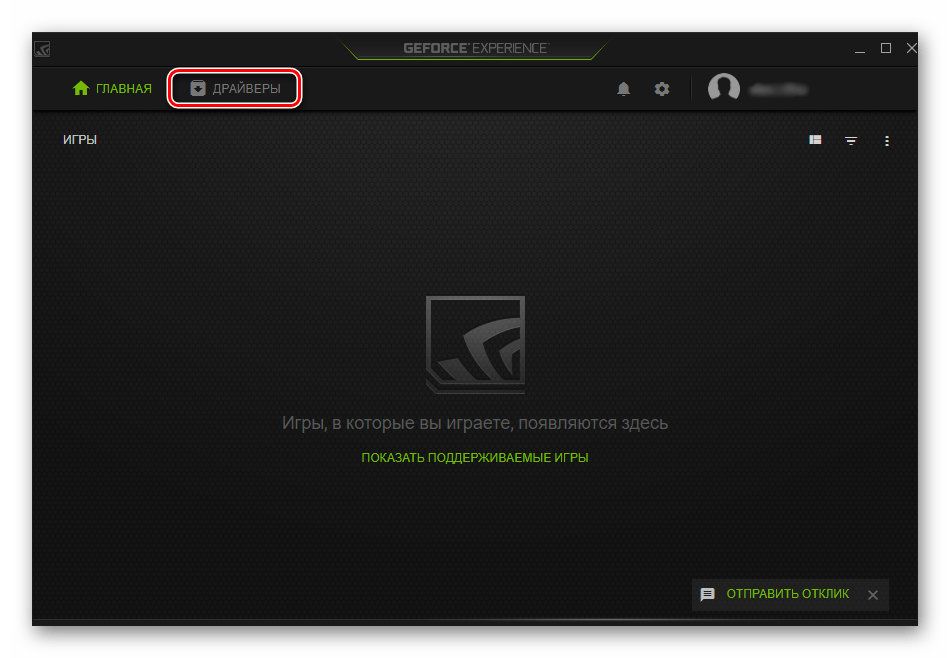
- В открывшемся окне перейдите во вкладку «Драйверы».
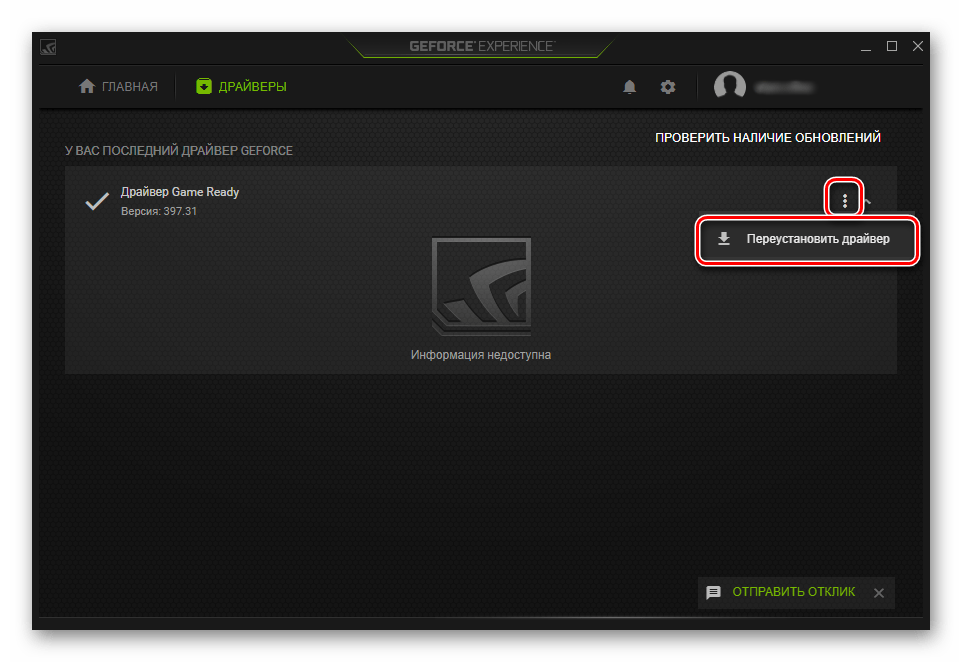
- Оказавшись в ней, справа от строки со сведениями об установленном ПО найдите кнопку в виде трех вертикальных точек, кликните по ней левой кнопкой мышки, выберите пункт «Переустановить драйвер».
- Процедура будет запущена автоматически, вам же останется просто следовать подсказкам Мастера установки.
Это далеко не единственный вариант переустановки драйвера графического адаптера. О том, как еще можно переустановить программное обеспечение NVIDIA с целью устранения тех или иных проблем в его работе, рассказано в отдельном материале на нашем сайте.
Подробнее: Переустановка драйвера видеокарты
Заключение
В этой статье мы рассмотрели два способа отката драйвера графического адаптера NVIDIA к предыдущей версии, а также один из возможных вариантов его переустановки. В большинстве случаев одно из этой пары решений уж точно позволяет избавиться от проблем с отображением графики на компьютере. Надеемся, этот материал оказался полезен для вас. Дополнительно рекомендуем ознакомиться со следующей статьей, возможно, она тоже будет информативна.
Подробнее: Устранение проблем с установкой драйвера видеокарты NVIDIA
Наша группа в TelegramПолезные советы и помощь
Option 1: Roll Back To Your Previous Driver:
If you installed your current driver without first uninstalling the previous version, you can simply roll back your driver to the previous version using these steps:
Windows XP steps to roll back your driver:
- Click Start
- Click Control Panel
- Click Performance and Maintenance and then System (in Category view) or System (in Classic view)
- Select the Hardware Tab
- Click Device Manager
- Double-click on Display Adapters
- Double-click on your NVIDIA GPU
- Select the Driver Tab
- Click on Roll Back Driver
Windows Vista or Windows 7 steps to roll back your driver:
- Click Start
- Click Control Panel
- Windows Vista: Click System and Maintenance and then System or simply System (in Classic view). Windows 7: Click System and Security and then System.
- In the left pane, click Device Manager
- Double-click on Display Adapters
- Double-click on your NVIDIA GPU
- Select the Driver Tab
- Click on Roll Back Driver
Option 2: Uninstall the Current Driver:
When you installed your current driver, if you first uninstalled the previous driver you won’t be able to roll back. In this case, follow the same steps that you previously used to uninstall your driver. Once complete, you can then download and re-install the recommended driver.
Updating NVIDIA drivers to new version can boost your computer’s graphics performance. But problems may occur if you install incorrect drivers. And sometimes the new driver doesn’t work out as expected. In this case, you can roll back the drivers to the old version.
In this tutorial, we will show you how to roll back NVIDIA drivers in Windows 11 and 10 step by step.
3 ways to roll back NVIDIA graphics driver:
There are several ways you can roll back the graphics driver. You can start by picking the one that you like the most. If it doesn’t work, simply continue to the next one.
- Roll back graphics driver in Device Manager
- Download & roll back graphics driver manually
- Roll back graphics driver to any version automatically (Recommended)
Method 1: Roll back graphics driver in Device manager
You can use this method to roll back graphics driver easily, if your computer has the previous driver.
Follow these steps to roll back the NVIDIA driver:
1) On your keyboard, press the Windows logo key and R at the same time to invoke the run box.
2) Type devmgmt.msc and click the OK button.
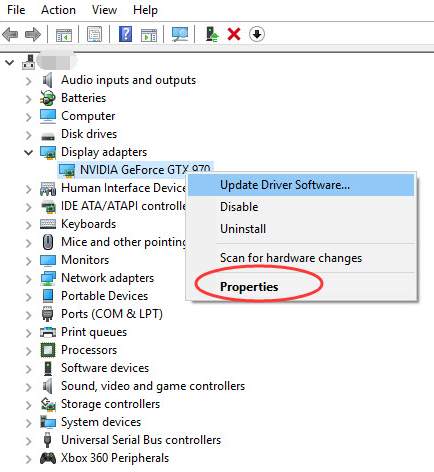
3) Expand the Display adapters category. Then right-click your NVIDIA graphics device and click Properties.
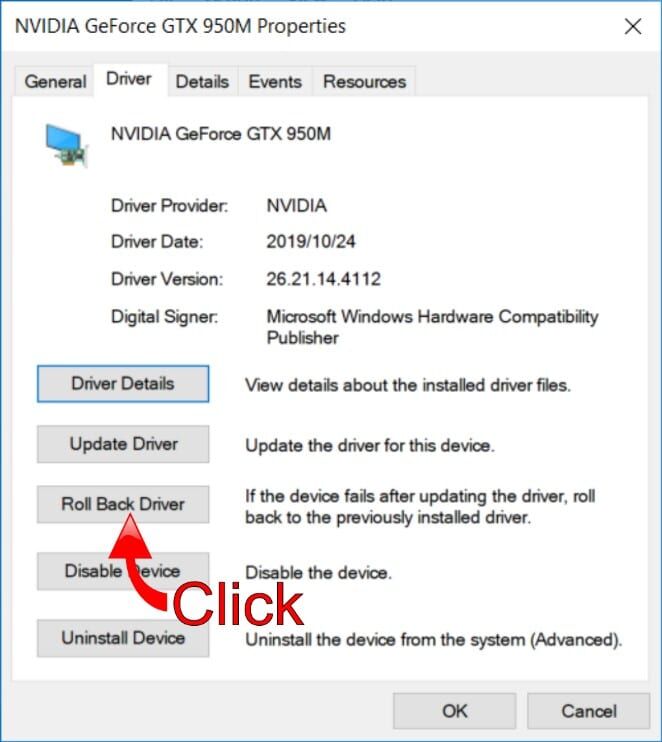
4) Select the Driver tab. Then click Roll Back Driver.
If the Roll Back Driver is greyed-out, it means your computer doesn’t have a previous driver installed for this graphics card. You need to try other methods to roll back drivers.
5) Then you will get a pop-up window like below. Click Yes and the driver will be restored to previously installed version.
6) Restart your PC for the change to take effect.
Method 2: Download and install older NVIDIA drivers manually
If you can’t roll back drivers in Device Manager, or you want to return to a specific version, one way is to do it manually by downloading the driver from NVIDIA.
If you’re looking for a more thorough reinstallation of the graphics driver, check out this guide to reinstall it with DDU.
- Go to the NVIDIA driver download page.
- In Manual Driver Search, select your graphics card model and click Find.

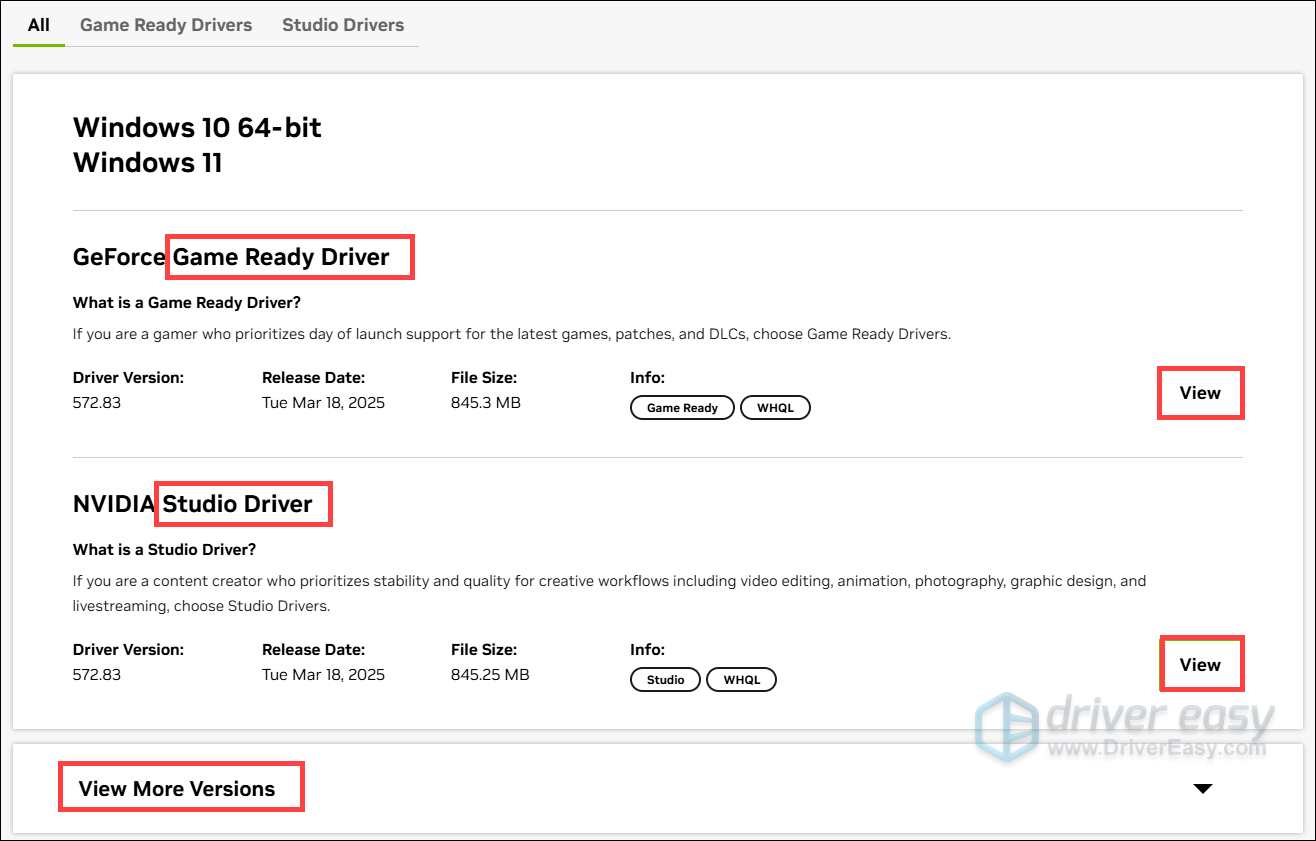
- In the search results, find the version you want and click View. (For visual design, video editing and other work purposes, select Studio Driver. Otherwise go with Game Ready Drivers, which is the most common one.)
You can also click View More Versions to see the older drivers.
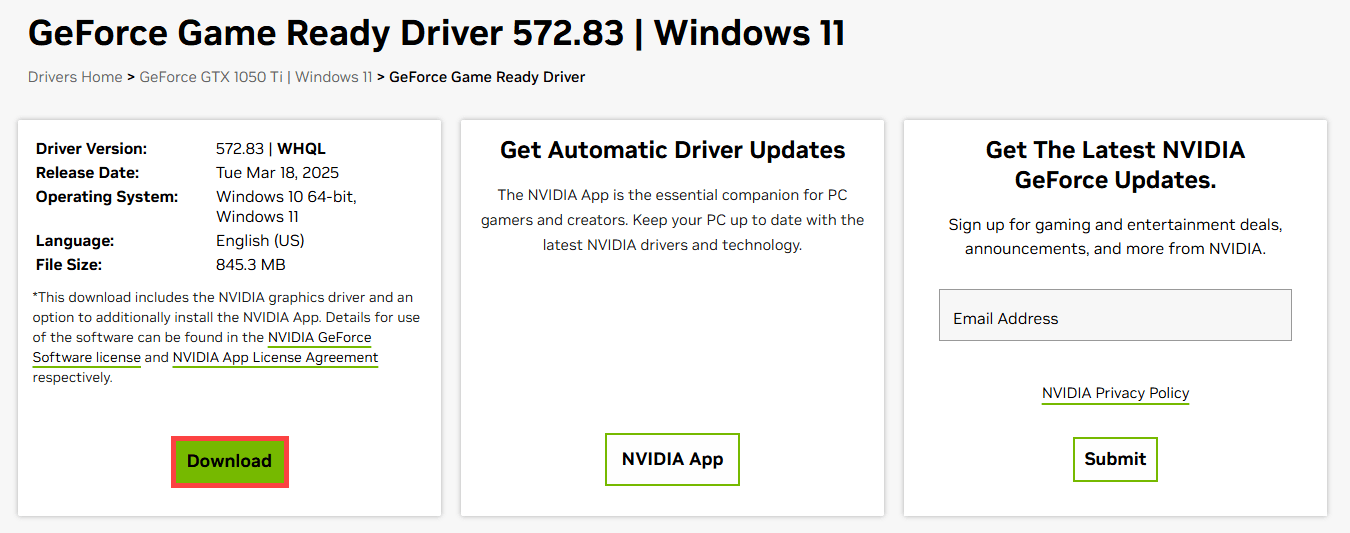
- Click Download to download the graphics driver installer. Then launch it and follow the on-screen instructions to install the driver.


Method 3: Roll back graphics driver to any version automatically (Recommended)
Many users reported that they need to switch to an older driver to get a better gaming experience. If you don’t have the time, patience or computer skills to roll back the driver manually, you can do it automatically with Driver Easy.
Driver Easy is a powerful driver update tool that will automatically recognize your system and find the all correct drivers for it. It also provides a handy feature that allows you to easily switch between different versions of drivers, which could be done in just a few clicks.
1) Download and install Driver Easy.
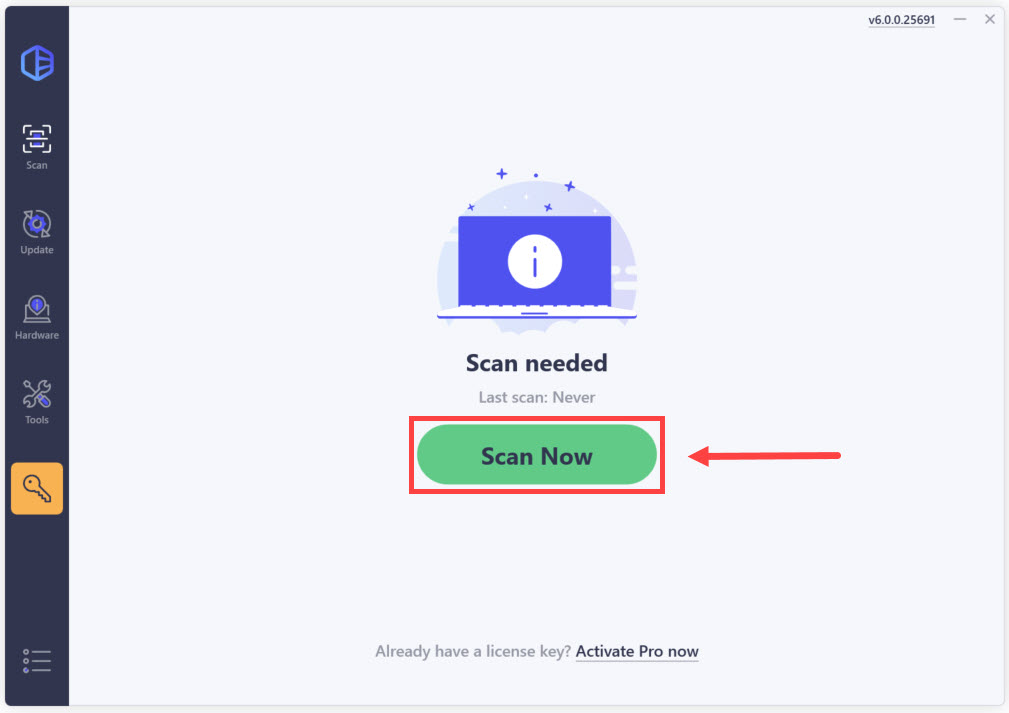
2) Run Driver Easy and click Scan Now. Driver Easy will then scan your computer and show you all the device drivers.
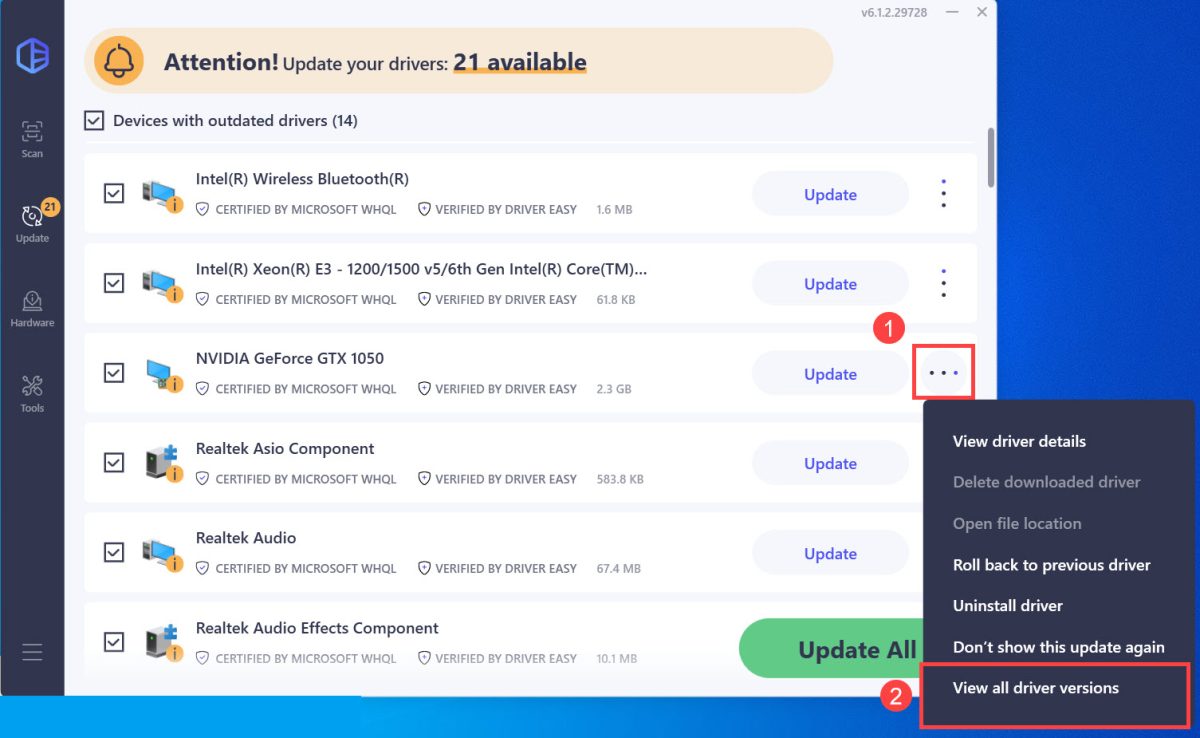
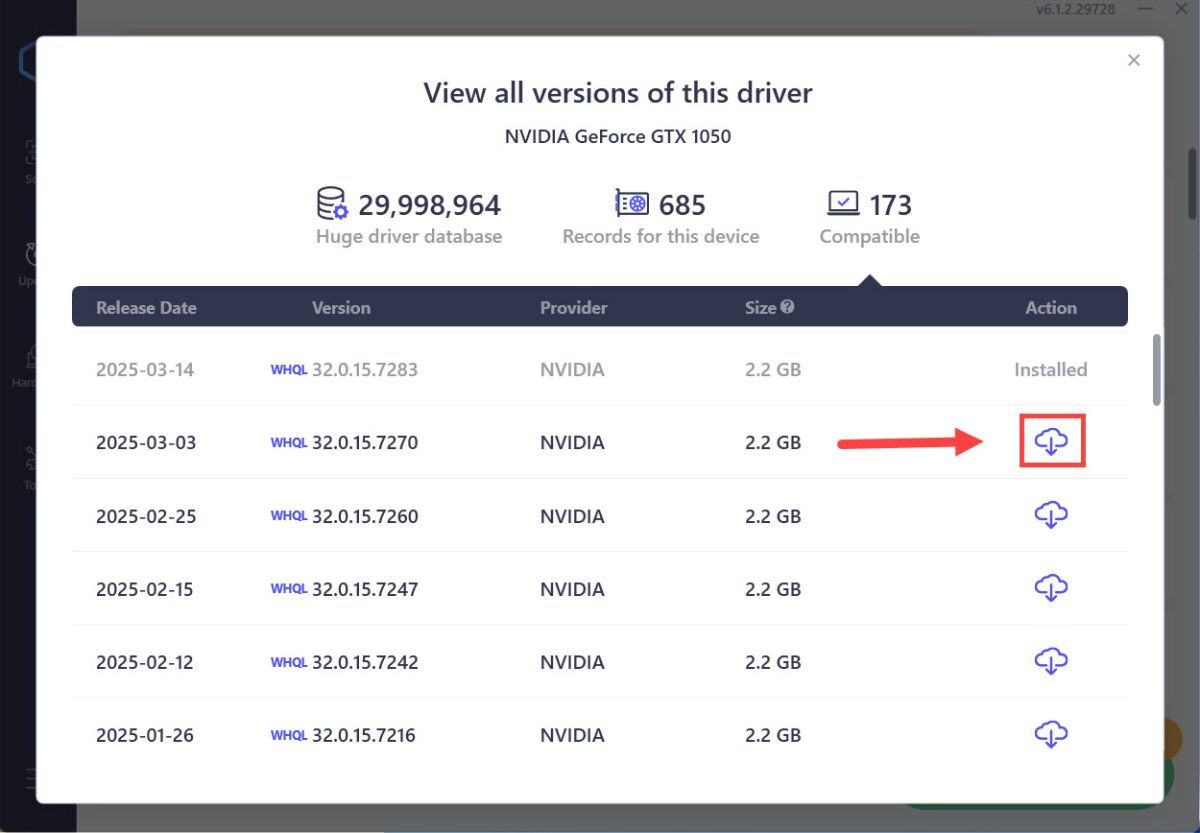
3) Click the three dots icon next to the NVIDIA graphics card to see the available options. Select View all driver versions.
4) Select a version you want to install. Then click the download button to download and install the specific driver automatically. (This requires the Pro version – you’ll be prompted to upgrade when you install drivers. If you’re not sure if Driver Easy is right for you, it offers a 7-day free trial where you can test out all the Pro features. You won’t be charged until the trial ends.)
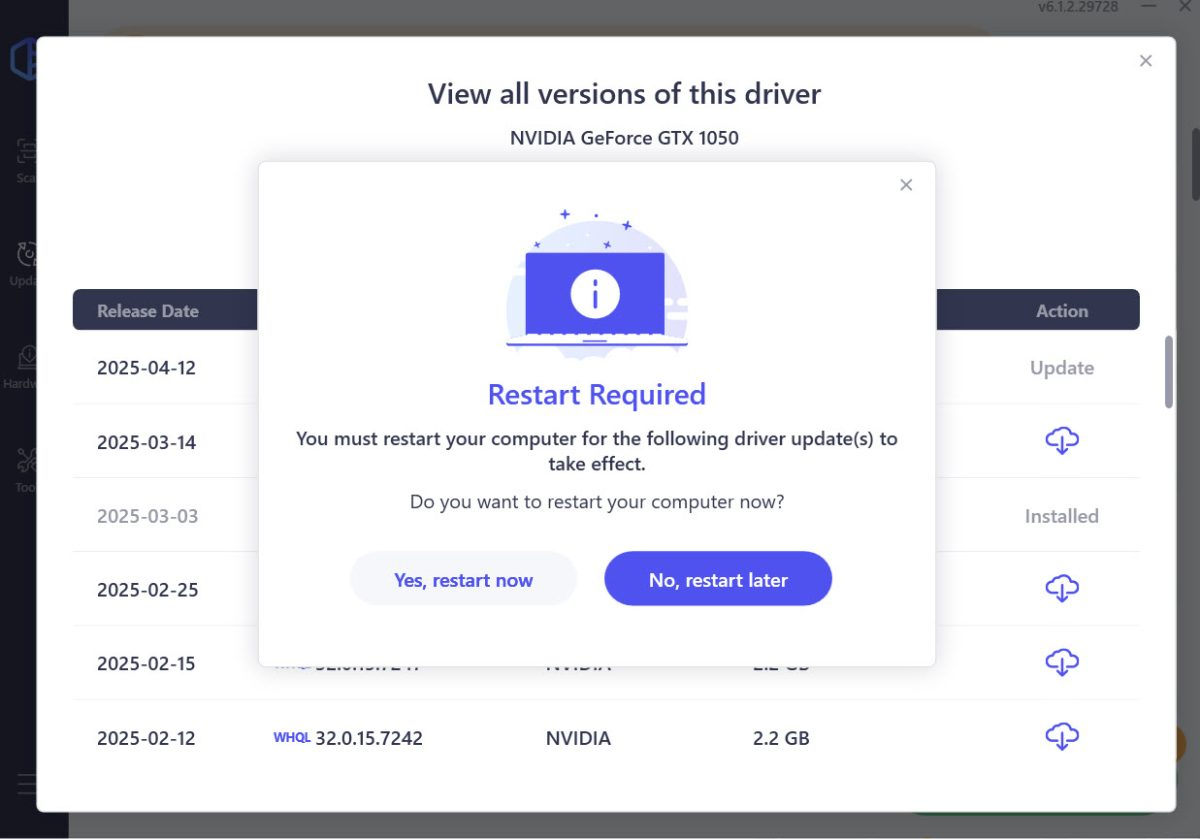
5) During the installation, click Yes if you’re prompted to provide Administrator privilege. Once the driver is installed, restart your computer for the changes to apply.
Hopefully you find this article helpful. If you have any questions, ideas or suggestions, feel free to leave a comment below.
9
9 people found this helpful
Available in other languages
In diesem Artikel erfahren Sie, wie Sie Ihren NVIDIA-Grafiktreiber zurücksetzen und den korrekten installieren.
Is your NVIDIA GPU acting weird after the latest driver update? Well, you are not alone! Since Windows rolled out its last update, many NVIDIA users have shared how they face display glitches and performance issues. This is because the update also included a refresh for NVIDIA drivers, which has impacted their performance.
Since then, new updates have been released to fix this problem, but the results vary from device to device due to PC configurations. If you face a similar problem and are looking for ways to update or roll back NVIDIA drivers in Windows 10, read along here. This post will help you.
Must Read: How to Fix Any NVIDIA Drivers Issues in Windows 11,10
Issues You Can Face Due to Installing Old NVIDIA Drivers
If you have installed the update and are facing minimal issues but do not realize what is wrong, check out the list of the problems that point toward driver errors with NVIDIA GPU. Note that these issues directly mean that you either have corrupt drivers or the existing ones need an update.
- Encountering Blue Screen of Death (BSOD) when attempting to play games.
- Decreased Frame Rates per Second (FPS).
- Sudden interruptions when playing specific games.
- Flickering screen or black screen out of nowhere.
- Lag in loading graphics-intensive games and apps.
Generally, updating the driver helps fix these issues and enhances system performance. However, as each PC configuration is different, sometimes compatibility issues occur due to updates. Rolling back drivers is a good idea to fix these issues.
How To RollBack NVIDIA Drivers in Windows 10
Windows provides an easy way to restore the previous version if you face an issue after updating a driver. While the process of rolling back drivers is easy, you might still face issues. This guide will explain both ways: automatically rolling back and updating drivers to fix issues.
Read Also: How To Download & Update Nvidia GeForce Game Ready Driver
Rolling Back Drivers Using Device Manager
Windows offers a built-in functionality known as Device Manager to manage driver updates. With its help, you can uninstall drivers, update drivers, rollback drivers, and do a lot more. If you face issues with the NVIDIA driver after updating Windows or the driver, follow these steps to roll back the NVIDIA drivers.
1. Press Windows + X > select Device Manager
2. In the Device Manager window, look for the Display Adapters section. Double-click on it to expand the category.
3. You will now get a list of currently installed drivers. Select the NVIDIA device > right-click > Properties.
4. This will open a new window. Click the Driver tab > Roll Back Driver to roll back the NVIDIA driver.

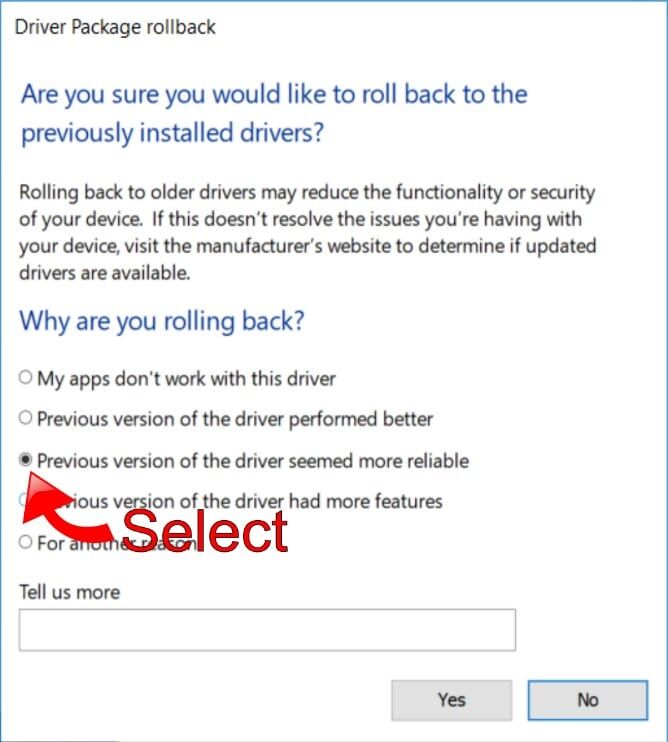
5. Give a reason to roll back the driver; this helps track down the issue and fix it to provide a seamless experience.

6. Select your specific issue; it will help Microsoft fix it ASAP.
7. Click Yes to proceed with the roll-back process.
8. Windows will uninstall the current driver and reinstall the previous version in the background.
Note : You won’t be able to access the Driver Properties window while the process is taking place. You’ll see the change in the Driver version when it’s done.
9. Once the driver is rolled back, the Roll Back option will be greyed out
However, if the Roll Back greyed out before you can follow the above steps read further.
Rolling Back NVIDIA Drivers (if the Roll Back Driver button is greyed out)
Windows cannot find the NVIDIA driver to restore if the Roll Back Driver button is greyed out. In such a situation, you will need to manually download and install the older version of NVIDIA. Follow the steps to learn how to install old Nvidia drivers on Windows 10:
1. Press Windows + X > Device Manager
2. Double click Display Adapters > right-click NVIDIA > Update Driver.
3. Select Browse my computer for driver software.
4. Click Browse > Select the downloaded NVIDIA driver from the manufacturer’s website > Open.

5. Click Next to process and wait for Windows to install the drivers. Right-click the NVIDIA driver > Properties > Driver tab > and look for the version when done.
6. Restart the system to apply changes.
If rolling back does not get the job done for you, you may be looking at a corrupt/outdated driver error on your PC. In that case, we recommend you look for the latest stable update for your NVIDIA GPU driver. We may have the method to get it done for you! Check out the next section to learn more!
Update Correct NVIDIA Driver Automatically Using Advanced Driver Updater
Advanced Driver Updater automatically detects the system and finds the correct drivers. To use the best driver updater, you don’t need to know the details of the system you are running. Also, the risk of manually downloading incorrect drivers is eliminated when using Advanced Driver Updater.
You can update your drivers automatically with the FREE or registered version. However, the registered version requires just two clicks to update all outdated drivers. Also, you get a 60-day money-back guarantee.
To use Advanced Driver Updater, follow these steps:
1. Download and install Advanced Driver Updater.
2. Launch the driver updating tool and click Start Scan Now to scan the system for outdated drivers.

3. Review scan results. If using the trial version, click Update driver next to NVIDIA driver. However, if you use the registered version, you can click the Update All button to Review scan results. If you are using the trial version, click Update driver next to NVIDIA driver. However, if you are using the registered version, you can click the Update All button to update all out-of-date drivers. update all out dated driver.

4. Restart the system to apply changes.
Wrap Up
Hopefully, the steps explained above have answered how to install old Nvidia drivers on Windows 10, and you’ve learned how to roll back the NVIDIA driver and update to the latest version of the driver. To easily update the drivers and never face problems caused due to outdated drivers, use Advanced Driver Updater. This excellent driver updater will quickly scan the system and show compatible driver updates. Feel free to comment if you have questions, suggestions, or feedback.
FAQ
Recommended :
Unable to Install NVIDIA Drivers – 5 Things That May Be Wrong {Fixes Inside}
Driver Support/ knowledgebase/ How To Rollback NVIDIA Drivers in Windows 10

Since the latest updates from Microsoft for Windows 10, many users reported experiencing problems with graphics cards no longer functioning properly or failing completely. This issue by no means only applies to NVIDIA Graphic Processing Units (GPUs). The makers of MS Windows have since released new updates that attempt to solve the issues, but results vary between different devices and PC configurations. If you’re facing similar issues with your GPU, this guide will show you how to rollback NVIDIA drivers in Windows 10. Some of the issues include Blue Screens when attempting to run games, slower Frame Rates per Second (FPS), and intermittent failures when trying to run specific games.
Usually, updating your drivers can boost your PC’s performance and provide new features for your gaming experience. However, with so many companies responsible for different parts of your computer’s architecture, compatibility issues can creep in between different updates pushed out by different vendors. Rolling back your drivers to a previous version can fix these compatibility issues.

Rollback NVIDIA Drivers in Windows 10
Windows provides you with the ability to roll back a driver in the event that you experience issues after an update. While the process is simple, last year’s fall update from Windows corrupted DNS records and created a variety of problems with many different device drivers. This means that even if you roll back to a previous driver version, you may still face issues and it could mean you’ll need to do a clean install. This guide will cover both scenarios.
Rolling Back NVIDIA Driver from Windows Device Manager
Windows’ Device Manager is where you manage and update all your PC’s device drivers. You can also uninstall and disable devices using Device Manager. If you’re using NVIDIA’s GeForce Experience to manage your drivers, you may receive better results by using Device Manager to roll back your drivers instead.
- Open Device Manager by hitting the Windows Key and typing Device Manager into the search bar. To open the application, select the top result.
- In Device Manager, scroll down and locate the Display Adapters section. Click on the arrow to expand the list.
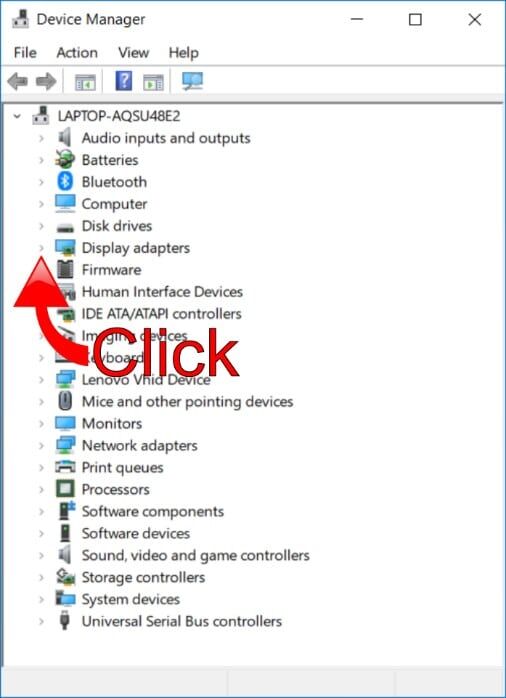
- You should see a list of the GPUs currently available on your PC. Select the NVIDIA device and use the Right Hand Mouse Button (RHMB) to access the Context Menu.
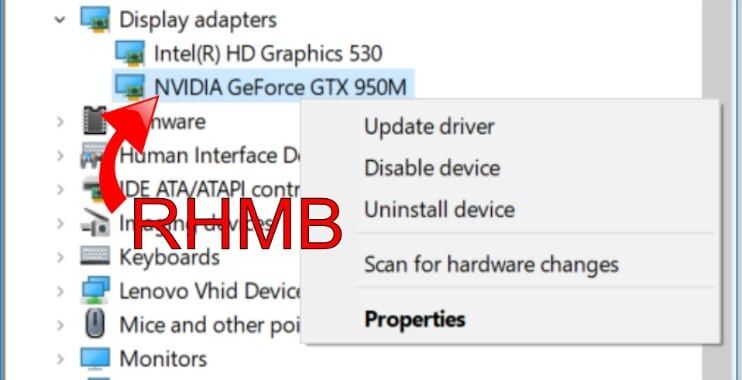
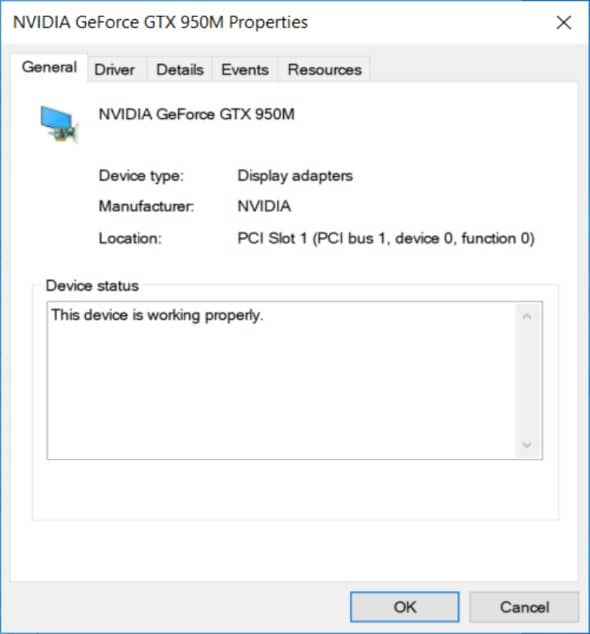
- On the Context Menu, select Properties to open the Device Properties Window.

- From the Properties Window, you can see the Device Status, review the driver details, and find additional information about the resource settings.
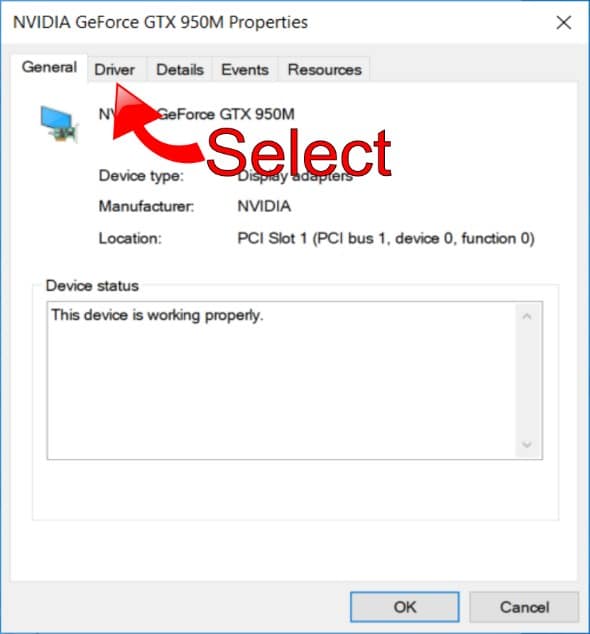
- To rollback your GPU driver, select the Drivers Tab.
- On the Driver tab, you can view the driver details, update the driver, uninstall the device, rollback the driver, or disable the GPU completely.
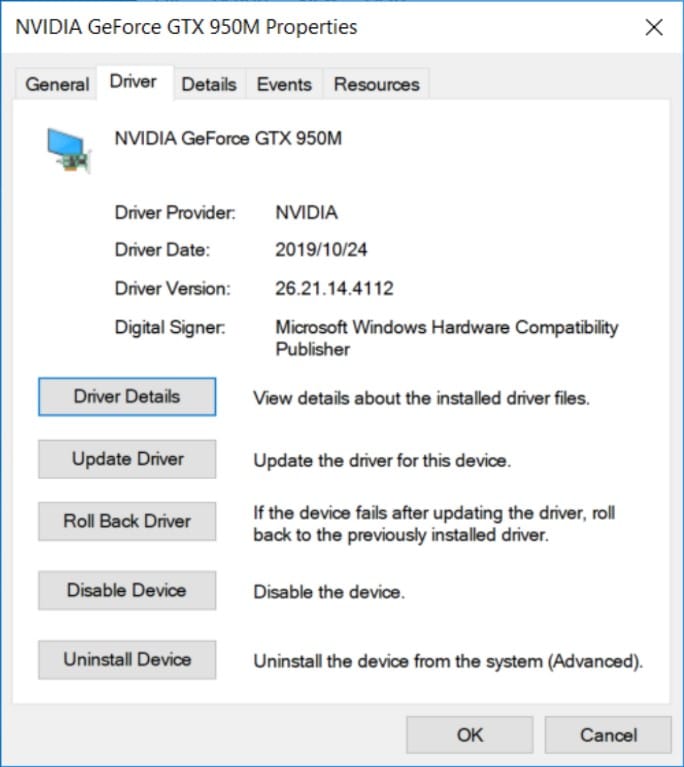
The options available include:
- Driver Details – Shows you the current files and the locations of the device drivers.
- Update Driver – Allows you to update the driver using the Windows Update Wizard.
- Roll Back Driver – Lets you revert to a previous driver version (if available).
- Disable Device – Shuts down the device temporarily.
- Uninstall Device – Removes the current driver and supporting software from your PC.
- Select Roll Back Driver to revert your driver to the previous version you were using before the latest update.
- Windows will request that you provide a reason why you’re rolling back the driver. This is to track issues with drivers and provide a better service to other users in the future.
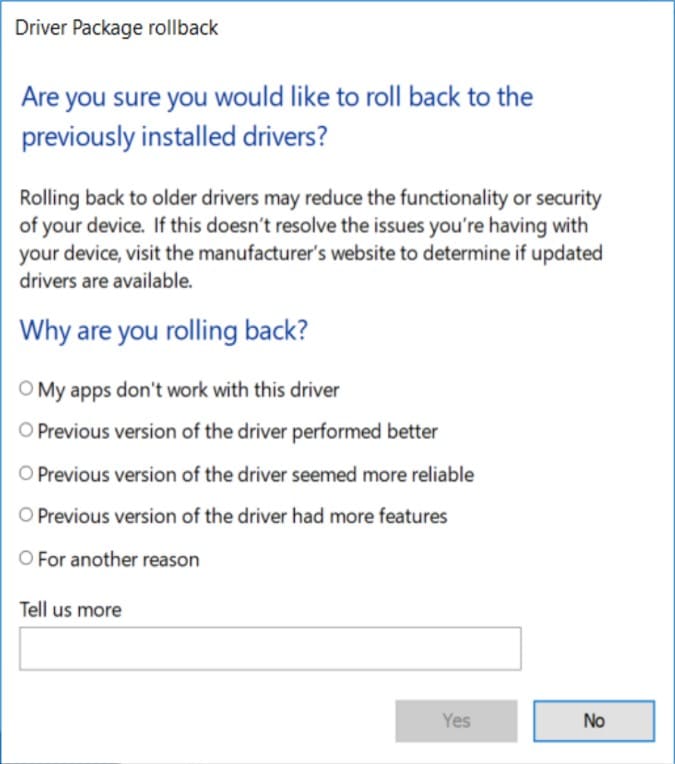
- You should choose the option that applies to your specific issue. If the GPU didn’t work with the latest driver, this is valuable information for Microsoft so you should make sure to select that reason. However, if you had any stability issues with the latest driver, select Previous Version of the Driver Seemed More Reliable.
- Click Yes to revert to your previous NVIDIA device driver.
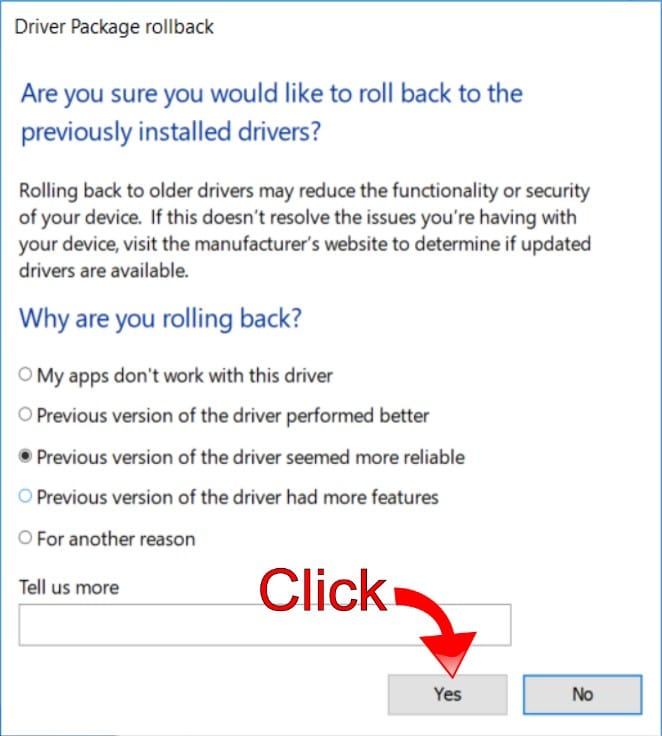
- Windows will uninstall the current driver and reinstall the previous version in the background. While the process runs, you won’t be able to access the Driver Properties window. Once the process completes, you’ll note the Driver tab now displays the previous driver version instead of the last one you were using.
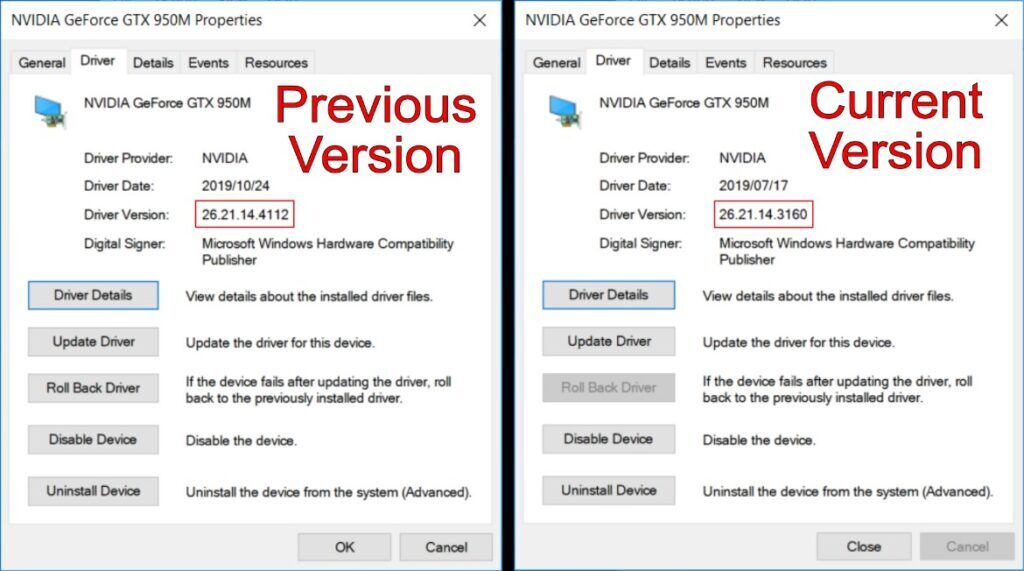
Note that once you revert to the previous driver, the Roll Back option will no longer be available on the Driver tab.
Using Older Driver if Roll Back Option isn’t Available
If you don’t have the option to rollback your driver, it could mean you performed a clean install of the latest version. In this case, you can still revert to a previous version by uninstalling the latest version and downloading an older one from NVIDIA’s website.
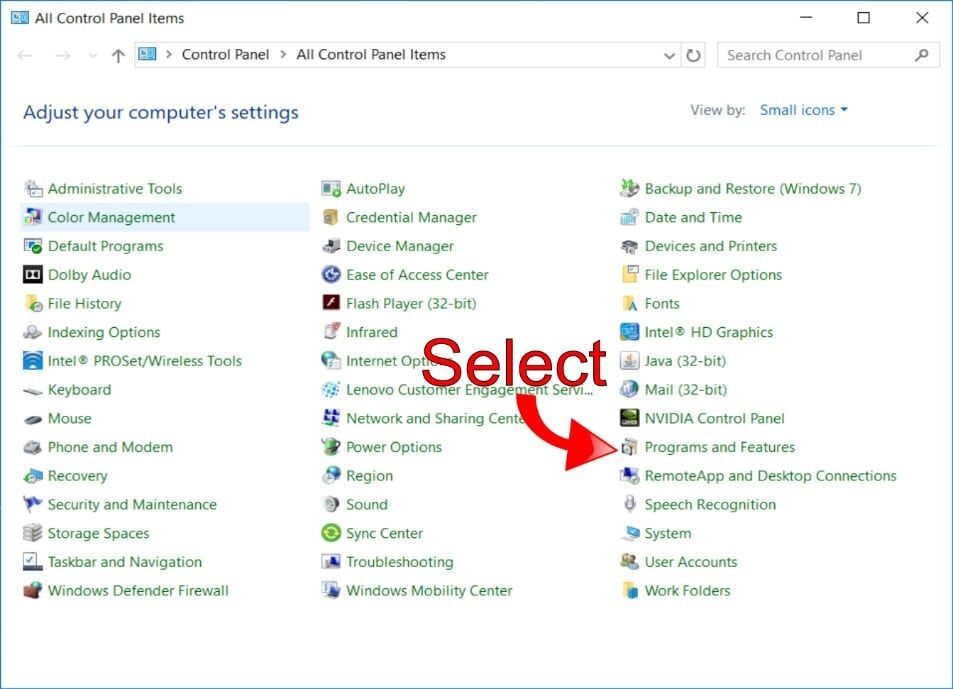
- To uninstall the current version, open Control Panel by hitting the Windows Key and typing Control Panel, then select the top result.

- In Control Panel, select Programs and Features. If you can’t find this option, change the view from Categories to Small Icons and you should be able to find the application.
- Scroll down in Programs and Features until you find the NVIDIA Graphics Driver software.
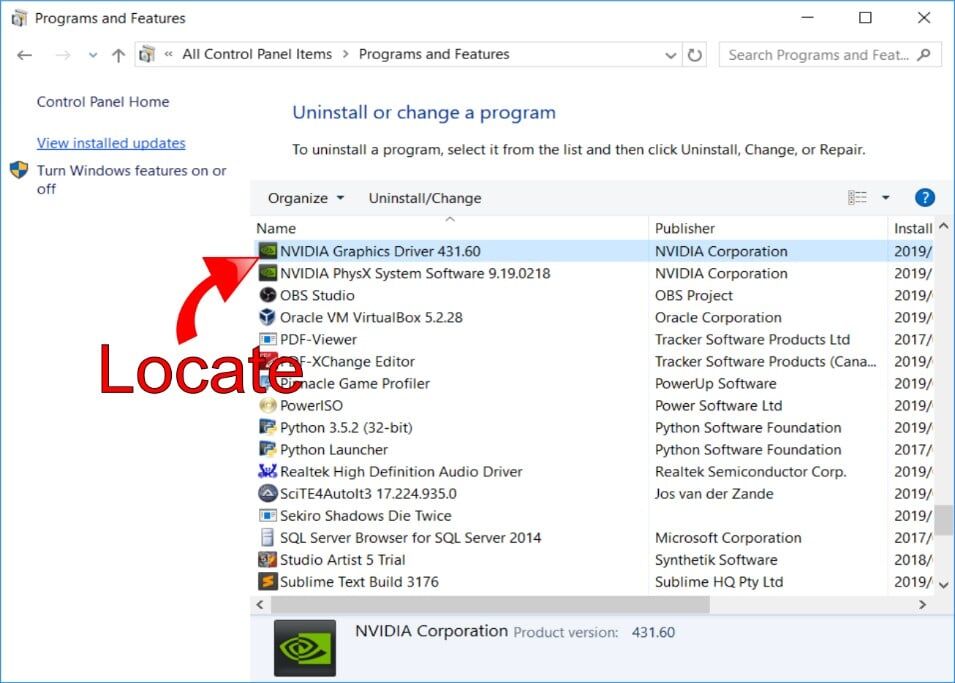
- Select the software and click on Uninstall / Change to open the Uninstaller.

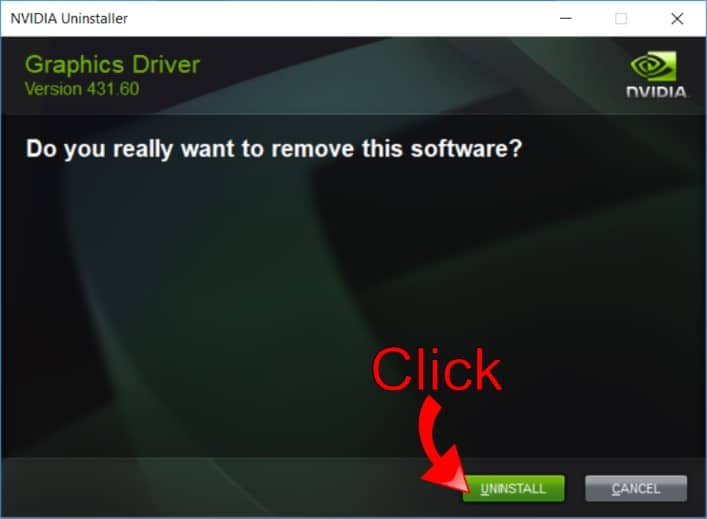
- This will load the NVIDIA Uninstaller that will allow you to make changes to your driver software.
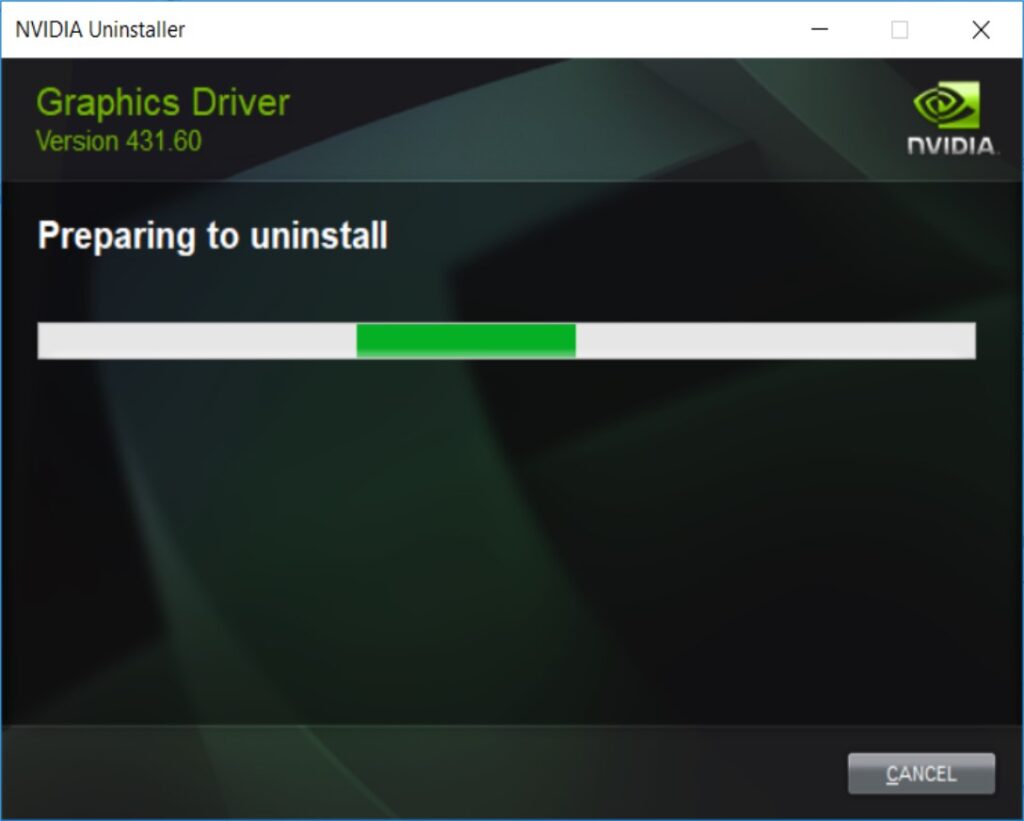
- You’ll need to confirm that you want to uninstall the drivers. Select Uninstall to continue.
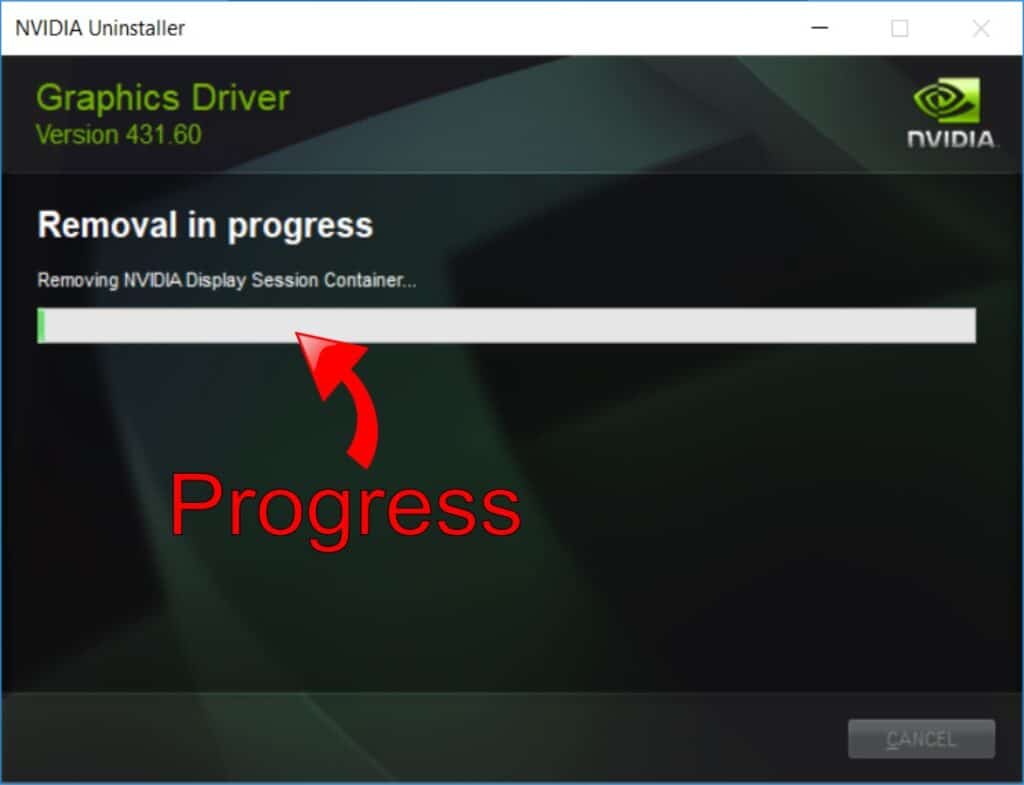
- Once you click on Uninstall, NVIDIA will start uninstalling the device drivers. You can track the progress on the screen.
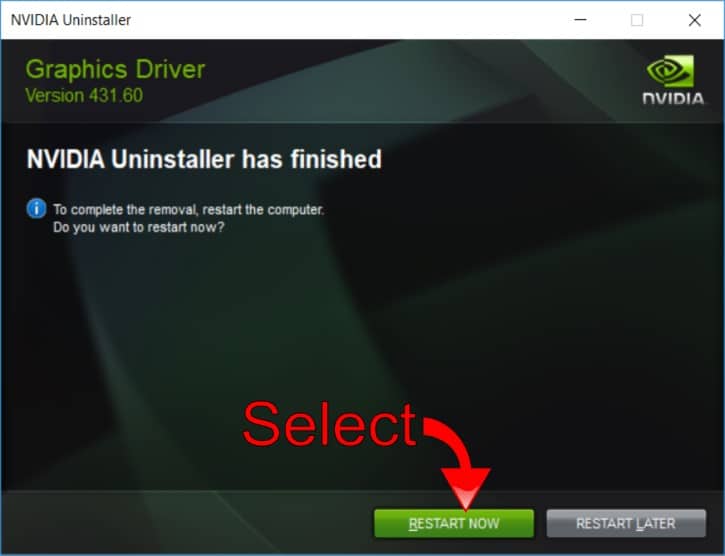
- After the process completes, you’ll need to restart your PC to finalize the process.
- Once you’ve restarted your PC, you should head to the NVIDIA website and download the driver you want. Use the manual search for your device model to locate a list of older drivers.
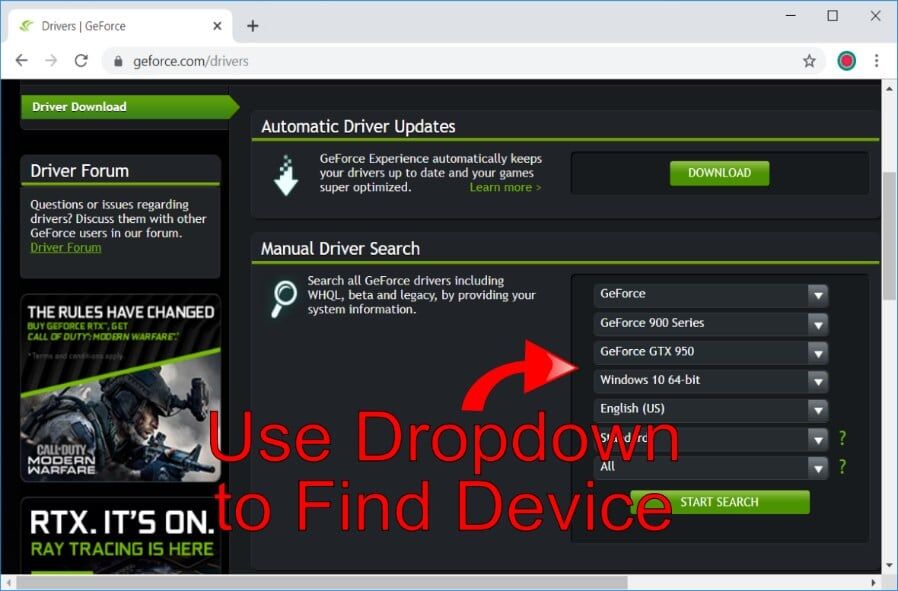
- After selecting the model of your GPU, click on Start Search. NVIDIA will provide you with a list of drivers for your device and you can choose the one that gave you the best performance.
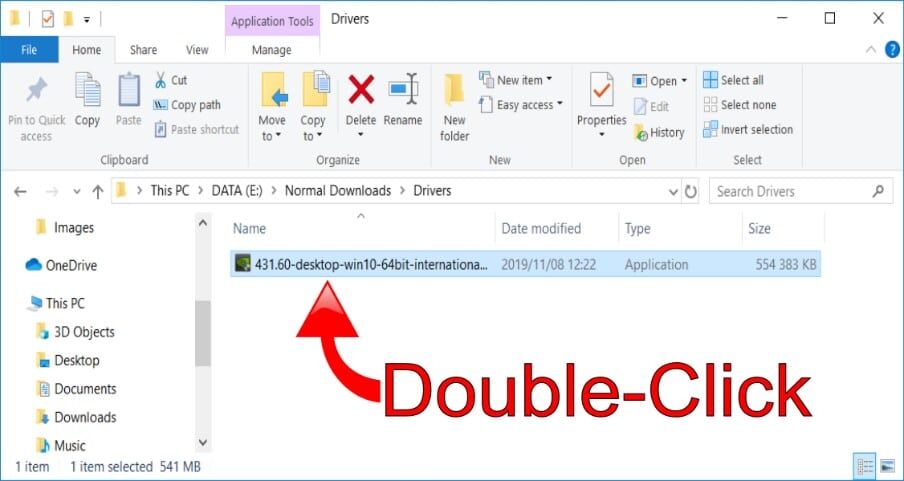
- Download the driver from the site and locate it on your computer, then double click to start the installation process.
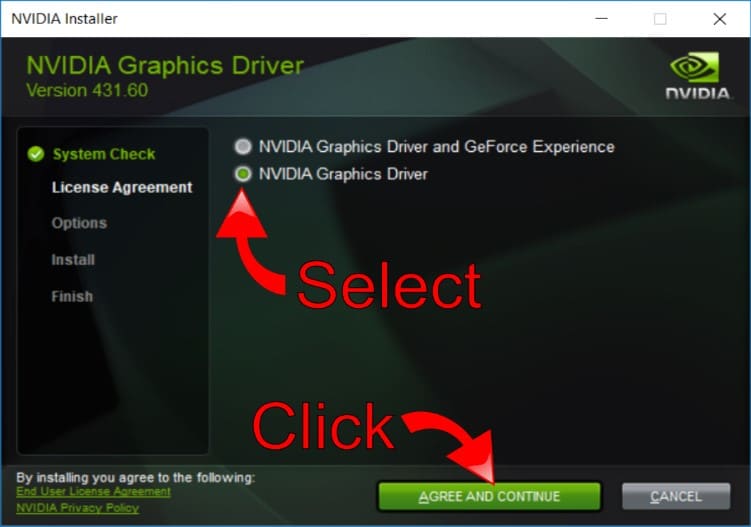
- Accept the default extraction folder and wait for the installer to load. Once the installer is open, select the NVIDIA Graphics Driver option from the screen and click on Agree and Continue.
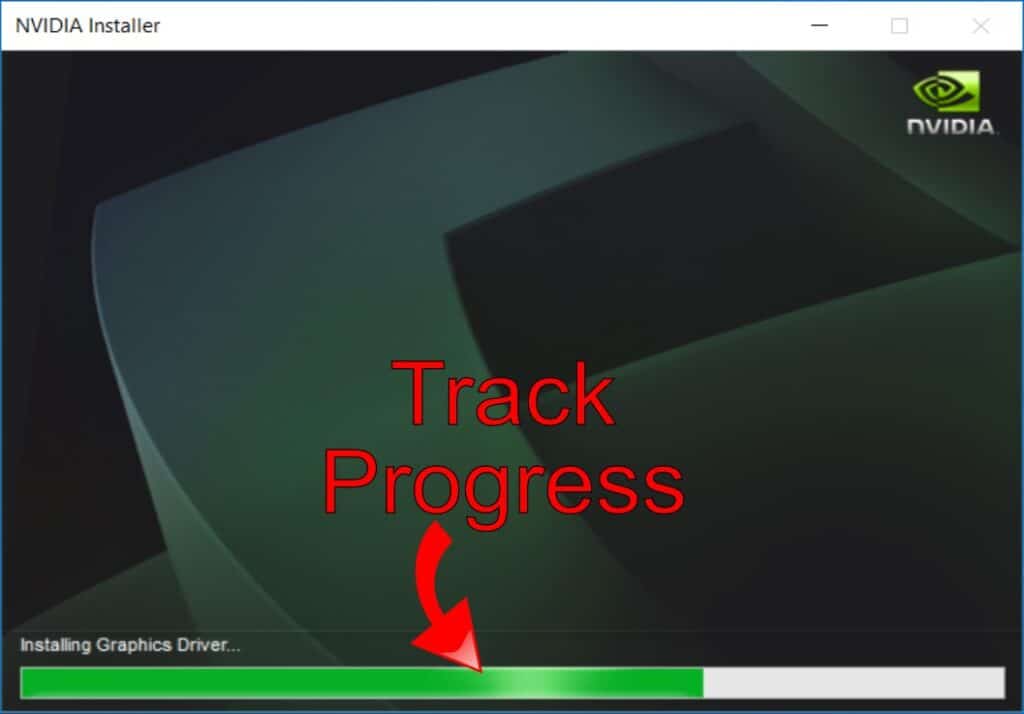
- Accept the default settings by clicking Next on the page. Once the installation starts, you can track the progress until it completes.
- You’ll receive a confirmation message that the installation was successful and the device is now ready for use. Click on Close to complete the process.

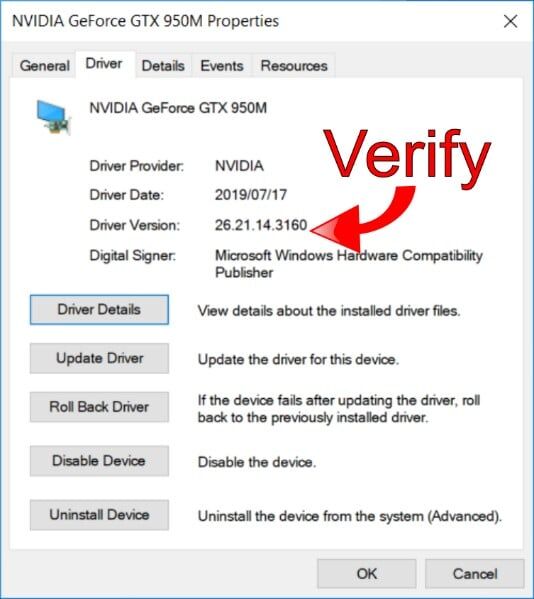
- To verify you are using the version you wanted, open Device Manager and open the Display Adapter properties for your NVIDIA GPU.
- Click on the Driver tab and verify it’s the version you want to use on your PC.
Note that for the best results, you may need to try different versions. Follow the steps in this guide while using different driver versions if you aren’t sure what driver you had installed previously. Unfortunately, the different driver versions from NVIDIA provide varying results depending on which build of Windows and what updates you installed on your PC.
Manage Your NVIDIA GPU Drivers with Driver Support
You can opt to use Driver Support to manage your NVIDIA GPU drivers and other devices. Driver Support ensures you only use the latest signed drivers for your PC’s hardware. If you download and register the software, Driver Support will create an inventory of your PC’s hardware and devices, and automatically install the updated drivers for you. You can also backup all your drivers, and restore a previous driver if you run into any problems with a new version.
To improve your PC’s performance and quickly recover from driver related issues, Give DriverSupport | ONE a try today! for improved peace of mind.