
Contents:
EXT4, EXT3 and EXT2 file system
What is file system?
File system is the method by which files are named and placed logically to store, retrieve and update data and also used to manage space on available storage devices. Without file system, files stored on a device would be one large body of data, as data does not know where to stop or when to begin. Information stored on device media is split into two pieces, which are usually called metadata and user data. The structure and logic rule used by system to manage data is called a file system.
There are many different types of files system, and each has its own structure and logic rules, speed, size, etc. File system is widely used on various storages devices such as hard drive, flash memory, virtual disk, etc. As a Windows user, you must be family with FAT32, exFAT and NTFS. In this section, we’ll talk about file systems Ext2, Ext3 and Ext4, which belong to Linux operating system.
Ext2 (Second Extended File System)
Ext2 file system was first introduced by Remy Card in 1993 and it was the first default file system in several Linux distro. This file system was developed for the purpose of overcoming limitations on previous Ext file system. Ext2 does not support journaling feature, thus it is recommended to be used on flash drives or SD cards which do not need the overhead of journaling. The maximum individual file size it can be 16GB-2TB.
Ext3 (Second Extended File System)
- Ext3 file system was introduced by Stephen Tweedie in 2001 and it is available starting from Kernel 2.4.15.
- Journaling feature is available in Ex3.
- Maximum individual file size is 15GB -2TB
- Provide solution to convert Ext2 to Ext3 file system directly without backing up / restoring data.
Ext4 (Second Extended File System)
- Ext4 file system was introduced in 2008, starting from Linux Kernel 2.6.19.
- Provide option to disable journaling feature.
- Backward compatibility is supported. You can mount Ext3 file system as Ext4 without upgrading it.
- The maximum individual file size 16GB – 16TB.
- Some new features are included such as multiblock allocation, fast fsck, journal checksum, etc.
It is easy to format a partition to ext4, ext3 or ext2 with the help of DiskGenius Free, and the formatting speed is fast. Please note formatting wipes all data from the volume, and you should make sure important files have been backed up. Let’s see have a look at the formatting steps.
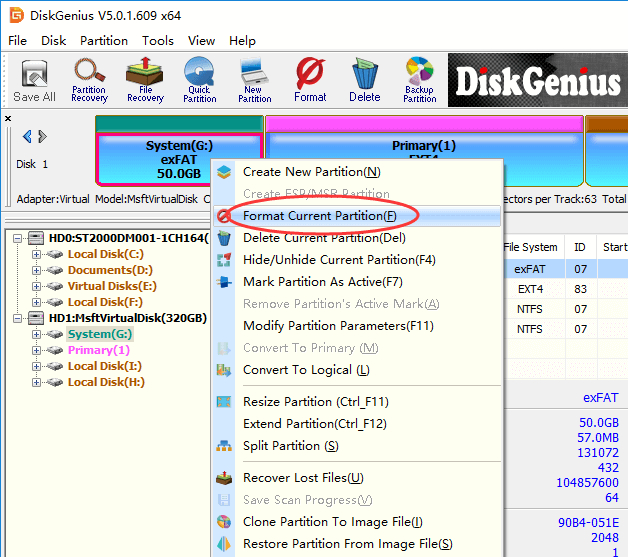
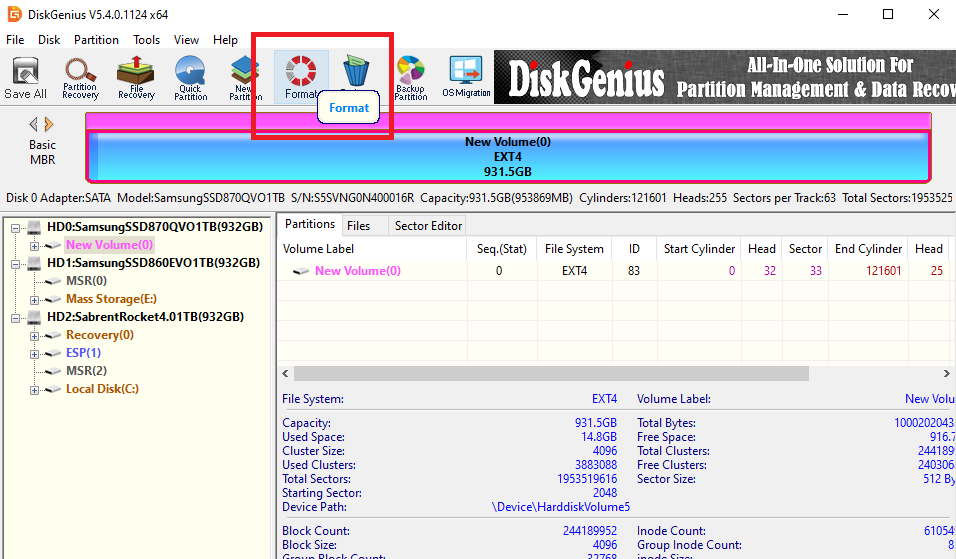
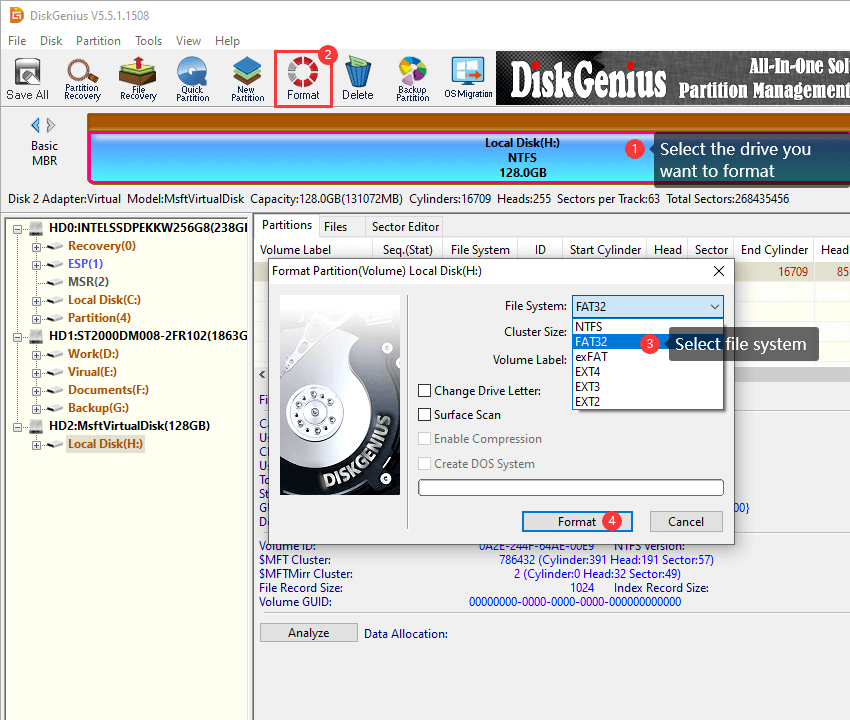
Step 1. Install and launch DiskGenius from computer and you can see all partitions on the disk.
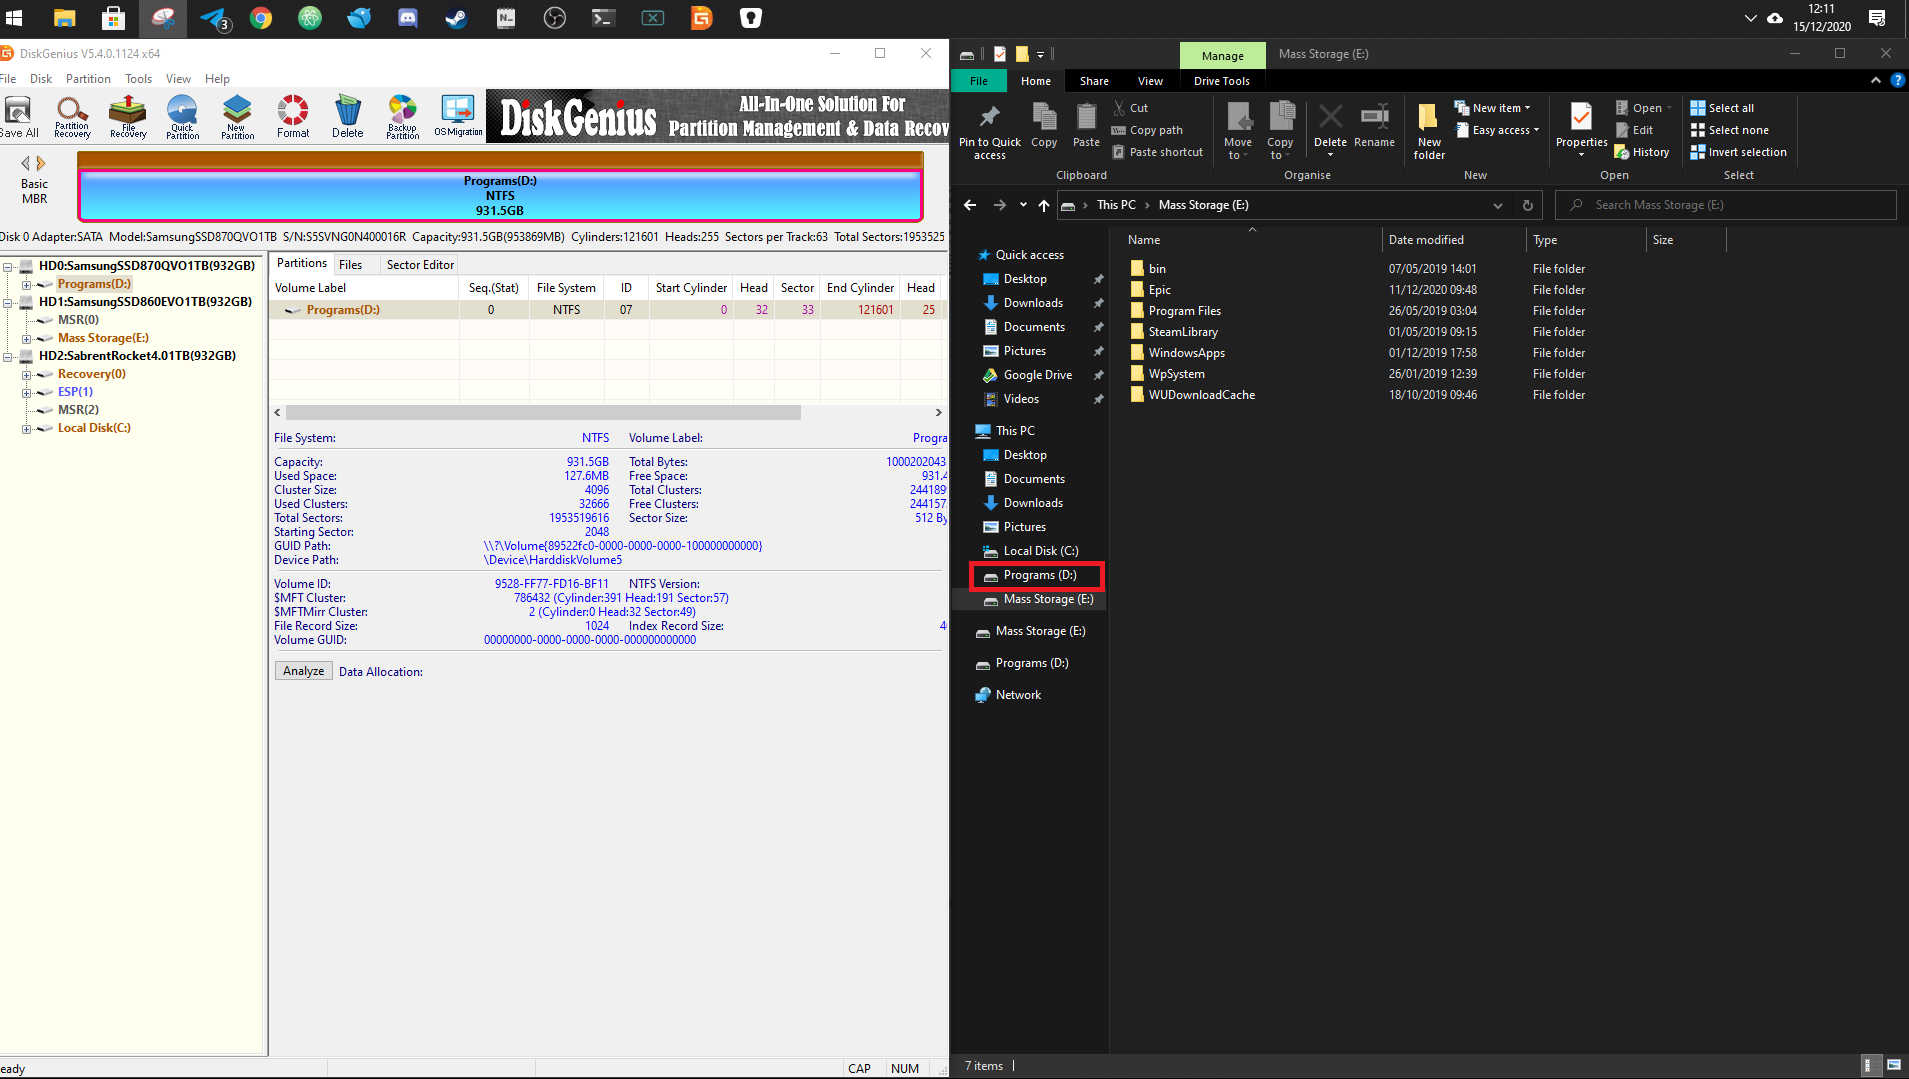
Step 2. Select the partition you want to format and click «Format» button from toolbar. Also, you can right-click on the partition to be formatted, and choose Format Current Partition, as below:
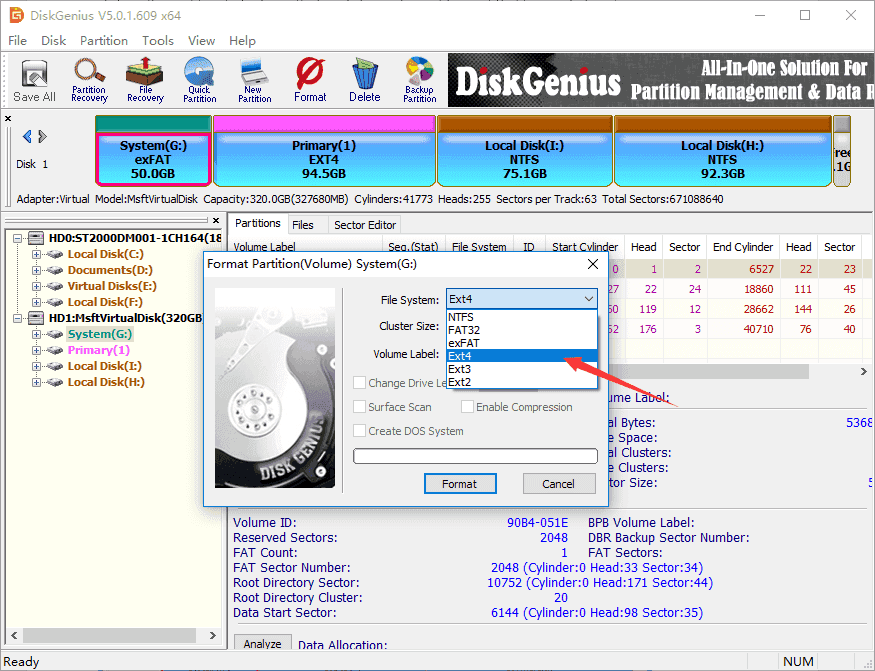
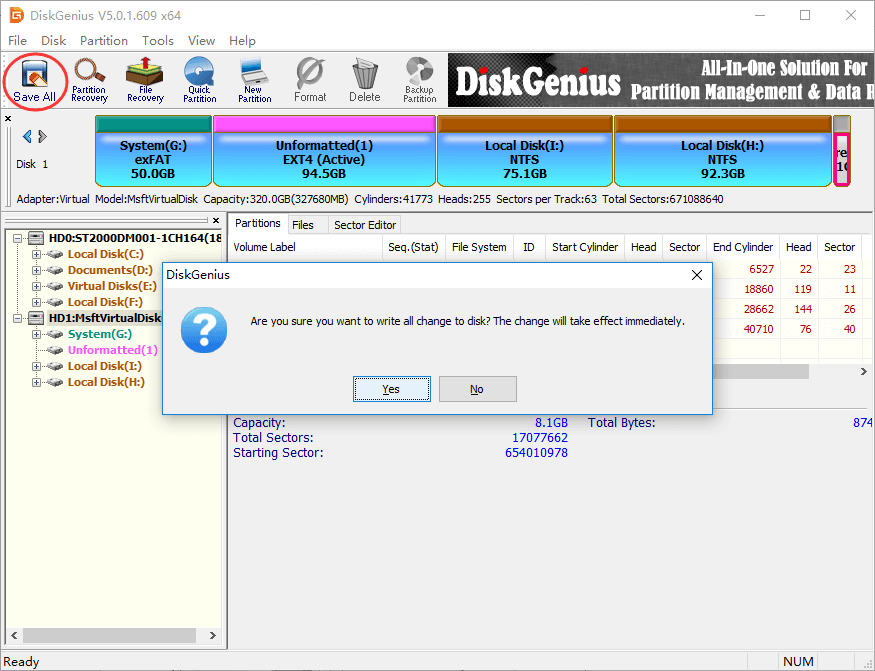
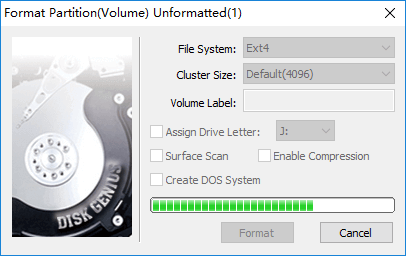
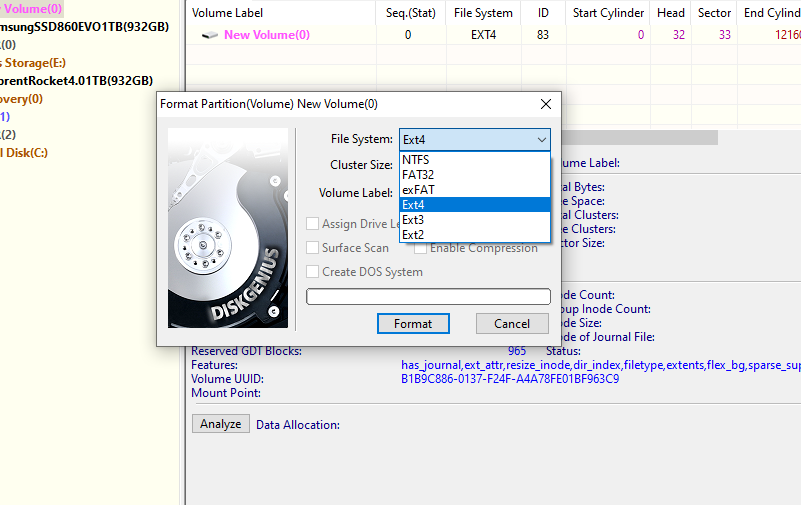
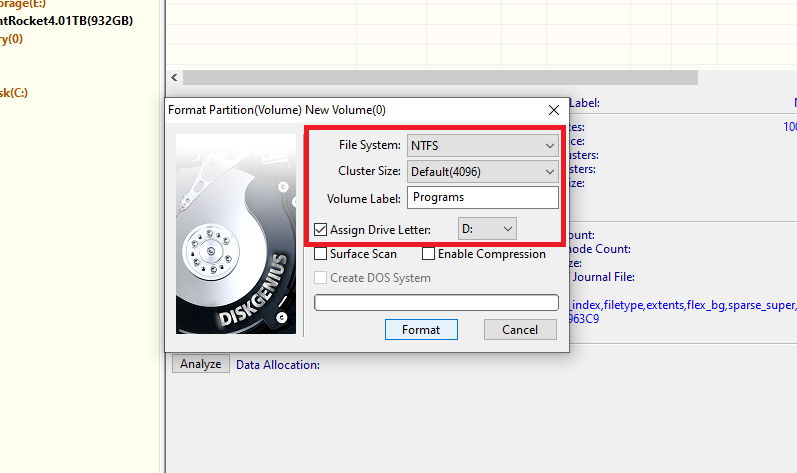
Step 3. Choose file system type you need from the Format Partition window and click Format button. To format ext4, you should choose Ext4 from the drop-down list.
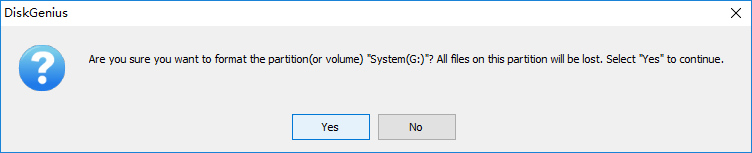
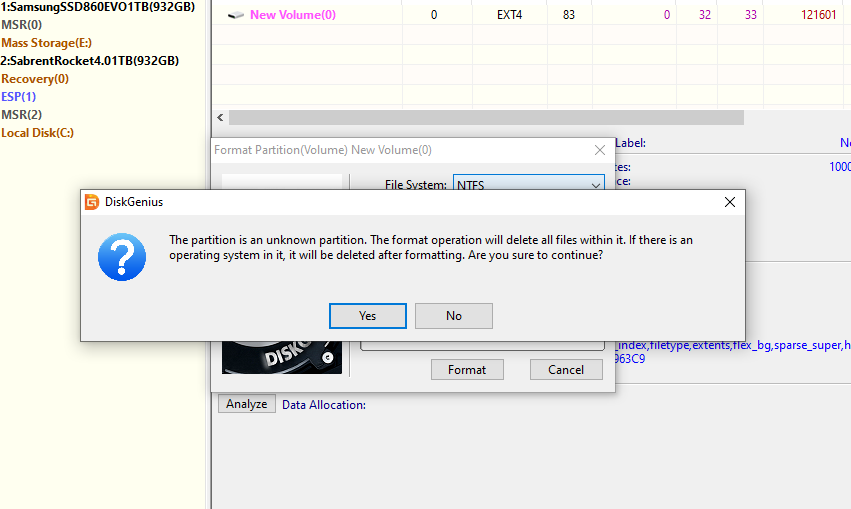
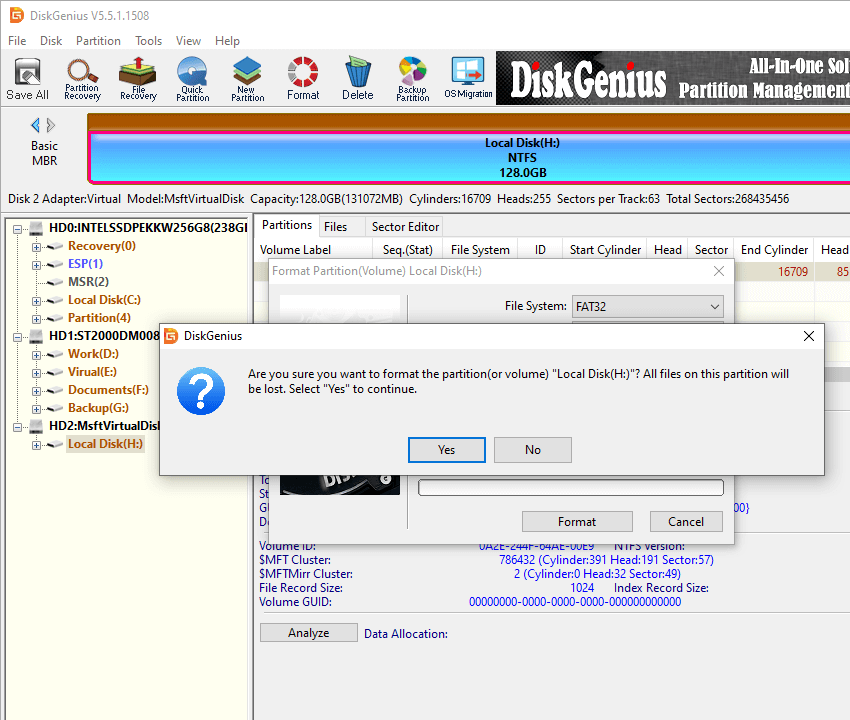
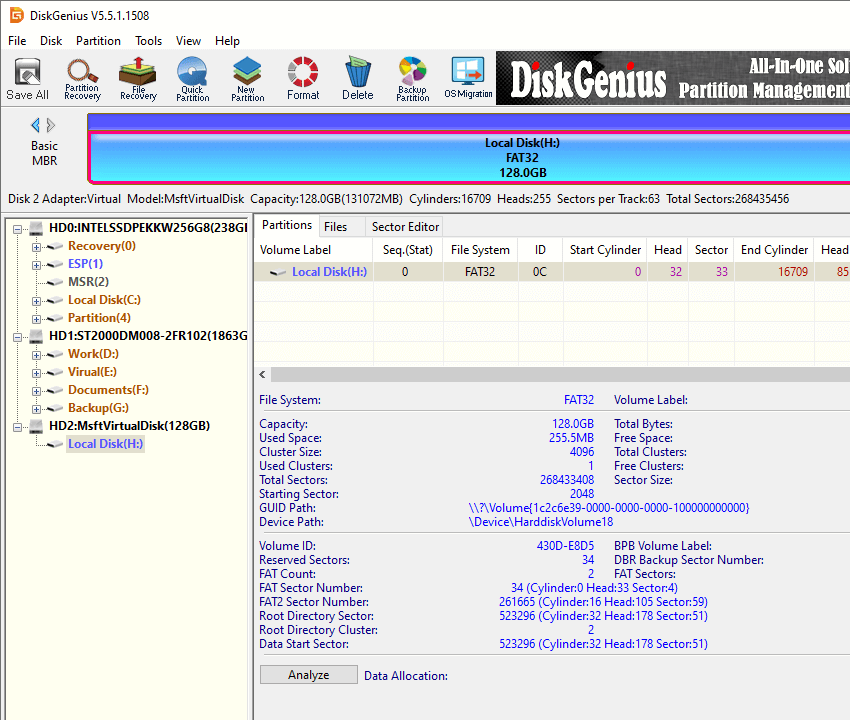
Step 4. Click Yes to continue. Wait for several seconds and the formatting will complete.
The video guide to format Ext4 in Windows
Note: Since V4.9.5.508 PartitionGuru changed name to DiskGenius.
How to create EXT4/3/2 Linux partition in Windows 10?
Windows uses NTFS, FAT32 or exFAT file system and Linux uses extended file system like ext3, ext4. Windows does not support to read, write or access Linux file system without the help of third-party partition tools. As we all known, Windows users cannot create partitions with these file systems easily in Disk Management. How to create an Ext4/3/2 Linux partition under Windows?
Here, we recommend a free partition tool – DiskGenius Free to fulfill the task. DiskGenius can be used under any Windows platform, and it provides a bunch of useful features like data recovery, disk & partition management, data backup, repair bad sectors, edit hex data, etc. The recently released version adds support to create, format, read or access ext4 / ext3/ ext2. So, we can use this partition tool to create an ext4 /3/2 partition in Windows.
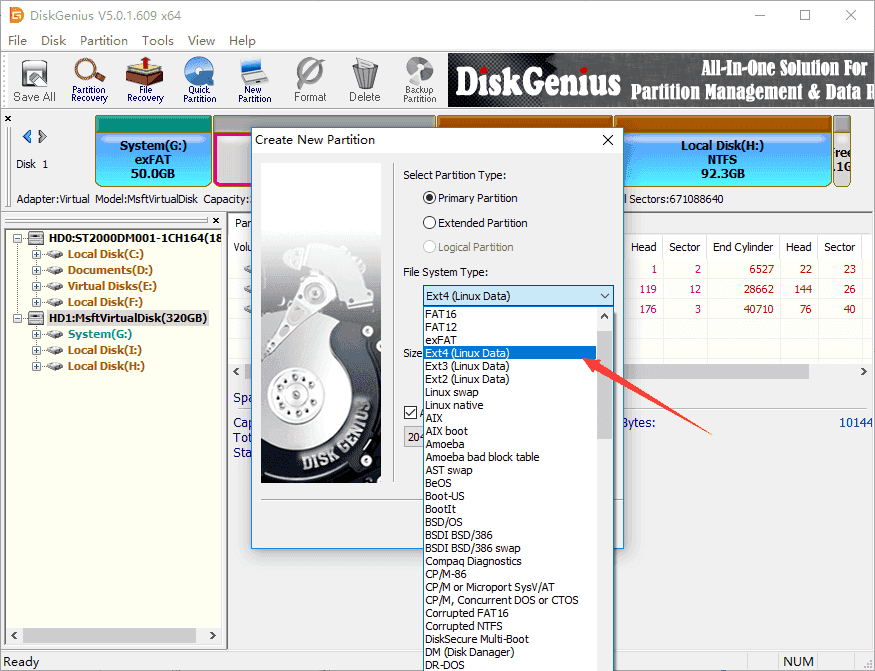
Step 1. Right-click on free / unallocated disk space and select Create New Partition from context menu, as follows. Alternatively, you can select free disk space and click New Partition button.

Note: If there is not free disk space on your drive, you can use DiskGenius shrink one partition to free some disk space. Also, you can just delete a partition whose files have all been backed up.
Step 2. The «Create New Partition» box comes up, and you can select file system type now. To create ext4 partition, you should select Ext4 (Linux Data). Then click OK button.
Step 3. Click Save All button on the upper-left panel to save the new partition to partition table.
Step 4. DiskGenius asks whether to format the partition after it is saved to partition table. Click Yes and the partition will be formatted quickly.
Conclusion
DiskGenius makes it very easy to format partition to EXT4, EXT3 or EXT2 file system in Windows. Besides, it provides many other functions to help you manage and access EXT4 Linux partition in Windows 10, for instance, save data to ext4 partition, delete data from Linux partition, clone EXT4 partition to image, resize Linux partition without losing data, etc. If you need to format EXT4 in Windows, free download DiskGenius and try it now.
(Image credit: Rich Edmonds / Windows Central)
Which file system you have set up on your PC’s drives isn’t something many of us pay much attention to. In most cases, we’ll be using NTFS, which is totally fine and works across different operating systems.
But if you’ve been using Linux on a drive it could well be formatted in the Ext4 file system, which will make it completely impossible to use with Windows 10.
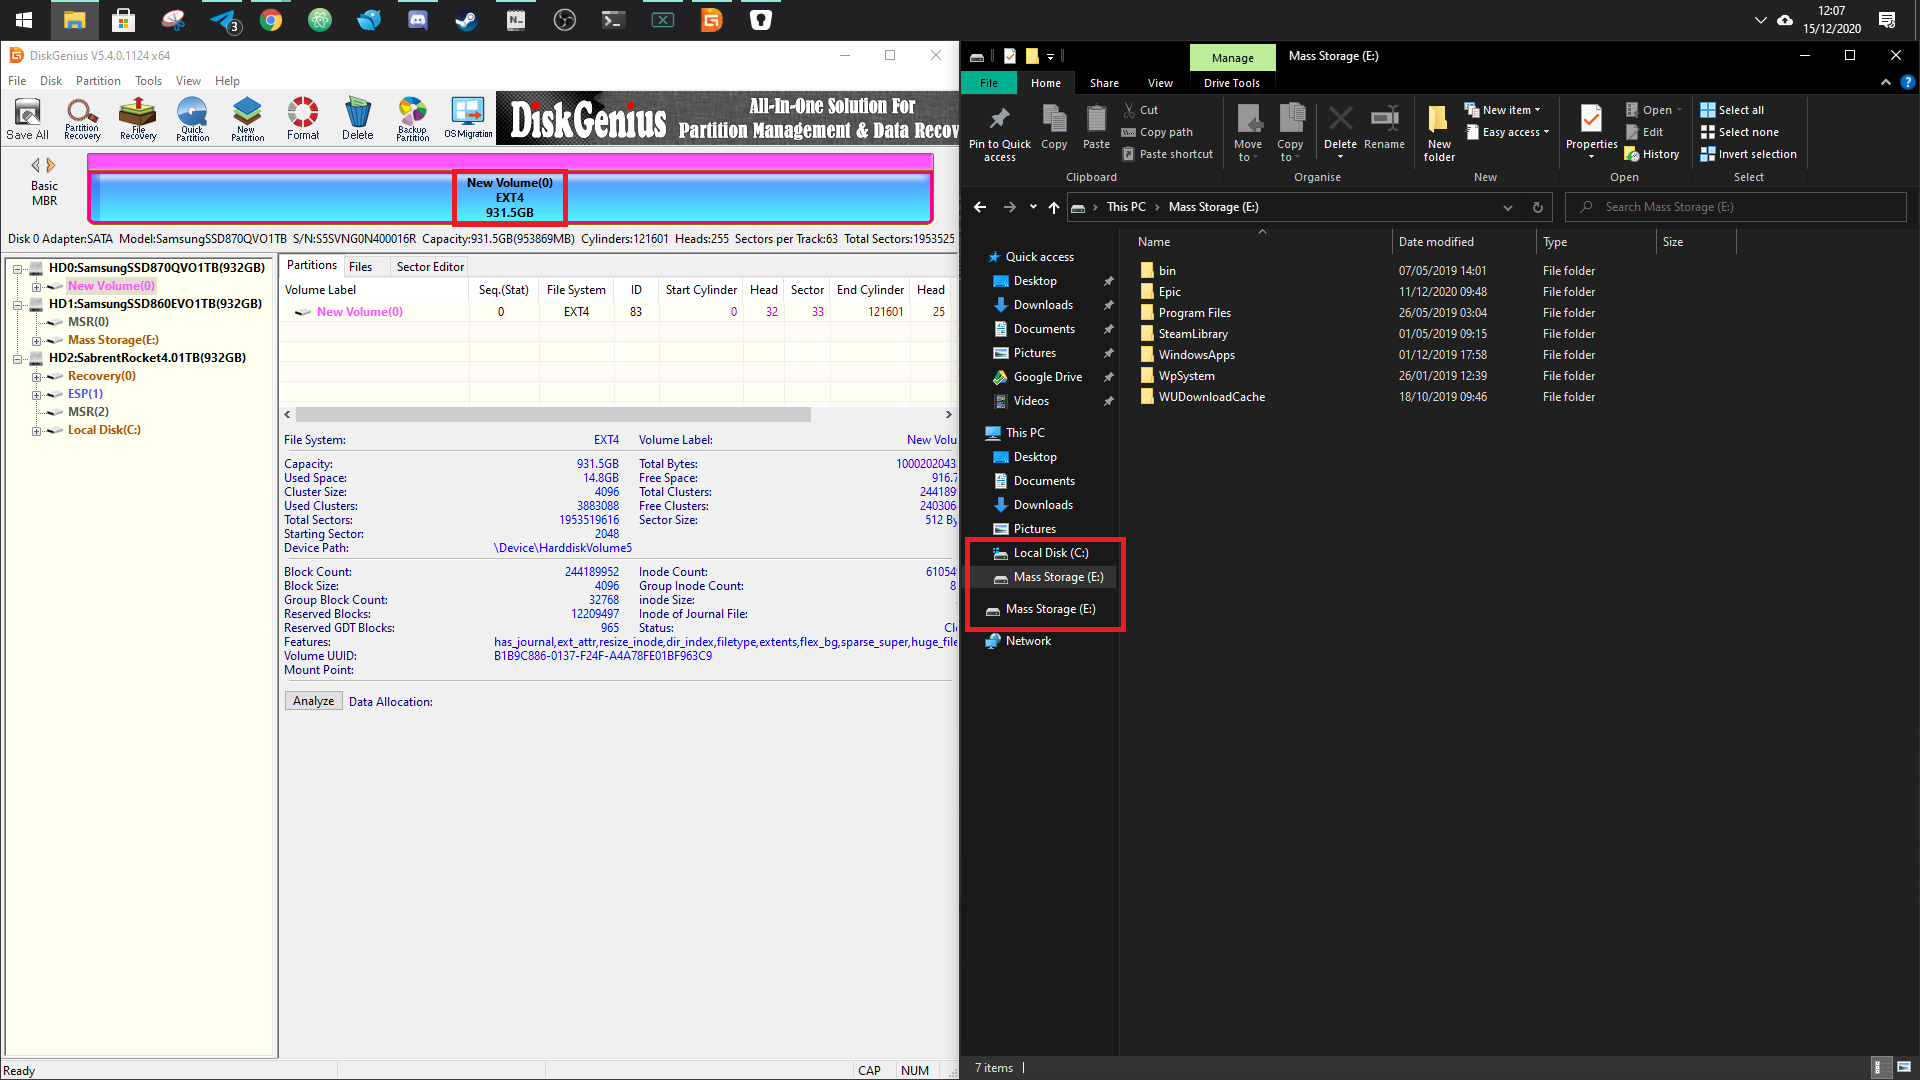
As you can see here, we have an Ext4 SSD in a PC running Windows 10, but it’s not visible in File Explorer. To use it you’ll need to reformat it to something more Windows-friendly, but it’s not entirely straightforward. If you open the Disk Management app on Windows 10 you’ll see the drive exists, but you can’t do anything with it.
But fear not, there’s a simple solution.
How to reformat an Ext4 drive in Windows 10
The first step is having the right tool for the job. In this case, we’re using a piece of software called DiskGenius, which can be used for free. You can install it if you like, but I just use the 64-bit portable version instead. Download this first from their site and install or open it ready to get started.
Then follow these steps.
- Select your Ext4 drive from the pane on the left.
- Click the format button along the top bar.
- Use the dropdown box to choose your preferred file system, in this case, NTFS.
- If you wish give your drive a name and letter.
- Click format.
- Click yes if you’re happy.
- Wait for it to complete.
Now, when you go back to File Explorer you’ll see your newly formatted drive available to you to do with as you please.
All the latest news, reviews, and guides for Windows and Xbox diehards.
Richard Devine is a Managing Editor at Windows Central with over a decade of experience. A former Project Manager and long-term tech addict, he joined Mobile Nations in 2011 and has been found on Android Central and iMore as well as Windows Central. Currently, you’ll find him steering the site’s coverage of all manner of PC hardware and reviews. Find him on Mastodon at mstdn.social/@richdevine
If you are trying to format Ext4 Windows and you have not found any way to do it successfully, then you’d better read this MiniTool article since it provides you a perfect assistant to help you format disk to Ext4 Windows.
“Hi, guys! I need to format SD card Ext4 Windows. Thus, I tried to format Ext4 Windows 10, but I only found that I cannot do this in Windows 10. It is not working in Windows Explorer, or Disk Management. I want to know that is there any way to format my SD card to Ext4 file system in Windows 10 or I just can’t do this in Windows 10. Thanks a lot!”
The Need to Format Ext4 Windows
The file system provides a solution to organizing data for the operating system, and different operating systems ask for different file systems. The specific operating system cannot read or write data from the device media if the target storage device does not have the proper file system.
Therefore, you should choose the appropriate file system format for your storage device so that the particular operating system can recognize it. However, making the right choice sometimes might be difficult since there are various types of file systems.
If you are interested in external devices cannot be recognized issue, this article below can be helpful:
Now we will provide you with a basic introduction to the commonly used file system formats for recent Windows, Mac, and Linux.
Nowadays, for Windows, NTFS is the most used file system, also the default one. Windows also supports REFS, exFAT, and FAT32. Microsoft is removing support for REFS from Windows 10 Pro.
Related article: News Express: Microsoft to Remove Full ReFS Support from Win10 Pro
For Mac, the default file system is APFS, and it supports a handful of common file systems – HFS+, FAT32, and exFAT, with read-only support for NTFS.
Well, Linux supports lots of file systems, while the common choices are Ext family, XFS, JFS, and btrfs, and its default option is Ext4.
So, if you plan to switch from Windows to Linux, you may need to format your internal hard drives or external devises (like SD card drives) to Ext4 on the Windows operating system so that Linux can successfully identify them. Or, if you are dual booting Windows and Linux, you may want to access files on your Windows system from Linux at some point, which also requires formatting the disk as Ext4.
Apart from the reasons we put there, you might have various reasons according to your own specific situation. Well, no matter what, the need is to format Ext4 Windows.
As the Windows 10 user of the post said, he/she cannot format his/her SD card to Ext4 no matter using Windows Explorer or Disk Management. It is true. Windows built-in tools cannot format Ext4 Windows. Let’s see what will happen if using Windows built-in tool to format Ext4 file system.
When you try to format a hard disk to Ext4 file system in Windows Explorer or Disk Management, both of them will only give you tree options – FAT32, NTFS and REFS. When you try this operation with an external device, such as formatting an SD card to Ext4, you will only get three formatted options – NTFS, FAT32 and exFAT. No Ext4 option exists. See the image below.
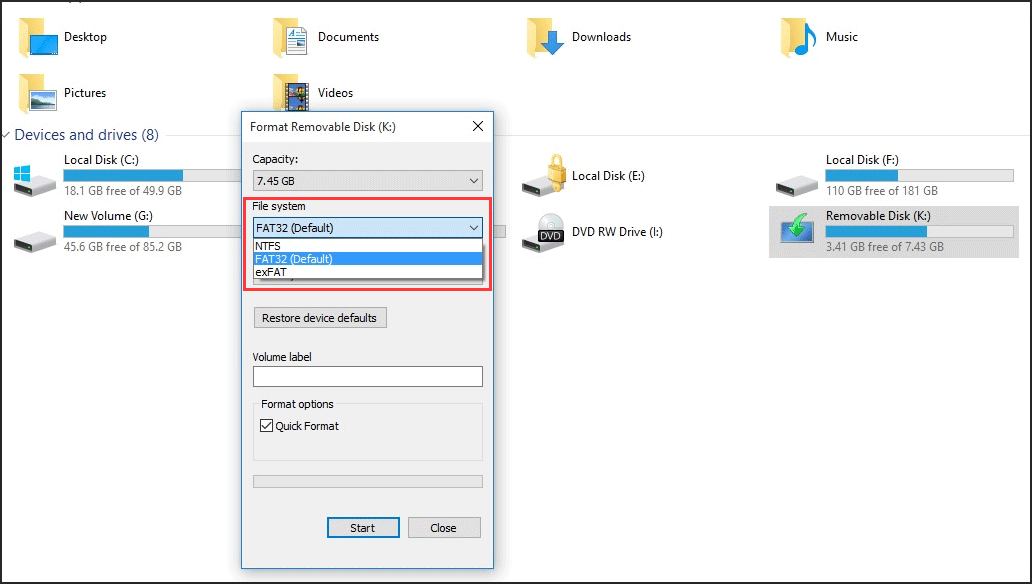
So, neither of them can format your storage device to Ext4. If you know a more powerful tool – diskpart and put your last hope on it, well, bad news to you, it will fail too. When you type the command and hit enter, you receive the message that Virtual Disk Service error: The file system is incompatible.
Even though Windows built-in tools can’t help you format your storage devices to Ext4, you don’t need to be disappointed, because it’s not entirely impossible to format your device to Ext4 on Windows. A free partition manager – MiniTool Partition Wizard can be your Ext4 formatter Windows.
What’s Good about MiniTool Partition Wizard as Your Ext4 Formatter Windows
MiniTool Partition Wizard supports Windows 10/8/7/Vista/XP all editions. It has many useful features including resizing partitions, copying partitions, creating partitions, formatting partitions, convert file systems, migrating OS to HDD/SSD, converting MBR to GPT, rebuilding MBR…
These features give you complete control over your hard disk partitions so that you can make the optimal disk space distribution, and most of them do not exist in Disk Management. With its user-friendly interface and straightforward guidance, these operations are easy for everyone.
For the format Ext4 Windows issue, the feature Format Partition is required. This feature is really powerful. In addition to helping to format the disk as Ext4 Windows, it can also help format Ext3, Ext2, Linux Swap and other file systems… Well, lucky for you, the feature is available in the Free Edition. Click the button below to get the Ext4 formatter Windows.
MiniTool Partition Wizard FreeClick to Download100%Clean & Safe
After downloading MiniTool Partition Wizard, follow prompts to install it on your computer. Then we will tell you how to format Ext4 Windows 10/8/7 with this fantastic Ext4 formatter Windows in the following part.
How to Format Ext4 Windows 10/8/7 – Detailed Steps with Pics
Note: formatting will erase all data on the target disk partition/SD card, so be sure to back up your important data before starting the formatting process, or you don’t need to worry about this if there is no important data in the storage device at all. For data protection, you can directly back up partition.
Now learn how to format Ext4 Windows 10/8/7 with step-by-step guide below. Here we will take a hard disk partition as an example.
Step 1 – launch MiniTool Partition Wizard
Find the icon on your computer and double click it to open this partition manager, and then choose Launch Application to enter its main interface.
Step 2 – select the specific feature
When you are in the main interface, select the target partition and then choose Format Partition under Partition Management from the left action panel.
Step 3 – format Ext4 Windows
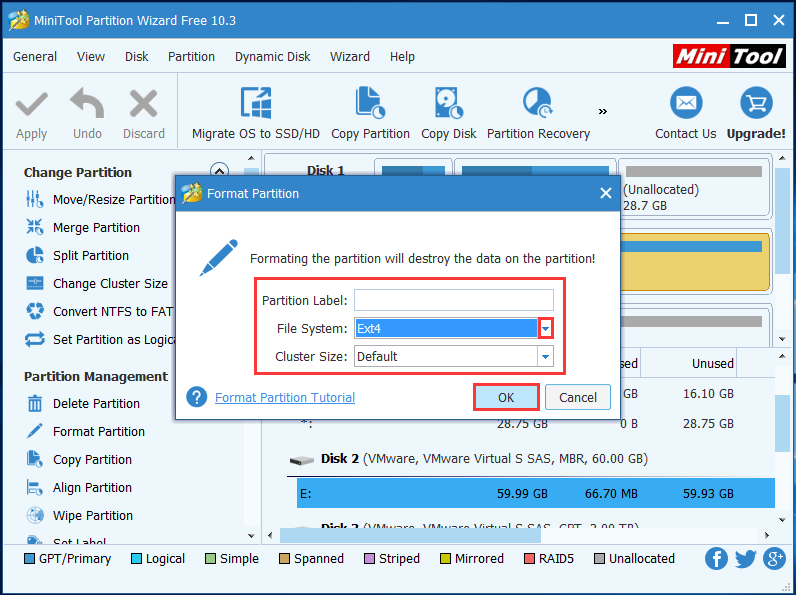
After clicking Format Partition feature, you will enter the Format Partition window. Please click the File System drop-down list, then you can see this Ext4 formatter Windows provides you a variety of file system options including Ext4. Select it and click OK to continue.
Step 4 – apply this operation
Now you can preview the effect. If you are not satisfied with the results or find that you have made a mistake by previewing, you can withdraw all your actions by one simple click on Discard, while if you are just one step regret, click on Undo.
On the contrary, if you decide to perform this operation, click Apply. At this point, the actual formatting officially begins, and you only have to wait for a while until the process is completed.
When the process is finished, the hard disk partition is formatted to Ext4 successfully. While you can’t view it in Windows Explorer or Disk Management because Windows cannot recognize Ext4 file system.
This can also be applied to SD card if you want to format SD card Ext4 Windows. You just need to insert the SD card into the computer at the beginning, and then the operations are all the same except changing the object from a hard disk partition to an SD card.
Click to Tweet
How to Format A Brand-New Partition/SD Card to Ext4 on Windows
If the disk or SD card to be formatted is new, you can format disk to Ext4 Windows or format SD card Ext4 Windows using the Create Partition feature of MiniTool Partition Wizard Free Edition, and we still use a disk partition as a demonstration.
Step 1 – open and launch this program to its main interface
Find the icon of the program and double-click on it, then choose Launch Application to enter the main interface.
Step 2 – click the specific function
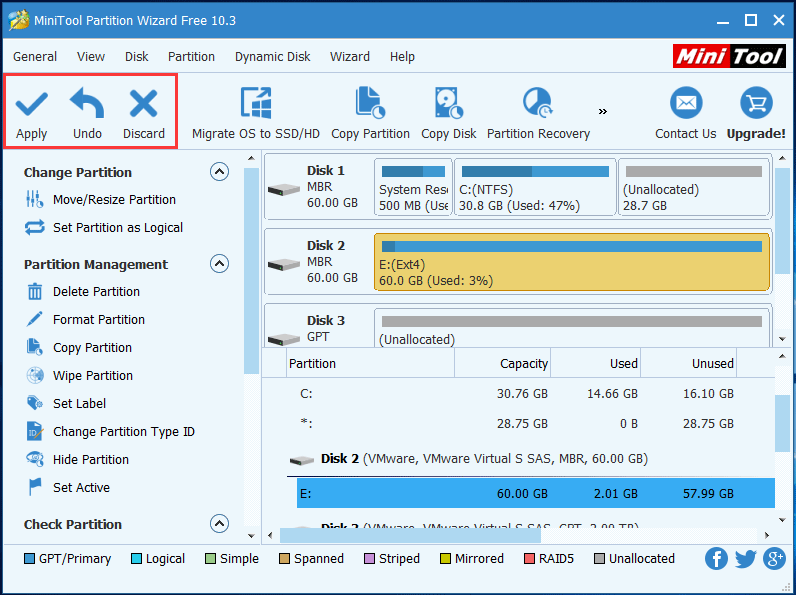
Firstly, click on the unallocated space, and then click Create Partition under Partition Management from the left action panel.
Step 3 – set the file system format as Ext4
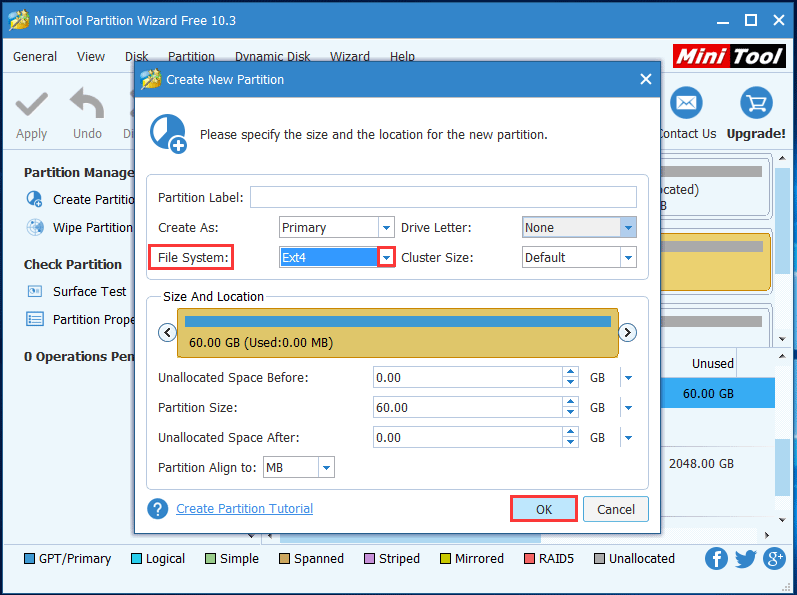
Now you are entering the setting window, in which you can configure various settings for the new partition. Click the drop-down list of File System and choose Ext4 from those file systems, and keep other parameters by default or change it according to your own needs. Then click OK to continue.
Step 4 – click Apply to save your change
This is the last step. Now you are back to the main interface. Click Apply from the top left to save the changes.
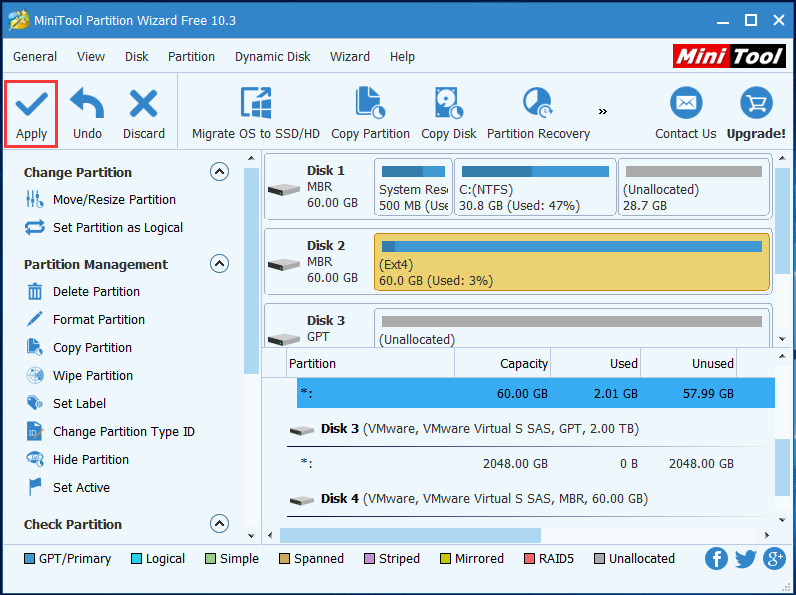
Finally, the partition is formatted as Ext4 file system successfully during creating a partition.
Hey! I found a fantastic partition tool MiniTool Partition Wizard can format Ext4 on Windows. It’s really easy! I hope it can help you guys too if you have the same need.Click to Tweet
Ext4, Ext3, and Ext2
If you are new to the Linux system, you may not know much about Ext file system. In this part, we’ll talk about file systems Ext2, Ext3, and Ext4, which belong to the Linux operating system.
Ext2: Second Extended File System
Ext2 stands for second extended file system which was first introduced by Remy Card in 1993. It does not support journaling feature; therefore, it is recommended to be used on flash drives like SD card or USB which do not need the overhead of journaling.
The maximum individual file size of Ext2 can be 2 TB and overall ext2 file system size can be 32 TB.
Ext3: Third Extended File System
Ext3 is short for third extended file system. It was developed by Stephen Tweedie and was introduced in 2001. It was available since Linux Kernel 2.4.15.
The main benefit of Ext3 is that it supports journaling feature. The journaling feature has a dedicated area in the file system that keeps track of all changes. When the system crashes, the file system is less likely to be corrupted due to the journaling.
The maximum single file size can be 2 TB, and the total Ext3 file system size can be up to 32 TB. You can convert an Ext2 file system to Ext3 file system directly without data loss.
Ext4: Fourth Extended File System
Ext4 stands for fourth extended file system which was introduced in 2008, starting from Linux Kernel 2.6.19.
Ext4 supports huge single file size and overall file system size. The maximum individual file size can reach to 16 TB. The overall maximum Ext4 file system size is 1 EB (exabyte). Ext4 also supports journaling, and you can choose to turn the journaling feature “off”.
Final Words
After reading this post, we believe now you know that it is possible to format Ext4 Windows. Actually, the formatting can be really easy as long as you have the partition magic – MiniTool Partition Wizard.
If you have any trouble when using this freeware, you are always welcome to contact us through [email protected] or you can leave your comment on the comment area. Of course, any suggestion or idea is appreciated.
Format Ext4 Windows FAQ
Can I read ext4 on Windows?
Windows 10 can’t read Ext 4 partitions. But, you can use third-party software to read Ext 4 on your Windows 10 computer.
Is ext4 better than NTFS?
It depends. Ext4 is a better choice for flash drives. While NTFS is a good choice for computer internal hard drive.
How do I format a Linux partition in Windows 10?
- Download and install MiniTool Partition Wizard on your computer.
- Open the software.
- Select the partition you want to format.
- Select Format Partition from the left toolbar.
- Define the partition based on your requirements.
- Press OK.
- Click Apply after the formatting process ends.
Can Windows read exFAT?
Yes, Windows 10 supports exFAT. You can use this file system on your Windows computer.
-
Home
-
News
- Full Guide – Format SD Card to Ext4/3/2 on Windows 10/11
Full Guide – Format SD Card to Ext4/3/2 on Windows 10/11
By Yamila | Follow |
Last Updated
Sometimes, you may want to format SD card to Ext4/3/2 on Windows PCs. Do you know how to format SD card to Ext4 on Windows? In this post, Partition Magic provides a step-by-step guide to help you format an SD card. You can take a look.
If you get a new SD card and want to format SD card to Ext4/3/2 in Windows 10/11, refer to the guide below.
About Ext4/3/2
Ext2, Ext3, and Ext4 are all extended file systems commonly used for the Linux operating system. You can learn more about them from the following content.
Ext2
Ext2, standing for the second extended file system, is the first commercial file system for Linux that was originally introduced in 1993. It’s designed to overcome limitations on the previous Ext file system. The Ext2 file system ranges from 2TB to 32TB and the maximum size of a single file it supports can be up to 2TB.
Since Ext2 lacks a journaling feature, it’s recommended for flash drives, such as SD cards and USB flash drives.
Ext3
Ext3, or the third extended file system, is a journaled file system that was introduced in 2001 as an improved version of Ext2. Like Ext2, it can also handle a single file with a maximum size of 2TB.
The prominent advantage of Ext3 is journaling, which can help track the changes to the file system. With this feature, Ext3 is more reliable and easier to recover data after an unclean shutdown.
Ext4
Ext4 refers to the fourth extended file system released in 2008. It’s the successor to Ext3 and is now the latest version of the EXT file system. It’s also a journaling file system for Linux and offers backward compatibility with Ext2 and Ext3.
Different from the older EXT file systems, Ext4 supports larger file size and partition size, up to 16TB and 1EB respectively.
In some cases, you may need to format SD card to the EXT file system on Windows. However, you may receive the “The file system is incompatible” issue when you try using Diskpart or other Windows built-in utilities to perform the format. In this case, you may ask how to format SD card to Ext4 in Windows 10/11.
Well, to format SD card to Ext4 on Windows successfully, we’d like to recommend you use MiniTool Partition Wizard. It’s a comprehensive partition manager that enables you to partition/clone a hard drive, format SD card FAT32/NTFS/Ext4/Ext3/Ext2, convert MBR to GPT and vice versa, migrate Windows 10 to SSD/HDD, and more.
Here’s a detailed guide on how to format SD card to Ext4 in Windows 10/11.
Note:
The formatting will erase all data on the SD card. So, you’d better back up SD card before the process to avoid data loss.
Step 1: Connect the SD card to your Windows PC. Make sure your PC is well-running.
Step 2: Download and install MiniTool Partition Wizard on your PC. Then launch it to enter the main interface.
MiniTool Partition Wizard FreeClick to Download100%Clean & Safe
Step 3: Right-click the partition on the SD card and select Format from the context menu. Also, you can highlight the target partition and select Format Partition from the left action panel.
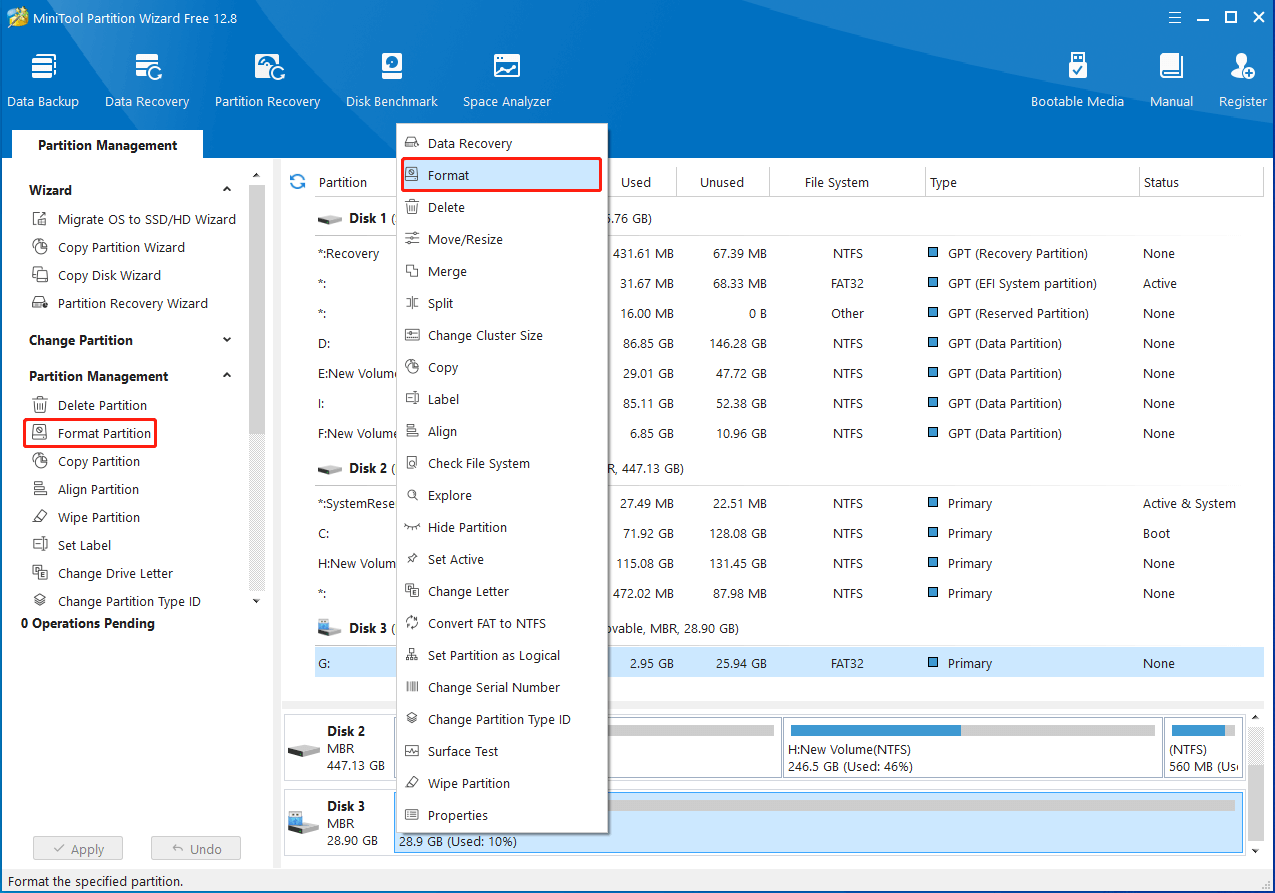
Step 4: In the pop-up window, choose Ext4, Ext3, or Ext2 from the File System drop-down menu. Then click OK.
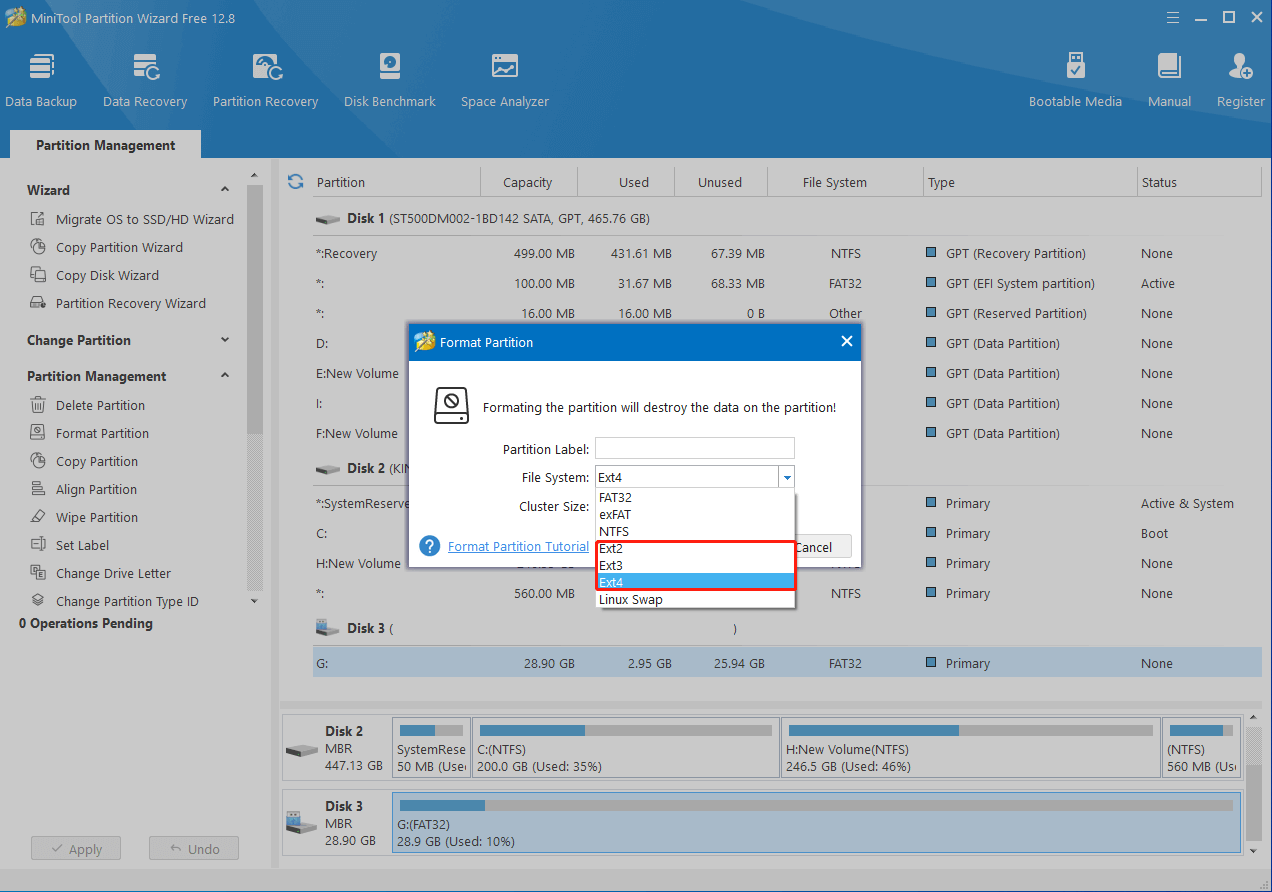
Step 5: After that, click Apply to save the pending operation.
To Sum Up
How to format SD card to Ext4 on Windows? This post reveals the answer to you. Hope you can successfully format SD card to the preferred file system by following the given guide.
About The Author
Position: Columnist
Yamila is a fan of computer science. She can solve many common issues for computer users by writing articles with simple and clear words. The very aspect that she is good at is partition management including create partition, format partition, copy disk and so on.
When she is free, she enjoys reading, doing some excerpts, listening to music and playing games.
This article mainly talks about how to format / reformat USB flash drive to FAT32, exFAT, NTFS or EXT4 file system in Windows 11/10/8/7/XP. Formatting a USB drive can repair corrupt partition as well as change file system format, thus we may need to format USB flash drives from time to time. In this guide, you can find multiple methods to format USB disks and you can choose one based on actual situation and needs.
About formatting USB flash drives
Formatting a USB drive, volume or hard drive is one common operation to all computer users. Many users count on formatting to fix errors on storage devices, free up disk space, or change file system formats. understand the ins and outs of formatting? Let’s take a close look at it now.
What formatting a USB disk can do for you?
In many cases we format a drive in order to prepare it to be used by operating systems or erase all data. In fact, some underlying benefits of formatting a USB flash drive are ignored. This section sums up what formatting can do for you.
- Wipe data rapidly. The quick formatting is the best way to wipe data from storage media with ease and speed. Since it causes data loss, be sure files are backed up before formatting. If you want to permanently erase data from USB drives (make USB data recovery impossible), you can refer to the guide: How to completely wipe a USB flash drive?.
- First time use. Will you format the USB flash drive you’ve recently purchased? The answer should might be Yes. You can perform a full format on the flash drive, which helps check USB drive health by scanning whether there are bad sectors on the USB drive.
- Change file system formats. Formatting process creates a file system to organize data, and it also can change file system format when necessary. USB drive can be reformatted to FAT32, exFAT, NTFS, EXT4, etc., so that it can be used on different system platforms.
- Remove virus or malware. If your USB flash drive is infected with virus or malware, you can format the disk to totally get rid of threats.
- Repair corrupted partitions. Many users take formatting as the last resort to errors they encounter. For example, when a disk becomes inaccessible and reports error message like «The file or directory is corrupted and unreadable», you may want to format it to repair the corrupt volume.
Quick format VS. full format (low level format)
If you format a volume in Windows, you can see the «Quick Format» option is selected by default. Have you ever wondered the differences whether it is selected? Normally, the formatting is called a full format or low level format if the «Quick Format» is not selected. What are the differences between quick format and full format? Which one should you use to format / reformat a USB drive?
What is a quick format? The obvious feature is quick. The formatting does not check bad sectors for selected drive, but it deletes the journaling part of file systems. The journaling records what files are stored and where they are located. The quick format simply removes journal and lays a new and blank file system. It does not really recreate the file system and does not completely delete file data. Thus if there are not files that stored on the disk to overwrite lost data, you can recover files with a free file recovery program. If you want to permanently wipe data, this is not the correct choice.
What happens during a full format? The full format runs an additional step that scans bad sectors, which takes much longer than a quick format. It completely wipes the drive being formatted, and thus lost files are no longer recoverable by any means. Also, it scans and tries to fix bad sectors during formatting. A sector which is not writable, inaccessible, or damaged is called a bad sector. Causes of bad sectors are many, such as failed flash memory transistors, aging, quality, failed heads, etc. If the full format finds bad sectors, it’ll try to fix them. If the process completes successfully, the damaged USB drive gets repaired.
A quick format does not permanently destroy data, and files can be unformatted by data recovery software. If you attempt to re-use the drive which does not contain any bad sectors or physical damages, a quick format is adequate. If you are not sure about the bad sector thing, or plan to sell or give it away, then perform a full format to fix errors as well as wipe data.
File system types on USB drives
Since formatting can create and change file system formats, you need to choose a file system type for the USB flash drive to be formatted. There are a number of file systems types such as NTFS, exFAT, FAT16, FAT32, EXT4, EXT3, EXT2, etc. File system provides solutions for operating system to organize and manage data, and different systems adopt separate file system formats. File system plays key part in translating data stored on physical storage devices to operating system. Without a proper file system, OS cannot read data off a device media. Thus, you should choose a proper file system format while formatting a USB drive, SSD, hard drive, or SD card, so that operating system can read or write data correctly.
Nowadays, many users own more than one computer which may runs different systems such as Windows, Linux, or Mac OS. Thus, it is necessary to make sure the external drive can be used under different systems. To do that, you may have to reformat the USB drive to required file system type.
The following content talks about several methods to format a USB disk to FAT32, exFAT, NTFS, EXT2, EXT3, or EXT4 in Windows 10 without purchasing any software.
How to format/reformat a USB flash drive to FAT32, exFAT, or NTFS? (4 Methods)
If you format a USB disk or memory card whose capacity is smaller than 32 GB in Windows 11/10/8/7, you may take notice of the file system options which usually is FAT32 by default. However, you can also reformat your USB flash drive or SD card to exFAT, NTFS, EXT2, EXT3 or EXT4 in Windows. Methods to format USB flash drives can be many, this section choose the most common ways.
Notes:
- Formatting wipes data, always be sure to back up your data before starting the formatting process and remember to choose a file system format that suits your needs.
- If you want to repair inaccessible drive via formatting, you should recover data from the corrupted USB drive first. If you receive error message «Windows was unable to complete the format», that means the USB drive is physically damaged and it can’t be repaired by formatting.
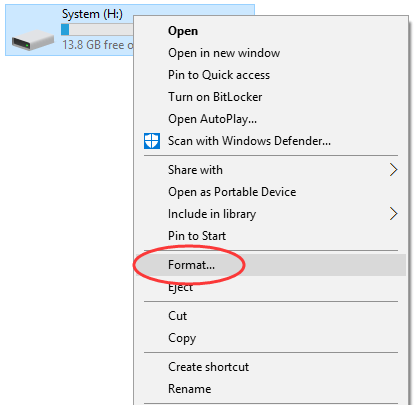
Method 1. Format a USB flash drive to FAT32 in Windows File Explorer
This is the easiest way to format a USB flash drive to FAT32, exFAT or NTFS. Go ahead and plug your USB disk to a PC which is running Windows so that it can be recognized by system.
Step 1. Open File Explorer to find the USB drive, right-click on it and select «Format». This will open a dialog box showing formatting options.
Step 2. Set formatting parameters.
Here you can choose desired file system formats from NTFS, exFAT, and FAT32 in File system drop-down list. The FAT32 won’t be available if the USB drive is larger than 32GB. In that case, you can refer to Method 4 to format USB to FAT32; the value of Allocation Unite Size can remain changed; if you want to rename the USB flash drive, then enter the name in the «Volume label» column; the «Quick Format» option is selected by default, but you can unselect to perform a full formatting.
Step 3. Format the USB drive. Once all options are set correctly and important files have been backed up, you can click «Start» button to initiate formatting process.
Step 4. Click «OK» button to give confirmation to the action when system prompts the process will delete all data on the drive.
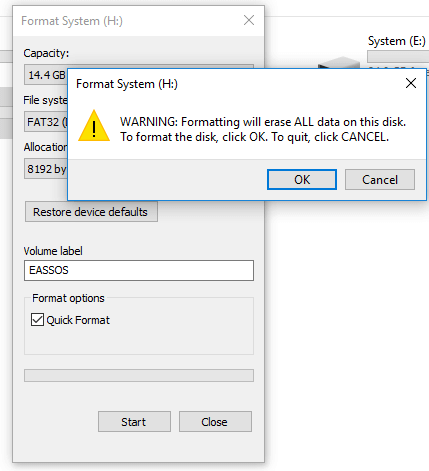
Step 5. A message box will pop up once the formatting completes. Click «OK» button.
Method 2. Format a USB stick as FAT32 in Disk Management
Disk Management is a system utility built in Windows Vista /7/8/10/11, and it is able to complete basic operations to manage disks and partitions. In this section, we’ll format a USB stick in Disk Management.
Step 1. Open Disk Management. If your computer is running Windows 10, you can open Disk Management by right-clicking the Start button and selecting «Disk Management» option. To access Disk Management in Windows Vista or Windows 7, please follow: Right-click «Computer» icon from desktop and select «Manage» from the context menu; then you can choose «Disk Management» from the Computer Management window.
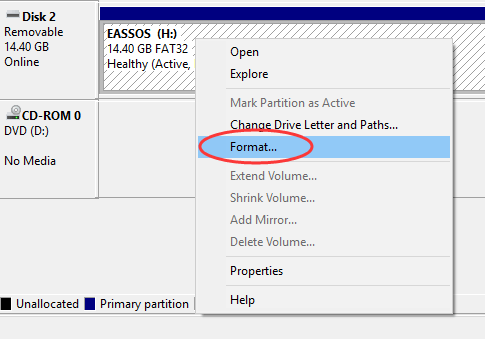
Step 2. Find the USB drive you want to format and right-click it to choose «Format» option.
Step 3. A message box will pop up to ask confirm for the formatting action, as all data on the partition will be lost. Click «Yes» to continue.
Step 4. Configure formatting options and click «OK». In this dialogue box, you can modify Volume label, choose file system format from FAT32, NTFS and exFAT, and set allocation unit size, etc. If you don’t know how to set these options, you can just follow the default settings.
Step 5. Click «OK» button to continue when asked «Formatting this volume will erase all data on it. Back up any data you want to keep before formatting. Do you want to continue?»
Method 3. Format a USB drive using Command Prompt
Do you know how to format a USB drive using DiskPart in Command Prompt? DiskPart is a powerful command line utility and it is able to create, delete, and format partitions. Let’s have a close look at how to format a USB drive in Command Prompt.
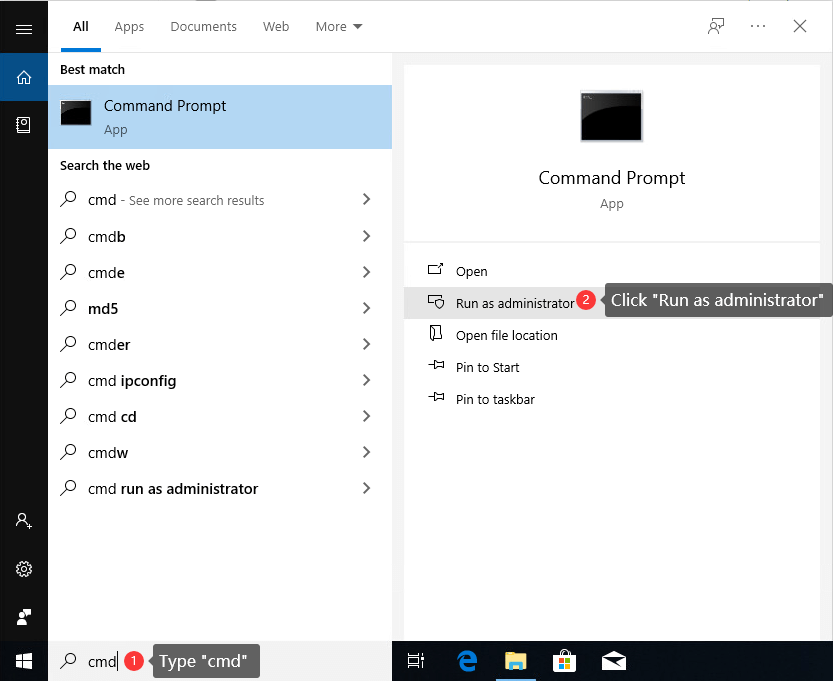
Step 1. Click the searching box next to the Start menu, and type cmd to find out command prompt. Then click «Run as administrator». For Windows 7 users, click «Start» button and enter cmd in searching box; then you can right-click cmd.exe in search result and choose «Run as administrator». If UAC (User Account Control) asks confirmation, click «Yes» to continue.
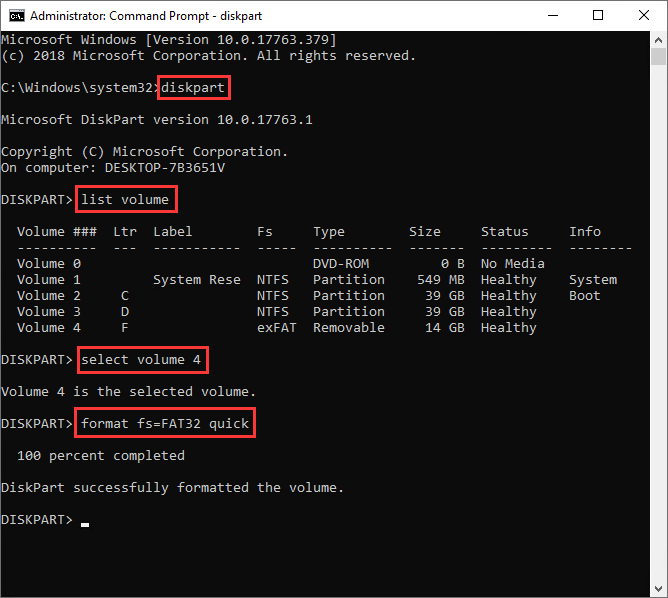
Step 2. Once the Command Prompt opens up, type command diskpart in it and press Enter key.
Step 3. Type command list volume and press Enter to view all partitions on your computer, including the volume on the USB drive you want to format.
Step 4. Type command select volume # (replace # with the volume number of your USB drive), and press Enter. This command is used to select the partition on your USB drive you want to format. In this case, select volume 4 should be entered. Please make sure you select the correct partition, or you could destroy data.
Step 5. Type format fs=FAT32 quick and press Enter. If you want to format a USB drive to exFAT or NTFS, replace «FAT32» with either of the two format.
Method 4. Format a 64GB, 128GB or larger USB flash drive to FAT32 using DiskGenius Free
When the USB flash drive is larger than 32 GB, for example, 64 GB, and you are attempting to format it as FAT32 file system in Windows Disk Management or File Explorer, the option FAT32 is not available. If you try diskpart in Command Prompt or PowerShell, the formatting will end up with an error «the volume it too big for FAT32». So, formatting a large USB drive or SD card as FAT32 file system, a third-party disk formatting tool will be needed. DiskGenius Free Edition is free disk partitioning and disk cloning software. With DiskGenius Free Edition, you can easily format a 64GB, 128GB or even larger drive as FAT32 file system. Also, it can create or format a partition with EXT4, EXT3, and EXT2 file system. Following steps shows how to format a large partition as FAT32 file system using DiskGenius Free Edition in Windows 10.
Step 1. Free download, install and open DiskGenius Free Edition on your computer. Then connect the USB drive to computer, and you can find the USB drive in DiskGenius.
Step 2. Select the USB drive you want to format, and click «Format» button to open the formatting window. Then select FAT32 file system from the dropdown list and click «Format» button.
Step 3. A warning message pops up to ask confirmation. The Formatting process will delete everything from the USB drive. If you’ve backed up important data, click «Yes» to proceed.
Step 4. See the 128GB partition is formatted as FAT32 successfully now, and you can access in Windows File Explorer.
Here is the video guide on formatting a USB drive as FAT32 when the drive is bigger than 32 GB.
How to format a USB stick to EXT4, EXT3 or EXT2 in Windows 10/11? (FREE)
EXT2, EXT3 and EXT4 are all file systems created for Linux and they are not natively supported by Windows operating system. Thus Windows cannot directly format a partition to EXT4, EXT3 or EXT2 format. How to format a USB stick or SD card to Linux EXT4/3/2 in Windows 10? We’d like to recommend DiskGenius Free to complete the task. DiskGenius is a free Windows partition manager program, and it allows users to access EXT4/3/2 partition data without installing any additional drivers. Also, it’s able to create or format a partition to EXT4 in Windows 10/11 easily. Plug your USB stick or SD card to Windows computer, download DiskGenius Free Edition and you can follow steps here to format your USB drive to Linux partitions.
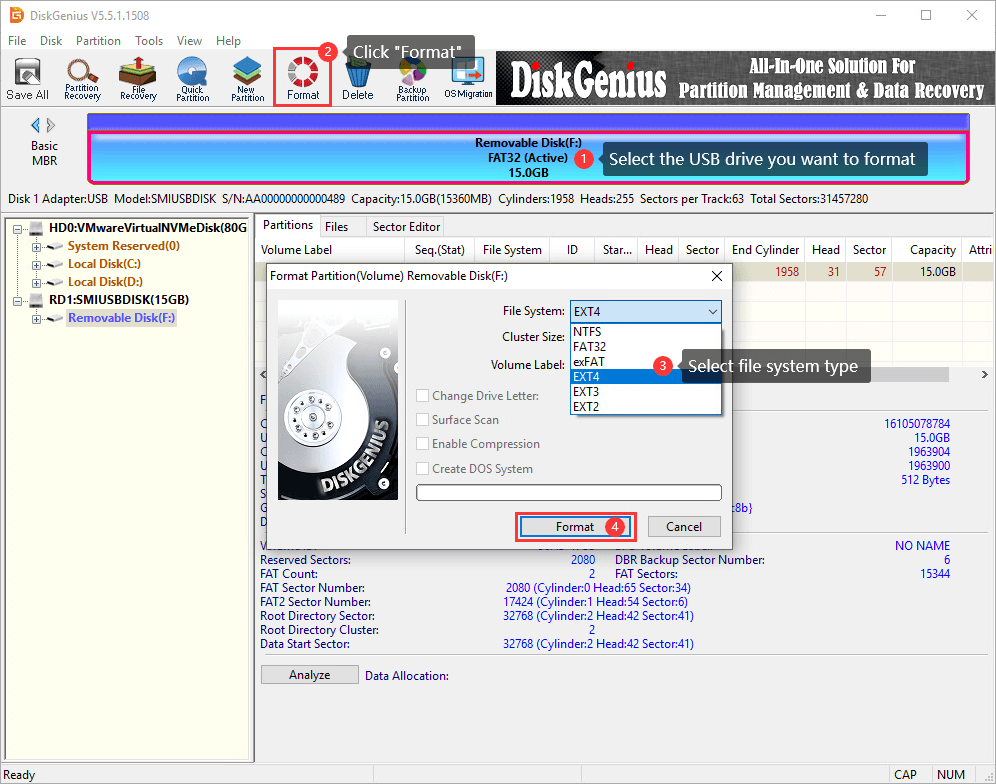
Step 1. Install and launch DiskGenius Free Edition and you can see all disks and partitions on your computer.
Step 2. Select the USB stick or SD card you want to format and click «Format» button from the toolbars. The formatting partition window will open up.
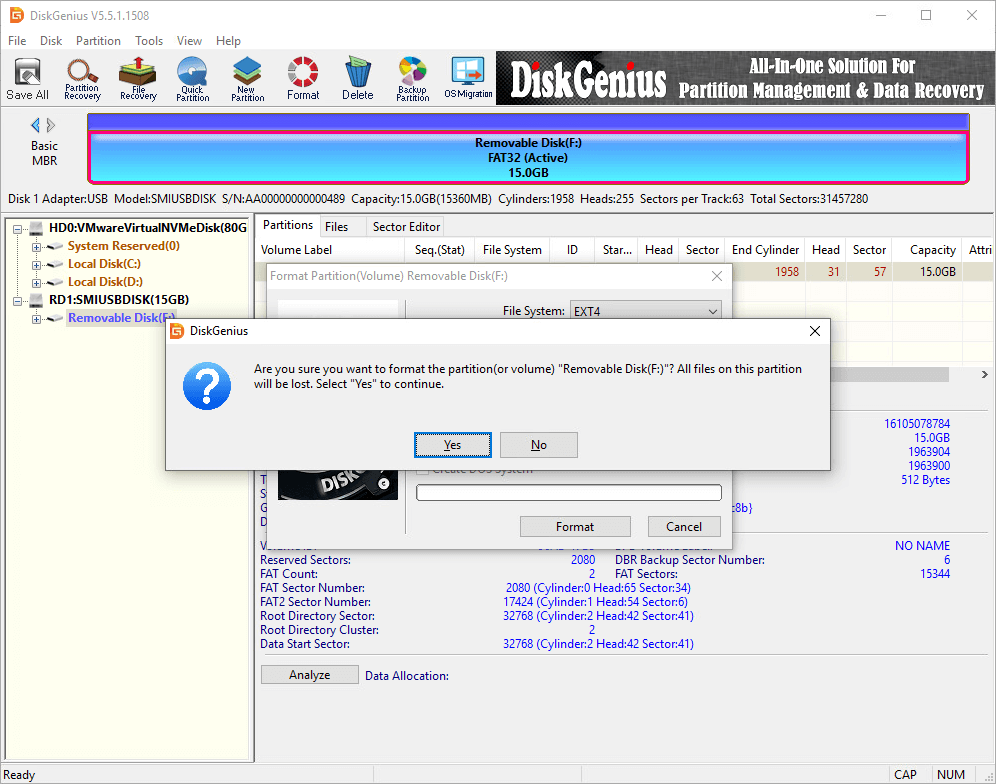
Step 3. Click the dropdown list beside File System and you can choose EXT4, EXT3 or EXT2 file system based on your requirement. Then click «Format» button.
Step 4. DiskGenius will prompt the formatting process erases all data in the partition. If you have backed up data in the USB disk, click «Yes» to continue formatting.
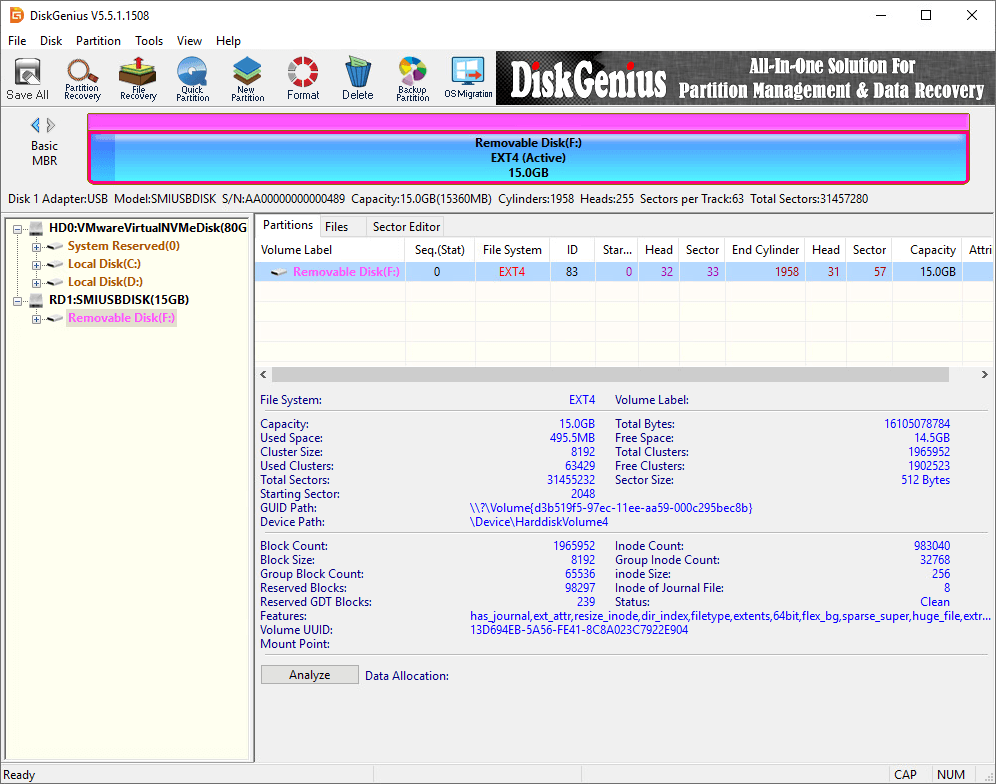
Step 5. Wait for a couple of seconds, and the formatting will complete. The follow picture shows the USB stick has been formatted to EXT4 file system.
How to unformat USB flash drives (Recover data from USB flash drives)?
It has been mentioned a few times in previous content that formatting process wipes all data in the partition to be formatted or reformatted. Thus, you should make sure files in that drive have been well backed up or there is not important data in it at all; otherwise you’ll definitely lose all files. Is it possible to unformat a USB drive or hard drive? The answer is YES and it is easy to unformat and recover lost files if you use an effective tool. If you are among those who format a wrong USB drive and lose data or get a USB flash drive that needs to be formatted, you can try the solution below to recover data from formatted hard drives, SD cards, or USB drives easily.
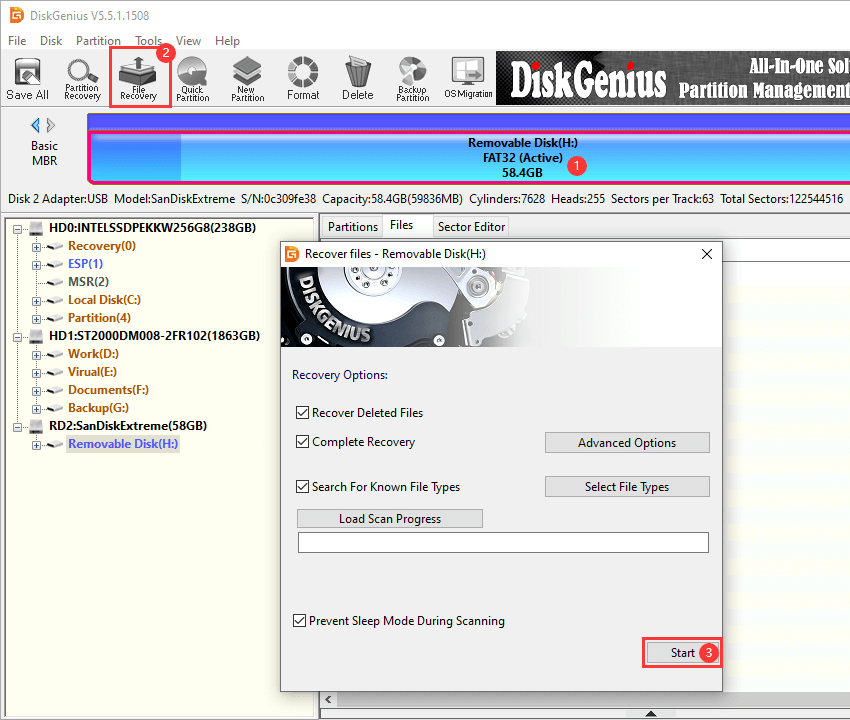
Step 1. Launch DiskGenius again, select the USB drive you want to recover data, and click «File Recovery» button.
Step 2. On the Recover Files windows select «Complete Recovery» mode and then click «Start» button to initial the scanning process.
DiskGenius is scanning the USB drive and has found many lost files.
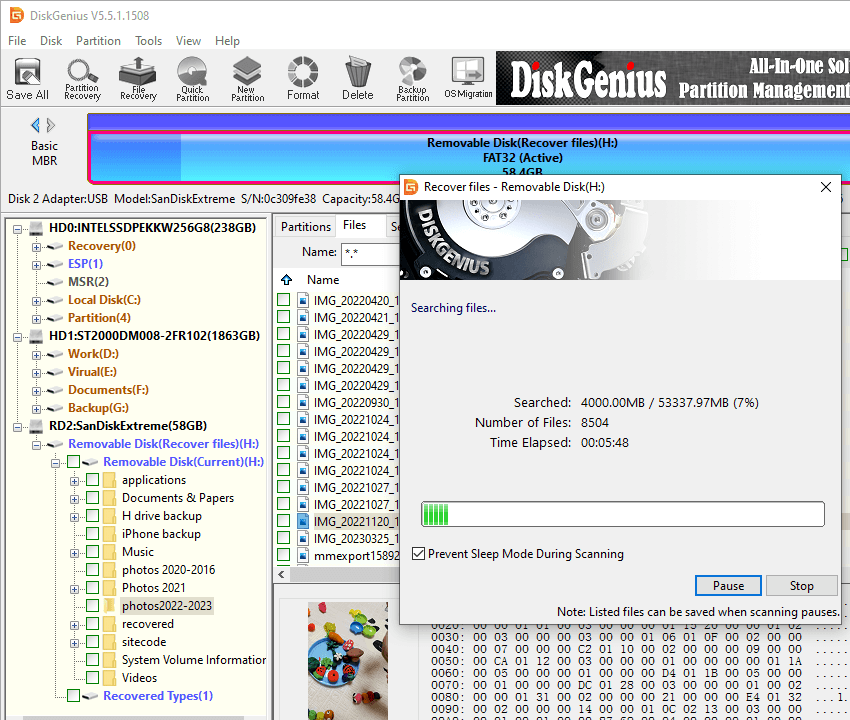
Step 3. Scanning a formatted drive may take long time if the partition is very large, but you can preview files during or after the scanning to judge whether files are recoverable.
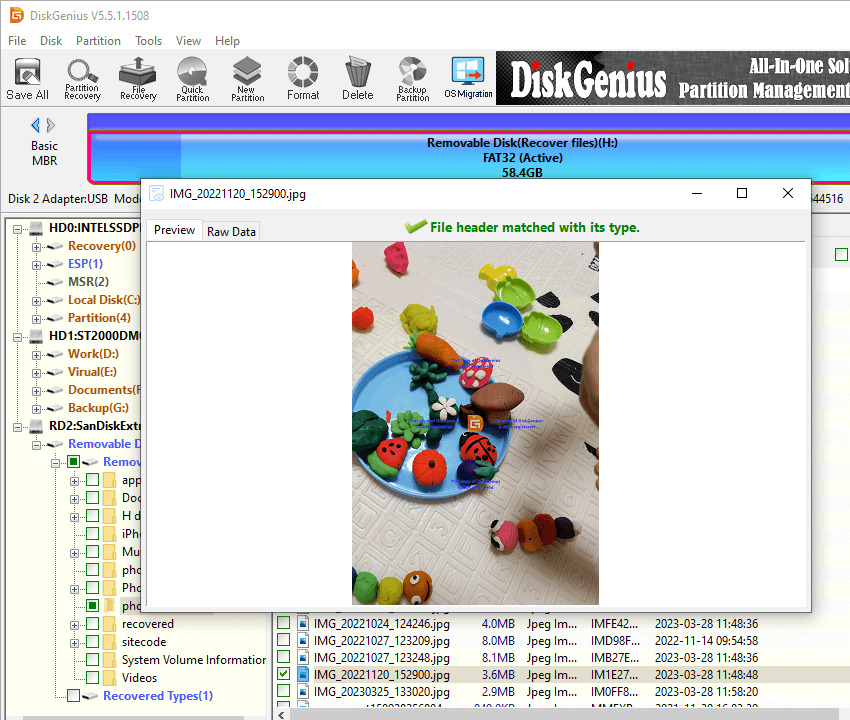
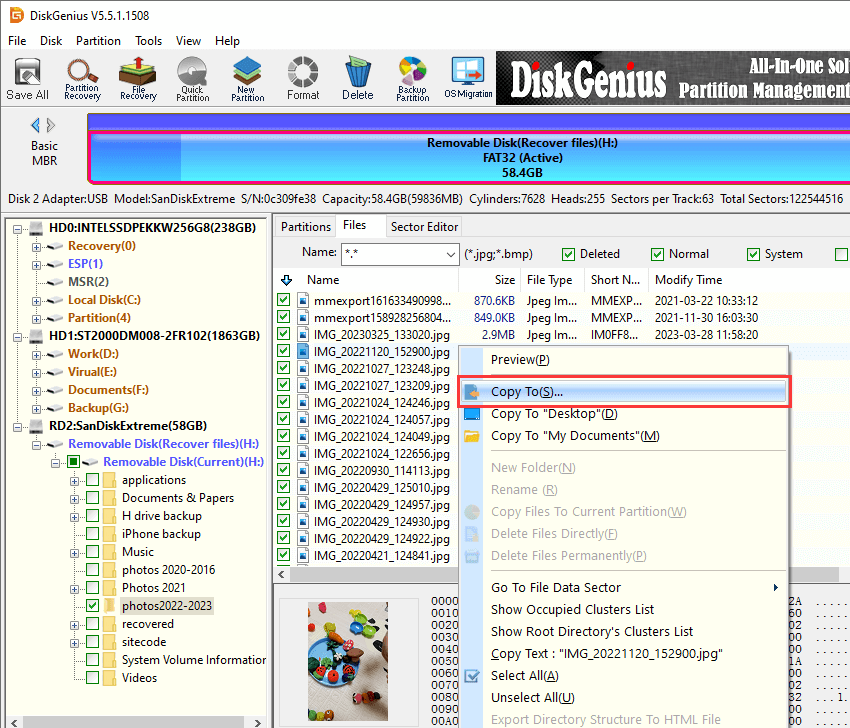
Step 4. Once scanning pauses or stops, you can save recovered data to a specified location. Select files you want to recover and right-click them to choose «Copy To». Then you can set a location to store files and get them successfully recovered.
Conclusion
By following instructions given above, you can format a USB flash drive as FAT32, Ext4, exFAT, NTFS, etc. easily whatever the size of the USB drive. Just remember to back up any important data before starting the formatting process, as it deletes all existing content on the drive.
Formatting USB FAQs
1. How to format disk write protected USB?
Formatting process will write a new file system on the USB, thus, to format a disk write-protected USB drive, you need to remove the write protection, otherwise the formatting won’t complete. The fix the write protecting issue on USB drives, you can refer to solutions here: How to fix «The disk is write protected» error on USB drives?
2. Does reformatting a USB drive wipe it?
Reformatting a USB drive deleted all the existing data on it. Formatting erases the file system and any stored data, so it’s crucial to back up important files before formatting. However, a quick formatting does not permanently erase data, if you want to make USB data recovery impossible, you can either perform a full format (low level format) or use DiskGenius Free Edition to wipe USB drive data.
3. How do you format a USB for Windows installation?
To format a USB drive for Windows installation, you need to make the USB drive bootable. When installing Windows, you can use the USB drive to boot your computer, and then use tools stored on the USB drive to partition the hard drive or SSD, and then start installing Windows. To create a bootable USB drive, you can try tools like Media Creation Tool, DiskGenius Free, Rufus, etc.
4. Should a flash drive be formatted NTFS or FAT32?
The choice between NTFS and FAT32 is totally up to your needs. FAT32 is originally designed for removable disks like USB flash drives and memory cards, and yet it does not support individual files larger than 4GB. Thus, if you want to store large files on the flash drive, you can format it to NTFS or exFAT.
5. Do USB flash drives need to be formatted?
USB flash drives don’t necessarily need to be formatted unless there are specific requirements in the file system. Formatting is usually done to quickly delete all data, change file system type, or fix corrupted drives.
6. How do I format a damaged USB flash drive?
Formatting a damaged USB flash drive can be attempted through the following steps:
Step 1. Recover files from the damaged USB drive using recovery software like DiskGenius.
Step 2. Check recovered files to make sure they are recovered correctly.
Step 3. Format the damaged USB drive in File Explorer: right-click the USB drive > click «Format» > select a file system and unselect «Quick Format» > click «Start».
7. How do I format a flash drive on a Mac?
To format a flash drive on a Mac OS 10+, try following steps:
Step 1. Go to Applications > Utilities > Disk Utility.
Step 2. Locate and select the USB flash drive you want to format from the list on the left, then click «Erase» at the top.
Step 3. Select a file system for the USB drive, for example, exFAT, APFS based on you needs. Then type a name for the drive.
Step 4. Click «Erase».