
Recently, we discussed about an issue where search indexing is automatically turned off in Windows 10, under following post:
Fix: ‘Search indexing was turned off’ error in Windows 10
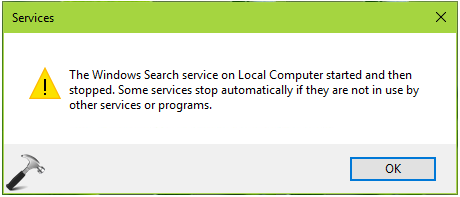
The above mentioned fix suggests you to manually start the Windows Search service, if it is not running. However, following the suggestion, one of my friend found that he couldn’t start the Windows Search service on his machine. Following is message he received instead:
Page Contents
The Windows Search service on local computer started and then stopped. Some services stop automatically if they are not in use by other services or programs.
So if you’re also getting this message, make sure you first tried the suggestion of running Search & Indexing troubleshooter. Also try rebuilding the search index, if you’ve not done this yet. In case if the Windows Search service still fails to start/initiate, here is how you can fix it:
FIX : The Windows Search Service On Local Computer Started And Then Stopped In Windows 10/8/7
Microsoft is already aware of this issue, since days of Windows Vista. The software giant recommends you to delete all files with .BLF and .REGTRANS-MS extension under C:\Windows\system32\config\TxR folder, to fix this issue. Also try deleting Windows Search folder under C:\ProgramData\Microsoft. Worth to mention here that these files are hidden files, so make sure you checked ‘Hidden items‘ on View tab, under File Explorer ribbon.
Try below mentioned registry manipulation, if you still have the issue:
Registry Disclaimer: The further steps will involve registry manipulation. Making mistakes while manipulating registry could affect your system adversely. So be careful while editing registry entries and create a System Restore point first.
1. Press + R and put regedit in Run dialog box to open Registry Editor (if you’re not familiar with Registry Editor, then click here). Click OK.

2. In left pane of Registry Editor window, navigate to following registry key:
HKEY_LOCAL_MACHINE\SOFTWARE\Microsoft\Windows Search
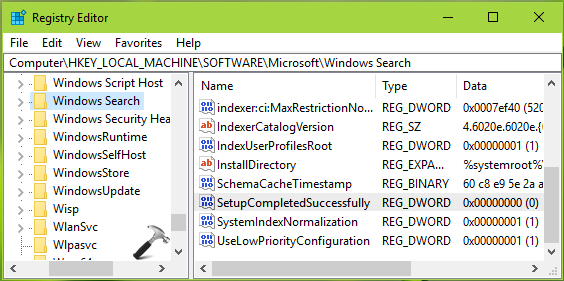
3. On the right pane of Windows Search registry key, look for SetupCompletedSuccessfully named registry DWORD (REG_DWORD). Double click on it modify its Data.
4. Set the Value data to 1 and click OK. Then go to following registry location:
HKEY_LOCAL_MACHINE\SOFTWARE\Microsoft\Windows Search\FileChangeClientConfigs
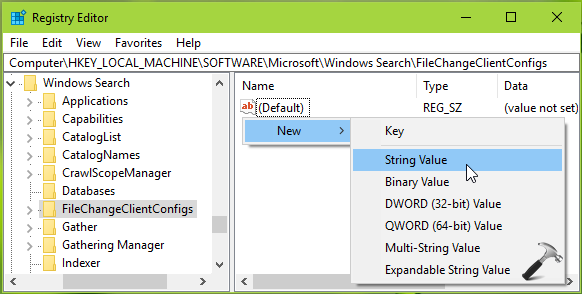
5. On the right pane of FileChangeClientConfigs registry key, right click and select New > String Value. Name the newly created registry string (REG_SZ) as {A010C594-BAB6-4690-952C-28A0C0365307}. Double click to modify the string Data.
6. Finally, set the Value data to ScopeToMonitor and click OK. Close Registry Editor and reboot.
After restarting your machine, re-try to start the Windows Search service and it should work fine now.
That’s it!
RELATED ARTICLES
,
If you own Windows 11 or Windows 10/8.1 and the Windows Search crashes, freezes or not responding when you try to search or when clicking the search box, continue reading below to fix the problem.
Problem in details: Windows Search crashes and then becomes unresponsive when the user clicks the Search box on the taskbar or in Windows Explorer and then Explorer restarts. The problem can affect both Windows 8.1 and Windows 10 for no apparent reason.
How to FIX: Windows Search is Crashing, Freezing, or Unresponsive in Windows 10/11.
Method 1. Delete Corrupt Registry Entries for ‘Search’.
Usually when the Windows Search is not working, this indicates a corrupted entry in ‘Search’ registry key. To delete corrupted ‘Search’ registry entries, proceed as follows:
1. Open Registry Editor: to do that:
1. Press Windows + R keys to open the run command box.
2. Type regedit and press Enter.
3. In Registry Editor navigate to the following key at the left pane:
- HKEY_CURRENT_USER\SOFTWARE\Microsoft\Windows\CurrentVersion\Search
4. Highlight the Search key on left pane and go to File > Export to take a backup of the current registry entries in case something goes wrong.

5. Give a name for the exported registry file (e.g. «Search.reg») and Save the file to your Desktop.

6. When done, right-click at the Search key and Delete it. (Click Yes when prompted).

7. Close the Registry Editor and restart your PC.
8. After restart, try 2-3 times to perform a search. (At first nothing will happen, but after trying 2-3 times the Search will start working without crashing).
Method 2. Repair Disk & System Files.
Step 1. Repair Disk Errors.
1. Open Command Prompt as Administrator. To do that:
1. Press the Windows + R keys to open the ‘Run’ command box
2. Type CMD and then press CTRL + SHIFT + ENTER.
2a. At command prompt give the following command to repair your disk and press Enter.
- chkdsk C: /R
2b. Press the Y key and Enter to schedule the checking at the next restart.

3. Restart your computer and be patient until the disk check and repairing process is complete.
Step 2. Repair Windows System Files.
After restart, proceed and repair Windows by using the DISM and SFC commands.
1. Open Command Prompt as Administrator.
2. In command prompt give the following command and press Enter:
- DISM.exe /Online /Cleanup-image /Restorehealth

3. When the DISM operation is completed, type the following command and hit Enter:
- sfc /scannow

4. Now wait until the System File Checker repairs the Windows System Files.
5. When this done, restart your computer.
6. After restarting, check if the search problem is resolved.
Method 3. Fix Windows Search by Re-registering Modern Apps.
1. Press the Windows + R keys to open the ‘Run’ command box
2. Type powershell and then press CTRL + SHIFT + ENTER to open Windows PowerShell as Administrator.
3. At PowerShell (copy &) paste the the following command & press Enter:
Get-AppXPackage | Foreach {Add-AppxPackage -DisableDevelopmentMode -Register «$($_.InstallLocation)\AppXManifest.xml»}

4. When the deployment operation process is completed, ignore any errors and close the PowerShell window.
5. Reboot your computer and then try to perform a search.
Method 4. Fix Windows Search problems by Repairing Windows 10/11.
If you still face problems with the search function in Windows 10, then perform a repair of your Windows 10 installation by using the instructions mentioned in this article: How to repair Windows 10.
That’s all folks! Did it work for you?
Please leave a comment in the comment section below or even better: like and share this blog post in the social networks to help spread the word about this solution.
If this article was useful for you, please consider supporting us by making a donation. Even $1 can a make a huge difference for us.
- Author
- Recent Posts
Konstantinos is the founder and administrator of Repairwin.com. Since 1995 he works and provides IT support as a computer and network expert to individuals and large companies. He is specialized in solving problems related to Windows or other Microsoft products (Windows Server, Office, Microsoft 365, etc.).
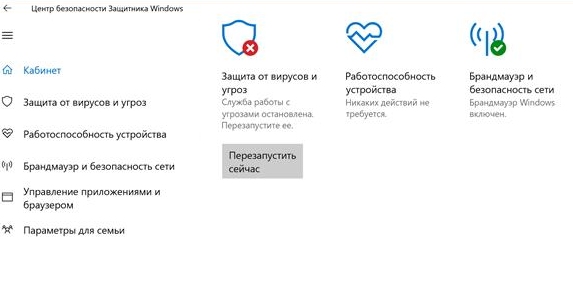
Привет, админ! Пытаюсь в Windows 10 включить Windows Defender, но в Центре безопасности Защитника Windows у компонента Зашита от вирусов и угроз висит надпись: «Служба работы с угрозами остановлена. Перезапустите ее». При попытке перезапустить Защитника Windows с помощью соответствующей кнопки появляется надпись: “
Непредвиденная ошибка. Извините, мы решаем проблему. Попробуйте еще раз
”. Как мне починить Windows Defender? Заранее спасибо!

Ответ
Давайте разберем типовые причины, из-за которых в Windows 10 может не работать функция зашиты от вирусов и угроз (встроенный антивирус Windows Defender). Последовательно проверьте все пункты.
Обратите внимание, что начиная с билда Windows 10 2004, Windows Defender Antivirus был переименован в Microsoft Defender Antivirus.
Содержание:
- На компьютере установлен сторонний антивирус
- Проверьте и включите службы Защитника Windows
- Включение Защитника Windows 10 в реестре
- Проверьте, что Защитник Windows включен в групповых политиках
- Перерегистрация библиотек Microsoft Defender
- Проверьте и установите обновления Windows
На компьютере установлен сторонний антивирус
Проверьте, возможно у вас на компьютере установлен сторонний антивирус, который препятствует работе Microsoft Defender. Антивирус Microsoft Defender автоматически отключается, если на компьютере установлена сторонняя антивирусной программа.
Решите, какой антивирус вы хотите использовать – сторонний или Microsoft Defender.
Если сторонний антивирус вам не нужен, отключите или удалите его.
Проверьте и включите службы Защитника Windows
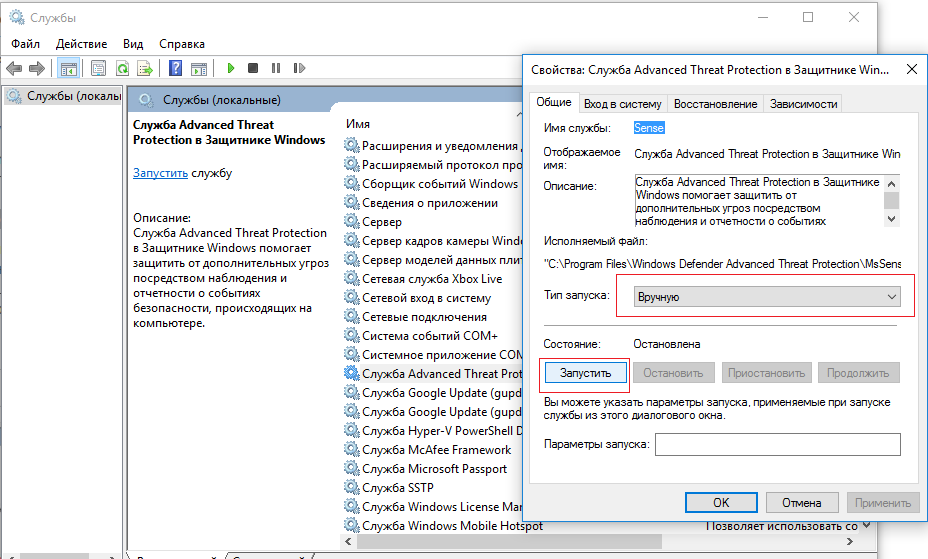
Для корректной работы Microsoft Defender в Windows 10 нужно проверить нескольких служб. Откройте консоль управления службами (services.msc) и проверьте, есть ли в списке служб следующие элементы:
- Служба Advanced Threat Protection в Защитнике Windows (Windows Defender Advanced Threat Protection Service) —
Sense
; - Служба проверки сети Защитника Windows (Microsoft Defender Antivirus Network Inspection Service) —
WdNisSvc
; - Служба Защитника Windows (Microsoft Defender Antivirus Service)
WinDefend
; - Служба Центра безопасности Защитника Windows (Security Center) —
WSCSVC
(Windows Security Center).
Состояние служб можно проверить с помощью PowerShell:
get-service Sense, WdNisSvc, WinDefend, wscsvc | select name,status,starttype

Для служб Sense и WdNisSvc тип запуска должен быть Manual.
Службы Security Center (WinDefend) и Microsoft Defender Antivirus (wscsvc) должны быть обязательно запущены. Если эти службы отключены, вы не сможете использовать Microsoft Defender.
Проверьте, что тип запуска у служб – Автоматический. Если какая-то служба остановлена, запустите ее вручную. Если все службы запущены, перезапустите их.
Включение Защитника Windows 10 в реестре
В версиях Windows 10 до билда 2004 можно было отключить защитник Windows через реестр. Для этого использовался параметр реестра DisableAntiSpyware. Этот параметр обычно включался OEM производителями или системными администраторами, когда на устройстве предполагалось использовать стороннее антивирусное приложение.
Запустите редактор реестра (regedit.exe) и перейдите в ветку HKEY_LOCAL_MACHINE\SOFTWARE\Policies\Microsoft\Windows Defender. Если в этой ветке есть параметры DisableAntiVirus и DisableAntiSpyware (хотя бы один), удалите их или измените значение на 0.

После этого, попробуйте перезапустить службу Защита от вирусов и угроз.
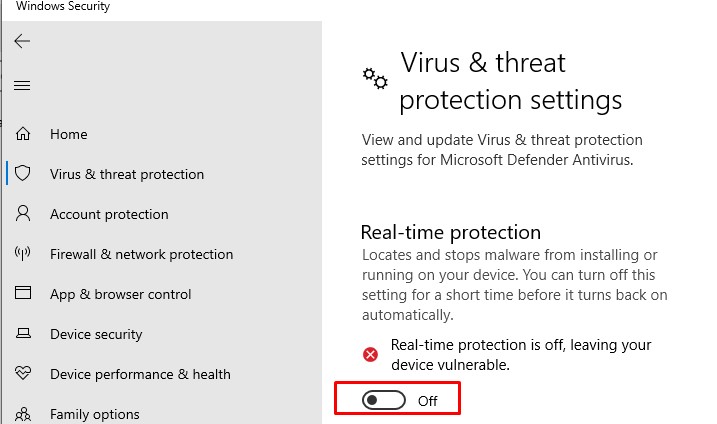
Затем перейдите в Settings -> Windows Security и нажмите на кнопку Virus & threat protection -> Turn on.

Также проверьте, что включена опция Real-time protection в Windows Security -> Virus & threat protection -> Manage settings.
В современных билдах Windows 10 нельзя отключить Microsoft Defender через параметр реестра
DisableAntiSpyware
(этой лазейкой пользовались многие вредоносы).
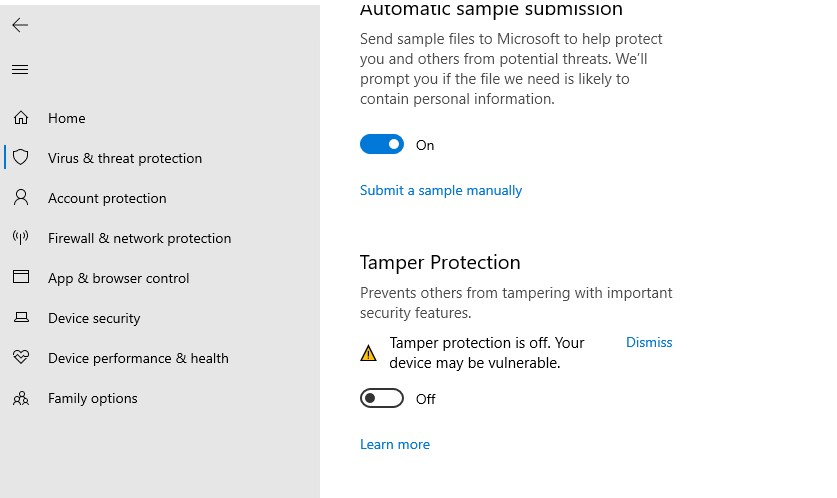
Microsoft Defender теперь автоматически отключается Windows 10, если он обнаруживает на компьютере сторонний антивирус. Если у вас не установлен сторонний антивирус и вам нужно отключить Microsoft Defender, сначала вам нужно отключить функцию защиты Microsoft Defender Tamper Protection. Данная защита от изменений в системе безопасности Windows помогает предотвратить изменение вредоносными приложениями важных параметров антивируса Microsoft Defender, включая защиту в реальном времени и облачную защиту. Отключить Tamper Protection можно только через приложение Windows Security, и для подтверждения отключения появится запрос User Account Control (UAC).
Отключить Tamper Protection можно и через реестр. Для этого в ветке HKEY_LOCAL_MACHINE\SOFTWARE\Microsoft\Windows Defender\Features нужно создать параметр типа DWORD с именем TamperProtection и со значением 0. Но перед этим сначала придется предоставить своей учетной записи права владельца на ветку Features.
Проверьте, что Защитник Windows включен в групповых политиках
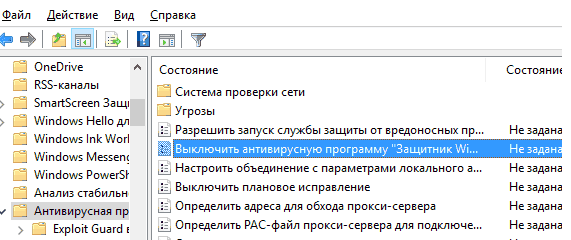
Откройте редактор локальной групповой политики (gpedit.msc) и проверьте, не отключен ли Windows Defender через GPO. Для этого, перейдите в раздел Computer Configuration -> Administrator Templates -> Windows Components -> Windows Defender Antivirus (Конфигурация компьютера -> Административные Шаблоны -> Компоненты Windows -> Антивирусная программа Защитник Windows). Проверьте, что политика Выключить антивирусную программу Защитник Windows (Turn off Windows Defender Antivirus) находится в состоянии Не задано или Отключена.
В Windows 10 2004 и выше ветка GPO с настройками Defender называется Microsoft Defender Antivirus.
Перерегистрация библиотек Microsoft Defender
Попробуйте выполнить перерегистрацию библиотек Защитника Windows. Для этого, откройте командную строку с правами администратора и выполните команды
regsvr32  atl.dll
regsvr32  wuapi.dll
regsvr32  softpub.dll
regsvr32  mssip32.dll
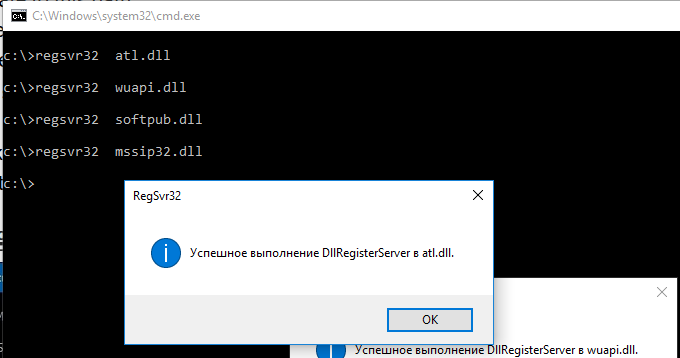
Перезапустите Windows Defender и проверьте, исправлена ли проблема.
Проверьте и установите обновления Windows
В редких случаях после установки ежемесячных обновлений Windows может перестать антивирус защитника Windows 10. Проверьте наличие новых обновлений и установите их через Settings -> Update & Security -> Windows Update -> Check for updates или с помощью PowerShell. Скорее всего, они исправят ситуацию.
Если ничего не помогло, проверьте целостность системных файлов и образа Windows командами:
sfc /scannow
и
DISM /Online /Cleanup-Image /RestoreHealth
Надеюсь, эта краткая инструкция помогла вам решить проблему с невозможностью запуска (остановкой) службы работы с угрозами.
Windows Defender is more than an anti-virus app. It provides lots of other protections as well such as ransomware protection, browser-based protection against malicious websites, and on-demand file scans.
In order to do all this, it runs several underlying services. These services start automatically if Windows Defender is enabled. A user generally does not need to intervene.
Windows Defender is an essential service that runs on Windows 10. If you want to use Windows Defender, you cannot stop this service. If the service won’t start, neither will Windows Defender. Here’s what you can do if the Windows Defender service won’t start.
1. Turn off third-party anti-virus apps
One of the main reasons Windows Defender may not run or its services may not start is if you have another anti-virus app running on your system. Normally, Windows Defender does not run when another anti-virus is running.
Disable the third-party antivirus and restart the system. If the service and Windows Defender do not work, uninstall the third-party anti-virus and restart the system again.
2. Check Windows Defender service start settings
The Windows Defender service should start automatically when you boot your system. However, if the service is set to manual start, Windows Defender won’t run automatically.
- Tap the Win+R keyboard shortcut to open the run box.
- In the run box, enter services.msc and tap the Enter key.
- Look for the Windows Defender firewall service and double-click it.
- In the Startup type dropdown, select Automatic.
- Click the Start button.
3. Change registry settings
Windows Defender can be disabled from the registry. If it has been disabled from the registry, the Windows Defender service will not start. You need first enable it from the registry.
- Tap the Win+R keyboard shortcut to open the run box.
- In the run box, enter
regeditand tap the Enter key. - Go to this key:
HKEY_LOCAL_MACHINE\SYSTEM\CurrentControlSet\Services\SecurityHealthService - Double-click the Start value and set it to 2.
- Restart the system.
- Enable Windows Defender.
4. Check Environment variables
Users have the freedom to edit their Environment Variables however, users shouldn’t remove any of the paths that are added to it by default. Check if the path to the %ProgramData% variable is set correctly. If it isn’t, it will prevent Windows Defender from working.
- Open File Explorer.
- Paste this
explorer shell:::{BB06C0E4-D293-4f75-8A90-CB05B6477EEE}in the location bar and tap the Enter key. - Click Advanced system settings in the column on the left.
- Go to the Advanced tab and click Environment variables.
- Select %ProgramData% and it should point to C:ProgramData. If it doesn’t, edit it and update the path.
- Click Ok and restart the system.
5. Change permission for ProgramData
The ProgramData folder is an important system folder. If the folder’s permissions have been changed, it will impact Windows Defender.
- Open File Explorer.
- Open the C drive or whichever is the Windows drive.
- Right-click the ProgramData folder and select properties from the context menu.
- Go to the Security tab.
- Click Advanced at the bottom
- Disable all inherited permissions.
- Click Apply and restart the system.
Note: ProgramData is a hidden folder. You must enable hidden items in order to access it.
6. Run a system scan
If files on Windows 10 have been damaged, Windows Defender won’t start. You can use the SFC scan tool to check for and repair damaged files.
- Open Command Prompt with admin rights.
- Run this command:
scf /scannow. - Allow the command to complete and enable Windows Defender.
7. Install pending updates
Windows Defender receives regular virus definition updates. If these updates aren’t installed, you may run into problems getting the anti-virus to run.
- Open the Settings app with the Win+I keyboard shortcut.
- Go to Update & Security.
- Select the Windows Update tab.
- Click Check for updates.
- Install available updates and restart the system.
8. Create a new user
It’s possible that the files for the current user have been damaged beyond repair. The easiest way to check this is to create a new user and enable Windows Defender. If it is enabled, you can switch to the new user, make it the system admin, and remove the old account.
- Open the Settings app with the Win+I keyboard shortcut.
- Go to Accounts.
- Select Family & Other people.
- Click Add someone else to this PC.
- Configure a new, local account.
- Sign in to the new account and enable Windows Defender.
9. Reset Windows 10
If creating a new user doesn’t work, it’s time for the nuclear option; reset Windows 10. You will keep all your files but the apps will be removed.
- Open the Settings app with the Win+I keyboard shortcut.
- Go to Update & Security.
- Select the Recovery tab.
- Click Get Started under Reset this PC.
- Choose the option that allows you to keep your files.
- Follow the on-screen instructions and the PC will be reset.
Conclusion
A computer should not be without an anti-virus. If Windows Defender isn’t running, and you have no other anti-virus app in place, your system is in danger of being infected. The above fixes should get Windows Defender up and running.

Fatima Wahab
Fatima has been writing for AddictiveTips for six years. She began as a junior writer and has been working as the Editor in Chief since 2014.
Fatima gets an adrenaline rush from figuring out how technology works, and how to manipulate it. A well-designed app, something that solves a common everyday problem and looks
How to Fix Windows 10 Search Not Working
Windows Search is a Windows service that allows users to find and search for files on their computers quickly. Unfortunately, this feature may stop working. This article contains several methods to fix this issue.

There’s no doubt that Windows Search is a helpful feature. Type a keyword or two, and it will reveal not only file and data results but also web links, Windows tools, and settings. This can be useful if you wish to find and open a specific Windows setting or tool with a single click.
There is no need to look for a particular setting manually or go through several different windows to find a file using Windows Search. The same can be said about typing manually since you can also use Cortana, the voice-recognition assistant. If it is more convenient for you to use voice search, the results will be the same as typing.
Despite these advantages, operating systems are not perfect, and users often face problems when using Microsoft Windows. Windows Search might not work correctly or not work at all. In this article, we show several methods to fix this type of problem.
Since it can be difficult to ascertain what causes these problems, you may need to try a number of the methods outlined below.
Video Showing How to Fix Windows Search Not Working
Table of Contents:
- Introduction
- Restart File Explorer
- Restart Cortana
- Check Windows Search Service
- Run Windows Troubleshooter
- Re-register Cortana Using PowerShell
- Restore Indexing Service
- Restore Your System Using Restore Points
- Video Showing How to Fix Windows Search Not Working
Download Computer Malware Repair Tool
It is recommended to run a free scan with Combo Cleaner — a tool to detect viruses and malware on your device. You will need to purchase the full version to remove infections. Free trial available. Combo Cleaner is owned and operated by Rcs Lt, the parent company of PCRisk.com read more.
Restart File Explorer
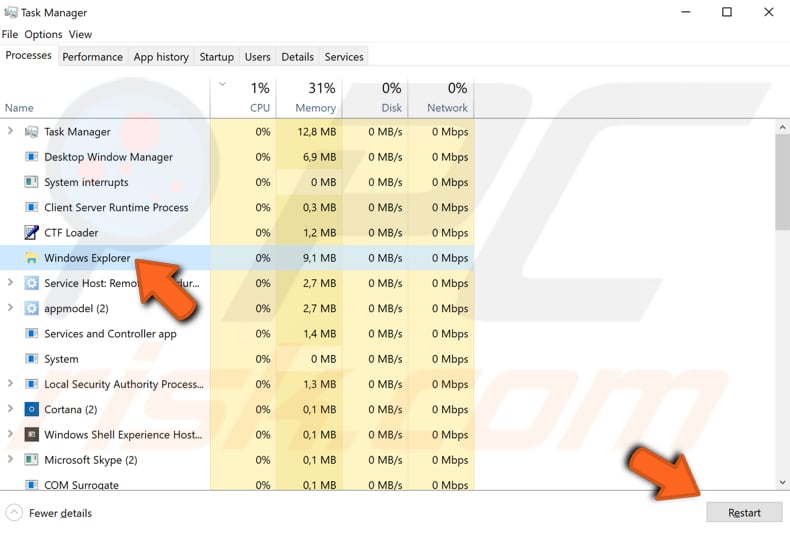
Restarting File Explorer might get Windows Search working properly. To restart File Explorer (Windows Explorer), open Task Manager by pressing the Ctrl + Shift + Esc keys on the keyboard or right-click Start menu and select Task Manager from the contextual menu.
Once Task Manager is open, find «Windows Explorer» under the «Processes» tab and select it. Then locate the «Restart» button in the bottom-right corner and click it. File Explorer will be restarted, and Windows Search should work.
[Back to Table of Contents]
Restart Cortana
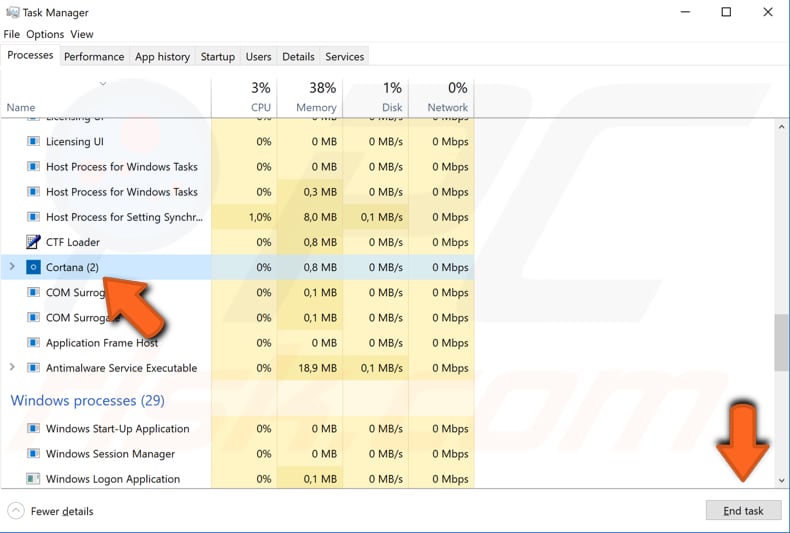
To restart Cortana, go to Task Manager by pressing Ctrl + Shift + Esc keys on the keyboard or right-click Start menu and select Task Manager from the contextual menu.
Once Task Manager is open, find the Cortana process under the Processes tab and click the «End task» button in the bottom-right corner.
Alternatively, right-click the Cortana process and select «End task» from the contextual menu. This will restart the Cortana process — check if Windows Search now works properly.
[Back to Table of Contents]
Check Windows Search Service
Windows Services (also know as services.msc) are used to modify how Windows services run on your system. These services are responsible for running available programs and managing many system settings and resources.
You can modify a service’s settings for security, troubleshooting, and performance-related reasons. Windows Search might not be working because the Windows Search service is not running or not enabled.
To access the Windows Search service, press Win key + R to open the Run dialog box. Once the Run dialog box is open, type «services.msc» and click «OK», or press Enter on the keyboard.
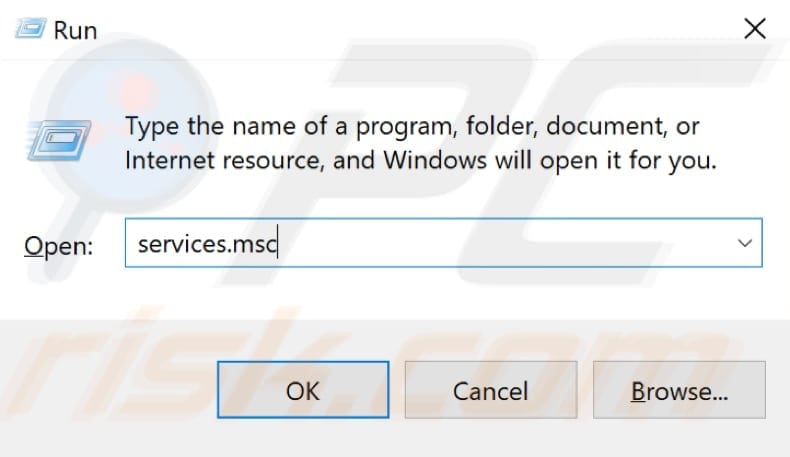
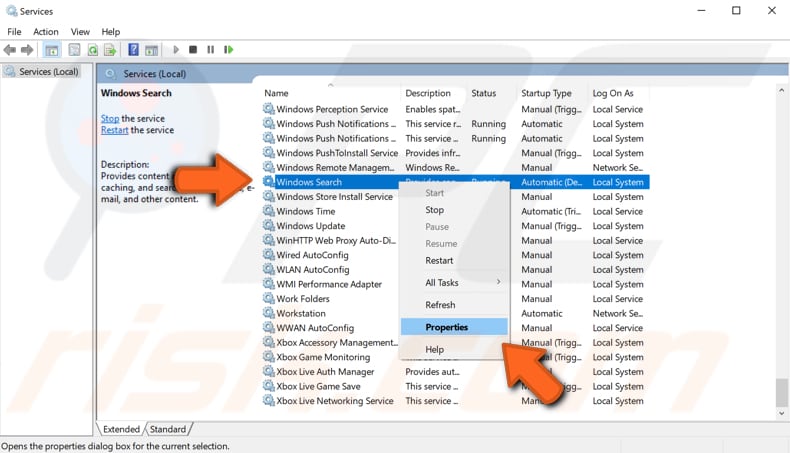
In the Services window, you will see a list of local services. Scroll down to find «Windows Search» and right-click it. Select «Properties» from the drop-down menu to open the service’s properties.
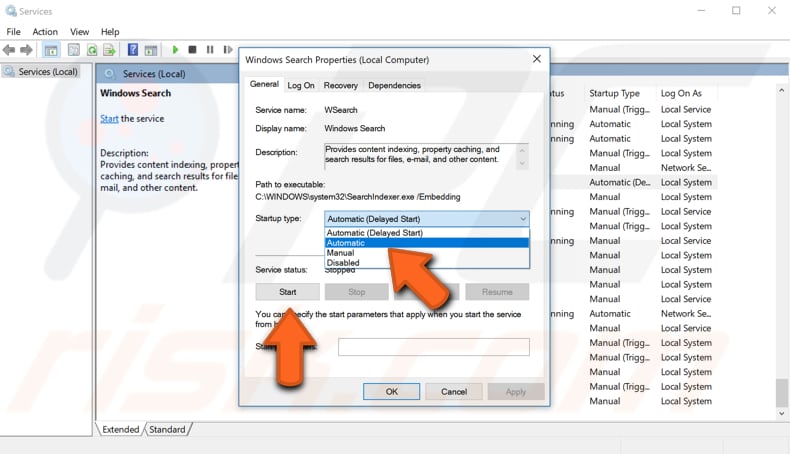
In the Windows Search Properties window, click «Start» to start this service (if it has stopped) and ensure that the «Startup type» is set to «Automatic». By doing this, you will direct the Windows operating system to start the Windows Search service on every Windows startup. Click «Apply» to save the changes made and «OK» to exit.
You can also right-click the Windows Search service (in the Windows Services window) and select «Restart» from the contextual menu. See if the Windows Search is now working properly.
[Back to Table of Contents]
Run Windows Troubleshooter
The built-in Windows troubleshooter can solve (or at least identify) most problems that can occur when using Windows 10.
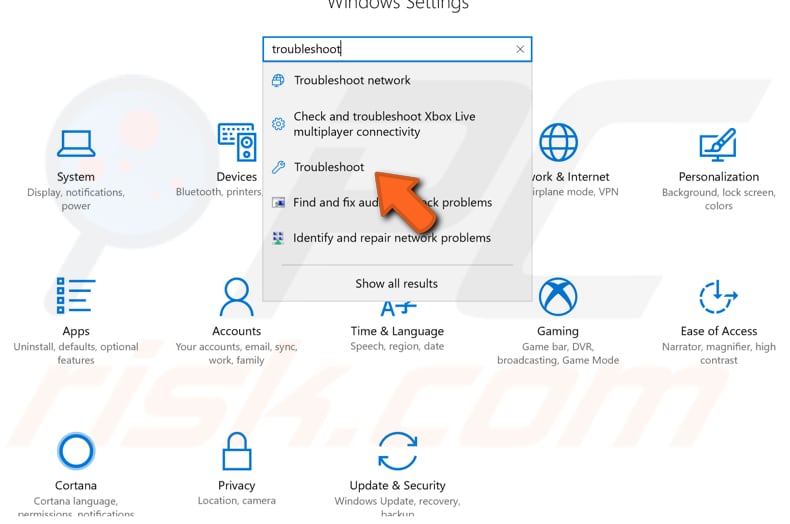
To start troubleshooting, go to Settings and type «troubleshoot», and then select «Troubleshoot» from the list.
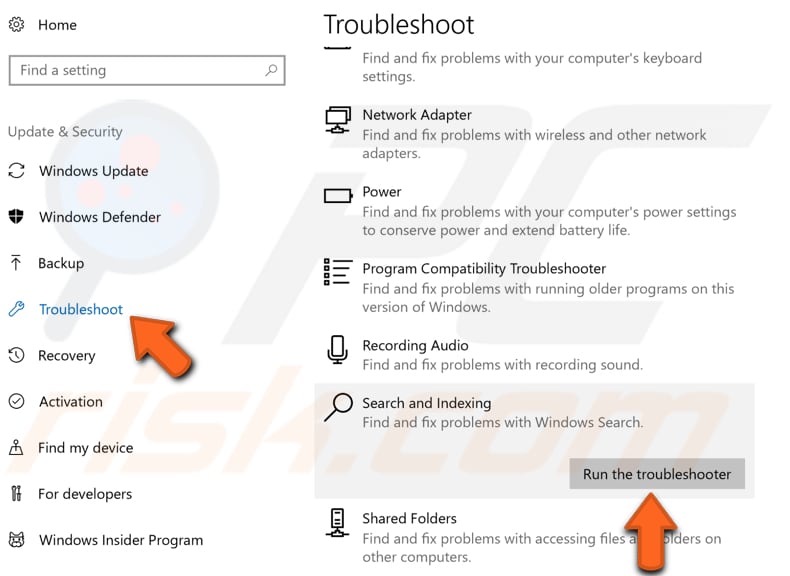
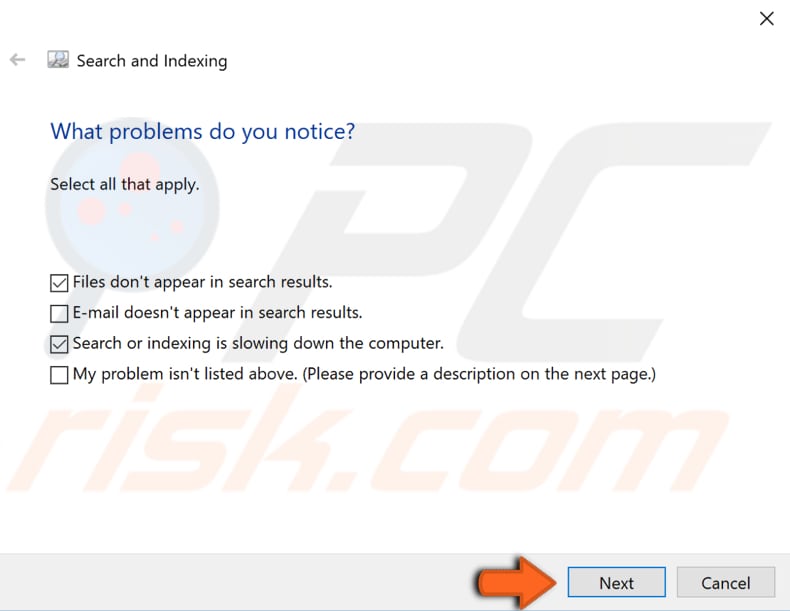
Now, scroll down to find «Search and Indexing» under «Find and fix other problems» and click it, and then click «Run the troubleshooter».
Windows troubleshooter will ask, «What problems do you notice?» Mark the «Files don’t appear in search results» and «Search or indexing is slowing down the computer» checkboxes and click «Next» to start troubleshooting. See if this fixes the problem with Windows Search.
[Back to Table of Contents]
Re-register Cortana Using PowerShell
PowerShell is a task automation and configuration management framework from Microsoft, consisting of a command-line shell and associated scripting language. In PowerShell, administrative tasks are generally performed by «cmdlets», which are specialized .NET classes implementing a particular operation.
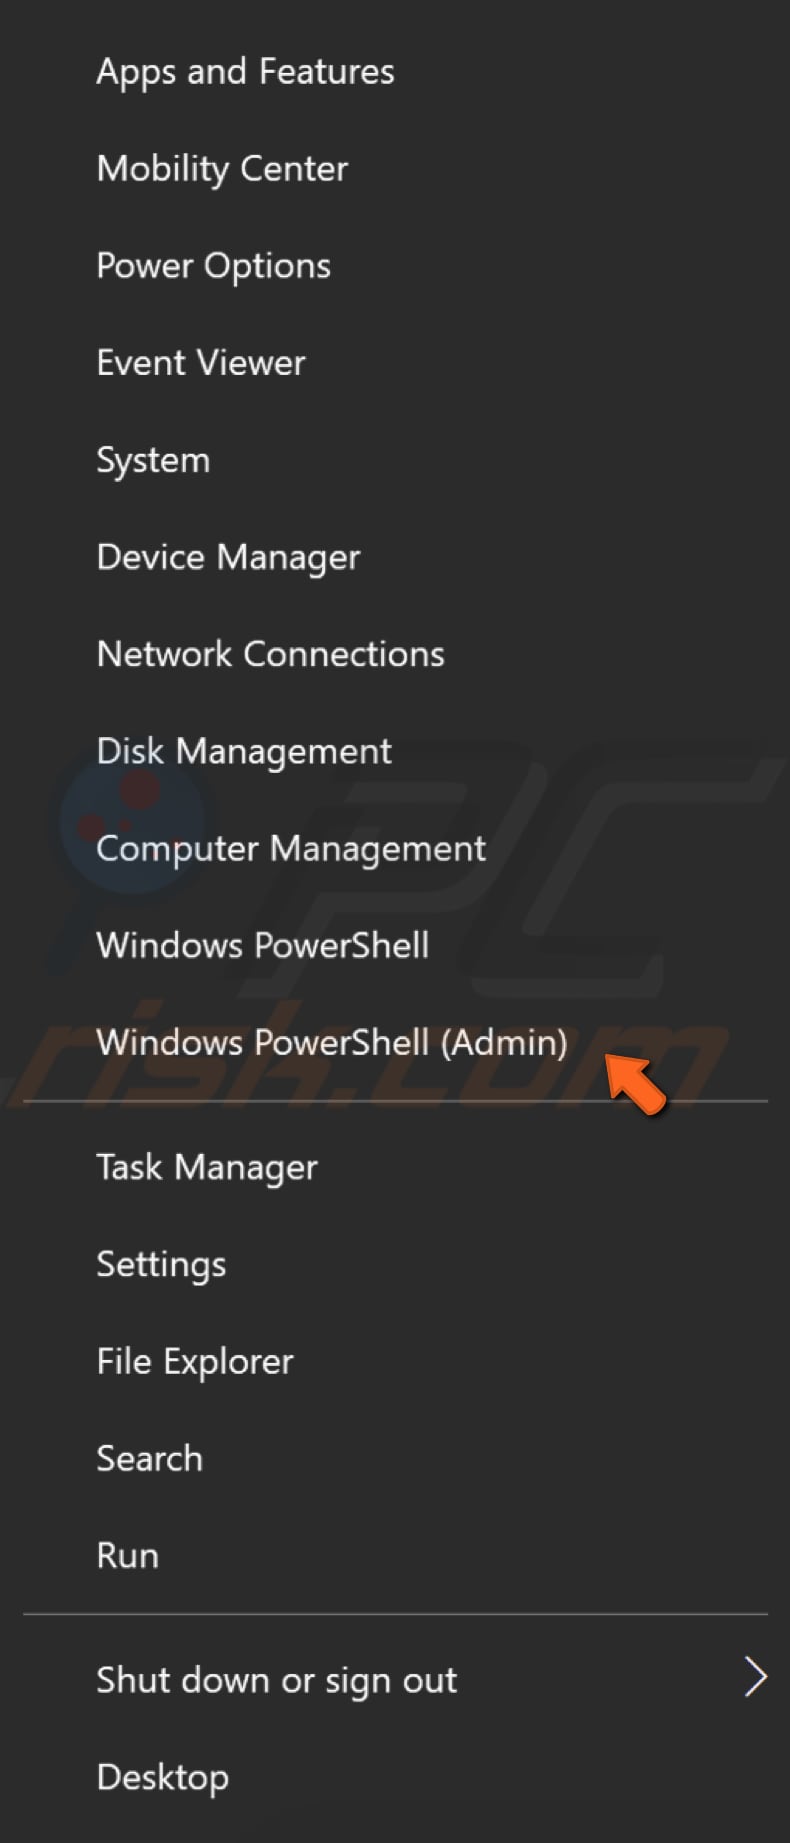
You can access PowerShell by right-clicking on the Start icon in Windows and selecting the «Windows PowerShell (Admin)» result.
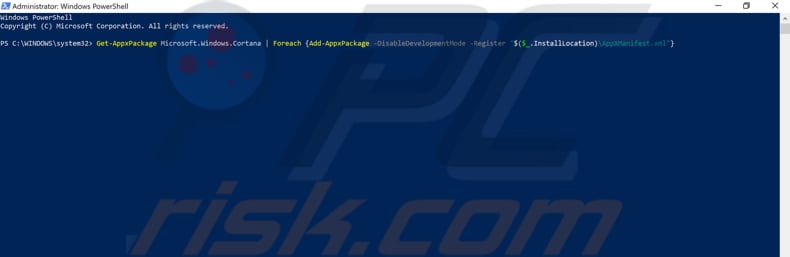
Now copy the «Get-AppxPackage Microsoft.Windows.Cortana | Foreach {Add-AppxPackage -DisableDevelopmentMode -Register «$($_.InstallLocation)\AppXManifest.xml»}» command and paste it into the PowerShell window.
To paste it, simply right-click on the Powershell background, and the command will appear — press Enter to execute this command. Close PowerShell and see if this fixes Windows Search and it is working properly.
[Back to Table of Contents]
Restore Indexing Service
Indexing service (now known as Windows Search indexer) is a Windows service created to improve search performance on Windows computers. If Windows Search stops working properly or stops working completely, restoring this service might help fix the problem.
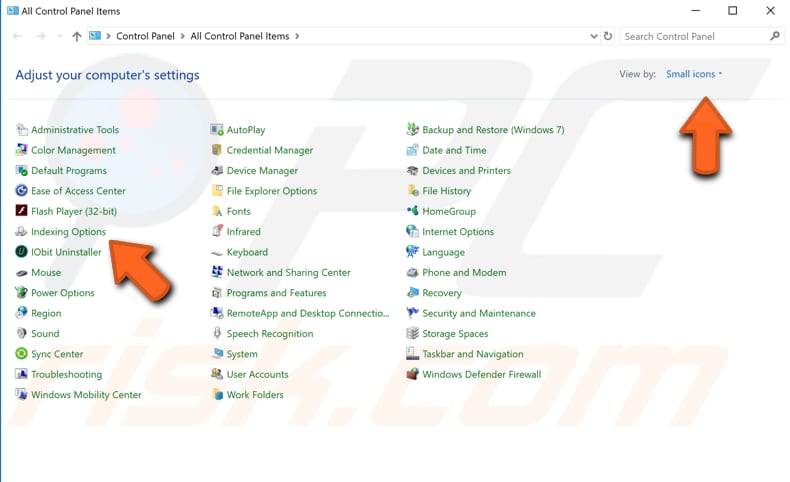
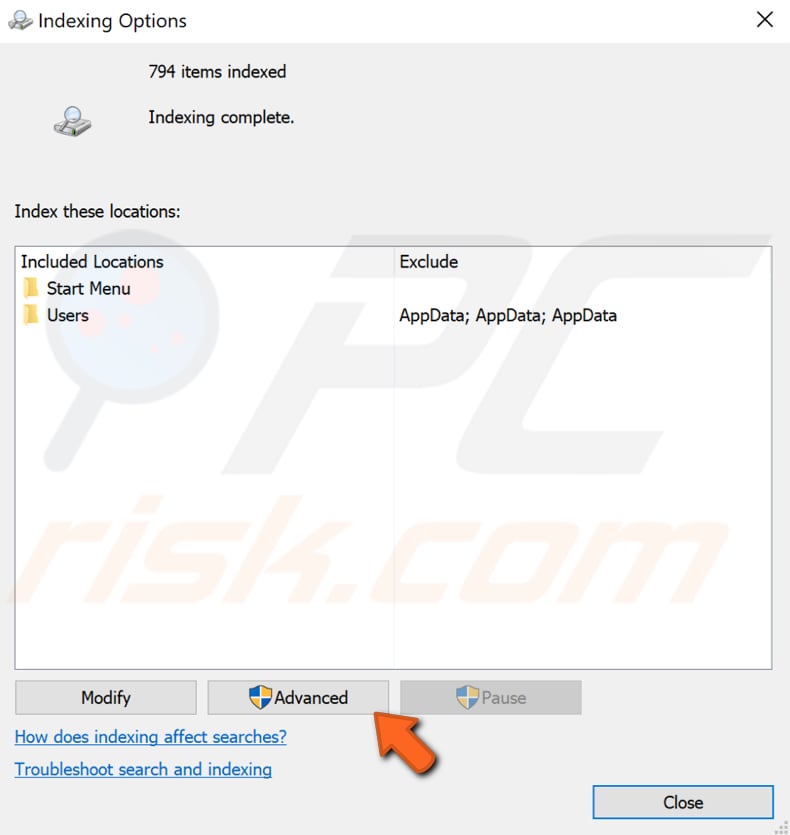
To restore the Windows Search indexer, go to Control Panel and find «Indexing Options». If it does not appear, ensure that the Control Panel view is set to «Small icons».
In the Indexing Options window, click the «Advanced» button.
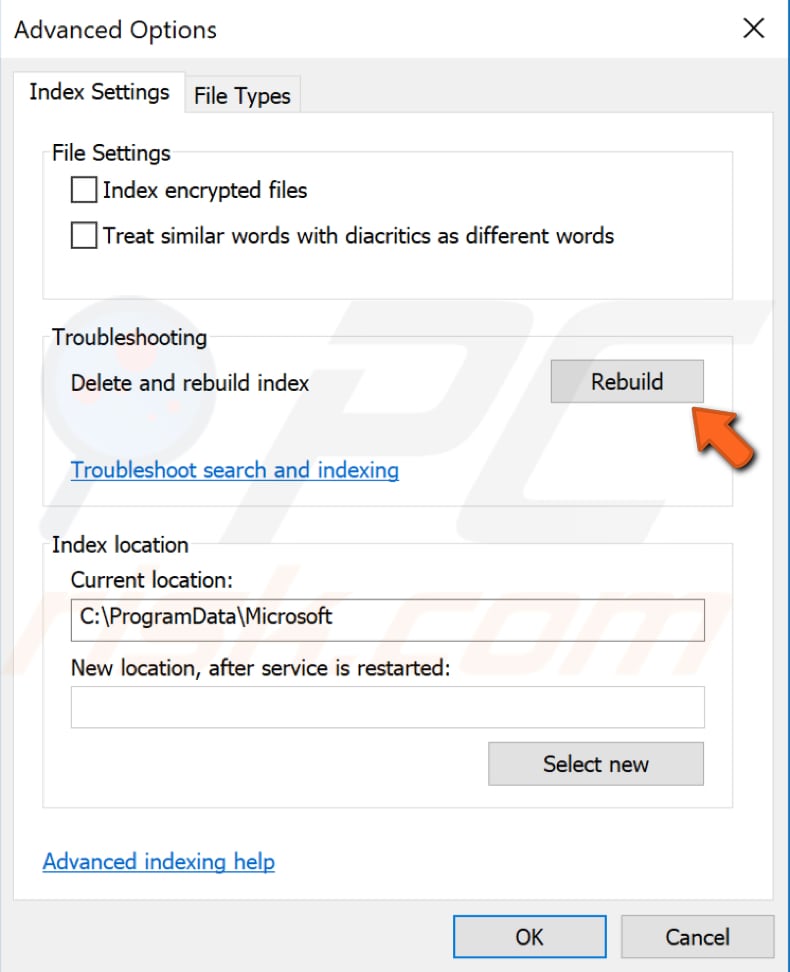
In the «Index Settings» tab, find the «Rebuild» button under Troubleshooting and click it. This will display a notification saying that rebuilding the index might take some time to complete and that some views and search results might be incomplete until rebuilding has finished.
The amount of time required to finish this process will depends on the system speed. If you have an older or slower computer, it might take much longer to complete. Click «OK» to start rebuilding the index.
[Back to Table of Contents]
Restore Your System Using Restore Points
If none of the methods mentioned above fixed the problem with Windows Search, you can try to restore the Windows operating system to a previous state at which the problem with Windows Search was not present.
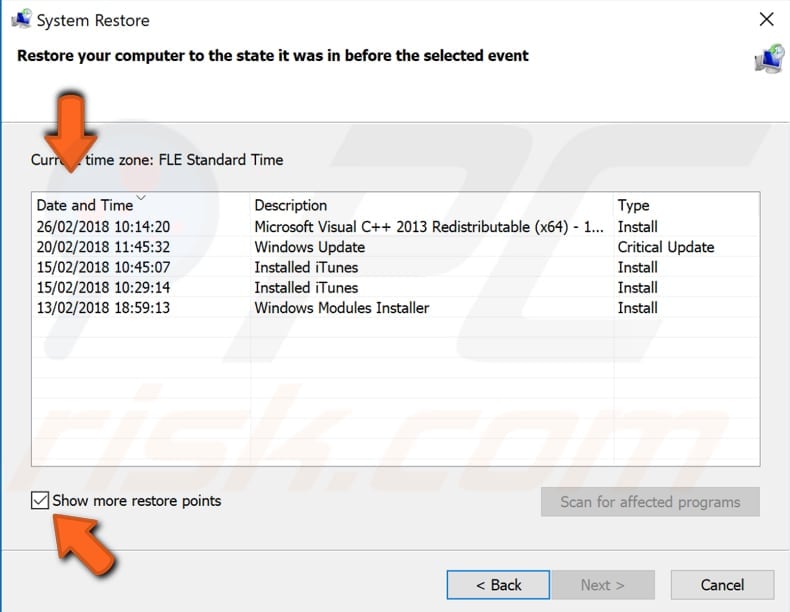
The System Restore tool creates restore points. A restore point is a collection of important system files stored by System Restore on a given date and time. System Restore reverts everything to a saved restore point, but first, you must have one recorded.
If a restore point does not exist on your computer, System Restore has nothing to revert to. To use this tool, you must have previously created restore points. With a created restore point, this feature will bring your system back to the previous working state, without affecting your files and data.
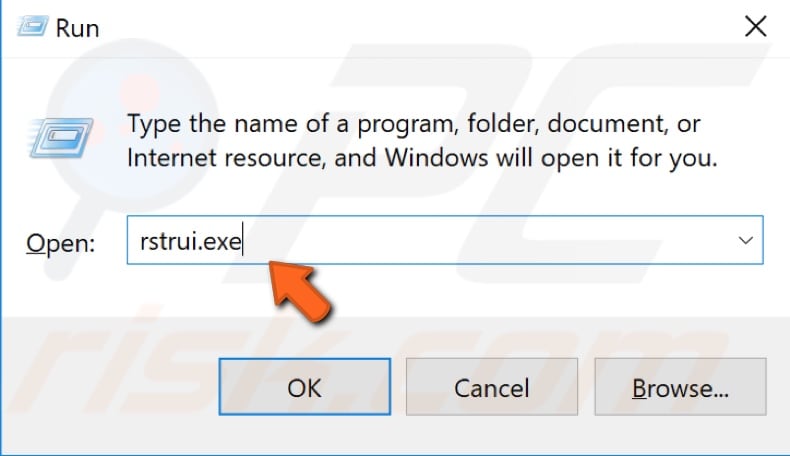
To restore your system, launch Run. To start it, press the Windows Key + R and type «rstrui.exe». In the Run dialog box, press Enter or click «OK».
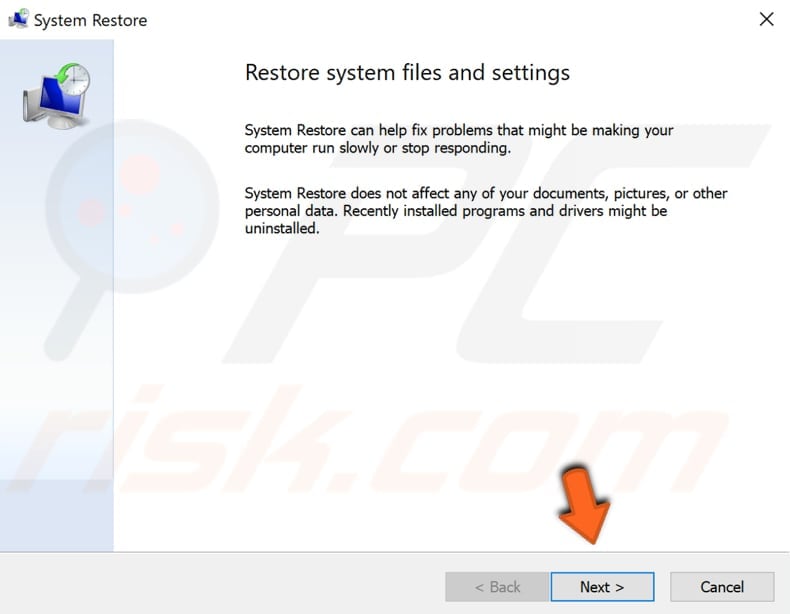
In the System Restore window, click «Next».
If there are restore points created, you will see a list of them. Mark the «Show more restore points» checkbox — this should display more restore points. Select the most appropriate restore point (depending on the time created, etc.) and click «Next».
Do not select a Restore Point at a time when the Windows Search problem was already present.
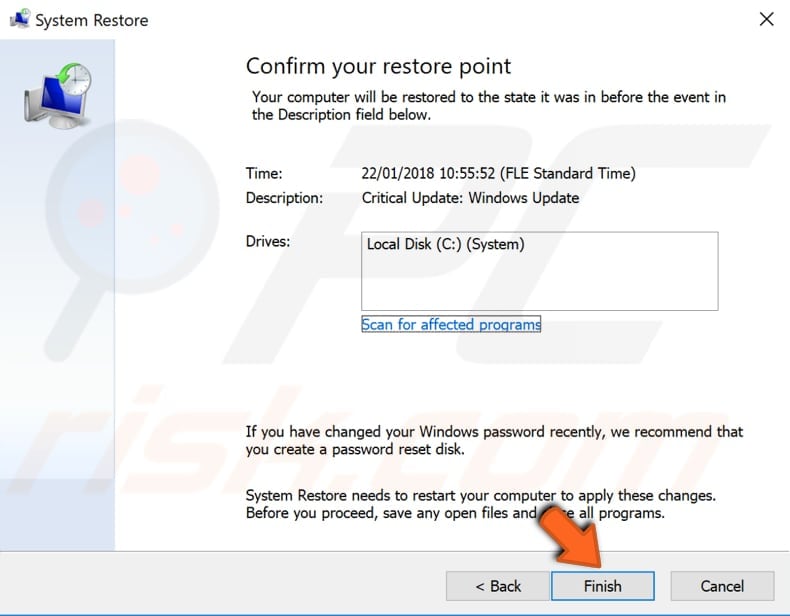
Confirm the restore point. Your computer will be restored to the state before the event detailed in the «Description» field.
If you are happy with your choice, click «Finish» and begin the system restore process.
We hope that this article was helpful and you were able to fix your Windows 10 search not working problem.
[Back to Top]