
One of the main tools for performing administrative tasks in an Active Directory domain is the Active Directory Users and Computers (ADUC) MMC snap-in. The ADUC is a Microsoft Management Console snap-in dsa.msc which is used to manage users, groups, computers, and Organizational units in the AD domain.
In this article, we will look at how to install the Active Directory Users and Computers console on computers running Windows Server and desktop editions of Windows 10 and 11.
Installing Active Directory Users and Computers Snap-in on Windows Server
The ADUC console is automatically installed on a Windows server when it’s promoted to the domain controller as part of the Active Directory Domain Services (AD DS) role deployment. You can manually install the ADUC snap-in on any Windows Server member host.
You can install ADUC console on Windows Server 2022/2019/2016 using Server Manager (Add roles and features > Features > Remote Server Administration Tools > Role Administration Tools > AD DS and AD LDS Tools > AD DS Tools > AD DS Snaps-Ins and Command Line Tools) or with the PowerShell command:
Install-WindowsFeature -Name RSAT-ADDS-Tools

Check that the ADUC console is installed on Windows Server:
Get-WindowsFeature -Name RSAT-ADDS-Tools

How to Install ADUC on Windows 10 and 11
An ADUC snap-in can be installed as part of the Remote Server Administration Tools (RSAT) on the Pro and Enterprise editions of Windows 10 and Windows 11 (but not on the Home editions). You can install ADUC on Windows 10 and 11 by using the Settings app or with PowerShell.
Enable Active Directory Users and Computers Console on Windows 10 and 11
On modern versions of Windows 10 and 11 (with build 1809 and later), you can install the ADUC console from the modern Settings app.
- Press the Start menu > Settings > System;
- Select Optional Features > Add a feature;
- From the list of optional features, select RSAT: Active Directory Domain Services and Lightweight Directory Tools, and press Install.

- Windows will download the ADUC RSAT binary files and install them on your computer.
- You will need to restart your computer when the RSAT installation is complete.

The RSAT was distributed as a separate MSU update file in previous versions of Windows. For example, to install RSAT on Windows 10 1803, you must download and install the KB2693643 update. You can then enable a specific RSAT option using the Control Panel > Turn Windows Features On or Off applet (optionalfeatures.exe).
Install the ADUC Snap-in on Windows 10 or 11 Using PowerShell
You can use PowerShell to install the Active Directory console on Windows 10 and 11. Open an elevated PowerShell prompt and run the command to check whether the RSAT Active Directory feature is installed on your computer:
Get-WindowsCapability -Online | Where-Object {$_.Name -like "RSAT.ActiveDirectory*"}

In this case the RSAT: Active Directory Domain Services and Lightweight Directory Services Tools feature is not installed (State > NotPresent).
If the RSAT ActiveDirectory Tools feature is missing, you can install it:
Add-WindowsCapability -Online -Name Rsat.ActiveDirectory.DS-LDS.Tools~~~~0.0.1.0

You can also use the DISM command to install the RSAT ADUC feature:
DISM /Online /Add-Capability /CapabilityName:Rsat.ActiveDirectory.DS-LDS.Tools~~~~0.0.1.0

Check the AD RSAT status. The State should be changed to Installed.

Note. The PowerShell Active Directory module is also installed with the ADUC console.
Unable to Install RSAT Active Directory on Windows
The RSAT components in the latest versions of Windows are delivered as Features on Demand (FoD). Windows doesn’t store the local RSAT binaries on a local drive; instead, it downloads the RSAT files from the Microsoft Update servers. If your computer is in an isolated (disconnected) environment, you will receive an error when you try to install the ADUC snap-in:
0x800f0954

No features to install
You can use the FoD ISO image to install the RSAT components on offline computers. FoD DVD medias is available for download from your Volume License Servicing Center (VLSC) or on my.visualstudio.com.

Download and mount the FoD ISO image to a virtual drive (for example, to drive F:). You can then install the ADUC feature from local media using the command:
Add-WindowsCapability -online -name Rsat.ActiveDirectory.DS-LDS.Tools~~~~0.0.1.0 -source -Source "F:\" –LimitAccess
If you are using WSUS or SCCM to deploy Windows updates to client devices, you must enable the special GPO option to correctly install Features on Demand (including ADUC) on computers.
- Open the local Group Policy Editor (gpedit.msc) and go to Computer Configuration > Administrative Templates > System;
- Enable the GPO option Specify settings for optional component installation and component repair and check the Download repair content and optional features directly from Windows Update instead of Windows Server Update Services (WSUS);

- Update the Group Policy settings on the computer by using the command: gpupdate /force.

Without this option, Windows 11 will try to get RSAT from your local Windows Update Server (errors 0x8024402c and 0x800f081f).
How to Open and Use Active Directory (DSA.msc) Snap-in on Windows
To run the Active Directory snap-in on Windows 11, go to Start Menu > All Programs > Windows Tools.
On Windows 10 (and previous versions) the AD Management snap-ins are available in the Administrative Tools section of the Control Panel.

As you can see, it refers to the MMC console %SystemRoot%\system32\dsa.msc.
This means that you can quickly open the ADUC console by pressing Win+R, typing dsa.msc and clicking OK.

If your computer is joined to the Active Directory domain, the ADUC console will automatically connect to the nearest DC in your Active Directory site.
If the console can’t find the domain controller, you can use the PowerShell command to get the name of your LogonServer:
$env:LOGONSERVER
Right-click on the root in the ADUC console and select Change Domain Controller. Select the name of your logon DC from the list.
Always use the nearest domain controller when managing Active Directory from ADUC. The RSAT console may become slow when working with a domain controller at a remote site.
If you want to connect to AD using the dsa.msc snap-in from a non-domain joined computer, you must:
- Run the command:
runas /netonly /user:Domain_Name\Domain_USER mmc
- Select File > Add/Remove Snap-In;
- Add Active Directory Users and Computers snap-In to the right pane and press OK;

- Connect to the domain with right-click on ADUC > Connect to the domain and enter the domain name.


The ADUC snap-in should display your Active Directory domain structure.

You will see a standard set of Active Directory OUs and containers:
- Saved Queries — saved search criteria for quick searches against Active Directory (LDAP query supported);
- Builtin — built-in user accounts;
- Computers — default container for computer accounts;
- Domain Controllers — default container for domain controllers;
- ForeignSecurityPrincipals — contains information about objects from trusted external domains;
- Users — default container for user accounts.
Depending on the domain structure, the ADUC console may contain other containers. Some AD containers are not displayed by default. To display them, select View > Advanced Features in the top menu.

In the ADUC console, you can perform the following actions:
- Create and manage user accounts, computers, and Active Directory groups;
- View and edit AD object attributes with ADSI Edit;
- Search for AD objects;
- Change user password in Active Directory or reset it;
- Create Organizational Units and build hierarchical structures for AD objects. Enable or disable OU accidental deletion protection;
- Delegate administrative permission to OUs to non-admin domain users;
- Raise domain functional level, and move FSMO roles to another domain controller.
Cyril Kardashevsky
I enjoy technology and developing websites. Since 2012 I’m running a few of my own websites, and share useful content on gadgets, PC administration and website promotion.
После установки Windows Server на VDS вам доступна только одна учётная запись — Administrator. Однако во многих случаях сервер нужен для работы нескольких человек — причём одновременной. В таких случаях в систему необходимо добавлять дополнительных пользователей — при условии, что у вас уже настроен терминальный сервер и подключено требуемое количество RDP-лицензий.
Добавление учётной записи в Windows Server 2016
Добавление учётной записи в Windows Server 2019/2022
Зачем нужны RDP-лицензии и где их взять
Для начала подключитесь к вашему серверу по RDP под пользователем Administrator. Если сервер только приобретён, для удобства работы можно сразу включить русский язык в настройках:
- Как добавить русский язык в Windows Server 2016
- Как добавить русский язык в Windows Server 2019/2022
Добавление учётной записи в Windows Server 2016
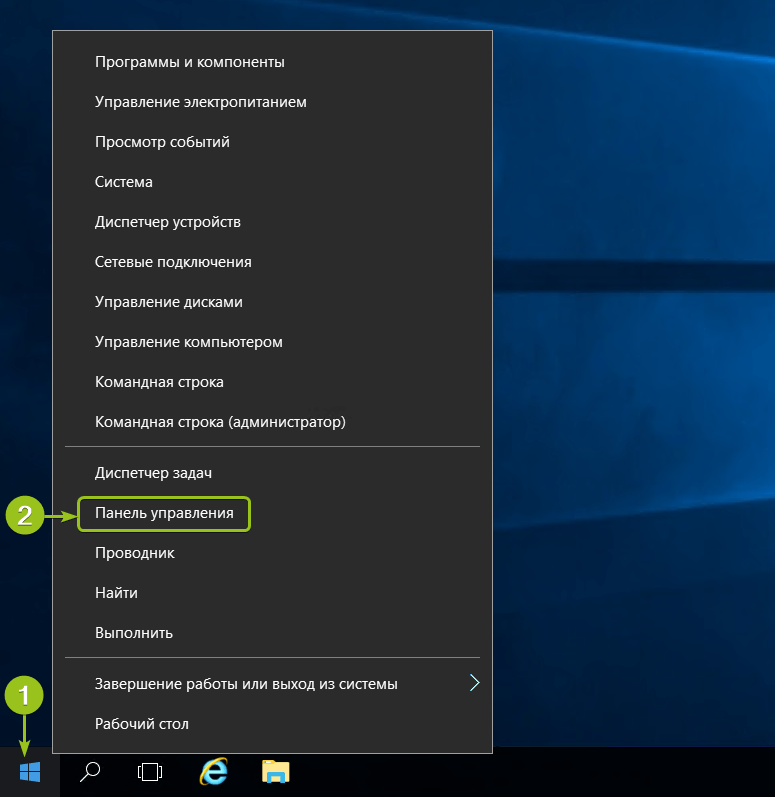
В Windows Server 2016 в панель управления можно перейти из контекстного меню при клике правой кнопкой мыши по меню «Пуск»:
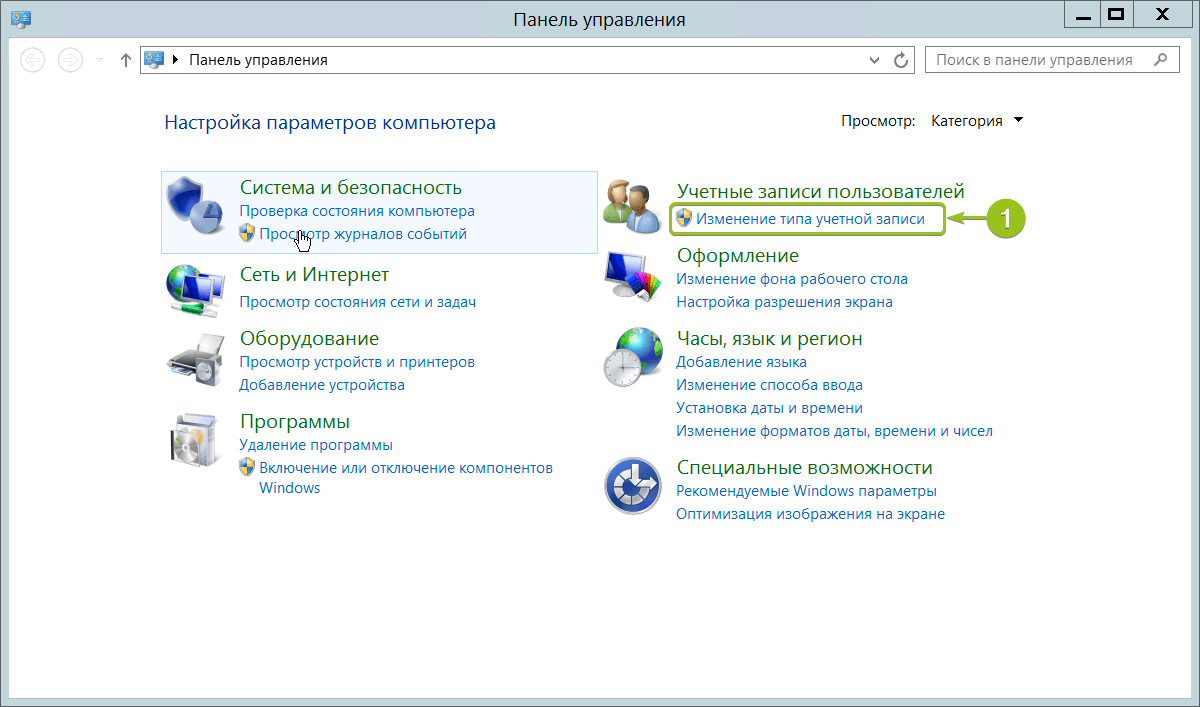
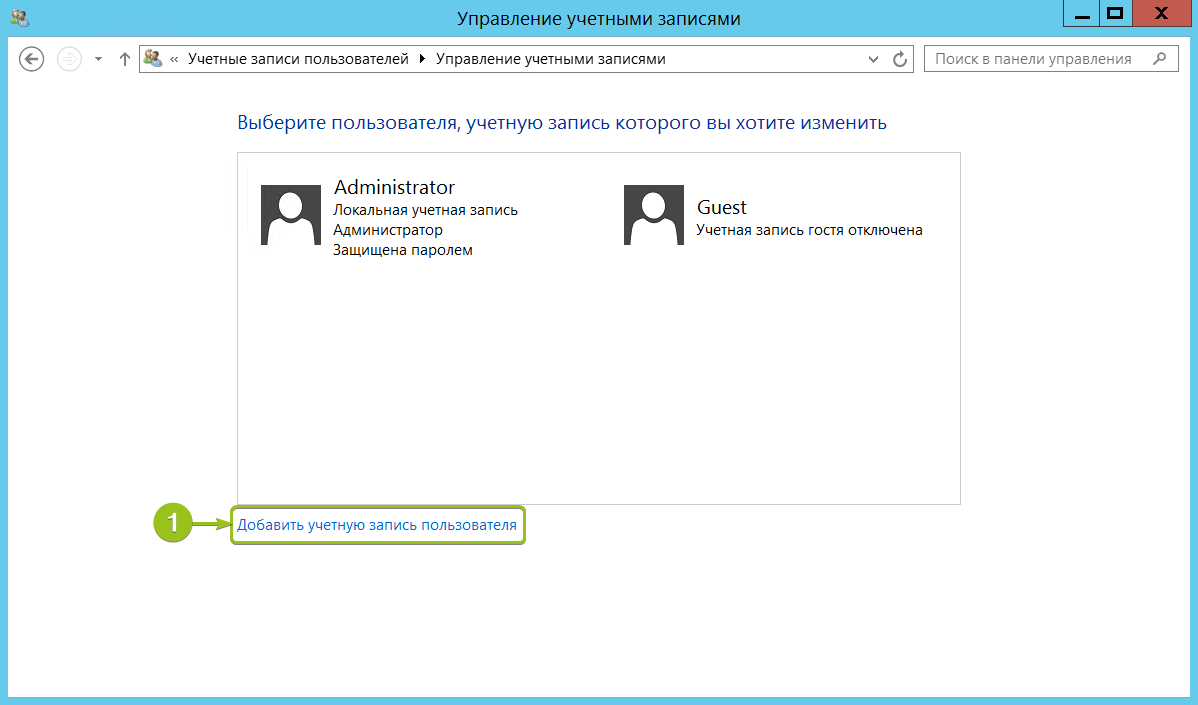
В панели управления в разделе «Учётные записи пользователей» нажмите «Изменение типа учётной записи». Откроется список пользователей вашего сервера. Здесь выберите опцию «Добавить учётную запись пользователя»:
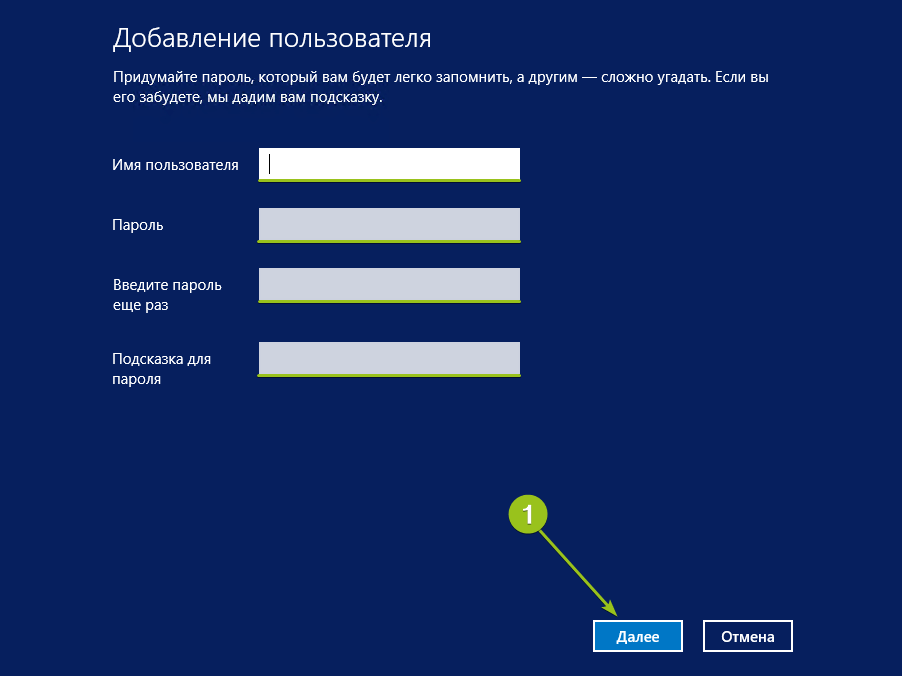
Запустится мастер создания пользователей. Введите логин, пароль, подтверждение пароля, подсказку и нажмите «Далее».
Система добавит новую учётную запись и отобразит её данные — имя и уровень прав. Для завершения настройки нажмите «Готово»:
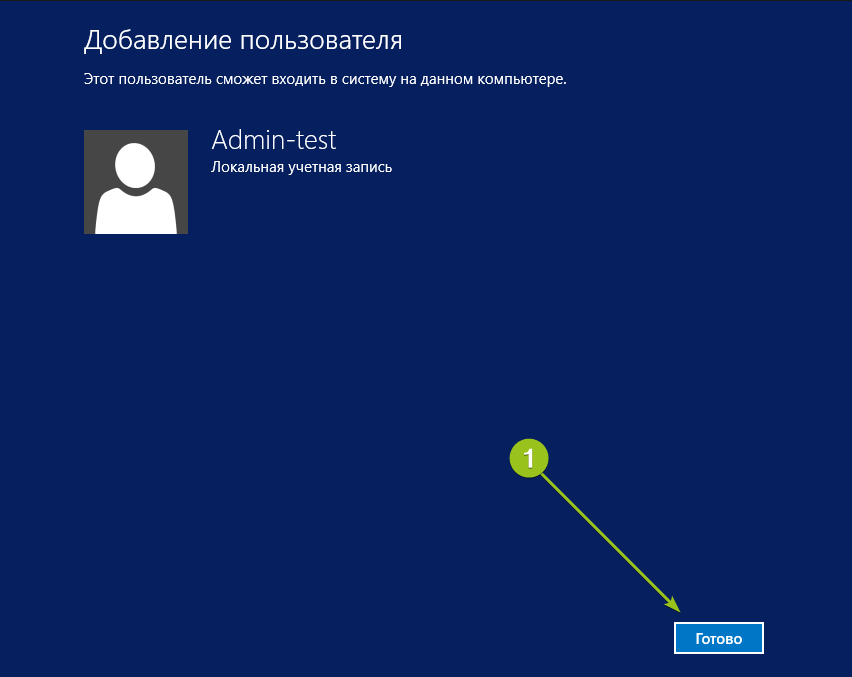
После этого в списке пользователей появится новая учётная запись.

При необходимости вы можете изменить тип созданного пользователя — дать ему права администратора. Для этого кликните на карточку учётной записи — откроется окно настройки:
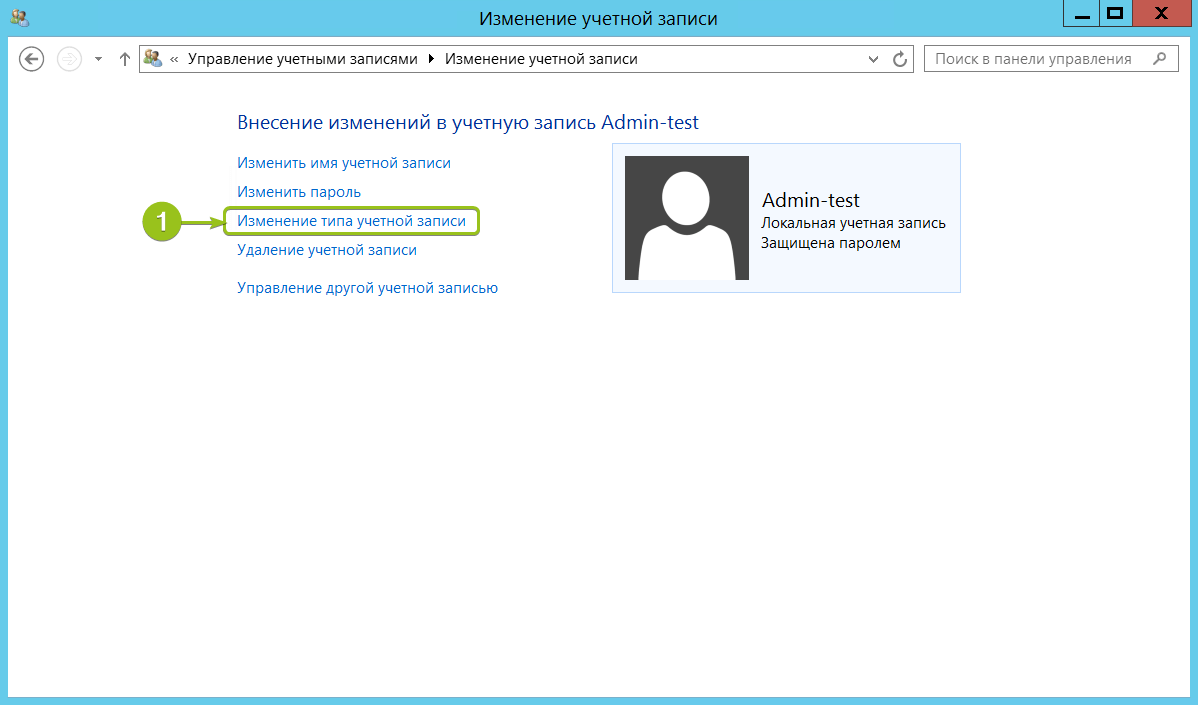
В меню слева выберите «Изменение типа учётной записи» — система предложит настроить уровень доступа:
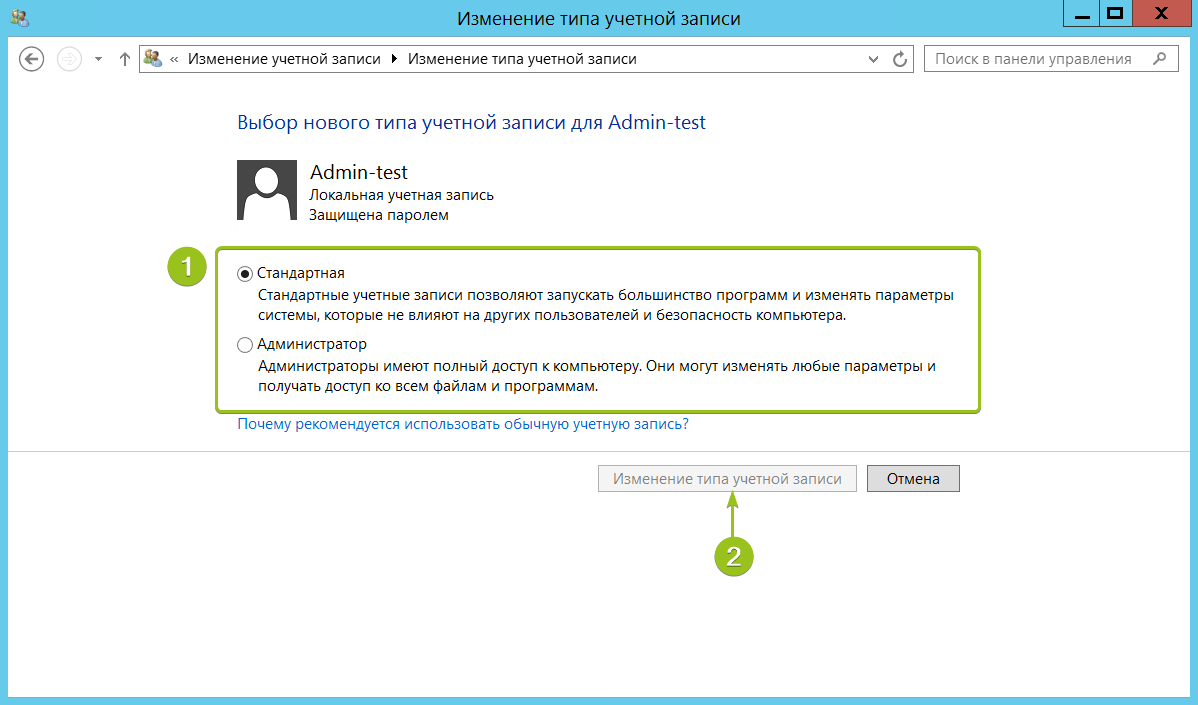
Укажите требуемый уровень прав и нажмите «Изменение типа учётной записи» для вступления настроек в силу.
На этом процесс создания пользователя на Windows Server 2016 завершён. Чтобы новый пользователь мог подключиться к серверу по RDP, ему потребуются следующие данные:
- IP-адрес вашего сервера / домен;
- логин пользователя;
- пароль пользователя.
Добавление учётной записи в Windows Server 2019/2022
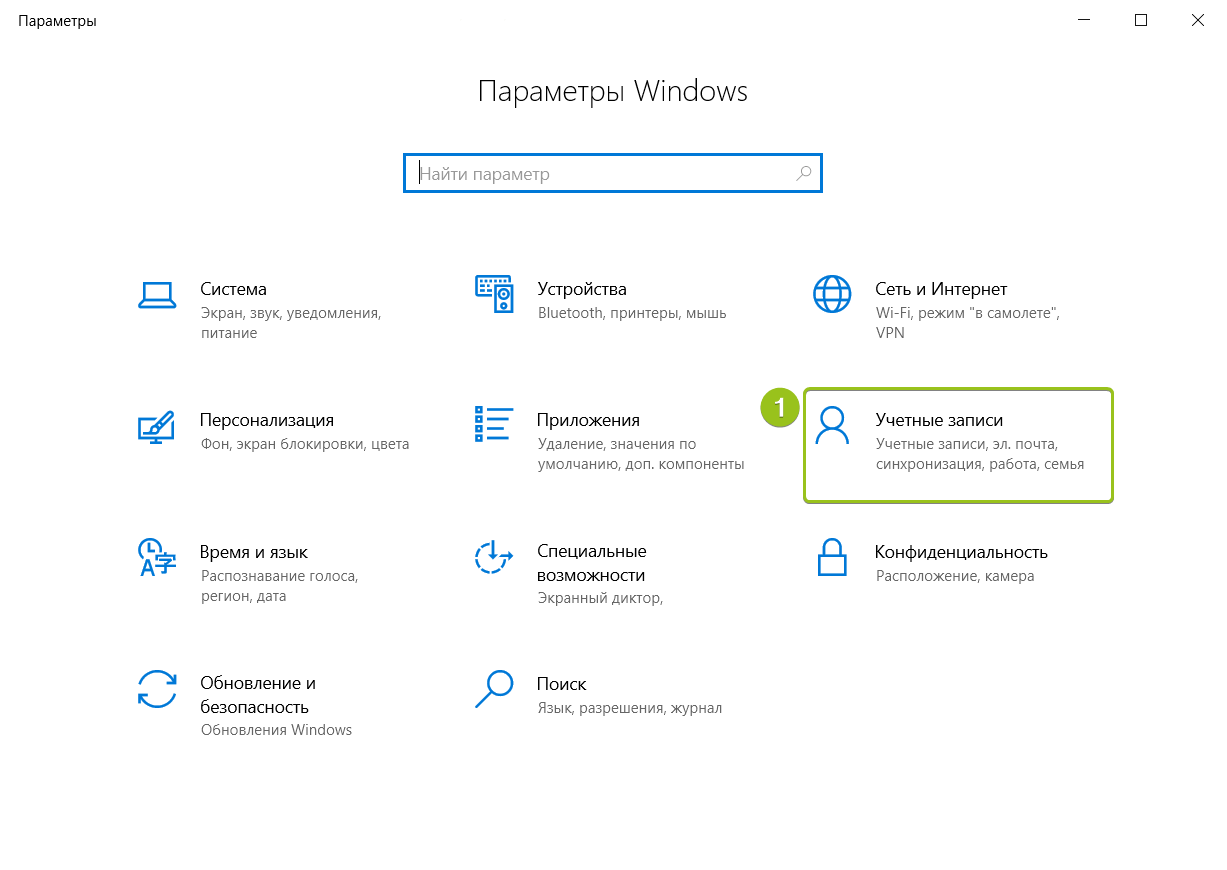
Алгоритм создания пользователей на Windows Server 2019 и 2022 немного отличается. После подключения к серверу откройте меню «Пуск» и перейдите в раздел «Параметры».

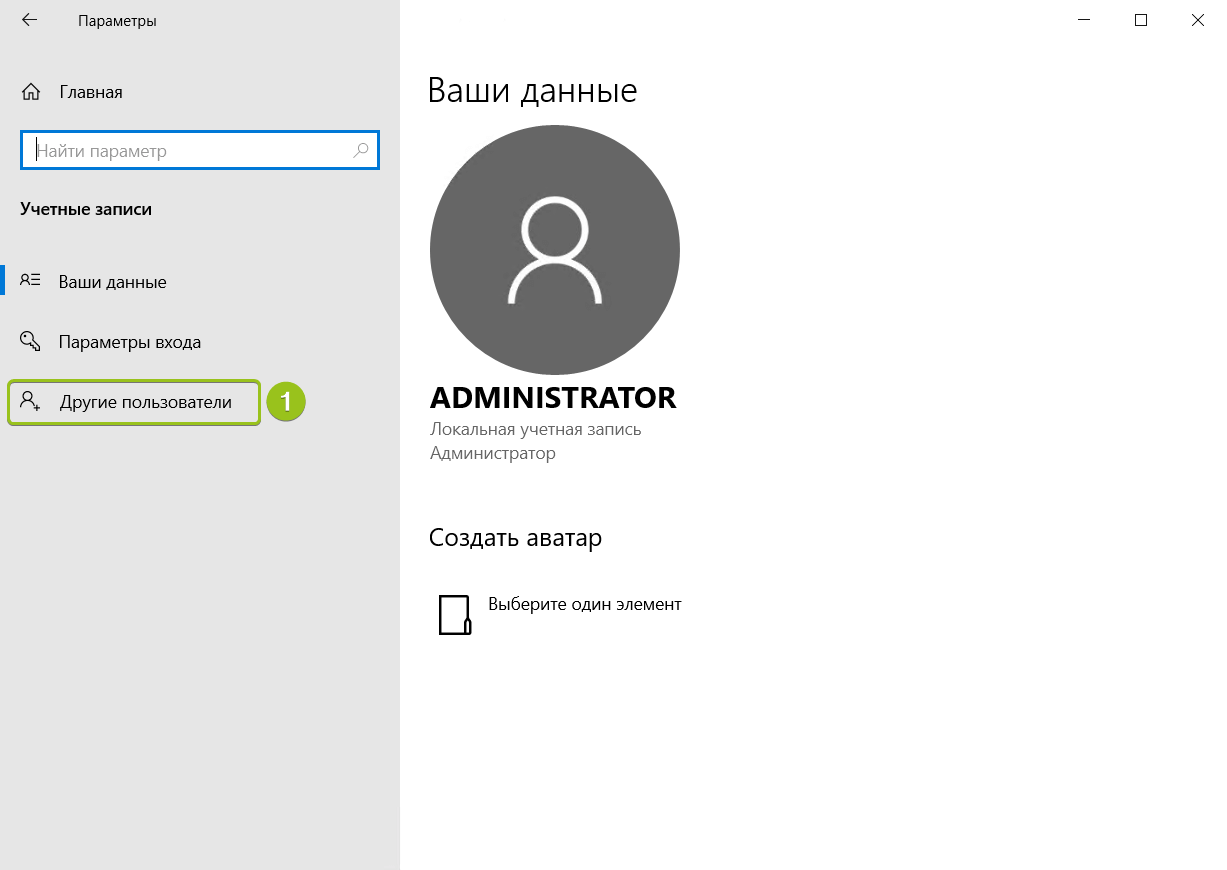
В панели управления выберите раздел «Учётные записи».
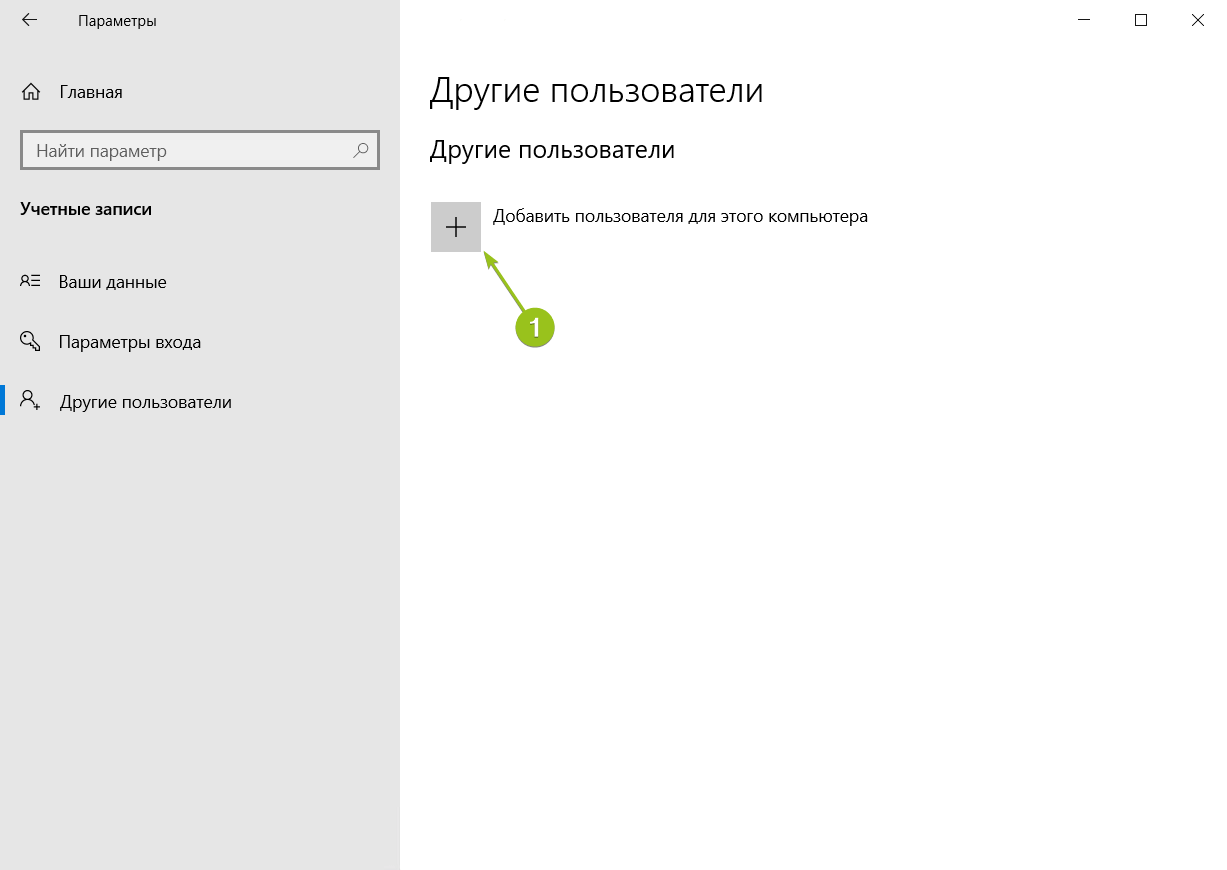
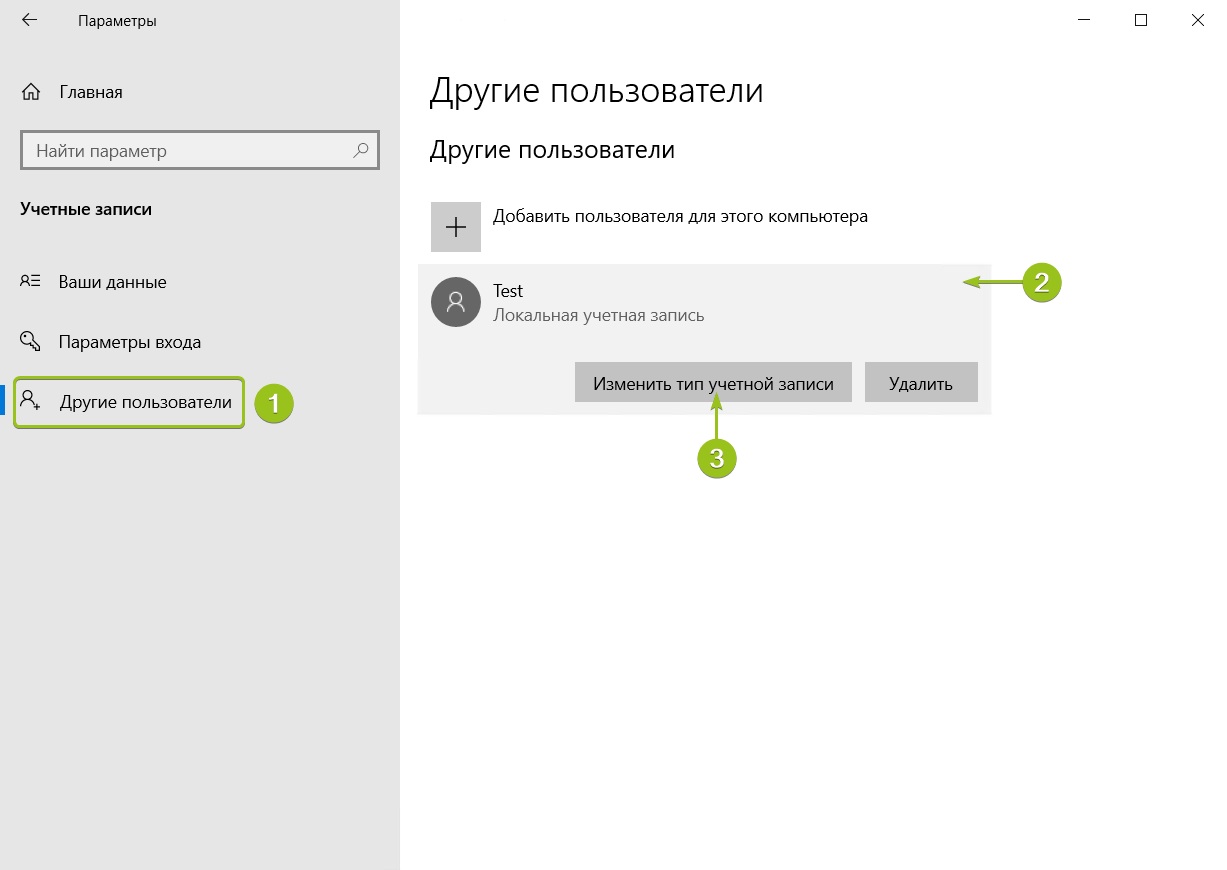
Система перенаправит вас на страницу с данными текущего пользователя. В меню слева перейдите в раздел «Другие пользователи» и нажмите «Добавить пользователя для этого компьютера»
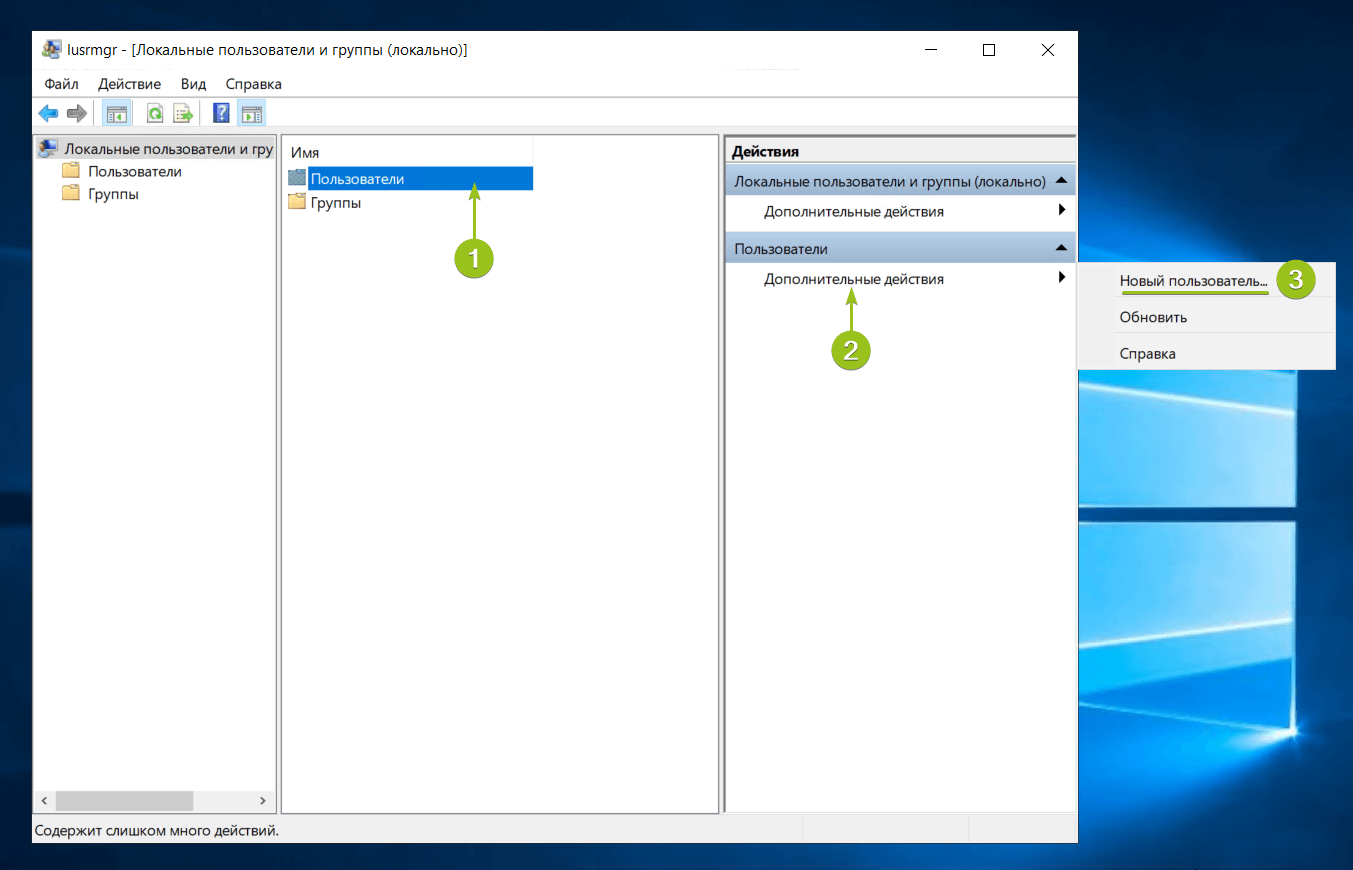
Запустится оснастка настройки локальных пользователей и групп. Выберите раздел «Пользователи» и в блоке «Действия» в соответствующем подразделе справа перейдите в меню «Дополнительные действия» — «Новый пользователь...»:
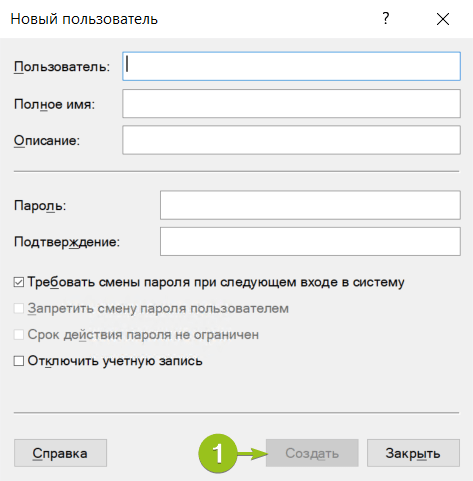
Система предложит ввести данные нового пользователя: логин, имя для отображения в системе, описание и пароль с подтверждением. После заполнения данных нажмите «Создать». Поля в форме сбросятся к пустому состоянию — при отсутствии ошибок это означает, что новый пользователь успешно добавлен.
После добавления нужного количества пользователей нажмите «Закрыть» — вы вернётесь к списку пользователей, где появятся созданные учётные записи.

По умолчанию новые учётные записи создаются со стандартным уровнем прав. Если вы хотите предоставить новому пользователю права администратора, вернитесь в Параметры — Учётные записи — Другие пользователи. Выберите созданного пользователя и нажмите «Изменить тип учётной записи».
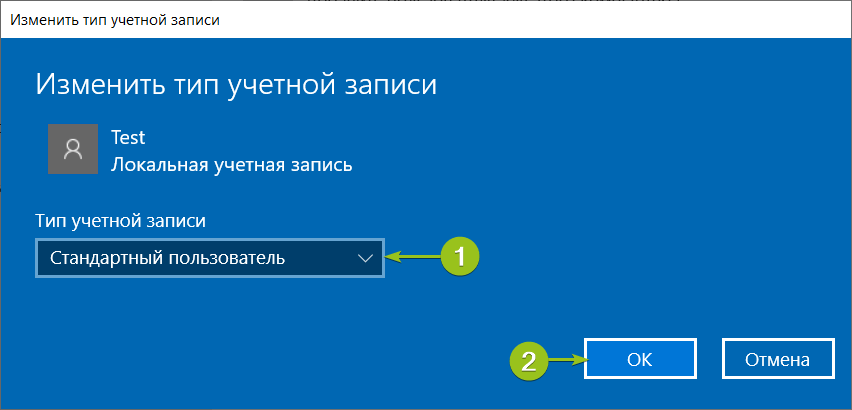
В окне настройки выберите в списке «Тип учётной записи» уровень прав и нажмите «ОК».
На этом процесс добавления пользователя завершён. Чтобы новый пользователь мог подключиться к серверу по RDP, ему потребуются следующие данные:
- IP-адрес вашего сервера / домен;
- логин пользователя;
- пароль пользователя.
Зачем нужны RDP-лицензии и где их взять
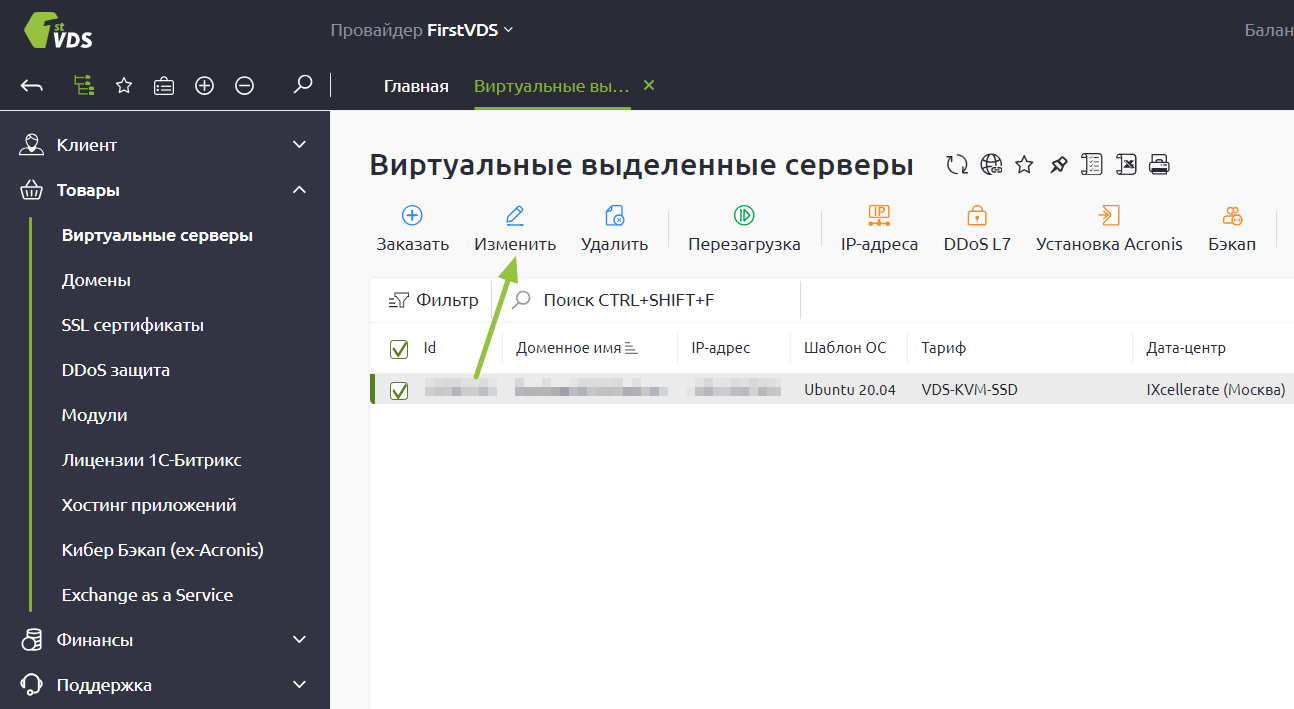
По умолчанию в Windows Server одновременно могут работать только два пользователя уровня Administrator. Для совместной работы большего числа пользователей к серверу нужно подключить RDP-лицензии — по одной на каждого дополнительного пользователя. Их можно приобрести в Личном кабинете: для этого откройте раздел Товары — Виртуальные серверы, выберите ваш сервер в списке, сверху «Изменить».
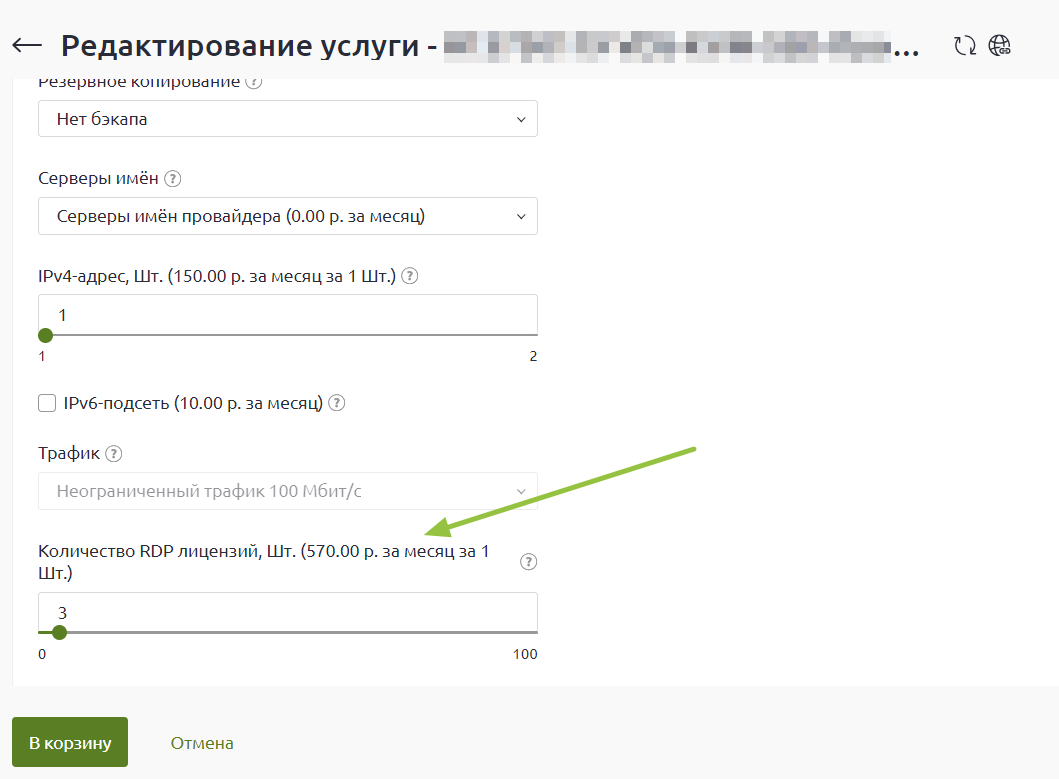
В списке настроек услуги в блоке «Дополнительно» измените значение поля «Количество RDP-лицензий» и нажмите «В корзину». Стоимость одной RDP-лицензии составляет 1200 ₽ в месяц. После активации лицензия включается в стоимость сервера и автоматически продлевается вместе с ним.
После оплаты в течение получаса к серверу подключится наш системный администратор для активации лицензий и настройки терминального сервера.
Этот материал был полезен?
A Complete Guide to Managing Users and Groups in Windows Server 2019
The robust operating system Windows Server 2019 is capable of efficiently managing users and groups. Any organisation must manage users and groups in Windows Server 2019 because it improves security and resource management.
This guide will cover effective user and group management in Windows Server 2019.
Establishing Users and Groups
Creating new users and groups is the first step in managing users and groups in Windows Server 2019.
Follow these steps to create a new user:
- Launch the «Local Users and Groups» section of the Server Manager console.
- From the context menu, click «Users» and choose «New User.»
- Type the user’s name, full name, description, and password in the «New User» dialogue box.
- To create a new user, click «Create.»
The steps below should be followed to create a new group:
- Launch the «Local Users and Groups» section of the Server Manager console.
- From the context menu, click «Groups,» then choose «New Group.»
- Enter the group name, description, and group type in the «New Group» dialogue box.
- To create the new group, click «Create.»
Taking care of Users and Groups
The next step is to manage new users and groups efficiently after they have been created.
Various tools are available in Windows Server 2019 to manage users and groups.
These tools consist of:
- Active Directory Users and Computers: This application is used for Active Directory user and group management.
- Local Users and Groups: On a local computer, users and groups are managed using this tool.
- PowerShell: PowerShell is an effective scripting language that can be used to manage users and groups.
Active Directory Users and Computers User Management
Follow these steps to manage users with Active Directory Users and Computers:
- Launch the console for Active Directory Users and Computers.
- Locate the container labelled «Users.»
- Double-click the user whose account you wish to manage.
- You can change a number of attributes, including the user’s name, description, password, and group membership, in the user’s properties dialogue box.
- To save the changes, click «OK.»
Using Active Directory Users and Computers for Group Management
The steps listed below can be used to manage groups with Active Directory Users and Computers:
- Launch the console for Active Directory Users and Computers.
- Select the «Groups» container from the list.
- Double-click the group that needs management.
- You can change a number of attributes, including the group’s name, description, membership, and scope, in the group’s properties dialogue box.
- To save the changes, click «OK.»
Using PowerShell for User and Group Management
An effective command-line interface for managing users and groups is offered by PowerShell.
Follow these steps to manage users and groups using PowerShell:
- Launch the PowerShell console.
- Use the «Get-ADUser» and «Set-ADUser» cmdlets to manage users.
- Use the «Get-ADGroup» and «Set-ADGroup» cmdlets to manage groups.
- Use the appropriate parameters to change different user and group attributes.
Managing Permissions for Users and Groups
Enhancing security and resource management requires managing user and group permissions.
Various tools are available in Windows Server 2019 to manage user and group permissions.
These tools consist of:
- File Explorer: File Explorer can be used to control folder and file permissions.
- Security Configuration Wizard: You can set up security settings on servers and applications using the Security Configuration Wizard.
- Group Policy: Group Policy allows users and groups to have their security settings customised.
File Explorer’s User and Group Permissions Management
2. Select «Security» from the tabs.
3. To change the permissions, click the «Edit» button.
4. You can edit the permissions for users and groups in the «Permissions for [file or folder]» dialogue box by adding or removing them.
5. To save the changes, click «OK.»
Utilizing Group Policy to Manage User and Group Permissions
The steps listed below can be used to manage user and group permissions using Group Policy:
- Launch the console for Group Policy Management.
- Make changes to an existing Group Policy Object (GPO) or create a new one.
- Select «Computer Configuration> Policies> Windows Settings> Security Settings> Local Policies> User Rights Assignment.»
- Double-click the user right that needs to be changed.
- You have the option to add or remove users and groups in the user right properties dialogue box.
- Press «OK» to save the modifications.
Conclusion
In conclusion, optimising security and resource management in an organisation requires managing users and groups in Windows Server 2019.
In order to effectively manage users, groups, and resources, Windows Server 2019 offers a variety of features and tools.
Using tools like Active Directory Users and Computers, Local Users and Groups, and PowerShell, we covered how to create and manage users and groups in Windows Server 2019 in this guide.
We also covered the use of tools like File Explorer, Security Configuration Wizard, and Group Policy for managing user and group permissions.
You can effectively manage users and groups in Windows Server 2019 and improve resource management and security in your company by following the instructions provided in this guide.
FAQs
- How do I define Windows Server 2019?
The robust operating system Windows Server 2019 is made for servers, and it offers many features and tools for efficiently managing users, groups, and resources.
- In Windows Server 2019, what role does managing users and groups play?
Enhancing security and resource management in an organisation requires managing users and groups in Windows Server 2019.
It aids in maintaining data integrity and limiting access to resources.
- What tools are available in Windows Server 2019 for managing users and groups?
Active Directory Users and Computers, Local Users and Groups, PowerShell, and other tools are available in Windows Server 2019 to manage users and groups.
- In Windows Server 2019, how do I manage user and group permissions?
In Windows Server 2019, tools like File Explorer, the Security Configuration Wizard, and Group Policy can be used to manage user and group permissions.
- What advantages does Windows Server 2019’s management of user and group permissions offer?
In Windows Server 2019, managing user and group permissions improves resource management and security within an organisation. It aids in regulating resource access, preserving data integrity, and preventing unauthorised access.
Any Windows Server administrator must have used the Active Directory Users and Computers (ADUC) Microsoft Management Console on a Domain Controller (DC). Using this console, you can control and manage users, user groups, computers, and the Organizational Units (OUs) in the domain.
The ADUC console is no longer limited to servers anymore. You can install the Active Directory Users and Computers snap-in on a Windows 11 or Windows 10 computer as well, which performs the same functions as the original Server console. This snap-in is part of the Remote Server Administration Tools (RSAT) for Windows operating systems.
We have written separate posts for installing any RSAT tools on Windows 11 and Windows 10. This article focuses on installing specifically the Active Directory Users and computers snap-in on a Windows PC and then using it to manage your domain.
Table of Contents
How to Install Active Directory Users and Computers (ADUC) on Windows
All RSAT tools, including the Active Directory Users and Computers snap-in, allow you to manage the different Active Directory components as if you are on the server itself. This way, you do not always have to access the server, neither physically nor remotely, to perform an action.
You can download and install the Active Directory Users and Computers snap-in using the Settings app, from the Command Prompt, and Windows PowerShell.
Note: On Windows 10 v1803 and older, you must download and install all RSAT tools using the MSI files. You can find the MSI files for your version of Windows here.
Install Active Directory Users and Computers from Settings App
The easiest way to install the ADUC snap-in on a Windows PC is from the settings app. It does involve more steps than the other methods shared below, but this is the only method using the Windows GUI.
Use these steps to install the ADUC snap-in from the Settings app:
-
Navigate to the following:
Settings app >> Apps >> Optional Features
-
Click “View features.”
 Snap-In On Windows 11/10 1")
Add an optional feature -
Search for “Active Directory,” select “RSAT: Active Directory Domain Services and Lightweight Directory Services Tools,” and click Next.
Select Active Directory Users and Computers -
Click “Install.”
Install Active Directory Users and Computers from the Settings app -
Once installed, restart the computer.
 Snap-In On Windows 11/10 1")
 Snap-In On Windows 11/10 2")
 Snap-In On Windows 11/10 3")
The Active Directory Users and Computers snap-in will now be installed. If you prefer installing it using the command line, refer to the sections below. To learn how to use the snap-in, continue reading down.
Install Active Directory Users and Computers from Command Prompt
Below are the simple steps to install Active Directory Users and Computers snap-in using the Command Prompt:
-
Open an elevated Command Prompt instance.
-
Run the following command:
DISM /Online /Add-Capability /CapabilityName:Rsat.ActiveDirectory.DS-LDS.Tools~~~~0.0.1.0 Snap-In On Windows 11/10 4")
Install Active Directory Users and Computers snap-in using Command Prompt
 Snap-In On Windows 11/10 4")
The ADUC snap-in should now be installed. Run the following command in Command Prompt to confirm that the Active Directory Users and Computers snap-in has been installed:
DISM.exe /Online /Get-CapabilityInfo /CapabilityName:Rsat.ActiveDirectory.DS-LDS.Tools~~~~0.0.1.0 Snap-In On Windows 11/10 5")
You should see “Installed” in front of Status.
Install Active Directory Users and Computers from PowerShell
Use the following steps to install the Active Directory Users and Computer snap-in using PowerShell:
-
Launch an elevated PowerShell instance.
-
Run the following command to install ADUC:
Add-WindowsCapability -Online -Name Rsat.ActiveDirectory.DS-LDS.Tools~~~~0.0.1.0
Install Active Directory Users and Computers snap-in using PowerShell
 Snap-In On Windows 11/10 6")
The ADUC snap-in should now be installed. To confirm its status, run the following command in PowerShell:
Get-WindowsCapability -Online | Where-Object {$_.Name -like "RSAT.ActiveDirectory*"} Snap-In On Windows 11/10 7")
You should see “Installed” in front of State.
These are all the methods to install the Active Directory Users and Computers snap-in on a Windows 11/10 PC. Let us now continue to see how to use this tool.
How to Use Active Directory Users and Computers
How to Open Active Directory Users and Computers Snap-In
Now that Active Directory Users and Computers is installed, you can open it by searching for it in the Start menu, or running the following in the Run Command box:
dsa.mscAlternatively, you can also open the ADUC snap-in through the Control Panel at the following location:
Control Panel >> System and Security >> Windows Tools
 Snap-In On Windows 11/10 9")
If your computer is connected to a domain and you are logged in from an authorized domain account, then the ADUC snap-in will automatically connect to the server. However, if one is not connected, then you must connect to the Domain Controller.
Connect ADUC to Domain Controller
Use these steps to connect to a Domain Controller. You can also use these to change your domain/Domain Controller.
-
From the ADUC console, click “Action,” and then click “Change Domain Controller.”
Change or connect to Domain Controller The Change Directory Server window will now open.
-
Select the “This Domain Controller or AD LDS instance” radio button, then select the Domain Controller from the give list and click Ok.
Select and connect to Domain Controller
 Snap-In On Windows 11/10 10")
 Snap-In On Windows 11/10 11")
The ADUC will now connect to the Domain Controller and populate the fields.
 Snap-In On Windows 11/10 12")
Now that you are connected to the Domain Controller, you can now begin making changes and managing the different components of the domain.
Manage Users, Computers, Organizational Unit using ADUC
 Snap-In On Windows 11/10 13")
You can now begin adding new users, computers, printers, and Organizational Units to the domain. Simply right-click on the OU that you want to add the new device/user to, expand “New”, and select the element that you want to add.
Once you have selected the element to add, the respective window will open, where you can then configure the component to add.
You can now also use other operators to manage the users, devices, and other elements configured inside the domain directly from your Windows PC.
Additionally, you can also manage what you see inside the snap-in. Click “View” from the top menu and select the things that you want to see. You can then also click “Filter options” to open the advanced viewing options.
 Snap-In On Windows 11/10 14")
The list does not end here. There are a bunch of other management options you can perform directly from the ADUC snap-in on a Windows PC. We suggest that you play around to discover all the options. However, we advise caution and only use the console if you know what you are doing.
What is Active Directory Users and Computers Used For
By now, we have a pretty good understanding of what the ADUC snap-in can be used for. However, there is more to it than meets the eye. The Active Directory Users and Computers RSAT tool can be used to perform the following actions:
- Create and manage user accounts, computers, and Active Directory groups.
- View and edit AD object attributes with ADSI Edit.
- Search for AD objects.
- Change or reset user password in Active Directory.
- Create organizational units and build hierarchical structures for AD objects. You can also delegate administrative permission on these OUs to other domain users.
- Delegate administrative permissions.
- Raise domain functional level, and transfer FSMO roles with PowerShell to another domain controller.
From this, it is understood how useful the ADUC snap-in is for administrators that use Windows client PCs.
Создание пользователя
Существует несколько способов создания пользователя Windows. Здесь мы разберем 2 случая.
Способ 1
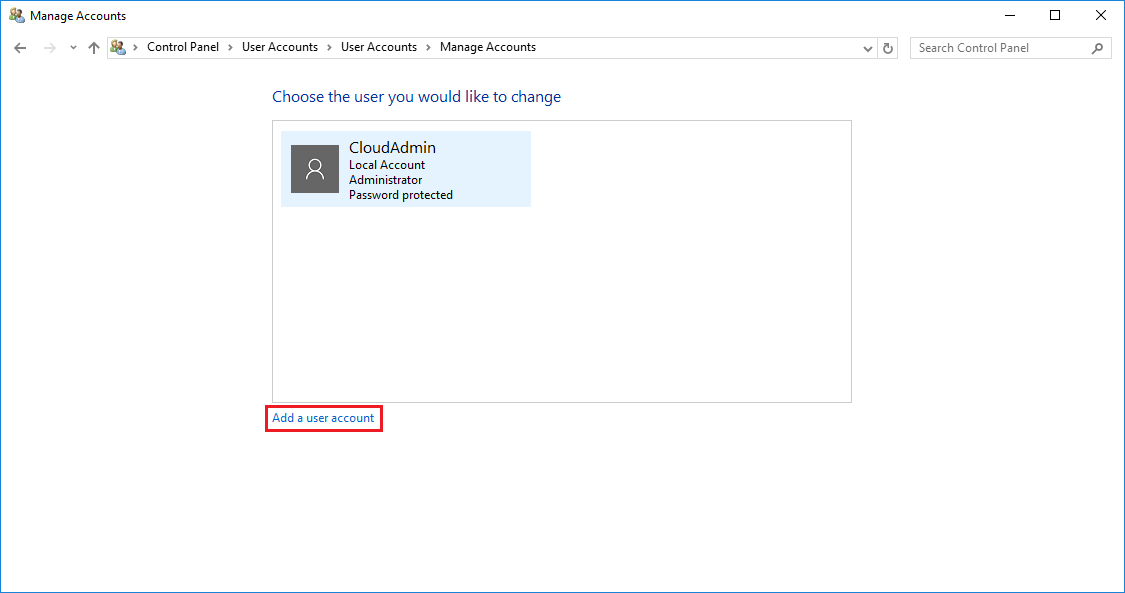
Открываем Панель управления сервером и выбираем вкладку User Accounts.
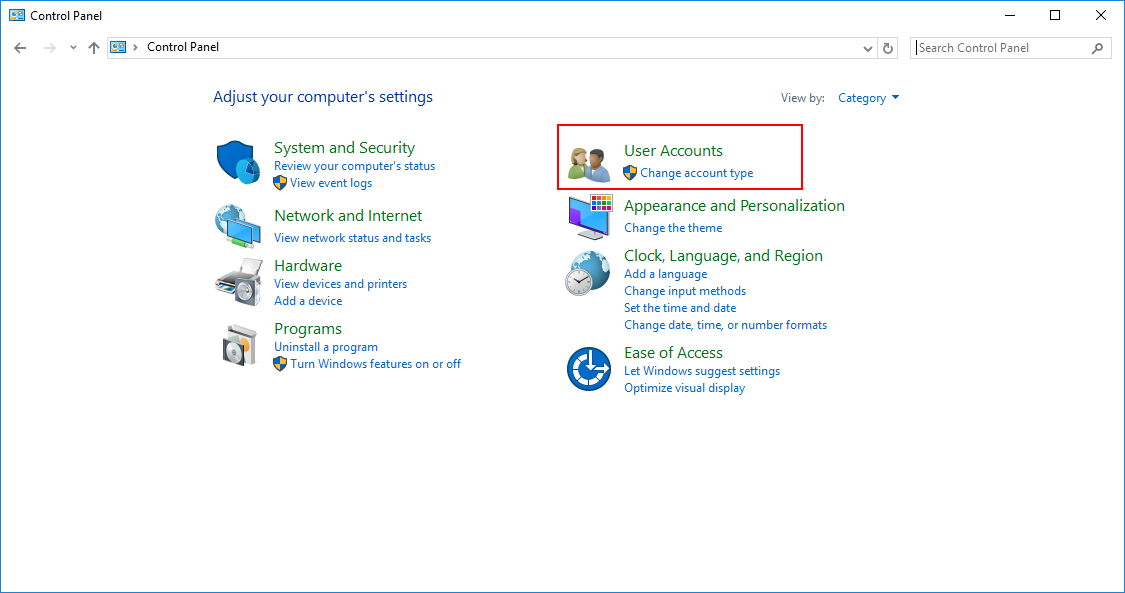
Переходим во вкладку User Accounts.
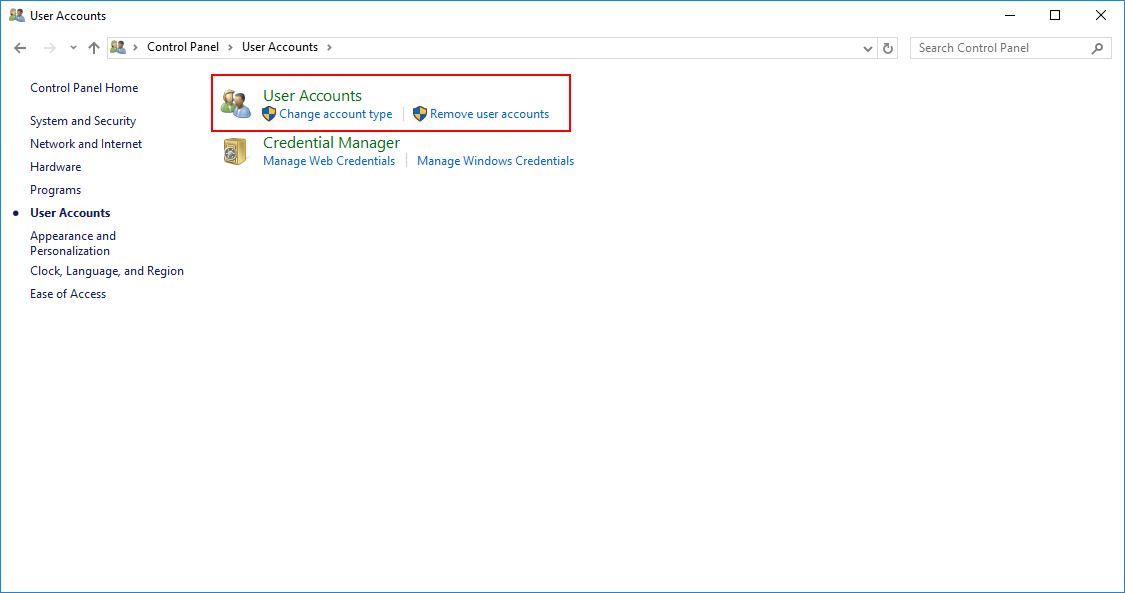
Выбираем Manage other account.
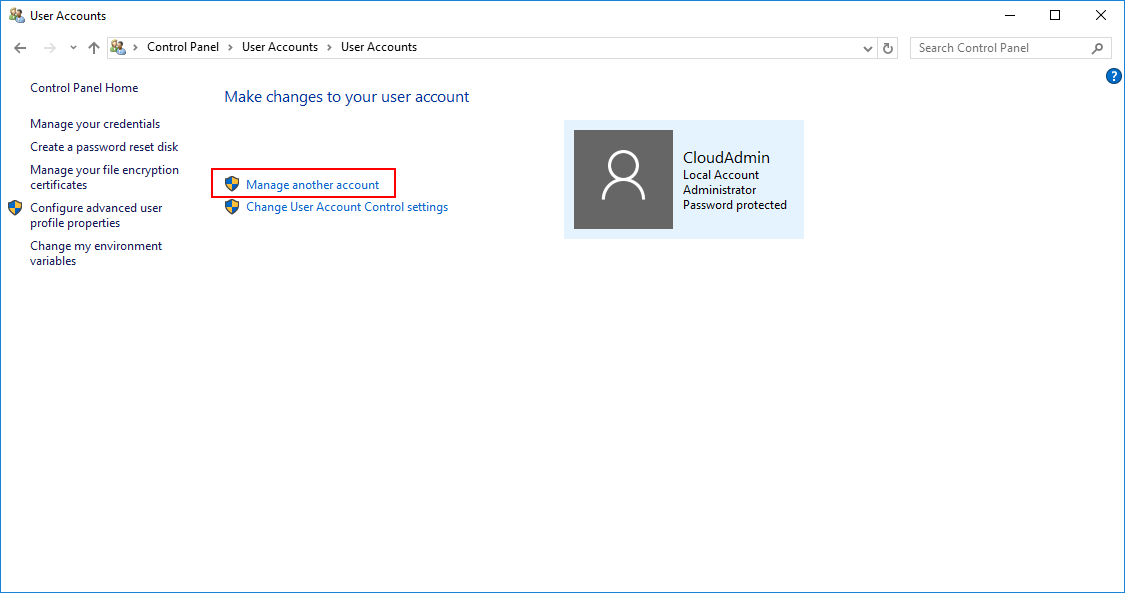
Далее выбираем Add a user account.
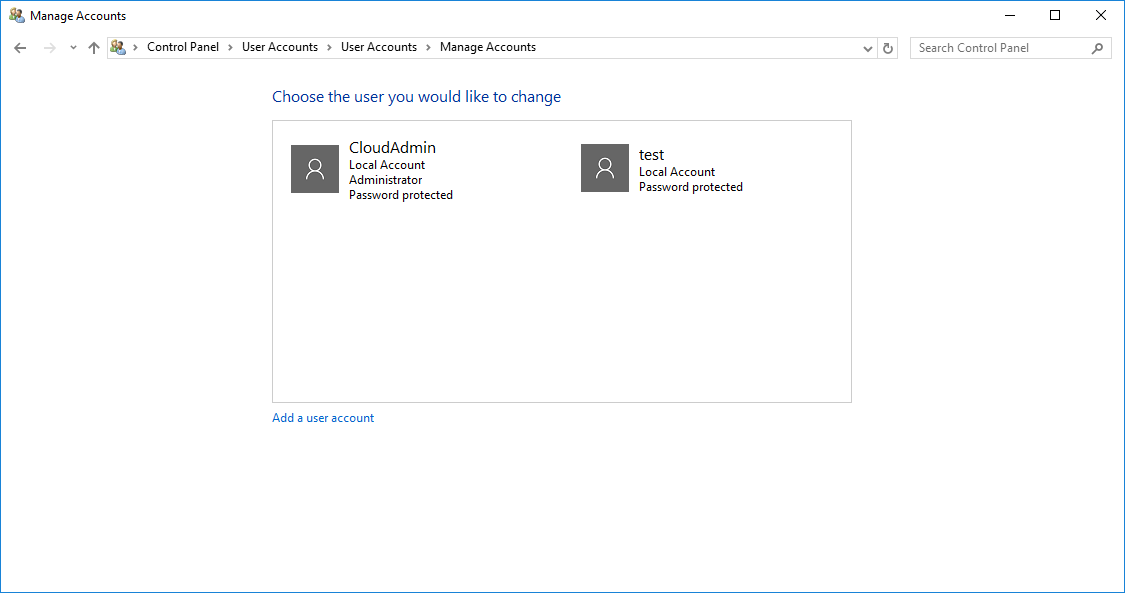
В открывшемся окне вводим Имя пользователя, Пароль и Подсказку пароля.

По окончании вы увидите нового пользователя
Способ 2
Нажимаем Win+R и вводим mms.
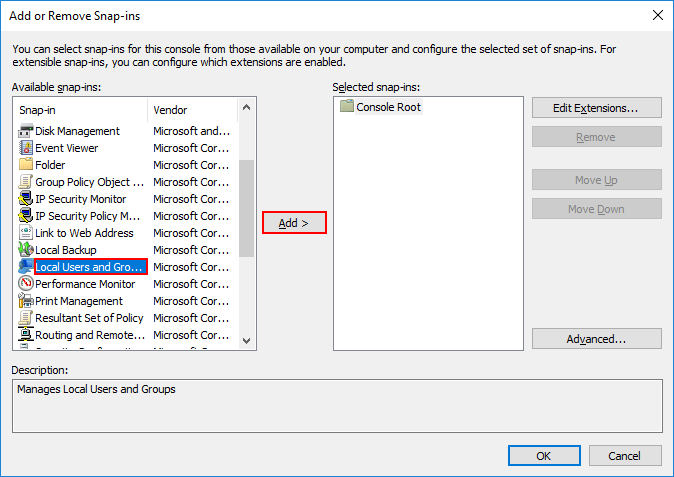
Далее нужно добавить оснастку, для этого откройте закладку File -> Add/Remove Snap-in.
Нам нужно найти останку Local Users and Groups, далее нажимаем Add -> Ok.
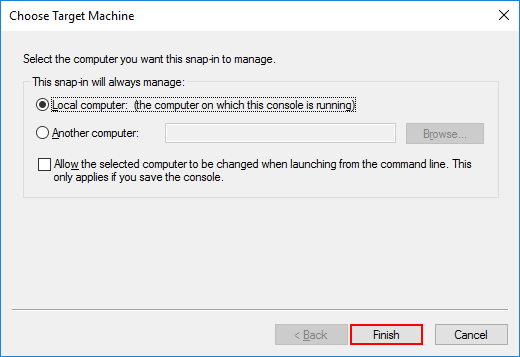
Выбираем Local computer и нажмите Finish.
Раскрываем иерархию оснастки, нажимаем ПКМ на Users и создаем нового пользователя Windows.
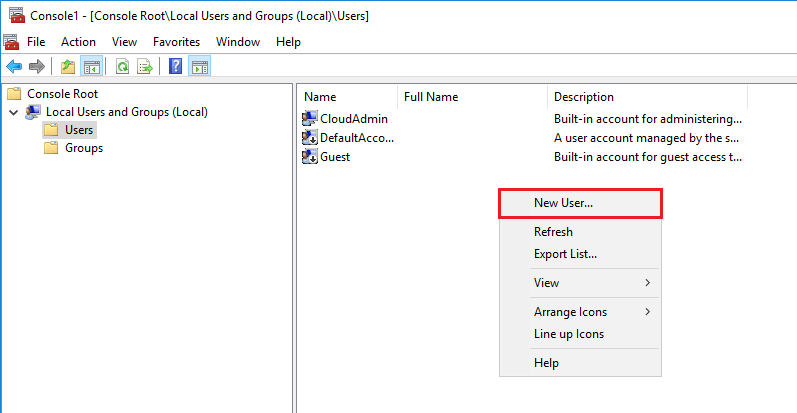
Далее вводим данные как и в первом случае создания пользователя Windows.
Разрешение на удаленное подключение
Способ 1:
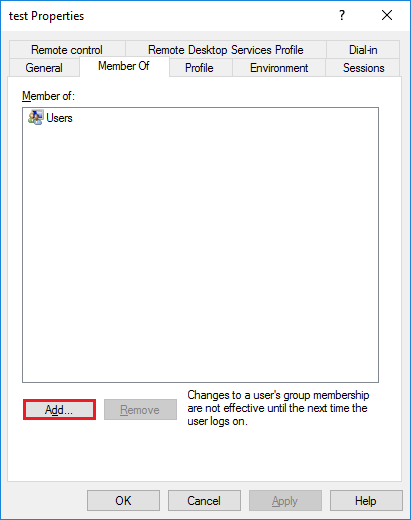
Так же через консоль (Win+R) открываем «mms». Добавляем оснастку Local Users and Groups, для этого открываем закладку File -> Add/Remove Snap-in. После этого находим нужного пользователя при помощи ПКМ открываем свойства. Переходим во вкладку Member Of и нажимаем Add.
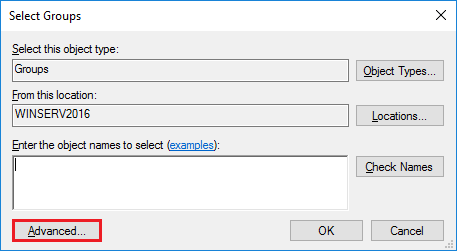
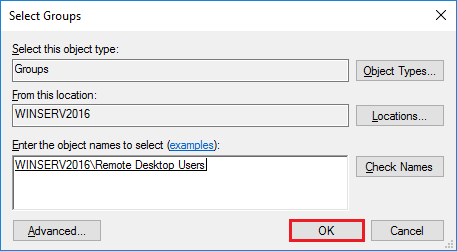
Тут нажимаем «Advanced».
Для поиска нужной группы кликните Find Now и выберете группу с именем Remote Desktop Users. Кликните OK.
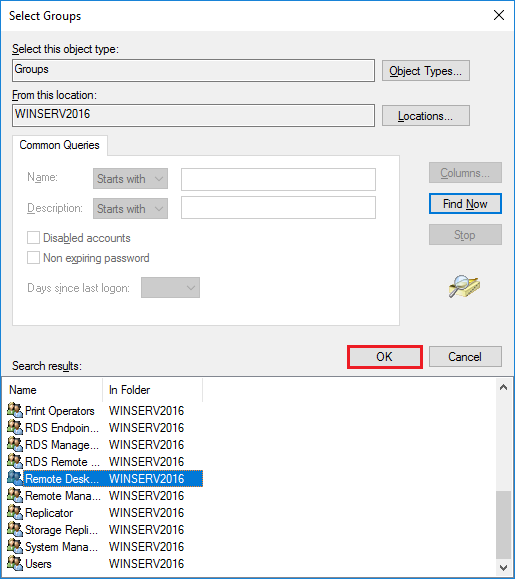
Опять нажимаем Ok.
Сохраните изменения с помощью кнопок Apply -> OK.
Способ 2:
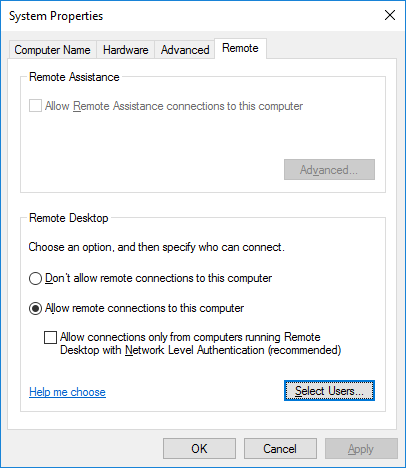
Чтобы новый пользователь Windows Server мог подключиться к виртуальному серверу, необходимо добавить его в список пользователей, которым разрешено удаленное подключение. Для этого откройте Панель управления компьютером и перейдите во Вкладку Remote — Programs – Page User.
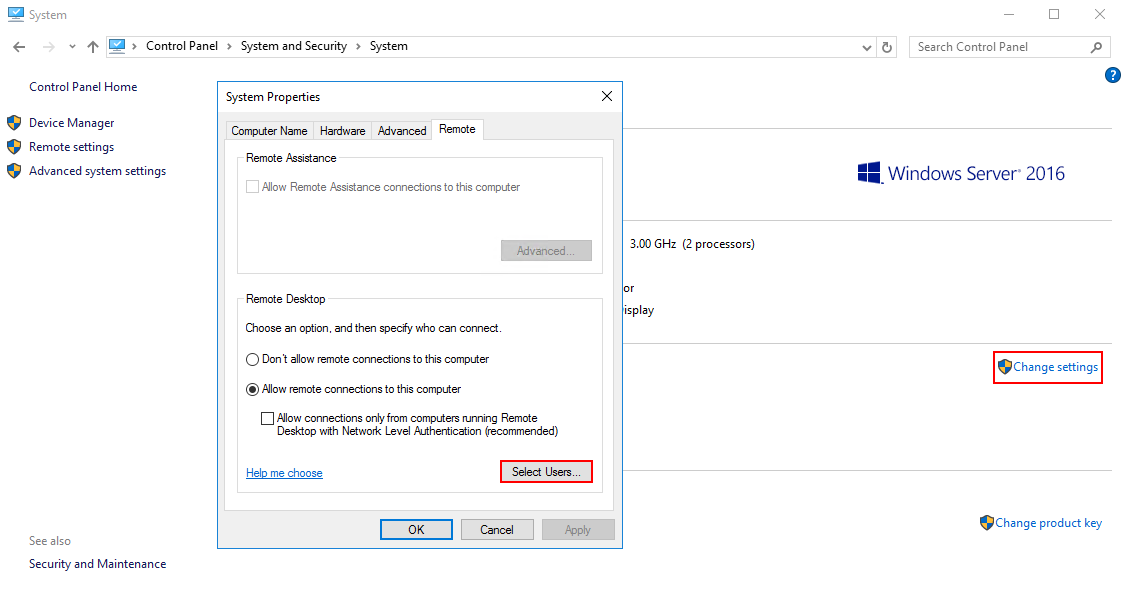
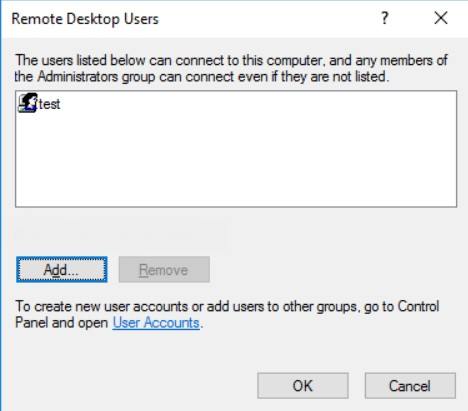
Затем нажмите кнопку Add для добавления нового пользователя.
В новом окне введите имя созданного пользователя, например «test». Нажмите Check Names и появится полное системное имя.

Сохраните изменения, нажав OK.
После этого можно подключиться к виртуальному серверу от имени нового пользователя.