
В данной статье поговорим о том, как установить оснастки Active Directory в Windows 7. Как вы, наверное, помните, для того, чтобы в Windows XP появилась оснастка Active Directory Users and Computers (сокращенно ADUC), необходимо установить специальный набор утилит от Microsoft – Windows 2003 Admin Pack. В Windows 7 процесс установки консолей управления Active Directory несколько изменился.
Во-первых, Admin Pak теперь стал называться Remote Server Administration Tools (RSAT). Где найти и скачать RSAT для Windows 7 я уже писал. Обратите внимание, что существует несколько версий RSAT для Windows 7: версии будут отличаться в зависимости от разрядности вашей ОС (32 ил 64 –битная Window 7) и установленного Service Pack (скачать RSAT для Windows 7 SP1). Если вы не знаете, какая версия ОС используется у вас, нажмите кнопку Start, щелкните правой кнопочкой мыши по значку «Computer» и выберите «Properties». Окно с версией системы будет выглядеть примерно так:

В поле «System type:» будет указан тип вашей ОС Windows 7. В том случае, если вы используете 32 битную версию Windows 7, необходимо скачать файл, имя которого начинается с «x86…» (сейчас это «x86fre_GRMRSAT_MSU.msu», но имя может измениться). Для пользователей 64-битных систем, необходимо скачать файл, имя которого начинается с «amd64…» (сейчас это «amd64fre_GRMRSATX_MSU.msu») – это пакет подойдет даже в том случае, если вы используете процессор, отличный от AMD 64-bit.
После того, как вы скачаете RSAT для Windows 7, его нужно установить (в принципе это обычное обновление Microsoft KB).
Во-вторых, после установки RSAT в Windows 7, по умолчанию большинство дополнительных функций управления отключены, и оснастку управления Active Directory в Windows 7 нужно активировать вручную.
- Перейдите в панель управления Control Panel, выберите раздел Programs.
- В разделе Programs and Features, щелкните по ссылке Turn Windows features on or off.

- Перейдите в раздел Remote Server Administration Tools > Role Administration Tools, и выберите AD DS and AD LDS Tools.
После этого консоль ADUC и другие оснастки управления AD в Windows 7 появится в панели управления в разделе Administrative Tools.
Активировать оснастку «Active Directory User and Computer» в Windows 7 можно и из командной строки, однако в любом случае придется скачать и установить RSAT.
В командной строке с правами администратора наберите следующие команды, добавляющие оснастки Active Directory:
dism /online /enable-feature /featurename:RemoteServerAdministrationTools-Roles-AD-DS

 dism /online /enable-feature /featurename:RemoteServerAdministrationTools-Roles-AD-DS-SnapIns
The Microsoft Remote Server Administration Tools (RSAT) toolkit allows administrators to remotely manage the roles and functions of Windows Server 2008 R2 from a computer running Windows 7.
It includes support for remote control of computers running Server Core or a full-featured Windows Server 2008 R2 server.
Installing RSAT is carried out in 2 stages:
Actually installing the RSAT distribution (where I already described it in the article about including Windows 7 in the AD domain, just in case I remind you http://www.microsoft.com/downloads/details.aspx?FamilyID=7d2f6ad7-656b-4313-a005 -4e344e43997d & displaylang = en)
Activation of functions and consoles (snap-ins) RSAT.
Step 1. Install RSAT
wusa Windows6.1-KB958830-x86.msu / quiet (x86)
wusa Windows6.1-KB958830-x64.msu / quiet (x64)
After installing the RSAT package, which contains most of the utilities and equipment needed by the administrator, they will be available in the Control Panel (Programs & Features – Windows Features).
Related post : Change domain computer password
Step 2. Turn on snap-ins and RSAT features
The various functions of the RSAT package can be activated using the command line utility (CLI), called DISM (Deployment Image Services and Management), its use is completely analogous to the procedure for enabling / disabling functions and roles in Windows Server 2008 R2 Server Core.
DISM allows you to list, install, remove, configure, or update features and packages in a Windows image. The list of available commands depends on the operating mode of the system: offline or online.
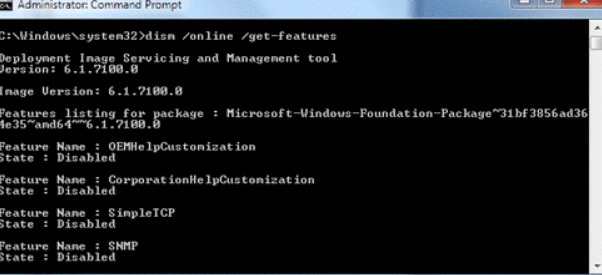
To get a list of all available functions, type in the command line:
dism / Online / Get-Features
Related post : How to run 32-bit applications in 64-bit versions
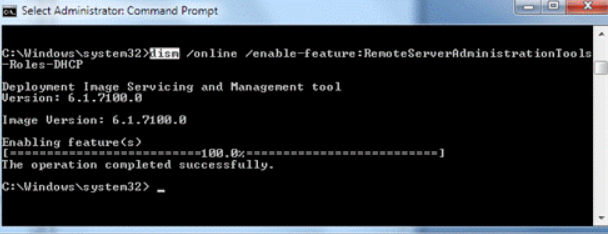
Using the utility DISM (Deployment Image Servicing and Management), To activate a particular function, use the command:
dism / Online / Enable-Feature / FeatureName:
For example:
dism / Online / Enable-Feature: RemoteServerAdministrationTools
dism / Online / Enable-Feature: RemoteServerAdministrationTools-Roles-DHCP
Related post : How to delegate administration of the RODC controller
Below I will provide a full list of function names available in RSAT.
Feature Names:
- RemoteServerAdministrationTools
- RemoteServerAdministrationTools-ServerManager
- RemoteServerAdministrationTools-
- RemoteServerAdministrationTools-Roles
- RemoteServerAdministrationTools-Roles-CertificateServices
- RemoteServerAdministrationTools-Roles-CertificateServices-CA
- RemoteServerAdministrationTools-Roles-CertificateServices-OnlineResponder
- RemoteServerAdministrationTools-Roles-AD
- RemoteServerAdministrationTools-Roles-AD-DS
- RemoteServerAdministrationTools-Roles-AD-DS-SnapIns
- RemoteServerAdministrationTools-Roles-AD-DS-AdministrativeCenter
- RemoteServerAdministrationTools-Roles-AD-DS-NIS
- RemoteServerAdministrationTools-Roles-AD-LDS
- RemoteServerAdministrationTools-Roles-AD-Powershell
- RemoteServerAdministrationTools-Roles-DHCP
- RemoteServerAdministrationTools-Roles-DNS
- RemoteServerAdministrationTools-Roles-FileServices
- RemoteServerAdministrationTools-Roles-FileServices-Dfs
- RemoteServerAdministrationTools-Roles-FileServices-Fsrm
- RemoteServerAdministrationTools-Roles-FileServices-StorageMgmt
- RemoteServerAdministrationTools-Roles-HyperV
- RemoteServerAdministrationTools-Roles-RDS
- RemoteServerAdministrationTools-Features
- RemoteServerAdministrationTools-Features-BitLocker
- RemoteServerAdministrationTools-Features-Clustering
- RemoteServerAdministrationTools-Features-GP
- RemoteServerAdministrationTools-Features-LoadBalancing
- RemoteServerAdministrationTools-Features-SmtpServer
- RemoteServerAdministrationTools-Features-StorageExplorer
- RemoteServerAdministrationTools-Features-StorageManager
- RemoteServerAdministrationTools-Features-Wsrm
Related post : Windows 7 RSAT for Windows Server
The RSAT toolkit in Windows Server 2008 R2 and Windows 7 will also allow you to remotely manage servers (running Windows Server 2008 R2) using the Server Manager snap-in via remote PowerShell. Server roles and its functions will be available for management using local and remote PowerShell 2.0 scripts. Thus, after installing RSAT Windows 7, the Server Manager console familiar to you will appear at your disposal.
Related post : Installing the Active Directory snap-in in Windows 7
Active Directory Users and Computers is a standard Microsoft Windows Server feature. Using it manages recipients: in other words, this tool allows you to add users to your network, as well as other computers. You will be able to create groups and control your shared devices, such as printers. This tool creates a network of computers using the same domain, so you can set up and control your computer, using the access from a different location. This guide will help you understand how to install Active Directory Users and Computers on Windows 7.
Step 1. Go to Microsoft website and download the package for the Microsoft Windows Server feature.
Choose the package that is designed for your system, which can be either 32-bit or 64-bit. To find out what version of Windows you are running, you need to follow this pathway: Start menu > All Programs >Accessories > System Tools folder. In the System Tools folder, select the System Information option, and the value column will have the answer.
Step 2. Install the update package.
To do that, follow these instructions:
- Once you’ve downloaded the package and opened it, you will get a message that explains that you can, in fact, install it. Click Yes.
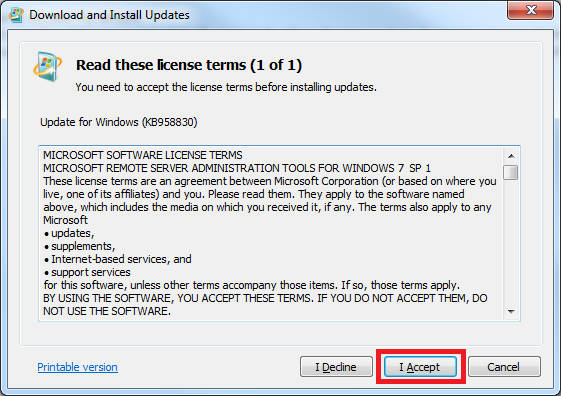
- You will get a window stating all the terms of the agreement.
- You have to Accept it to proceed.
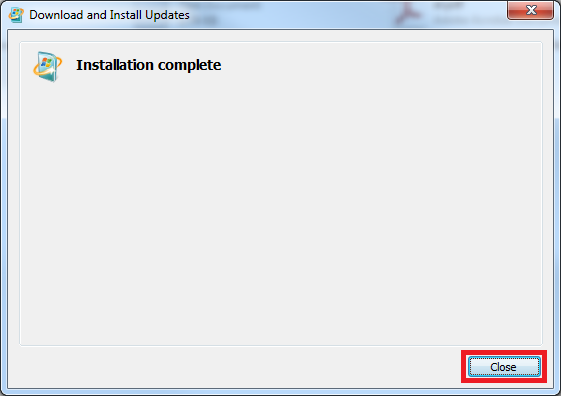
- The installation will start, and after it is completed, click Close to close the window.
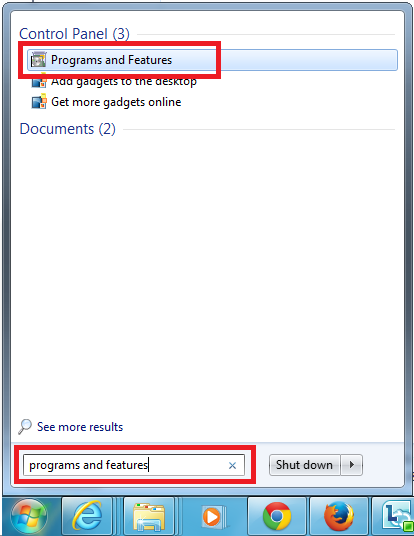
Step 3. Open the Windows Start menu and type ‘Programs and features’ in the search box.
- on the left side of the window, click the link that says, ‘turn Windows features on or off’
- follow this pathway: Remote Server Administration Tools > Role Administration Tools > AD DS and AD LDS Tools > AD DS Tools
- Tick the box next to ‘Active Directory Administrative Center’ and click OK to save the changes

- After you have installed the Microsoft Windows Server, you will find Active Directory Users and Computers in the Windows Start menu.

In order to run Active Directory Users and Computers tools on Windows 7, you need to be confident in your system. Unfortunately, Windows 7 security issues leave your computer exposed to various malicious programs. If you use an anti-malware tool such as Auslogics Anti-Malware, you can have a significant advantage.

This tool can find out if you are being tracked by cookies that collect your personal data, which is an essential feature nowadays. Depending on your internet activity, you’ll get a schedule for your scans. In other words, it’s important to take preventive measures to safeguard your computer when you are browsing the web or creating a group of computers that use the same domain, all connected by the “Active Directory Users and Computers” feature. The program will perform a series of scans to determine the status of the overall health of your operating system:
- quick scan
- deep scan
- custom scan
We hope this guide was useful, and you’ve learned how to install Active Directory Users and Computers on Windows 7 and many of the underlying issues this question may have raised.
The Active Directory Users and Computers tools come as part of the Microsoft Server Tools. Once the Server Tools are installed you are able to add the Active Directory Users and Computers tools features to the computer. The steps below detail how to do this.
Step 1: Download from Microsoft website
- Download the package here: https://docs.microsoft.com/en-us/troubleshoot/windows-server/system-management-components/remote-server-administration-tools – make sure to select the correct one for your system, 32-bit or 64-bit
Step 2: Install the update package
- When you run the update package you will see this message, which explains that you are able to install an update – click ‘Yes’
- Then after reading and agreeing to the terms, click ‘I Accept’
-

- The installation will take a few minutes, when complete click ‘Close’
-
Step 3: Turn on the “feature”
- Open the Windows Start menu and in the search box type ‘Programs and Features’.
- When it appears above, click on the icon for ‘Programs and Features’
-

- On the left of the window click on the link for ‘Turn Windows features on or off’
- Expand Remote Server Administration Tools > Role Administration Tools > AD DS and AD LDS Tools > AD DS Tools
- Place a tick next to ‘Active Directory Administrative Center’
-
- Click ‘OK’ to save the changes
- Once it is installed you can use the Windows Start menu to find ‘Active Directory Users and Computers’
-


If you are looking to install active directory users and computers tools on your Microsoft windows 10/8/vista/7 then obviously this article will help you. By default, Active Directory tools are not available in Windows operating systems. So that if you want to install, then you manually download this updated package in official Microsoft site.I believe that the below steps helpful for your needs.
Table of Contents
As was previously stated, the Active Directory doesn’t install your Windows 7 systems. Given these points, guide how to add users and computers tools in your local as well as remote computers.
Download and Install Windows 7 Remote Server Administration Tools Package
Step 1: At first thing go to the following official Microsoft website link: –
https://www.microsoft.com/en-AU/download/details.aspx?id=7887
Step 2: Under the “Remote Server Administration Tools for Windows 7 with Service Pack 1 (SP1)” click “Download” button.
Step 3: Make sure once you have to download this package whether x64(64 bit) or X86(32 bit).
(Note: – if you don’t know your system type then go to Start-> right click the “computer” tab and click properties.)
Step 4: Select the appropriate active directory package and click the “Next” button.
Step 5: Now, the file is download here.
Step 6: After download completion, run the setup, and installed your system.
Step 7: During install this package it will show the dialogue box and ask, “Do you want to install the following windows software update” then click the “Yes” button.
Step 8: Hereafter reading those Microsoft terms and conditions and click “I Accept” button.
Step 9: After installation is complete, then click the “Close” button.
Turn on “Active Directory Administrative Center” windows feature in Control Panel:
Step 10: Go to the windows start menu -> click “Control Panel.”
Step 11: Press “Programs and Features” option under the “Adjust your computer’s settings” screen.
Step 12: In the left side window, find the option named “Turn Windows features on or off” and click that link.
Step 13: however, it will show the “Windows Features” popup screen here.
Step 14: Scroll down the mouse as well as to find “Remote Server Administration Tools.”
Select the Active Directory Administrative Center option
Step 15: Next expand the following directory “Remote Server Administration Tools > Role Administration Tools > AD DS and AD LDS Tools > AD DS Tools.”
Step 16: Moreover, tick the checkbox named “Active Directory Administrative Center.”
Step 17: After all finished then click the “OK” button.
Step 18: System sometimes takes to save these changes.
Step 19: Restart your Windows 7 system once.
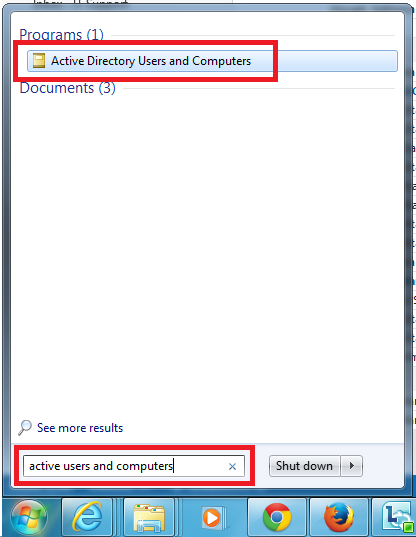
Step 20: Henceforth go to the windows start menu and type “Active Directory Users and Computers” to make sure the option is showing here or not.
RSAT Installation for Windows 10/8 1809 and other advanced versions
Admittedly, if you are using windows 10 version 1809 and any other higher versions, then Microsoft installer cannot support this RSAT installation.because its already there in windows feature. So that you can following these steps to turn on this RSAT Active Directory tools.
Step 1: Go to the start menu in your Windows 10 system.
Step 2: Next select “settings->apps->Manage optional features->Add feature.”
Step 3: Find the option named as “RSAT: Active Directory Domain Services and Lightweight Directory Tools.”
Step 4: Click “Install,” then the system can take some time to update this new feature.
Step 5: After a while, this tool will be appeared and belongs to the “Start -> Windows Administrative Tools.”
Windows 10/8 1803 and other earlier version- Steps to install the Active Directory Users and Computers tools
Similarly, Windows 10/8 systems also do not have this feature so that you can download and install these Active Directory users and computers tools here.
Note: – Active directory installation only allowed for Windows 10 Professional or Enterprise systems.
In other kinds of Windows 10 versions, “Remote Server Administration Tools” installation will not work so far.
Official download page for Windows 10 administrative tools
Step 1: Go to that following Microsoft page link:-
https://www.microsoft.com/en-us/download/details.aspx?id=45520
Step 2: Click the “download button” under “Remote Server Administration Tools” for Windows 10.
Step 3: Make sure your Windows 10 system type (32 bit/64 bit) first and tick the mark for a suitable package.
Step 4: After-all click the “Next” button then download is to start.
Install Windows 10/8 Remote Server Administration Tools on your system
Step 5: Locate the active directory download folder and run that setup one by one.
Step 6: During your installation, it will ask the confirmation “windows update standalone installer” prompt then you can click “Yes” to proceed further installations.
Step 7: By the same way, install all packages in your windows 10/8 systems. I download the three files so that I can Install those all three files sequentially.
Active Directory Administrative Center – Turn ON this Windows Feature
Step 8: In windows start menu type “Control Panel.”
Step 9: Choose the following option here.
“Control panel -> Programs -> Programs and Features -> Turn Windows features on or off”
Step 10: In that dialog box, scroll down your mouse continuously and find the “Remote Server Administration Tools” option.
Step 11: Expand this selection, then some list of tools shows here.
Step 12: For now, expand (+) the “Role Administration Tools.”
Step 13: Select the checkbox for belongs to the “AD DS Tools.” after that suddenly windows systems will install some files, and everything will be done then prompt says rebooting the system.
Step 14: Next Restart your system and after select the start menu and type your keyboard “active directory” then ensure once again users & computers administrative tools shows in your windows 10/8 or other earlier versions.
Suppose Windows 10 “Remote Server Administration Tools” option is not there?
Step 1: On the other hand, Windows Features doesn’t have the option “Remote Server Administration Tools” then alternatively you can following these instructions.
Step 2: Likewise, follow above step 1 to step 9.
Step 3: “Turn Windows features on or off” dialog box choose the option “Active Directory Lightweight Directory Services” and click “OK” button.
Step 4: Then Windows updated for these new changes.
Step 5: After that, everything will ok, type windows start menu for “active directory” and check this “Active Directory Users and Computers” should install correctly.