
In this guide, I’ll show you how to install the RSAT tools on Windows 10, Windows 11, and Windows Server. I’ll also show you how to install RSAT using PowerShell.
To remotely manage Active Directory, DNS, DHCP, and other Windows features you will need the Remote Server Administration Tools (RSAT) installed.
- Install RSAT Tools on Windows 10
- Install RSAT Tools on Windows 11
- Install RSAT Tools on Windows Server
- How to Install RSAT using PowerShell
Note: Starting with Windows 10 October 2018 Update, the RSAT tools no longer need to be downloaded. They are now included with the Windows build and just need to be installed. RSAT tools are only supported on Windows Pro and Enterprise versions of Windows 10 and 11.
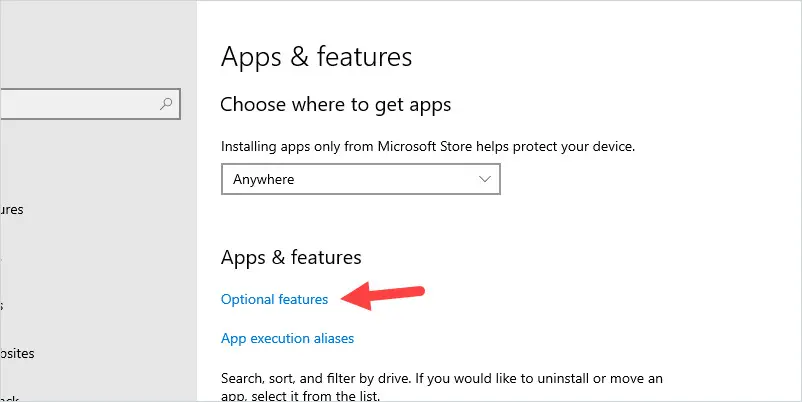
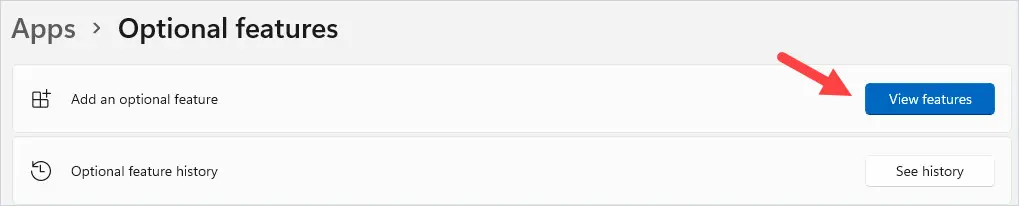
1. Open Apps & features and click on “Optional features”
2. Click on Add a feature.
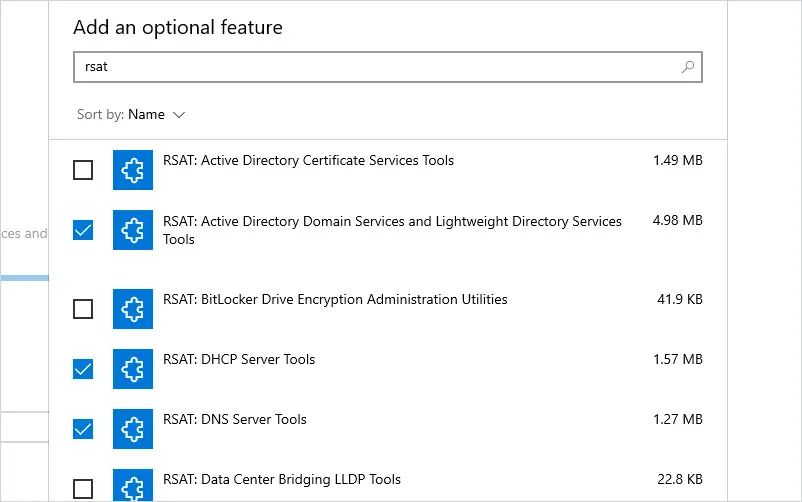
3. Type rsat and then select the RSAT tools you want to install.
In this example, I’ll install the Active Directory, DHCP, and DNS tools.
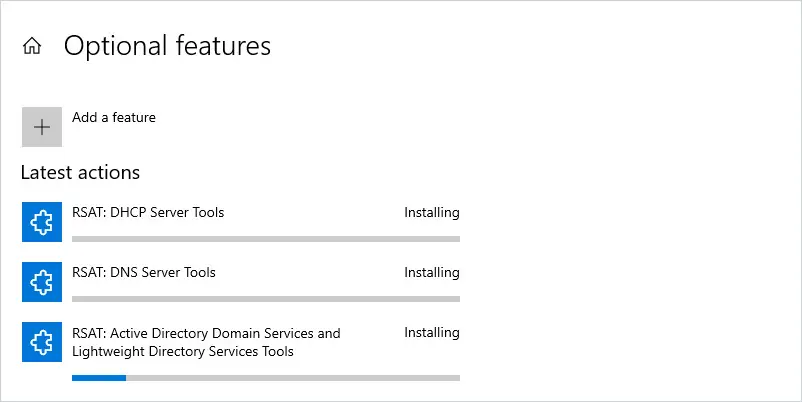
4. Click install to start the installation.
When the installation is complete the status will say installed.
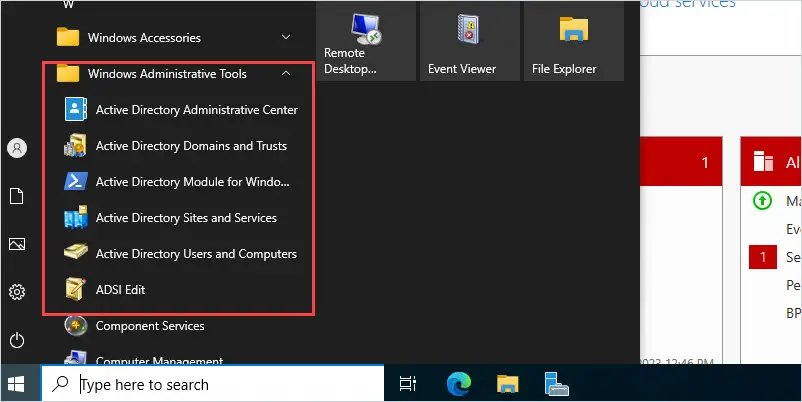
You can now navigate to the start -> Windows Administrative Tools to open one of the RSAT tools.

Install RSAT on Windows 11
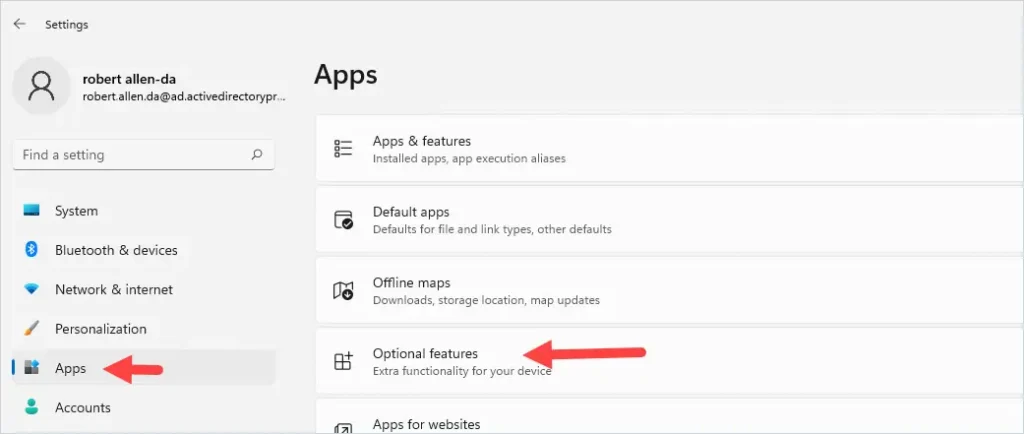
On Windows 11 go to settings and then Apps.
Click on Optional Features.
Click on the View Features button.
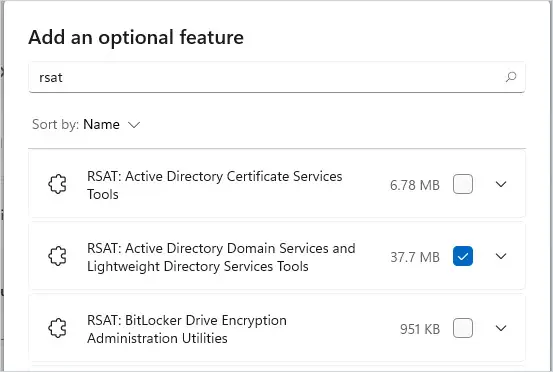
Type in rsat and select the tools you want to install.
In this example, I’ll select the Active Directory Domain Services tool.
Click “Next”.
Click “Install”.
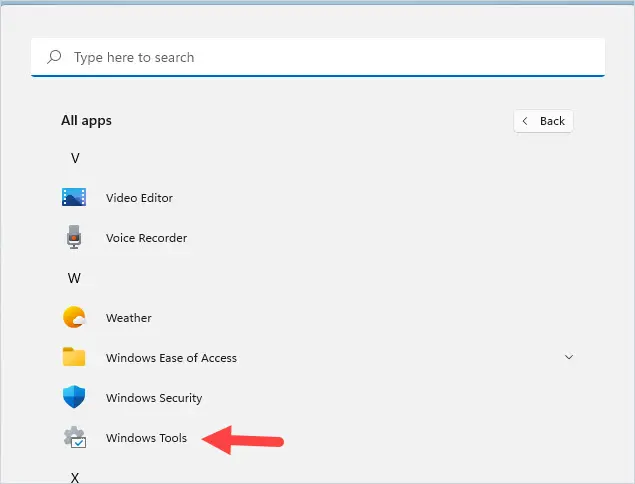
When the installation is complete, you can access the tools by going to all apps -> Windows Tools.
Install RSAT on Windows Server
These steps work for Server 2016, 2019, and 2022.
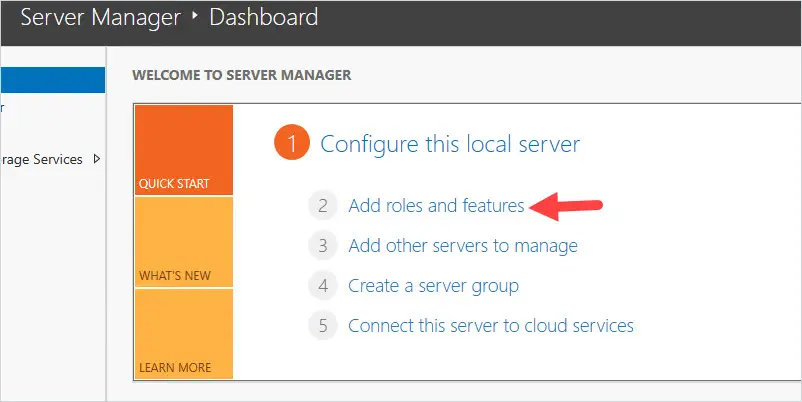
1. Open the Server Manager and click on Add roles and features
Click Next.
Select “Role-based or featured-based installation” and click next
Select your server and click next.
For server roles click Next. (We are not adding any server roles).
For features scroll down to Remote Server Administration Tools).
Select the tools you want to install and click next.
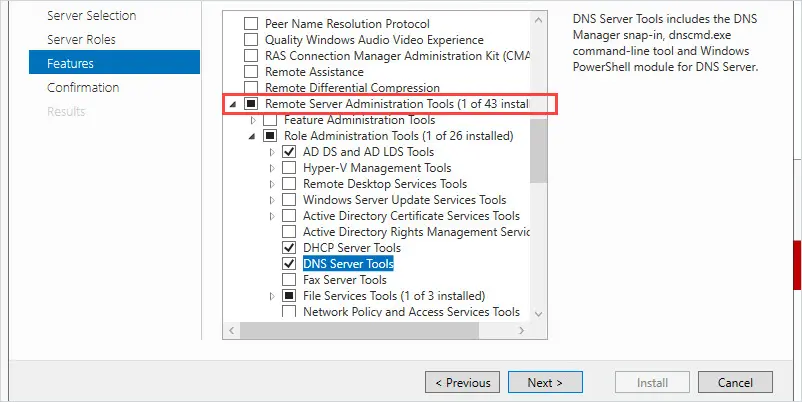
Confirm the selections and click install.
When the installation is complete the tool can be accessed from start -> Windows Administration Tools
Using PowerShell to Install RSAT
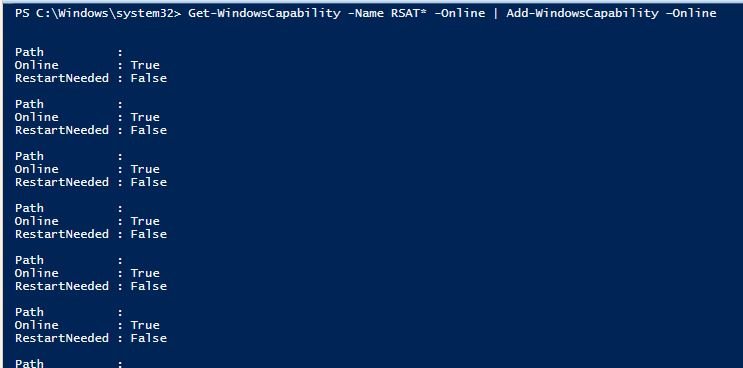
You can install individual RSAT tools or all of them using Powershell.
Example 1.Install all RSAT tools run the below command.
Get-WindowsCapability -Name RSAT* -Online | Add-WindowsCapability –Online
Example 2. Install Specific RSAT Tool using PowerShell
To install individual tools you will use the Add-WindowsCapability -Online -Name command followed by the PowerShell tool name.
In this example, I’ll install the Active Directory Domain Servers tools using the command below.
Add-WindowsCapability -Online -Name Rsat.ActiveDirectory.DS-LDS.Tools~~~~0.0.1.0Use the names below to install other RSAT tools via PowerShell.
Active Directory Domain Servers and Lightweight Directory Services Tools: Rsat.ActiveDirectory.DS-LDS.Tools~~~~0.0.1.0
BitLock Drive Encryption Administration Tools: Rsat.BitLocker.Recovery.Tools~~~~0.0.1.0
Active Directory Certificate Services:
Rsat.CertificateServices.Tools~~~~0.0.1.0
DHCP Server Tools:
Rsat.DHCP.Tools~~~~0.0.1.0
DNS Server Tools:
Rsat.Dns.Tools~~~~0.0.1.0
Failover Clustering Tools:
Rsat.FailoverCluster.Management.Tools~~~~0.0.1.0
File Services Tools:
Rsat.FileServices.Tools~~~~0.0.1.0
Group Policy Management Tools:
Rsat.GroupPolicy.Management.Tools~~~~0.0.1.0
IP Address Management (IPAM) Client:
Rsat.IPAM.Client.Tools~~~~0.0.1.0
Data Center Bridging LLDP Tools:
Rsat.LLDP.Tools~~~~0.0.1.0
Network Controller Management Tools:
Rsat.NetworkController.Tools~~~~0.0.1.0
Network Load Balancing Tools:
Rsat.NetworkLoadBalancing.Tools~~~~0.0.1.0
Remote Access Management Tools:
Rsat.RemoteAccess.Management.Tools~~~~0.0.1.0
Remote Desktop Services Tools:
Rsat.RemoteDesktop.Services.Tools~~~~0.0.1.0
Server Manager:
Rsat.ServerManager.Tools~~~~0.0.1.0
Shielded VM Tools:
Rsat.Shielded.VM.Tools~~~~0.0.1.0
Storage Migration Service Management Tools:
Rsat.StorageMigrationService.Management.Tools~~~~0.0.1.0
Storage Replica Module for Windows PowerShell:
Rsat.StorageReplica.Tools~~~~0.0.1.0
System Insights Module for Windows PowerShell:
Rsat.SystemInsights.Management.Tools~~~~0.0.1.0
Volume Activation Tools:
Rsat.VolumeActivation.Tools~~~~0.0.1.0
Windows Server Update Services Tools:
Rsat.WSUS.Tools~~~~0.0.1.0
You can use PowerShell to view which RSAT tools are installed with the following command.
Get-WindowsCapability -Name RSAT* -Online | Select-Object -Property DisplayName, State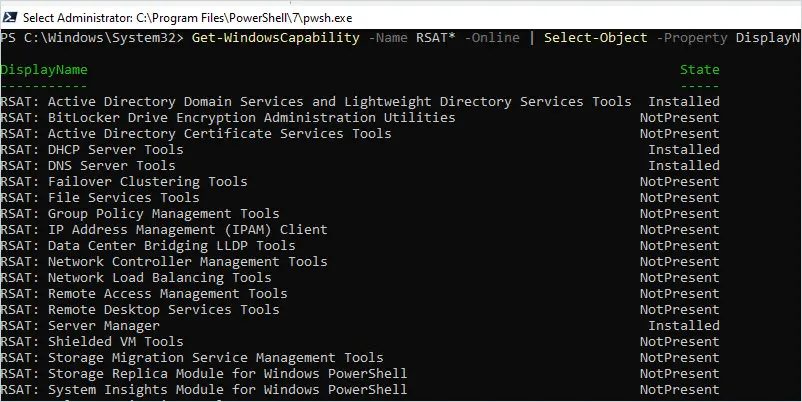
Simplify Active Directory Management with AD Pro Toolkit
Managing Active Directory with the RSAT tools has its limitations, such as bulk editing and no reporting. Fortunately, the AD Pro Toolkit simplifies bulk management and reporting with its comprehensive set of Active Directory Tools. The toolkit also includes a built in scheduler to automate tasks and reporting.
AD Pro Toolkit Key Features:
- Bulk import users
- Bulk update users
- Cleanup inactive user and computer accounts
- User management tools
- Quickly unlock and reset user passwords
- Manage user group membership
- Onboard and offboard users
- 200+ built-in Active Directory reports
In addition to the management tools, the toolkit includes over 200 built in Active Directory Reports. Create security reports, compliance reports, customize reports and send email reports.
Try the AD Pro Toolkit for 14 days and experience the All-in-One Toolkit that makes managing Active Directory fast, easy and efficient. Download AD Pro Toolkit now and try it for yourself. Easy to Install and get started in minutes
I hope you found this article helpful. If you have questions leave a comment below.
Posted by essjae on March 7, 2016
Note: This assumes you’ve already got the RSAT tools installed. RSAT for Windows 10
Building on my post here for Hyper-V manager:
Running Hyper-V Manager as a different user in Windows 10 (Runas)
You can use the same method to get Active Directory Users and Computers (ADUC) and DNS MMC admin consoles working if you’re logged in with your Microsoft account versus your domain account:
DNS shortcut:
C:\Windows\System32\runas.exe /savecred /user:domain\username "cmd /c Start /B %SystemRoot%\system32\mmc.exe %SystemRoot%\system32\dnsmgmt.msc""
Icon path:
%SystemRoot%\system32\dnsmgr.dll
ADUC shortcut:
C:\Windows\System32\runas.exe /savecred /user:domain\username "cmd /c Start /B %SystemRoot%\system32\dsa.msc""
Icon path:
%SystemRoot%\system32\dsadmin.dll
When you double-click, you’ll get prompted for the password (if you haven’t already) and also for UAC


DHCP is a little more involved as the RSAT doesn’t include the DHCP manager. NOTE: this is not currently supported by MS
- 1. copy dhcpmgmt.msc and dhcpsnap.dll.mui from %windir%\system32\system32\en-us on the 2012 server to the same location on the w10 pc
- copy dhcpsnap.dll from %windir%\system32\ on the 2012 server to the w10 pc
- From an admin cmd prompt run: regsvr32.exe dhcpsnap.dll
- Create the short-cut: C:\Windows\System32\runas.exe /savecred /user:domain\username “cmd /c Start /B %SystemRoot%\system32\mmc.exe %SystemRoot%\system32\dhcpmgmt.msc””
- Change Icon path: %SystemRoot%\System32\dhcpsnap.dll
You’ll need to manually add your DHCP server each time you run this. I haven’t found a way to save the config.
*This was done with Windows 10 Build 1511 and Windows Server 2012.
For additional snap-ins, just modify the last part of the short-cut with the correct mmc path for the add-in you want.
This entry was posted on March 7, 2016 at 11:26 pm and is filed under Sysadmin, Windows, Windows 10, Windows 2012.
Tagged: ADUC, DHCP, DNS, RSAT, Windows, Windows 10, Windows Server 2012 R2. You can follow any responses to this entry through the RSS 2.0 feed.
You can leave a response, or trackback from your own site.
How to Enable DHCP Server in Windows 10?
Enabling a DHCP (Dynamic Host Configuration Protocol) server in Windows 10 allows you to assign IP addresses and other network settings to devices on your network. In this article, we will guide you through the process of enabling a DHCP server in Windows 10.
Why Do I Need a DHCP Server?
A DHCP server is essential in a network where you have multiple devices connected, such as in a home network, office, or even a large enterprise network. It helps to:
- Assign unique IP addresses to each device
- Keep track of IP address assignments
- Provide DNS (Domain Name System) and gateway settings
- Support roaming users by assigning IP addresses
How to Enable DHCP Server in Windows 10?
To enable a DHCP server in Windows 10, follow these steps:
Step 1: Install the DHCP Server Role
- Open the Start menu and search for «Add Roles and Features» or «Install the Windows Server with Desktop Experience» feature.
- Open the Add Roles and Features Wizard and select «Next» to begin the installation process.
- Select «Next» to continue with the installation.
- Check the box next to «DHCP Server» and click «Add Features» to install the DHCP server role.
Step 2: Configure the DHCP Server
- Open the DHCP console by typing «dhcp» in the «Run» dialog box and pressing Enter.
- Right-click on the «DHCP» server in the console and select «New Scope».
- Define the scope options:
- Scope name: Give your scope a name (e.g., «My Home Network»)
- Start IP address: Set the starting IP address (e.g., 192.168.1.100)
- End IP address: Set the ending IP address (e.g., 192.168.1.200)
- Subnet mask: Set the subnet mask (e.g., 255.255.255.0)
- Default gateway: Set the default gateway (e.g., 192.168.1.1)
- Click «Add» to add the scope.
- Configure DNS settings:
- Primary DNS suffix: Set the primary DNS suffix (e.g., myhome.local)
- DNS server search order: Set the DNS server search order (e.g., 192.168.1.1, 8.8.8.8)
- Click «OK» to close the New Scope Wizard.
Step 3: Start the DHCP Server
- Open the «Services» console by typing «services.msc» in the «Run» dialog box and pressing Enter.
- Find the «DHCP» service and right-click on it to start it.
Step 4: Configure Network Settings
- Open the «Network and Sharing Center» by searching for it in the Start menu.
- Click on «Change adapter settings».
- Right-click on the «Ethernet» or «Wi-Fi» adapter and select «Properties».
- Select «Internet Protocol Version 4 (TCP/IPv4)» and click «Properties».
- Check the box next to «Obtain an IP address automatically» to enable DHCP.
- Apply the settings and close the window.
Troubleshooting Tips:
- Make sure you have a working internet connection and DNS resolution is enabled.
- Verify that your DHCP server is running and configured correctly.
- Check for any conflicts with existing network settings.
Conclusion
Enabling a DHCP server in Windows 10 allows you to manage and assign IP addresses to devices on your network. By following the steps outlined in this article, you can set up a DHCP server and configure it to meet your network’s needs.
Additional Resources:
- Microsoft documentation: Windows Server – DHCP
- Debian documentation: DHCP Configuration
Important:
- Make sure to secure your DHCP server with a strong password and configure it to only assign IP addresses to authorized devices.
- Use a secure password for your DHCP server to prevent unauthorized access.
- Regularly back up your DHCP server configuration to prevent data loss.
Your friends have asked us these questions — Check out the answers!

Estimated reading time: 1 minutes
If you are a server administrator, you will have noticed that the RSAT for Windows 10 does not include the DHCP Console with it.
The reason why Microsoft have removed this is unknown to us but we are here to put it right!
We have now created a program that you can install on your machine which will allow you to use the DHCP Console on a Windows 10 machine.
Note that we have only created this for 64-bit versions of Windows 10 at the moment, if you would like it for the 32-bit version please let us know by leaving a comment below.
Download
Download DHCP Console for Windows 10
Instructions
Included in the download is an EXE installer and also a MSI installer so that you can use it to deploy to machines using Group Policy, WDS or Configuration Manager.
Simply run one of the installers and you will see a DHCP icon appear on your desktop, run it and there you go, a DHCP Console.
Screenshots
If you have any questions on this or just want to say thanks, please feel free to leave us a message below using our comments system.
Стала доступна для загрузки англоязычная версия Remote Server Administration Tools for Windows 10 (только для редакций Windows 10 Professional и Enterprise). После установки пакета все инструменты RSAT активны по умолчанию (не требуют активации через механизм включения компонент Windows). Однако если установка выполняется на локализованную (напр. русифицированную) клиентскую систему Windows 10, то для появления соответствующих оснасток в системе необходимо предварительно установить английский языковой пакет. Сделать это можно разными способами, например через утилиту lpksetup.exe

И только после установки языкового пакета можно устанавливать RSAT (только в этом случае после его установки система попросит перезагрузки, после которой в панели управления появятся соответствующие административные оснастки).
Этот релиз RSAT не содержит следующих работоспособных инструментов:
— DHCP Tools (Dhcpmgmt.msc);
— IP Address Management (IPAM) Tools;
— Network Policy Server Tools;
— Routing and Remote Access Tools.
Для DHCP Tools и Routing and Remote Access Tools в составе RSAT поставляются эквивалентные командлеты Windows PowerShell.
Загрузить сабж можно по ссылке: Remote Server Administration Tools for Windows 10