
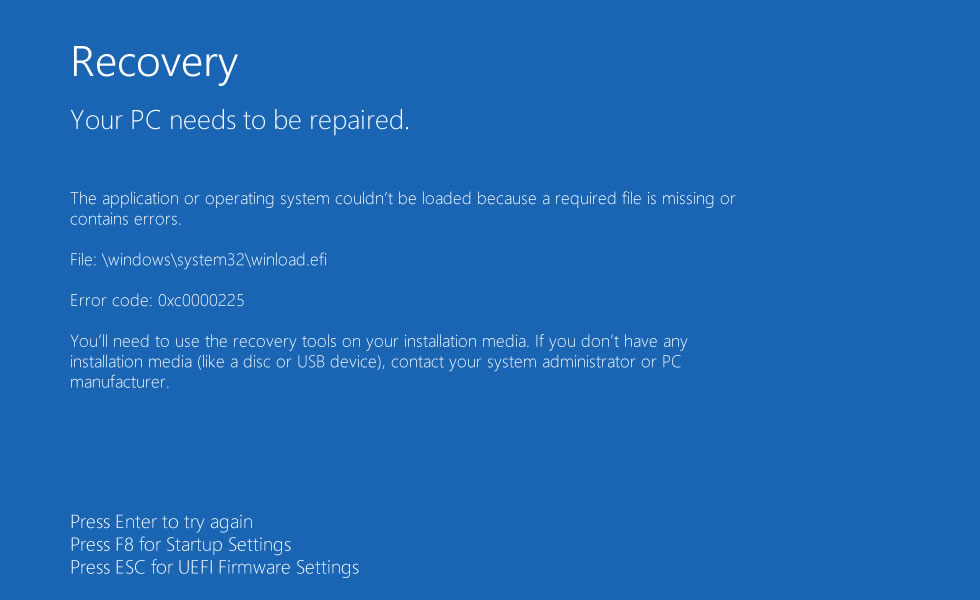
Рассмотрим еще одну распространенную ошибку загрузки Windows 10, вызванную повреждением или отсутствием файла winload.efi. Проблема проявляется следующим образом: Windows 10 перестает загружаться с ошибкой BSOD и следующим сообщением на экране загрузки:
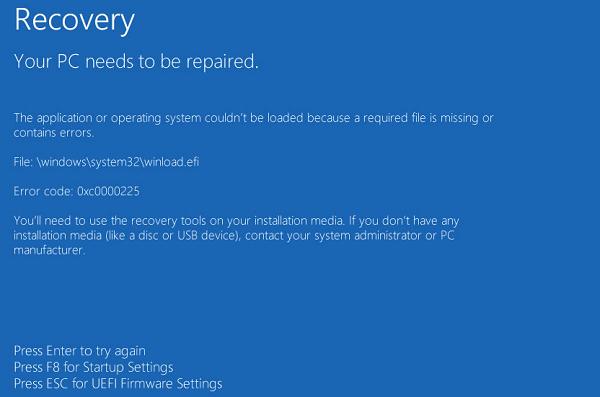
Recovery
Your PC needs to be repaired
The application or operating system couldn’t be loaded because a required file is missing or contains errors.
File: \Windows\system32\winload.efi
Error code: 0xc000000f
You’ll need to use the recovery tools on your installation media. If you don’t have any installation media (like a disc or USB device), contact your system administrator or PC manufacturer.
Press Enter to try again
Press F8 for Startup Settings
Press ESC for UEFI Firmware Settings
Примечание. Код ошибки может быть и таким: Error code: 0xc0000225 или 0xc0000001.
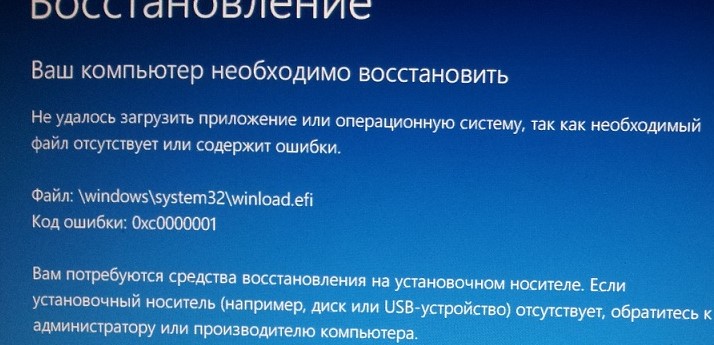
В русской версии Windows ошибка выглядит так:
Ваш компьютер необходимо восстановить
Не удалось загрузить приложение или операционную системы, так как необходимый файл отсутствует или содержит ошибки
Файл \Windows\system32\winload.efi
Код ошибки 0xc0000225
Вам потребуется средства восстановления на установочном носителе. Если установочный носитель (например, диск или USB-устройство) отсутствует, обратиться к администратору или производителю компьютера.
Данная проблема связана с отсутствием или повреждением файла загрузчика \windows\system32\winload.efi. Эта проблема появляется чаще всего после некорректного обновления системы, при повреждении диска или файловой системы, при переразбивке диска сторонними утилитами, обновлении антивируса, после переноса (клонирования) установленного образа Windows на новый диск, замене материнской платы компьютера и прочими вмешательствами.
Файл Winload.efi – это исполняемый файл среды EFI, который инициализирует окружение и запускает загрузку Windows.Если этот файл поврежден, отсутствует или в конфигурации загрузки BCD указан путь к несуществующему тому с файлом winload.efi, Windows не сможет загрузиться.
Решение проблемы зависит от того, использовался ли у вас режим загрузки UEFI или Legacy до возникновения проблемы. Далее рассмотрим основные шаги, которые помогут исправить данную ошибку и корректно загрузить Windows 10/Windows Server 2016.
Содержание:
- Включите режим совместимости CSM и отключите Secure Boot
- Автоматическое восстановление загрузчика Windows
- Отключите функцию защиты ELAM
- Выполните проверку дисков на ошибки и целостность системных файлов
- Восстановление BCD загрузчика и файла winload.efi для UEFI системы
- Пересоздание загрузочных записей в хранилище BCD с помощью bootrec и bcdedit
Включите режим совместимости CSM и отключите Secure Boot
Большинство компьютеров с поддержкой UEFI могут загружаться как с дисков с таблицей разделов GPT, так и с MBR дисков старого формата в режиме совместимости (Legacy).
Перезагрузите компьютер и войдите в меню настройки UEFI. Клавиша входа в меню UEFI зависит от производителя компьютера, как правило, это клавиши F2, F8, Del или Esc. Либо на нажмите кнопку ESC прямо на экране с ошибкой.

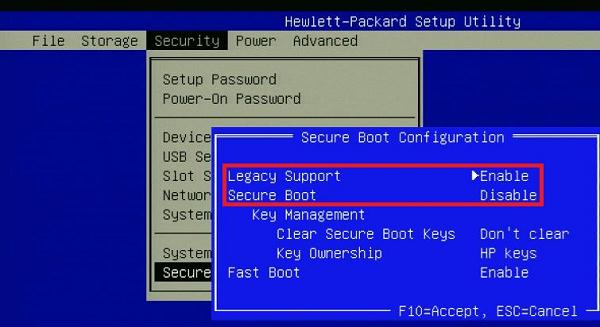
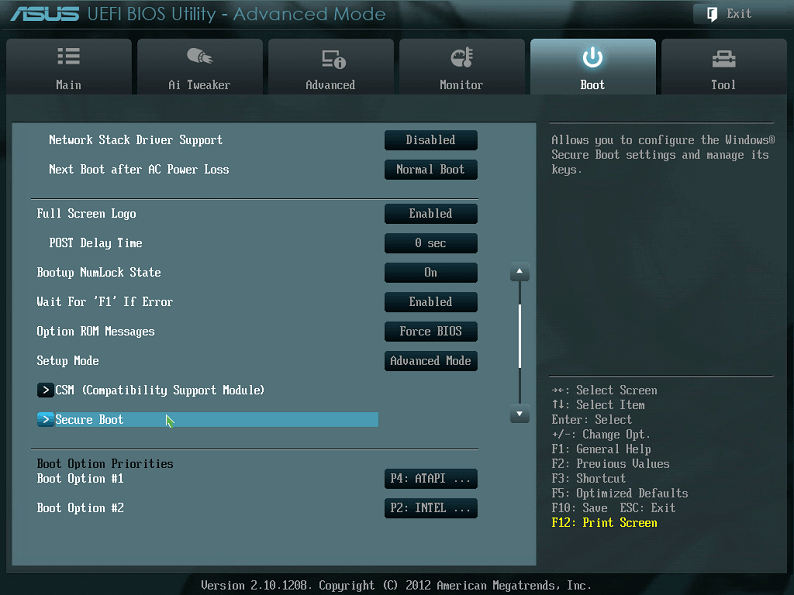
- Попробуйте в настройках UEFI включить режим совместимости CSM Boot (в некоторых версиях прошивок UEFI он может называться Legacy Boot);
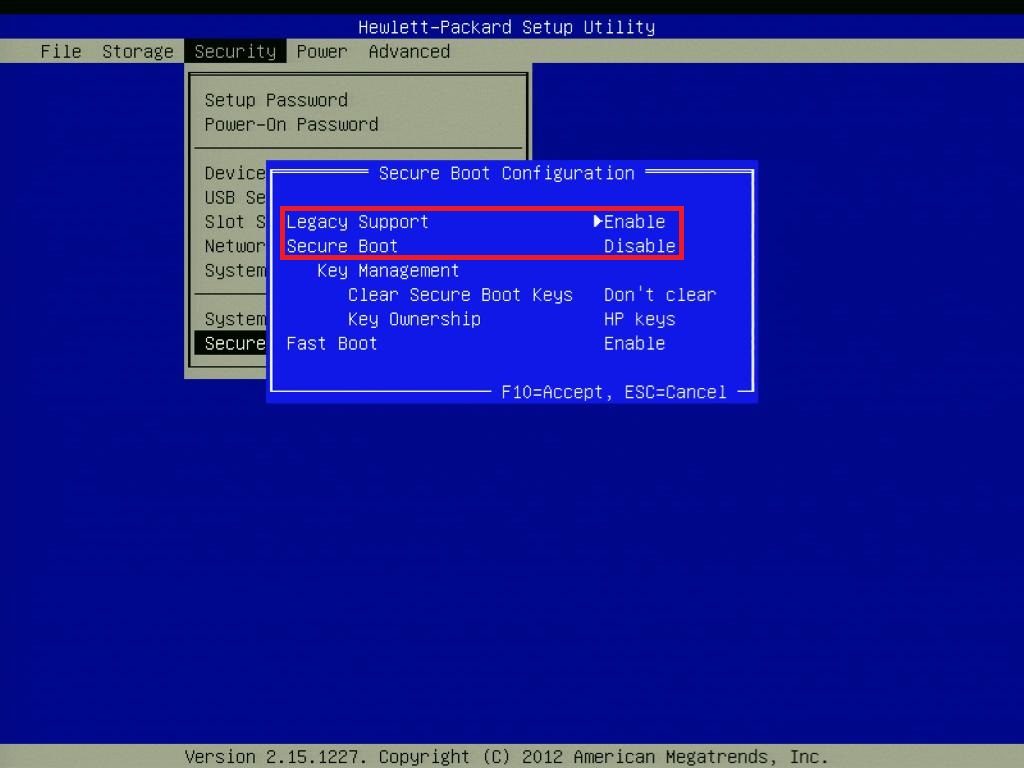
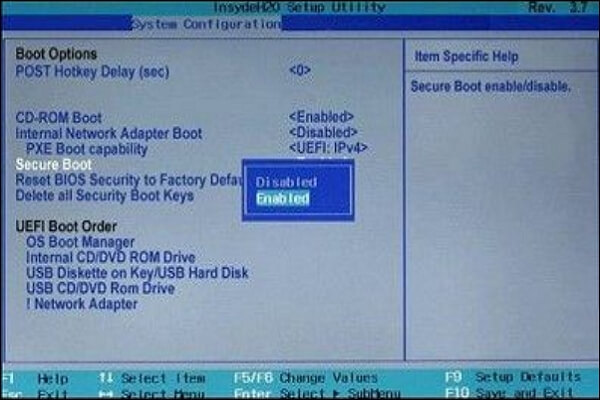
- В настройках UEFI найдите и отключите режим Secure Boot. Местоположение данной настройки зависит от производителя прошивки UEFI. Как правило, ее стоит поискать в разделах Security, Authentication или Boot. На ноутбуке HP, например, пункт Secure Boot находится в разделе Security. Измените режим Secure Boot на Disabled или Off;

Совет. Ранее мы уже рассказывали, что такое UEFI и для чего нужен режим Secure Boot. Велика вероятность, что проблема с недоступностью файла winload.efi при загрузке системы исчезнет после отключения режима Secure Boot в настройках UEFI.
- Проверьте приоритет загрузки дисков. Убедитесь, что в качестве первичного устройства загрузки в настройках UEFI выбран ваш жесткий диск с Windows;
- Не забудьте сохранить изменения и перезагрузите устройство;
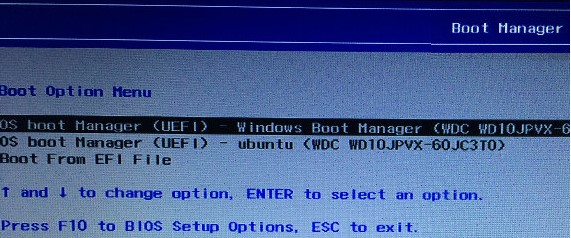
- Если при загрузке компьютера доступно UEFI Boot меню, попробуйте вручную выбрать запись OS Boot Manager (UEFI) – Windows Boot Manager.

Автоматическое восстановление загрузчика Windows
Попробуйте исправить ошибку с помощью средства автоматического восстановления системы. Для этого:
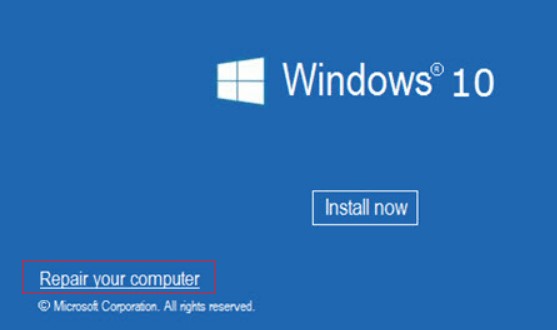
- Загрузитесь с установочного DVD диска (или загрузочной UEFI флешки) с Windows 10;
- Нажмите кнопку Repair your computer (Восстановить ваш компьютер) или клавишу R;

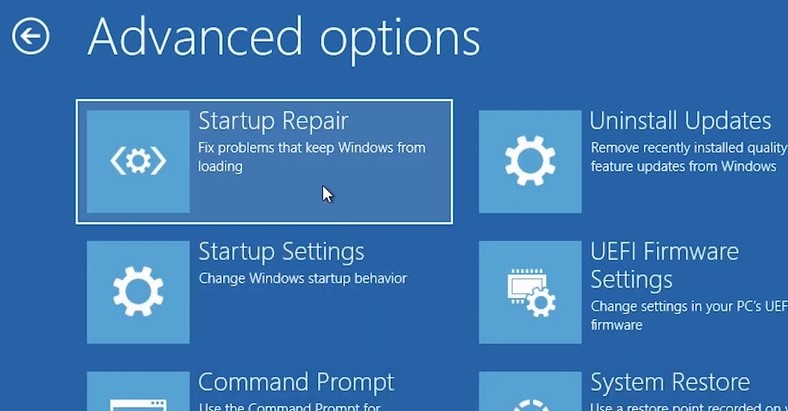
- Перейдите в раздел Troubleshoot-> Advanced options -> Startup repair (Диагностика -> Дополнительные параметры -> Восстановление системы);

- Запустится мастер восстановления. Далее следуйте его инструкциям.
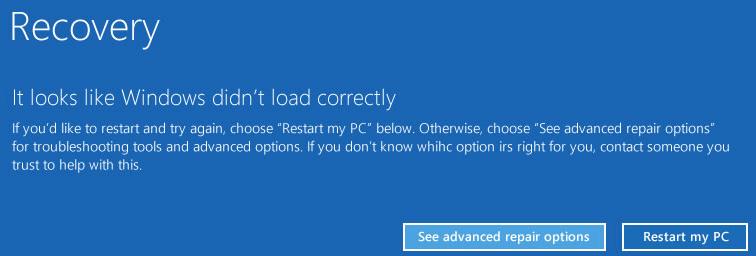
Если установочного диска с Windows под рукой нет, следует три раза перезагрузить компьютер нажатием на кнопку питания (Power) до тех пор, пока не появится экран консоли восстановления WinRe. Выберите пункт See advanced repair options (Дополнительные варианты восстановления). Далее все аналогично.
Отключите функцию защиты ELAM
Если предыдущие методы не исправили ошибку с загрузкой winload.efi, попробуйте отключить технологию ранней защиты от вредоносного ПО — ELAM (Early-launch Anti-Malware), которая по умолчанию активна для загрузчика Windows.
Примечание. Технология ELAM – позволяет сертифицированным антивирусам загружаться до запуска всего стороннего ПО. Антивирус в этом случае может выполнять раннюю антивирусную проверку и контролировать запуск драйверов и загружаемого ПО.
Для этого:
- Выполните шаги 1-2 из 2 способа;
- Перейдите в раздел Troubleshoot-> Advanced options -> Startup settings (Диагностика -> Дополнительные параметры -> Восстановление при загрузке);
- Перезагрузите компьютер, нажав кнопку Restart;
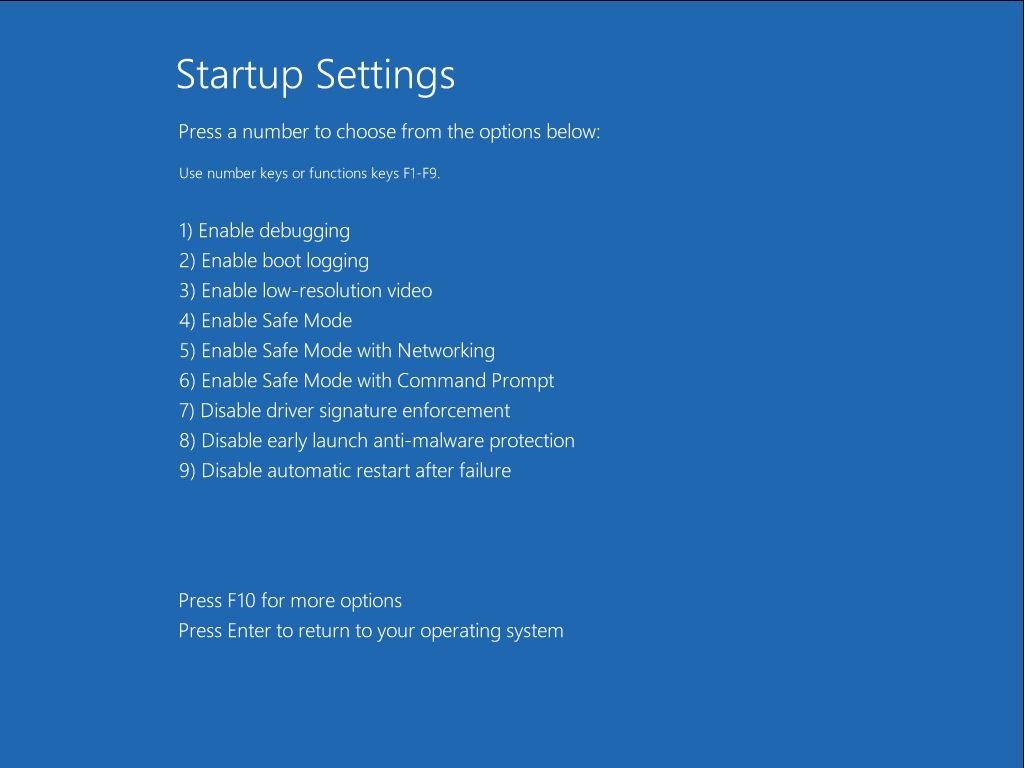
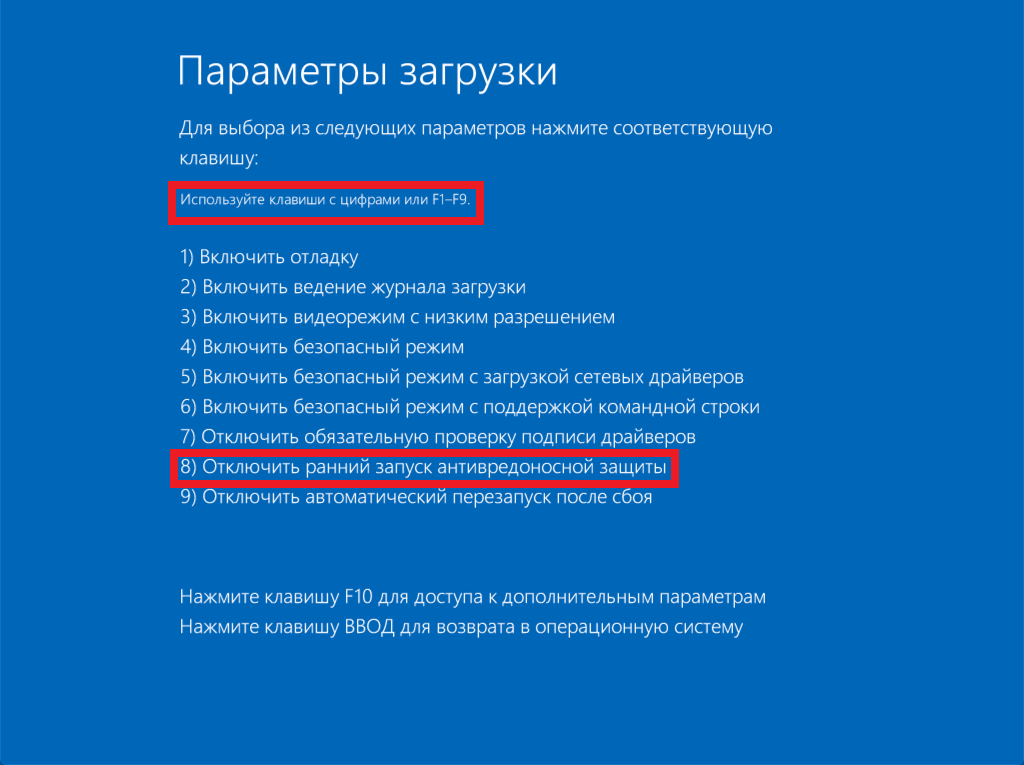
- После следующей загрузки, система автоматически откроет меню настройки параметров загрузки — Startup Setting / Параметры загрузки (кстати, именно отсюда можно Windows 10 в безопасном режиме);
- Нажмите F8 чтобы выбрать пункт
 Disable early launch anti-malware protection / Отключить автоматическую перезагрузки при сбое системы.
 Disable early launch anti-malware protection / Отключить автоматическую перезагрузки при сбое системы.
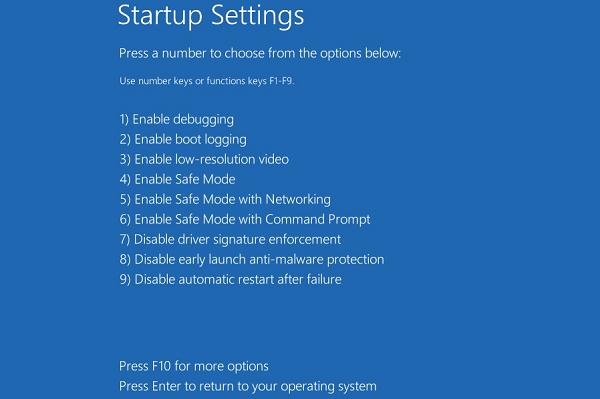
Выполните проверку дисков на ошибки и целостность системных файлов
Проверьте свои диски на наличие ошибок, возможно имеются ошибки диска или файловой системы на разделе с файлом winload.efi. Чтобы проверить все диски на наличие ошибок и исправить их, выполните команду:
chkdsk /f /r
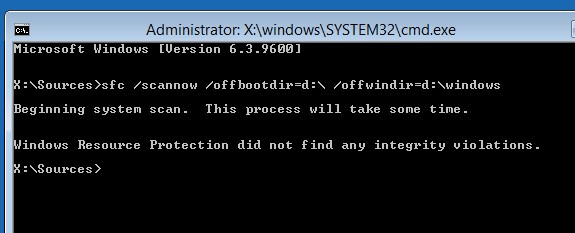
После этого желательно проверить целостность системных файлов с помощью утилиты sfc. Для использования утилиты sfc в офлайн режиме, нужно указать путь к системному диску и папке Windows. Вы можете определить букву диска, назначенную разделу Windows с помощью команды:
Bcdedit /enum | find "osdevice"
Предположим, в вашем случае это диск D:. Команда проверки системных файлов будет выглядеть так:
sfc /scannow /offboot=d:\ /offwindir=d:\windows
Также нужно выполнить офлайн проверку хранилища компонентов Windows с помощью DISM. Нужно сравнить ваш образ с оригинальным установочным wim файлом вашего билда Windows 10 (предположим, оригинальный wim образ лежите на диске E:):
Dism /image:D:\ /Cleanup-Image /RestoreHealth /Source:E:\sources\install.wim
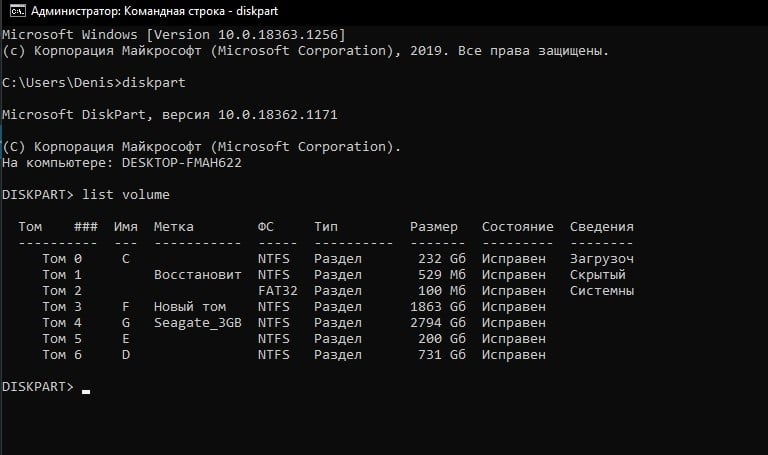
Совет. Чтобы разобраться с буквами дисков в среде WinPe, выполните команды
Diskpart
List vol
По меткам и размерам диска можно определить букву раздела на диске, на котором у вас хранится установленная Windows.
Восстановление BCD загрузчика и файла winload.efi для UEFI системы
Если ваша Windows 10 была установлена в нативном UEFI режиме на GPT диске, мы рекомендуем вам воспользуетесь инструкцией по пересозданию EFI загрузчика Windows 10 на устройствах с UEFI . Рекомендую воспользоваться статьей по ссылке, там все описано довольно подробно. Здесь оставлю короткий гайд:
Загрузитесь с загрузочного диска и запустите командную строку:
- Выполните команду:
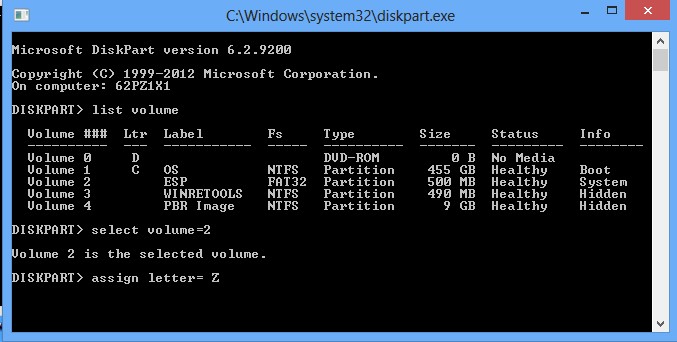
diskpart - Выведите список разделов на дисках:
list volume - айдите раздел с меткой ESP или EFI размером 500 мб (размер и название раздела может отличаться в зависимости от версии Windows, но главное – его файловая система всегда должна быть FAT32). Запомните его номер. Если EFI раздел был случайно удален, его можно восстановить так;

- Выберите этот раздел:
select volume 2 - Назначьте разделу букву диска:
assign letter=Z - Выйдите из diskpart:
exit - Теперь нужно пересоздать загрузчик, скопировать загрузочные файлы из каталога Windows:
bcdboot c:\Windows /s Z: /f ALL
(замените c:\ на букву диска, на котором у вас находится ОС); Если вы все сделали правильно, появится надпись
Boot files successfully created
; - Перезагрузите компьютер и проверьте, исправлена ли проблема.
Пересоздание загрузочных записей в хранилище BCD с помощью bootrec и bcdedit
Если у вас система установлена не в режиме UEFI, тогда вы можете восстановить пересоздать загрузочные записи и сам MBR загрузчик Windows с помощью утилиты bootrec.
- Выполните шаги 1-2 из 2 способа;
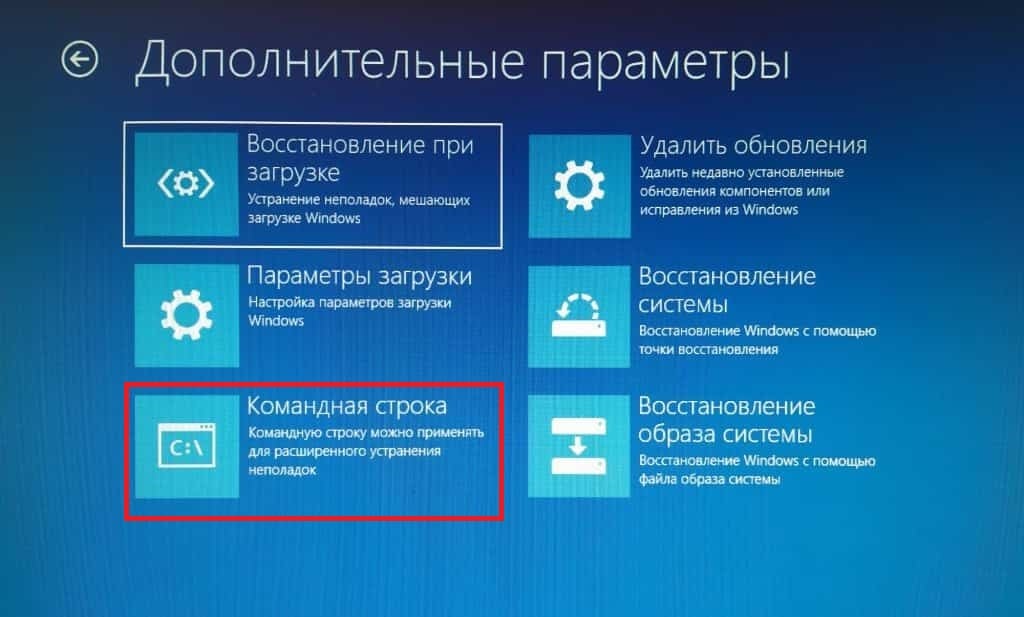
- Перейдите в раздел Troubleshoot > Command Prompt (Диагностика – Командная строка).
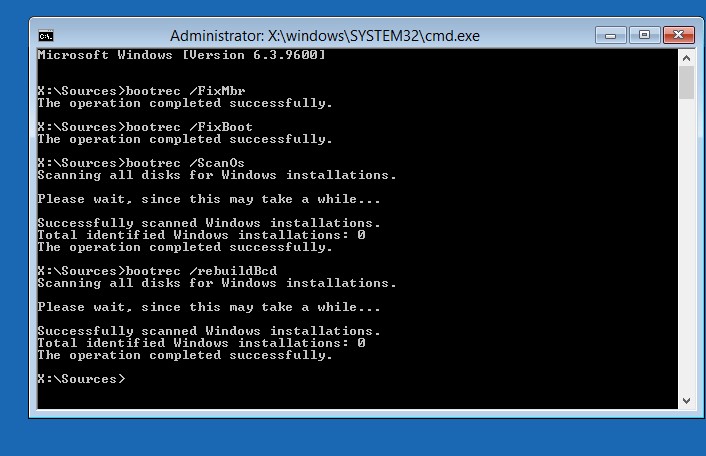
- В открывшемся окне командной строки выполните последовательно команды:
bootrec /FixMbr
(запись основной загрузочной записи в системный раздел)
bootrec /FixBoot
(перезапись нового загрузочного сектора в системном разделе)
bootrec /ScanOs
(сканирование дисков на предмет наличия установленных ОС)
bootrec /RebuildBcd
(пересоздание конфигурации загрузчика) - Закройте командную строку командой:
exit - Перезагрузите компьютер.

Если предбудущий способ не помог, нужно пересоздать файл конфигурации загрузки для MBR в командной строке консоли восстановления или загрузочного диска:
bcdedit /set {bootmgr} device boot
bcdedit /set {default} device boot
bcdedit /set {default} osdevice boot
bcdedit /set {default} device partition=c:
bcdedit /set {default} osdevice partition=c:
bcdedit /set {default} path \windows\system32\winload.efi
Перезагрузите компьютер и проверьте, исправлена ли проблема.
Get the fix for the error winload.efi is missing or corrupt on Windows 7, Windows 8 or Windows 8.1.
About “winload.efi is missing or corrupt“
The following information on this error has been compiled by NeoSmart Technologies, based on the information gathered and reported by our global network of engineers, developers, and technicians or partner organizations.
Description and Symptoms
The error messages, alerts, warnings, and symptoms below are tied to this error.
Symptom 1: “winload.efi is missing or corrupt” error screen on startup
If the error screen mentions winload.exe and not winload.efi, go to Fix: winload.exe is missing or corrupt.
Other common winload.efi related error messages can be any of the following, depending on your Windows versions:
- winload.efi cannot be found
- winload.efi is missing
- winload.efi is missing or contains errors
- This program can’t start because winload.efi is missing from your computer
- There was a problem starting [path]\winload.efi. The specified module could not be found.”
- This application requires the file winload.efi, which was not found on this system
The error code can be different from computer to computer, but the File: row mentions the winload.efi file at the \windows\system32\ folder:
\windows\system32\winload.efi
The winload.efi error can have different error codes, such as Error code: 0xc0000225 or Error code: 0xc0000001 or any other, but File always mentions the file as being winload.efi
Here’s how the winload.efi error with the 0xc0000225 code looks on Windows 8/8.1 systems:
Recovery

Your PC needs to be repaired.

The application or operating system couldn't be loaded because a required file is missing or contains errors.

File: \windows\system32\winload.efi

Error code: 0xc0000225

You'll need to use the recovery tools on your installation media. If you don't have any installation media (like a disc or USB device), contact your system administrator or PC manufacturer.

Press Enter to try again
Press F8 for Startup Settings
Press ESC for UEFI Firmware Settings
On a Windows 7 computer the error screen looks like this:
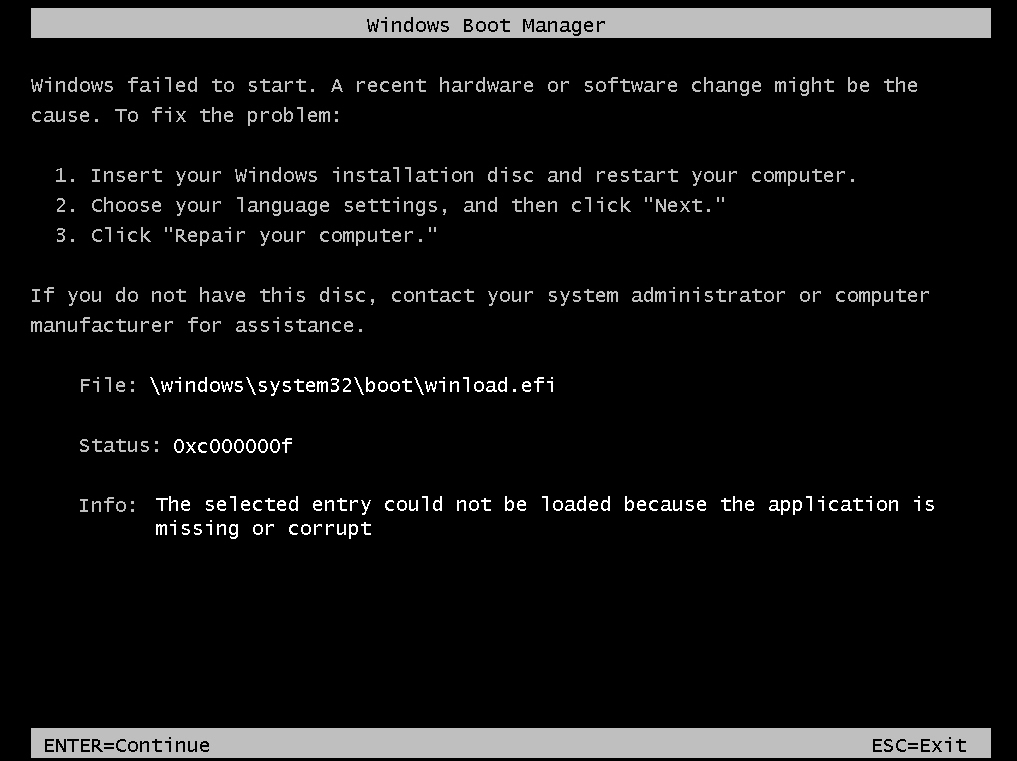
Windows Boot Manager

Windows failed to start. A recent hardware or software change might be the cause. To fix the problem:

1. Insert your Windows installation disc and restart your computer.
2. Choose your language settings, and then click "Next."
3. Click "Repair your computer."

If you do not have this disc, contact your system administrator or computer manufacturer for assistance

File: \windows\system32\boot\winload.efi

Status: 0xc000000f

Info: The selected entry could not be loaded because the application
      is missing or corrupt
Causes of this Error
This error has been known to occur as a result of one of the following causes:
Cause 1: The winload.efi file is corrupt or missing
Failed Windows Updates or Automatic Updates to Windows that involve an upgrade of critical system files (especially service pack installations) that update winload.efi may result in this error. Alternatively, this may happen because of hardware failure.
Cause 2: File system integrity compromised
The hard drive’s file system may become damaged because of disk write errors, power outages or virus attacks. If that’s the case, the operating system cannot find winload.efi to boot properly and the loading process is halted.
Fix winload.efi error with Easy Recovery Essentials
Easy Recovery Essentials is guaranteed to fix the “winload.efi error” error automatically using its built-in Automated Repair option. EasyRE is currently available for Windows XP, Vista, 7, 8, Windows 10, and Windows 11 and can be downloaded and created on any PC.
- Download Easy Recovery Essentials. Make sure to note your Windows version (XP, Vista, 7, 8, 10, or Windows 11) before you download EasyRE. This guide can help you identify what version of Windows you have installed.
- Burn the image. Follow these instructions on how to burn the bootable ISO image very carefully, as making a bootable CD can be tricky! Alternatively, these instructions explain how to create a bootable EasyRE recovery USB stick/drive.
- Boot up your PC from the Easy Recovery Essentials CD or USB you created.
- Once EasyRE is running, choose the “Automated Repair” option and click Continue.

Choose “Automated Repair” in Easy Recovery Essentials
- After EasyRE scans your computer’s drives, identify and select the drive letter for your Windows installation from the list, and then click on the Automated Repair button to begin.
Choose the drive associated with the Windows installation you’re trying to repair.
- Easy Recovery Essentials will start analyzing the selected drive for problems. EasyRE will test for and attempt to automatically correct errors with the disk, partition, bootsector, filesystem, bootloader, and registry. No intervention is required, as EasyRE’s repair is fully automated:
Easy Recovery Essentials searches for errors and makes corrections to the selected Windows installation.
- Once the process is complete, EasyRE will report its findings. Click on the Restart button to reboot your PC and test the changes.
- The “winload.efi error” error should now be fixed as your PC begins to load:


You can download Easy Recovery Essentials from here.
Fix winload.efi missing or corrupt in Windows 7
Windows Setup CD/DVD Required!
Some of the solutions below require the use of the Microsoft Windows setup CD or DVD. If your PC did not come with a Windows installation disc or if you no longer have your Windows setup media, you can use Easy Recovery Essentials for Windows instead. EasyRE will automatically find and fix many problems, and can also be used to solve this problem with the directions below.
Fix #1: Rebuild the BCD
You can try to rebuild the BCD if the winload.efi error appears because of a corrupt BCD file:
- Insert the installation disc
- Restart your computer and boot from the disc
- Click Repair your computer
- At the System Recovery Options screen, select Command Prompt
- Run the following commands:
bootrec /fixboot
bootrec /scanos
bootrec /fixmbr
bootrec /rebuildbcd
- Press Enter after each and wait for the commands to finish
- Restart your computer


bootrec utility results screen
If the above bootrec commands didn’t worked, try running the same commands 3 more times before proceeding to Fix #2 below.
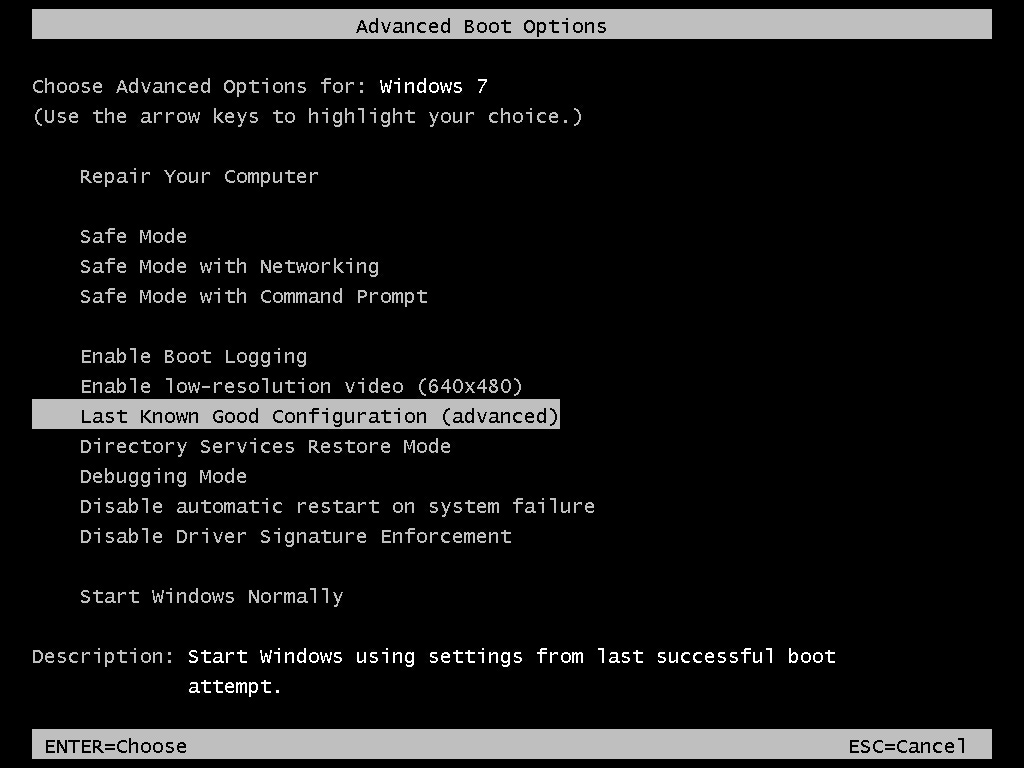
If you don’t have the installation disc, you can check if your system has the system recovery tools installed on the hard disk to access Command Prompt. To do so, follow these steps:
- Restart your computer
- Press F8 as soon as your computer boots. Make sure you don’t have any media in your drives (CDs, DVDs etc)
- At the Advanced Boot Options screen, select Repair your computer
- Press Enter
- Your computer should now boot into the System Recovery Options screen
Fix #2: Run chkdsk and sfc
To run the chkdsk or sfc commands, follow these steps:
- Insert the installation DVD
- Restart the computer
- Boot from the DVD by pressing any key whenever the “Press any key” message appears
- At the Install Windows screen, click Repair your computer or press R
- Select Command Prompt
- Enter the chkdsk command:
chkdsk c: /r
Replace
c:with the letter of the drive where Windows 7 is installed - Press Enter

chkdsk utility results screen
If the chkdsk utility doesn’t fix the winload.efi error, try running the sfc utility instead:
- At Command Prompt, type the sfc command:
sfc /scannow /offboot=c:\ /offwindir=c:\windows
- Press Enter

sfc utility results screen
Fix #3: Disable secure boot
If you happen to have Windows 7 installed on a computer with UEFI and not BIOS, you can try to disable the Secure Boot option found in the UEFI boot options menu. This might fix the winload.efi error:
For more information on how to disable Secure Boot, follow the Disabling Secure Boot Guide.
- Boot into UEFI as soon as you boot the computer.Depending on your computer manufacturer, the key to boot into UEF menu can be F2 or F8 or F12 or Del or Esc.If none of the above keys work for your system, boot your computer and find the key you need to press listed on the first screen that appears on your monitor.
- Depending on your computer manufacturer, the UEFI boot menu can look different. Look for a Secure Boot option. This is usually found in a Boot or a Security or a Authentication tab listed in the menu.
- Once you’ve found the Secure Boot option, make sure it’s Disabled or Off.
- Save the changes and exit the UEFI menu
- Restart your computer
Fix winload.efi missing or corrupt in Windows 8
Fix #1: Disable Secure Boot
In most cases the winload.efi missing or corrupt error can disappear if the Secure Boot option is Disabled or Off in the UEFI boot menu.
For more information on how to disable Secure Boot, follow the Disabling Secure Boot Guide.
- Restart your computer
- Press the necessary key to boot into your system’s UEFI menu. Depending on your computer manufacturer (HP, Acer, Asus etc.), the key can be F2, F8, Esc or Del.
On this Dell computer, the F2 key would open the UEFI menu. This screen is listed right after the computer boots.
- Search for the Secure Boot option. This option is usually placed in any of the following tabs: Security, Authentication or Boot.On HP computers Secure Boot is listed at the Security tab:
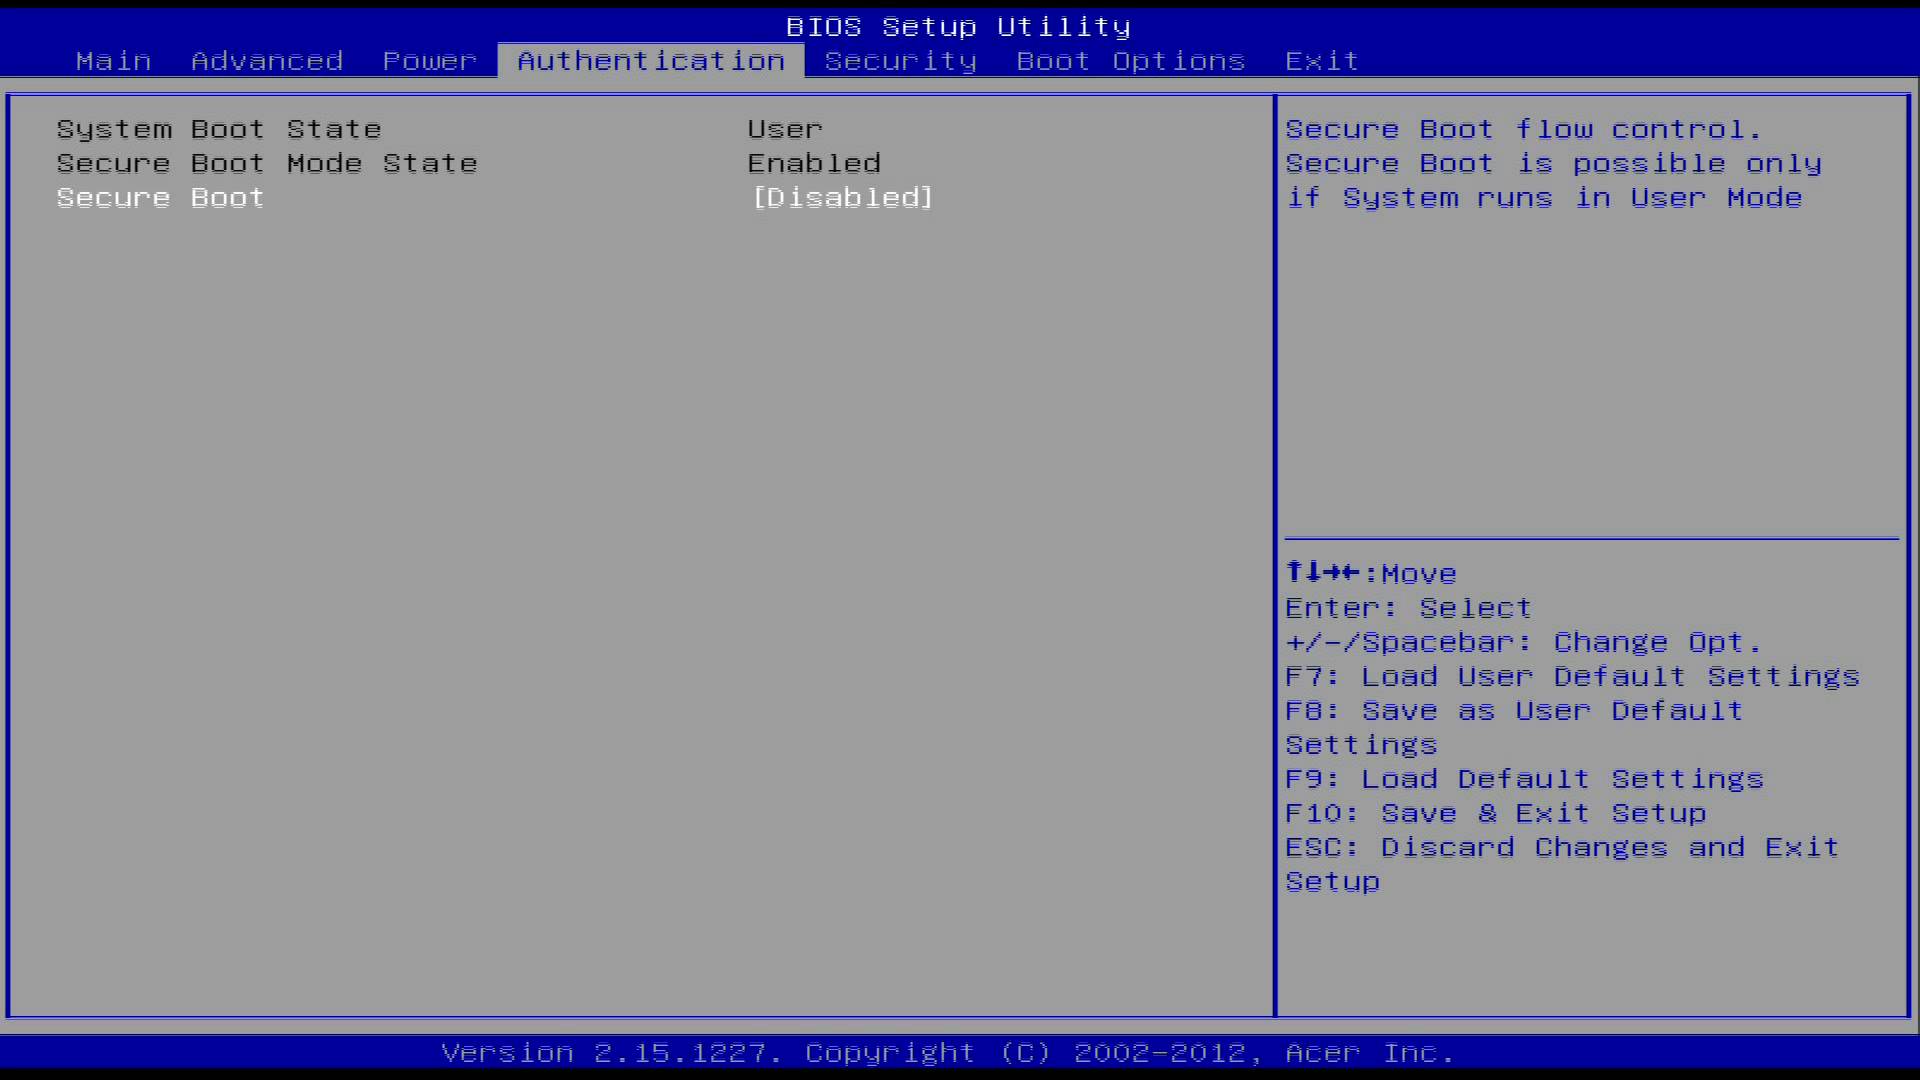
On Acer computers it’s listed at the Authentication tab:
- Select the Secure Boot option and make sure it’s Disabled or Off
- Save the changes
- Restart the computer

Fix #2: Run Automatic Repair
Follow these steps to run Automatic Repair:
- Insert the Windows 8 media: the DVD or the USB
- Restart the computer and boot from the media
- Click Repair your computer or press R
- Select Troubleshoot
- Select Advanced options
- Click Automatic repair
- Follow the remaining steps to complete the process

If you don’t have the original Windows 8/8.1 media to access Automatic Repair, you can try to restart the computer multiple times:
- Hold the Power button to shutdown your computer
- Press the Power button to start your computer
- As soon as your computer stats to boot, press the Power button to shutdown your computer
- Perform these steps a few times until Windows 8 shows the Recovery screen:


Fix #3: Disable early launch anti-malware protection
If Fix #1 or Fix #2 doesn’t work to fix the winload.efi error, you can also try to disable the built-in anti-malware protection that your Windows 8 system has activated by default.
- Access the Advanced options screen (see Fix #2 steps on how to do this using the original disc or try to shutdown/start your computer a few times using the Power button)
- Click Startup settings
- Click Restart
- Your computer will restart and boot into the Startup Settings screen
- Press F8 to select Disable early launch anti-malware protection
Fix #4: Run bootrec
Similar to Fix #1: Rebuild the BCD for Windows 7, you can try to run the same bootrec commands on your Windows 8 systems:
- Boot from the installation DVD or USB
- Click Repair your computer or press R
- Navigate to Troubleshoot > Command Prompt
- Type the bootrec commands:
bootrec /FixMbr
bootrec /FixBoot
bootrec /ScanOs
bootrec /RebuildBcd
- Press Enter after each command
- Remove the DVD or USB and type
exitin Command Prompt:exit
- Press Enter
- Restart your computer

bootrec utility results screen
More Information
Linked Entries
- bootrec
- chkdsk
Support Links
- Easy Recovery Essentials for Windows – our repair and recovery disk.
It’s an easy-to-use and automated diagnostics disk. It’s available for Windows 8, Windows 7 and Windows Vista. It’s also available for Windows XP and Windows Server.
Read more at Windows Recovery Disks.
- The NeoSmart Support Forums, member-to-member technical support and troubleshooting.
- Get a discounted price on replacement setup and installation discs: Windows 7, Windows 8.
Applicable Systems
This Windows-related knowledgebase article applies to the following operating systems:
- Windows 7 (all editions)
- Windows 8 (all editions)
- Windows 8.1 (all editions)
Propose an edit
Как исправить критическую ошибку Winload EFI на Windows 7 и Windows 10?
Критическая ошибка Winload EFI — ее название уже подсказывает, какие из компонентов операционной системы Windows начали работать некорректно либо и вовсе вышли из строя. Для непросвещенных пользователей: в данном случае виновниками BSoDов могут быть загрузочная запись (MBR) и неправильная конфигурация загрузки ОС.
Вот пример этой ошибки на Windows 10:
Не удалось загрузить приложение или операционную систему, так как необходимый файл отсутствует или содержит ошибки.
Файл: \windows\system32\winload.efi
Код ошибки: 0xc*******Вам потребуются средства восстановления на установочном носителе. Если установочный носитель (например, диск или USB-устройство) отсутствует, обратитесь к администратору или производителю компьютера.
В сегодняшней статье мы посмотрим с вами, как избавиться от критической ошибки Winload EFI, причем в довольно короткие сроки.
Метод №1 Отключение безопасной загрузки (Secure Boot)
Если ваша материнская плата работает на UEFI, а не на традиционном BIOS, то проблема может заключаться в такой особой функции, как «Безопасная загрузка» (Secure Boot). Работая неправильно, эта функция может буквально препятствовать вашему компьютеру получить доступ к файлу Winload EFI. На Windows 8 и более поздних версиях ОС Майкрософт функция безопасной загрузки активирована по умолчанию.
Ваши действия:
- Пройти в BIOS/UEFI своей материнской платы.
- Перейти в раздел/вкладку с конфигурацией системы или ее загрузки.
- Найти в списке функцию «Secure Boot» (функция может быть перефразирована в вашем случае) и отключить ее, выставив соответствующий пункт.
- Сохранить внесенные изменения и перезагрузить компьютер.
Попробуйте зайти в операционную систему и проверьте, исчезла ли ошибка с файлом Winload EFI.
Метод №2 Восстановление загрузочной записи
Давайте попробуем с вами восстановить загрузочную запись вашей операционной системы. Первым делом вам нужно обзавестись установочным носителем с вашей версией ОС Windows. Можете воспользоваться следующим материалом от самих Майкрософт, чтобы создать подобную вещицу. Как только у вас на руках будет установочный носитель, сделайте вот что:
- загрузитесь с установочного носителя;
- доберитесь до окошка с установкой Windows;
- выберите пункт «Восстановление системы»;
- далее выберите пункты «Поиск и устранение неполадок→Дополнительные параметры→Командная строка»;
- добравшись до системной консоли, выполните в ней следующий ряд команд:
- bootrec /fixboot
- bootrec /scanos
- bootrec /fixmbr
- bootrec /rebuildbcd
- перезагрузите компьютер.
Не забудьте отключить установочный носитель от своего ПК, чтобы постоянно не загружаться через него. Проверьте наличие ошибки Winload EFI.
Метод №3 Утилита BCDBoot
Воспользуйтесь вышеуказанными шагами, чтобы добраться до командной строки в среде восстановления Windows. Попав в командную строку, сделайте в ней следующее:
- выполните команды diskpart и list volume;
- запомните букву системного тома, например, C или D, и выполните команду exit;
- далее пропишите команду bcdboot C:\windows, где C — буква системного тома, и нажмите Enter.
Перед вами должно возникнуть сообщение о том, что файлы загрузки ОС были успешно созданы. Перезагрузите компьютер и попытайтесь зайти в систему привычным образом. Ок, а что делать, если команды не помогли и вы все еще не можете нормально запустить свой ПК? Что же, снова возвращаемся к командной строке в среде восстановления и делаем вот что:
- вводим команды diskpart и list volume;
- хорошенько исследуем список; если у вас BIOS и MBR, то запоминаем номер тома NTFS-раздела размером в ~500 Мб, а если у вас UEFI и GPT — номер тома FAT-раздела размером в ~100 Мб;
- также запоминаем букву раздела, на котором располагается ваша ОС;
- теперь выполняем следующий ряд команд:
- select volume S (где S — номер скрытого раздела);
- format fs=fat32 (или format fs=ntfs);
- assign letter=W (или любая другая незанятая буква);
- exit;
- bcdboot C:\Windows /s W: /f ALL;
- diskpart;
- list volume;
- select volume S;
- remove letter=W;
- exit.
- еще раз перезагружаем компьютер и проверяем, была ли устранена критическая ошибка Winload EFI.
Метод №4 Отключение антивредоносной защиты
В некоторых случаях подобную проблему можно разрешить с помощью деактивации антивредоносной защиты. В этом деле вам снова потребуется установочный носитель Windows с его средой восстановления. Как только доберетесь до последней, сделайте следующее:
- Поиск и устранение неисправностей↓;
- Дополнительные параметры↓;
- Параметры загрузки↓;
- Перезагрузить↓;
- нажмите на кнопку F8, оказавшись на соответствующем экране, чтобы отключить ранний запуск антивредоносного драйвера.
Вам наконец-то удалось зайти в операционную систему? Поздравляем, однако, возможно, проблема решена лишь от части. Рекомендуем установить все отложенные обновления для своей ОС Windows, а также провести дотошное сканирование системы на наличие вирусов и вредоносных программ. Надеемся, наш материал помог вам избавиться от BSoD с Winload EFI.
Updated on Apr 28, 2025
Winload.efi is an EFI (Extensible Firmware Interface) file responsible for booting, restarting, or resetting the computer and installing Windows. It is an essential component at the core of the boot process. If this file is missing or corrupted, your Windows cannot boot normally. The system will stuck on the blue or black screen with various error codes, such as Winload.efi Missing or winload.efi error code 0xc00000e etc.
Winload.efi missing or contains error usually happens after clone or Windows 11/10 installation. Luckily, EaseUS will address the issue and delve into the six solutions to resolve this problem.
How to Fix Boot Manager Failed to Find OS Loader [100% Working]
Resolve the «Boot Manager Failed to Find OS Loader» problem effortlessly by exploring our expert-backed solutions. Follow step-by-step instructions to troubleshoot and resolve this issue.
The «Winload.efi Missing» error occurs when the OS fails to locate or access the Winload.efi file. To resolve «winload.efi missing» errors, we provide six solutions. You can jump to the method you need or look at the following methods in turn
- Option 1: Disable Secure Boot
- Option 2. Use the Boot Repair Tool
- Option 3. Run CHKDSK to Check for Drive Errors
- Option 4. Run SFC to Check System File Integrity
- Option 5. Rebuild BCD and MBR
- Option 6. Repair EFI Boot Loader
The above are methods that have been proven effective by many users. You can click the social buttons below to share these methods with others in need! Then, let’s explore the best options to repair winload.efi missing or containing errors.
Option 1: Disable Secure Boot
Safe/Secure boot may be responsible for the winload.efi error. The error occurs when the UEFI-based system fails to access the winload.efi file. To fix this, you must disable safe boot from the UEFI configuration. Here are the detailed steps to turn off UEFI secure boot:
Note* The interface may vary per the computer model. Please be attentive.
Step 1: Press «F2» or «Delete» when you see the logo after restarting your computer.
Step 2: Navigate the «Secure Boot» option. According to the computer model, you may find the option under the «Boot,» «Security», or «Authentication» tab.
Step 3: You will encounter the enabled «Secure Boot» interface. Change it to «Disable.»
Step 4: Save changes and exit the UEFI settings.
Step 5: Restart the system and see if it boots normally. If the issue exists, move to the following method.
Option 2. Use the Boot Repair Tool
EaseUS WinRescuer is a powerful and easy boot repair tool. You can create bootable devices, repair boot systems, and fix disk-related tasks. Its «boot repair» feature is designed to correct all system boot errors in one click. Any users can solve the missing file and corrupted boot order without prior knowledge.
Additionally, it assists in numerous problems, including system failure, system blue screen, system black screen hard disk corruption, hard disk conversion, and many more. This tool is a reliable choice when it comes to winload.efi missing error.
Download EaseUS Partition Master and follow the steps to utilize the «boot repair» feature.
Step 1. Connect the USB drive/external drive to a working computer, open EaseUS WinRescuer, and click «Create Bootable Media.»
Step 2. Select EaseUS Boot Toolkits and other components you need. Then, click «Next.»

Step 3. Select your movable device and click «Go» to create an image on your USB drive/external drive. You can also burn the Windows ISO file to the storage media.
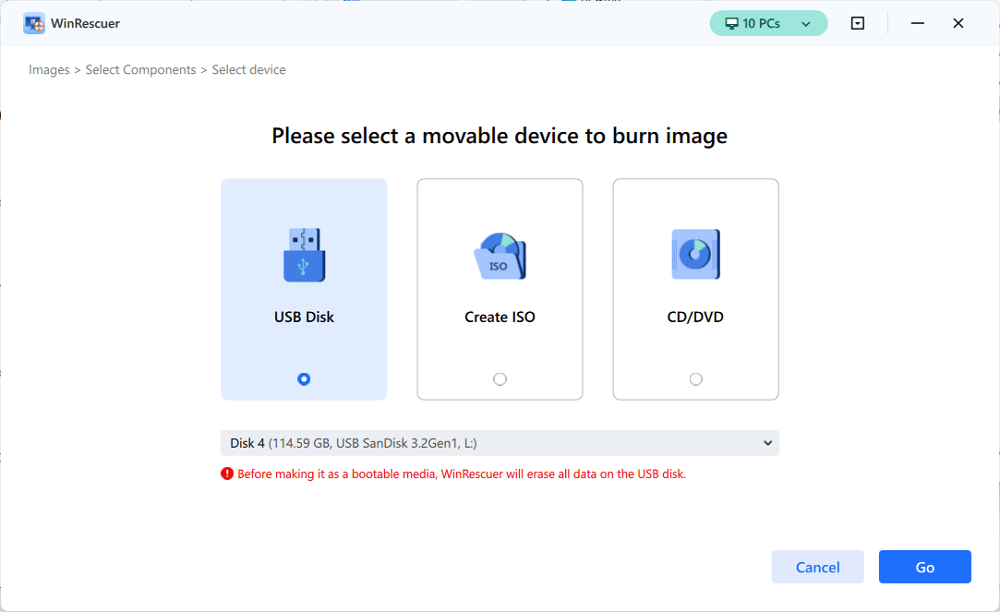
Step 4. Confirm the warning message and then wait for the creation process to complete.
Step 5. Connect the created bootable drive to the faulty computer and reboot it by pressing and holding «F2″/»Del» to enter the BIOS. Then, set the WinPE bootable drive as the boot disk and press «F10» to exit.

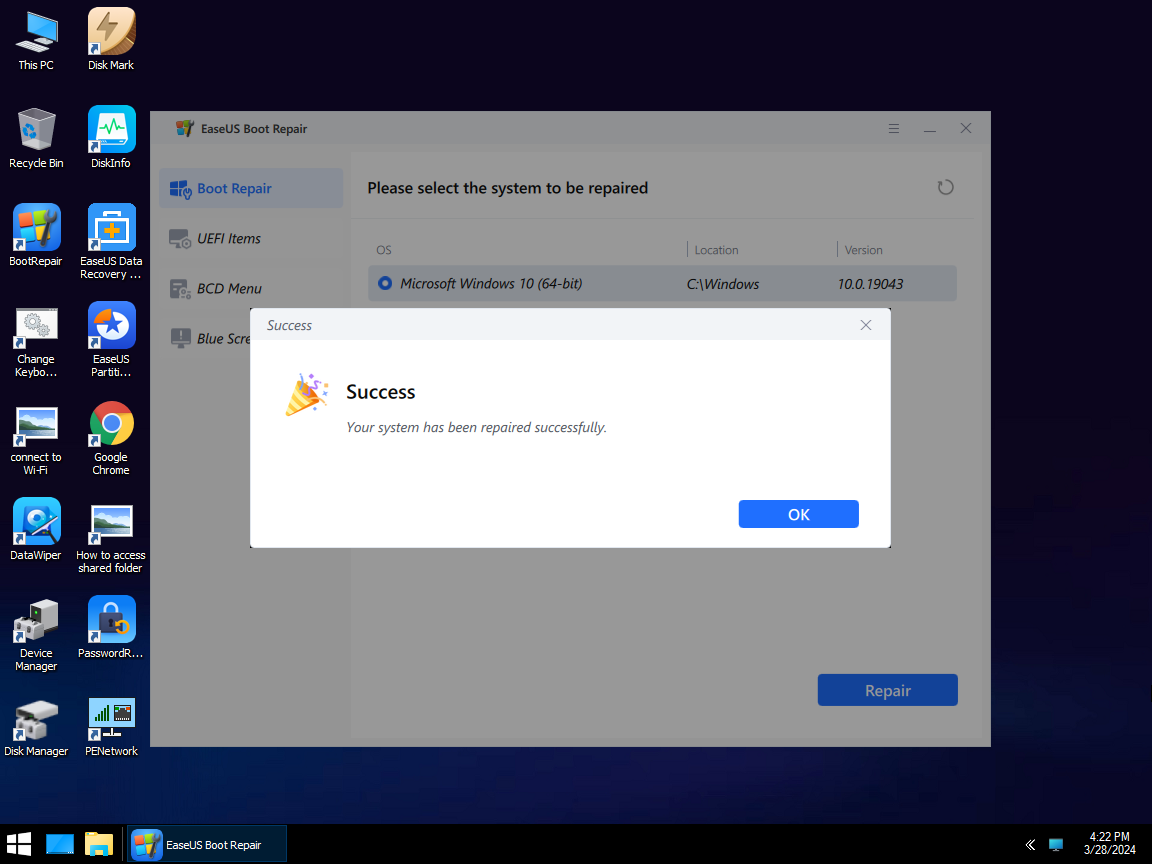
Step 6. Then, the computer will enter WinPE desktop. Open BootRepair, select the system you want to repair, and click «Repair.»
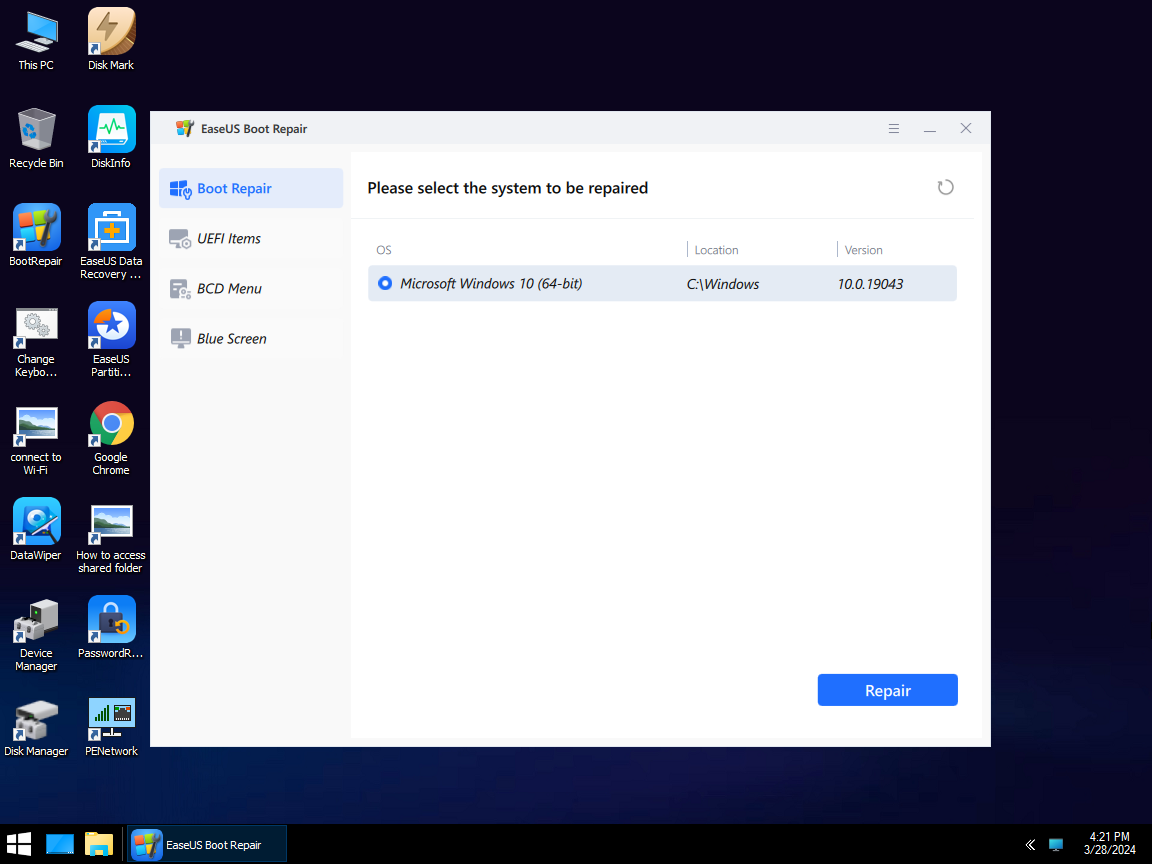
Step 7. Wait a moment, and you will receive an alert that the system has been successfully repaired. Click «OK» to complete the boot repair process.
As one of the best Windows boot repair tools, EaseUS Partition Master can also fix the following errors:
Option 3. Run CHKDSK to Check for Drive Errors
CHKDSK is an inbuilt utility to fix potential disk errors. Here are the steps to run CHKDSK:
Step 1: Connect a USB drive with Windows Installation Media to the computer.
Step 2: Boot the system from the USB and select «Repair your Computer.»
Step 3: Select the «Troubleshoot» and «Command Prompt» options.
Step 4: The following command should be typed or pasted, then hit «Enter.»
chkdsk c: /f
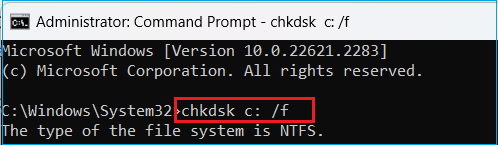
It will check and fix the system drive errors. Once done, unplug the USB and restart the computer. Check if the system boots normally.
Option 4. Run SFC to Check System File Integrity
System File Checker is another built-in feature by Windows to analyze and fix system file errors. Please follow these steps to Run SFC to check system file integrity.
Step 1: Connect the Windows installation media drive to the computer and open Command Prompt. (Steps mentioned in Option 4).
Step 2: Launch the upcoming command and hit «Enter.»
sfc /scannow
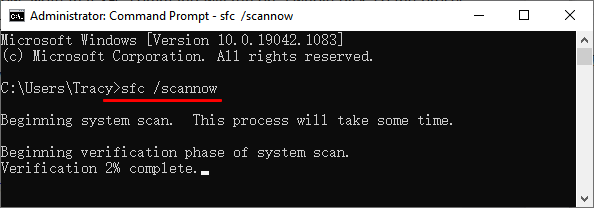
Step 3: Restart your system and check the winload.efi error code 0xc00000e message still appears.
Try the next step if the «sfc /scannow» command fails to repair the Winload.efi missing file.
Step 4: Open the Command Prompt and input the following command.
Note* Please be careful; the wrong command may create potential system errors.
sfc /scannow /offboot=C: /offwindir=C:windows
Replace «C» with the system hard drive partition letter.
Option 5. Rebuild BCD and MBR
As mentioned earlier, the EaseUS Partition Manager is a universal tool. It will also help ensure the current drive uses the MBR system format. The operating system will be unable to read the winload.efi file if the system partition operates under BCD or another file format. The Rebuild MBR feature of EaseUS Partition Manager converts the BCD file system to MBR in one click. And it can also fix other errors such as MBR error 1.
Here are the steps:
Step 1. Create a WinPE bootable disk
- Launch EaseUS Partition Master, and click «Bootable Media» on the toolbar. Select «Create bootable media».
- Click «Next» to finish the process.

Step 2. Boot EaseUS Partition Master Bootable USB
- Connect the bootable USB or CD/DVD to your PC.
- Press F2 or Del when you restart the computer to enter the BIOS screen. Set and boot your computer from «Removable Devices» or «CD-ROM Drive». And then EaseUS Partition Master will run automatically.
Step 3. Rebuild MBR
- Click «Toolkit» and choose «Rebuild MBR».

- Select the disk and the type of MBR. Then, click «Rebuild».

- After that, you can see «MBR has been successfully rebuilt on Disk X».

Option 6. Repair EFI Boot Loader
EFI boot loader is an essential part of a computer’s boot process, commonly called the UEFI boot loader (Unified Extensible Firmware Interface). Repairing the EFI loader helps to fix the corrupted or missing winload.efi errors.
Steps to repair the EFI boot loader:
Step 1: Use the Windows Installation Media to start your PC.
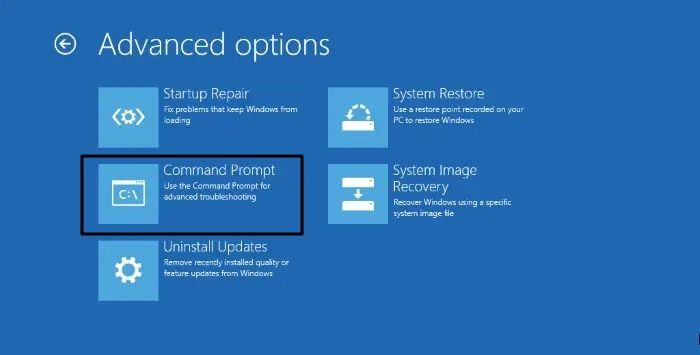
Step 2: Choose «Repair Your Computer» > «Troubleshoot» > «Advanced Options» > «Command Prompt.»
Step 3: Input the following commands individually and press «Enter» after each command.
- diskpart
- list disk
- select disk 0
- list vol
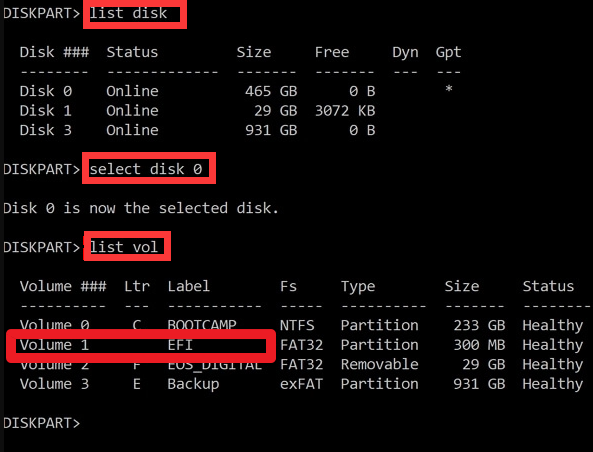
Confirm the EFI partition has a FAT32 file system.
Step 4: Assign the partition a drive letter. Enter each of the following commands as you type them:
- sel vol
- assign letter=:
- exit
- cd /d:\EFI\Microsoft\Boot\
- bootrec /fixboot
Restart your computer after a successful EFI loader repair.
What Caused Winload.efi Missing Error
Now that you have learned the solutions to fix winload.efi missing or contains error after clone errors, let’s cover the potential causes.
- The «winload.efi missing» error can be caused by mistakes made during system upgrades that affect the bootloader or system files.
- The corrupted or damaged system files result in boot-related issues like winload.efi error code 0xc00000e.
- Incorrectly modifying disk partitions or updating antivirus software with third-party tools can corrupt the system’s boot process, causing winload.efi missing or containing error.
- Cloning Windows installation without required modifications can result in boot issues, such as the winload.efi missing or containing error after clone.
- Replacing or modifying a computer’s motherboard may cause problems with devices and drivers. If this isn’t fixed, the «winload.efi» problem may appear.
We advise all users to try the suitable methods offered in this article to fix the «winload.efi missing» error. We also recommend using EaseUS Partition Master to identify and fix common hard disk issues.
Conclusion
This tutorial will assist you in effortlessly resolving the winload.efi missing error. Resolving the issue can be both time-consuming and frustrating. Nevertheless, EaseUS Partition Master simplifies the entire process, providing users with automated assistance in addressing this issue.
The following topics are also related to boot error, and if you are interested, click the buttons and see more information.
FAQs About Winload.efi Missing
Please follow this FAQs section if you have further inquiries about the topic discussed on this page.
1. What is the error code 0xc000000f in Winload EFI?
Winload EFI error code 0xc000000f is a frequent Windows boot error that indicates an issue with the Winload.efi file or the bootloader setup. It frequently happens when the bootloader cannot locate the files required to boot the operating system.
2. How do I fix Winload files?
To fix the Winload files error, you can try:
— Running Windows Startup Repair.
— Rebuilding the BCD (Boot Configuration Data).
— Repairing the Master Boot Record (MBR).
3. What is the function of Winload EFI?
Winload.efi is a crucial component for performing the Windows boot process. Its primary purpose is to load the operating system, required drivers, and data.
Readers help support Windows Report. We may get a commission if you buy through our links.
Read our disclosure page to find out how can you help Windows Report sustain the editorial team. Read more
If you see the error message saying the Winload.efi is missing or corrupted, your computer cannot boot into Windows, and you may encounter a Blue Screen of Death screen.
In this guide, we will discuss some expert-recommended methods to fix the winload error on Windows 11 right after explaining the potential causes behind the problem.
What is the Winload.efi file?
The Winload.efi is an Extensible Firmware Interface file that is an integral component of the Windows Boot Manager, which uses the file to load the Windows kernel & other essential system files into memory.
Generally, the file is used for tasks such as restarting the computer, installing Windows, resetting your PC settings, and more. The file is located at C:\windows\System32\Boot\winload.efi
What causes the Windows 11 Winload error?
There could be various reasons for the Winload.efi is missing error; some of the common ones are mentioned here:
- Corrupted BCD – The Boot Configuration Data (BCD) store is misconfigured or damaged; you may encounter the error. Try rebuilding the BCD.
- UEFI firmware issues – If there is an issue with UEFI firmware settings, you could see this error during the boot process.
- Bad sectors – The bad sectors or system file corruption may result in this BSoD error. You need to scan your computer for bad sectors and repair system files using an SFC scan.
- Interrupted Windows update – If the Windows updates were interrupted or unsuccessful, it could corrupt system files, causing the problem.
- Damaged Winload.efi file – The disk errors, malware infection, or power failures during updates can corrupt the file, hindering the Windows booting process and causing the blue screen error.
Now that you know the causes of the issue, let us move quickly to learn the solutions to eliminate it.
How do I fix the Winload error in Windows 11?
Before engaging in advanced troubleshooting steps, you should consider performing the following checks:
- Try rebooting your PC.
- Ensure your BIOS firmware is updated.
- Remove all the external peripherals.
Once you are through these checks, check out the detailed methods to fix the problem.
1. Disable Secure Boot
- Restart your computer. During startup, you need to press a key designated by the OEM or computer manufacturer to access the UEFI settings. For HP, it is F10; for Dell, it is F2.
- You will enter the UEFI settings. Locate the Security or System Configuration section.
- Now look for Secure Boot or UEFI Secure Boot, select it, and change the status to Disabled.

- Depending upon your machine, you might also have to change the UEFI mode to Legacy mode to disable Secure Boot.

- Once done, Save & Exit to save the changes.
- Restart your computer.


Turning off Secure Boot allows you to boot non-signed OS or bootable tools, which can help you fix the issue. If, after reboot, you can’t get past the BSoD screen and get the Automatic Repair screen, move to the following method.
2. Run the Startup Repair tool
2.1 Prepare an installation media file & change the boot order
- On another device or PC, go to Windows 11 website, locate Windows 11 Installation Media, and click Download Now.

- The mediacreation.exe file will be downloaded; double-click to open it.
- Click Accept.

- For Select language and edition, choose Language and Edition and click Next.
- Select the USB flash drive option. Plug in the USB drive with a minimum of 8 GB storage.
- The Windows 11 Setup will detect and show the drive; click Next.
- Once ready, click Finish.
- Plug in the flash drive to the affected computer and turn it on. Press the key designated by the manufacturer to enter Boot options.
- Go to Boot and locate the USB flash drive, use the arrow keys to move it up in the list, and save the changes & restart.


2.2 Initiate Startup Repair
- After restart, you will see the Windows Setup screen, select Language to install, Time and currency format, and Keyboard or input method.

- Click the Repair your computer option from the next page.

- On the Choose an option screen, select Troubleshoot.

- Choose Advanced options from the next page.

- Select the Startup Repair option.

- Follow the onscreen prompts and wait for the process to complete, then restart your computer.


The Startup Repair tool diagnoses and repairs complex startup problems; that’s why it should be the first thing to do if the computer doesn’t boot up.
3. Repair the BCD files
- Boot your computer using Windows installation media via a USB flash drive created in Step 2.1. On the Windows Setup screen, input the details, and click Next.
- Select Repair your computer on the next page.
- On Choose an option screen, click Troubleshoot.
- Next, select Advanced options.
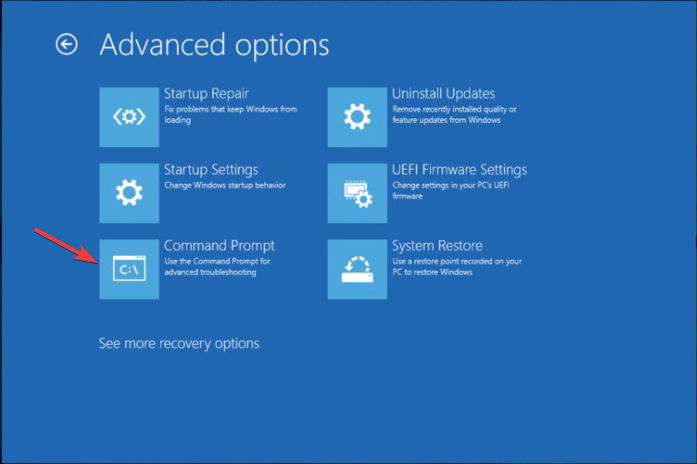
- On the Advanced options screen, choose Command Prompt. Your PC will restart and input the user account credentials when prompted.
- On the Command Prompt window, copy & paste the following commands one by one to fix Boot Record, Boot Sector, and BCD store, and press Enter after every command:
bootrec /fixmbr
bootrec /fixboot
bootrec /scanos
bootrec /rebuildbcd
- Restart your computer to see if you can now access Windows.
If you are facing booting issues on Windows 10, we have a great guide with solutions to fix it
4. Run the DiskPart command
- Boot your computer using Windows installation media via a USB flash drive created in Step 2.1. Fill in the details on the Windows Setup screen, and click Next.
- On the next page, click Repair your computer.
- From Choose an option screen, click Troubleshoot.
- Next, select Advanced options.
- Now choose Command Prompt. Your computer will reboot, and input the user account credentials if asked.
- Type the following commands one by one and hit Enter after every command:
diskpart
list volume
select volume=n
assign letter=m
- Copy & paste the command after replacing the c with the letter of your system drive and press Enter:
bcdboot c:\Windows /s m: /f uefi - Reboot your computer to check if the issue is fixed.
- Microsoft releases Windows 11 (KB5058411, KB5058405) May 2025 Patch Tuesday
- You can now share an app/browser window with Copilot Vision to help you with different tasks
5. Use an SFC scan to repair system files
- Restart your computer using the Windows installation media created in Step 2.1. On the Windows Setup screen, enter the details, and click Next.
- Select Repair your computer on the next screen.
- On Choose an option screen, select Troubleshoot.
- Choose Advanced options from the next screen to proceed.
- Select Command Prompt from the Advanced options window. The system will restart and enter credentials when prompted.
- On the Command Prompt window, type the following command to restore the system files and hit Enter:
sfc /scannow
- The command will take some time to complete; wait till you see a successfully completed message, then restart your PC.

6. Repair disk errors
- Reboot your PC using the Windows installation media created in Step 2.1. On the Windows Setup screen, fill in the details, and click Next.
- Click the Repair your computer option on the next screen.
- On Choose an option screen, select Troubleshoot.
- Next, click Advanced options.
- Select Command Prompt from the Advanced options window. Your PC will reboot and prompt you for a user account password; enter it to proceed.
- Type the following command to check and repair the disk errors after replacing C with the letter of the system drive and press Enter:
chkdsk c: /f /r /x - When prompted, press Y, then wait for the command to get executed.
If your computer is not able to boot up, you might want to check our guide on the subject to fix the issue on Windows 11.
7. Perform System Restore
- Restart your PC using the Windows installation media created in Step 2.1. On the Windows Setup screen, fill in the details, and click Next.
- Click the Repair your computer option on the next screen.
- On Choose an option screen, select Troubleshoot.
- Choose Advanced options.
- From the Advanced options window, choose System Restore. Your computer will reboot, and enter the user name and password to proceed.
- On the System Restore window, click Next.

- Select the Restore point and click Next.
- Click Finish and wait while the system returns to the last known good configuration.


8. Reinstall the operating system
- Restart your PC using the Windows installation media created in Step 2.1. Enter information for the Language to install, Time and currency format, & Keyboard or input method options, and click Next.
- Click Install Now.
- Enter the product key or choose I don’t have a product key.
- Choose the Windows version and click Next.

- Follow the onscreen prompts to complete the installation process.


So, these are methods you can use to fix the Winload error on Windows 11 and regain access to your computer.
If you are encountering missing Winload.efi error on Windows 10, feel free to check this informative guide to resolve the issue.
Please let us know of any additional solutions or thoughts you may have on this topic in the comment section below.
Claire Moraa
Windows Software Expert
Claire has a knack for solving problems and improving the quality of life for those around her. She’s driven by rationality, curiosity, and simplicity, and always eager to learn more about Microsoft’s products.
With a background in teaching and reviewing, she breaks down complex topics into easily understandable articles, focusing mostly on Windows 11, errors, and software.