
Home
Windows
By
Abhishek Silwal
If you have enabled Windows Boot Manager or use an older Operating System where the UEFI bootloader is not available, you will encounter the error message: “Windows failed to start. A recent hardware or software change might be the cause.” It appears when the Boot Manager can’t access the boot device.
It will also display a possible cause, such as, “A required device isn’t connected or can’t be accessed.” This issue mainly happens because of the corruption of the boot files necessary to start the OS. But it is also possible that the necessary boot device is not connected properly.
Remove External Devices
Depending on your Boot priority order, your system may be trying to boot from another media, such as a USB or a network device. So, before trying other possible solutions, try removing all unnecessary external devices.
This way, only the normal OS storage device or installation media is available as the current boot device.
Check BIOS Settings
Before you begin repairing the potentially corrupt boot files, you need to ensure that your computer is detecting the OS drive and interfacing with it properly. Also, you need to check the boot order list to make sure that the OS drive is the first priority.
- Start your computer and press the BIOS key immediately after you see the logo to get to BIOS.
- Go to Boot or a similar tab and select something like Boot Priority.

- Make sure your OS drive (generally C Drive) is at the top of the list. If the drive does not show up, it is not connected properly, and you need to reinsert it in this scenario.
- If you are trying to boot from a Windows installation media, you have to move the media to the top instead.
- Now, look for the SATA mode option. You can usually find it under Advanced or Storage Controller settings.
- If you are using older operating systems, IDE is the preferred choice. And for newer systems, set it to AHCI. We recommend checking if the computer boots when enabling each option to ensure what mode you need.

- If you still encounter the error regardless of the mode, set the SATA mode to AHCI for now if you are using Windows Vista and later OS. After trying other methods, you can switch the SATA mode and check which works best for you.


Perform Startup Repair Using Windows Installation Media
Windows includes the Startup Repair feature that automatically checks for errors with the boot configuration data or other boot files and attempts to repair them. You will get an option to perform the startup repair whenever you encounter the error.
However, if it can’t solve it, the source file for the repair may have some issues as well. In such cases, you need to use an installation media to use it as the source.
- Create a Windows installation media with the same version as your system on another computer.
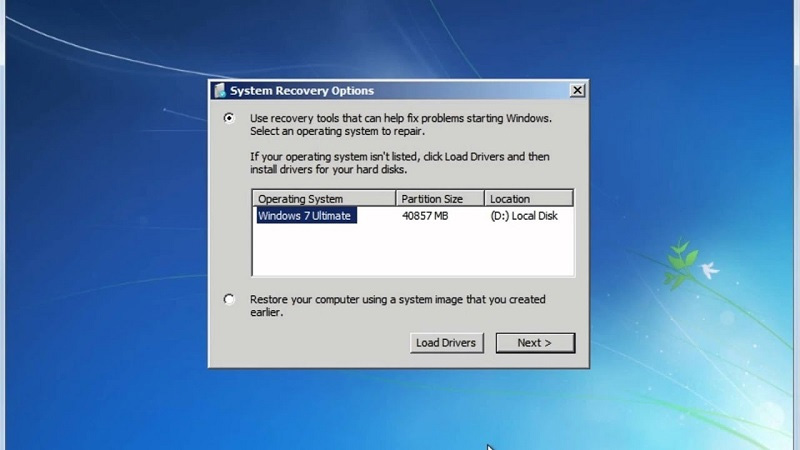
- Boot using this installation media. If you have an MBR disk, you need to manually change the Boot order from the BIOS to prioritize the installation media.
For a GPT disk or UEFI system, you should get the choice to boot from the media. Or you may need to press a certain key to access the boot menu. Search official sources for such a key for your motherboard. - Set the language preferences and agree with any license terms.
- Then, on the installation screen, click on Repair your computer.

- On newer Windows OS, go to Troubleshoot > Advanced options > Startup Repair. For older ones, you can directly select Startup Repair.

- Follow the on-screen instructions to finish the repair and then boot again.
- This time, boot using your original OS drive and then check if you still encounter the error.


Manually Repair Boot Files
Sometimes, the automatic startup repair utility can’t repair the boot files. In such cases, you need to manually repair them using the Command Prompt.
- Boot using the proper Windows installation media (see above solution).
- Specify your language preferences and click Next.
- On the Install screen, click Repair your computer.
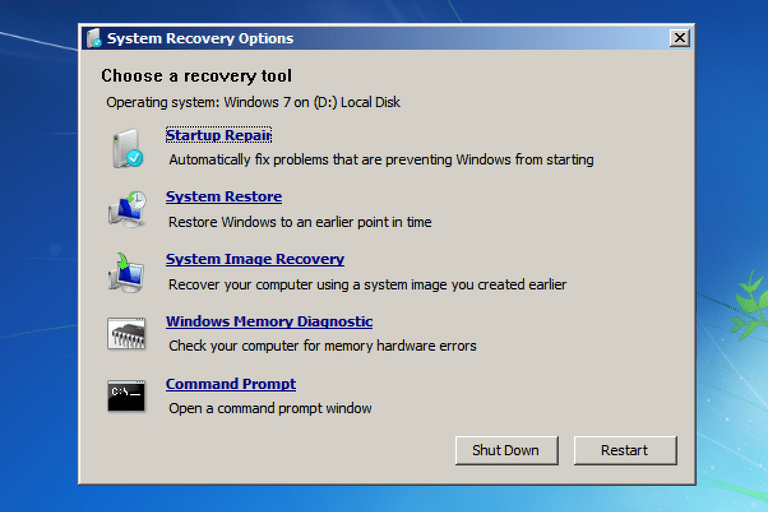
- Select Command Prompt or Troubleshoot > Advanced options > Command Prompt.

- Type the two commands below to check if you have a GPT partition system in your OS disk and press Enter after each:
diskpartlist disk(here, the Gpt column should show an asterisk (*) sign if you have a GPT partition on the disk)
- Enter the commands below depending on the partition scheme of your system disk:


For GPT,
For MBR,
exit(to exit out of diskpart)bootrec /fixmbrbootrec /fixbootbootrec /rebuildbcd

Re-create Boot Files
If the boot configuration and file repairing commands don’t work, you must recreate these files from scratch using your operating system files.
- Boot using the proper Windows installation media and go to the Command Prompt (see above method).
- Type the two commands below to check if you have a GPT partition system in your OS disk and press Enter after each:
diskpartlist disk(here, the Gpt column should show an asterisk (*) sign if you have a GPT partition on the disk)
- Enter the commands below depending on the partition scheme of your system disk:
For GPT,
select disk #(replace # with the relevant disk number)list volume(check the number of the volume with the FAT32 partition that is hidden)select volume #assign letter = S:(or any unused drive letter)exitcd /d S:\EFI\Microsoft\Boot\(replace S: with the drive letter you used earlier)ren BCD BCD.old(to create a backup to account for unforeseen situations)bcdboot C:\Windows /l en-us /s S: /f all(here, replace C: with the drive letter of the operating system and S: with the letter you assigned earlier.)
bootrec /rebuildbcd(not necessary if you have a Windows version before Windows 10 Version 1709)

For MBR,
select disk #(replace # with the required disk number)list volume(check the number of the volume with where Info says System)select volume #assign letter = S:(or any unused drive letter)exitbootrec /fixmbrbcdboot C:\Windows /s S:(here, replace C: with the drive letter of the operating system and S: with the letter you assigned earlier.)

Clean Install Windows
If you cannot boot into your operating system after repairing the boot files, your final option is to clean install Windows. A clean install removes the partition containing the boot files as well as the OS partition. This way, you can reinstall all such files (but without corruption) to resolve your issue.
Clean installing Windows will delete all the data on the disk (of your non-system drives as well). So, first, try backing the data on the disk by booting with a Linux live disk or Windows-to-go disk.
- Create a Windows installation media of the version you want (using the same as the Windows in your disk is not necessary).
- Boot using this media and specify your language preferences.
- Click on Install now on the Install screen.
- Enter your product key if you have it. If not, select I don’t have a product key as well as the Windows build you want (Home, Pro, etc.)
- Click on Next.
- Agree with the license agreements and select Next.
- Choose Custom: Install Windows only.
- Select all the partitions for your OS disk (Drive 0) and click Delete for each. Confirm your choice as well.
- After you only have the unallocated space for the disk, select it and click Next.

- Ignore the warning as the setup process will automatically create the necessary partitions.
- Click on the partition that says Primary and then Next.
- Follow the on-screen instructions to clean install Windows.
- After restarting, check if you can boot from the OS drive. Then, you will need to go through the initial account and privacy setup.


Use USB 2.0 Port to Install Older Windows
All computers that already have Windows 10+ may not support installing old OS like Windows 7 from USB 3.0 ports or flash drives. If you try doing so, you’ll get the above error while trying to boot from the installation media.
This is mainly because of the lack of USB 3.0 drivers on the installation media. But on some computers, you might still be able to install the OS. Regardless, it’s better to either use USB 2.0 or include USB 3.0 drivers in the Windows image on the installation media. You may also need to enable CSM or Legacy support on your BIOS settings.
Additionally, if you only have USB 3.0 ports, you have to enable USB debug mode on BIOS to use them as USB 2.0 ports.
If you are facing this error, then chances are you may have installed new hardware or software which is causing the issue. Sometimes installing the latest Windows updates seems to cause this issue but you can’t be sure until you troubleshoot the issue. Now as far as software problems are concerned, these might be the possible reasons as to
why you are facing this error:
- Corrupted BCD information
- System File is damaged.
- Loose or faulty SATA/IDE Cable
- Conflicting 3rd party software
- Virus or malware

The error which you will get after a reboot will be:
Error: Windows failed to start. A recent hardware or software change might have caused the issue after you install Windows Updates
The main problem is that you won’t boot into Windows and you will be stuck at this error message screen. In short, you will be inside a reboot loop as every time you restart your PC you will again face the same error message until you fix the issue. So without wasting any time let’s see how actually to Fix “Windows failed to start. A recent hardware or software change might be the cause” with the below-listed troubleshooting steps.
Table of Contents
Method 1: Run Startup/Automatic Repair
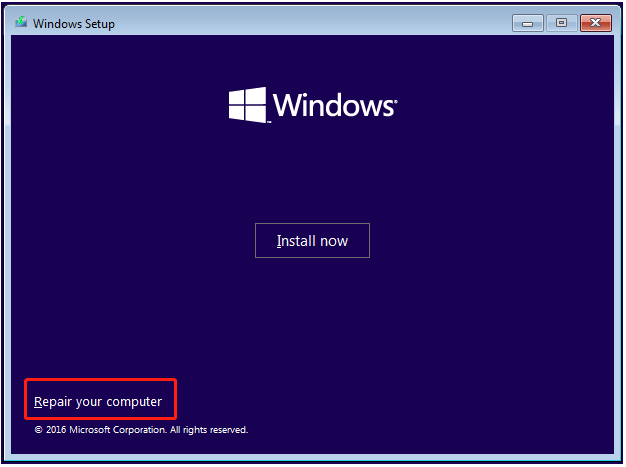
1. Insert the Windows 10 bootable installation DVD or Recovery Disc and restart your PC.
2. When prompted to Press any key to boot from CD or DVD, press any key to continue.

3. Select your language preferences, and click Next. Click Repair your computer in the bottom-left.

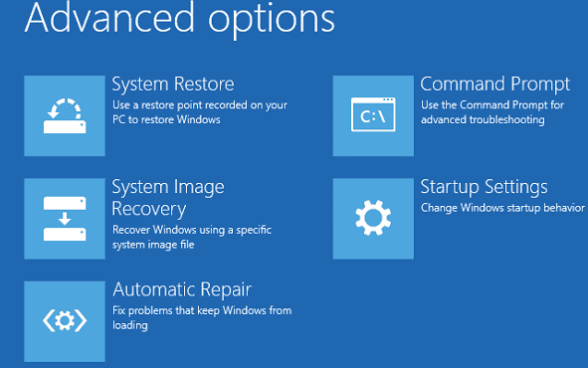
4. On choose an option screen, click Troubleshoot.

5. On Troubleshoot screen, click the Advanced option.

6. On the Advanced options screen, click Automatic Repair or Startup Repair.

7. Wait till the Windows Automatic/Startup Repairs complete.
8. Restart and you have successfully Fix Windows failed to start. A recent hardware or software change might be the cause, if not, continue.
Also Read: How to fix Automatic Repair couldn’t repair your PC.
Method 2: Boot into Last Known Good Configuration
Before going any further let’s discuss how to Enable Legacy Advanced Boot Menu so that you can easily get Boot Options:
1. Restart your Windows 10.
2. As the system restarts enter into BIOS setup and configure your PC to boot from CD/DVD.
3. Insert the Windows 10 bootable installation DVD and restart your PC.
4. When prompted to Press any key to boot from CD or DVD, press any key to continue.
5. Select your language preferences, and click Next. Click Repair your computer in the bottom-left.
6. On choose an option screen, click Troubleshoot.
7. On Troubleshoot screen, click the Advanced option.

8. On Advanced options screen, click Command Prompt.

9. When the Command Prompt(CMD) open type C: and hit enter.
10. Now type the following command:
BCDEDIT /SET {DEFAULT} BOOTMENUPOLICY LEGACY
11. And hit enter to Enable Legacy Advanced Boot Menu.

12. Close Command Prompt and back on the Choose an option screen, click Continue to restart Windows 10.
13. Finally, don’t forget to eject your Windows 10 installation DVD to get Boot options.
14. On the Boot Options screen, choose “Last Known Good Configuration (Advanced).”

Method 3: Perform a System Restore
1. Put in the Windows installation media or Recovery Drive/System Repair Disc and select your language preferences, and click Next
2. Click Repair your computer at the bottom.
3. Now, choose Troubleshoot and then Advanced Options.
4. Finally, click on “System Restore” and follow on-screen instructions to complete the restore.

5. Restart your PC to save changes and see if you can fix Windows failed to start. A recent hardware or software change might be the cause error.
Method 4: Run SFC and CHKDSK
1. Again go to command prompt using the method 1, click on command prompt in the Advanced options screen.
2. Type the following command in cmd and hit enter after each one:
sfc /scannow /offbootdir=c:\ /offwindir=c:\windows
chkdsk C: /f /r /x
Note: Make sure you use the drive letter where Windows is currently installed. Also in the above command C: is the drive on which we want to check disk, /f stands for a flag which chkdsk the permission to fix any errors associated with the drive, /r let chkdsk search for bad sectors and perform recovery and /x instructs the check disk to dismount the drive before beginning the process.

3. Exit the command prompt and restart your PC.
Method 5: Rebuild BCD configuration
1. Using above method open command prompt using Windows installation disk.
2. Now type the following commands one by one and hit enter after each one:
bootrec.exe /FixMbr
bootrec.exe /FixBoot
bootrec.exe /RebuildBcd

3. If the above command fails, then enter the following commands in cmd:
bcdedit /export C:\BCD_Backup
c:
cd boot
attrib bcd -s -h -r
ren c:\boot\bcd bcd.old
bootrec /RebuildBcd

4. Finally, exit the cmd and restart your Windows.
5. This method seems to Fix Windows failed to start. A recent hardware or software change might cause the error, but if it doesn’t work for you, then continue.
Method 6: Set Correct Boot Order
1. When your computer starts (Before the boot screen or the error screen), repeatedly press Delete or F1 or F2 key (Depending upon your computer’s manufacturer) to enter BIOS setup.
2. Once you are in BIOS setup, select the Boot tab from the list of options.

3. Now make sure that the computer Hard disk or SSD is set as a top priority in the Boot order. If not, use up or down arrow keys to set hard disk at the top, which means the computer will first boot from it rather than any other source.
4. Finally, press F10 to save this change and exit.
Recommended:
- Fix High CPU Usage By TiWorker.exe
- 10 ways to fix A disk read error occurred
- Fix High CPU Usage by svchost.exe (netsvcs)
- Fix High CPU Usage by RuntimeBroker.exe
That’s it you have successfully Fix Windows failed to start. A recent hardware or software change might be the cause, but if you still have any questions regarding this post, please ask them in the comment’s section.

Are you the one struggling with the “Windows Failed to start error on Startup”, then here check out what goes wrong with your Windows operating system and how to fix the error.
Getting the Windows errors is a common problem but sometimes this can be a big headache. Facing Windows won’t boot into its Operating system is the biggest nightmare that comes in the life.
Well, there are various errors appear when the Windows system won’t boot or failed to start. One of the recent error messages is:
“Windows has failed to start. A recent hardware or software change might be the cause.”

The most common reason responsible for getting the Windows failed to startup properly error is recently installed Windows update. However when the error message appears it provides the users with a couple of options like run startup repair, or start Windows normally to fix the error.
But after running the startup repair or starting the Windows normally return the same error message.
Apart from the Windows update, there are many other reasons responsible for getting the “Windows failed to start” error message:
- The incompatible or faulty hardware
- Software confliction
- Outdated driver issues
- Recently installed drivers or update
- Boot files corruption
- HDD/SSD issue
These are some of the reasons responsible for getting the “Windows failed to start” error message.
Here check out the solutions that you try to resolve the issues and boot into the operating system. But before moving further check out some of the common error message related to the Windows failed to start error message.
Some other error messages related to Windows failed to start issue.
- Windows Failed To Start Startup Repair Not Working: When the Windows failed to start many users reported that the Startup repair option also stops working.
- Windows 7 Failed To Start File Boot BCD: This is another version faced by the Windows 7 users.
- Windows 10 Failed To Start Error 0xc000000f: The Windows 10 users are also not free from the Windows won’t boot error.
- Windows Failed To Start Boot Device Is Inaccessible: Inaccessible boot device is another common error message appears when the Windows failed to start.
How to Fix Windows Failed To Start on Startup Error Message:
Try the below-given solutions one by one to get rid of the Windows won’t boot up an error message.
Solution 1: Remove External Devices
Very first you need to the remove the external devices and then try booting. Well, the Windows failed to start error message on startup is most likely related to the hardware.
The External devices like printers, camera, scanners etc. are some of them. In some cases, the bad or outdated drivers also cause the error when Windows begins to load, determine which device is causing the issue.
Also if have installed any latest Windows update then simply uninstall it and check if this helps you.
- To do so turn off the computer and unplug it > press power button for twenty seconds. And plug it back after that try booting again.
Solution 2: Assure your Computers Detects HDD and Boot From It:
It is important that your windows operating system boot from HDD to avoid the failed startup issue.
So here follow the steps to do so:
- Restart your system > get into the BIOS settings (you can find the key on system user manual or on the first screen appears when it boots up)
- Then in the BIOS settings > locate Boot priority order or Boot order > highlight the Boot priority order > hit Enter
- Then from the list of devices make sure the HDD is on the top of the list.
- But if you don’t find that HDD then open your machine > remove and reseat the SATA or IDE cable connecting the HDD to the motherboard (if possible replace it altogether)
- Next Boot up your computer > access BIOS settings > check HDD is detected or not
- If the HDD is on the list but not on the top > configure the list to let the HDD on the top.
- After doing this Save changes > exit BIOS > restart your system.
Hope doing this will help you resolve the Windows failed to start on Startup error message but if not then try the next solution.
You May Also Read:
- Fix Boot Error 0xC000000E: The selected entry could not be loaded
- FIX: Boot Problem Caused by Corrupted BCD File under Windows 8
- Best Ways to Fix Endless Reboot Loop after Windows 10 Update
- 6 Ways to Fix “Your PC Did Not Start Correctly” Windows 10
Solution 3: Perform a Startup Repair
Try performing a Startup repair, this helps you fix Windows failed to start error.
Follow the steps to do so:
- Insert a Windows installation disc or Windows system repair disc in the system.
- Restart system > boot from the disc.
- Choose language and other preferences > click Next.
- Now a screen displays having Install Now button at its centre
- Click on Repair your computer in the bottom left corner.
- And as the whole process is completed > restart your system.
Note: if you are using the system repair disc, then you will be taken to next step. Choose operating system you want to repair > click Startup Repair and follow the onscreen instruction > restart your system.
Lastly, check if doing this will help you to resolve Windows failed to start issue.
Solution 4: Perform a System Restore
Well, if none of the above-given solutions helps you to fix the issue then try performing a system restore. Doing this will help you to restore your computer to a point time before it was installed.
Follow the steps to perform a system restore:
- Insert a Windows installation disc or Windows system repair disc > reboot your system and boot from the disc.
- Go to the BIOS settings > set the DVD/CD drive system first boot device.
- Now Save the changes > exit BIOS settings > press any key to boot from the disc when the computer startup.
- Choose operating system needed to Repair > select Repair Your Computer
- Click on System Restore > select the Restore Point (created days before the error appears)
- Follow the onscreen instruction to begin the System Restore
- After finishing the system restore process > restart your computer
Now check if the issue is resolved or not.
Solution 5: Reinstall Windows
This is the last solution, if none of the above-given fixes helps you to fix the error, then try reinstalling the Windows operating system together.
Please Note: Reinstalling the Windows system will erase the entire data, programs, so before a backup of the important files and folders.
Check Your Windows PC/Laptop Health
You can make use of the professional recommended solution Windows Repair tool, to fix various Windows update errors and other issues related to it. This is the advanced tool that scan, detect and repair various Windows operating system issues such as corruption, damages of the Windows system files, malware/viruses, protect you from file loss, hardware issues and many more. You can also fix various issues like BSOD error, DLL error, Registry issues, drivers issues, games related issues, application error and many others. This not only fixes the errors but also optimize your Windows PC performance and fix other issues without any hassle.
Conclusion:
Windows failed to start on startup is the most irritating error message faced by the Windows users.
There are many unpleasant reasons behind getting the error message.
I tried my best to put together the entire working solutions that helped many users to get rid of the error.
Apart from that always delete the temporary files, scan your system with good antivirus software and remove unwanted software time to time to maintain the Windows PC performance and other boot up issues.
Additionally, if you find the article helpful or have any query, comment, questions or suggestions related, then please feel free to share it with us in the comment section below or you can also go to our Fix Windows Errors Ask Question Page.
Good Luck!!!

Summary
Article Name
5 Tricks to Fix Windows Failed to Start Error on Startup
Description
Uninstall the latest installed Windows update, hardware, old drivers and other working solutions to fix Windows Failed to start error on Startup error message and start using your Windows operating system without any hassle…
Author
Publisher Name
Fix Windows Errors
Publisher Logo
Many Windows 7 users have the Windows failed to start error when trying to boot their computer, which causes data loss. This article tells how to retrieve data from unbootable computers and helps fix Windows boot manager Windows failed to start issue using the top 7 methods.
Many Windows 7 users may be familiar with this error “Windows failed to start. A recent hardware or software change might be the cause.” The error message will also give users a couple of options to resolve the issue like running Startup Repair or starting Windows normally, as the following screenshot shows.
See: What Should Be Done if a System Cannot Boot from the Hard Drive
There are various Windows boot errors and this one is a typical error for Windows Vista, Windows 7, Windows 8 and Windows 8.1 operating systems. What leads to this error? The following contents will show you the most common causes.
Reasons for Windows Failed to Start Error
the following reasons are possible causes of a Windows failed to start error.
1. Missing or Corrupted BCD File
The most likely cause of the Windows failed to start error is the missing or corrupted BCD file. The reasons for BCD file missing or corruption are various. There could be disk write errors or power outages and so on. If the BCD file is missing, your computer will show the error “Windows failed to start. A recent hardware or software change might be the cause.”
2. Bad or Outdated Driver Issues
Sometimes bad drivers can cause the Windows failed to start Windows 7 error as Windows begins to load.
3. The Corruption of System Files
The file system itself may become corrupt or damaged due to some reasons. If you turn off a PC while it is in the middle of writing crucial data to the boot sector, you may encounter this Windows 7 failed to start error. System file corruption may also cause boot issues like error “Recovery your PC needs to be repaired” if you use Windows 10.
When people come across the Windows failed to start error, what they worry about the most is the data saved on the computer. Well, how to get files off the unbootable computer?
How to Get Files off from an Unbootable Computer
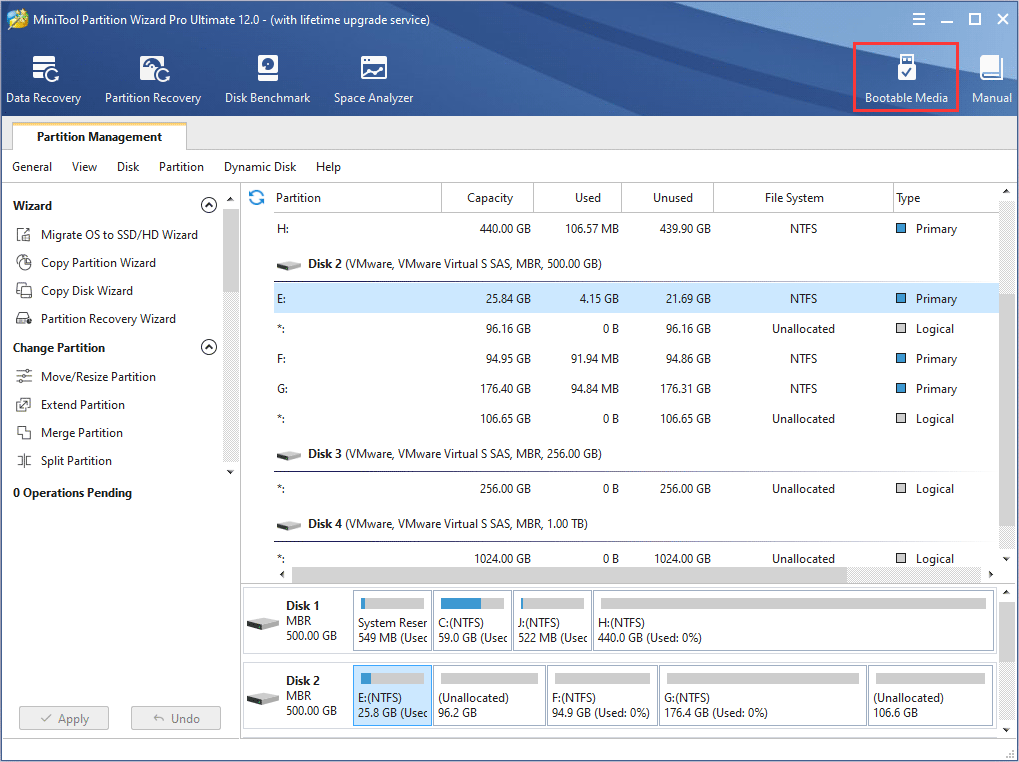
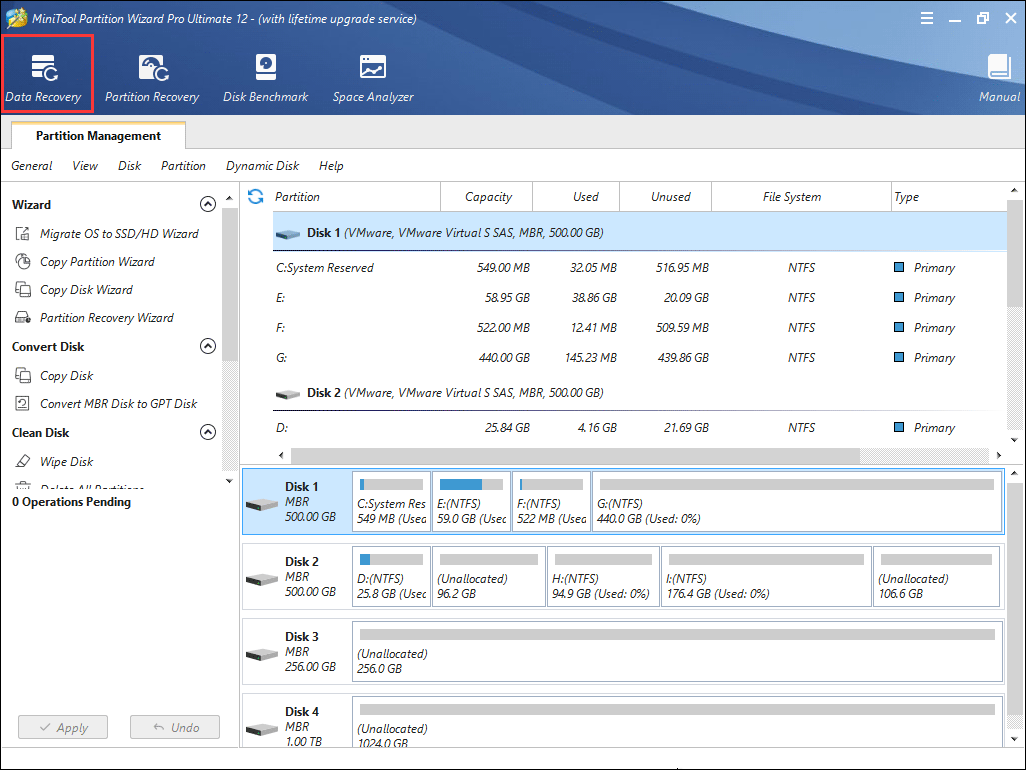
You can try MiniTool Partition Wizard’s Data Recovery feature to recover important files from the computer with Windows failed to start error immediately. Just follow the steps as below.
Step 1. Get MiniTool Partition Wizard Pro Ultimate from the following button and install it on a normal computer.
Step 2. Create a bootable USB drive or CD/DVD disc using the Bootable Media embedded in this software to boot the computer with the Windows failed to start error.
Step 3. Connect the boot disk you’ve made to the computer with Windows failed to start error.
Step 4. Enter the BIOS settings menu of your computer to give the bootable USB drive or disc boot priority. Then boot from the disk.
Step 5. When you get to the interface of MiniTool Partition Wizard, launch the Data Recovery wizard.
Step 6. After launching the Data Recovery function, you can see that all the detected disk partitions are arranged by drive letters.
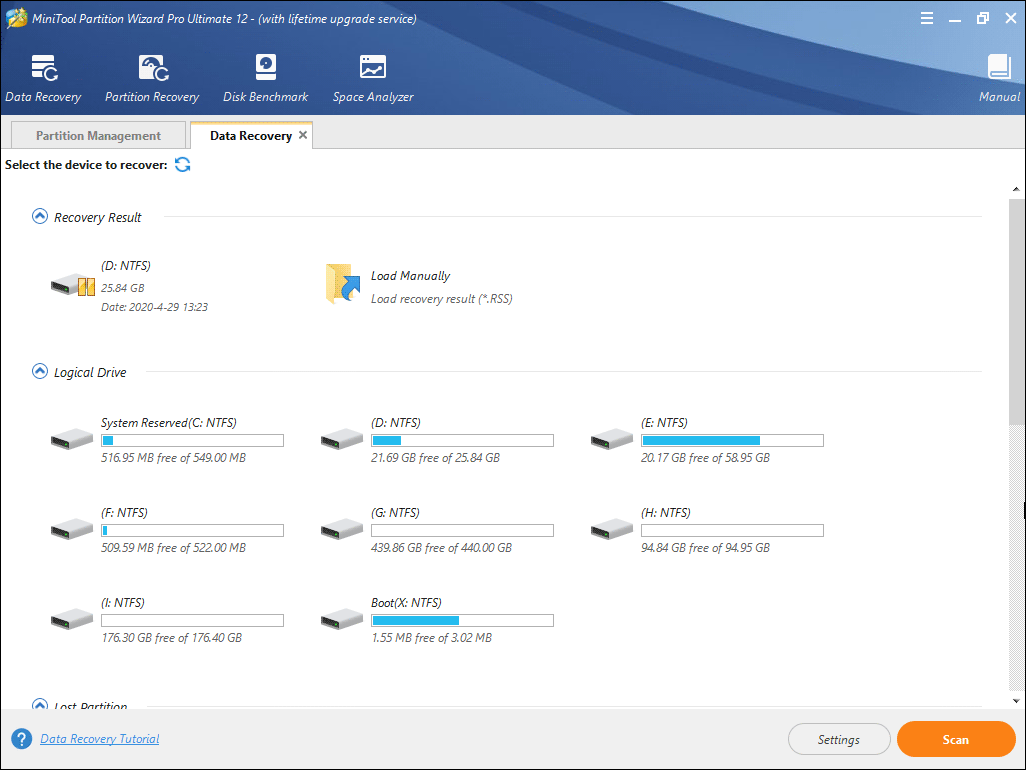
Here Data Recovery will list 5 parts, and every part is different from each other.
- Recovery Result: this section will show the last scanning result record and you can manually load scanning result to check recovered files directly.
- Logical Drive: this section will show all existing partitions on your computer including removable devices.
- Lost Partition: this section will show all lost partitions detected by Data Recovery and then you can recover data from lost partitions.
- Unallocated Space: this section will show all unallocated spaces on your computer.
- Hard Disk: this section will list all hard disks on the computer. Users can also select a hard disk to scan.
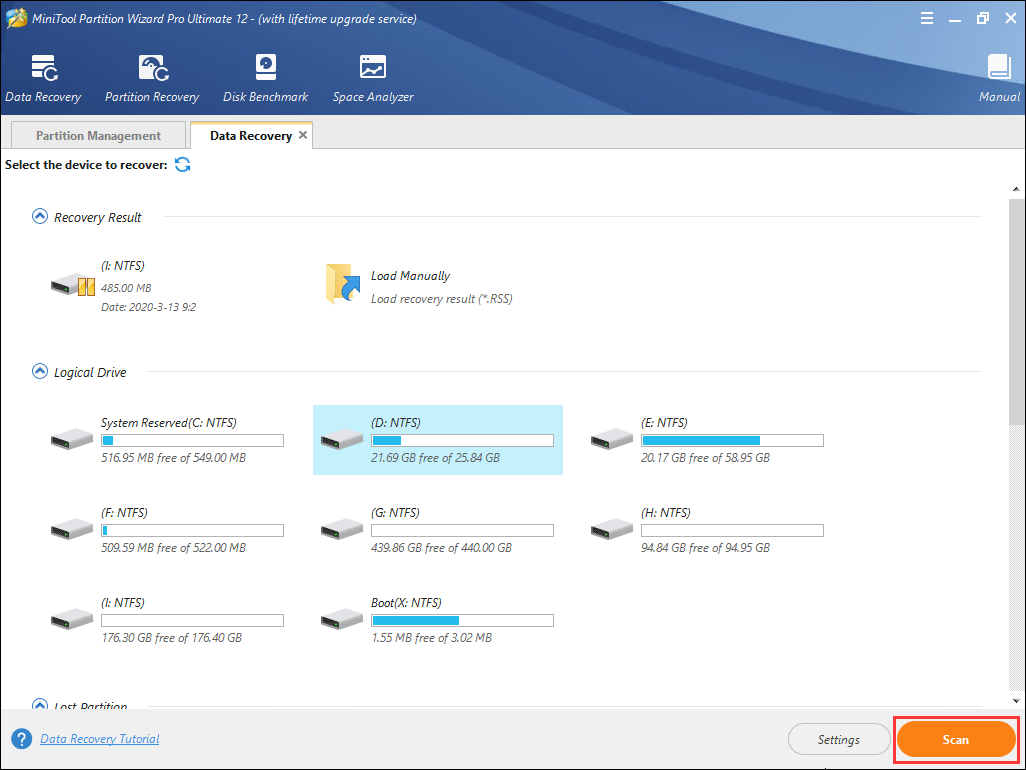
Step 7. You can select a partition and click Scan. Here I take partition G as an example.
Note: In the bootable edition, every partition has its drive letter including the system reserved partition. So, the drive letter of the system partition can be changed. You can pay attention to the partition size to make sure you choose the right partition to recover.
Step 8. Waiting for the scanning completion. During the process of scanning, you can pause or stop the scanning by clicking the Pause or Stop button if you find what you need.
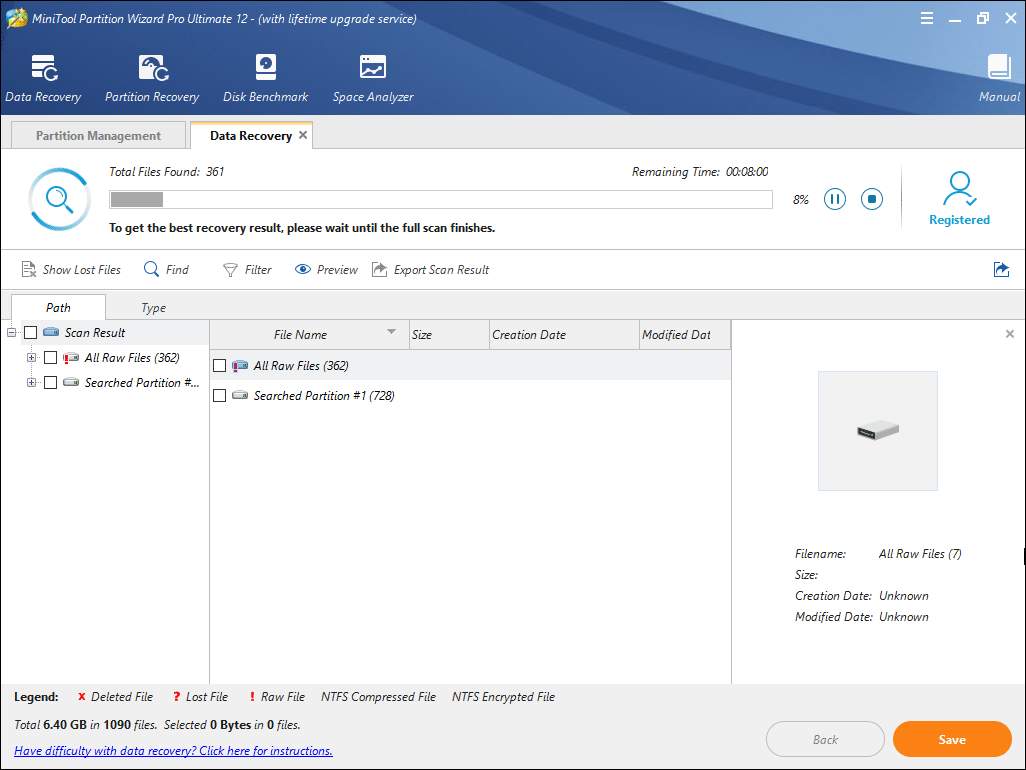
Step 9. After completing the scan, you can check items that you need and click Save button.
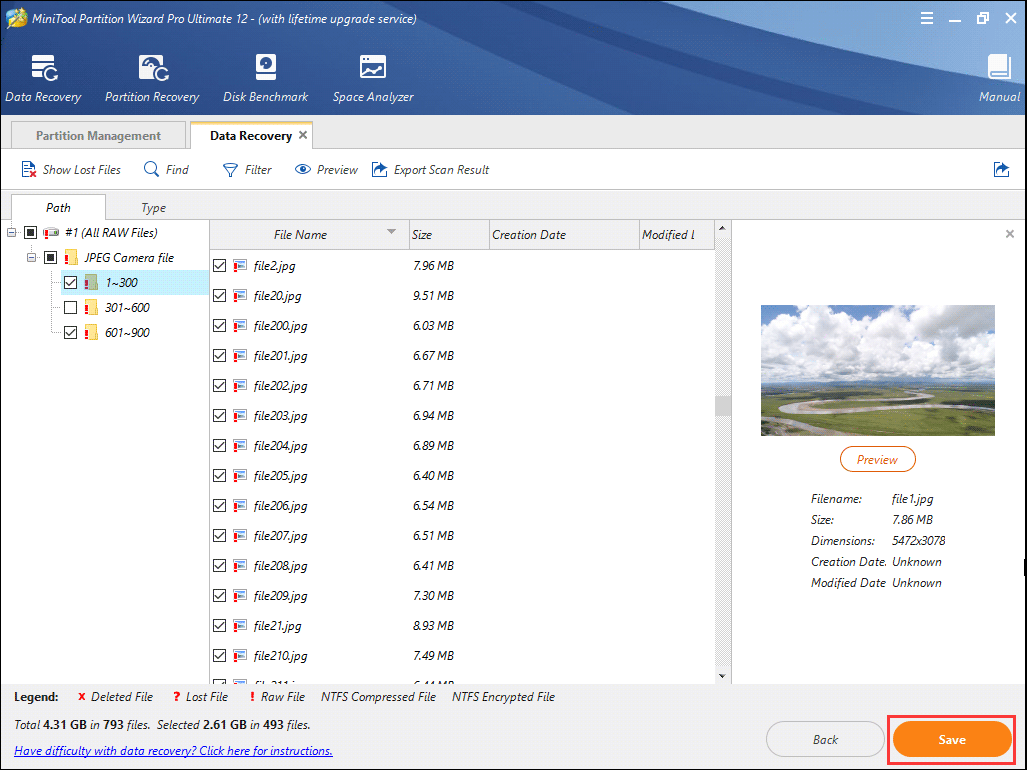
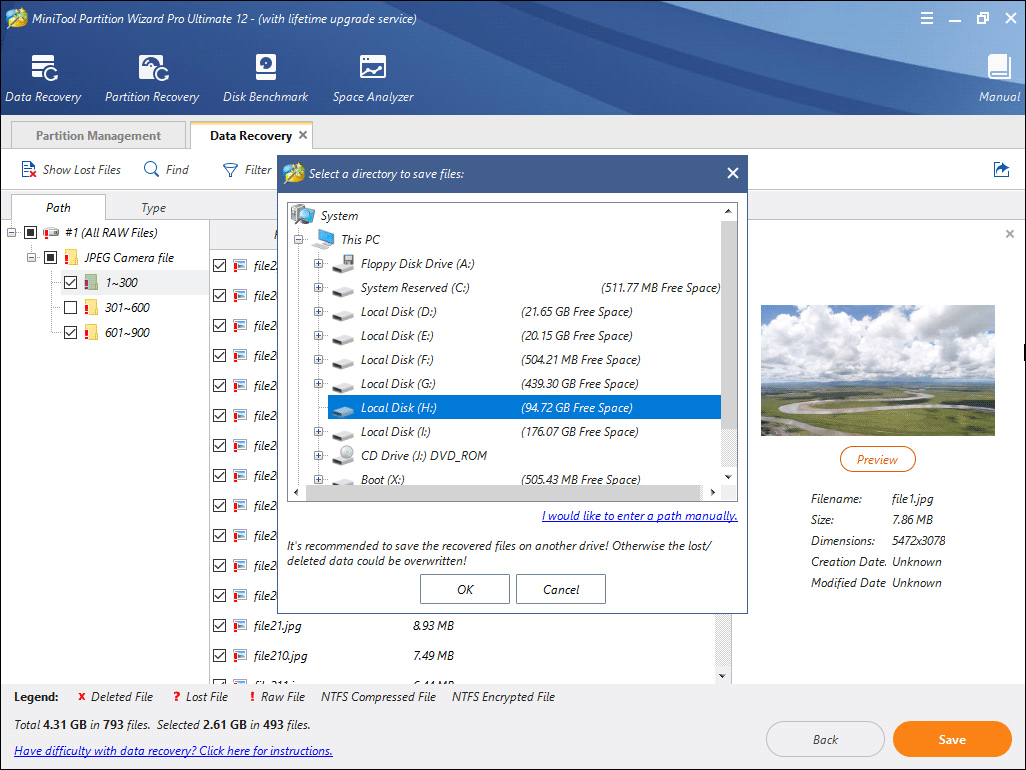
Step 10. At last, choose a directory to save selected files. It is recommended to save the recovered files on another drive. Otherwise, the lost/deleted data could be overwritten. You can save the files to a USB drive or other external devices.
This is how to get files off with MiniTool Partition Wizard Pro Ultimate when computers won’t boot. If you want to rescue important files immediately, try this.
Well, after recovering the essentials, how can we fix the Windows failed to start Windows 7 error? To fix this issue, use the following top 7 solutions to fix “Windows failed to start. A recent hardware or software change might be the cause.”
7 Solutions to Fix Windows Failed to Start Windows 7 Error
Solution 1. Remove Newly Installed Hardware or External Devices and Reboot.
If you installed any hardware (such as printers or scanners) before you met the “Windows failed to start. A recent hardware or software change might be the cause.” error, just remove the hardware you installed (especially all other unnecessary hardware with only the mouse and keyboard kept) and restart the computer.
Solution 2. Use the Last Known Good Configuration to Boot up Windows
When you are faced with “Windows failed to start. A recent hardware or software change might be the cause.” error, you can try booting into the Last Known Good Configuration option, which might save your computer.
Step 1. Restart your computer and press F8 continuously until you see the list of boot options.
Step 2. Choose Last Known Good Configuration (Advanced) from the list and press Enter.
Step 3. Wait and see if Windows can boot up successfully.
If not, you may try using Startup Repair with detailed steps in Solution 3.
Solution 3. Run Startup Repair
Step 1. Insert a Windows installation disc into the computer with Windows failed to start error.
Step 2. Restart the computer with its power button. You should be able to see “Press any key to boot from CD or DVD”. Follow the instructions and boot.
Step 3. Choose your language and other preferences and then click on Next.
Step 4. On this screen, click on Repair your computer in the bottom left corner.
Step 5. Select the operating system you want to repair and then select Next.
Step 6. On the System Recovery Options menu, select Startup Repair, and then follow the on-screen instructions. When it completes, restart your computer to see if it fixed the problem.
When the startup repair process is done, you may restart your computer and check if Windows failed to start Windows 7 error disappears.
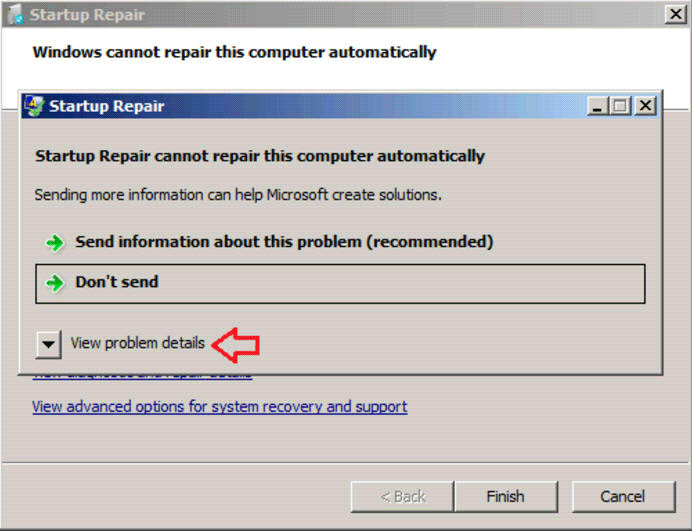
When you receive the following message in the picture, it means that the startup is unable to solve Windows failed to start error and you might resort to another method instead.
Solution 4. Rebuild BCD Configuration
The missing or corruption of BCD file is also a critical reason for the Windows failed to start error. You can follow the steps as below to rebuild BCD in command prompt.
Step 1. Insert the Windows 7 installation disc and restart your computer.
Step 2. Boot from the disc by pressing any key when the “Press any key to boot from CD” message appears.
Step 3. On the Install Windows page, choose your language and other preferences, and then select Next.
Step 4. Select the Windows operating system you want to repair, and then select Next.
Step 5. On the System Recovery Options page, choose Command Prompt.
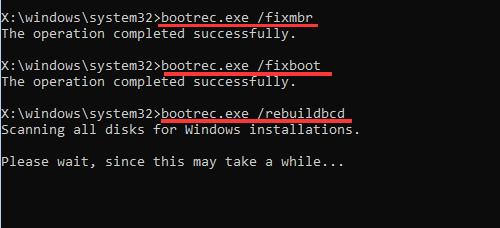
Step 6. Then input the following commands in the Command Prompt window and press Enter after each command.
- bootrec.exe /fixmbr
- bootrec.exe /fixboot
- bootrec.exe /rebuildbcd
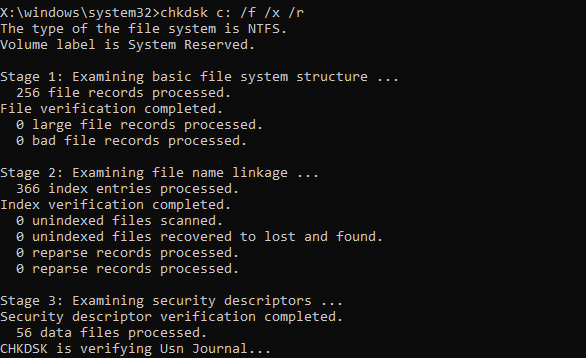
Solution 5. Run CHKDSK Utility
Step 1. Insert the Windows 7 installation disc and restart your computer.
Step 2. Boot from the disc by pressing any key when the “Press any key to boot from CD” message appears.
Step 3. On the Install Windows page, choose your language and other preferences, and then select Next.
Step 4. Select the operating system you want to repair, and then select Next.
Step 5. On the System Recovery Options page, select Command to open a command prompt window.
Step 6. Input the following command and press Enter.
chkdsk c: /f /x /r
Solution 6. Perform a System Restore
Step 1. Insert the Windows install disc.
Step 2. Press a key when the “Press any key to boot from CD or DVD” message appears on your screen.
Step 3. Click on Repair your computer after selecting a language, time and keyboard method.
Step 4. Select the drive where you installed Windows (usually C:) and click Next.
Step 5. Select System Restore from the System Recovery Options window.
Step 6. Follow the System Restore wizard instructions to select a restore point.
Step 7. Restore your PC by clicking Finish.
Solution 7. Reinstall Windows Operating System
If none of the solutions listed works, you may need to reinstall Windows altogether. Since reinstalling Windows will clear all of the data and third-party programs on your computer, you’d better backup everything on the disk.
Step 1. Also, get MiniTool Partition Wizard Pro Ultimate to create a bootable USB drive on a normally running computer.
Step 2. Boot your computer with the USB drive/disc and get the main interface of MiniTool Partition Wizard. Select the disk that you want to copy and click on Copy Disk.
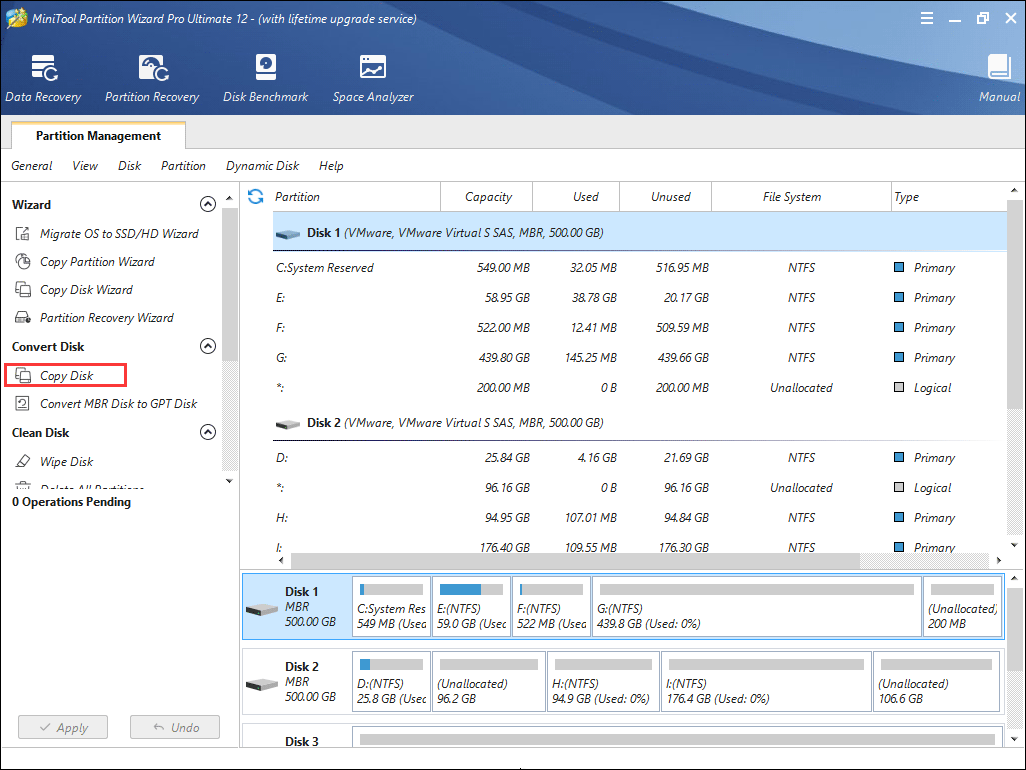
Step 3. Follow the instructions on the Partition Wizard and at last click Apply on the upper left corner.
Then you can reinstall Windows 7.
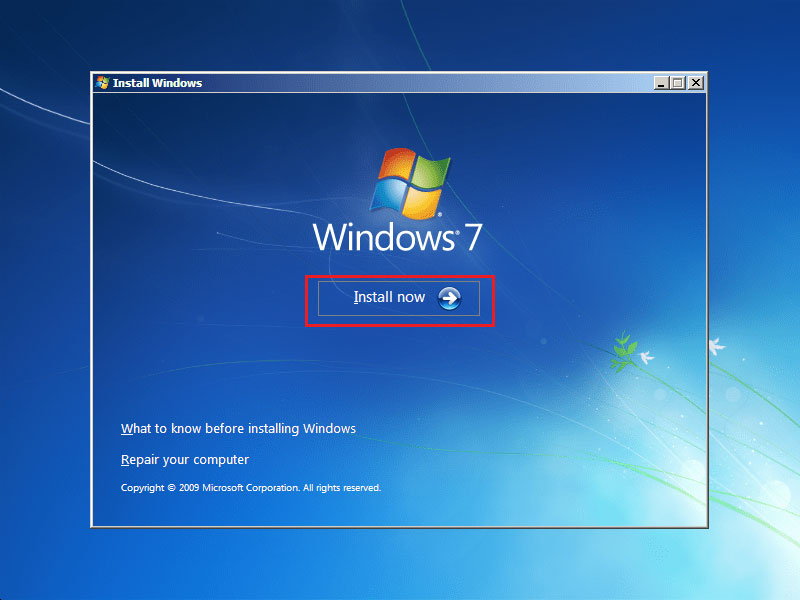
Step 1. Insert a Windows installation disc into the computer with Windows failed to start error.
Step 2. Restart the computer with its power button. Press any key to boot when you see “Press any key to boot from CD or DVD”.
Step 3. Choose your language and other preferences and then click on Next.

Step 4. On this screen, click on Install now to start Windows 7 reinstallation.
After reinstallation, you can manage Windows 7 disks and partitions with a professional Windows 7 partition manager and backup Windows 7 regularly in case of any accidental boot failure.
“By following the steps in this post, I successfully fixed “Windows failed to start. A recent hardware or software change might be the cause.” error after trying a few solutions in this post. If you have the same issue, why not have a try?Click to tweet
Bottom Line
After reading this post, have you resolved the issue after trying the above solutions for the Windows 7 failed to start error? Hope you were able to fix the problem via these methods.
If you have any other good solutions for the “Windows failed to start. A recent hardware or software change might be the cause.” Windows 7 error, you can leave a message on the following comment zone and we will respond as soon as possible. If you need any help when using MiniTool software, you can contact us via [email protected].
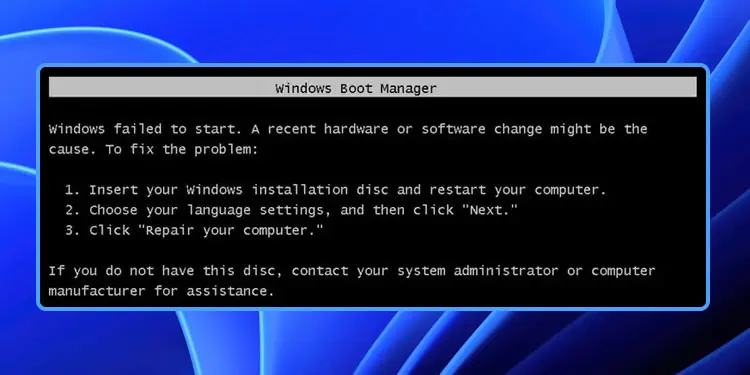
Are you stuck at the “Windows failed to start. A recent hardware or software change might be the cause. To fix the problem.” screen? If you are at loss now, the fixes mentioned in this guide on MiniTool Website might help you out.
Windows Failed to Start Windows 10/11
Some of you might be unable to start Windows after a hardware or software change. As soon as it occurs, you will be stuck at the following error message screen and cannot boot into Windows.
Windows failed to start. A recent hardware or software change might be the cause. To fix the problem.
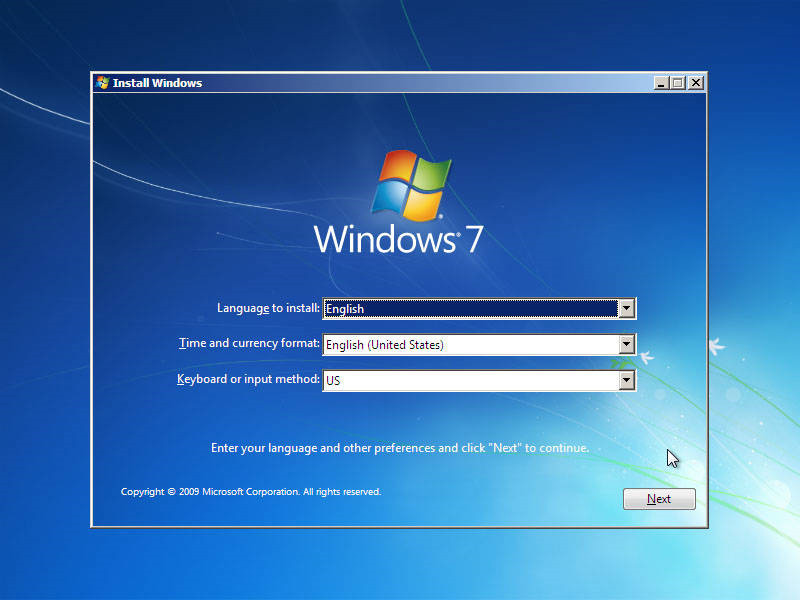
- Insert your Windows Installation disk and restart your computer.
- Choose your language setting, and then click “Next”.
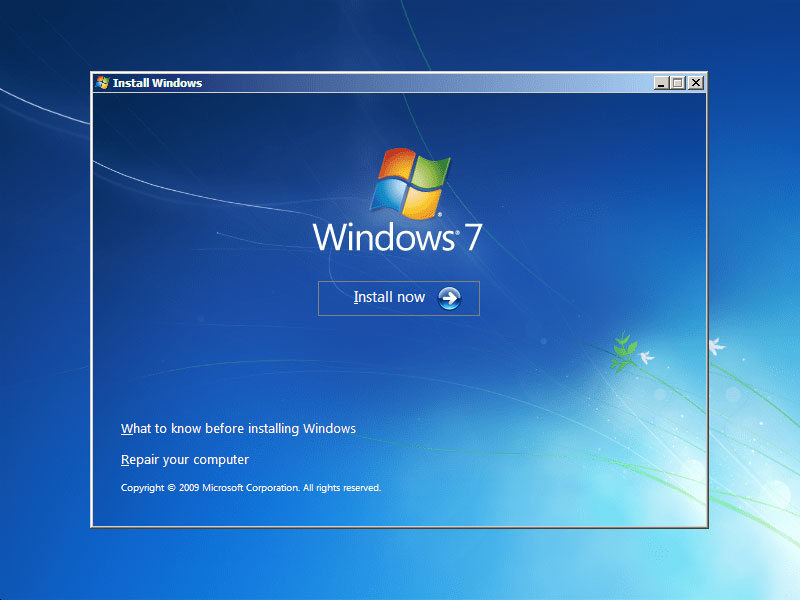
- Click “Repair your computer”.
Some possible causes for why you are stuck at this screen might be:
- Corrupted BCD files.
- Damaged System Files.
- Virus and malware infections.
- Incompatible third-party software
- Incorrect boot order.
Suggestion: Back up Your System Before Hand
Now, your computer can boot up without error. To avoid having trouble in starting the computer once more, it is essential to create a backup of your system. When your computer crashes, you can use this backup image to restore your system to an earlier state.
Here, we recommend backing up your system with a piece of free backup software – MiniTool ShadowMaker. It allows you to create a backup for your systems, partitions, disks, folders and files. Meanwhile, this tool is also known for providing a one-click system backup solution for Windows devices, that is to say, you can back up your OS easily. To do so:
Step 1. Launch MiniTool ShadowMaker and go to the Backup page.
MiniTool ShadowMaker TrialClick to Download100%Clean & Safe
Step 2. In this page, you can choose the backup source and destination. As you can see in SOURCE, this program is set to back up your operating system by default, so you just need to choose a destination path for the backup image in DESTINATION (an external drive or USB flash disk is preferred).
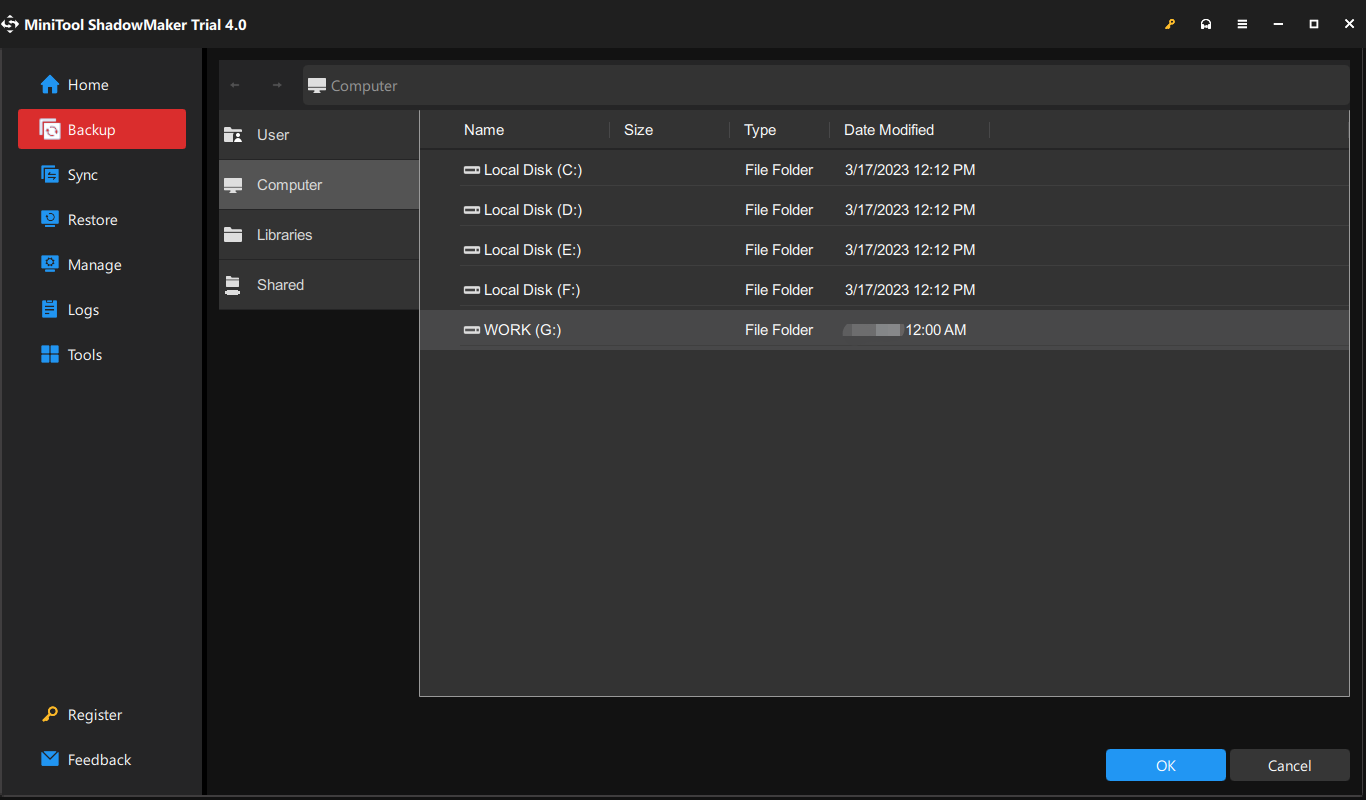
Step 3. Click on Back Up Now to start the task immediately.
How to Fix Windows Failed to Start Windows 11/10?
Fix 1: Run Automatic Repair
When your system encounters issues like Windows failed to start Windows 10, you can use the inbuilt Automatic Repair feature. This feature will scan system files, registry settings, & configuration settings and fix the problem on its own.
Step 1. Press the Power button to power off your computer and reboot it several times when you see the Windows logo. Then, you will see the Automatic/Startup Repair screen.
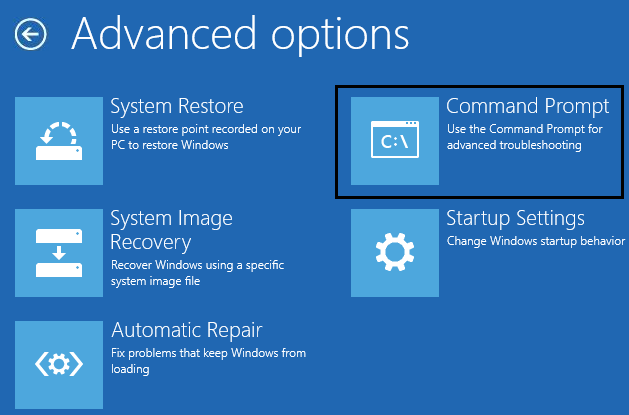
Step 2. Press Advanced options to enter WinRE.
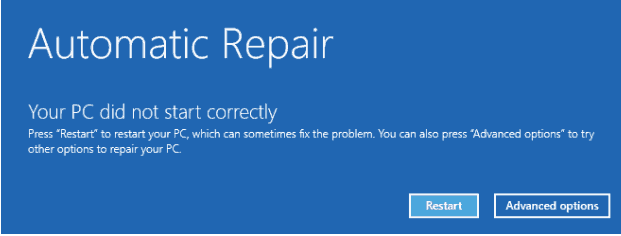
Step 3. Go to Troubleshoot > Advanced options > Automatic/Startup Repair. Then, this feature will start to deal with Windows failed to start Windows 10 for you.
Step 4. Once the process is complete, reboot your computer.
Fix 2: Rebuild BCD
BCD (also known as Boot Configuration Data) contains the files that the bootloader can find to boot Windows. Sometimes, BCD might be corrupted due to some reason, leading to Windows failed to start Windows 10/11. In this is the case, rebuilding BCD might do the trick.
Step 1. First, you need to create a bootable USB disk on another computer that works normally. Insert the Windows bootable recovery disk and reboot your computer.
Step 2. If prompted by Press any key to boot from CD or DVD, hit any key to continue.
Step 3. Choose your language preferences and click on Repair your computer from the lower left corner.
Step 4. Go to Troubleshoot > Advanced options > Command Prompt.
Step 5. Type the following command one by one and don’t forget to hit Enter after each command.
bootrec.exe /FixMbr
bootrec.exe /FixBoot
bootrec.exe /RebuildBcd
Step 6. If these commands fail, run the following command:
bcdedit /export C:\BCD_Backup
c:
cd boot
attrib bcd -s -h -r
ren c:\boot\bcd bcd.old
bootrec /RebuildBcd
Step 7. Quit Command Prompt and reboot your computer to check if Windows failed to start on startup is gone.
Fix 3: Run SFC & CHKDSK
Another method is to run SFC and CHKDSK in Windows Recovery Environment. Follow these steps:
Step 1. Boot your computer from the bootable recovery disk or reboot the computer three times to enter WinRE.
Step 2. Go to Troubleshoot > Advanced options > Command Prompt.
Step 3. Type sfc /scannow and hit Enter.
Step 4. After the process is done, run chkdsk C: /f /r /x.
Fix 4: Set Correct Boot Order
The bootloader will look for a set of files when Windows starts. If it cannot find the corresponding files, Windows will not load and you may be probably stuck on the Windows failed to start a recent hardware or software change might be the cause screen. Therefore, make sure that the OS drive is the first priority. Here’s how to set the correct boot order:
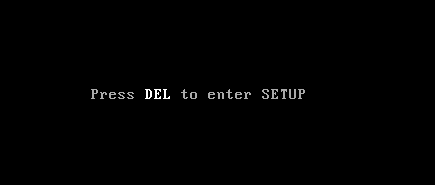
Step 1. Shut down your computer and reboot it. When pressing the power button to restart it, press Delete, F1, or F2 (depending on the manufacturer of your computer) to enter the BIOS setup.
Step 2. Go to the Boot tab > select Boot Device Priority > press Enter.
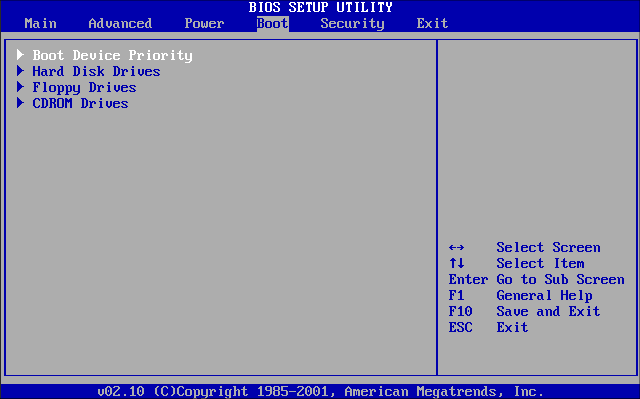
Step 3. Set the default bootable drive to HDD or SSD.
Step 4. Press F10 to save the changes and exit BIOS.
We Need Your Voice
That’s all the causes and solutions for why Windows failed to start after a recent hardware or software change. For more problems about our products, you can leave a comment below or send an email to [email protected]. Have a nice day!