
Ошибки с кодами 126, реже 127, ссылаются на то, что «Не найден указанный модуль». Таким образом легко сделать вывод — в Windows 7, 8, 10 недостает какого-то файла. Это действительно часто означает отсутствие DLL-библиотеки, но не всегда. Дело может быть и в других неприятных неполадках с реестром или системой защиты и т. п. Вполне может быть, что все дело и в самой программе, которая этот сбой провоцирует. Мы поможем исправить ошибку (Error 126) своими силами, ничего особо сложного в этом нет. Однако, предупреждаем, что неправильные действия в реестре или при взаимодействии с драйверами могут вызвать негативные последствия для работы операционной системы.
Причины ошибки 126
Если отображается ошибка 126 «Не найден модуль» — можем сделать вывод о наличии одной из перечисленных ниже проблем:
- отсутствует, не зарегистрирован или поврежден DLL-файл;
- неправильная настройка или нарушение целостности системных файлов;
- некорректная установка программы или она была чем-то прервана;
- повреждение Windows вирусами;
- сбой в системном реестре;
- проблема в драйверах, настройке оборудования или его несовместимости с версией операционной системы.
Как исправить ошибку 126?
Мы разработали серию решений проблемы, одно из них обязано помочь, так как исправляет каждую из перечисленных проблем. Логично, что после устранения неполадки, все должно заработать правильно.
Способ 1: автоматическое исправление проблем с DLL-файлами
Есть специальная утилита, которая автоматически сканирует системные библиотеки и сравнивает их с эталоном. Если она обнаружит, что какого-то файла или нескольких, недостает, она сама их загрузит. Также происходит анализ битых, поврежденных и модифицированных файлов. Это очень удобно и быстро в сравнении с ручным способом и, что немаловажно, еще и более безопасно. На личном опыте, программа работает стабильно и не устанавливает файлы, зараженные вирусами. Однако любые манипуляции с DLL-библиотеками сложно назвать полностью безопасными.
Инструкция по устранению ошибки 126:
- Загружаем программу Restoro PC Repair Tool. Лучше это делать с официального сайта.
- Устанавливаем и запускаем софт. Нажимаем на кнопку «Начать сканирование» (Start Scan).
- После процедуры анализа системы кликаем по клавише «Восстановить все» (Repair All).
Важное достоинство программы – она оптимизирует компьютер, увеличивая его производительность (если в системе есть какие-то проблемы с DLL). Ее можно оставить в качестве настольного софта, так как утилита решает большой спектр проблем.
Способ 2: временно отключаем антивирус
Есть большая вероятность, что ошибка 126 спровоцирована антивирусной защитой системы. Если в момент установки программы антивирус посчитал один из компонентов угрозой и заблокировал его, он будет отсутствовать, а система писать «Не найден указанный модуль». В целом желательно отключать защиту в момент установки программ, которым доверяем.
Инструкция:
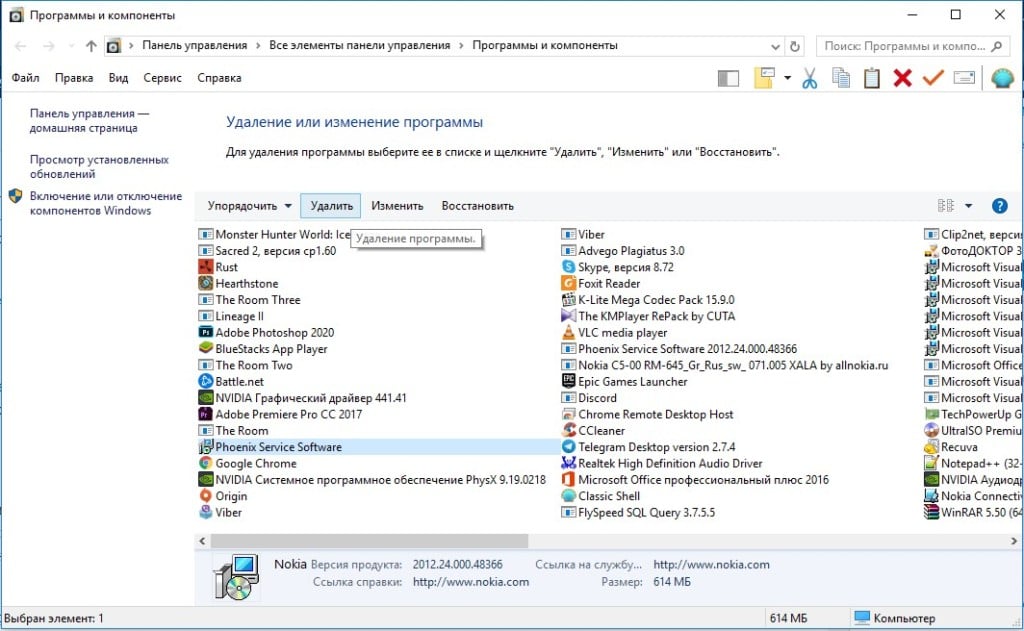
- Выключаем антивирус (встроенный Защитник Windows и/или сторонний).
- Полностью удаляем программу через «Программы и компоненты» (пункт находится в Панели управления).
- Начинаем установку утилиты снова, проверив, что сейчас антивирус не работает.
- Проверяем результат.
Если сейчас программа заработала нормально, рекомендуем открыть антивирус и добавить в список его исключений данный софт. В противном случае со временем ошибка может вернуться, ведь антивирусная защита снова может заблокировать или удалить файл.
Важно! Для максимального результата лучше сделать полное удаление программы. Для этого можем воспользоваться iObit Uninstaller. Софт анализирует систему и ищет остатки файлов приложения, удаляя и их.
Способ 3: обновляем Microsoft NET Framework
Устаревание платформы Microsoft NET Framework нередко приводит к ошибкам с кодом 126 и 127. Благо, это просто решается, достаточно обновить среду. Если дело было в этом, все должно заработать. Скачать актуальную версию NET Framework можем с официального сайта Microsoft.
Способ 4: переустанавливаем DirectX
Очень много DLL-файлов напрямую связаны с DirectX, поэтому есть высокая вероятность, что сообщение «Не найден указанный модуль» относится к данному программному компоненту. Его легко переустановить, так как DirectX тоже распространяет Microsoft совершенно бесплатно и для любых версий, конфигураций операционной системы. С установкой проблем быть не должно, за исключением одного момента – желательно, перед началом инсталляции софта удалить старую версию DirectX.
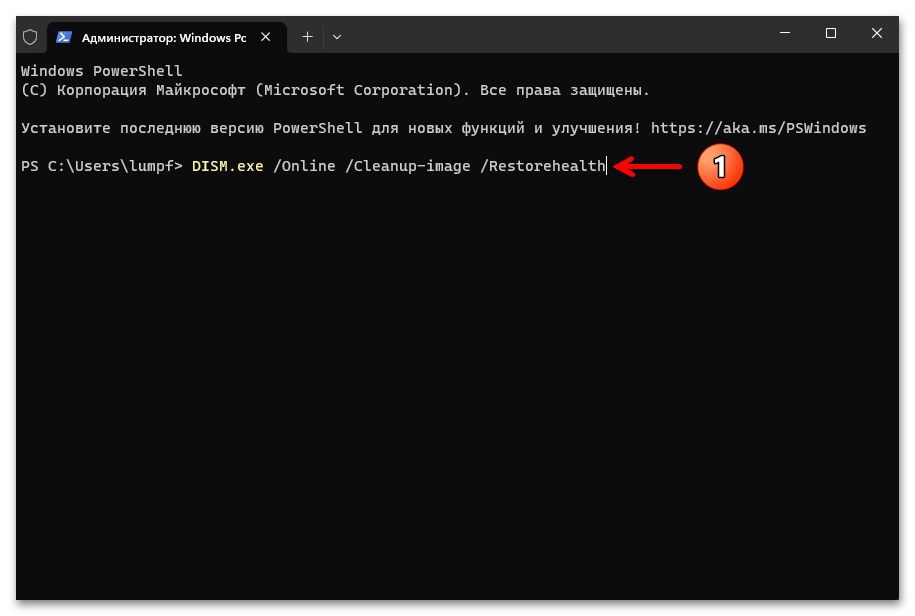
Способ 5: сканируем системные файлы Windows
Во всех актуальных версиях Windows есть встроенный инструмент анализа системных файлов. Он часто помогает при различных проблемах с DLL-файлами.
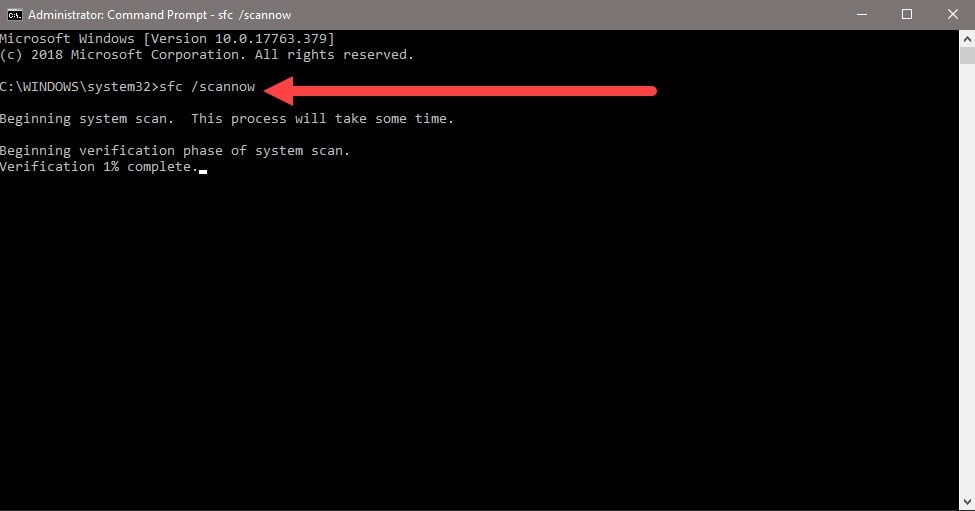
Как запустить системные файлы:
- В поиск Windows вводим cmd и запускаем «Командную строку».
- Вводим команду sfc /scannow.
- Ждем завершения сканирования системы. Все ошибки должны быть исправлены автоматически, если такая возможность есть.
Способ 6: восстанавливаем системные реестр
Ошибка 126 и 127 может быть следствием скопления мусора в реестре или повреждения значений в нем. Одна проблема – вручную все перелистать и исправить просто нереально. Для этого лучше использовать специальные программы, например, Total System Care. В утилите есть все необходимое для анализа системного реестра, его оптимизации и исправления существующих проблем. Еще можем порекомендовать CCleaner. Обе программы справятся со своими задачами.
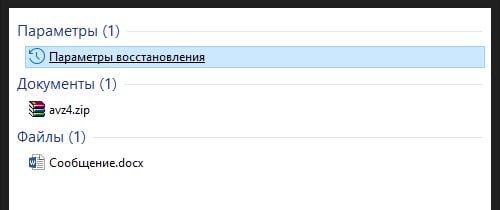
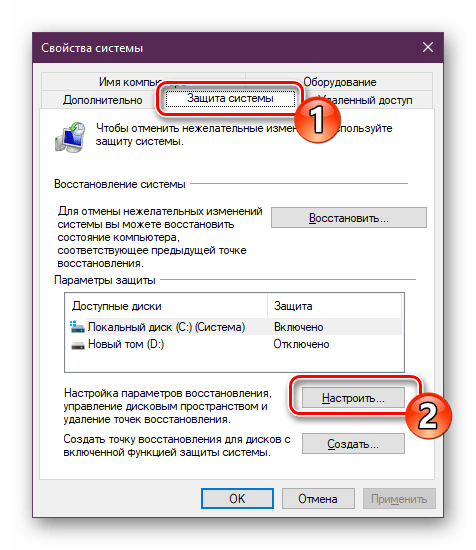
Способ 7: делаем откат Windows
Если никакие ручные способы исправления не помогают, что бывает редко, приходится обратиться к последнему методу и откатить Windows к последнему рабочему состоянию. Иногда файлы DLL могут пропадать из-за удаления программы, и вы можете столкнуться с ошибкой 126. Чтобы устранить ее, воспользуйтесь точками восстановления. Найти «Параметры восстановления» можем через поиск в Windows.
Теперь ошибка с кодом 126 больше не должна беспокоить пользователя как в Windows 7, так и 8, 10. Одна из процедур практически 100% должна исправить проблему. При этом мы не рекомендуем вручную менять DLL-файл, если удалось обнаружить в каком именно проблема. Все из-за чрезмерно высокого шанса загрузить вирус.
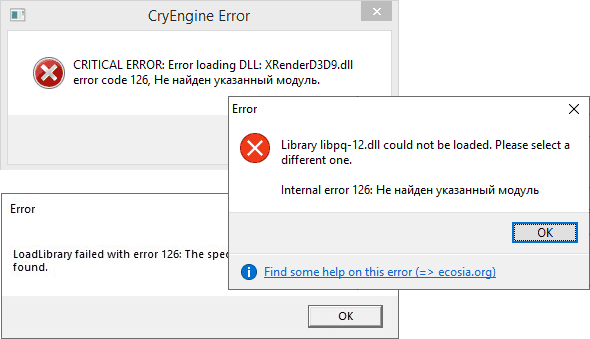
При запуске игр, программ, а в некоторых случаях — и системных компонентов вы можете получить сообщение об ошибке загрузки DLL с кодом 126. Текст может быть разным, обычно: «Error 126: Не найден указанный модуль», «Error loading DLL. Error code 126», «Error 126: The specified module could not be found» и другие похожие варианты.
В этой инструкции подробно о причинах ошибки 126 при загрузке DLL файлов в Windows 11, Windows 10 и предыдущих версиях системы, а также о вариантах решения проблемы.
Причины и варианты решения для ошибки DLL 126 «Не найден указанный модуль»
Почти всегда причина ошибки DLL 126 при запуске игр и программ — отсутствие необходимой для запуска библиотеки (файла) DLL в нужном расположении. Путь к отсутствующему файлу обычно указан в сообщении об ошибке:
Почему DLL может отсутствовать? Здесь возможны следующие варианты:
- Для не вполне лицензионных игр и программ чаще всего причина в том, что встроенные средства защиты Windows или сторонний антивирус удаляют модифицированные (для обхода лицензии) файлы DLL. Подробнее об этом: Что делать, если Windows 11 или Windows 10 удаляет файлы.
- Необходимые DLL были случайно удалены, либо по умолчанию отсутствовали в системе, а программа, их требующая, не содержала эти DLL в комплекте поставки.
- Программа или игра были установлены в предыдущей установке Windows и хранила часть своих DLL в системных папках, а ошибка появилась после переустановки Windows (после который эти DLL в системных папках исчезли).
Отсюда следуют и основные действия, которые можно предпринять, в случае если вы столкнулись с ошибкой:
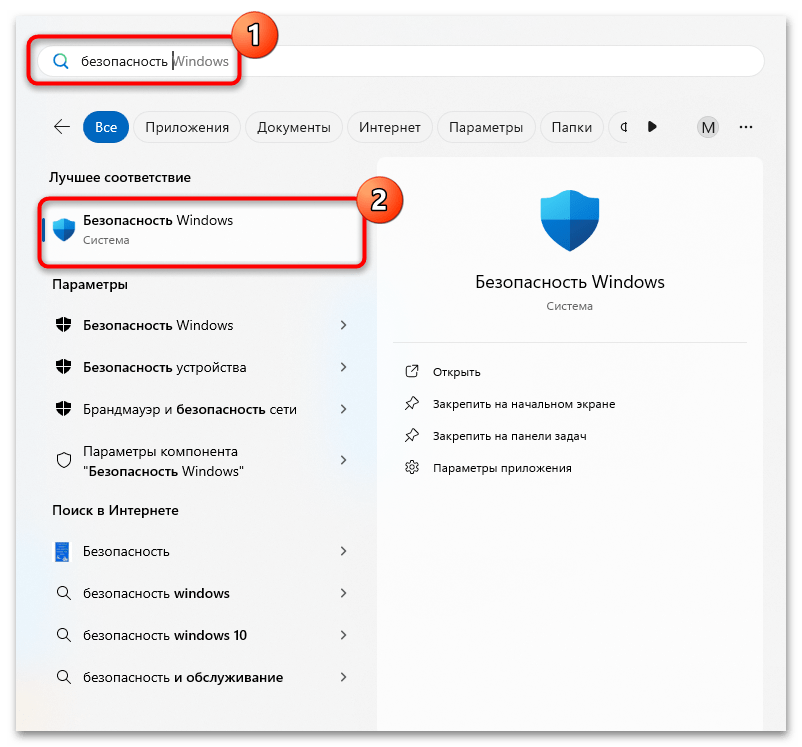
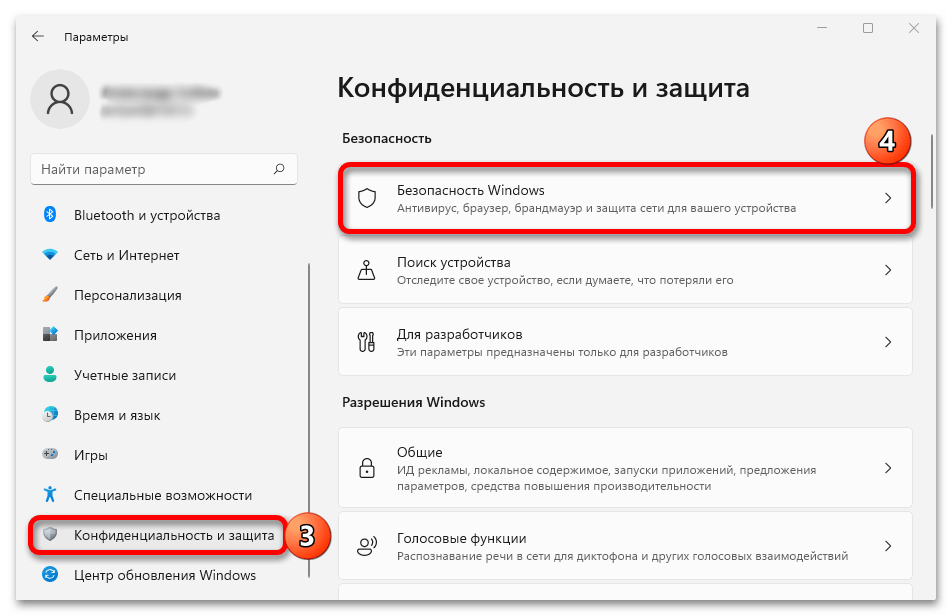
- Зайдите в «Безопасность Windows» (используйте поиск в панели задач или значок в области уведомлений) — «Защита от вирусов и угроз» — «Журнал защиты». И посмотрите, есть ли заблокированные при установке игры или программы угрозы. Если такие есть в наличии, нажмите по ним и используйте кнопку «Действия» и пункт «Разрешить» или «Восстановить».

- При отсутствии заблокированных файлов, попробуйте добавить установщик и место установки в исключения Microsoft Defender (либо временно отключите встроенный или сторонний антивирус), а затем выполнить удаление и повторную установку игры/программы, при запуске которой возникли проблема. Подробнее: Как добавить исключения в Microsoft Defender (Защитник Windows).

- Ещё один вариант, похожий на предыдущий: откройте установщик игры или программы в архиваторе, например, 7-Zip и посмотрите, есть ли среди файлов нужная DLL. При её наличии, извлеките эту DLL в ту папку, которая указана в сообщении об ошибке 126, предварительно добавив саму папку в исключения антивируса.
- Для игры, установленной в Steam, проверьте целостность файлов в её параметрах в библиотеке Steam.
- Если название DLL в сообщении об ошибке похоже на что-то системное, попробуйте найти в Интернете, что это за библиотека DLL: возможно, требуется установить какие-то системные компоненты Windows, её содержащие: .NET Framework, Распространяемые компоненты Visual C++, недостающие компоненты DirectX (по умолчанию в Windows 11/10 присутствуют не все библиотеки D3D/DX).
- Если до недавнего времени ошибка не появлялась, а речь идёт о системной DLL Windows, попробуйте использовать точки восстановление системы.
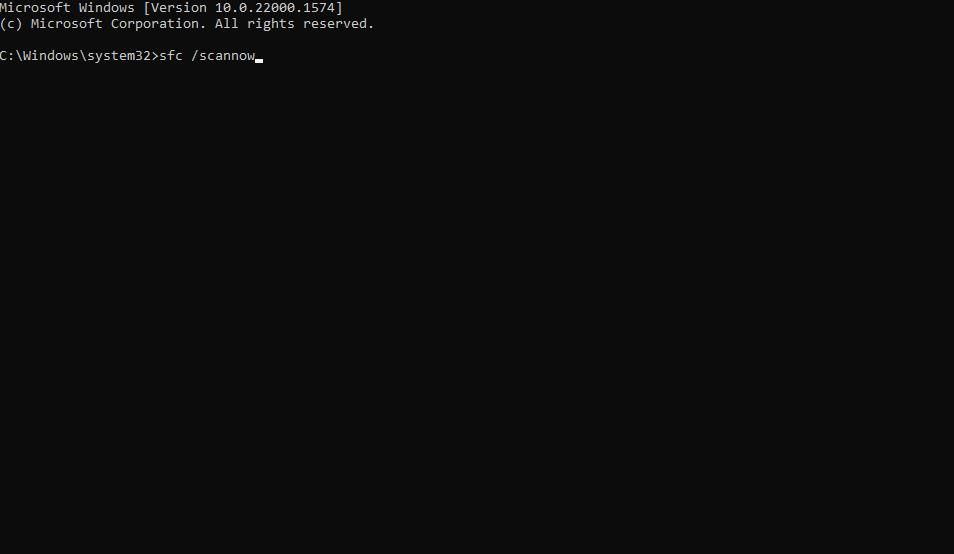
- В ситуации, когда ошибка появляется при загрузке системной DLL из папок System32 или SysWOW64, попробуйте выполнить команду sfc /scannow в командной строке, запущенной от имени администратора для восстановления целостности системных файлов.
- Для нелицензионных игр и программ может помочь скачивание другого варианта ПО из другого источника и последующая установка.


Также вы можете описать ситуацию в комментариях ниже: какое ПО запускается и к какой DLL (в идеале — с указанием полного пути к ней) относится сообщение об ошибке 126, я постараюсь предложить способ исправить проблему.
Все способы:
- Способ 1: Проверка «Журнала защиты» Windows
- Способ 2: Список исключений антивируса
- Способ 3: Использование архиватора
- Способ 4: Проверка целостности игры в Steam
- Способ 5: Установка/обновление библиотек
- Способ 6: Точка восстановления
- Способ 7: Сканирование с помощью SFC
- Вопросы и ответы: 0
Способ 1: Проверка «Журнала защиты» Windows
Как правило, ошибка под кодом 126, связанная с DLL-файлом, при попытке запустить игру встречается в тех случаях, когда средства защиты операционной системы или сторонний антивирус блокирует подозрительные файлы, которые зачастую и являются проблемные DLL в виде различных модификаций. Отсюда следует, что потребуется проверить «Журнал защиты» Windows с целью разблокировки таких файлов игры:
- С помощью строки системного поиска найдите встроенное приложение «Безопасность Windows».
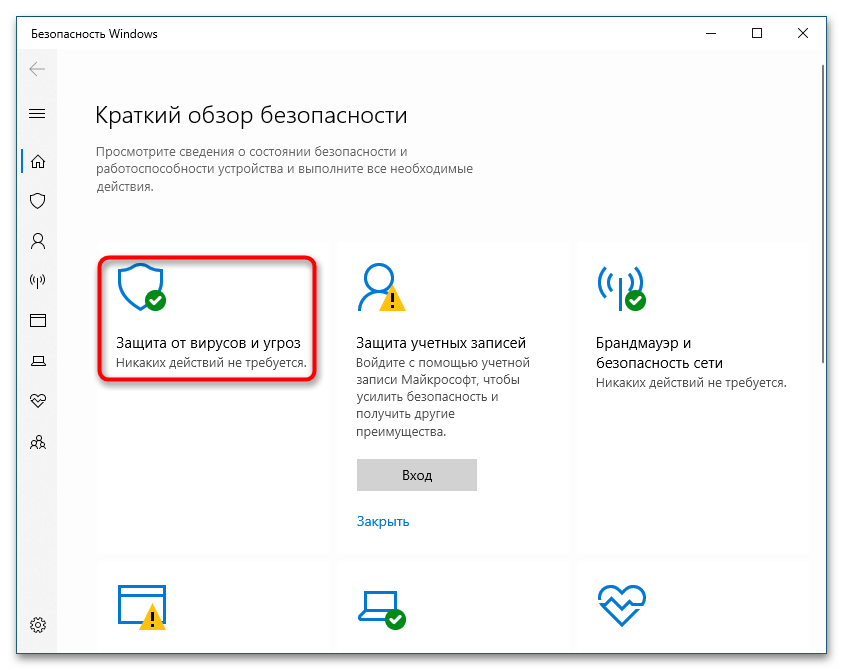
- Выберите раздел «Защита от вирусов и угроз».
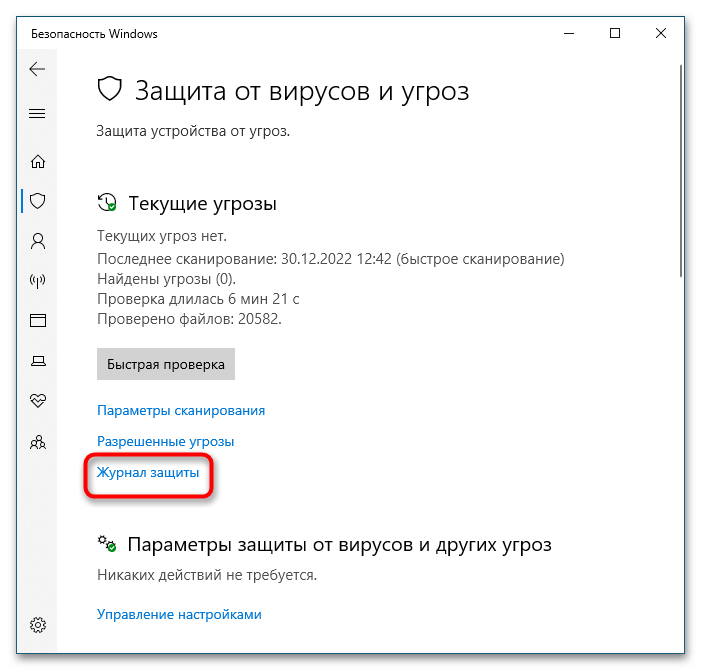
- Кликните по строке «Журнал защиты».
- Теперь можно посмотреть, были ли заблокированы подозрительные элементы, которые могли быть связаны с проблемной игрой. Если есть, вручную разблокируйте их.
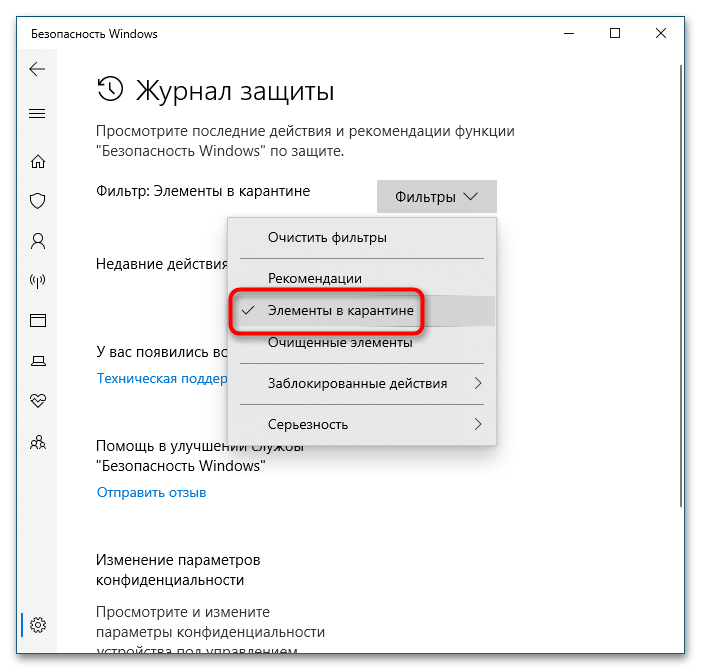
Таким образом, файл, работу которого ограничило встроенное средство защиты, вновь сможет корректно функционировать, а ошибка с кодом 126 пропадет, поскольку недостающий DLL снова начнет взаимодействие с ПО.
Способ 2: Список исключений антивируса
Если заблокированных файлов в «Журнале защиты» нет, стоит попробовать добавить инсталляционный файл игры и расположение, куда будет осуществляться установка, в список исключения встроенного «Защитника Windows» или стороннего антивируса. Тогда проверка данных не будет осуществляться, как и удаление потенциально опасных файлов, которые могут быть вшиты в установщик. Добавление места инсталляции игры также приведет к тому, что даже после распаковки всех компонентов, со стороны антивирусного софта не будет предприниматься никаких действий, и DLL не будет заблокирован или удален. О том, как добавить файл или каталог в список исключений, читайте в наших отдельных материалах.
Подробнее:
Создание исключений в Защитнике Windows 11 / Windows 10
Добавление программы в исключения антивируса
Способ 3: Использование архиватора
Как ни странно, но проблему иногда можно решить, если открыть установщик проблемный игры через программу-архиватор. Этот вариант также касается ситуаций, когда причиной возникновения ошибки является отсутствующий/поврежденный DLL-файл, необходимый для запуска игры.
Вариант подойдет, если игра уже установлена, но каталог с инсталляционным файлом и другими компонентами, которые скачаны со стороннего источника, есть еще на компьютере.
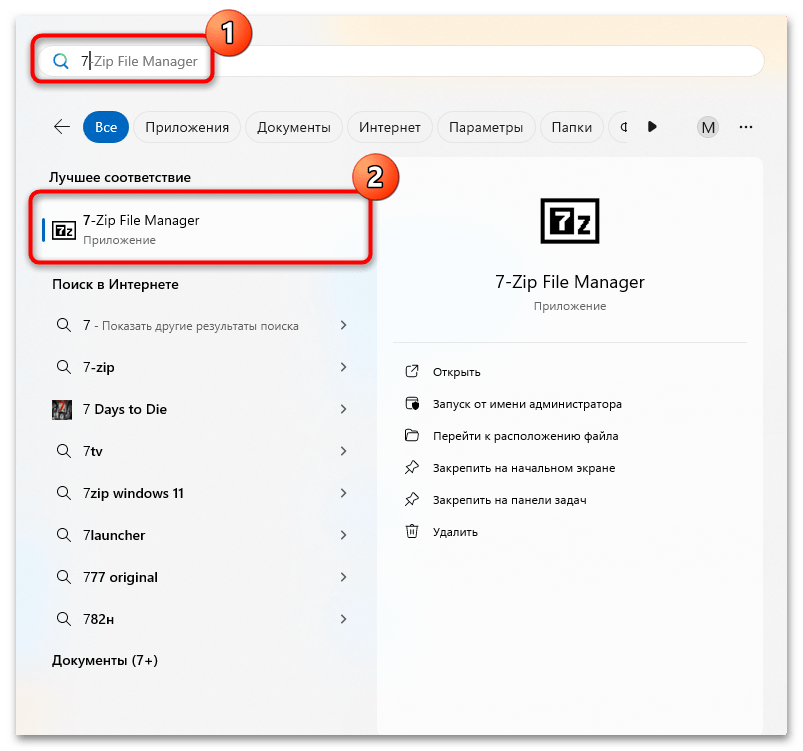
Можно использовать любой архиватор, например, 7-Zip, который, к слову, доступен на бесплатной основе, в отличие от большинства аналогичных продуктов. Перед тем, как воспользоваться инструкцией ниже, добавьте расположение игры в список исключений, чтобы антивирусные средства защиты больше не сканировали каталог с файлами на наличие подозрительных файлов, иначе ситуация может повториться, и DLL вновь будет заблокирован.
Скачать 7-Zip
- Перейдите по ссылке и скачайте архиватор на компьютер, если требуется, затем инсталлируйте его. После можно попытаться открыть папку с ресурсами игры через него. Он подойдет даже для отображения содержимого ISO-образов. Запустите 7-Zip File Manager, который интегрируется в систему после установки.
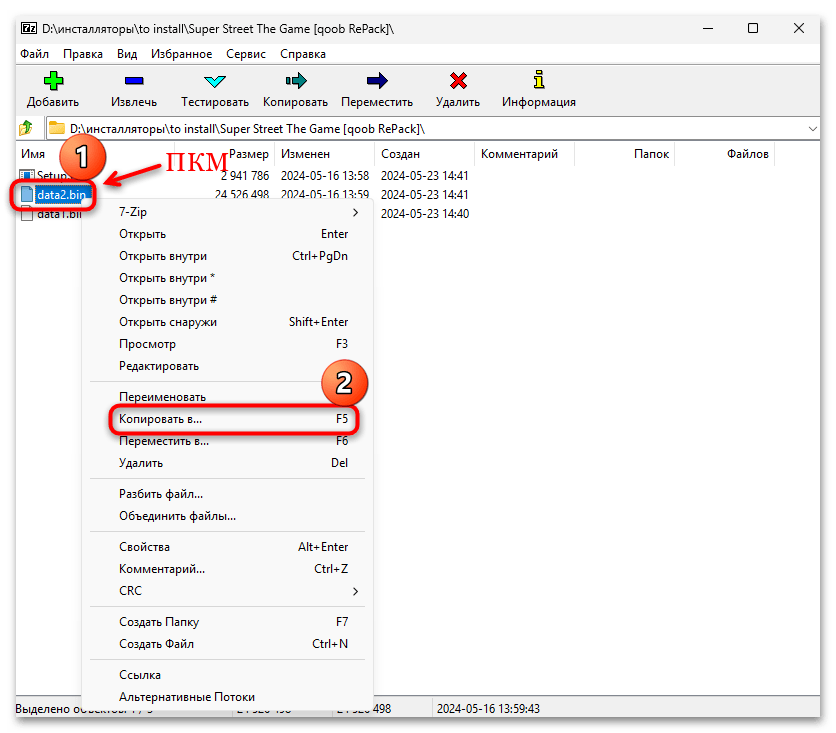
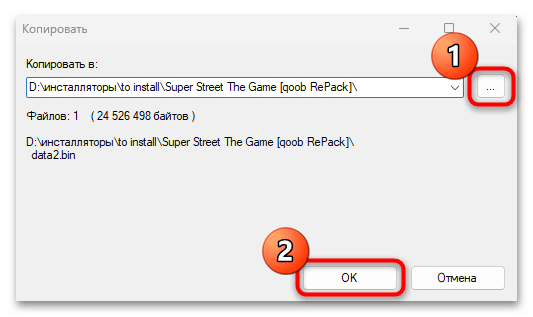
- Перейдите к расположению, где хранятся файлы установщика. Если там есть DL, который отсутствует или поврежден, извлеките его в ту папку, где находятся файлы установленной игры. Щелкните правой кнопкой мыши по файлу и выберите в контекстном меню пункт «Копировать в».
- Далее укажите путь к папке с игрой, нажав на кнопку с тремя точками, и скопируйте туда DLL.
Если каталог с данными проблемной игры уже добавлен в список исключений, а причиной ошибки 162 является DLL, который мог быть заблокирован или удален, тогда проблема должна быть решена, и вы сможете запустить игру.
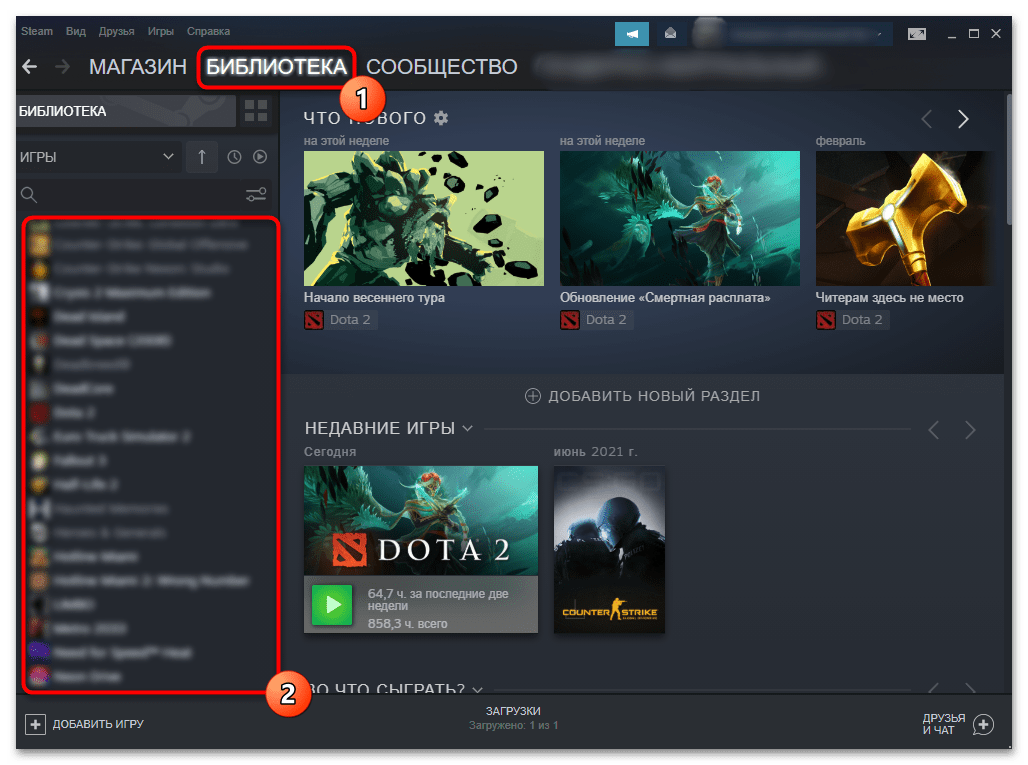
Способ 4: Проверка целостности игры в Steam
Если рассматриваемая ошибка появляется при запуске игры через клиент Steam, то вполне вероятно, что ее файлы попросту повреждены по каким-то причинам, например, из-за системного сбоя или деятельности вирусов. В самом клиенте предусматривается функция, позволяющая проверить данные и кэш игры на целостность и восстановить их при необходимости. Переходите к нашему отдельному материалу, чтобы узнать, как просканировать установленную через Steam игру.
Подробнее: Проверка целостности игровых файлов в Steam
Способ 5: Установка/обновление библиотек
Если помимо кода ошибки, упоминается еще что-то системное, тогда может потребоваться установить библиотеки и компоненты операционной системы Windows, например, недостающие файлы DirectX или Microsoft Visual C++. В Windows 10 и 11 такие библиотеки, как Microsoft .NET Framework и DirectX уже предустановлены, поэтому для восстановления компонентов часто достаточно обновить саму операционную систему.
Подробнее: Обновление Windows 11 / Windows 10 до последней версии
При необходимости можно переустановить Microsoft .NET Framework, воспользовавшись встроенными средствами ОС или сторонними инструментами. Этот вариант актуален, если даже после обновления Windows библиотека не может стабильно функционировать по причине поврежденных файлов.
Подробнее: Переустановка Microsoft .NET Framework в Windows 11 / Windows 10
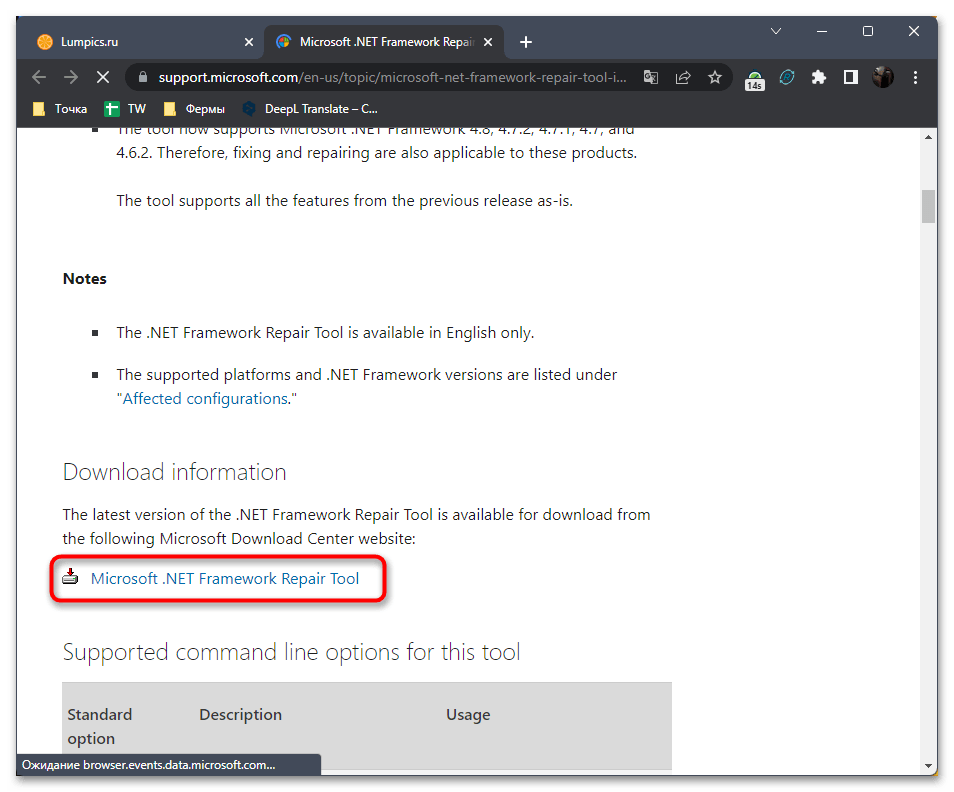
Читайте также: Почему не устанавливается .NET Framework 4
То же самое касается и набора компонентов для взаимодействия с видео- и аудиооборудованием DirectX. Хоть и поставляется вместе с 10 и 11 версиями ОС, но иногда требуется самостоятельно переустановить или добавить недостающие компоненты, о чем более развернуто мы писали ранее.
Подробнее:
Переустановка и добавление недостающих компонентов DirectX в Windows
Как обновить библиотеки DirectX
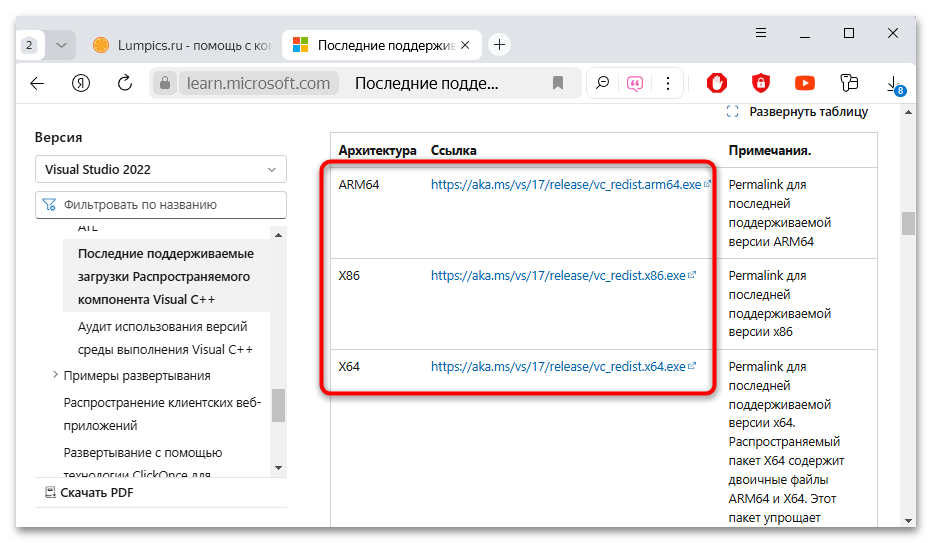
Владельцы всех версий операционки от Microsoft дополнительно должны инсталлировать Microsoft Visual C++ — набор библиотек и средств разработки на языке C++. Даже если у вас уже установлены компоненты, они могли быть повреждены, отчего и возникает ошибка 126 при запуске игры.
Скачать Microsoft Visual C++ с официального сайта
- Перейдите по ссылке выше на официальный сайт Microsoft и скачайте последнюю версию библиотек с учетом разрядности операционной системы.
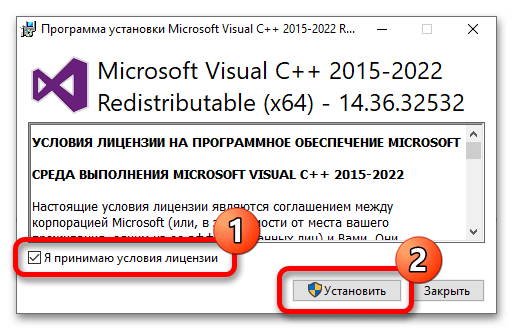
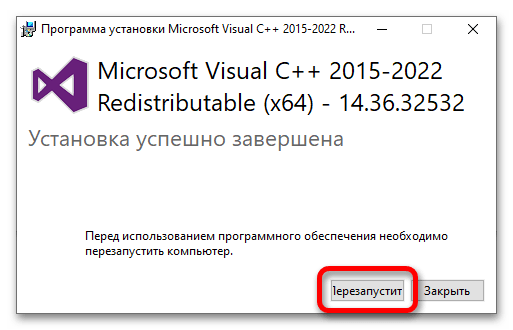
- Запустите скачанный инсталляционный файл и в открывшемся окне установщика отметьте пункт «Я принимаю условия лицензии», затем кликните по кнопке «Установить».
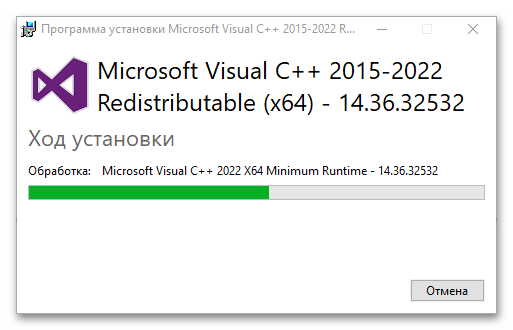
- После запустится процедура распаковки компонентов библиотеки, а прогресс вы увидите в окне.
- По завершению будет предложено перезагрузить компьютер. Подтвердите действие, нажав на соответствующую кнопку.
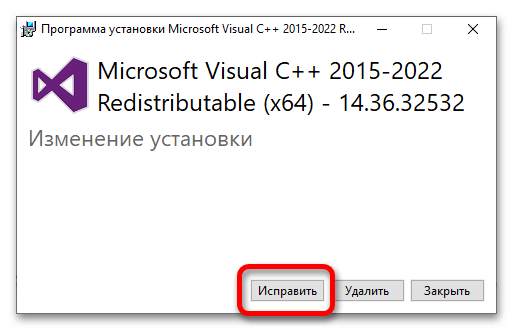
Если же библиотеки уже есть в системе, но они при этом повреждены или устарели, в окне установщика отобразится сообщение об изменении установки. Кликните по «Исправить», чтобы все проблемы были устранены.
Можете дополнительно ознакомиться со статьей на нашем сайте, где разобраны наиболее распространенные ошибки во время установки компонентов и возможные пути их исправления.
Читайте также: Решение проблем с установкой Microsoft Visual C Redistributable 2015
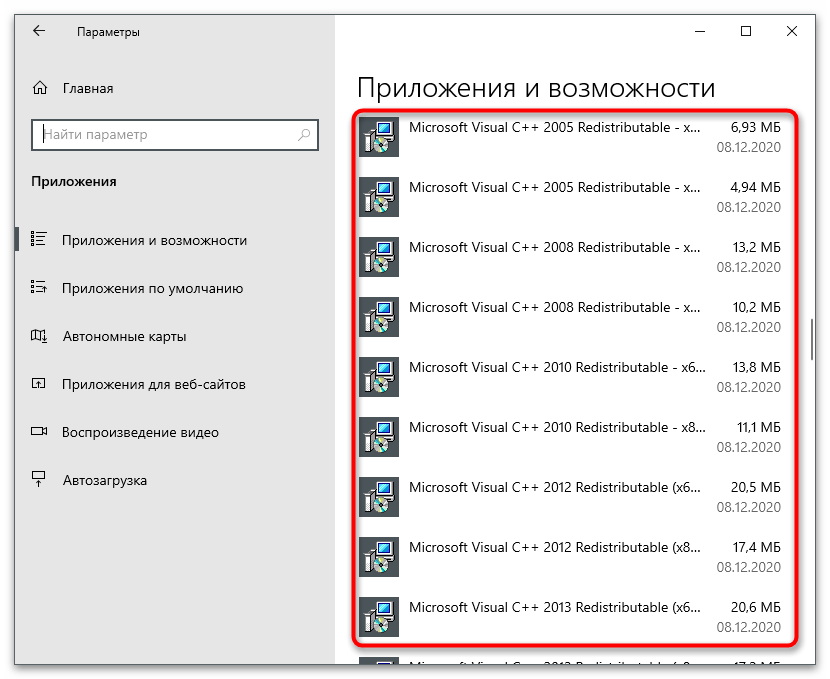
Кроме того, иногда приходиться прибегать к полной переустановке Microsoft Visual C++ в случае, если ни обновление, ни исправление не помогли. Тогда потребуется полностью удалить все предыдущие версии ПО, затем перезагрузить компьютер и снова вернуться к инструкции, которая приведена выше. А о том, как правильно стереть компоненты из системы, читайте в нашем отдельном руководстве.
Подробнее: Удаление компонентов Microsoft Visual C++ с компьютера
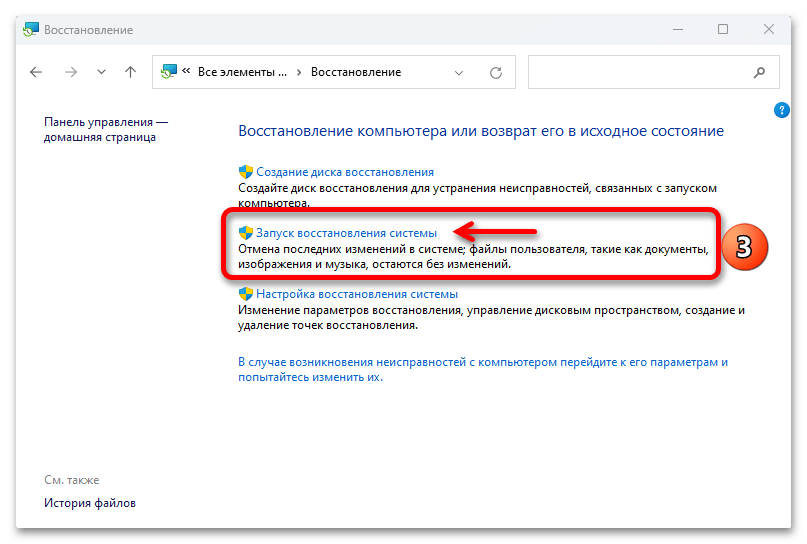
Способ 6: Точка восстановления
Если ошибка 126 при запуске игры начала появляться не так давно, а до этого все работало стабильно, есть вероятность, что виной всему стали недавние изменения в параметрах системы или сторонние программы, которые вмешиваются в общее функционирование системы и самой игры. В такой ситуации есть смысл попробовать откатить состояние ОС до этого момента, используя точки восстановления. Метод подойдет, если они уже созданы, автоматически или вручную. Таким образом, причина, которая появилась уже после создания точки, будет устранена, например, если это софт, он сотрется, а параметры вернуться к предыдущему состоянию. Наши авторы писали, как правильно воспользоваться функцией в разных версиях операционной системы.
Подробнее: Откат к точке восстановления в Windows 11 / Windows 10 / Windows 7
Способ 7: Сканирование с помощью SFC
Когда ошибка связана с системной папкой «System32» или «SysWOW64», вероятнее всего, повреждены файлы операционки, например, из-за вирусной атаки или критического сбоя. Для такой ситуации во всех версиях Windows применяется интегрированная утилита SFC, которая позволяет просканировать системные данные на целостность и восстановить их при необходимости. О том, как правильно ее применить, вы узнаете в отдельных статьях на нашем сайте. Обратите внимание, что, если после проверки отображается сообщение, что восстановить системные файлы не удалось, может помочь другая утилита, DISM, для проверки хранилища этих файлов.
Подробнее: Проверка целостности системных файлов Windows 11 / Windows 10 / Windows 7
Наша группа в TelegramПолезные советы и помощь
Error 126 is a Windows issue users have reported on support forums for many years. That error occurs when users launch games and various other types of (typically OpenGL) software. The error 126 message says, “LoadLibrary failed with error 126.”
When users click the OK button on that error message, games and programs for which the issue arises close. So, users cannot utilize affected programs or play games because of error 126. Does the same error crash any software on your PC as well? If yes, this is how you can fix error 126 in Windows 11 and 10.
1. Set Affected Programs to Run With Admin Rights
Insufficient system access privileges for affected software is a potential cause for error 126. Affected software packages on your PC might not be able to access a system resource because they don’t have administrator rights, resulting in error 126. You can easily address this potential cause by setting affected programs to run with administrator rights.
System file corruption causes a good deal of software crash issues, and error 126 isn’t an exception. It might be the case some programs on your PC can’t access a resource because of corrupted system files. You can resolve such an issue with the System File Checker command-line tool. Check out our guide to running the SFC tool for further details about how to apply this potential solution.
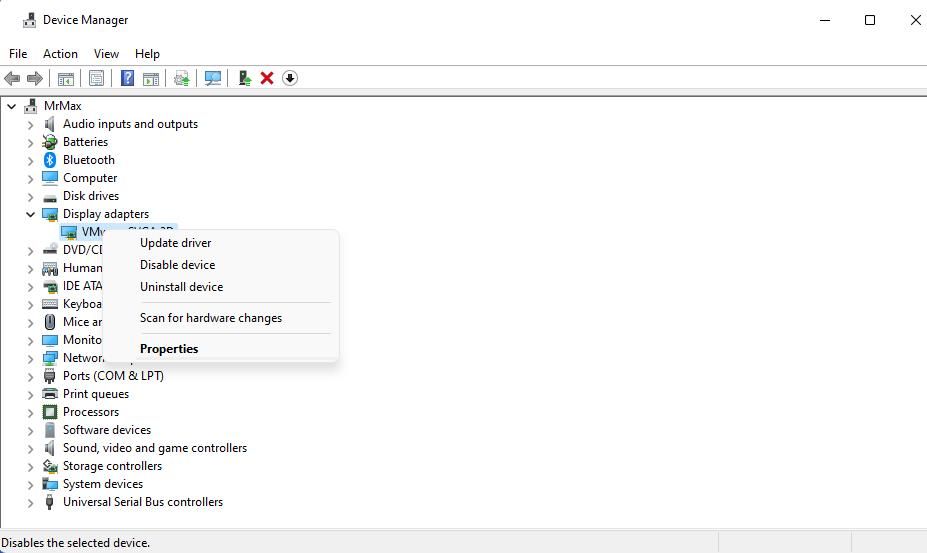
3. Disable a Secondary Graphics Adapter Device
Does your PC have two graphics adapters? If so, disabling the integrated GPU (graphical processing unit) on your PC could fix error 126. This issue can arise because of a graphics driver conflict, and users have confirmed disabling secondary GPUs resolves the issue. This is how you can disable one graphics adapter in Windows 11/10:
- First, right-click Start on your taskbar to select a Device Manager Power User menu shortcut.
- Then double-click Display adapters to view devices for that category.
-
Right-click your PC’s integrated (usually Intel) GPU to select Disable device.

- Click Yes when asked to confirm.
- Open the affected programs again to see if error 126 persists.
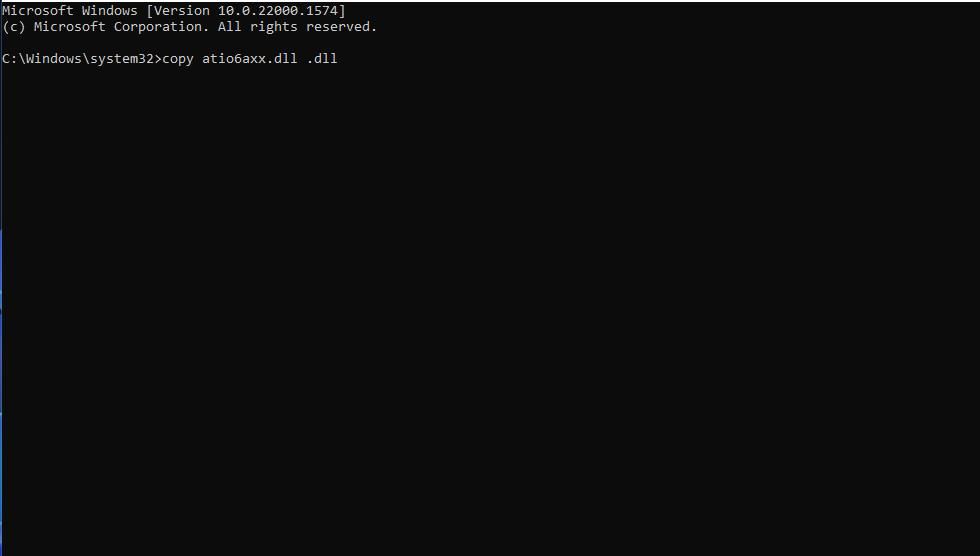
4. Run a Copy Atio6axx.dll Command
Atio6axx.dll is an AMD OpenGL driver file. Lots of users have said that copying the Atio6axx.dll file in the Command Prompt resolves error 126. If your PC has an AMD graphics card, this potential solution might work for you. You can run the copy atio6axx.dll like this:
- Bring up your search box with its Win + S key combination (or click that tool’s magnifying glass icon or bar on the taskbar).
- Enter Command Prompt to search for that app.
- Open Command Prompt with elevated permissions by clicking the Run as administrator option for launching that app within the search tool.
-
If the Command Prompt doesn’t open within the System32 folder, execute this change directory command:
cd\Windows\system32
-
Input this copy command and hit Return:
copy atio6axx.dll .dll
- Click the Command Prompt’s X (close window) button and restart your Windows 11/10 desktop or laptop.

5. Select the «Make This My Main Display» Setting
This error 126 resolution is for users with multi-display PC configurations. If you’re utilizing multiple monitors, make sure your primary VDU is set as the main internal display as follows:
- To open Settings, press that app’s Windows keyboard button + I hotkey.
- Click Display within the System tab.
- Next, click Multiple displays to expand options in Settings.
- Select the Make this my main display checkbox if that option isn’t already selected.
If that doesn’t work, try disconnecting the secondary monitor entirely so that you’re only utilizing a single VDU. Restart the PC, and then launch software packages that error 126 occurs. If that resolves the issue, you can at least utilize the programs without multiple monitors. Or reconnect the secondary VDU to an alternative port if possible.
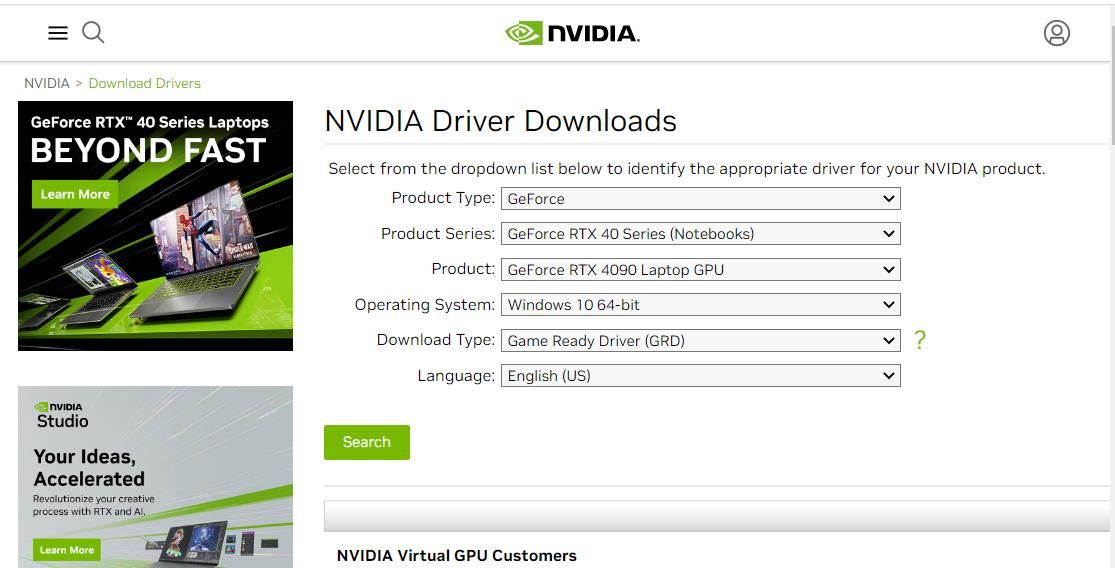
6. Update the Driver for Your GPU
If your graphics card’s driver is somewhat outdated, that could be what’s causing error 126 on your desktop or laptop. There are different ways you can update graphics drivers in Windows 11/10. You can use driver updater software like Driver Booster, which is a bit quicker and easier. However, such software will download the latest graphics drivers from their databases, which might not always be entirely up-to-date.
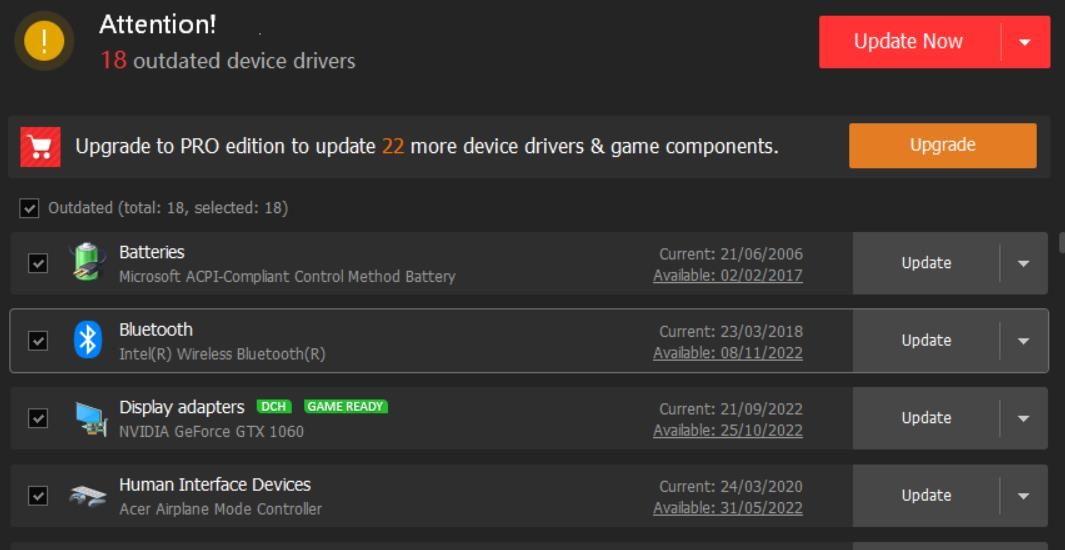
The manual method for downloading graphics drivers from the AMD, Intel, or NVIDIA websites is the best way to ensure you’re getting the very latest driver for your GPU. However, that method is a bit slower, and you’ll need to be clear about what your graphics card model is beforehand. Our guide for updating graphics drivers provides further details about the different methods for keeping graphics drivers up-to-date.
7. Reinstall the GPU’s Driver
If your GPU’s driver doesn’t need updating (it already has the latest one), reinstalling is an alternative troubleshooting option for error 126 that’s worth a try. Such a solution can fix issues that arise from faulty GPU drivers, among which error 126 can be counted. Check out our guide to cleanly reinstalling GPU drivers on Windows for details about how to apply this potential error 126 resolution.
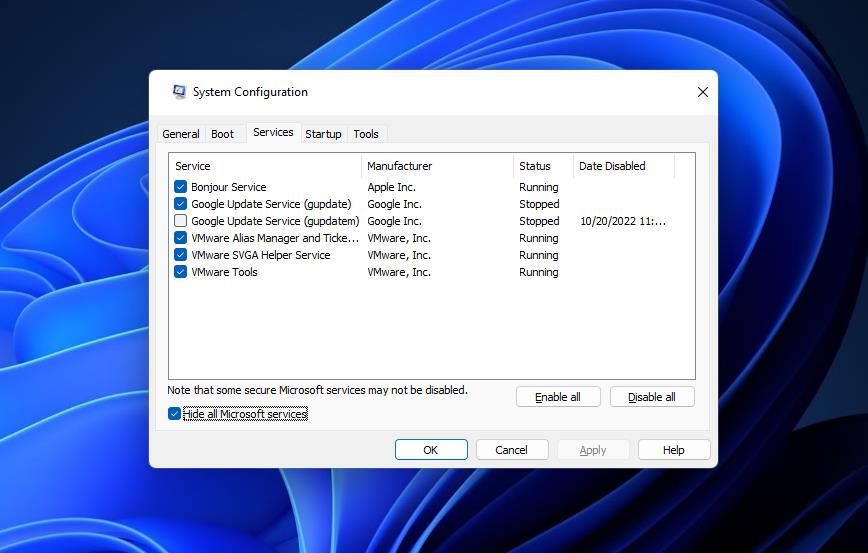
8. Clean Boot Your Windows PC
Clean booting disables all third-party startup items. Doing so will remove app and service background processes that automatically start. One such process could be causing error 126 on your PC by interfering (conflicting) with the affected software.
To apply this potential solution, follow the instructions within our guide about performing a clean boot on Windows. Disable all non-essential third-party startup items with Task Manager and System Configuration (otherwise MSConfig). Then restart your PC to clean boot and try launching the affected software again.
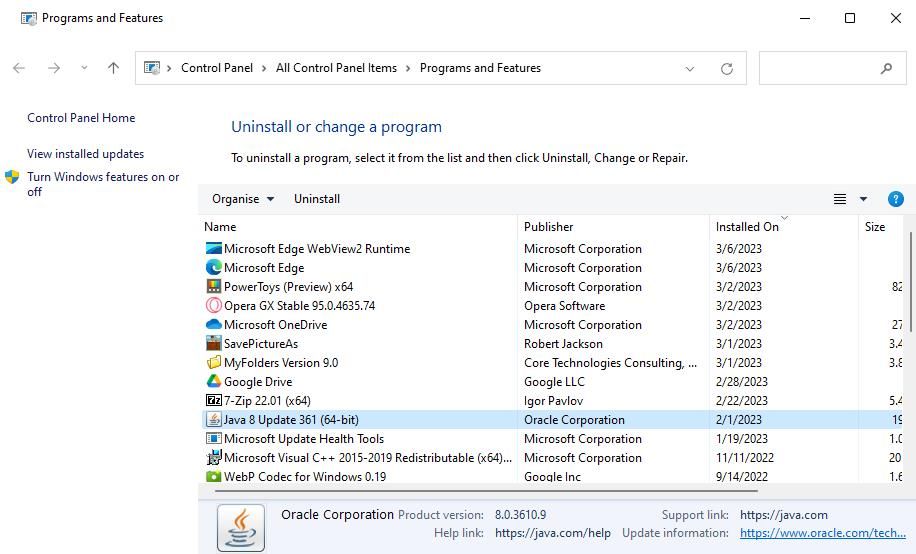
9. Remove AMD Software
Some users have also resolved error 126 by removing AMD Catalyst (now AMD Software) in Windows 11/10. So, that could be another solution worth a shot if you have AMD Software installed. You can remove AMD Software with the Control Panel (Programs and Features) method included in our guide for uninstalling Windows programs.
Get Error 126 Resolved on Your PC
Error 126 isn’t always easy to fix as there are quite a few potential causes for that issue arising on Windows PCs. The potential error 126 resolutions above will address many of those causes and are among the most widely confirmed fixes. They are primarily Windows 11/10 fixes, but some might also resolve that same issue in older platforms like Win 8, 7, and Vista.
What Is Error 126?
Error 126 is a very commonly occurring error that is often the result of damaged system files of Windows. They usually occur during the installation of some Windows program or application. When Error 126 is generated, it terminates the installation process almost instantly.
It is important to take corrective measures immediately to ensure that no such problems are encountered again in the future.
Solution
Error Causes
There are a variety of conditions that may trigger Error 126. These conditions are listed below as follows.
- Corruption of the service-related DLL file
- Missing or damage service-related DLL file
- Corrupt, damaged, or Misconfigured system files
- Improper hardware or application installations or uninstallations
- Existence of viruses, malware, adware, or spyware in the system
- Corrupt or incorrect registry entries in the system files
When any of the above-listed conditions occur, the corrupt system files will go to the improper links or missing information.
Eventually, the problems with the files will keep the applications or programs from responding in the usual manner. Whatever are the reasons for error generation, it is of utmost importance that the error is removed to ensure smooth functioning of the system.
Further Information and Manual Repair
There are many different ways this error can be rectified. However, the two most effective solutions are listed below as follows.
- This solution is for the advanced user. Turn on the system and log on to it as the Administrator. Now click on the Start button. Now click on All programs -> Accessories -> System Tools. Here you will come across the option for System Restore. Click on it. A new window will appear. Select ‘restore my computer to an earlier time’ point. Now clock on Next. A list of restore points will now appear in front of you. Choose the latest restore point you come across from this list and click on ‘Next’. In the next window that opens, click on ‘Next’ again. This is the confirmation window. Once the restoration finishes, restart your computer.
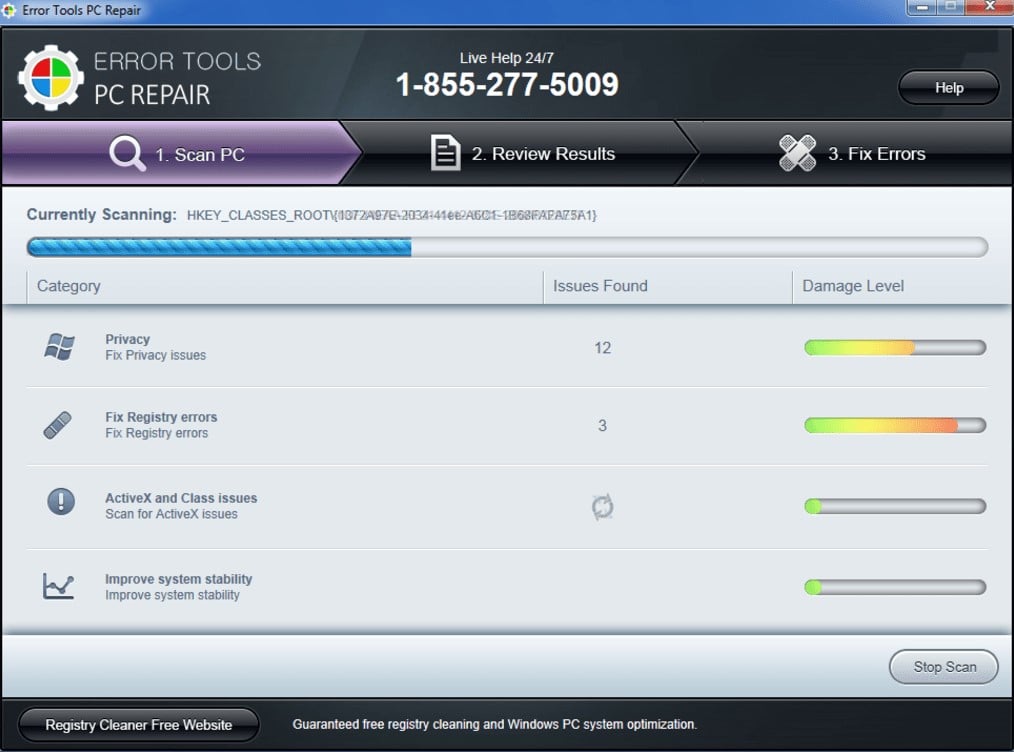
- This solution is for novice users. Download an Error 126 repair utility program. Install it on your system. Now use it to scan your system for errors. Find out if there is an option to fix/repair error. When you come across it, click on it as soon as the scan is complete. Restart your computer. Your system is now free of Error 126.
Do You Need Help with Your Device?
Our Team of Experts May Help
Troubleshoot.Tech Experts are There for You!
GET HELP
Troubleshoot.Tech experts work with all versions of Microsoft Windows including Windows 11, with Android, Mac, and more.
Share this article:
You might also like
nslookup is a command-line tool that helps in finding the DNS records of a website. It sends a name server query to the DNS and obtains the corresponding IP address. Aside from that, it can also perform some complex functionality such as finding details about FTP server, Mail server and many more but most of them are used by administrators. The best thing about nslookup is that it queries the DNS server directly and it does not rely on the cache.
On the other hand, there is another tool called PING that is used to verify connectivity. PING sends a packet of information to the IP address or Domain and gets back a response in the form of packets. So if everything goes well, all packets are received but if not, it will help you find out where the delay in the network exactly is. However, the ping command does not always attempt a DNS lookup which means that it might be using the DNS cache and use the IP address available in that table.
Although both nslookup and PING help you in identifying the host or IP address, however, they don’t always work and sometimes fail. So if your nslookup works but ping fails on your Windows 10 PC when querying the IP address of a website then it could be caused by many reasons. It could be that the nslookup queries work for you but when you try to use PING, it fails. For instance, if you open the abc.com website, here’s how it will look like:
nslookup xyz.com
Server: dns.company.com
Address: 192.168.1.38
C:> ping xyz.com
Ping request could not find host xyz.com. Please check the name and try again.
The domain is converted into an IP address and then data is sent to that IP address when you use PING. So when a reply comes back it means that the data is going back and forth to that domain without any problem. However, if the DNS fails to resolve the IP address of the website or if your PC does not attempt a DNS lookup, you will receive a similar error message that says, “Could not find host” and so on. To resolve this issue, here are some options that might help.
Option 1 – Reset Winsock, TCP/IP & Flush DNS
Resetting Winsock, TCP/IP, and flushing DNS might help you resolve the issue with nslookup and PING. To do so, follow these steps:
- Right-click on the Start button and click on Command Prompt (administrator) so you can pull up an elevated Command Prompt.
- After that, execute each one of the commands listed below. And after you typed in one after the other, you have to hit Enter.
- netsh winsock reset – type in this command to reset Winsock
- netsh int ip reset resettcpip.txt – type in this command to reset TCP/IP
- ipconfig /flushdns – type in this command to flush the DNS cache
- Next, restart your PC and check if the problem’s fixed.
Option 2 – Force Windows to do a DNS lookup using FQDN
- Go to Settings > Network & Internet > Status > Change adapter options.
- From there, right-click on the network and select Properties.
- Next, in case you’re using IPv6, from the list of connections available in the list, select Internet Protocol Version 4.
- Then click on Properties and click Advanced.
- After that, switch to the DNS tab and select “Append these DNS suffixes (in order)” and click on the Add button and then add “.” as a suffix so that each time you query using PING and another tool, it will add a “.” at the end and will force the lookup.
Option 3 – Make sure that there is only one default gateway
If your computer has more than one NIC connected and there are multiple default gateways, then it will most likely create confusion which is why you need to remove the default gateway from the configuration of all NICs and make sure that there is only one default gateway.
Option 4 – Use the Google Public DNS
You might want to change your DNS to Google Public DNS as it could also help you in fixing the nslookup and PING issues. To do so, follow the steps below.
- The first thing you have to do is right-click on the network icon in the Taskbar and select Network and Sharing Center.
- Next, click on the “Change Adapter Settings” option.
- After that, search for the network connection that you are using to connect to the internet. Note that the option might be “Wireless Connection” or “Local Area Connection”.
- Right-click on your network connection and click on Properties.
- Then select the new window to choose the “Internet Protocol 4 (TCP/IPv4)” option.
- After that, click on the Properties button and click the checkbox in the new window for the option “Use the following DNS server addresses”.
- Type in “8.8.8.8” and “8.8.4.4” and click OK and exit.
Option 5 – Check the Windows Host file
You can also try to cross-check the Windows Hosts file to find out if the website you are trying to open has been blocked, because if it is, then it’s no wonder why PING fails even when nslookup works. There are instances when some third-party application modifies the file and adds some websites to the blocklists. So if the website is indeed blocked, you need to remove it from the list.
Option 6 – Delete the WLAN Profiles
Deleting the WLAN Profiles might be a good idea if you are not able to connect to the internet on your computer and if you’re using Wi-Fi. It could be that the networks that were connected previously have gone rogue which is why it is not connecting properly. And so deleting the WLAN profiles might help you in fixing the issue with nslookup and PING.
Option 7 – Reinstall the Network Adapter Drivers
- Tap the Win + R keys to launch the Run window and then type in the “msc” command and hit Enter to open the Device Manager window.
- Under the Device Manager, you will see a list of drivers. From there, look for the Network Adapters and expand it.
- Then right-click on each one of the Network drivers and select “Uninstall device”.
- Restart your PC.
Read More
Error 0x80004005 — What is it?
Error 0x80004005 is a typical Outlook error. This error code occurs either when sending emails or receiving them. The error message may be displayed in either of the following formats:
‘Sending and receiving reported error «0x80004005»: The operation failed.’
‘This message could not be sent. Try sending the message again or contact your network administrator. The client operation failed. Error is [OX80004005- 0X0004B9-OXOO501].’
Error Causes
There are several causes for the error 0x80004005 such as:
- The Script Blocking Feature Enabled While Using Norton Antivirus
- Spyware
- Viruses
- Registry problems-Missing or corrupt registry keys
It is advisable to repair and resolve error 0x80004005 immediately as it may cause a great deal of inconvenience to you.
This error may hamper your ability to receive and send emails from your Outlook account and lower your productivity too as you may be unable to communicate with your peers.
Further Information and Manual Repair
To fix error 0x80004005, you don’t have to wait for the network personnel or be a technical expert yourself. This may be a critical error but the good news is that it is easy to resolve.
Here are some effective methods and quick fixes to resolve the error 0x80004005 instantly.
Method 1: Disable Script Blocking Feature in Norton Antivirus
After installing Norton Antivirus on your PC, if you start experiencing the Outlook error 0x80004005, then the best way to resolve it is to simply disable the script blocking feature.
However, the downside of this is that by disabling this feature your PC will become vulnerable to viruses and malware.
Method 2: Disable the New-Mail Notification Feature in MS Outlook
If you don’t have Norton Antivirus downloaded on your PC, then try method 2. This method involves disabling the new-mail notification feature in MS Outlook. The error code 0x80004005 is often resolved by switching off this feature. Try it to see if it works.
To disable the new-mail feature all you have to do is open your Outlook account and then go to the Tools menu, then go to Options and then select the ‘Preferences’ tab.
After that click on the ‘Emails Options’ tab and then simply uncheck the check-box against ‘Display a notification message when new mail arrives’.
To confirm changes press OK.
Method 3: Scan for Viruses
The error 0x80004005 may also be triggered due to viral infection or spyware. Such malicious software enters your PC through phishing emails and while downloading files and attachments. You may not be aware of this but your PC may be infected by viruses.
It is important you remove them immediately as they can expose you to serious risks including privacy issues, identity thefts, data breaches, and more.
Read More
Both the Windows 10 and Windows Server operating systems have a number of common system files that vary from the ones that support the installation, boot process, and other operations or tasks in the system. However, if any of these files get corrupted, it might cause some errors during the setup of the Windows 10 operating system. One of these errors is the “Windows cannot find the Microsoft Software License Terms” error.
“Windows cannot find the Microsoft Software License Terms. Make sure the installation sources are valid and restart the installation.”
The only option given when you encounter this error is to click on the OK button and nothing else and then the setup gets interrupted and won’t push through. To fix this error and proceed with the installation, you can try to get a new installation image or switch ports, or fix the CFG file. For more details, follow each one of the potential fixes provided below.
Option 1 – Try to get a new installation image
It is possible that there might be some issues with the installation image. It could be corrupted or was modified illegally. Or it could be that the bootable storage device created might have damaged sectors or installation. To resolve this problem, you need to download a fresh copy of the Windows 10 installation image using the Windows Media Creation tool or simply use the ISO image separately and then build a bootable USB.
Option 2 – Try to switch Ports
The error might be caused by the connection to the USB port. It could be that the port is unstable due to a number of factors that resulted in the interruption of the installation process. To fix this problem, you can try switching the USB port or if you are using an optical drive, you can get an external USB optical drive or connect it to another port internally and see if it fixes the problem.
Option 3 – Try to fix the CFG file
If none of the first two options worked, then you might want to fix the CFG file. This file is a configuration file format used for storing settings. All you have to do is download the CFG file. Once you’ve downloaded this file, copy this file to the root of your bootable drive and then check if it fixes the error. If not, then try to copy the same file inside the “/sources/” folder inside the root of the drive. This should fix the error.
Read More
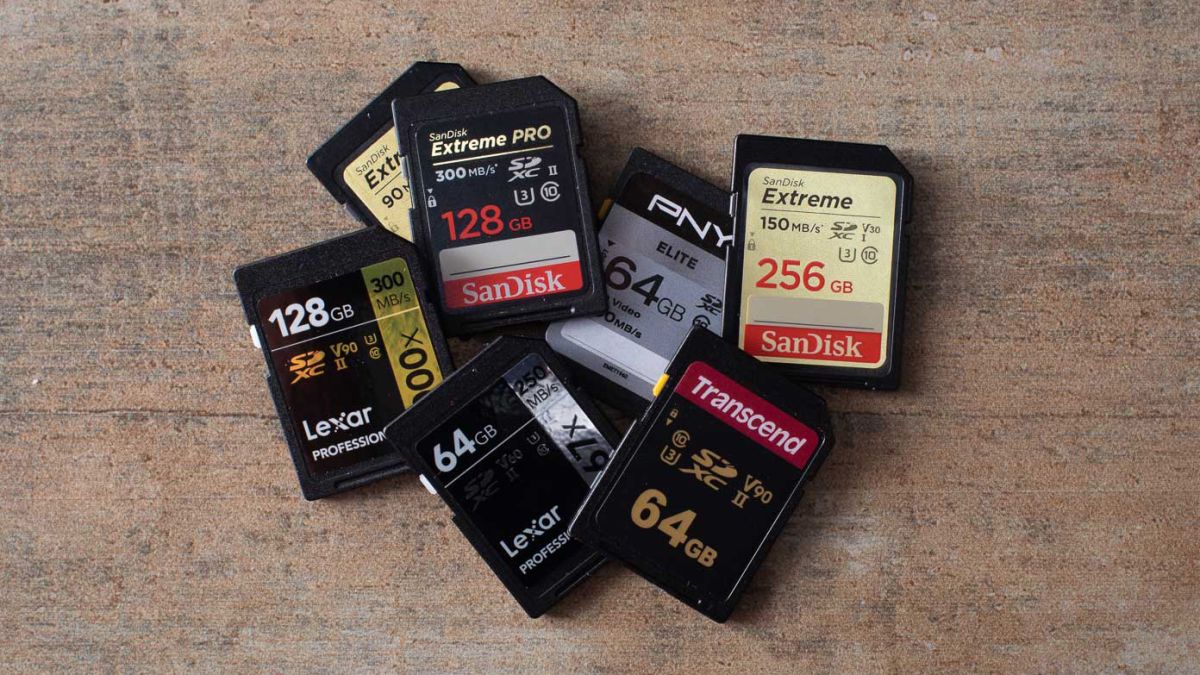
SD memory cards have surfaced as standard cards for digital cameras and microSD as phone standard memory cards. Most people have and use at least one daily, so naturally copying files and even formatting SD cards is a natural thing to do, but what if you cannot copy files or format SD cards?
Fear not because we had this issue and tried several things in order to overcome the problem and after some time here is a list of what can you do if you are facing this exact issue. The list is written from most simple solutions to more complex ones and it is advisable to follow it as presented. That being said, let’s dive into solving the problem.
1. Remove Write Protection on SD card
First and in my experience the most usual thing preventing deleting, copying files, and formating SD card is due to write protection. Take an SD card out of the laptop, camera, or card reader and visually inspect it. On side of almost every SD card, there is a hardware lock switch and mark where it needs to be positioned in order to be locked. Even if the switch is positioned on unlocked state, switch it to locked and then back to unlocked. Sometimes this easy moving of switch can resolve some contact issues and the card will start working normally.
Another type of lock that could be turned ON is a software one. If for any kind of reason data protection has been turned ON, you will need to turn it off in order to be able to format an SD card. In order to do this follow this guide:
- Press ⊞ WINDOWS + R to open the Run dialog
- In run dialog type in diskpart and press ENTER
- Once diskpart is opened in command prompt type in: list disk and press ENTER
- Locate your SD card and type in select disk x, where x is disk number followed by ENTER
- After the SD card is selected type in: attributes disk clear read-only and press ENTER
This process will clear the software lock on the SD card, after following this method try to format the card again, if the problem still exists go to the next solution.
2. Format SD card using Command prompt
Command prompt is a great tool and can perform some commands that are not been able to be completed using file explorer or another tool inside Windows.
- In the taskbar search box, search for cmd and select the Command prompt
- On the right part select run as administrator
- If needed click on YES on UAC prompt
- Inside command prompt type in diskpart and press ENTER
- type in list disk followed by ENTER
- Select your SD card by locating its number in the list and typing select disk X, where is X SD cards number in list and press ENTER
- Once SD card is selected type in format fs=ntfs quick and press ENTER
This should format SD card but if for reason even this step is provided as unproductive, go to the next solution.
3. Format your card with the Disk Management tool
- Go into the taskbar and search for Disk Management and open it
- Select SD card partition that you wish to format
- Right-click on the partition and select format
- After the format is done, enter the volume label, file system, and allocation unit size. Confirm with OK
- Press OK again to confirm the formatting process.
If you have not managed to format your SD card even with this method go to the next solution.
4. Repartition card with Disk part
If all previous solutions have failed there is a chance that the SD card has bad sectors on it. If this is the case that we will need to partition cards in order to isolate bad sectors and use healthy ones.
- Press ⊞ WINDOWS + R to open the Run dialog
- In run dialog type in diskpart and press ENTER
- Once diskpart is opened in command prompt type in: list disk and press ENTER
- Locate your SD card and type in select disk x, where x is disk number followed by ENTER
- Type in Clean and press ENTER
- Type in Create partition primary and press ENTER
- To select a new partition type select partition 1 followed by ENTER
- Make partition active by typing active and pressing ENTER
- Format the drive by typing format fs=ntfs label=SDCard quick followed with ENTER
- Assign a letter to drive by typing assign letter=h followed with ENTER
- Type exit to close Command prompt followed again by ENTER and open File Explorer to check if the drive is active
5. Try a dedicated SD card formating fool
If anything failed so far, one last thing you could do is to download and try a dedicated SD card formatting tool. One that I would recommend is SD Memory Card Formatter, which is free software make specifically for formatting SD memory cards.
Read More
As you know, the Windows Firewall is designed not just to protect your computer from viruses and malware, and other security threats but it’s also designed to block any program from accessing the internet. Users are given the option to block both inbound and outbound traffic for any apps on their computers. However, this kind of option can often lead to not being able to access the internet.
In such cases, when you try to run the Windows Firewall Troubleshooter or the Windows Network Diagnostic troubleshooter, it will throw an error message that says, “Windows Firewall is preventing connections to your computer. The Windows Firewall rule HSS DNS Leak Rule may be blocking your connection”. If you are in this kind of scenario, then you’ve come to the right place as this post will guide you on how exactly you can fix this error.
When you encounter this kind of error, there are several options you can check out to fix it. You can try to allow an app or feature through the Windows Firewall or uncheck the HSS DNS leak rule in both private and public. For more details, refer to the suggestions provided below.
Option 1 – Try to allow an app or feature through Windows Firewall
The first thing you can do to get rid of the error is to allow a feature or app through the Windows Firewall. To do this, follow these steps:
- Open the Windows Defender Security Center.
- From there, select the Firewall and Network Protection option.
- Next, click on the “Allow an app through firewall” option and then click on the “Change Settings” button and make sure that you have administrative privileges.
- After that, select the app or feature you want to allow through the Firewall from the menu. You also have the option to manually add the app by using the “Add an App” option.
- Then select the between the type of network an app can access such as:
- Private Network will allow the app to connect to the internet only at home or work.
- Public Network will allow the app to connect to the internet from anywhere, including Public WiFi hotspots.
- Once done, restart your computer and see if it fixed the error or not.
Option 2 – Try to uncheck the HSS DNS leak rule in both private and public
The next thing you can do to fix the error is to uncheck the HSS DNS leak rule in both private and public. You can do this by following these steps:
- Open the Windows Defender Security Center.
- From there, select the Firewall and Network Protection option.
- After that, click on the “Allow an app through firewall” option and then click on the “Change Settings” button and make sure that you have administrative privileges.
- Next, scroll down until you see the HSS DNS leak rule in both private and public option and then uncheck it.
- Now restart your computer and check if the error is now gone.
Read More
What is Error 3?
This is a type of Google Chrome update error code. It indicates a failure to communicate with Google update. The error code is displayed in the following format:
‘Update server not available (error: 3)’
Solution
Error Causes
Error 3 may be triggered by several reasons. These include:
- You are running Vista/ 7 and you have configured Google Chrome to run as an administrator
- Google Update is not registered properly
- Registry issues
Further Information and Manual Repair
Here are some of the best and effective DIY methods to resolve error 3 on your PC without any professional help. You don’t need to be a technical whiz to try these methods.
Method 1
If the reason for the error cause is related to Google Chrome configured as administrator on your PC, then simply run it as a normal user. This is a common issue with Google Chrome auto-updating mechanism.
Method 2
If the problem still persists, then it is advisable to try re-installing Google Chrome.
To do this, first, uninstall Google Chrome. Go to the start menu, control panel, and then program and features. Choose Add and Remove Programs and uninstall Google Chrome.
To activate changes, reboot your system. Now reinstall Google Chrome by downloading it from Google Chrome’s official website.
Method 3
If error 3 is triggered because Google Chrome is not registered properly, then try this method to fix the issue.
- First, verify that GoogleUpdate.exe exists in the location specified in the Windows Registry Editor. For this, go to the Start Menu and then type Regedit in the search bar.
- Now click OK. The registry editor will appear. Now in the tree view on the left, navigate to the following directory:
- HKEY_CLASSES_ROOTCLSID{2F0E2680-9FF5-43C0-B76E-114A56E93598}LocalServer32
- Make sure the default value corresponds to the location of your GoogleUpdate.exe or GoogleUpdateOnDemand.exe file. Also, verify that these files are located in the given path.
- For instance, if they are located in different locations, then right-click the default value and select Modify.
- Enter the correct file path and use double quotation marks for example «C:\Documents and Settings%USERNAME%Local SettingsApplication DataGoogleUpdateGoogleUpdate.exe(or GoogleUpdateOnDemand.exe)»
Method 4
Error 3 may also pop up because of registry issues.
These issues occur when the registry gets overloaded with obsolete and unnecessary files like cookies, internet history, bad entries, and junk files. In such an event, it is advisable to download Restoro
This is a user-friendly and cutting-edge PC Fixer embedded with a registry cleaner. The registry cleaner removes all the obsolete files instantly and repairs the damaged registry thereby resolving all errors including error 3.
Click here to download Restoro and resolve error 3.
Read More
AudioToAudio is a browser extension for Google Chrome developed by Mindspark Inc. This extension allows users easy access to popular audio converting websites.
When installed, it changes the default search engine, home page, and new tab to MyWay.com. While active AudioToAudio gathers user browsing activities such as, but not limited to: visited websites, clicked links, search queries. This data is later used/sold by the Mindspark ad network to better target ads.
While browsing the internet with this extension enabled, you will see additional injected ads, sponsored content (such as links to web pages, banner ads, affiliate shop links, etc), and even pop-up ads from time to time if the regular ads are blocked.
AudioToAudio has been marked as a Browser Hijacker by several anti-virus applications and is marked for removal by most of them.
About Browser Hijackers
Browser hijacking is a form of unwanted software, commonly a web browser add-on or extension, which causes modifications in web browser’s settings. They are created to interfere with browser functions for various purposes. Typically, hijackers are developed for the benefit of cyber hackers often through revenue generation from forced ad clicks and website visits. However, it isn’t that innocent. Your online safety is compromised and it is also extremely annoying. Some browser hijackers are programmed to make particular modifications beyond the browsers, like changing entries in the computer registry and letting other malware further damage your computer.
How to determine if your browser has been hijacked
When your web browser is hijacked, the following might happen:
1. your web browser’s homepage is suddenly different
2. you get re-directed to sites you never meant to visit
3. The default search page of the web browser is changed
4. discover new toolbars that you simply did not add
5. you see numerous ads pop up on the web browsers or computer screen
6. webpages load slowly and often incomplete
7. Inability to navigate to certain websites, especially antivirus and also other computer security software sites.
How they infect computers
There are many ways your computer or laptop can become infected with a browser hijacker. They usually arrive by way of spam email, via file-sharing networks, or by a drive-by-download. They can also be deployed via the installation of an internet browser toolbar, extension, or add-on. A browser hijacker could also come bundled up with some free software that you unknowingly download and install the browser hijack, compromising your PC security. Some of the most well-known hijackers are AudioToAudio, Babylon Toolbar, Conduit Search, OneWebSearch, Sweet Page, and CoolWebSearch.
Removing browser hijackers
Some hijackers could be removed by just uninstalling the related freeware or add-ons through the Add or Remove Programs in the Microsoft Windows Control Panel. But, the majority of hijackers are quite tenacious and require specialized applications to eliminate them. Novice computer users shouldn’t ever attempt the manual form of removal, as it requires thorough computer knowledge to carry out repairs on the computer registry and HOSTS file.
Browser hijackers can be effectively removed by installing and running anti-malware software on the affected PC. Safebytes Anti-Malware has a sophisticated anti-malware engine to help you prevent browser hijacking in the first place, and mop up any existing issues. In addition to anti-malware, a system optimizer tool, similar to Total System Care, could help you resolve Windows registry errors, eliminate unwanted toolbars, secure online privacy, and increase overall computer performance.
How To Get Rid Of Malware That Is Preventing Anti-Malware Installation?
All malware is bad, but certain types of malware do more damage to your computer than others. Some malware types alter internet browser settings by including a proxy server or change the PC’s DNS settings. In these cases, you will be unable to visit some or all internet sites, and thus not able to download or install the required security software to remove the malware. If you are reading this article, you probably have got affected by malware that prevents you from installing a computer security program like Safebytes Anti-Malware. There are a few actions you can take to get around this problem.
Install in Safe Mode
In Safe Mode, you are able to modify Windows settings, un-install or install some applications, and remove hard-to-delete viruses and malware. In the event the malware is blocking access to the internet and affecting your PC, running it in Safe Mode allows you to download anti-malware and run a diagnostic scan whilst limiting possible damage. In order to enter into Safe Mode or Safe Mode with Networking, press the F8 key while the PC is starting up or run MSCONFIG and locate the “Safe Boot” options in the “Boot” tab. Once you are in Safe Mode, you can attempt to download and install your anti-malware software without the hindrance of the malicious software. Now, you can actually run the antivirus scan to remove computer viruses and malware without any interference from another application.
Switch over to a different web browser
Malicious code could exploit vulnerabilities in a particular internet browser and block access to all anti-virus software websites. If you suspect that your Internet Explorer happens to be hijacked by a computer virus or otherwise compromised by cybercriminals, the best plan of action would be to switch to an alternate browser like Chrome, Firefox, or Safari to download your favorite computer security program – Safebytes Anti-Malware.
Install and run antivirus from your Thumb drive
Here’s another solution which is creating a portable USB anti-virus software package that can scan your computer for malicious software without needing installation. Adopt these measures to use a USB drive to fix your infected computer system.
1) Download Safebytes Anti-Malware or MS Windows Defender Offline onto a virus-free computer system.
2) Mount the USB drive on the same computer.
3) Double-click the executable file to run the installation wizard.
4) Choose the USB flash drive as the destination for saving the file. Do as instructed on the screen to finish up the installation process.
5) Transfer the USB drive from the uninfected PC to the infected computer.
6) Double-click the EXE file to open the Safebytes tool from the thumb drive.
7) Run Full System Scan to detect and clean-up up all types of malware.
Protect Your PC and Privacy With SafeBytes Anti-Malware
If you’re looking to install an anti-malware application for your computer, there are several tools in the market to consider but you should not trust blindly anyone, irrespective of whether it is paid or free software. A few of them do a good job in removing malware threats while many will damage your computer by themselves. When searching for an antivirus tool, purchase one that offers reliable, efficient, and complete protection against all known viruses and malware. When considering commercial anti-malware software options, most people choose popular brands, like SafeBytes, and are very happy with them.
Safebytes is among the well-established computer solutions companies, which provide this all-inclusive anti-malware application. Through its cutting-edge technology, this software will help you protect your PC against infections brought on by various kinds of malware and other threats, including spyware, adware, computer viruses, worms, trojan horses, keyloggers, potentially unwanted program (PUPs), and ransomware.
SafeBytes anti-malware takes computer protection to a whole new level with its advanced features. Here are a few of the good ones:
Robust, Anti-malware Protection: Safebytes is built on the very best virus engine within the industry. These engines can find and eliminate threats even during the early phases of a malware outbreak.
Real-Time Protection: Malware programs trying to enter the computer are identified and stopped as and when detected by the SafeBytes real-time protection shields. This software will constantly monitor your PC for any suspicious activity and updates itself regularly to keep abreast of the constantly changing threat scenarios.
Internet Security: Safebytes assigns all websites a unique safety rating that helps you to get an idea of whether the webpage you’re going to visit is safe to browse or known to be a phishing site.
Lightweight: SafeBytes is a lightweight application. It uses up a really small amount of processing power as it works in the background so you’re free to use your Windows-based computer the way you want.
Premium Support: For any technical problems or product guidance, you may get 24/7 professional assistance via chat and e-mail.
Overall, SafeBytes Anti-Malware is a solid program since it has loads of features and could detect and eliminate any potential threats. You now may realize that this tool does more than just scan and eliminate threats from your computer. So when you want advanced forms of protection features & threat detections, purchasing SafeBytes Anti-Malware will be well worth the money!
Technical Details and Manual Removal (Advanced Users)
If you’d like to carry out the removal of AudioToAudio manually rather than utilizing an automated software tool, you can follow these simple steps: Go to the Windows Control Panel, click on the “Add/Remove Programs” and there, select the offending application to uninstall. In case of suspicious versions of web browser plugins, you can easily get rid of them through your browser’s extension manager. You may also want to reset your home page and search engine providers, as well as clear your browser cache and cookies.
If you decide to manually delete the system files and registry entries, utilize the following checklist to ensure that you know exactly what files to remove before undertaking any actions. However, this can be a tricky task and only computer professionals could carry it out safely. In addition, some malware is capable of replicating or preventing deletion. It is recommended that you do the removal procedure in Safe Mode.
For more information and manual removal instructions visit www.ErrorTools.com
Download Safebytes Anti-Malware: https://errortools.com/download/safebytes-anti-malware/
AudioToAudio is a browser extension for Google Chrome developed by Mindspark Inc. This extension allows users easy access to popular audio converting websites.
When installed, it changes the default search engine, home page, and new tab to MyWay.com. While active AudioToAudio gathers user browsing activities such as, but not limited to: visited websites, clicked links, search queries. This data is later used/sold by the Mindspark ad network to better target ads.
While browsing the internet with this extension enabled, you will see additional injected ads, sponsored content (such as links to web pages, banner ads, affiliate shop links, etc), and even pop-up ads from time to time if the regular ads are blocked.
AudioToAudio has been marked as a Browser Hijacker by several anti-virus applications and is marked for removal by most of them.
Read More

Skinning of applications is not new to PC users, but did you knew you could skin Steam?
With skin, you can customize the UI and style of the client to what you want making it more personal and to your liking. First thing is to find the skin that you would like to install. There are a lot of sites where you could find custom made Steam skins but we would recommend steamskins.org
The site itself is organized in tabs with different sections, once you click on the tab you will get a list of skins available for chosen section. If you click on the skin you will be taken to skin page detail where you can find what skin is aiming for, its legibility, a record of how the skin has been altered over time, or some mix of these aspects.
Note that some skins might have issues like some buttons might be missing from big picture mode but so far none of the skins has any kind of client breaking feature, only functionality one.
Downloading skin
Once you have chosen desired skin and while on the skin details page, scroll to the middle of the page just above the Related Skins sections with two options: Direct Download and External Download. Now usually I would recommend Direct download but in this case, I would advise going with External Download for the simple reason that the External link will send you to the developer’s website where there is a higher chance to get the latest updated skin.
Installing it in Steam
Once the skin is downloaded you will first need to create a skin folder inside your Steam installation location. Navigate to your Steam installation folder (default: C:\Program Files (x86)\Steam) and create a new folder inside it. Give new folder name Skins and confirm.
Extract the skin zip file in the newly made folder. Once the file is extracted you can delete the ZIP file if you wish.
Go to your Steam client and go to Steam>Settings. In settings select Interface on the left bar and on the right part then click the Select the skin you wish Steam to use the drop-down menu and select the skin that you wish to use. Confirm and restart your Steam client
Reverting to old skin
If you found skin unappealing or, unfortunately, has some functions missing you can always choose another skin or revert back to default Steam skin.
Default Steam skin is named in the drop-down menu as < default skin >.
Read More
If you encounter a Recovery Error code 0xc000000e, “Your PC needs to be repaired” error on your Windows 10 computer, then it means that there is some hardware failure or an incorrect drive configuration. Apart from the error, it may be accompanied by different error message such as:
- A required device is inaccessible
- The selected entry could not be loaded
- A required device isn’t connected or cannot be accessed
- The selected entry could not be loaded because the application is missing or corrupt
- The boot selection failed because a required device is inaccessible.
As mentioned, the error code 0xc000000e or STATUS_NO_SUCH_DEVICE error indicates that there is a hardware failure or an incorrect drive configuration and to fix it, you have to check your cables as well as check the drive with the diagnostic utility available from the manufacturer of the drive. And if you are using older PATA (IDE) drives, then this kind of error also indicates an incorrect master/subordinate drive configuration.
There could be different causes for this error. It could be that the winload.exe file is not accessible or is corrupted or that the boot location for the operating system cannot be found. Thus, for you to boot into and access the operating system, you can try the suggestions given below.
Option 1 – Try rebuilding the Boot Configuration Data (BCD) file
- Once you get to the Welcome Screen part, click on Next.
- Afterward, click on the Repair your computer option located on the bottom-left part of the window.
- Then click on Troubleshoot.
- Next, select the Advanced Options and then Command Prompt.
- Once Command Prompt has been pulled up, the following command to rebuild BCD files.
bootrec /rebuildbcd
- Once the command line is successful in finding out a Windows installation, hit Y to let it boot from the list which will successfully rebuild BCD.
- Now type “exit” to close Command Prompt and then restart your computer to successfully apply the changes made.
Option 2 – Try to run the Automatic Repair Utility
You might also want to use Automatic Repair in fixing the error code 0xC000000E. To do so, follow the steps below.
- You can start by creating and booting from a bootable Windows 10 USB Stick.
- After that, click on Repair your computer located in the bottom left corner when you are on the initial Windows Startup screen.
- Next, click on Troubleshoot, and then on the other screen, click the Startup Repair option.
- Now select the operating system you want to repair. Once you do that, it will start to repair your operating system. Wait until the process is completed and then check if the problem’s now fixed.
Option 3 – Try checking the physical device connections
You might also want to try checking if there are other devices that are connected to your PC. This is because of the configuration of the BIOS or UEFI might be configured in a way that any external device connected to the computer has a higher boot priority compared to the hard disk. And if it’s really the case, the externally attached disk might be the drive your computer is trying to boot into and not the hard disk. In such cases, Pen Drives, USB storage devices, CDs, DVDs, and so on, are included in this category of physical device connections.
Option 4 – Try updating the BIOS
As you know, the BIOS is a sensitive part of a computer. Even though it is a software component, the functioning of the hardware depends on it largely. Thus, you must be careful when modifying something in the BIOS. So if you don’t know much about it, it’s best if you skip on this option and try the other ones instead. However, if you are well-versed in navigating the BIOS, then follow the steps below.
- Tap the Win + R keys to open the Run dialog box.
- Next, type “msinfo32” in the field and press Enter to open System Information.
- From there, you should find a search field on the bottom where you have to search for the BIOS version and then press Enter.
- After that, you should see the developer and version of the BIOS installed on your PC.
- Go to your manufacturer’s website and then download the latest version of BIOS on your computer.
- If you are using a laptop, make sure that you keep it plugged in until you have updated the BIOS.
- Now double click on the downloaded file and install the new BIOS version on your computer.
- Now restart your computer to apply the changes made.
Option 5 – Try resetting the BIOS/UEFI configuration
You might also want to reset the BIOS configuration which will lead to arranging the boot configuration since it is intended by the manufacturer. Note that this will get rid of any blockage in the boot process.
Option 6 – Try marking your Disk as Online
Marking your Disk as Online can also help in resolving the error code 0xC000000E. To do so, follow the steps below.
- You need to first create a bootable Windows 10 Media and then boot from it.
- After that, click on Repair your computer on the first window of the Windows 10 installation setup.
- Now, choose the operating system partition from the options and click on Next.
- Then select Command Prompt from the System Recovery Options box.
- Next, type in “diskpart” and hit Enter to initiate the Diskpart utility inside the Command Prompt.
- Now type in either “list disk” or “list volume” and hit Enter. Either of these commands will help you in listing all the Disk connects or all the partitions on those disks formed. So you have to select one command depending on the list command you entered.
- Afterward, type in “select disk #” or “select volume #” and hit Enter to select the Disk or Partition you want to select.
- Now type in “online disk #” or “online volume #” and press Enter to mark the disk you selected as Online.
Read More
Facebook has an algorithm inside it that can recognize your face in pictures and videos which is meant to help people tag friends when they upload media into Facebook. It is a neat feature meant to help all Facebook users but what if we do not want to be detected in pictures and videos? What if we do not want to be tagged?
If you are one of the Facebook users that do not wish to be detected and recognized by Facebook in media keep on reading to find out how you can disable this option.
- Open the Facebook website and log into your account.
- Click on the arrow visible in the top menu bar.
- Select the Settings & privacy option.
- Click on the Settings option.
- Switch to the Face recognition tab on the left-hand side.
- Click the Edit button.
- Select No from the drop-down list.
And you are done, you do not need to log out or restart facebook in order for changes to have an effect. Now you are free from face recognition and detection.
Read More
Copyright © 2023, ErrorTools. All Rights Reserved
Trademark: Microsoft Windows logos are registered trademarks of Microsoft. Disclaimer: ErrorTools.com is not affiliated with Microsoft, nor claims direct affiliation.
The information on this page is provided for information purposes only.