
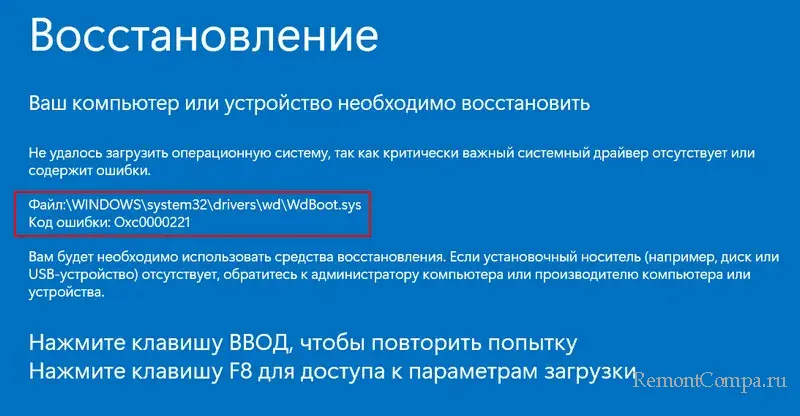
При очередном запуске Windows некоторые пользователи сталкиваются с ошибкой 0xc0000221 и сообщением «Не удалось загрузить операционную систему, так как ядро отсутствует или содержит ошибки» или «Критически важный системный драйвер отсутствует или содержит ошибки», иногда текст может сообщать о несовпадении контрольной суммы (checksum). В сообщении об ошибке также может указываться имя файла, чаще всего — ntoskrnl.exe, hal.dll, disk.sys, wdboot.sys, но возможны и другие варианты.
В этой инструкции подробно о том, как исправить ошибку 0xc0000221 при запуске Windows 11 или Windows 10 и о том, чем может быть вызван этот сбой.
Восстановление поврежденной файловой системы на диске

Несмотря на то, что сообщение об ошибке с кодом 0xc0000221 прямо сообщает о недоступности файлов ядра Windows или важных системных драйверов, чаще причиной является не фактическое отсутствие соответствующих файлов, а проблемы с доступом к ним вследствие повреждений файловой системы на диске.
Отсюда первое, что следует попробовать — проверить диск на ошибки и исправить их:
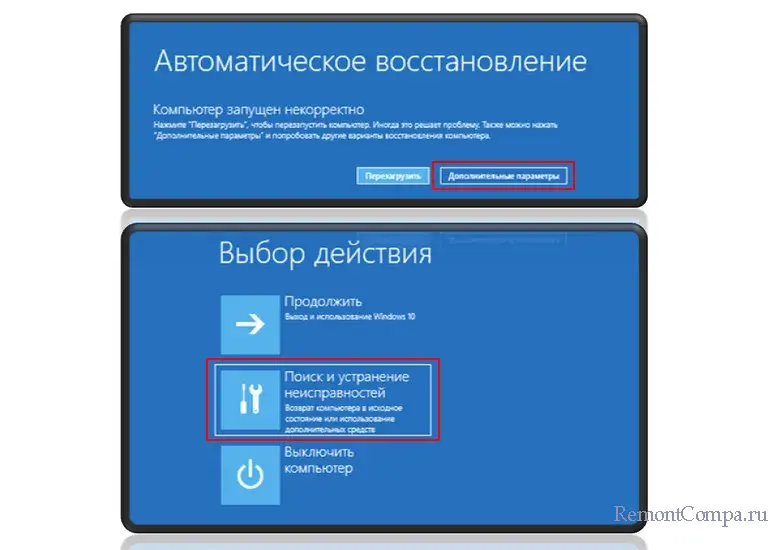
- На синем экране (если экран с этим же кодом ошибки черный, этот способ не подойдет) с сообщением об ошибке обратите внимание на указанную внизу клавишу для доступа к среде восстановления (Recovery Environment) или параметрам загрузки, нажмите её. Если это сработало, и вы попали в среду восстановления — перейдите к 3-му шагу.
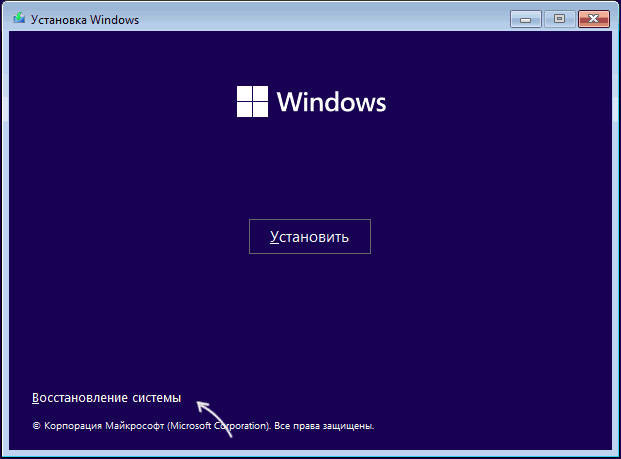
- Если предыдущий вариант не сработал, создайте загрузочную флешку Windows 11 или Windows 10 где-то на другом компьютере, загрузитесь с неё и на экране после выбора языка внизу слева нажмите «Восстановление системы».

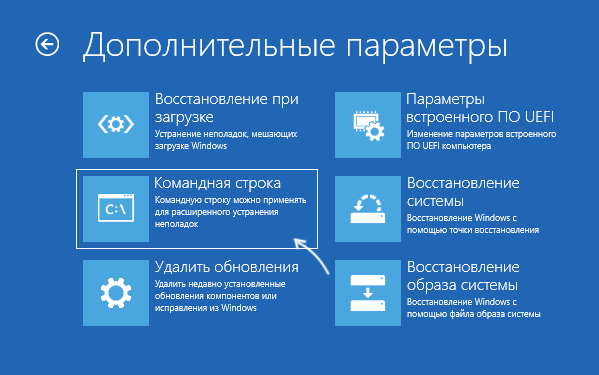
- На следующем экране (он может незначительно отличаться) перейдите в «Поиск и устранение неисправностей» либо «Дополнительные параметры». Откройте пункт «Командная строка».

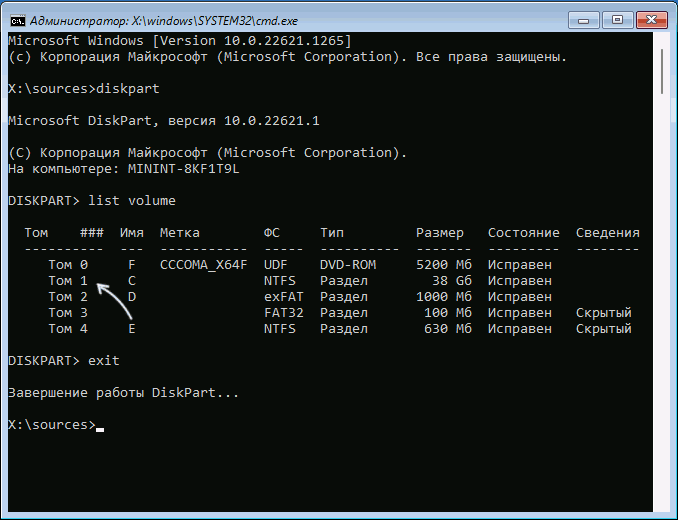
- В командной строке по порядку введите команды
diskpart
list volume
exit
- В выводе второй из введённых команд обратите внимание на букву раздела с Windows (при загрузке с флешки и в среде восстановления она может быть не C, поэтому мы проделываем описываемые шаги), а также на файловую систему этого раздела (должна быть NTFS, а не RAW).

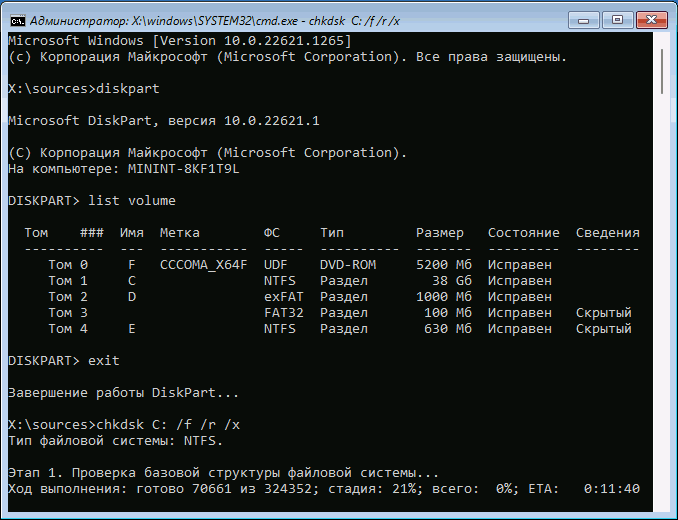
- Введите следующую команду, при необходимости изменив в ней букву диска C: на необходимую (внимание: команда может выполняться продолжительное время, в случае если проблема решается на ноутбуке, используйте питание от сети):
chkdsk C: /f /r /x
- Если в ходе выполнения команды ошибки были найдены и исправлены, можно попробовать закрыть командную строку и перезагрузить компьютер в обычном режиме: возможно, в этот раз запуск Windows не сообщит об ошибках.
- При ошибках ввода-вывода на устройстве при попытке выполнения команд, можно предположить как аппаратные неисправности диска, так и некачественное подключения коннекторов или повреждение SATA-кабелей, в редких случаях это может свидетельствовать о проблемах с питанием.

В ситуации, если утилита chkdsk не обнаружила ошибок, попробуем использовать восстановление системных файлов, что описано в следующем разделе инструкции.
Восстановление поврежденных системных файлов
Следующая возможная причина при исправном системном разделе диска — повреждение файлов, необходимых для загрузки Windows, в этом случае можно прибегнуть к восстановлению системных файлов:
- При возможности входа в среду восстановления способами, описанными выше, попробуйте использовать пункт «Восстановление системы» для использования точек восстановления — это может быстро решить проблему (при наличии точек восстановления).

- Если предыдущий вариант невозможно использовать и у вас есть доступ к другому компьютеру и возможность записи загрузочной флешки на нём, настоятельно рекомендую использовать WinPE для восстановления системных файлов: по порядку используйте пункты «Восстановление образа системы» и «Восстановление в MSDart Tools» из инструкции Восстановление системных файлов Windows 11 и Windows 10 с помощью WinPE.
- Если возможности создать загрузочную флешку WinPE нет, но среда восстановления доступна, попробуйте использовать команду
sfc /scannow /offbootdir=C:\ /offwindir=C:\Windows
в командной строке, запущенной в среде восстановления (как и в предыдущей части инструкции, букву диска C может быть необходимым поменять на актуальную).
- В случае, если выполнение команды на 3-м шаге сообщает об ошибках, попробуйте восстановить хранилище компонентов с загрузочной флешки Windows, как это описано в 4-й части инструкции про восстановление компонентов Windows 11 (подойдет и для Windows 10), а затем снова использовать команду из 3-го шага.
Учитывайте, что в случае проблем с доступом к диску или повреждений файловой системы на нём, выполнение описанных команд может быть невозможным.
Несколько дополнительных возможных причин ошибки 0xc0000221 и вариантов решения:
- Помимо повреждения системных файлов и проблем с жестким диском или SSD, к ошибке 0xc0000221 могут приводить ошибки работы оперативной памяти — попробуйте отключить разгон RAM, попробовать оставить подключенным только один модуль памяти, проверить оперативную память на ошибки.
- В редких случаях может помочь копирование поврежденного файла с рабочего компьютера (с той же версией Windows) на компьютер с ошибкой.
- Также можно попробовать выполнить загрузку в безопасном режиме, если это возможно: на экране с сообщением об ошибке нажать клавишу для перехода к параметрам загрузки и выбрать соответствующий режим загрузки, либо использовать пункт «Параметры загрузки» в дополнительных параметрах среды восстановления. Из этого же меню можно попробовать выполнить загрузку с отключенной проверкой цифровой подписи драйверов.
И, наконец, если ни один из вариантов не помогает — можно повторно установить Windows с загрузочной флешки: это возможно, в том числе и без удаления файлов (достаточно не форматировать системный раздел диска при установке), которые уже находятся на диске, однако все программы придется переустановить.
Все способы:
- Способ 1: Проверка аппаратной конфигурации
- Способ 2: Отмена разгона
- Способ 3: Проверка блока питания
- Способ 4: Загрузка в «Безопасном режиме»
- Способ 5: Восстановление целостности системных файлов
- Способ 6: Проверка оперативной памяти
- Способ 7: Откат к точке восстановления
- Вопросы и ответы: 0
Ошибка 0xc0000221 может вызываться разными причинами, носящими как программный, так и аппаратный характер. Чаще всего неполадка возникает после установки на ПК нового дополнительного оборудования, а также вследствие повреждения системных файлов и неисправностей блока питания.
Способ 1: Проверка аппаратной конфигурации
Если ошибка возникла сразу после апгрейда аппаратной составляющей, восстановите исходную конфигурацию, отключите все ненужные устройства. Вероятнее всего, одно из устройств оказалось несовместимо с остальными компонентами: например, вызвать BSOD с кодом 0xc0000221 может установка второй видеокарты при условии, что оба устройства используют технологию SLI или CrossFire.
Теоретически к падению системы в BSOD может привести конфликт между разными планками оперативной памяти, отмечены примеры, когда ошибка возникала после подключения второго жесткого диска. В любом случае, при подозрении на аппаратную проблему, разумным решением станет обращение за консультацией в сервисный центр.
Читайте также: Проверка совместимости комплектующих компьютера
Способ 2: Отмена разгона
Если на компьютере выполнялся разгон процессора, видеокарты или оперативной памяти, отмените его в той самой программе, в которой он осуществлялся. В большинстве таких приложений имеется опция сброса измененных параметров к значениям по умолчанию.
Способ 3: Проверка блока питания
Если при подключении одного или нескольких дополнительных устройств наблюдаете синий экран смерти с кодом 0xc0000221, при этом вы уверены в исправности и совместимости аппаратных компонентов, обратите внимание на блок питания. Не исключено, что последний не обладает достаточной мощностью для обеспечения энергией дополнительных комплектующих. При наличии более мощного блока питания замените им имеющийся, если устройства подключаются по USB, используете USB-концентраторы с внешним питанием.
Читайте также:
Как проверить работоспособность блока питания на ПК
Как узнать, сколько ватт потребляет компьютер
Способ 4: Загрузка в «Безопасном режиме»
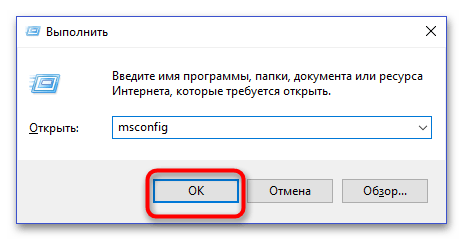
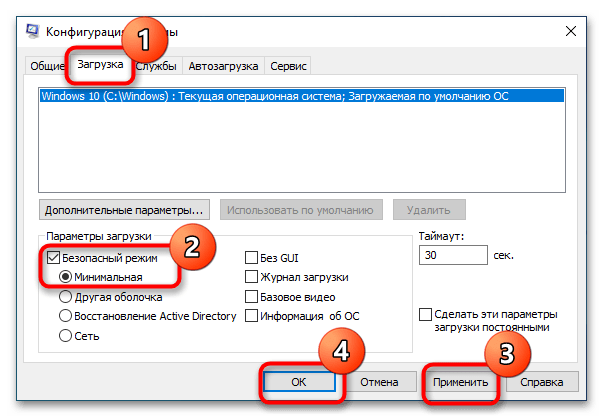
Попробуйте загрузить компьютер в «Безопасном режиме». В случае успеха с большей долей уверенности можно будет предположить, что источником проблемы является программный сбой или конфликт. Чтобы выполнить загрузку в «Безопасном режиме», сделайте следующее:
- Откройте нажатием клавиш Win + R окошко быстрого выполнения команд, введите в него
msconfigи нажмите «OK». - В окошке утилиты «Конфигурация системы» переключитесь на вкладку «Загрузка», отметьте флажком чекбокс «Безопасный режим», нажмите «Применить» и «OK».
- Согласитесь на перезагрузку компьютера.
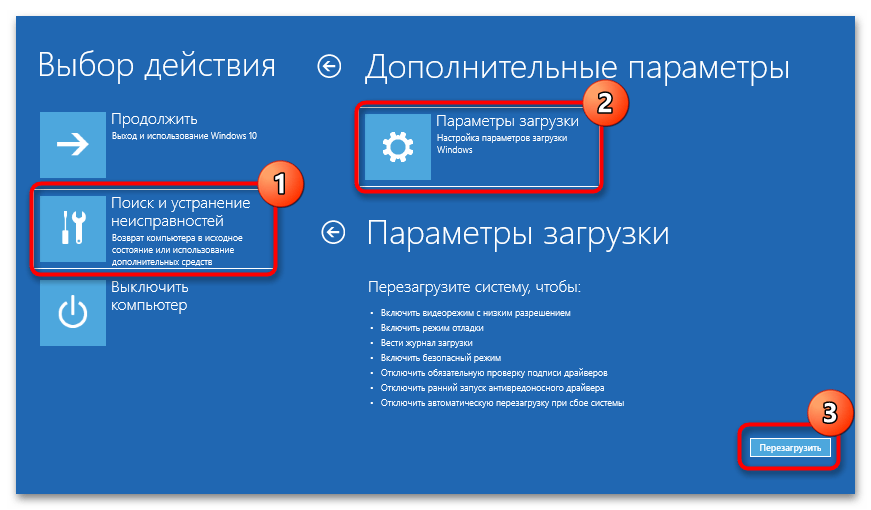
Если Windows 10 не в состоянии запуститься, попробуйте следующее:
- Дважды прервите процедуру загрузки операционной системы (сразу после включения компьютера), чтобы попасть в среду восстановления.
- На экране выбора действий выберите «Поиск и исправление неисправностей» → «Параметры загрузки» и нажмите кнопку «Перезагрузить».
- После перезагрузки появится экран параметров загрузки, нажмите клавишу F4, чтобы выбрать «Безопасный режим».
Дальнейшие шаги должны быть направлены на поиск и устранение первопричины. Вы можете предпринять следующие действия:
- удаление недавно установленных обновлений;
Читайте также: Удаление обновлений в Windows 10
- удаление недавно установленных сторонних программ или игр;
Читайте также: Удаление программ в Windows 10
- откат драйверов устройств к предыдущим версиям, если до этого они были обновлены;
Читайте также: Как откатить драйвер видеокарты NVIDIA
- отключение сторонних служб и элементов автозапуска.
Читайте также:
Отключение ненужных и неиспользуемых служб в Windows 10
Отключение автозапуска программ в Виндовс 10
Способ 5: Восстановление целостности системных файлов
Выполните проверку на предмет отсутствия или повреждения важных системных файлов средствами встроенной утилиты «SFC». Проверка может быть выполнена как в «Безопасном режиме», так и из-под установочной флешки с Windows 10. Рассмотрим второй вариант.
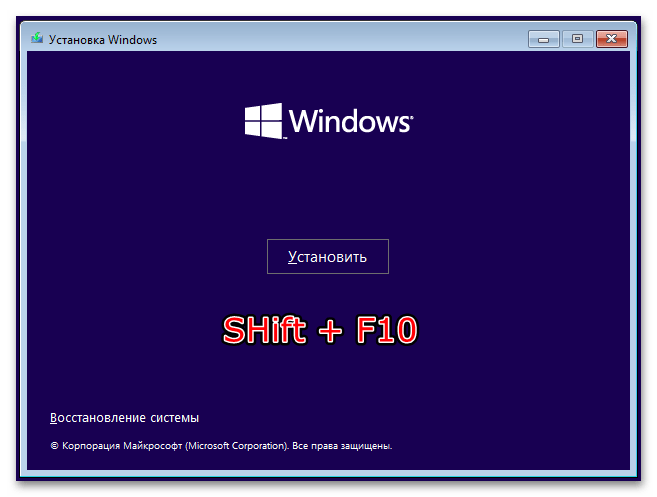
- Загрузите компьютер с установочной флешки с дистрибутивом Windows 10, а когда на экране появится окно мастера-установщика системы, нажмите комбинацию клавиш Shift + F10, чтобы вызвать «Командную строку».
- Выполните в запущенной консоли команду
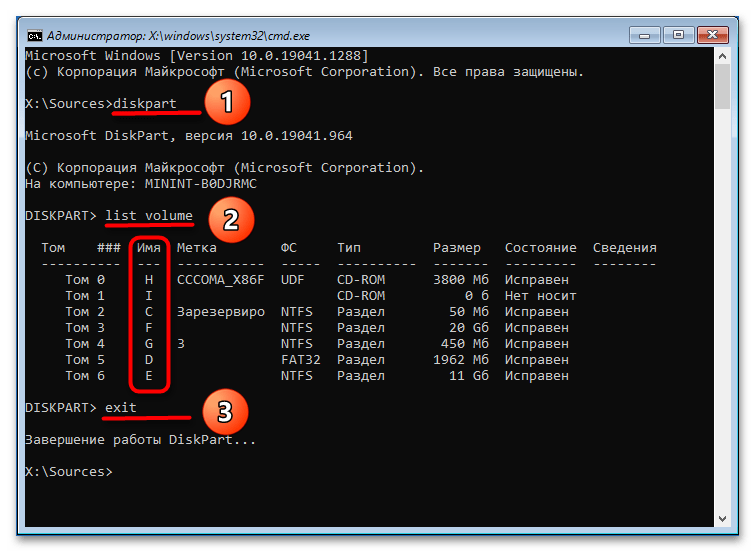
sfc /scannow /offbootdir=C:\ /offwindir=D:\windows, где C — буква загрузочного раздела, а D — буква с установленной Windows. - Так как в загрузочной среде буквы томов могут отличаться, перед выполнением приведенной выше команды желательно их определить. Для этого в той же «Командной строке» последовательно выполните команды
diskpart,list volumeиexit, в результате чего вы получите список имеющихся на жестком диске логических разделов с присвоенными ими в среде WinPE буквами. Определить раздел проще всего по его размеру.

Способ 6: Проверка оперативной памяти
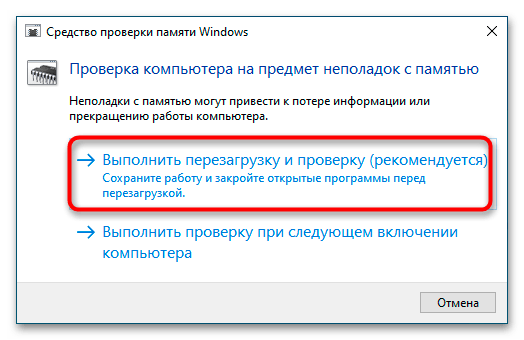
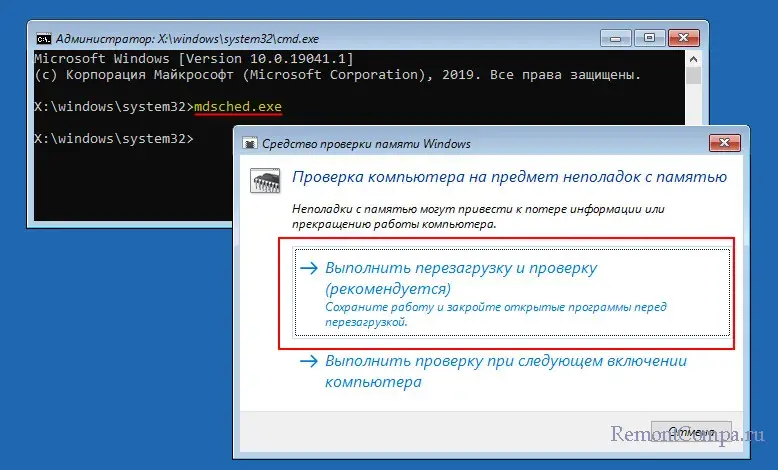
Исключите неисправность модулей оперативной памяти, выполнив ее проверку средствами штатной утилиты «mdsched».
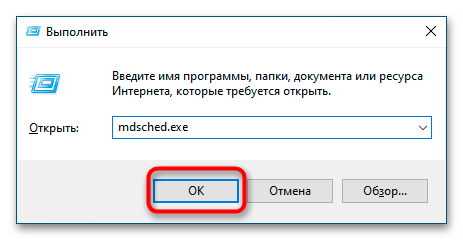
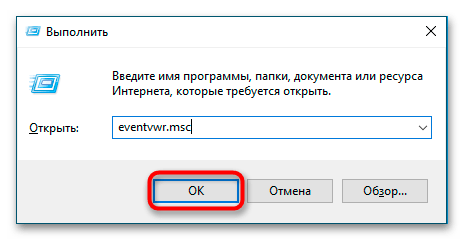
- Открыв окошко быстрого выполнения команд нажатием клавиш Win + R, введите в него
mdsched.exeи нажмите «OK». - В появившемся окошке «Средства проверки памяти Windows» выберите опцию «Выполнить перезагрузку и проверку (рекомендуется)».
- Компьютер перезагрузится, после чего начнется проверка ОЗУ.
- По завершении процедуры компьютер загрузится в штатном режиме, при этом в «Журнале событий» будет создан отчет. Чтобы открыть журнал, в окошке быстрого выполнения команд выполните команду
eventvwr.msc. - Перейдите в раздел «Журналы Windows» → «Система» и отыщите событие «MemoryDiagnostics-Results».
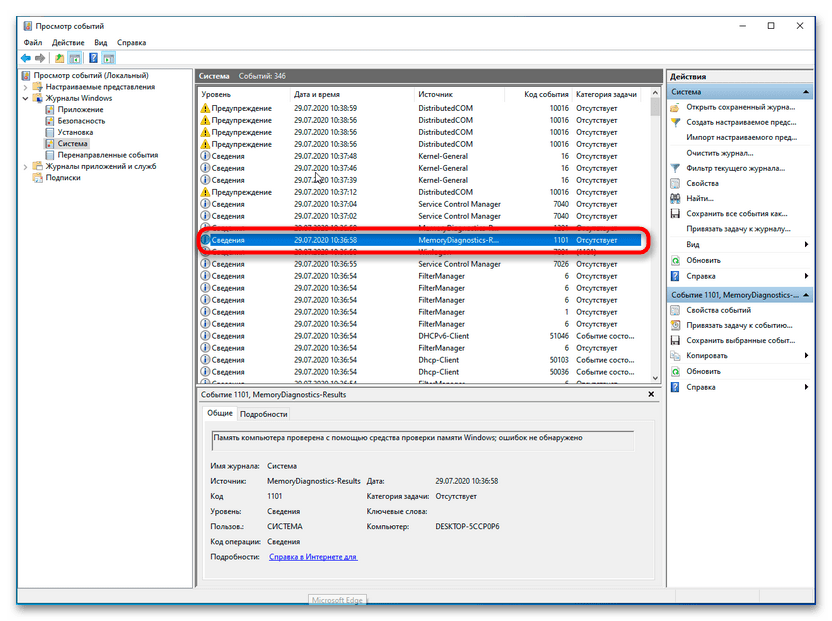
Наличие в отчете ошибок укажет на вероятную неисправность как минимум одного из модулей оперативной памяти, который потребует замены.
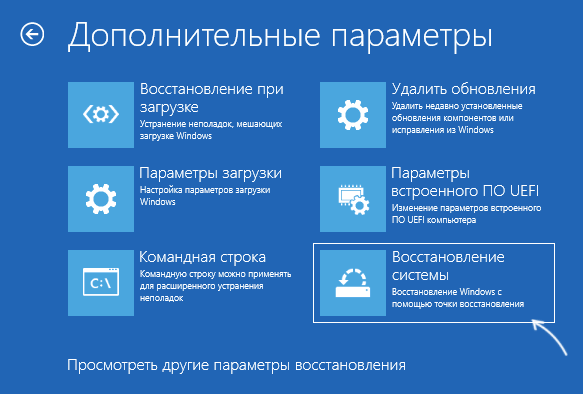
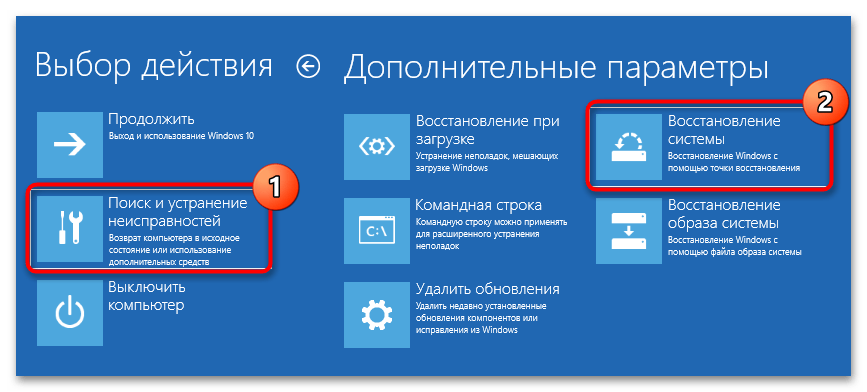
Способ 7: Откат к точке восстановления
Выполните откат к предыдущей точке восстановления — это позволит восстановить реестр, важные системные файлы и драйверы.
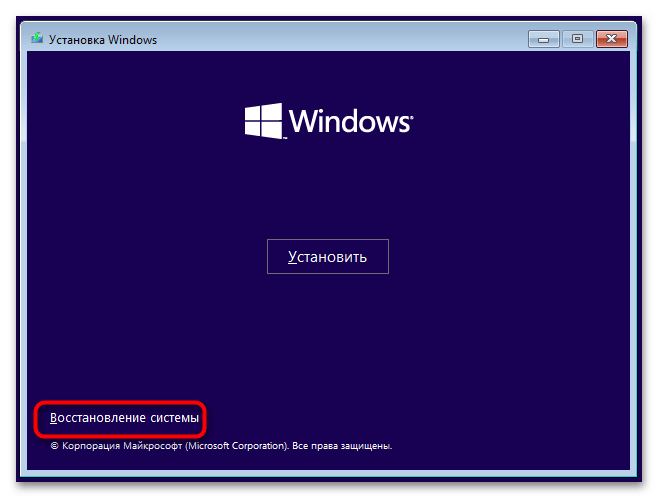
- Загрузите компьютер с установочной флешки и нажмите в окне мастера-установщика «Далее» «Восстановление системы».
- Выберите в загрузочной среде «Поиск и исправление неисправностей» → «Восстановление системы».
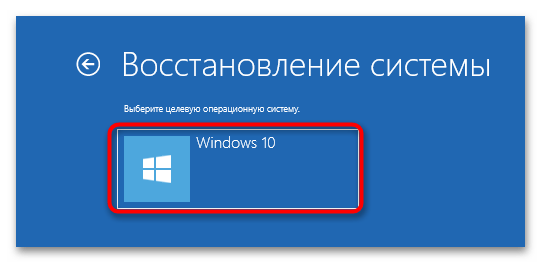
- Укажите целевую операционную систему.
- Нажмите в окне утилиты «Восстановление системы» кнопку «Далее» и проследуйте указаниям пошагового мастера.

Если устранить проблему не удается, переустановите операционную систему или сбросьте ее к исходному состоянию.
Читайте также:
Возвращаем Windows 10 к заводскому состоянию
Способы переустановки операционной системы Windows 10
Наша группа в TelegramПолезные советы и помощь
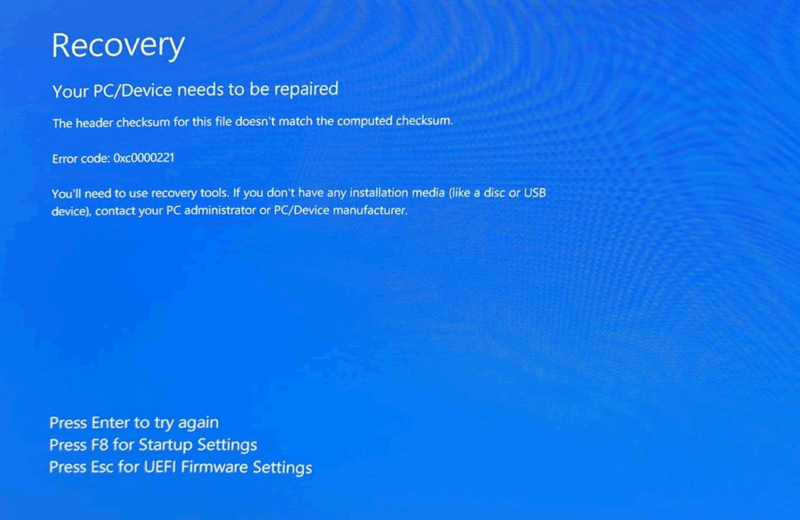
В этой публикации, друзья, разберём ошибку 0xc0000221, возникающую при загрузке Windows. При такой ошибке компьютер не сможет запуститься и, соответственно, не сможет работать. Ему потребуется восстановление с использованием средств среды восстановления Windows, а в идеале – средств аварийного LiveDisk’а. Что это за ошибка, как проявляется, и как её устранить?
Друзья, ошибка 0xc0000221 может появляться на синем экране с надписью «Восстановление» («Recovery»), где констатируется, что компьютер нуждается в восстановлении, указывается причина — отсутствие или повреждение файлов, необходимых для загрузки операционной системы. И указывается, собственно, сама ошибка 0xc0000221.
Также может быть, что эта ошибка является причиной циклического перезапуска компьютера с появлением надписи на синем экране «Автоматическое восстановление» (Automatic Repair). В процессе автоматического восстановления самой себя Windows не может устранить причину, сообщает о некорректном запуске, но перезагрузка приводит к новой попытке автоматического восстановления, которая завершается также неудачей. И так по кругу.

Если попробовать запустить Windows средствами WinPE 11-10-8 Sergei Strelec для случаев проблем с загрузчиком, получим указание на причинный файл, из-за которого Windows не может запуститься.
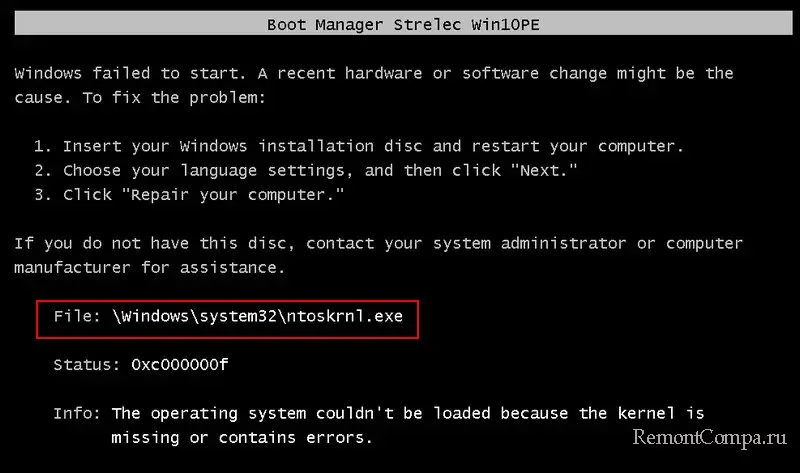
Ошибка 0xc0000221 означает, что Windows не может запуститься из-за:
- Повреждения или отсутствия одного или нескольких системных файлов, критически важных для работы операционной системы. Часто это bootmgr, winload.exe, ntoskrnl.exe, winresume.exe, hal.dll, disk.sys, wdboot.sys. Системные файлы могли быть уничтожены или повреждены в результате действия вирусов, сбоев в работе Windows и программ, наших пользовательских некорректных действий, проблем с жёстким диском;
- Конфликта с какими-то программой или драйвером;
- Проблем с оперативной памятью.
Ну и давайте теперь конкретно об инструментах и способах устранения ошибки 0xc0000221.
Если на компьютере запускается среда восстановления, можно попробовать её средства для реанимации Windows. Например, на экране автоматического восстановления для доступа к инструментам этой среды жмём «Дополнительные параметры». Далее — «Поиск и устранение неисправностей».
Здесь нам нужны будут «Параметры загрузки» и «Командная строка».
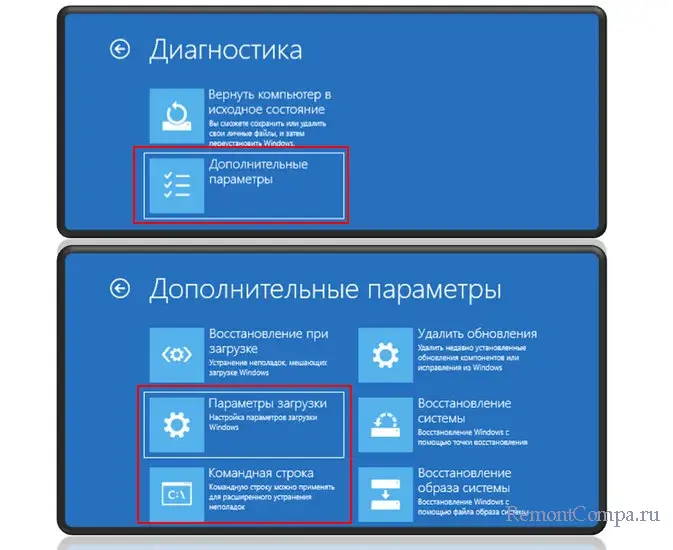
«Параметры загрузки» используем для запуска Windows в безопасном режиме. Безопасный режим позволит проверить, не вызвана ли ошибка конфликтом с программой или драйвером. Если в этом режиме Windows запустится, сможем выявить причинную программу или драйвер и удалить их.
Повреждение или отсутствие системных файлов, друзья, не всегда излечимо, но попробовать исправить ситуацию стоит. Для устранения этой причины используем командную строку и запускаем:
- Системную утилиту Chkdsk для проверки файловой системы;
- Восстановление целостности системных файлов.
Если причиной ошибки является оперативная память, проверяем её на ошибки с помощью консольной утилиты mdsched.exe.
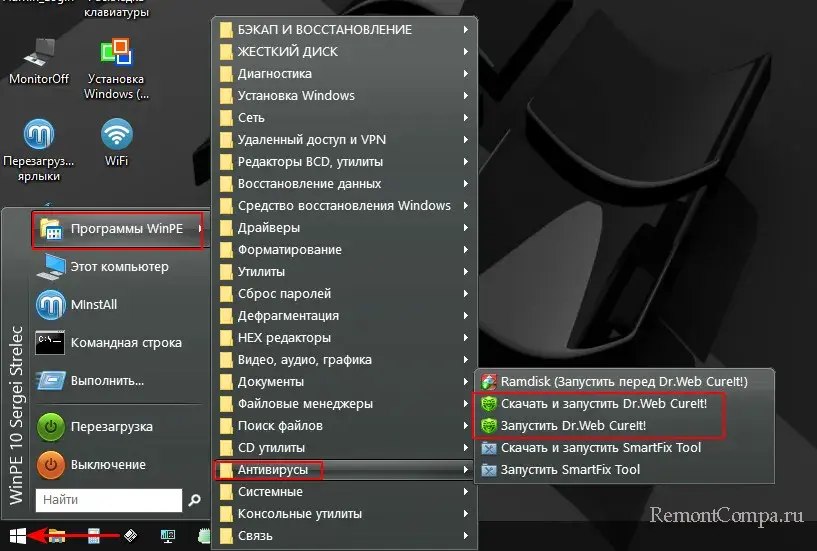
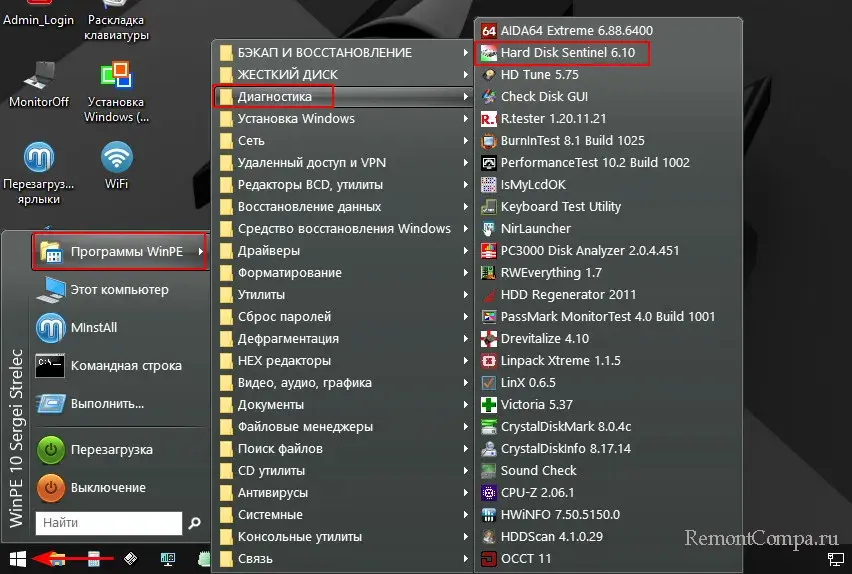
Больше возможностей для реанимации Windows нам предоставит аварийный LiveDisk WinPE 11-10-8 Sergei Strelec. Скачиваем его образ, записываем на флешку, загружаем с него компьютер.
С помощью инструментов WinPE 11-10-8 Sergei Strelec можно много чего предпринять:
- Запустить антивирус, если компьютер заражён вирусами;
- Выполнить разными способами восстановление системных файлов Windows;
- Выполнить проверку файловой системы Chkdsk с использованием графического интерфейса утилиты;
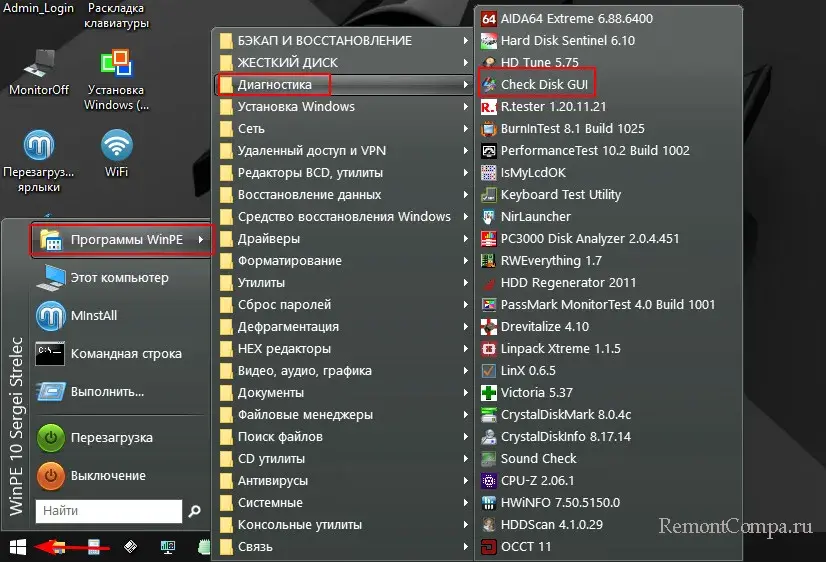
- Запустить командную строку и с помощью утилиты mdsched.exe проверить оперативную память;
- Выполнить диагностику и тестирование поверхности жёсткого диска, например, программой Hard Disk Sentinel.
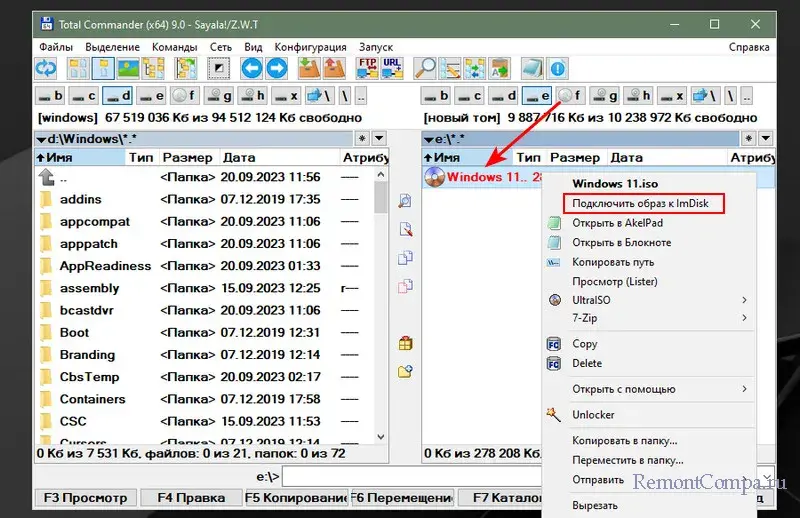
И это только средства самого WinPE 11-10-8 Sergei Strelec. Этот LiveDisk являет собой, по сути, портативную Windows. Мы можем использовать интегрированный в него браузер, выйти в Интернет, скачать любую программу, которая может устранить проблему, установить её (как в обычную Windows) и использовать. Если известен повреждённый или отсутствующий файл, из-за которого компьютер не может загрузиться, можно попробовать скачать в Интернете установочный ISO-образ используемой версии Windows, открыть образ, найти этот файл и подменить им исходный по пути его нахождения на диске Windows. Подмену без проблем осуществит присутствующий на LiveDisk’е файловый менеджер Total Commander.
В крайнем случае в среде WinPE 11-10-8 Sergei Strelec можно и переустановить Windows.
Что делать, если утилита mdsched.exe в процессе проверки оперативной памяти не смогла устранить её проблемы? Если память разогнана, можно попробовать отключить её разгон в BIOS. И можно протестировать включение компьютера с отдельными планками для выявления проблемной. Если причина подтвердится, далее, соответственно, нужно разбираться уже аппаратными проблемами памяти.
Проблемный жёсткий диск необходимо заменить.
Blue Screen of Death errors on Windows 11 PCs and laptops are always frustrating for users as they completely prevent them from starting or using their devices. One such BSOD error on Windows 11 that users sometimes encounter is the Error 0xc0000221. The said error indicates critical issues on Windows 11 devices that users must address and resolve.
As you are here, reading this article, we presume that you have recently encountered the Error 0xc0000221 on your Windows 11 PC or laptop and are looking for effective resolutions for it. So, to help you and all those who are currently struggling with the Error 0xc0000221 on Windows 11, we have come up with this article. In this in-depth guide, we will discuss everything about the Error 0xc0000221 on Windows 11 PCs and laptops and also show how one can resolve and avoid it on their devices. Check out the following sections for all the details!
What is Error 0xc0000221 on Windows 11?
Before we proceed to our list of fixes and suggestions to resolve the Error 0xc0000221 on Windows 11 PCs and laptops, let us quickly provide you with an overview of it. If you have the basic idea about the BSOR error 0xc0000221 on Windows devices, you can skip this part and jump on the next major section, including the fixes and suggestions.
For those unaware, the Error 0xc0000221 usually triggers when a Windows 11 PC or laptop cannot boot properly. The error is generally a result of low power supply due to voltage or battery issues and issues with the memory components of the computer such as the RAM and the hard drive. When the error shows up on a Windows system, it is usually on a blue screen and with the following message:
Your PC/Device needs to be repaired.

The operating system couldn't be loaded because the kernel is missing or contains errors.

File: \windows\system32\ntoskrnl.exe
Error code: 0xc0000221

You'll need to use recovery tools. If you don't have any installation media (like a disc or USB device), contact your PC administrator or PC/Device manufacturer.
In this situation, users are unable to start their PCs or laptops and get to the sign in screen.
Now, at first glance, the Error 0xc0000221 might seem like a critical one. However, there are a few things that users can ensure and check before taking it to a professional or service center. And in this guide, we will discuss these steps and measures that could help users mitigate the said error on their Windows 11 PC or laptop immediately.
Fix Error Code 0xc0000221 on Windows 11 PC and Laptop
In this section, we will discuss every possible step and measure that you can take when you encounter the BSOD error code 0xc0000221 on your Windows 11 PC or laptop. You will not only find resolutions to start your Windows 11 PC or laptop without getting the error but also some effective measures that you must take to avoid it in the future.
To further help you execute some of the fixes mentioned on the list, we have also included easy-to-follow, step-by-step guides. So, without further ado, take a look at the fixes and suggestions to resolve the BSOD error code 0xc0000221 on Windows 11 PCs and laptops right below.
1. Check Physical Connectors of Hardware Components
Many users who like to tinker with their PCs and laptops often encounter the error code 0xc0000221 after doing some physical changes to their devices. For instance, there are users who have encountered the error after changing the thermal pasting of their GPUs or after changing the RAM module of their PC or laptop.
So, if you started encountering the error code 0xc0000221 after disassembling and reassembling your Windows 11 PC or laptop recently, there is a chance that a physical connector issue is causing the said error to trigger. In this case, you must disassemble your Windows 11 PC or laptop once again and re-check all the connectors of the internal components such as the RAM, hard drives, and GPUs. Make sure they are properly connected to the motherboard.
After reassembling your device, you might also want to ensure that it is properly connected to a power source that can deliver enough power to sustain the PC or laptop’s needs. Once you re-check all the physical connectors of the hardware components of your device, turn it on and check whether or not you are getting the BSOD error code 0xc0000221.
2. Boot Your Windows 11 PC or Laptop in Safe Mode
Now, the next thing you can try when you encounter the error code 0xc0000221 on your Windows 11 PC or laptop is starting the device in safe mode. The safe mode can be a handy mode as it can actually allow you to start your Windows 11 PC or laptop without getting the error code 0xc0000221, albeit with limited functionality and apps. Moreover, if you are able to boot your device in the safe mode, you can also be 90% sure that some third-party app or program that you recently installed on your device is causing the current issue.
So, follow the steps right below to start your Windows 11 PC or laptop in safe mode and check if it boots up without the error code 0xc0000221:
1. With the BSOD error code 0xc0000221, use the physical Power button of your PC or laptop to turn off the device.
2. Now, you will have to turn on your device in a way that it boots up with the BIOS/UEFI settings. The way of booting a Windows 11 PC or laptop with the BIOS settings vary from device to device. So, take the help of the internet to check how you can boot your specific device with the BIOS/UEFI settings page. The hotkey for most motherboards is the F8 key.
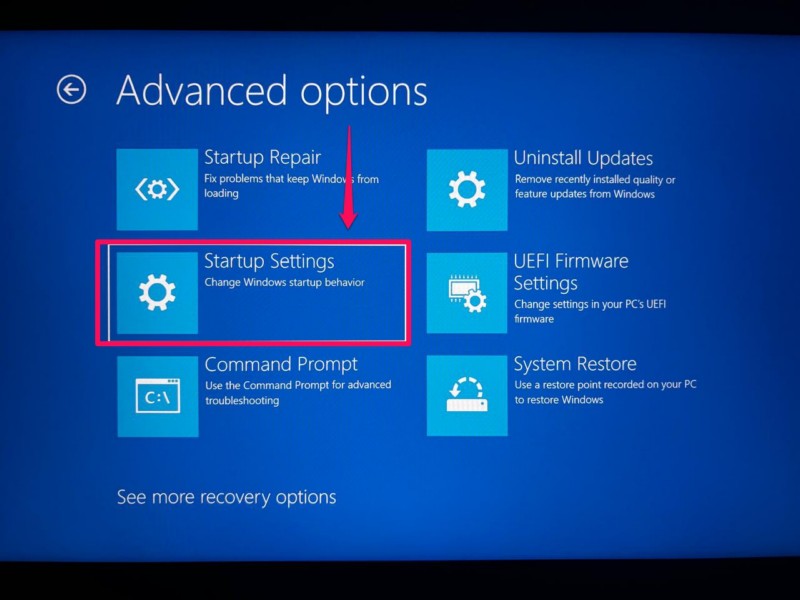
3. Once your Windows 11 PC or laptop boots up with the Advanced startup page, use your keyboard or mouse to open the Troubleshoot menu.
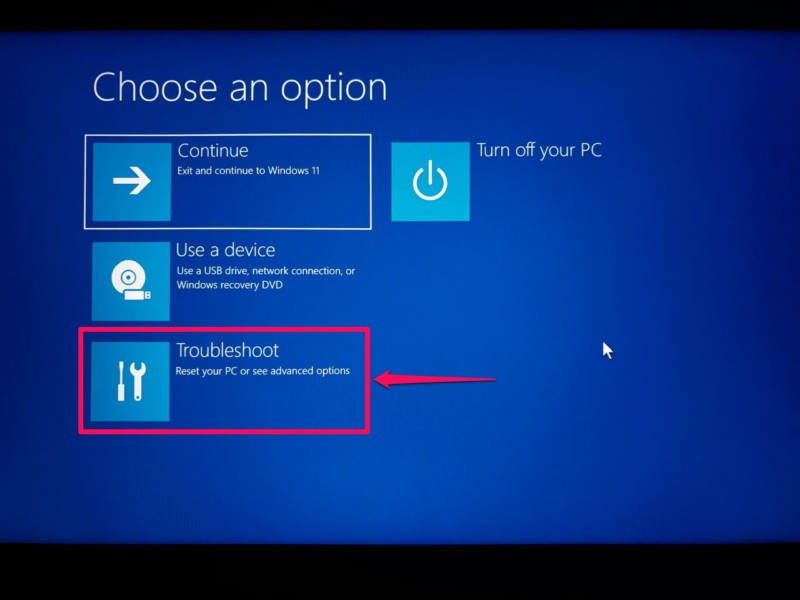
4. Open the Advanced options menu from the following screen.

5. Now, select and open the Startup Settings option.
6. On the following page, you will find a list of options, including the Safe Mode options. Here, select the Enable Safe Mode with Networking option.
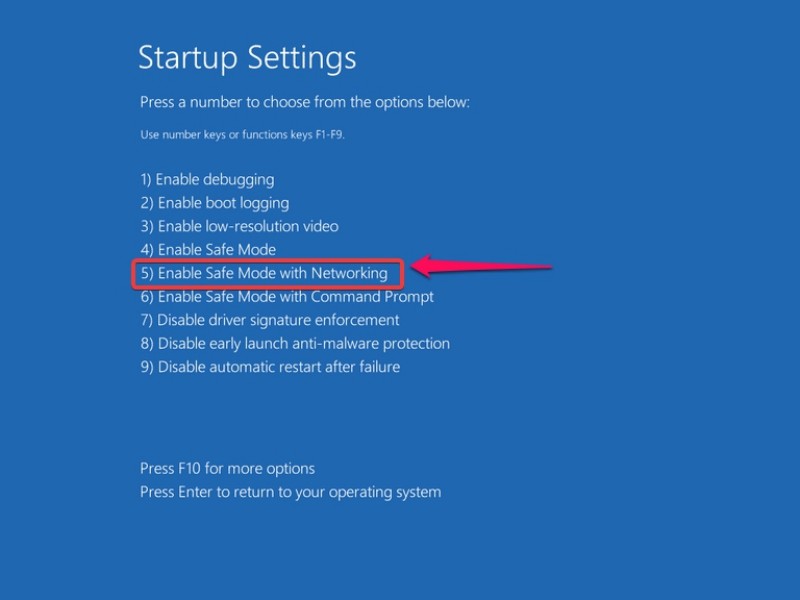
7. Wait for your Windows 11 PC or laptop to restart.
Following the restart, if your device starts up with the Windows sign in page, it is a good sign. Now, you can sign into your Windows 11 PC or laptop and perform some specific tasks that could eliminate the error code 0xc0000221 once and for all. For starters, you can try uninstalling the apps and programs that you recently installed to check if that resolves the issue. However, if your device does not start even in Safe Mode, you might need to take it to a professional technician or service center for a full diagnostic.
3. Use System Restore on Windows 11
If your Windows 11 PC or laptop boots up with/without the Safe Mode and you are unsure which of the third-party apps might be causing the error code 0xc0000221 to generate, you can try using the System Restore tool. By using the System Restore tool, you can leverage a previously-created restore point to restore your Windows 11 PC or laptop to a time when the system was not generating the error code 0xc0000221.
However, it is worth noting that you might lose some apps and data that were not present when the System Restore point was created. With that being said, you can follow the steps right below to use System Restore on your Windows 11 PC or laptop:
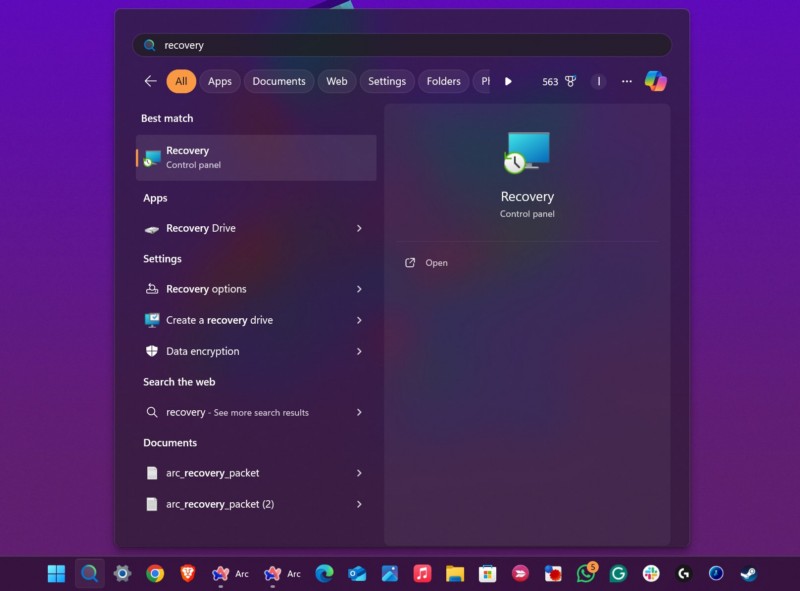
1. Use Windows + S to invoke Windows search.
2. Type in Recovery in the provided text field and click the same on the search results page.
3. Within the following Control Panel window, click the Open System Restore button.
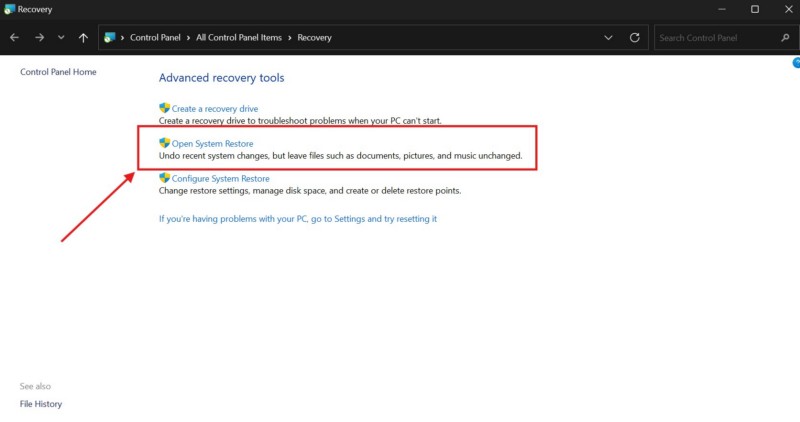
4. Follow the on-screen instructions to restore your Windows 11 PC or laptop.
After the process is completed, your device should reboot and operate without generating the BSOD error code 0xc0000221.
4. Use Disk Cleanup on Windows 11
The next thing you can do to avoid getting the error code 0xc0000221 on your Windows 11 PC or laptop is to use the Disk Cleanup tool. As mentioned earlier, the error code 0xc0000221 can be a result of issues with the memory system of your device, and if that is indeed the case, the Disk Cleanup tool can help you get rid of it. The built-in tool on Windows 11 lets users remove unnecessary files and data from within a selected disk drive that might be causing system issues such as generating the error code 0xc0000221.
So, follow the steps right below to use the Disk Cleanup tool on your Windows 11 PC or laptop and check if it resolves the error code 0xc0000221:
1. Press Windows + S to invoke Windows search and type in Disk Cleanup in the provided text field.
2. Click the Disk Cleanup tool to open it on your device.
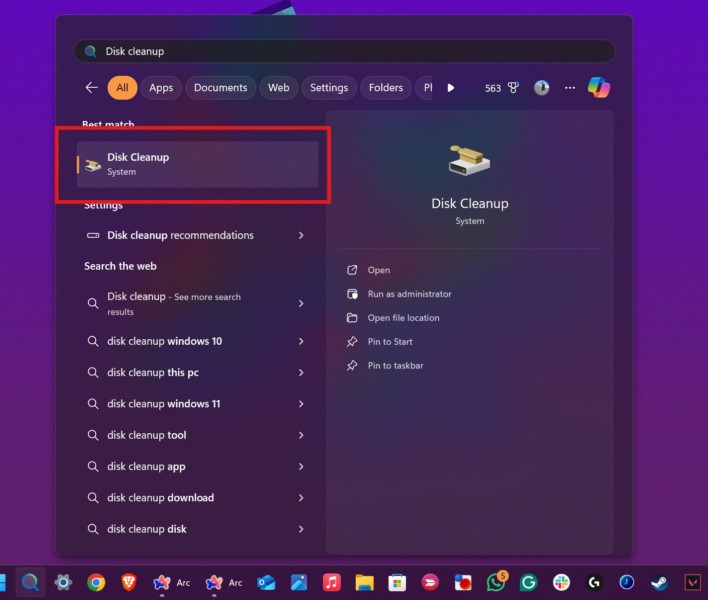
3. Next, select the disk drive upon which you want to run the Disk Cleanup tool. We’d recommend you select your primary drive, where the Windows system is installed, which is generally marked as OS: (C).

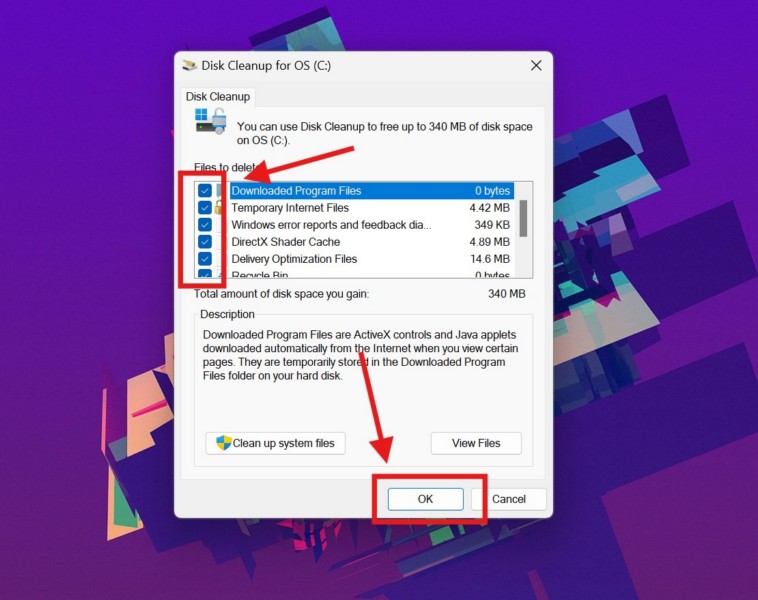
4. In the following window, click the checkboxes for all the options and make sure they are all checked.
5. Finally, click the OK button right below to run the Disk Cleanup tool and remove all the unwanted files and data.
After running the Disk Cleanup tool, restart your Windows 11 PC or laptop and check whether or not the error code 0xc0000221 shows up on reboot.
5. Use CHKDSK on Windows 11
Another handy tool that you can use to check your primary disk drive and remove unwanted issues that might be causing the error code 0xc0000221 to generate on Windows 11 is the CHKDSK command-line utility. It is a nifty tool that can detect and eliminate errors from within the disk drive where the Windows system is installed on your Windows 11 PC or laptop.
So, follow the steps right below to use the CHKDSK tool on your device and see if it helps in resolving the error code 0xc0000221:
1. Use Windows + S to open Windows search.
2. Type in cmd in the search box and click the Run as administrator button for the Command Prompt tool on the search results page.

3. Click Yes on the following User Account Control (UAC) prompt.
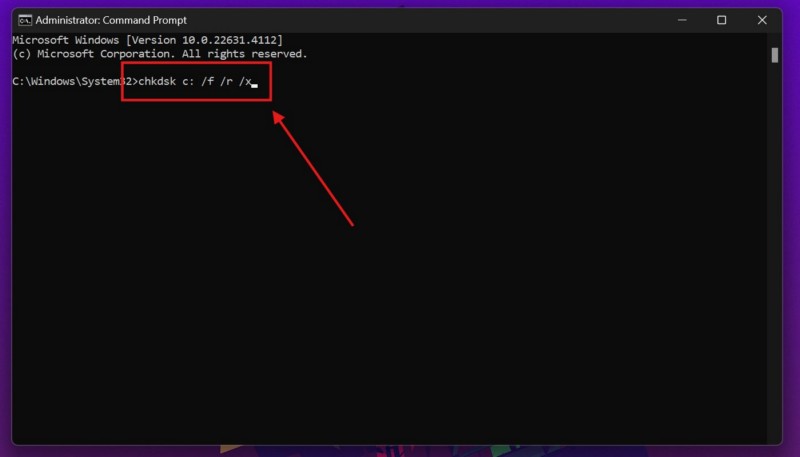
4. In the elevated Command Prompt window, type in or copy-paste the following command and press Enter to execute it:
chkdsk c: /f /r /xNote: If the Windows 11 OS is installed in any drive other than the C drive on your PC or laptop, replace the “c” with the letter associated with that specific drive in the above command.
5. After the command executes in the Command Prompt window, close it and restart your Windows 11 PC or laptop.
When your device restarts, check if you are getting the error code 0xc0000221 along with the BSOD or not.
6. Run SFC Scan on Windows 11
Apart from issues within the memory components of your Windows 11 PC or laptop, the error code 0xc0000221 can also generate due to issues with system files within the system file directory. In that case, you can rely on the trusty System File Checker (SFC) scan command-line utility that checks the system file directory and replaces missing or corrupted system files.
So, follow the steps right below to run the SFC scan on your Windows 11 PC or laptop and check if it resolves the error code 0xc0000221:
1. Use steps 1-3 from the previous section (Fix #5) to open an elevated Command Prompt window on your Windows 11 PC or laptop.
2. Within the Command Prompt window, type in or copy-paste the following command and press the Enter key to run it:
sfc /scannow
3. Wait for the command to execute on your device.
4. After it is done, restart your PC or laptop.
Following the restart, you should not get the error code 0xc0000221 if the said error was being generated due to issues with system files on your Windows 11 device.
7. Run DISM Scans on Windows 11
One other command-line utility that you can use to eliminate the error code 0xc0000221 on Windows 11 PCs and laptops is the DISM scans. Much like the SFC scan, the Deployment Image Servicing and Management (DISM) scans, is a group of scans that checks the disk images of the Windows system and resolves the issues with them.
So, if the SFC scan did not help in resolving the error code 0xc0000221 on your Windows 11 PC or laptop, try running the DISM scans using the following steps:
1. Use steps 1-3 from Fix #5 to open an elevated Command Prompt window on your device.
2. Now, type in or copy-paste the following commands in the Command Prompt window and press Enter to run them one by one:
DISM /Online /Cleanup-Image /CheckHealthDISM /Online /Cleanup-Image /ScanHealthDISM /Online /Cleanup-Image /RestoreHealthNote: Do NOT run the above commands simultaneously in Command Prompt. Run them one after the other in the same order.

3. Wait for all the commands to execute.
4. Following completion, restart your Windows 11 PC or laptop.
After your device reboots, check whether or not you are getting the BSOD error code 0xc0000221.
8. Use Windows Memory Diagnostic Tool on Windows 11
The Windows Memory Diagnostic tool is yet another built-in tool on Windows 11 that can help in resolving issues within the memory system of your PC or laptop that might be triggering the error code 0xc0000221. So, follow the steps right below to run the Windows Memory Diagnostic tool on your device and check if it eliminates the BSOD error that you are currently encoutering:
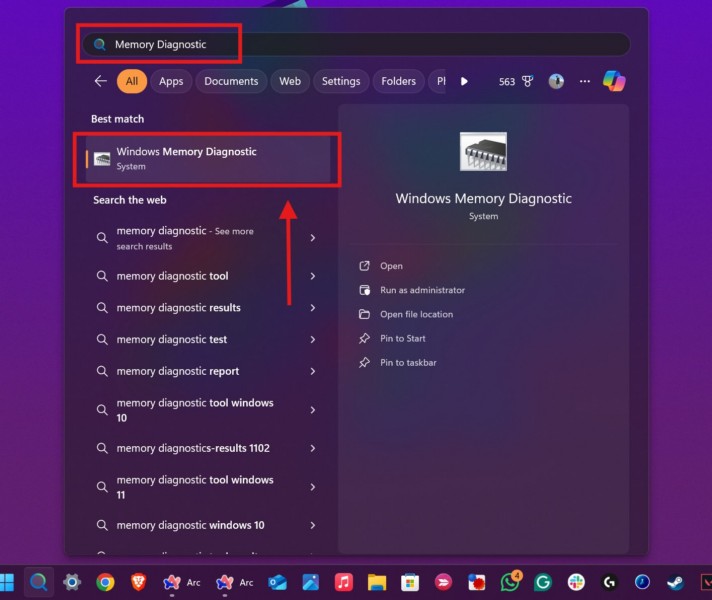
1. Use Windows + S to open Windows search or click the Magnifier button on the Taskbar of your Windows 11 PC or laptop.
2. Search for the Windows Diagnostic Tool and click the same on the search results page.
3. On the following prompt, click the Restart now and check for problems (recommended) option.
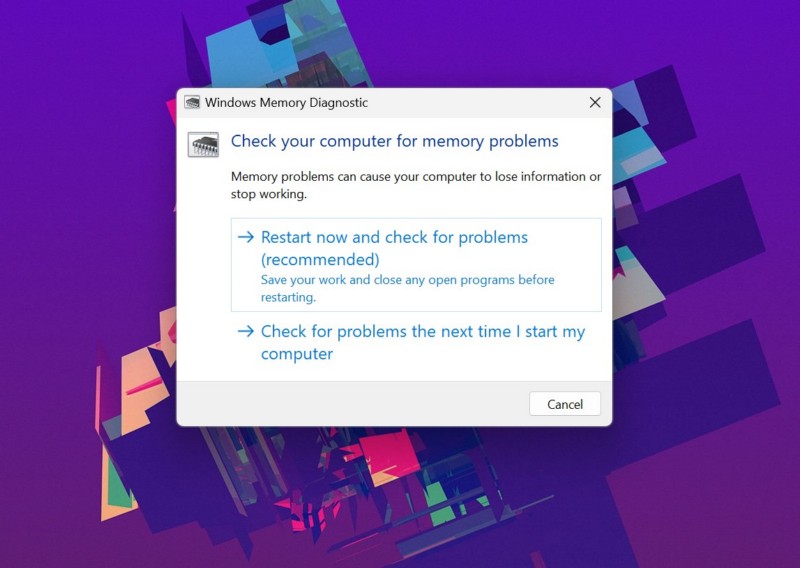
Note: Make sure to save your work on your PC or laptop before hitting the Restart button.
4. Wait for the tool to run the diagnostic process and for your device to reboot.
After your device restarts, check if the BSOD error code 0xc0000221 generates or not.
9. Reset Your Windows 11 PC or Laptop
Now, the last thing you can do to try and eliminate the BSOD error code 0xc0000221 on your Windows 11 PC or laptop is to completely reset the device. Resetting your Windows 11 PC or laptop will remove all your apps and data and reinstall the Windows system with all its default settings and configurations. Furthermore, it could take a long time to completely reset your computer.
So, keeping all that in mind, you can follow the steps right below to reset your Windows 11 device and check if that eliminates the BSOD error code 0xc0000221:
1. Use Windows + I to open the Windows Settings app on your PC or laptop.
2. Under the System tab on the left navigation bar, click the Recovery option on the right pane.

3. On the following page, click the Reset PC button under the Recovery options section to initiate the process.
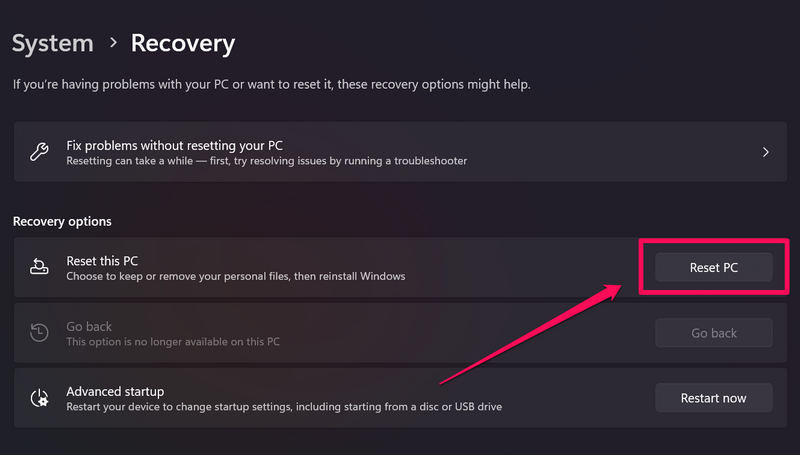
4. Follow the on-screen instructions to reset your device.
After the reset process is completed on your PC or laptop, the Windows OS will be reinstalled with the latest Windows 11 update and all your apps and data will be removed. So, set up and configure your computer as per your preference, and check whether or not get the BSOD error code 0xc0000221 while using it. At this stage, you should not get the said error anymore.
FAQs
What is error code 0xc0000221 on Windows 11?
The error code 0xc0000221 on Windows 11 PCs and laptops usually indicates issues within the system file directory or within the memory components of the computer. However, in rare cases, the said error can also arise due to insufficient power supply, a failing hardware component, or loose connections of the internal components.
How can I fix the error code 0xc0000221 on Windows 11?
When you encounter the error code 0xc0000221 on your Windows 11 PC or laptop, you can boot your device in safe mode and execute a few troubleshooting methods to eliminate the error. These include removing questionable programs, running the SFC and DISM scans, using the CHKDSK tool, and resetting the device.
Why can’t I start my Windows 11 PC or laptop for error code 0xc0000221?
The error code 0xc0000221 is one of the Blue Screen of Death errors that makes a PC or laptop completely inoperable. To bypass the error and get to the Windows sign in screen on your Windows 11 PC or laptop, you can try booting your device in safe mode or using System Restore from the Advanced startup options.
Wrapping Up
That brings us to the end of our comprehensive guide on how to fix the error code 0xc0000221 on Windows 11 PCs and laptops. The BSOD error 0xc0000221 one of the serious errors for Windows users as it indicates issues with hardware components and system files. So, if you fail to resolve the issue using the above fixes and suggestions, we recommend taking your PC or laptop to a service center.
However, if the above methods do help you in eliminating the error code 0xc0000221 on your Windows 11 device, don’t forget to let us know in the comments below. You can also subscribe to our website and YouTube channel to get updates about all our latest articles and videos. As always, thank you for reading this guide till the very end, and we will see you again in our next guide.
Introduction
Encountering the error code 0xc0000221 after a Windows update can be alarming, particularly when it disrupts your computer’s boot process. This error generally signals issues with corrupted files, hardware, or driver incompatibilities. While it may seem complex at first glance, the error is solvable with the right steps. This article will delve into the reasons behind the issue and provide a comprehensive guide to resolve it.
Overview of Error Code 0xc0000221
This error is associated with the Windows Boot Manager and typically appears as a Blue Screen of Death (BSOD). It’s a critical stop error that prevents Windows from loading properly. The message often reads something like:
“Your PC needs to be repaired. A required device isn’t connected or can’t be accessed.”
Why Does This Error Occur After Windows Updates?
Incompatible Updates: Sometimes, updates conflict with system files or drivers, leading to boot errors.
Corrupted Installation: Interrupted updates or power failures during installation may corrupt the Windows boot process.
Driver Issues: Outdated or incompatible drivers often cause problems after system updates.
Hardware Failures: Errors in hardware components like RAM, HDD, or SSD can trigger this code.
What Does Error Code 0xc0000221 Signify?
At its core, the error suggests a failure in the startup process due to missing, corrupted, or incompatible system files. The Boot Configuration Data (BCD), essential for booting, might be corrupted.
Common Scenarios for This Error
- During the first boot after a major Windows update.
- Following a sudden shutdown or power outage during an update.
- When upgrading from an older version of Windows to a newer one.
- Due to aging or failing hardware components.
Preliminary Steps Before Troubleshooting
Before jumping into fixes for the error code 0xc0000221, it’s crucial to take some preparatory steps. These ensure that your data is safe and minimize the risk of complications during troubleshooting.
1. Back Up Your Data
If your system can still boot into Safe Mode or access recovery options, prioritize backing up critical files.
Use these methods:
External Storage: Copy essential files to an external drive.
Cloud Services: Utilize platforms like OneDrive, Google Drive, or Dropbox.
Windows Backup Tool: Use the built-in backup feature:
Go to Control Panel > Backup and Restore (Windows 7).
Select “Set up backup” to back up files to an external location.
If the system won’t boot, consider creating a bootable USB drive with recovery software to retrieve files.
2. Ensure Power Stability
Unstable power can cause interruptions during troubleshooting, leading to further issues.
Plug the device into a UPS (Uninterruptible Power Supply) or ensure a stable power connection.
Avoid starting the process during potential power outages.
3. Access Troubleshooting Tools
Prepare to access recovery tools. You’ll need either the Windows installation media or recovery drive. If you don’t have one:
Download the Windows Media Creation Tool from Microsoft’s website.
Use the tool to create a bootable USB drive or DVD.
Key Fixes for Error Code 0xc0000221
1. Restart Your PC in Safe Mode
Safe Mode allows Windows to load with minimal drivers and services, often bypassing the issue.
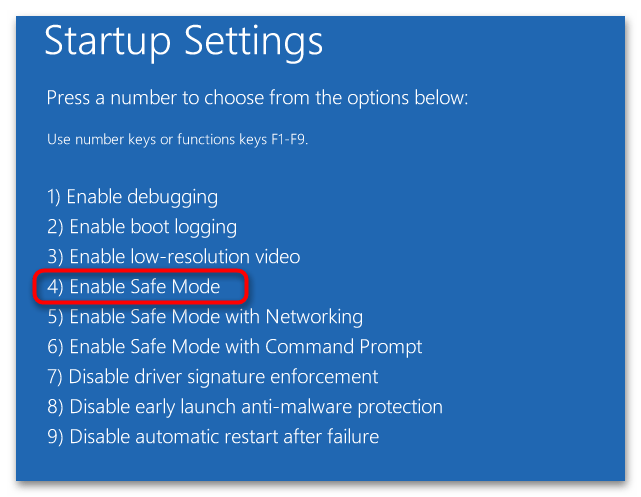
Steps for Windows 10/11:
Power on your PC and hold the Power button to force shutdown when the logo appears. Repeat this 3 times to trigger Automatic Repair Mode.
Go to Advanced Options > Startup Settings > Restart.
Press 4 or F4 to boot into Safe Mode.
If Safe Mode works, it indicates the issue is related to drivers or recent changes rather than hardware.
2. Run Startup Repair
Windows Startup Repair is a built-in utility that resolves common boot errors.
Steps to Access Startup Repair:
Boot your system using the installation media or recovery drive.
Select Repair Your Computer > Troubleshoot > Advanced Options > Startup Repair.
Choose the operating system you want to repair and let the tool run.
Startup Repair automatically checks for and fixes issues in boot configuration files.
3. Perform a System File Check (SFC) and DISM Scan
Corrupted system files are a primary cause of error code 0xc0000221. Running SFC and DISM scans can restore missing or damaged files.
Run SFC (System File Checker):
Open Command Prompt from recovery options or Safe Mode.
Type:sfc /scannow
Press Enter and wait for the scan to complete.
Run DISM (Deployment Image Servicing and Management):
In Command Prompt, type:
DISM/Online/Cleanup-Image/RestoreHealth
Press Enter to repair the system image.
These commands help ensure Windows is free from file corruption.
4. Uninstall Faulty Updates
Recent updates can sometimes be the root of the issue. Removing problematic updates may resolve the error.
Steps to Uninstall Updates:
Boot into Advanced Startup Options using recovery media.
Navigate to Troubleshoot > Advanced Options > Uninstall Updates.
Choose to uninstall the latest quality update or latest feature update.
Once removed, test if the issue persists
Advanced Fixes for Error Code 0xc0000221
If preliminary troubleshooting doesn’t resolve the issue, advanced methods may be necessary to address the root cause of error code 0xc0000221. Let’s explore these in detail.
1. Update or Reinstall Drivers
Outdated or incompatible drivers can cause system instability, especially after updates. Ensuring all drivers are updated can prevent such errors.
Identify Problematic Drivers:
Boot into Safe Mode.
Open Device Manager by pressing Win + X and selecting it.
Look for devices with a yellow warning icon.
Update Drivers:
Right-click the problematic driver and select Update Driver.
Choose Search Automatically for Updated Driver Software.
If updates are unavailable, download the latest drivers from the manufacturer’s website.
Reinstall Drivers (if updates fail):
Uninstall the driver by right-clicking it in Device Manager and selecting Uninstall Device.
Restart your PC. Windows will attempt to reinstall the necessary driver automatically.
2. Check and Fix Disk Errors
Hard disk or SSD errors are another common cause of this boot issue. Use the CHKDSK utility to detect and fix disk errors.
Steps to Run CHKDSK:
Boot into recovery mode and open Command Prompt.
Type the following command:chkdsk C: /f /r
Replace C: with the appropriate drive letter if your Windows installation is on a different partition.
Press Enter. The tool will scan for bad sectors and attempt to fix them.
3. Restore System to a Previous Point
If the error occurred after a recent change, using System Restore can revert the system to a previous, stable state.
Steps to Use System Restore:
Boot into Advanced Options using recovery media.
Navigate to Troubleshoot > Advanced Options > System Restore.
Choose a restore point from before the error occurred.
Note: System Restore doesn’t affect personal files but will remove apps or updates installed after the chosen restore point.
4. Rebuild Boot Configuration Data (BCD)
Damaged or corrupted BCD files can lead to boot errors like 0xc0000221. Rebuilding the BCD often resolves such issues.
Steps to Rebuild BCD:
Boot into recovery mode and open Command Prompt.
Type the following commands one at a time, pressing Enter after each:bootrec /fixmbr bootrec /fixboot bootrec /scanos bootrec /rebuildbcd
Restart your system after the process completes.
5. When to Reinstall Windows
If all else fails, reinstalling Windows may be the only viable solution. This can resolve deep-seated software issues.
Signs You Need a Reinstallation
- Multiple attempts at repair have failed.
- Critical system files are irreparably corrupted.
- You suspect malware or severe registry damage.
Steps for a Clean Installation
- Back up all important data if you haven’t already.
- Create a bootable USB drive using the Windows Media Creation Tool.
- Boot from the USB drive and select Install Now.
- Choose Custom Installation and format the drive where Windows is installed.
- Follow the on-screen instructions to complete the process.
Preventing Error Code 0xc0000221 in the Future
To minimize the chances of encountering this error again:
- Maintain Regular Backups: Use external drives or cloud storage to protect your data.
- Keep Drivers and Windows Updated: Regularly check for updates to ensure compatibility.
- Monitor Hardware Health: Use tools like CrystalDiskInfo to check disk health and replace failing components promptly.
- Use Reliable Power Sources: Invest in a UPS to protect your system from power interruptions.
- Employ Security Software: Keep malware and viruses at bay with reputable antivirus programs.
Conclusion
Error code 0xc0000221 can be daunting, but following these steps systematically will likely resolve the issue. From basic troubleshooting to advanced repairs, this guide has outlined a comprehensive approach to fixing the problem. If all else fails, a clean Windows installation ensures a fresh start. Prioritize preventive measures to avoid similar errors in the future, ensuring a smoother computing experience