
Сообщение о том, что с установкой некоторых обновлений возникли проблемы с кодом ошибки 0x80248007 в Центре обновлений — одна из самых распространённых ситуаций, с которыми сталкиваются пользователи Windows 11 и Windows 10. Чаще всего происходит при установке обновлений драйверов устройств и Microsoft Defender, но возможны и иные варианты.
Как правило, решение оказывается простым и описанные далее методы исправить ошибку 0x80248007 при установке обновлений обычно срабатывают.
Очистка кэша обновлений и перезапуск служб, необходимых для установки обновления
Первый метод, возможно, не самый простой для начинающего пользователя, но самый действенный для рассматриваемой ситуации, в большинстве случаев помогающий исправить ошибку 0x80248007. Необходимые шаги:
- Закройте окно с центром обновлений.
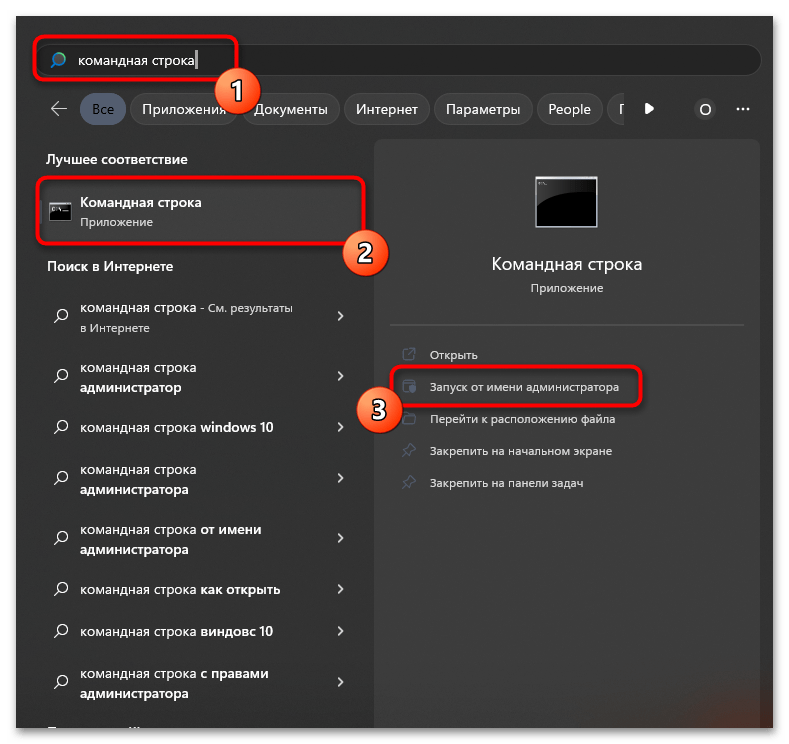
- Запустите командную строку от имени администратор. Для этого в поиске на панели задач можно начать набирать «Командная строка», затем нажать правой кнопкой мыши по найденному результату и выбрать пункт «Запуск от имени администратора» в контекстном меню. Другие способы запустить командную строку от имени администратора.
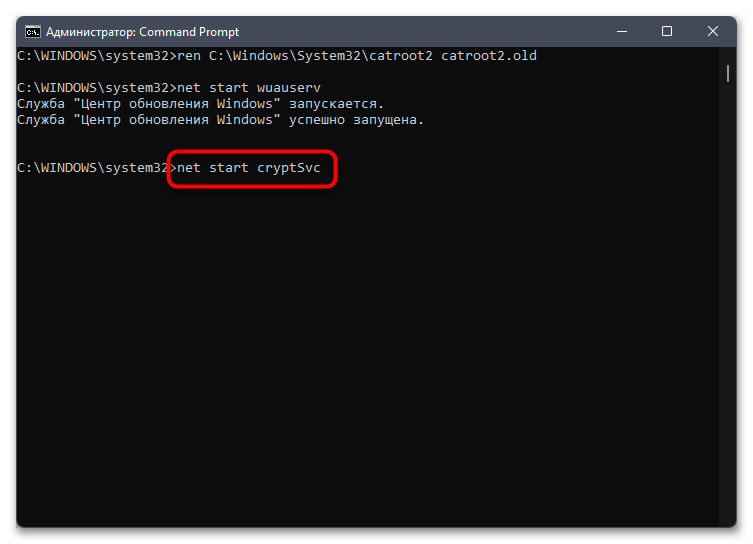
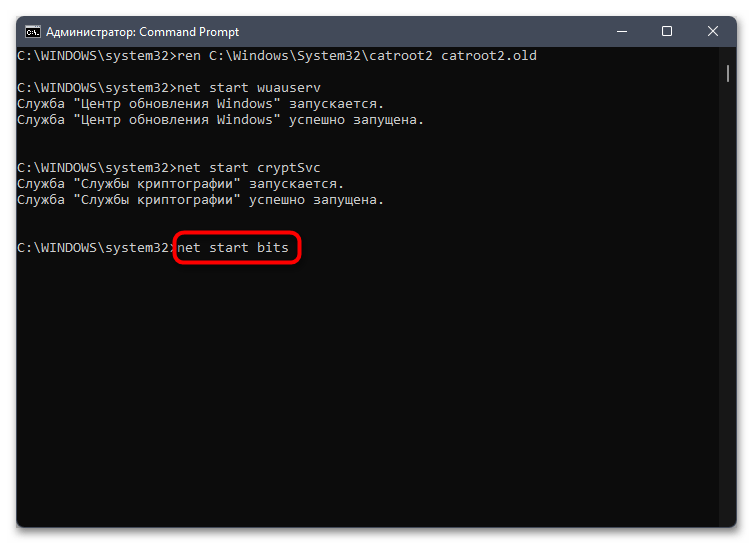
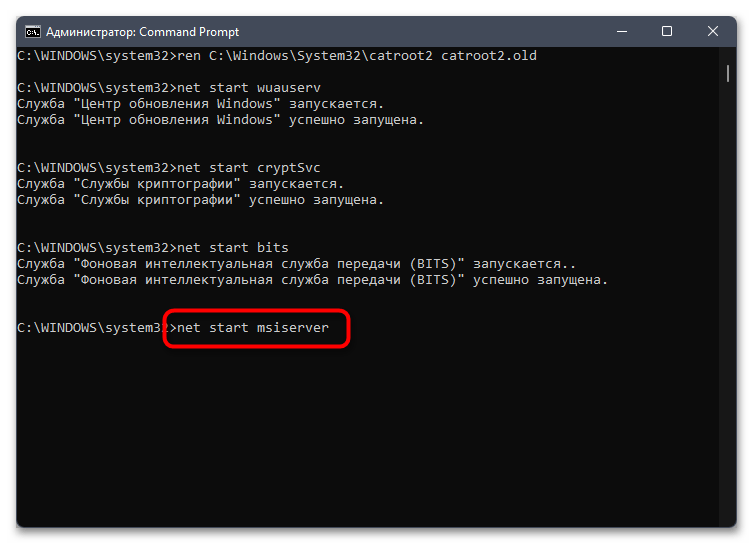
- По порядку введите следующие команды, нажимая Enter после каждой. При выполнении некоторых из первых четырёх команд вам могут сообщить, что «служба не запущена» — это нормально.
net stop wuauserv
net stop cryptSvc
net stop bits
net stop msiserver
ren C:\Windows\System32\catroot2 catroot2.old
ren C:\Windows\SoftwareDistribution SoftwareDistribution.old
net start wuauserv
net start cryptSvc
net start bits
net start msiserver

- Закройте командную строку, снова зайдите в Центр обновлений Windows 11 или Windows 10, выполните повторный поиск обновлений и их установку.

Обычно этот способ срабатывает, и установка обновлений проходит без сообщений об ошибке.
Обратите внимание: после выполнения указанных команд, если всё прошло успешно, и система работает исправно, следует удалить две ненужных папки, которые мы оставили в качестве резервных копий на случай, если что-то пойдёт не так — C:\Windows\System32\catroot2.old и C:\Windows\SoftwareDistribution.old.
Дополнительные методы исправить ошибку
Если предыдущий способ не помог решить проблему, попробуйте следующие шаги, чтобы исправить ошибку 0x80248007:
- Используйте встроенное устранение неполадок обновлений. В Windows 11 его можно найти в Параметры — Система — Устранение неполадок — Другие средства устранения неполадок — Центр обновления Windows. В Windows 10: Параметры — Обновление и безопасность — Устранение неполадок (в списке слева) — Дополнительные средства устранения неполадок — Центр обновления Windows.

- Если по какой-то причине вы не можете получить доступ к устранению неполадок в интерфейсе Параметров, то же средство устранения неполадок Центра обновлений можно скачать с сайта Майкрософт как отдельный файл: https://aka.ms/wudiag

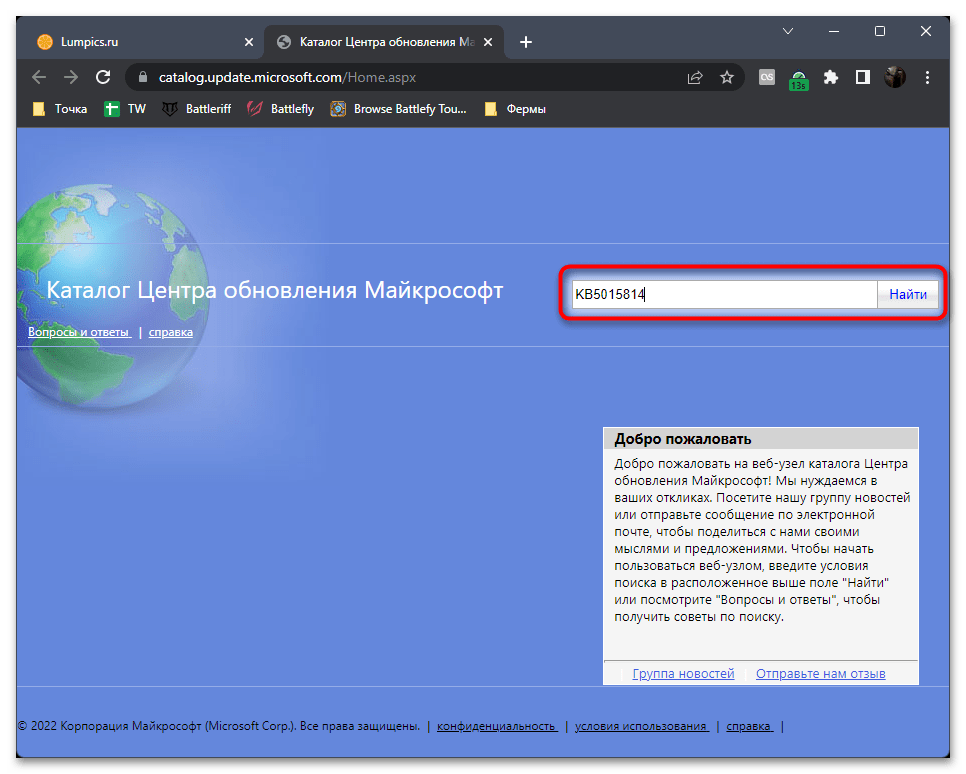
- Скачиваемые Windows обновления можно скачать и вручную, достаточно выполнить поиск по их номеру KB в официальном каталоге обновлений и выполнить загрузку — https://www.catalog.update.microsoft.com/Home.aspx, после чего запустить скачанный файл. Попробуйте выполнить это с проблемным обновлением, это может решить проблему. Некоторые обновления при поиске в каталоге (в частности, обновления для Windows Defender) в списке поддерживаемых версий ОС указывают Windows 10, но не указывают Windows 11, при этом предназначены и для 11-й версии.
- Если ошибка возникает при установке обновления драйвера какого-либо устройства, можно скачать драйвер этого устройства с официального сайта производителя устройства (не исключено, что более новый) и его установка через центр обновлений не потребуется.
- В редких случаях проблему может вызвать сторонний антивирус, установленный на компьютере. При наличии сторонних антивирусных программ, попробуйте временно отключить их и повторить установку обновления.
- Выполните восстановление хранилища компонентов Windows и восстановление системных файлов. На эту тему:
- Восстановление хранилища компонентов Windows 11
- Восстановление целостности системных файлов Windows 11
- Восстановление хранилища компонентов Windows 10
- Восстановление системных файлов Windows 10
- Выполните проверку системного диска на ошибки с помощью команды chkdsk C: /f и убедитесь, что на системном разделе диска (диске C) достаточно свободного места.
- Для опытных пользователей: попробуйте использовать утилиту Reset Windows Update Tool.


Быстрая переустановка с исправлением системы и без удаления личных данных и программ
И последний вариант, представляющий собой, по сути, переустановку системы с обновлением всех системных файлов, но с сохранением текущих параметров и программ:
- Если у вас есть образ ISO с текущей системой, смонтируйте его в системе и запустите файл setup.exe — пройдите все этапы установки.

- При отсутствии образа, в случае Windows 11 — скачайте оригинальный образ и используйте 1-й шаг. В случае Windows 10 зайдите на страницу https://www.microsoft.com/ru-ru/software-download/windows10, нажмите «Скачать средство сейчас», запустите загруженную утилиту. На экране «Что вы хотите сделать?» оставьте выбранным пункт «Обновить этот компьютер сейчас» и следуйте дальнейшим указаниям программы установки.


При использовании этого способа после завершения процесса, в зависимости от версии установленной ОС, вам может пригодиться одна из следующих инструкций: Как удалить папку Windows.old, Как удалить папку Windows.old в Windows 11.
Все способы:
- Способ 1: Использование средства устранения неполадок
- Способ 2: Проверка настроек загрузки обновлений
- Способ 3: Проверка связанных служб
- Способ 4: Сброс ранее загруженных файлов
- Способ 5: Проверка целостности системных файлов
- Способ 6: Ручная установка проблемного обновления
- Способ 7: Использование скрипта для сброса «Центра обновления Windows»
- Способ 8: Сброс Windows до заводских настроек
- Вопросы и ответы: 0
Способ 1: Использование средства устранения неполадок
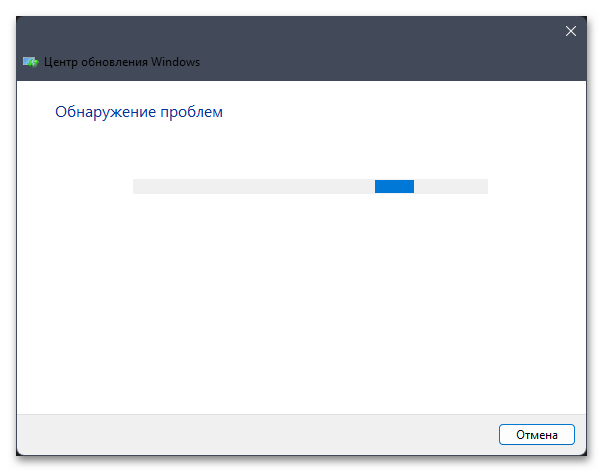
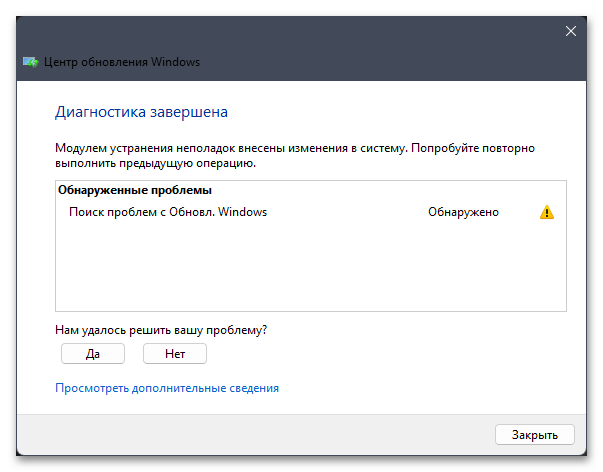
Ошибка скачивания с кодом 0x80248007 появляется в Windows 11 при попытке загрузить обновление. Один из самых простых методов ее решения заключается в использовании стандартного средства устранения неполадок. Этот инструмент проверяет основные службы и процессы, а также инициирует их запуск или перезагрузку, если это потребуется. Хоть сканирование не всегда помогает избавиться от проблемы, но запустить его точно стоит, поскольку это не займет много времени.
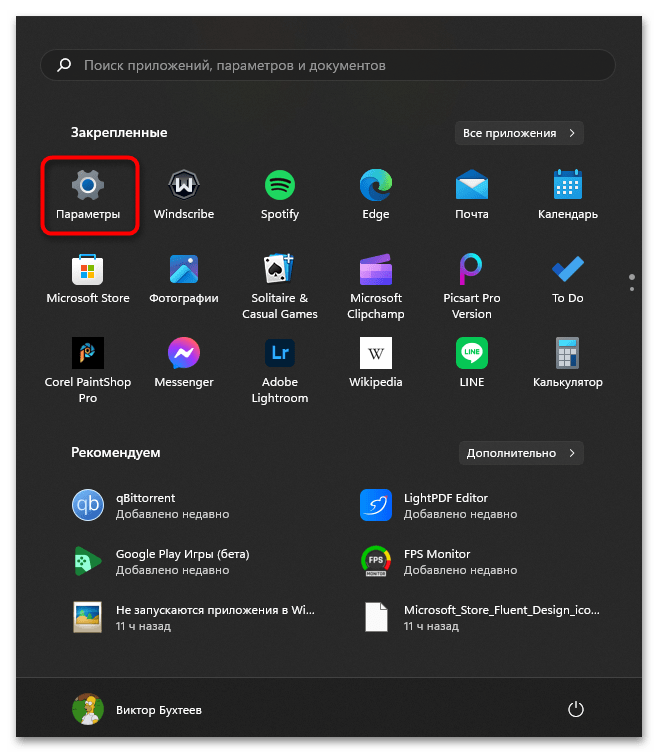
- Откройте «Пуск» и перейдите в «Параметры», кликнув по значку с изображением шестеренки.
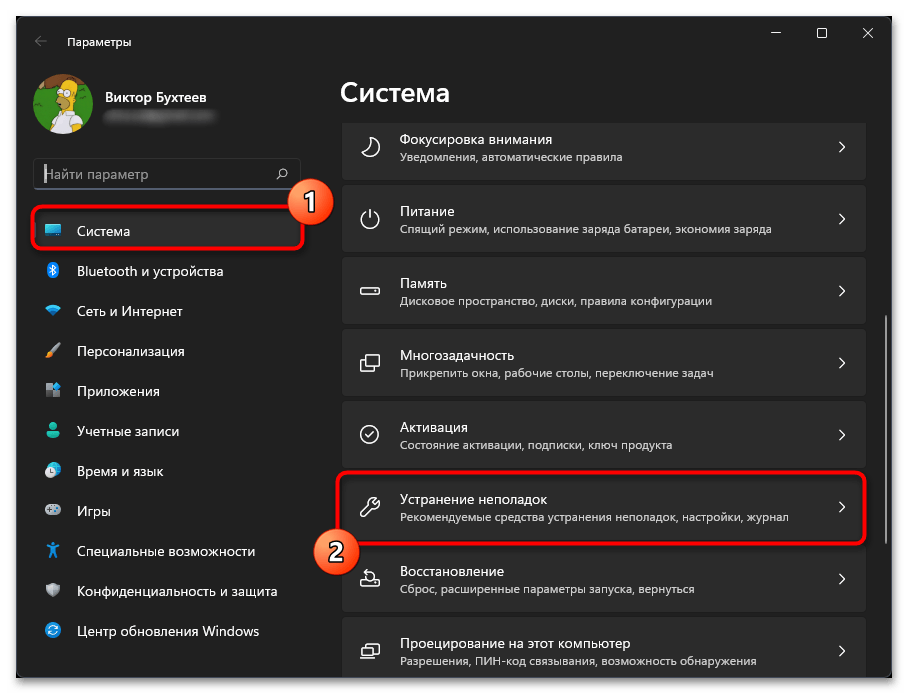
- На панели слева выберите раздел «Система», затем прокрутите список категорий справа и щелкните по «Устранение неполадок».
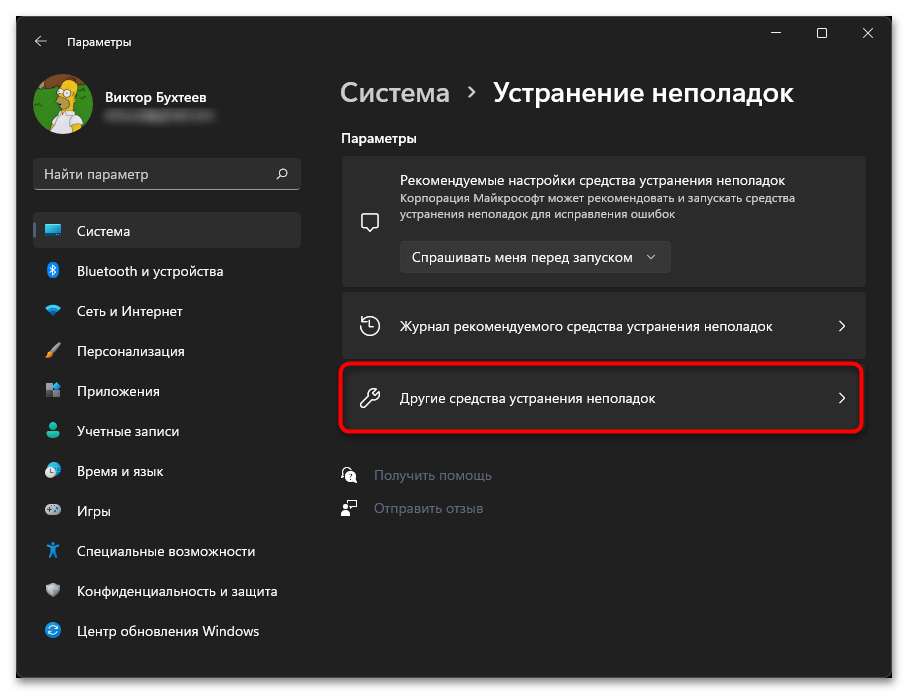
- В следующем окне понадобится нажать по «Другие средства устранения неполадок».
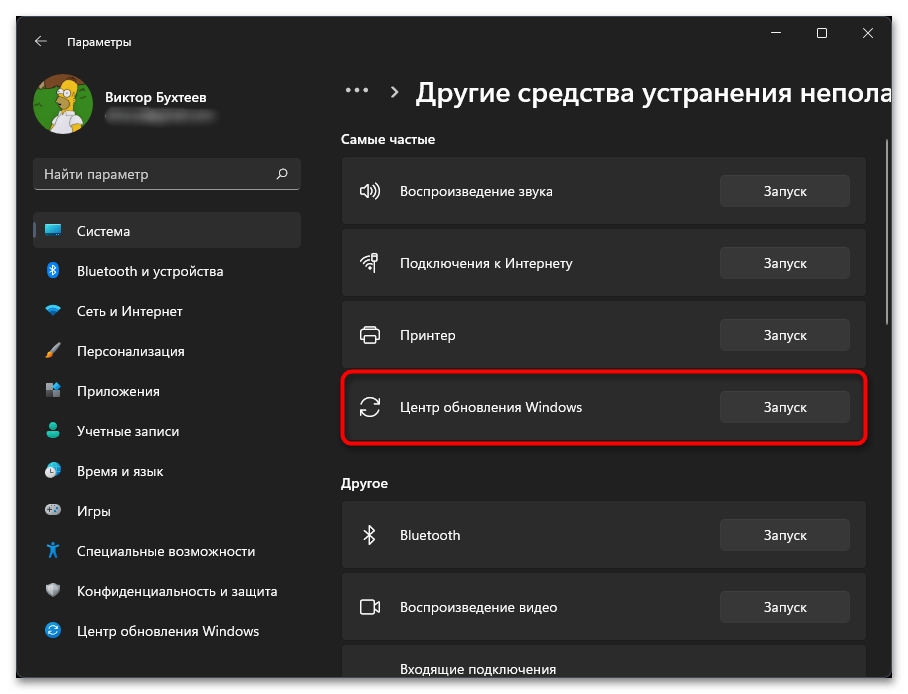
- Отыщите среди доступных «Центр обновления Windows» и запустите данное средство.
- Ожидайте окончания сканирования, что займет меньше минуты.
- В итоге на экране появится уведомление о том, были ли найдены какие-то проблемы и внесены ли изменения в ОС для их решения.
Способ 2: Проверка настроек загрузки обновлений
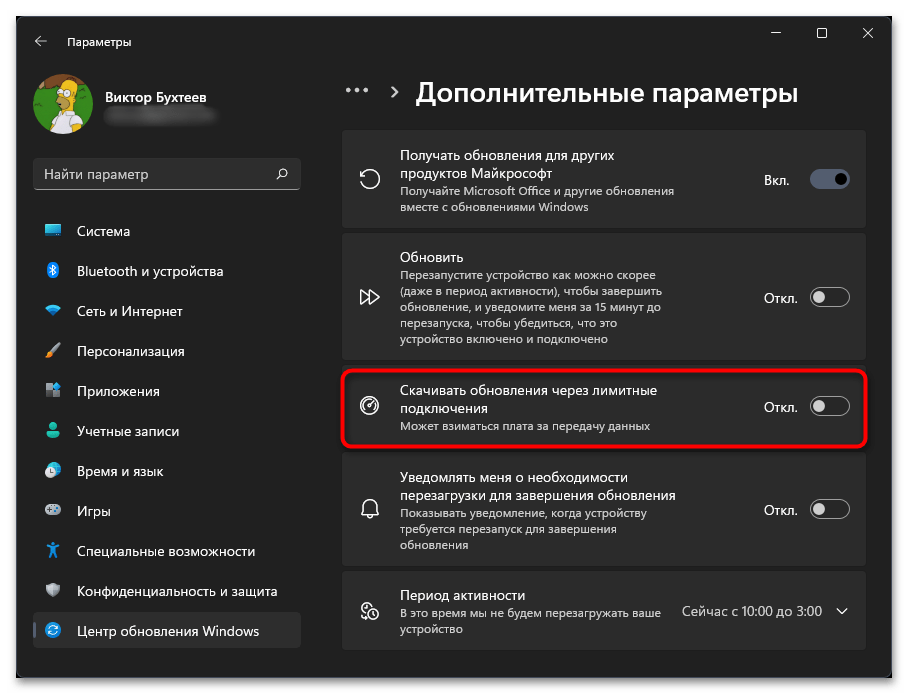
Если при попытке скачать апдейт в Виндовс 11 у вас появляется уведомление с кодом 0x80248007 и сам процесс прерывается, возможно, средство хочет загрузить обновление для компонентов Microsoft, что может быть запрещено через настройки, или почему-то у вас установлено ограничение на скачивание через лимитные подключения. Оба этих параметра проверяются через одно и то же меню, поэтому давайте быстро разберемся с ними в следующей инструкции.
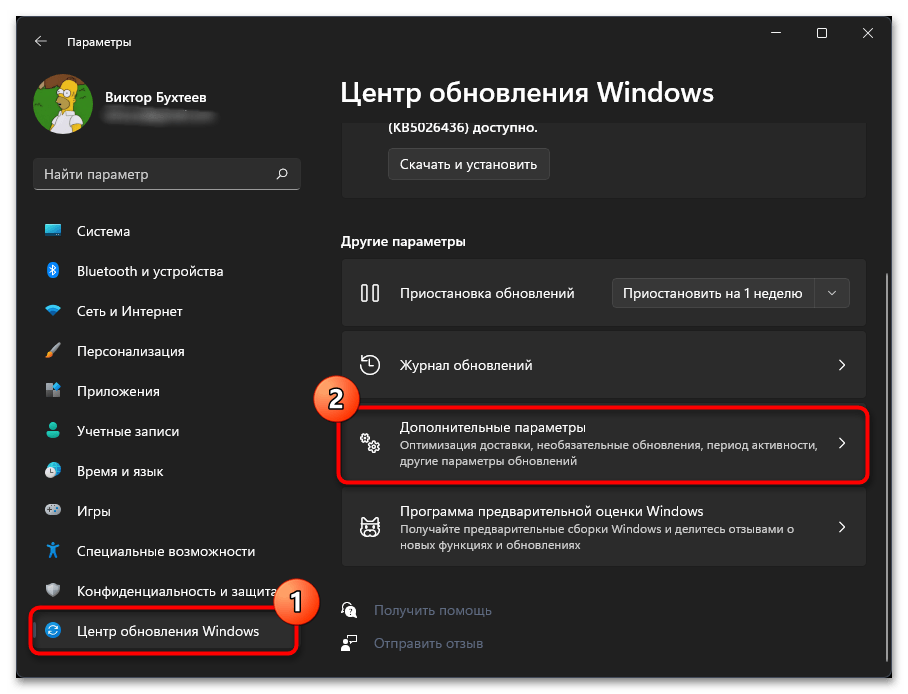
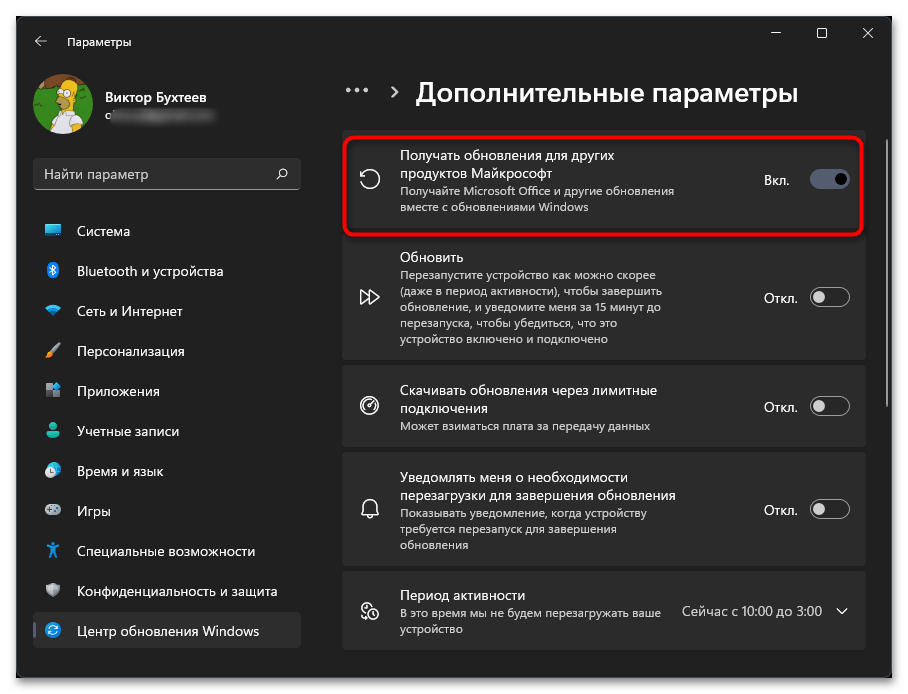
- В «Параметрах» на панели слева выберите «Центр обновления Windows», затем перейдите в «Дополнительные параметры».
- Активируйте настройку «Получать обновления для других продуктов Майкрософт».
- Затем ниже найдите «Скачивать обновления через лимитные подключения» и тоже включите данный параметр. После этого можете вернуться в «Центр обновления Windows» и повторно запустить загрузку апдейта.
Способ 3: Проверка связанных служб
За корректную загрузку и установку обновлений в Windows 11 отвечает сразу несколько важных служб. Все они должны находиться в соответствующем рабочем состоянии, чтобы при работе с апдейтами не возникало никаких ошибок, в том числе и рассматриваемой в этом материале. Вам понадобится вручную проверить данные службы и изменить их состояние, если оно отличается от требуемого.
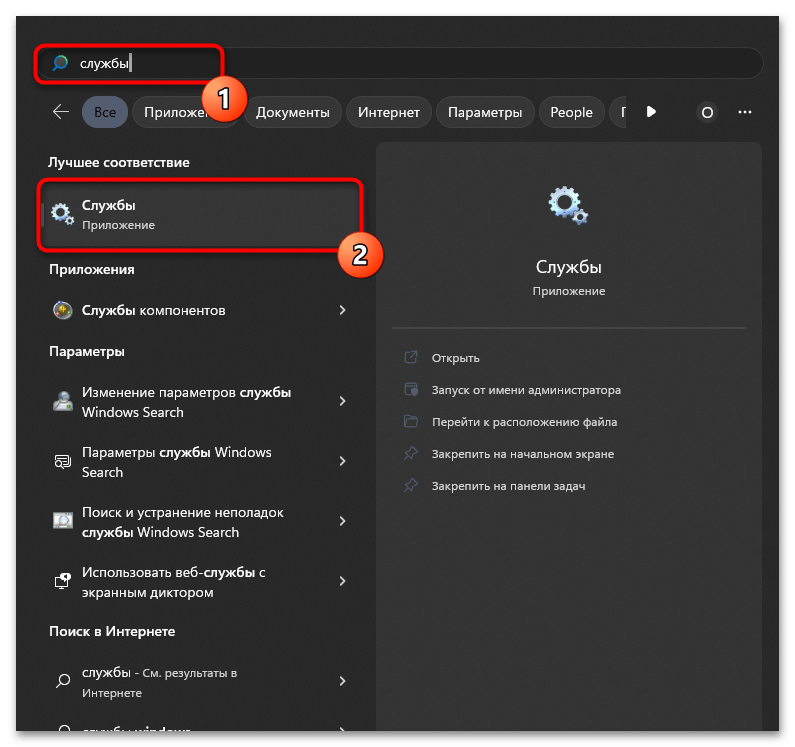
- Откройте «Пуск», через поиск найдите приложение «Службы» и запустите его.
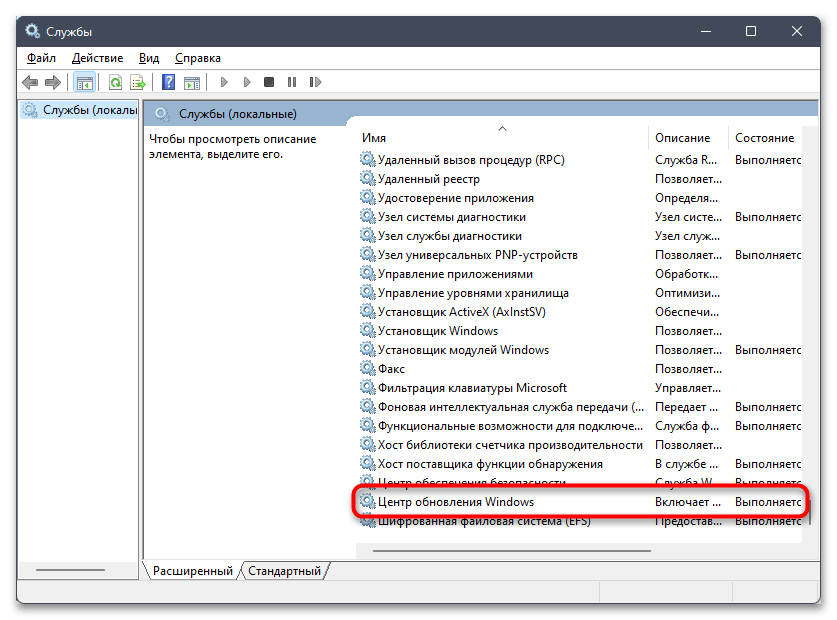
- В первую очередь найдите службу «Центр обновления Windows» и дважды щелкните по ней для проверки состояния.
- Служба должна запускаться автоматически, а также сейчас находиться в рабочем состоянии. Если это не так, поменяйте настройки и сохраните изменения.
- Далее проверьте службу «Службу Medic центра обновления Windows и установите ее тип запуска как «Вручную».
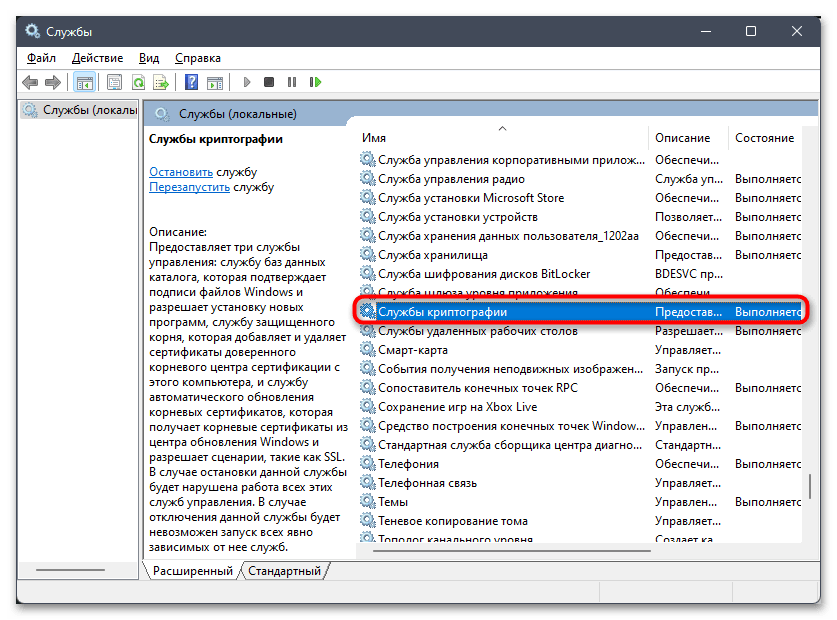
- На этом процесс взаимодействия с приложением не заканчивается, поскольку нужно проверить еще несколько компонентов. В списке отыщите «Службы криптографии» и тоже переведите службу в тип запуска «Вручную».
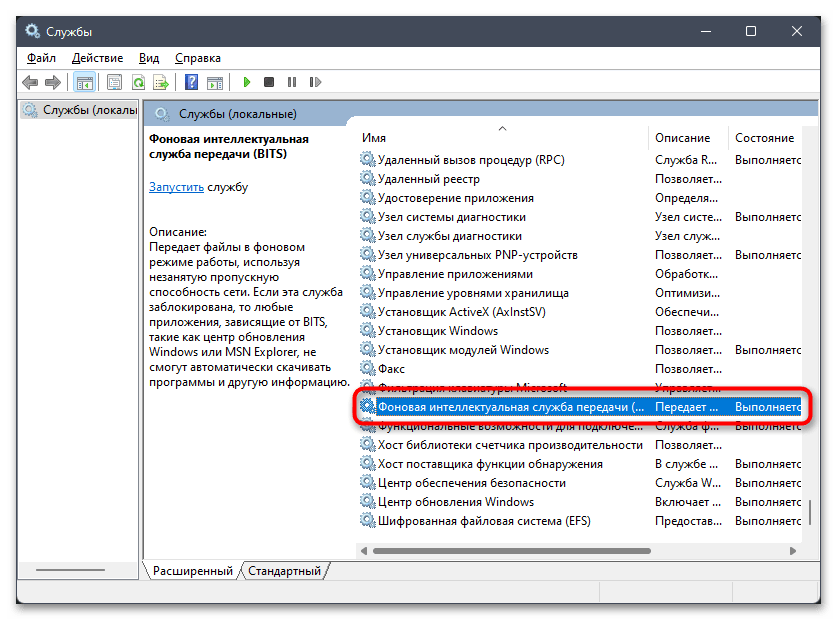
- Для «Фоновой интеллектуальной службы передачи (BITS)» установите значение «Автоматически».
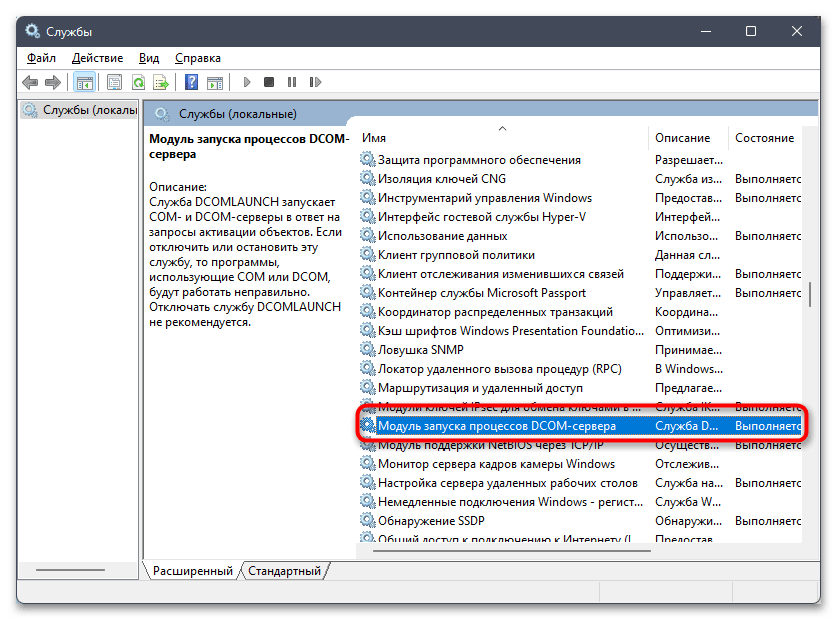
- «Модуль запуска процессов DCOM-сервера» — тоже «Автоматически».
- «Сопоставитель конечных точек RPC» — «Автоматически».
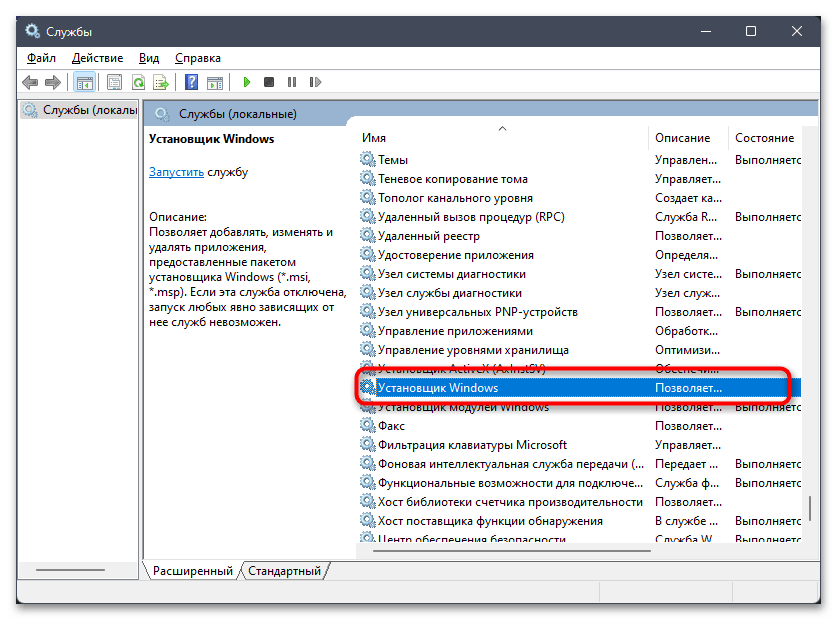
- Остается только отыскать «Установщик Windows» и выбрать тип запуска «Вручную», если сейчас данная служба почему-то запускается автоматически или вовсе отключена.


Нет ничего трудного в том, чтобы проверить каждую из представленных выше служб по названию и установить соответствующее состояние запуска. В этом вам помогут описания выше, а также представленные скриншоты, позволяющие более просто ориентироваться по списку компонентов. По завершении рекомендуется перезагрузить ПК, а уже потом заново запускать скачивание обновления и следить за тем, чтобы ошибка 0x80248007 не появилась снова.
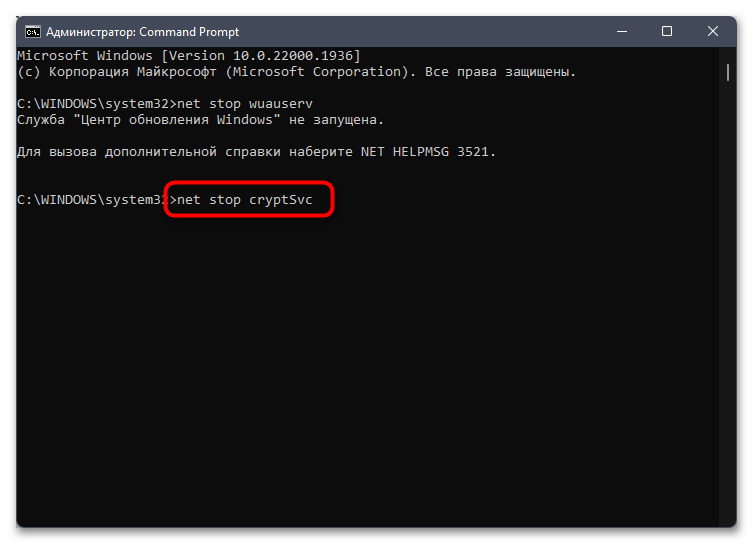
Способ 4: Сброс ранее загруженных файлов
Возможно, проблемы со скачиванием файлов обновления связаны с тем, что часть из них уже присутствует во временном хранилище и не может быть перезаписана или догружена, что и приводит к возникновению проблемы. Лучшим решением этой ситуации станет удаление этих файлов, чтобы все они скачались повторно с нуля. Для выполнения задачи понадобится обратиться к консоли, поскольку именно через нее можно быстрее всего отключить все службы, а затем удалить папки и их содержимое, чтобы не возникло никаких конфликтов.
- Отыщите через «Пуск» «Командную строку» и запустите ее от имени администратора.
- Основной службой, которая чаще всего и мешает удалить файлы обновления, является «Центр обновления Windows», поэтому отключите ее при помощи команды
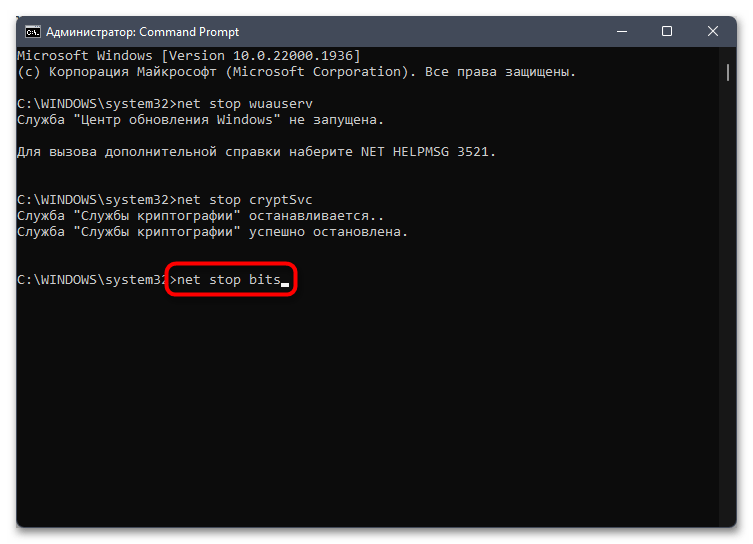
net stop wuauserv. - Служба криптографии тоже должна быть отключенной, поэтому используйте
net stop cryptSvc. - То же самое проверните и с BITS через
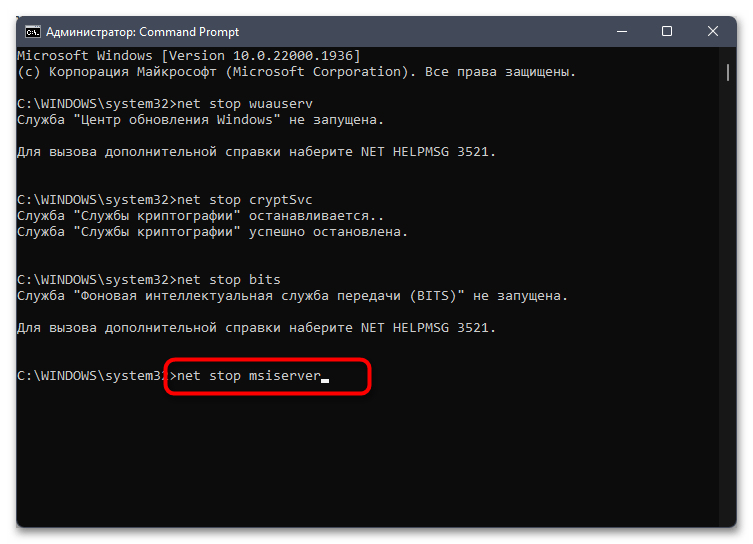
net stop bits. - На этом подготовительное отключение служб почти завершено, остается только выполнить
net stop msiserver, и можно переходить к следующему шагу. - Используйте команду
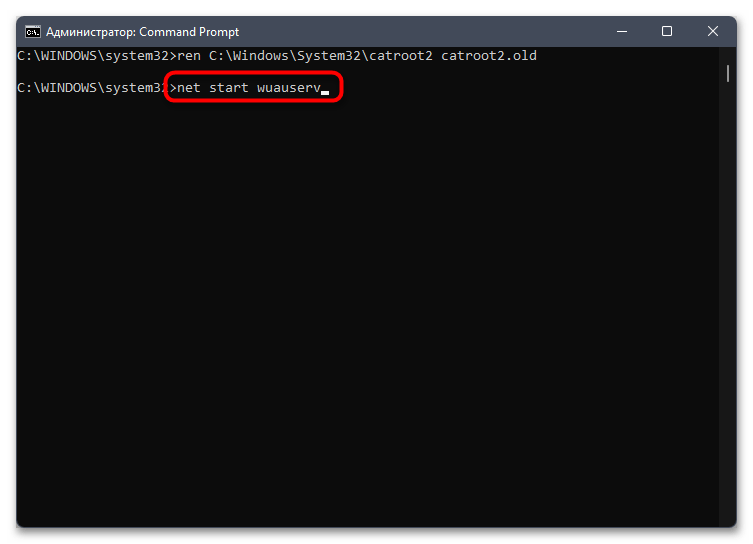
ren C:\Windows\SoftwareDistribution SoftwareDistribution.oldдля переименования текущего каталога с уже загруженными файлами обновления. Это инициирует повторное создание папки при следующем сканировании апдейтов. - Нужно точно так же переименовать и еще одну папку через
ren C:\Windows\System32\catroot2 catroot2.old. - Остается только запустить ранее отключенные службы, начав с
net start wuauserv. - Далее введите
net start cryptSvc. - После появления уведомления об успешном запуске —
net start bits. - Последняя команда имеет вид
net start msiserver. На этом этапе консоль можно закрыть и заново запустить сканирование обновлений. Начните загрузку найденных и проверьте, получилось ли избавиться от ошибки.


Если после этих действий ошибка была устранена, через«Проводник» можете перейти по двум путям (тем, что использовались в команде
ren) и удалить папки с «.old» в конце.
Данный вид сброса «Центра обновления Windows» влияет только на загруженные ранее файлы, сделав папки с ними резервными и позволив файлам заново загрузиться в пустые каталоги. И хотя это часто помогает избавиться от конфликтов, в некоторых случаях требуется более радикальный подход. О нем мы еще расскажем в завершающем методе данной статьи, поскольку он выполняется через специальную утилиту, которая нужна только в том случае, если ничего не поможет справиться с ситуацией и ошибка 0x80248007 будет появляться снова и снова.
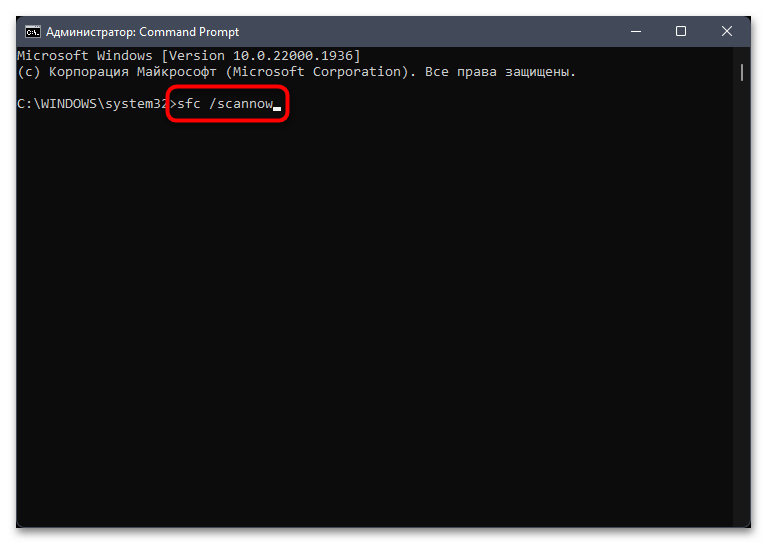
Способ 5: Проверка целостности системных файлов
В некоторых случаях сбои при скачивании обновлений в Windows 11 связаны с более глобальными проблемами, которые не решить сбросом кеша или изменением состояния служб. Такие ошибки могут быть связаны с повреждением целостности системных файлов. Поэтому понадобится использовать специальные консольные утилиты, которые позволяют проводить сканирование и автоматически исправлять найденные ошибки. Более детальную информацию по этой теме вы найдете в другой статье на нашем сайте по следующей ссылке.
Подробнее: Использование и восстановление проверки целостности системных файлов в Windows
Способ 6: Ручная установка проблемного обновления
Возможно, проблема, с которой вы столкнулись, связана с невозможностью загрузить конкретный апдейт. Это может случиться из-за сбоя на серверах или неполадок в файлах конкретного обновления. Если вам известен код апдейта, скачивание которого прерывается ошибкой 0x80248007, можно попробовать найти его на официальном сайте каталога обновлений Майкрософт, загрузить исполняемый файл и выполнить ручную инсталляцию. Помимо этого, поддерживаются и другие методы ручной установки, о которых более детально написано в статье ниже.
Подробнее: Установка обновлений в Windows 11 вручную
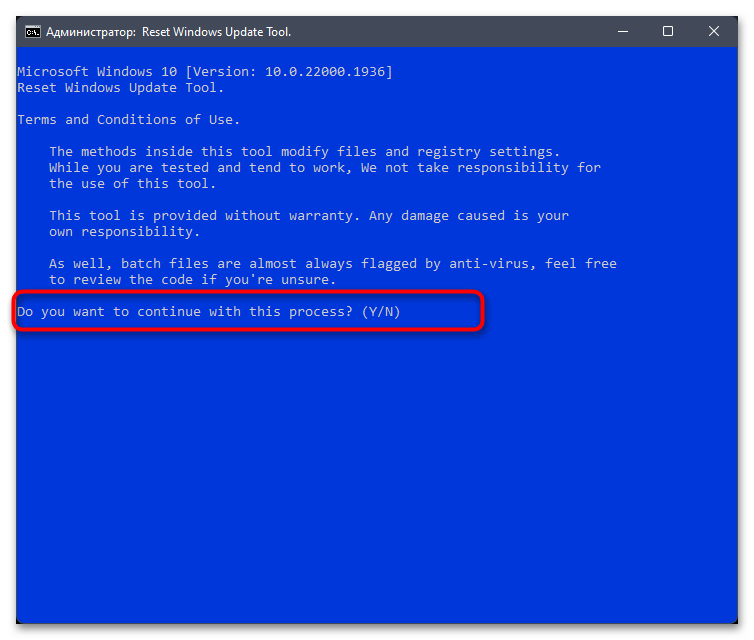
Способ 7: Использование скрипта для сброса «Центра обновления Windows»
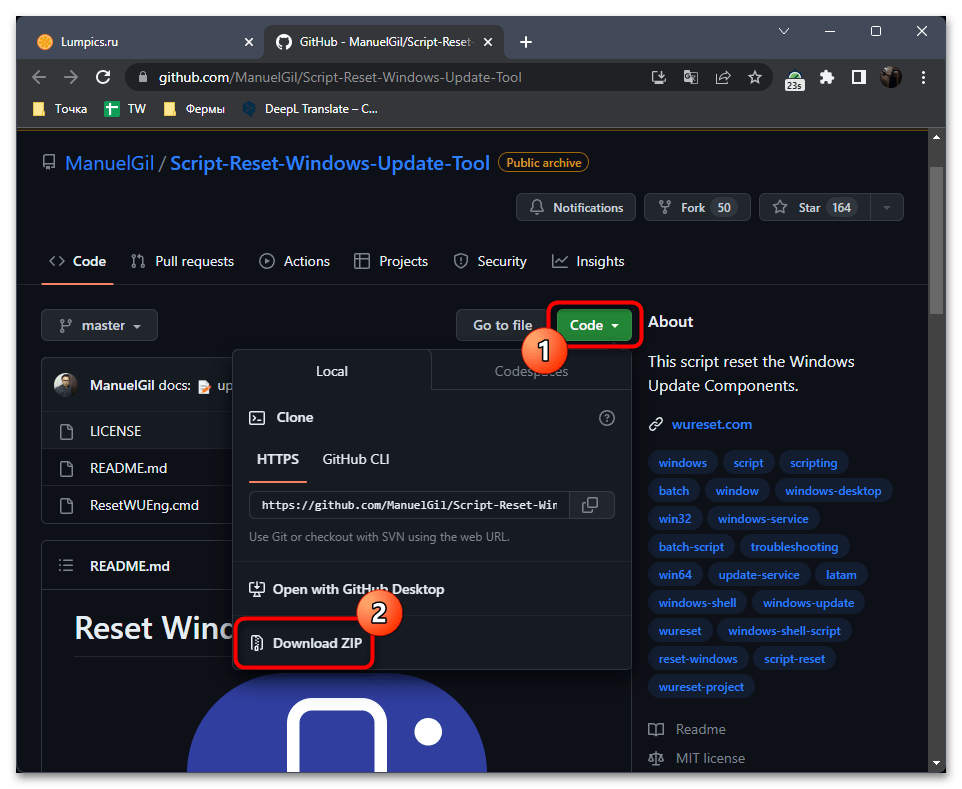
Энтузиастами разработан специальный скрипт для Виндовс 11, в набор которого входит множество самых разных автоматизированных инструментов. Среди них есть и тот, который запускает различные процессы сброса «Центра обновления Windows», очищая кеш, сбрасывая все пользовательские изменения и проверяя значения параметров в реестре. Это поможет решить ситуацию с инсталляцией апдейтов, если она связана как раз с проблемами в работе «Центра обновления Windows».
Скачать Script Reset Windows Update Tool через GitHub
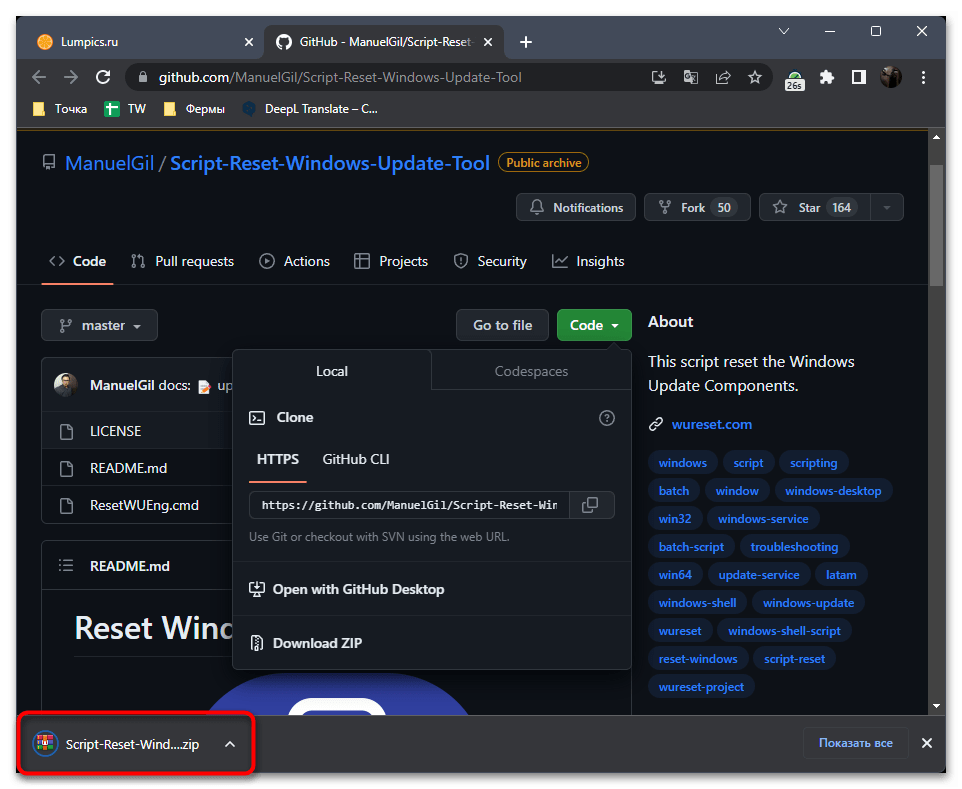
- Воспользуйтесь ссылкой выше, чтобы перейти на GitHub и скачать данный скрипт на компьютер. Для этого разверните меню «Code» и из него выберите пункт «Download ZIP».
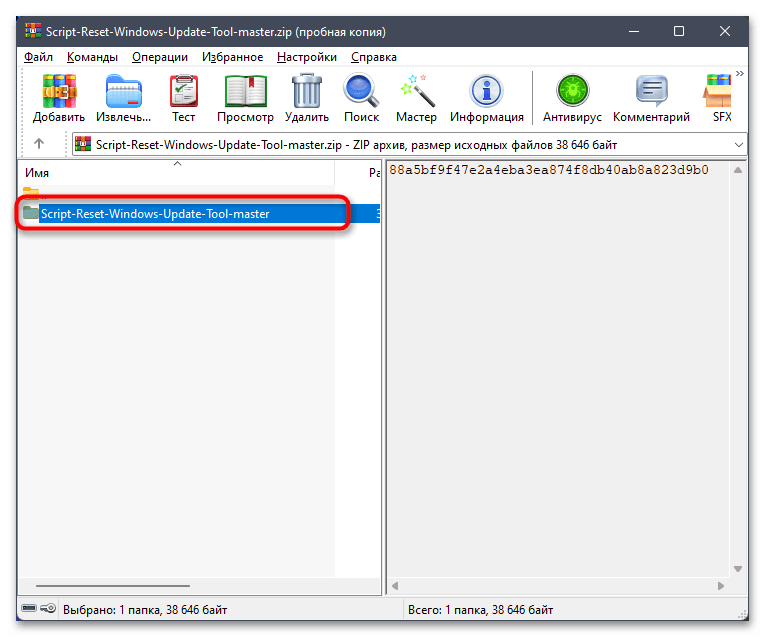
- Ожидайте загрузки архива, затем перейдите в него для дальнейшей распаковки файлов.
- Внутри архива вы найдете всего одну папку, которую нужно поместить в любое удобное место на компьютере.
- В этой папке найдите файл «Командной строки» с названием «ResetWUEng», щелкните по нему правой кнопкой мыши и выберите пункт «Запуск от имени администратора».
- На экране появится предупреждение о том, как именно работает данный инструмент. Подтвердите переход к следующему этапу, введя с клавиатуры Y.
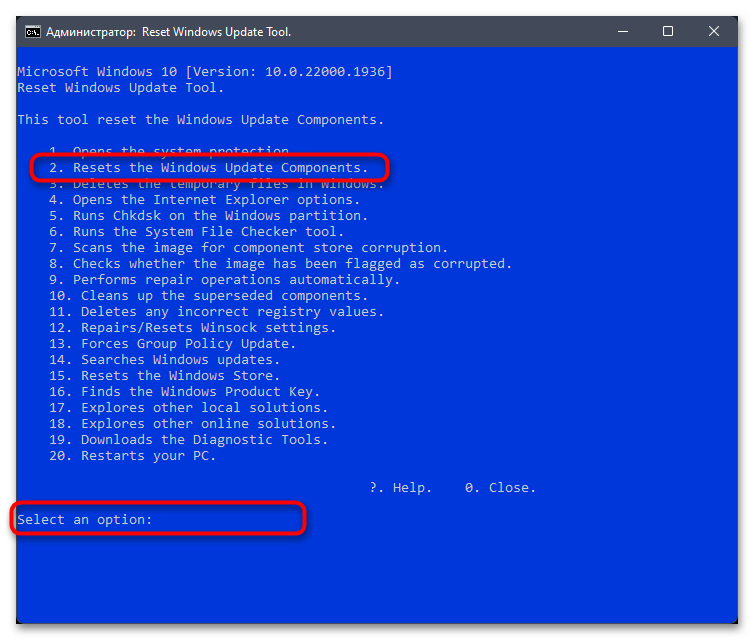
- Скрипт предлагает выбрать одно из двадцати разных действий, но в текущей ситуации нужно всего одно — под номером 2, которое называется «Resets the Windows Update Components». Введите это число в поле ниже и подтвердите команду.
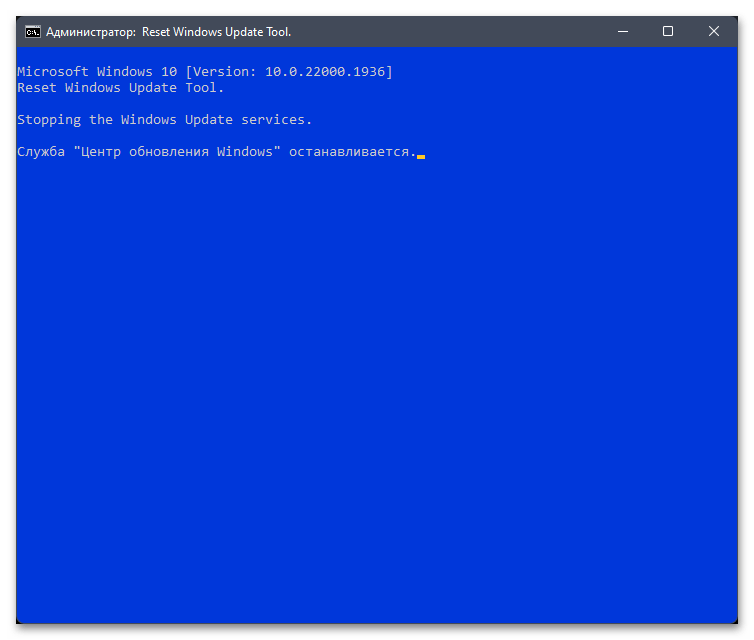
- На экране вы будете видеть весь процесс выполнения операции, поэтому остается только дождаться его завершения, перезапустить ПК и снова перейти к попытке инсталляции апдейта в Windows 11.

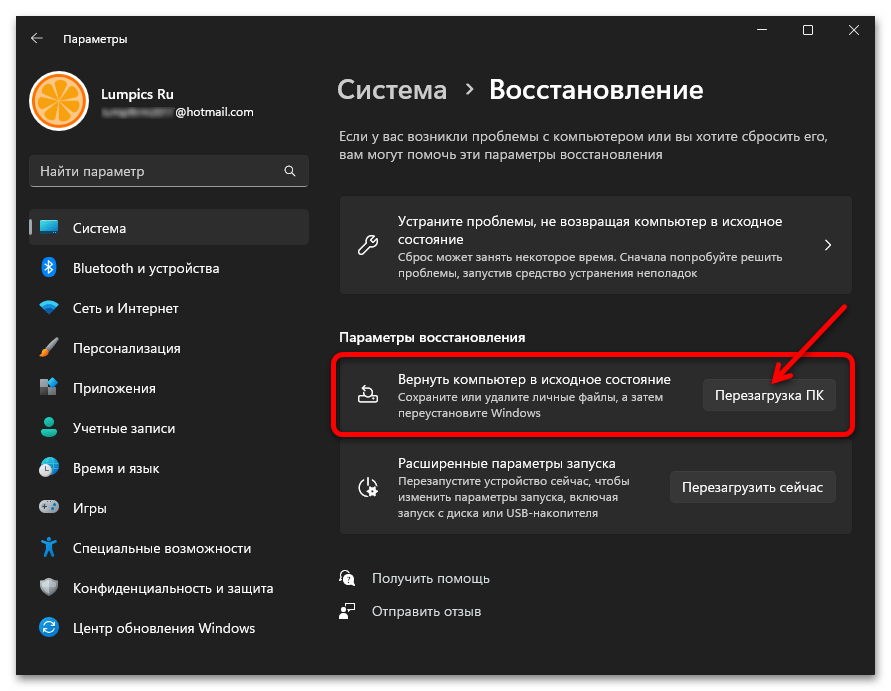
Способ 8: Сброс Windows до заводских настроек
Отсутствие прогресса по решению проблемы с загрузкой обновления в Windows 11 может свидетельствовать о том, что в самой ОС возникли более серьезные сбои, которые не так просто решить вручную. Если вы уже проверили все предыдущие рекомендации, то сейчас остается только сбросить Виндовс до заводских настроек, что должно положительно сказаться на исправлении ситуации с работой всех ее компонентов, включая и «Центр обновления».
Подробнее: Сброс Windows 11 к заводским настройкам
Наша группа в TelegramПолезные советы и помощь
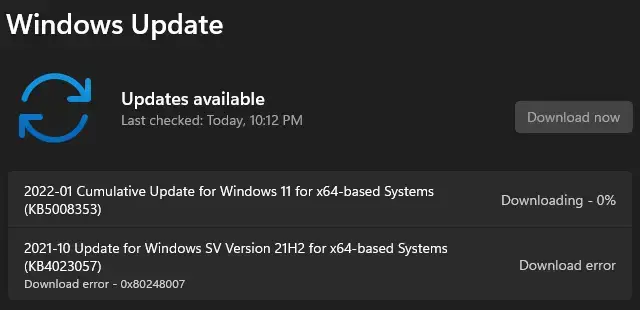
Are you struggling with “download error 0x80248007” on your Windows device? Don’t worry; you’re not alone. Several users have reported experiencing this error while downloading updates, which can be a real pain.
But the good news is that there are numerous effective ways to fix it. This step-by-step guide will discuss seven ways to fix “download error 0x80248007.” However, instead of directly jumping on the solutions, let’s first understand what this error is and why it occurs in the first place.
Why Does “Download Error 0x80248007 Occur?”
”The download error 0x80248007 is a Windows Update error that occurs during the download phase of the update. It generally happens because of the following causes:
- Missing Files
- Bug with the Update
- Unidentified/Unknown Microsoft Software License Terms
Here are some useful methods that can help you to fix the error:
Method 1: Start the Windows Installer Service
Windows Installer service is directly related to the Windows Update Service. You can start it manually to fix the issue. Get access to the Services console by following the below-mentioned steps:
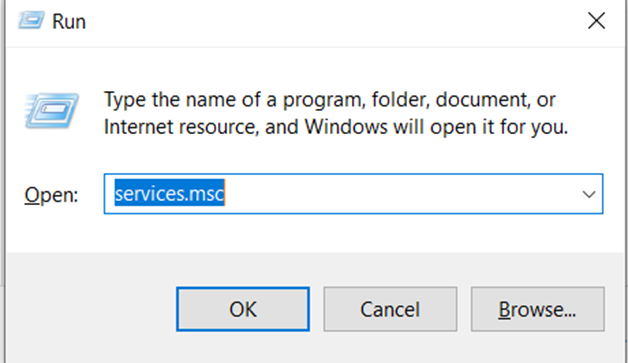
- Press Windows+R to open Run.
- Then, type services.msc in the message box and click OK.
- Now, search for the Windows Installer service in the Services window.
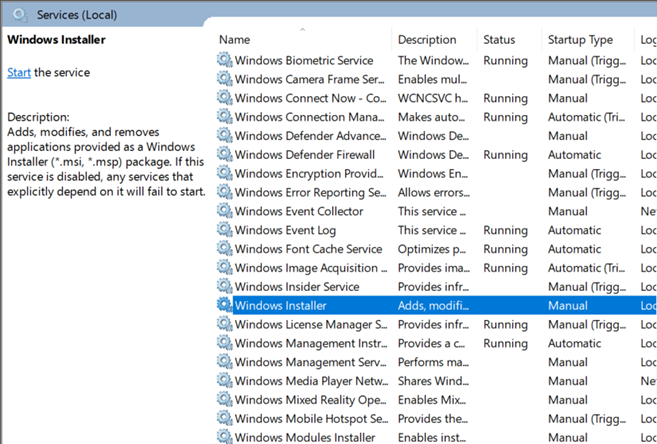
- Then, right-click on it and hit Start.
- Run Windows Update once again to check if the problem is resolved.
Method 2: Reboot the Windows Update Service
As mentioned, the Windows Update Service is a tool for downloading and installing Windows updates. If any modifications happen to this tool, you may witness the 0×80248007 error. In such a scenario, you can reboot the Windows Update Service to tackle this issue. For this:
- Go to services.msc, similar to the first method.
- Now, look for the Windows Update service from the list of services.
- Finally, right-click on it, and hit Restart.
Method 3: Run the Windows Update Troubleshooter
The Windows Update Troubleshooter is a tool that checks your system for Windows Update errors and reports them back to you. It can fix the error as well. To fix the error:
- Go to Settings > Update & Security >Troubleshoot.
- On the page, you will see an option for Additional troubleshooters.
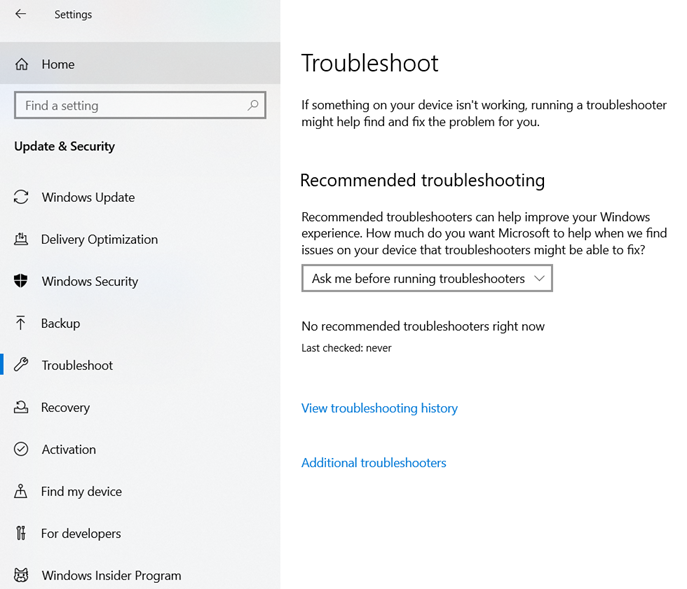
- Hit it to view the list of available troubleshooters.
- There will be an option called Windows Update. Select it and Run the troubleshooter to operate.
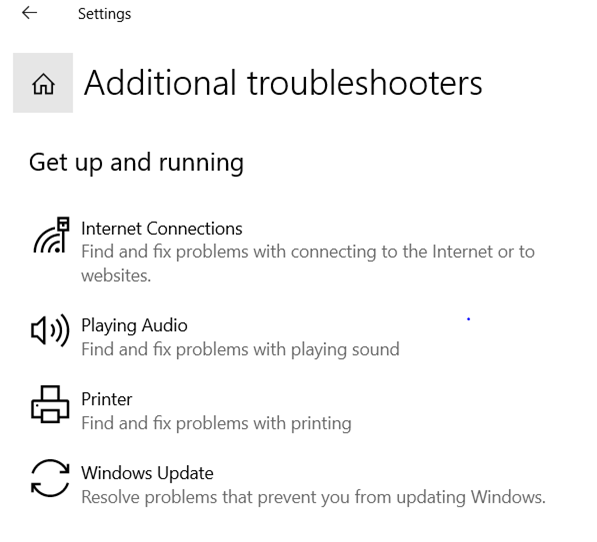
The troubleshooter will review the errors and fix them. Once the process is finished, rerun the Windows Update.
Method 4: Remove the Software Distribution Folder
This system folder on Windows consists of multiple Windows Update files. If any file gets damaged, you will encounter some problems in the Windows updates installation process.
It is possible to tackle these issues by deleting specific folders inside the Software Distribution folder. Here are the steps to do so:
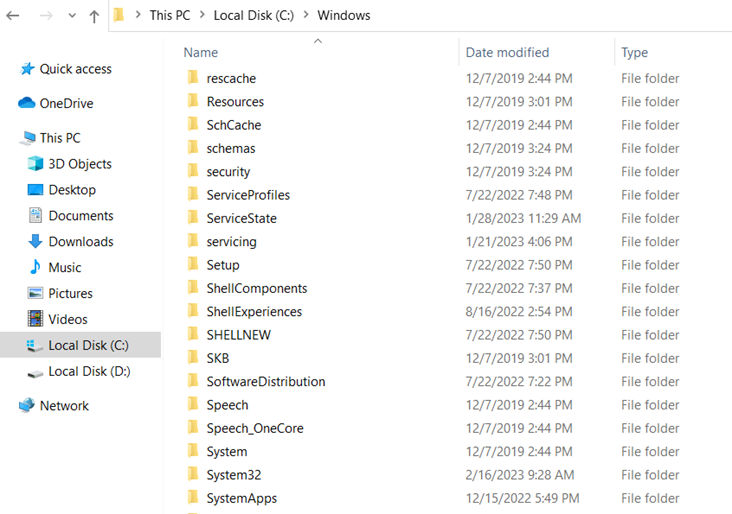
- Navigate to C, then to Windows, and then to Software Distribution.
- Now, search for the files named Data Store and Download.
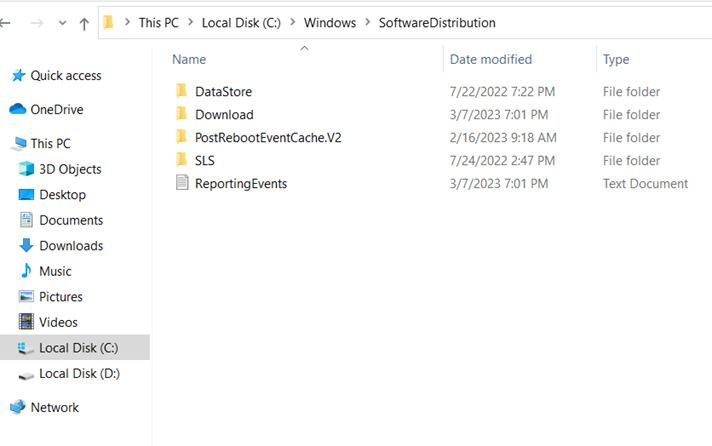
- After this, you need to go to these folders and delete everything inside them.
- Finally, start your PC and rerun Windows Update.
Fix 5: Run SFC and DISM Scan
The problem may be a symptom of more serious corruption of system files. It’s important to find and fix any issues causing a Windows update download error before you can continue downloading updates. Here are the essential scans to solve the problem:
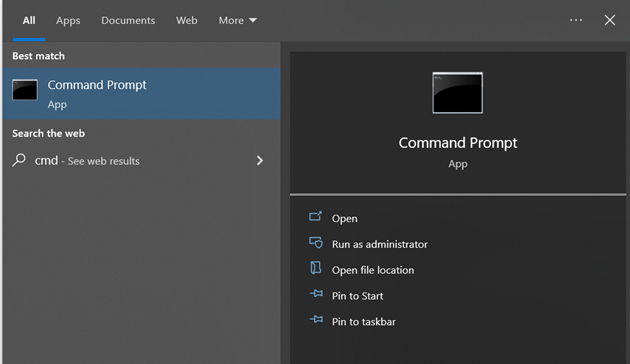
- First, press Start, type cmd, right-click on the well-suited outcome and choose Run as administrator.
- Now, run the System File Checker tool by typing the following command:
sfc /scannow
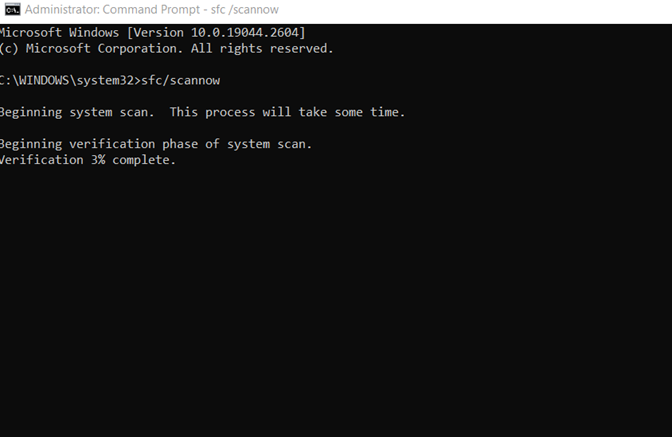
- Click on Enter and let the scan finish.
- After this, type the following command by running the DISM tool:
DISM /Online /Cleanup-Image /ScanHealth
- Hit Enter. The DISM utility will scan for damaged files and remove your system image.
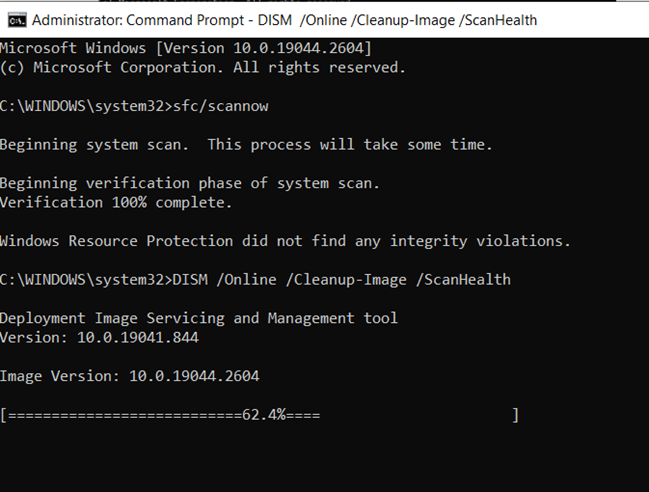
- In the final step, start your system again to see whether the issue is resolved.
It is important to note that you may accidently lose your crucial data while performing this step. But you don’t have to worry about anything, as you can use Stellar Data Recovery Professional for Windows and recover all your deleted files.
Method 6: Manually Install Windows Update
- First, go to the Microsoft Update Catalog website (https://www.catalog.update.microsoft.com/)
- Here, look for the update you wish to install by typing its KB number in the search box
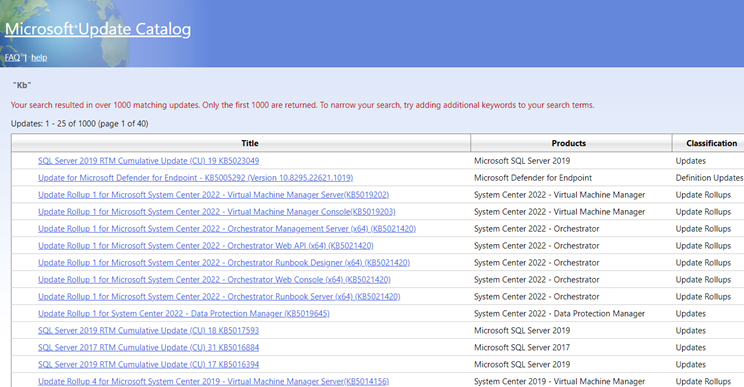
- Choose the appropriate update and click on “Download.“
- After this, you need to double-click on the downloaded update file.
- Follow the instructions to install the update.
- Now, restart your PC if prompted to do so.
- To verify the installation, go to the “Update & Security” section in Settings.
- Hit “View update history“
- See if the update you installed is listed and its status is “Successful.”
Note: It’s essential to download and install updates from trusted sources, like the official Microsoft website or Windows Update. Installing updates manually can be risky if you’re not cautious, so always download updates from a reliable source.
+
Method 7: Use Windows 11 Setup to Install Updates
You can also fix download error 0x80248007 by installing updates from the Windows 11 ISO setup. Here’s how to access the ISO files for the public release builds:
- Windows 11 Public Release | Download link
- Go to the links mentioned earlier and download the ISO file for Windows 11
- Pick your setup language and hit Confirm.
- After the download, double-click to run it.
- When prompted, click Open.
- Now, double-click on setup.exe and then click on Next.
- The setup will now begin checking for updates.
- As soon as the updates are installed, the setup will start again.
- Now, follow the instructions and ensure you pick Keep personal files and apps.
- To obtain Windows 11 Dev, Beta, and Release Preview channel updates, go to the following link: Download link.
- Click on the drop-down menu to choose your Windows 11 build.
- Pick your Insider build and click on Confirm.
- After downloading it, run it and pursue the on-screen instructions to finish the update.
Wrapping Up
Resolving Windows’s “Download Error 0x80248007” is crucial for smooth system performance. With this step-by-step guide, users can troubleshoot and fix the error by themselves and keep their system updated and error-free.
FAQs
What is “Download Error 0x80248007” on Windows?
It’s a Windows error that appears when the Windows Update service cannot download updates..
How can I resolve this error?
Some solutions include:
- Temporarily disabling antivirus.
- Resetting the Windows Update components.
- Running a virus scan.
- Checking your network connection.
Can I prevent this error from happening again?
Yes, keeping your system up-to-date, avoiding unreliable sources for software downloads, and regularly performing virus scans can prevent this error from occurring again.
Was this article helpful?
YES2
NO
What is Windows Update Error 0x80248007?
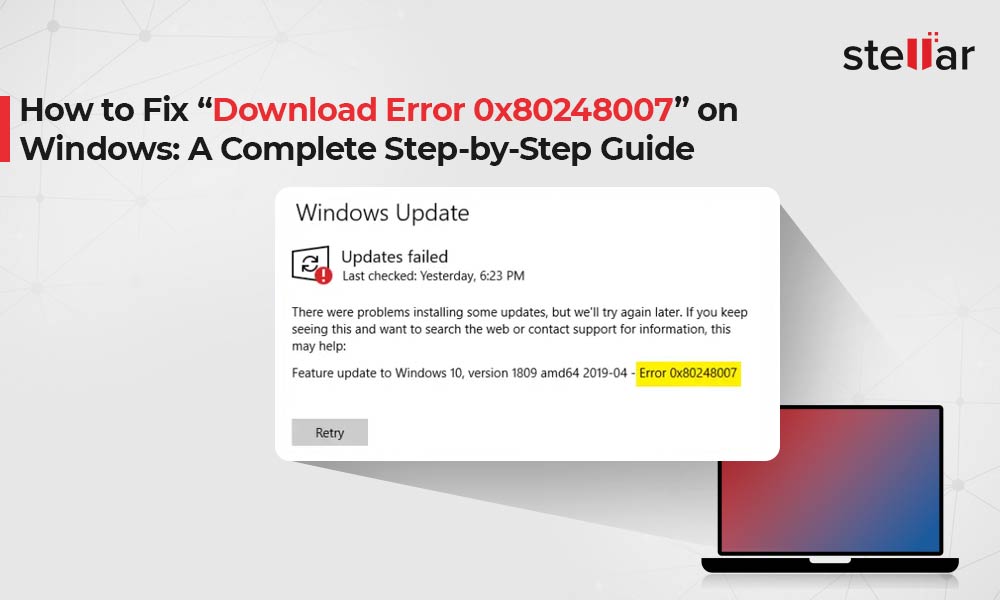
Windows error codes, such as 0x80248007, are supposed to be helpful for the user in finding and resolving issues operating systems. There can be many causes for such errors; however, this particular error involves problems relating to Windows updates. Most of the Windows update errors block the user from being able to download or install an update, and some, like 0x800f084, may even result in boot loops. Thankfully, error 0x80248007 does not deal with serious system errors, so generally speaking, this one is much easier to fix. When trying to update Windows or drivers via Windows Update, the update process may begin normally but then get interrupted by the 0x80248007 error message, which says:
“There were problems installing some updates, but we’ll try again later. If you keep seeing this and want to search the web or contact support for information, this may help – (0x80248007)”
Other common variations of this error message include:
- Feature update to Windows 10 version 1607 error 0x80248007
- Microsoft – WPD – 2/22/2016 12:00:00 AM – 5.2.5326.4762 – error 0x80248007
Causes of Windows Update Error 0x80248007
Following might be the possible causes of this error:
- Missing/Outdated drivers
- Inconsistent internet connection.
- Corruption or incomplete files may be inside the Software Distribution folder.
- Interference from antivirus software or a firewall.
- Possible infection by virus or malware.
This error typically means that Windows Update is missing necessary files or cannot locate the Microsoft Software License Terms. Although every Windows setup is unique due to different settings and installed applications, there are general troubleshooting steps that can help fix Windows 10/11 error 0x80248007.
It’s important to keep Windows updated whenever new patches are released, as updates enhance system stability, improve usability, and fix bugs. Before trying any troubleshooting steps, it’s recommended to restart your computer. This refreshes the system and removes any temporary corrupted files that might be triggering the error.
Read about other common Windows Update errors:
Windows Update Error 0x80070005
How to Fix Error Code 0xc0000005
Error Code 0x800701b1
Backup Error Code 0x800700E1
Zip File Extraction Error 0x80010135
0x80072f8f-0x20000 Windows Error
Windows Error 0xc000007b
Windows Error 0x800f081f
How to Fix Windows Update Error 0x80248007
Here is how you fix download error 0x80248007 to complete your windows update.
1. Start Windows Installer Service Manually
Sometimes the error gets fixed by starting the Windows Installer service manually.
- Open Command Prompt as Admin.
- Type
net start msiserverand hit Enter. - Close the Command Prompt and try updating again.
2. Restarting Windows Update Service
Temporary files may be causing the problem, which a simple restart of the Windows Update service might clear off.
- Hit Windows + R, type in
services.msc, and click OK. Find Windows Update, right-click it, and choose Stop. - Navigate to the following locations, listed in order, and delete whatever is inside of each of these folders:
C:\\Windows\SoftwareDistribution\DownloadC:\\Windows\SoftwareDistribution\DataStore - Go back into Services and start Windows Update or Automatic Updates again.
3. Run Windows Update Troubleshooter
Microsoft has a built-in troubleshooter dedicated to fixing update errors.
- Launch Settings > Update & Security > Troubleshoot
- Under Windows Update, click Run the troubleshooter
- Follow any on-screen instructions.
4. Resetting Windows Update Components Manually
If the above troubleshooter doesn’t work, you may want to manually reset Windows Update components.
- Launch Command Prompt as Administrator.
- In order to stop the update services, execute the following commands one by one, pressing Enter after each:
net stop bitsnet stop wuauservnet stop cryptsvc - Delete Update Cache. Clear the update cache by typing this command and pressing Enter:
Del "%ALLUSERSPROFILE%\Application Data\Microsoft\Network\Downloader\qmgr*.dat" - Rename the SoftwareDistribution folders. Run these commands:
Ren C:\Windows\SoftwareDistribution SoftwareDistribution.bakRen C:\Windows\System32\catroot2 catroot2.bak - Reset Winsoc. To fix any network issues, reset Winsock by typing:
netsh winsock reset. - Restart the services:
net start bits
net start wuauserv
net start cryptsvc
Following these steps, your Windows Update components should now be reset, and you might try running the update again. Should the issue persist, we encourage trying Outbyte PC Repair to deal with system errors that might be the reason for problems.
5. Running the SFC Command
Corrupted system files may be one of the reasons for the failure of updates. Running the System File Checker should help resolve these issues.
- Open Command Prompt as Administrator.
- In the command prompt, type in
sfc /scannowand press Enter. - Let the scan complete, then check if the update error persists.
6. Performing a Clean Boot
To rule out interference from a third-party app, perform a clean boot:
- Press Windows + R, type in
msconfig, and hit Enter. - Click the Services tab, put a checkmark in Hide all Microsoft services, then click Disable all.
- Next click the Startup tab. Click Open Task Manager then from here you will need to disable any apps that do not come from third-party sources
- Once done, reboot your computer and try the update again.
7. Manually Updating Windows via Microsoft’s Website
If all above methods fail, then you can download the update from Microsoft’s website manually and install it. Go to the official Microsoft Update Catalog. Look for the recent update that is compatible with your system version. Download it manually and install it.
For deeper system issues that may affect the normal functioning of system updates, consider Outbyte PC Repair to optimize performance and clean up errors.
FAQs
What does the error 0x80248007 mean?
This is an error that means some critical files are lacking in Windows Update or that the facility is unable to locate the Microsoft Software License Terms.
Why is my Windows Update getting stuck at 0x80248007?
The error may relate to corrupted files, or maybe drivers are outdated, and an issue with updates will be manifested due to networks.
How do I manually reset the Windows Update?
You need to stop services update, delete everything in the SoftwareDistribution folder, and then restart the services in order to reset Windows Update.
Is antivirus interfering with the update errors?
The answer to that is yes; there is a chance that antivirus programs do interfere with updates. You should disable them temporally and see whether the problem solves or not.
- The update error code 0x80248007 occurs while installing pending updates on Windows PCs.
- We’ll discuss the reasons causing this error code and five working solutions that might help in addressing this error code.
What causes Error 0x80248007 on Windows 11?
The error 0x80248007 may occur on Windows 11 PC because of one or a combination of these issues –
- Internal Glitches: Try the troubleshooter
- Corrupted system files and folders: Attempt SFC Tool
- Corruption inside the System Image: Run DISM Scan
- Windows Cache folders are corrupted: Reset update Components
If the error persists even after trying the above fixes, you need to manually download and install the pending updates.
If you are not able to install pending updates on your PC, try out these workarounds in the exact order as specified below.
1. Run Windows Update Troubleshooter
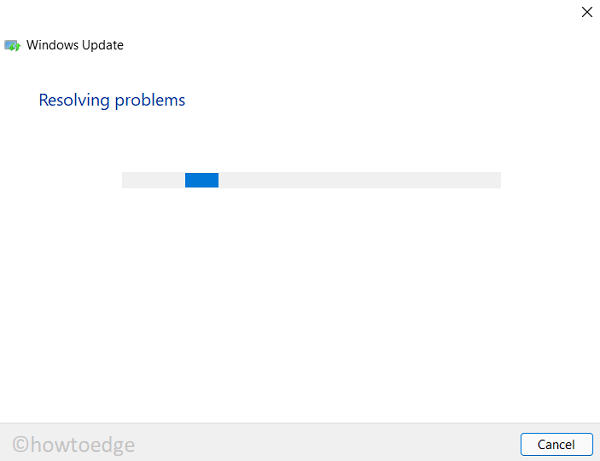
Troubleshooting Windows Update is the first thing to do in case you are getting an update-related issue. Here’s how to run this tool –
- Right-click on the Windows icon and select Settings. Alternatively, you may also press Win + I to enter the Settings page.
- Select System on the left navigation and head over to the right pane.
- Click Troubleshoot and then Other troubleshooters.
- Under “Most Frequent”, you will find Windows Update. Hit the Run button available next to it.

- The system will start detecting problems and will initialize the diagnostic page.
- Wait for a few seconds while this keeps on finding and resolving the underlying causes.
- Go and check if the update issue resolves on your PC. In case it is still occurring, hit No, and provide feedback to Microsoft.
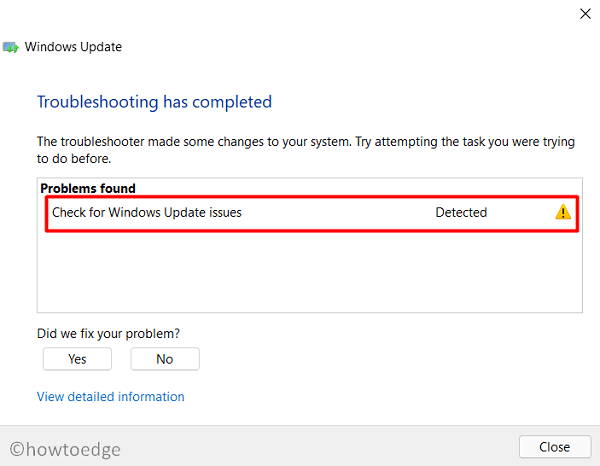
- If this indeed solves the problem, click Yes and close this window.
Restart your PC next so that the recent changes come into effect from the subsequent login.
2. Run SFC/DISM scans together
The update error code 0x80248007 may also occur when your system lacks some important files or they have been corrupted somehow. To overcome this issue then, you must run both SFC and DISM scans together.
The first will find and resolve any problems with the system files and folders whereas the DISM tool will repair any corruption inside the System image. Here’s how you may run both these tools –
- Press Win + X, and choose Windows Terminal (Admin).
- When the terminal comes into view, execute the below command –
sfc /scannow
- Wait till this tool completes the scanning/repairing process.
- Once this is over, copy/paste this code, and press Enter –
DISM /Online /Cleanup-Image /RestoreHealth

- When this utility program completes repairing the corrupted system image, restart your computer.
Sign back into your device again and attempt updating/installing updates on your Windows 11 PC.
3. Restart Windows Installer Service
Update-related problems may occur when the Windows installer service stays disabled on your device. Go and check this service and if you find it disabled, restart it.
- Press Win + R to launch the Run dialog.
- Type “
services.msc” and hit OK. - When the Services window launches, scroll down and locate the “Windows Installer” service. See its current status.
- If it is displaying “Stopped”, right-click on it and hit Start. Otherwise, right-click on Windows Installer and click Restart.
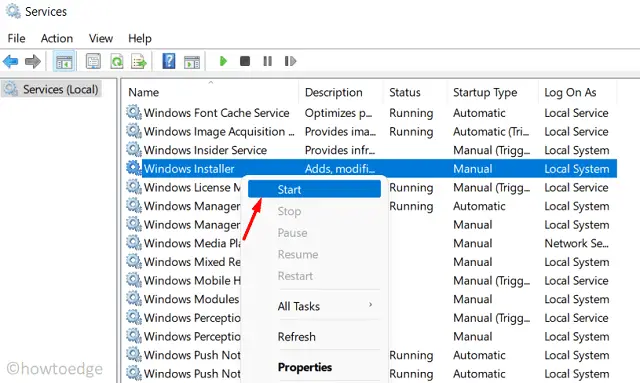
- Close Services, and restart your PC.
From the subsequent login, check if you are now able to install pending updates on your computer.
4. Reset update components
The presence of too many cache files inside SoftwareDistribution and Catroot2 folders may also prevent your Windows from updating. If that’s the case, you need to purge the contents of both these folders. Before you do so, make sure to disable all update-related services on your computer. Here’s a guide on how to reset update components on your PC –
- Launch CMD as administrator.
- On the elevated console, run these codes one after another. Make sure to press Enter after each command –
net stop wuauservnet stop cryptSvcnet stop bitsnet stop msiserver

- Rename SoftwareDistribution and Catroot2 folders by running these two codes –
ren C:\Windows\SoftwareDistribution SoftwareDistribution.oldren C:\Windows\System32\catroot2 catroot2.old
- Restart all those services that you have stopped earlier by executing these codes –
net start wuauservnet start cryptSvcnet start bitsnet start msiserver

- Type “exit” and press Enter to come out of Command Prompt.
- Restart your PC and see if this resolves the update error code 0x80248007 on your device.
5. Manually install pending updates
If the update error code 0x80248007 is still occurring while downloading or installing available patches, you better get the recent standalone packages from the Update Catalog.
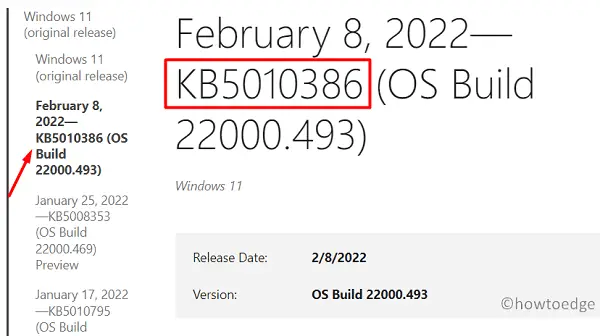
For each security/non-security/optional update that comes for Windows 11, Microsoft uploads a copy of it at its official site. Visit the Windows update history page, and click the top link on the left navigation. Note down the KB number that appears on the right pane.
Next, visit Microsoft’s Update Catalog, and paste the copied number on its search bar. Press Enter to view all available standalone packages. Pick your system architecture, and hit the Download button. Click over the top link to start downloading it. When the download completes, double-click on the setup file to update your Windows operating system.