
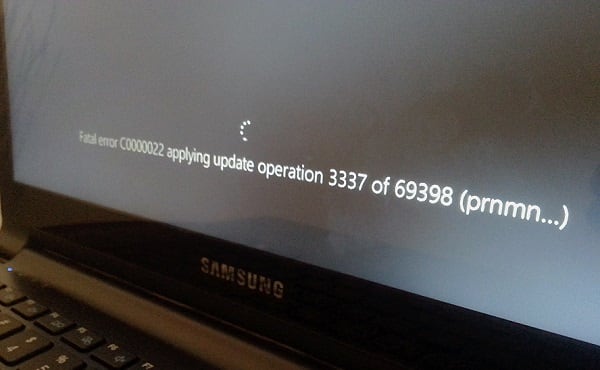
Некоторые пользователи Windows 8.1 и Windows 10 сообщают о появлении ошибки C0000034 после установки ранее отложенного обновления для ОС. В сообщении ошибки можно найти следующую информацию:
Критическая ошибка C0000034 при установке обновления на этапе ***** из *****
Понятное дело, после появления такой ошибки на экране Windows становится полностью неработоспособным. Нет ничего хуже, чем неудачное обновление ОС.
Тщательно рассмотрев проблему, мы пришли к выводу, что данная ошибка может возникать по следующему ряду причин:
- Бэд-блоки на SSD или HDD. Зачастую от таких «неполадок» страдают владельцы традиционных жестких дисков, но они могут появляться и на SSD. Если ваш компьютер больше не запускается после неудачной установки обновления Windows, вам нужно пустить в работу утилиту CHKDSK и заменить поврежденные сектора на неповрежденные.
- Поврежденные файлы обновления Windows. Пользователи, столкнувшиеся с повреждениями подобного типа, утверждают, что им удалось устранить их, применив утилиты System File Checker (SFC) и Deployment Image Servicing and Management (DISM). Разумеется, делать все это нужно в среде восстановления.
- Поврежденный компонент Центра обновления Windows. В определенных ситуациях ваша система может отказаться запускаться из-за найденной проблемы с Центром обновления. В таком случае вы должны воспользоваться MSconfig, чтобы отключить службу Центра обновления и нормально войти в систему.
- Конфликт со сторонним ПО. Некоторые пользователи столкнулись с ошибкой C0000034 после обновления/установки драйверов или установки сторонних программ. Чтобы выпутаться из этой непростой ситуации, вам нужно задействовать существующую точку восстановления.
- Поврежденные системные файлы. Возможно, вы не можете нормально обновить свою Windows из-за того, что файлы и компоненты, участвующие в процессе обновления, были серьезно повреждены. Устранить неполадку поможет возвращение ПК в исходное состояние либо полная переустановка ОС.
Ниже вы найдете список всех доступных на данный момент решений для ошибки C0000034. Рекомендуем выполнять их в том порядке, в котором они расставлены.
Метод №1 Использование CHKDSK, SFC и DISM
Чаще всего подобная проблема возникает на почве поврежденных системных файлов. Для восстановления последних можно воспользоваться такими предустановленными утилитами, как CHKDSK, SFC и DISM. Учитывая, что вы навряд ли можете нормально войти в ОС, вам нужно обзавестись установочным носителем вашей Windows: все три утилиты будут запускаться из среды восстановления.
- Подключите к компьютеру установочный носитель Windows (оптический диск, USB-флешка, внешний SSD/HDD и т.д.).
- Нажмите на любую кнопку на клавиатуре, когда на экране появится соответствующее сообщение.
- Добравшись до окна установки Windows, нажмите на кнопку Восстановление системы — вы попадете в среду восстановления.
Заметка: Важно отметить, что, технически, вы можете попасть в среду восстановления даже без наличия установочного носителя Windows. Достаточно выполнить три аварийные перезагрузки компьютера при запуске системы. Правда, такой метод не рекомендуется, потому что Windows — штука хрупкая, и постоянными перезагрузками вы потенциально можете навредить системе еще больше.
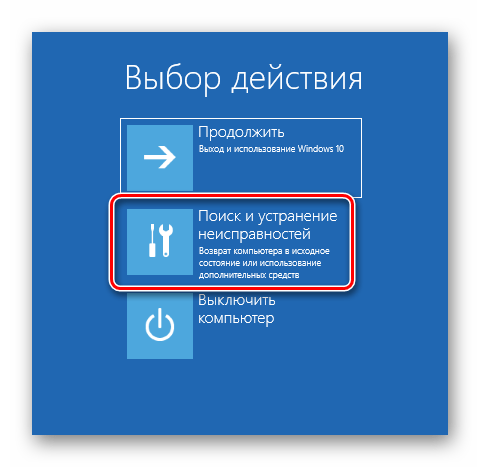
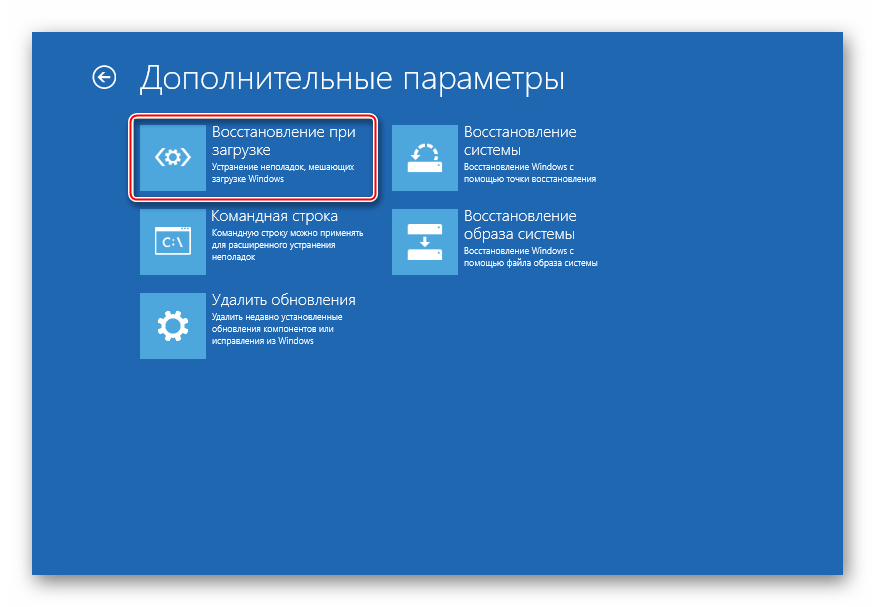
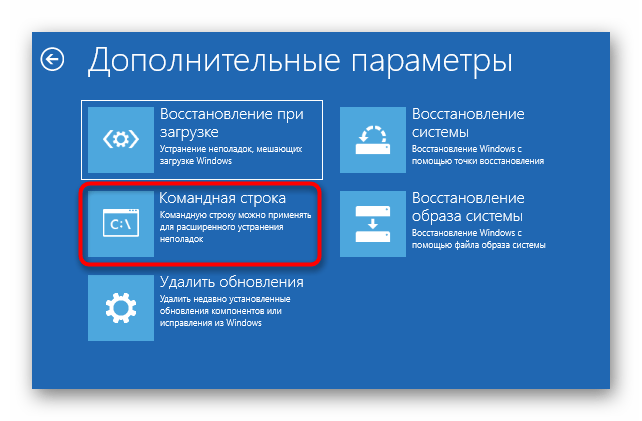
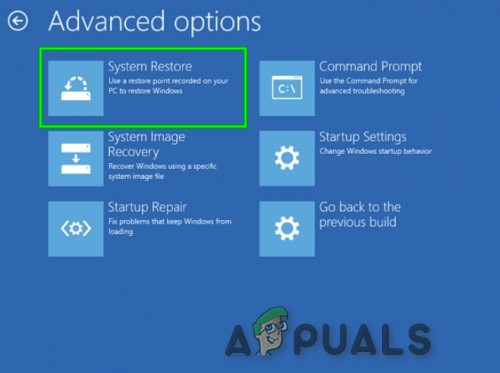
- Далее выберите Поиск и устранение неисправностей → Дополнительные параметры → Командная строка.
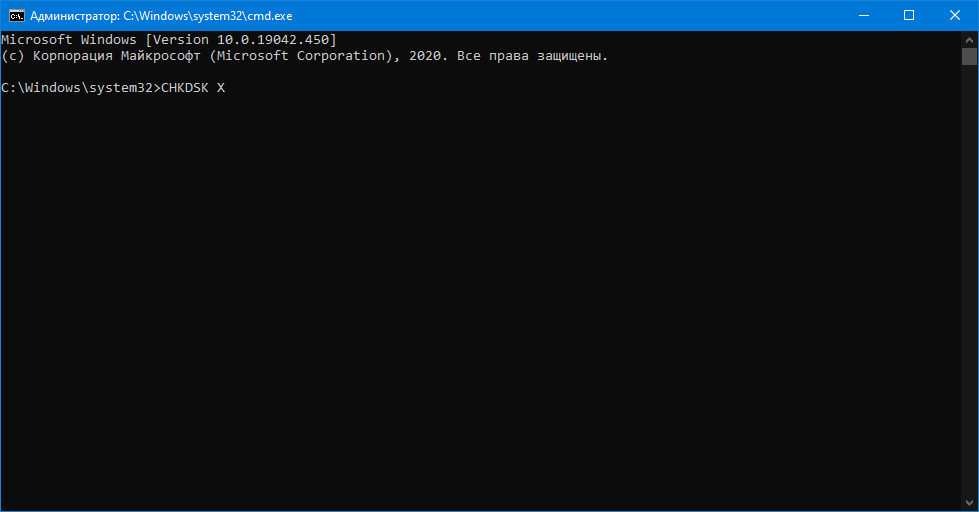
- Введите к командную строку команду CHKDSK X:, где X — это буква системного раздела вашего диска.

- Подождите окончания работы утилиты и перезагрузите свой компьютер, после чего повторите шаги 1-4, если вы все еще не можете войти в систему.
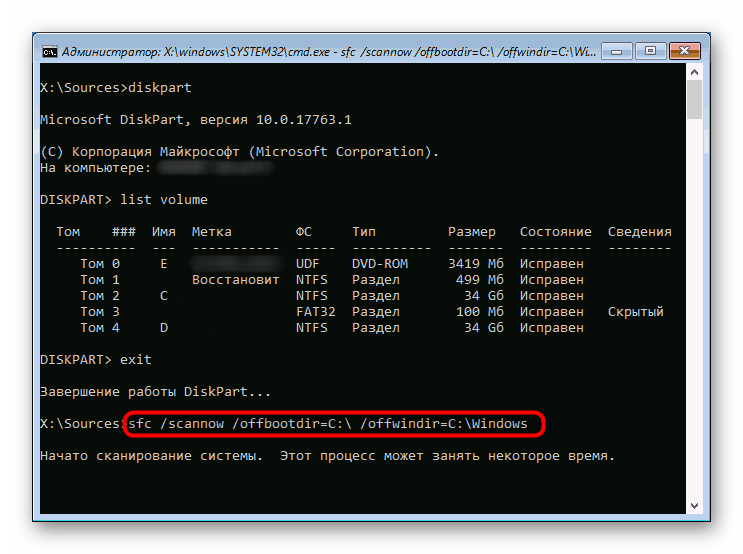
- Открыв командную строку, впишите команду sfc /scannow и нажмите Enter.
Заметка: процесс сканирования может зависать на некоторое время, но это вполне нормально. Если это произойдет, не вмешивайтесь в сканирование и просто наблюдайте за ним.
- Как только SFC закончит работать, перезагрузите компьютер и проверьте, получится ли у вас загрузиться в ОС. Если вы все еще наблюдаете за появлением ошибки C0000034, выполните шаги 1-4 и откройте Командную строку.
- Впишите команду DISM.exe /Online /Cleanup-Image /RestoreHealth /Source:C:\RepairSource\Windows /LimitAccess и нажмите Enter.
Заметка: убедитесь, что вы подключены к Интернету. Дело в том, что утилита DISM заменяет поврежденные компоненты системы нормальными, загружая последние с серверов Майкрософт.
- После окончания работы DISM перезагрузите ПК в последний раз и проверьте, нормально ли загружается Windows или нет.
Все еще видите ошибку C0000034? Что же, тогда переходите к следующим методам.
Метод №2 Отключение службы Центра обновления
Если верить утверждениям некоторых пользователей в сети, ошибку вызывает некорректно работающая служба Центра обновления. Чтобы выпутаться из неприятной ситуации, вам нужно войти в конфигурацию системы и деактивировать службу Центра обновления. Разумеется, делать это придется из среды восстановления Windows.
Попробуйте сделать вот что:
- Войдите в среду восстановления Windows с установочного носителя.
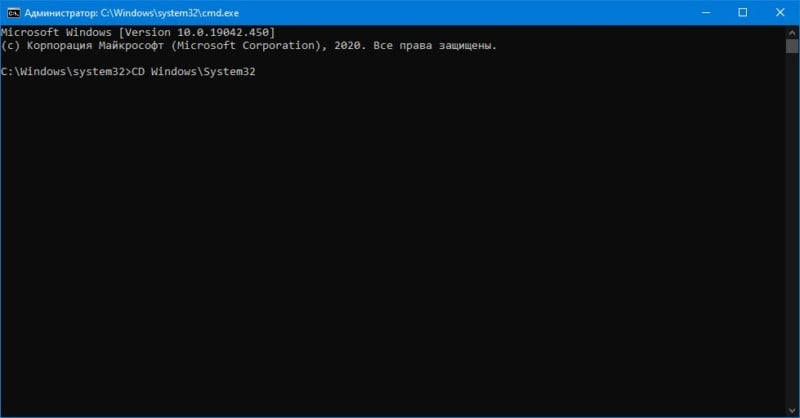
- Откройте Командную строку и выполните в ней команду CD Windows\System32.
- Как только перед вами появится окошко конфигурации системы, перейдите во вкладку Службы.
- Найдите в списке службу Центр обновления Windows.
- Уберите галочку возле нужной службы и нажмите Применить.
- Закройте Командную строку и перезагрузите компьютер.
Ну что, помогло? Нет? Двигаемся дальше…
Метод №3 Применение точки восстановления
Если вы начали видеть ошибку C0000034 после, например, установки какого-то обновления или приложения, то мы советуем вам воспользоваться точной восстановления Windows. Подобные точки создаются всякий раз, когда вы меняете настройки системы, устанавливаете различные обновления, приложения от сторонних разработчиков и так далее. Проще говоря, у вас должно быть куча точек восстановления, если вы, конечно же, не отключили их в параметрах Windows.
Как и во всех других случаях, восстановление ОС придется выполнять через среду восстановления на установочном носителе Windows.
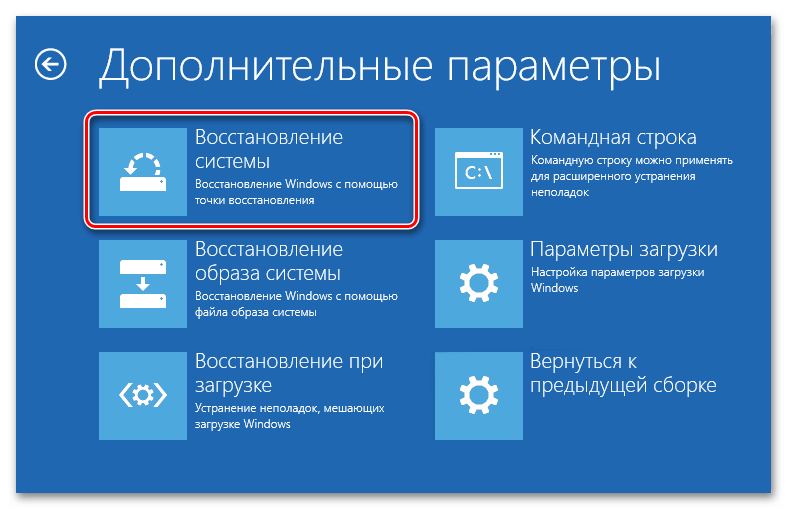
- Откройте Дополнительные параметры в среде восстановления (смотрим шаги выше ↑).
- Выберите Восстановление системы.
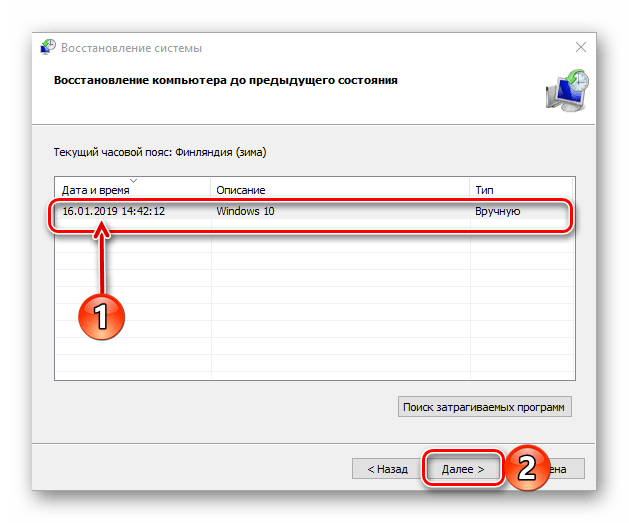
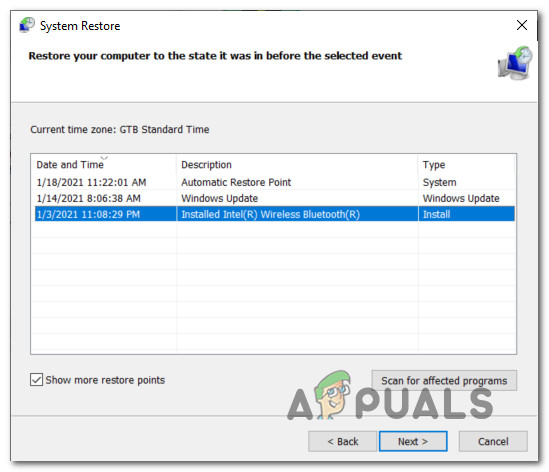
- В окошке восстановления поставьте галочку возле пункта Показать больше точек восстановления.
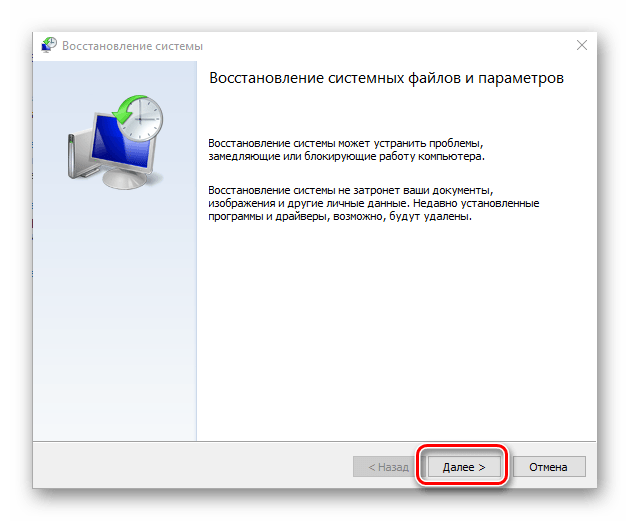
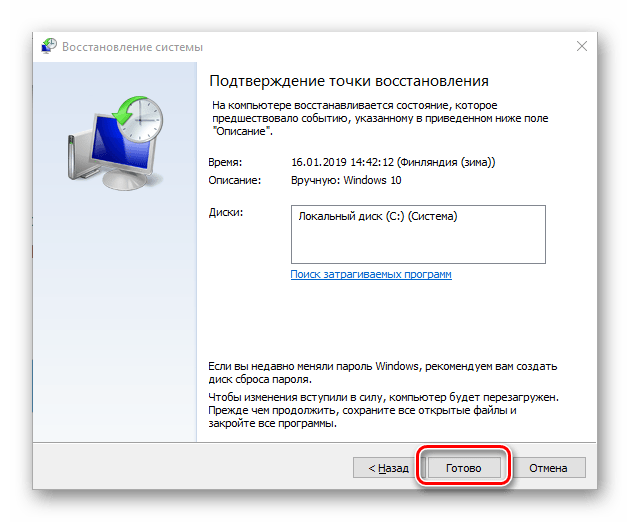
- Выберите подходящую точку восстановления и нажмите Далее → Завершить.
- Подождите окончания восстановления ОС Windows.
Попытайтесь загрузить систему и посмотрите, исчезла ли ошибка C0000034 или нет.
Метод №4 Возвращение ПК в исходное состояние
К сожалению, если ничего не изменилось и вы все еще не можете войти в ОС, то пора заняться «мягкой» переустановкой своей Windows. Во время установки обновлений явно произошло что-то серьезное, вследствие чего система больше не может нормально запуститься. Возврат компьютера в исходное состояние — такой процесс вам необходимо запустить на данном этапе.
- Войдите в среду восстановления, воспользовавшись установочным носителем Windows.
- Пройдите в Дополнительные параметры среды восстановления.
- Выберите пункт Вернуть компьютер в исходное состояние.
- Решите, хотите вы оставлять свои личные файлы в целостности или нет, и выберите соответствующий пункт.
- Пронаблюдайте за процессом восстановления системы и зайдите в Windows.
Возвращение ПК в исходное состояние практически точно должно избавить вас от ошибки C0000034. Если и это не помогло, то пора просто-напросто переустанавливать операционную систему.
Все способы:
- Способ 1: Автоматическое восстановление системы
- Способ 2: Восстановление загрузчика
- Способ 3: Утилита SFC
- Способ 4: Удаление обновлений
- Способ 5: Проверка HDD-накопителя
- Способ 6: Откат системы к точке восстановления
- Вопросы и ответы: 0
Ошибка под кодом 0xc0000034 появляется при попытке запуска Windows 10, и чаще всего она связана с некорректной установкой ОС или обновления, а также инсталляцией стороннего программного обеспечения, функции которого непосредственно взаимодействуют с системными файлами. Для исправления неполадки потребуется запустить среду RE (среда восстановления), затем воспользоваться приведенными ниже способами.
Подробнее: Как запустить среду восстановления в Windows 10
Способ 1: Автоматическое восстановление системы
Данная проблема может появляться, если произошли проблемы с загрузчиком операционной системы. В среде RE есть необходимые для выполнения необходимых действий инструменты, причем запуск системы в этом случае не требуется. Вы можете использовать автоматическое средство восстановления системы, которое порой помогает исправить рассматриваемую ошибку:
- В окне «Восстановление» выберите кнопку «Дополнительные варианты восстановления».
- Нажмите на строку «Поиск и устранение неисправностей».
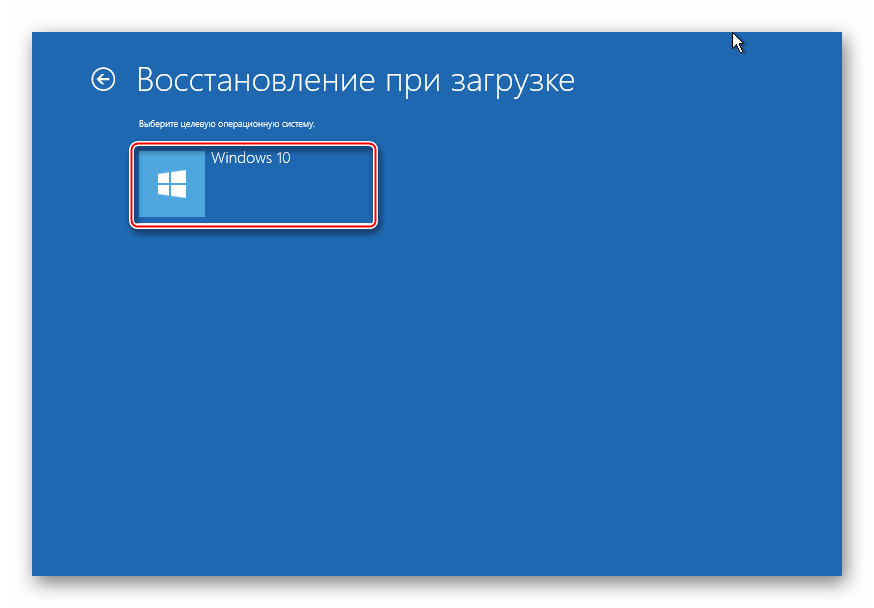
- Далее выберите пункт «Восстановление при загрузке».
- На последнем этапе выберите версию операционной системы, если вы используете несколько редакций.

Останется дождаться, когда средство среды восстановления выявит и исправит неполадку, провоцирующую появление ошибки под кодом 0xc0000034.
Способ 2: Восстановление загрузчика
Восстановить загрузчик Windows 10 можно и вручную, используя «Командую строку», запущенную в среде восстановления. Принцип работы заключается в том, что вы самостоятельно перезапишете некоторые системные файлы, но для этого потребуется указать диск, на который установлена операционная система (его буква в среде восстановления порой отличается от той, что присвоена в операционной системе):
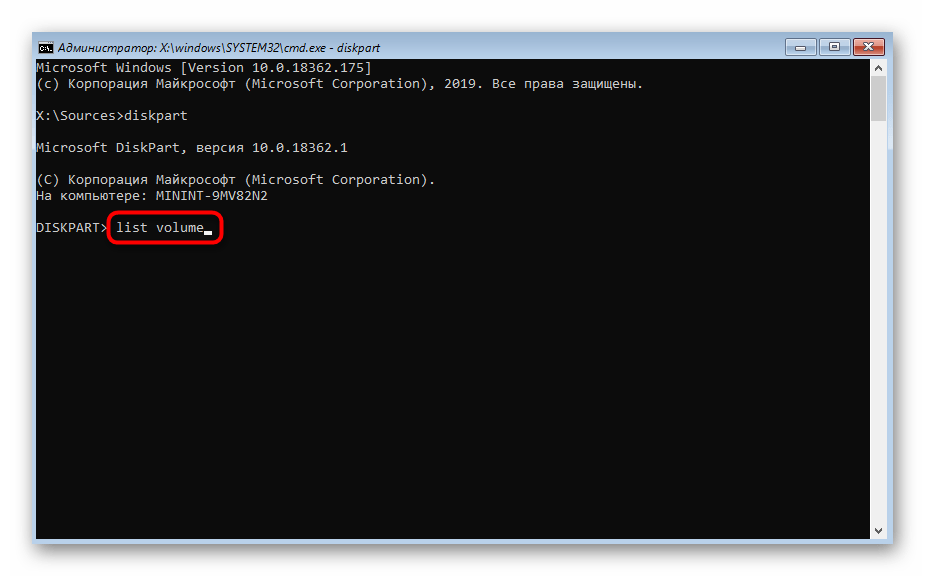
- На этапе «Поиска и устранения неисправностей» (Шаги 1 и 2 из предыдущей инструкции) выберите плитку «Командная строка».
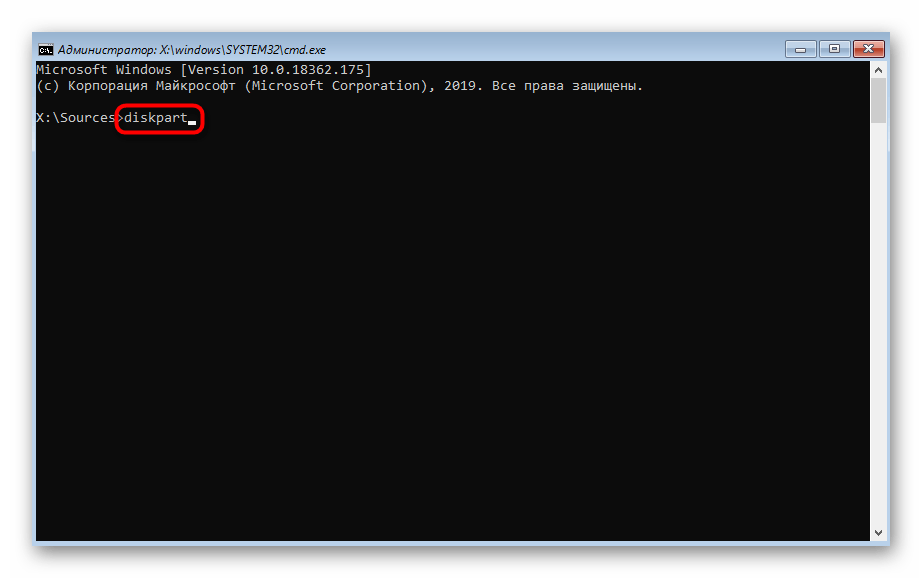
- Откроется окно консоли. Сначала выполните команду
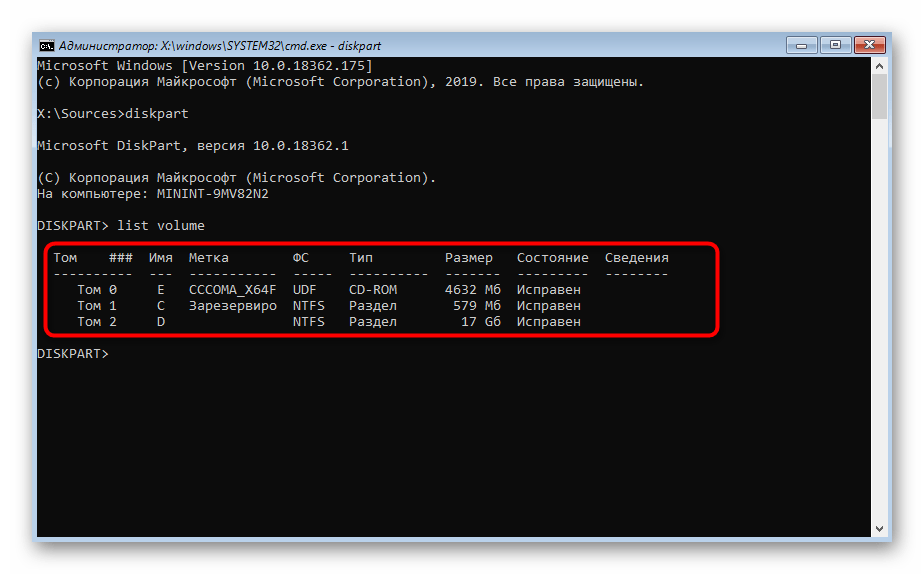
diskpart, прописав ее и нажав на клавишу «Enter». Запуск этой оснастки позволит ознакомиться с дисками. - Чтобы посмотреть список разделов диска, используйте запрос
list volume. - В появившемся перечне найдите тот раздел, который является основным (куда установлена операционная система), отталкиваясь от колонки «Размер», и запомните имя логического тома.
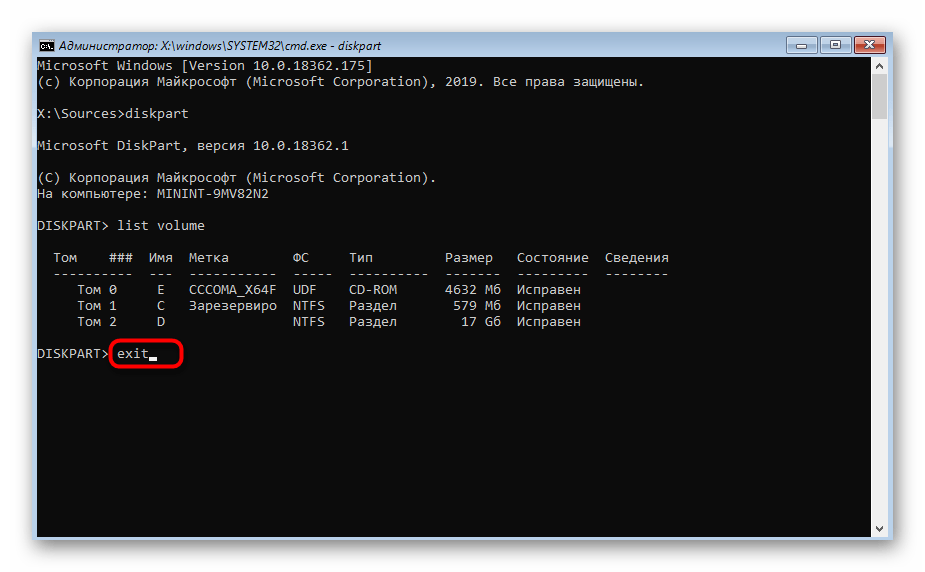
- Впишите команду
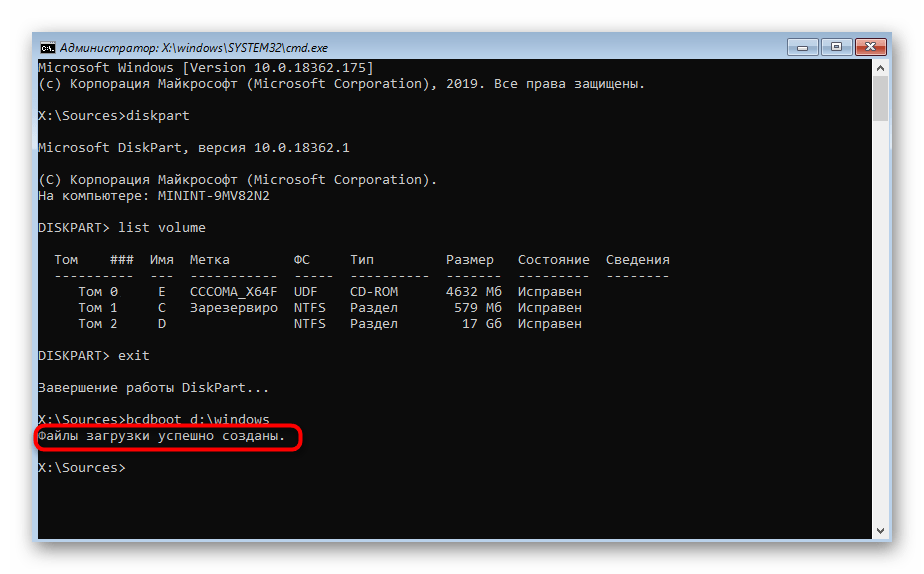
exitи нажмите на клавишу ввода, чтобы выйти из запущенной утилиты «DiskPart». - Для начала процедуры восстановления загрузчика введите и выполните команду
bcdboot c:\windows, где «C:» — это название логического тома с операционной системой. - Отображение в окне консоли сообщения «Файлы загрузки успешно созданы» означает, что все файлы, необходимые для загрузки, были созданы.
- Закройте консоль, затем на экране среды восстановления выберите пункт «Продолжить», в результате чего начнется стандартная загрузка ОС.

Если следовать нашей инструкции, этот метод не кажется слишком сложным, но при этом он является наиболее эффективным, поскольку часто позволяет исправить работу загрузчика Windows 10 и продолжить нормальную работу в системе.
Способ 3: Утилита SFC
При поврежденных системных файлах также могут возникать проблемы с запуском, в частности ошибка 0xc0000034 в Windows 10. Так же, как и в предыдущем способе, используя «Командную строку», можно запустить встроенную утилиту SFC, проверяющую целостность важных данных. Как это сделать, читайте в нашем отдельном материале.
Подробнее: Запуск SFC в среде восстановления Windows 10
Способ 4: Удаление обновлений
Инструменты среды восстановления предполагают и удаление обновлений. Этот вариант может сработать, если причиной ошибки является некорректная установка апдейта: проблемное обновление будет удалено, и после запуска Windows 10 вы сможете повторить его инсталляцию.
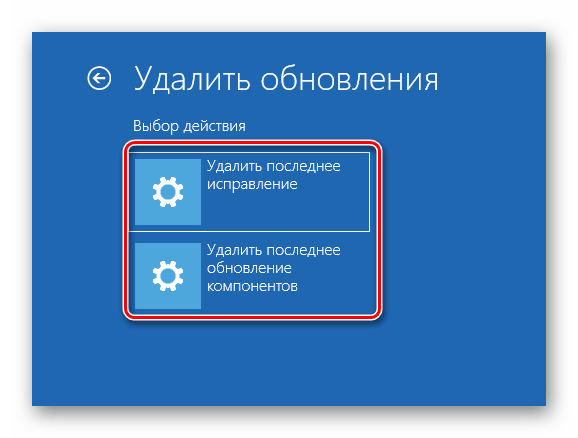
- В окне «Дополнительные параметры» среды RE выберите пункт «Удалить обновления».
- Отобразятся два варианта действий: «Удалить последнее исправление» и «Удалить последнее обновление компонентов». Возможно, придется воспользоваться инструментами по очереди.
- В следующем окне останется подтвердить выполнение выбранного действий и дождаться окончания удаления.

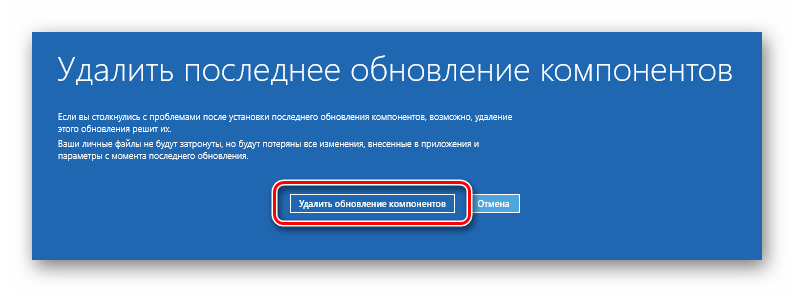
Если ошибка действительно связана с неправильно установленными обновлениями, то после процедуры система должна запуститься.
Способ 5: Проверка HDD-накопителя
Встречаются ситуации, когда ошибки при запуске Windows, в том числе и 0xc0000034, появляются, когда есть битые сектора или другие неполадки в работе жесткого диска. Для проверки и возможного исправления в системе предусматривается утилита Check Disk, которая взаимодействует с HDD-накопителем (то есть если у вас SSD, этот способ выполнять не следует). Выполните диагностику накопителя в среде восстановления.
Запустите «Командную строку» в среде RE так же, как в Способе 2, затем вставьте команду chkdsk C: /F /R и выполните ее нажатием на клавишу «Enter».
Буква C: в команде означает литеру системного диска, но присвоенную ему в среде восстановления. Если у вас она другая, то скорректируйте команду. О том, как определить букву системного диска, назначенную ему средой восстановления, написано в Способе 2, Шагах 2-4.
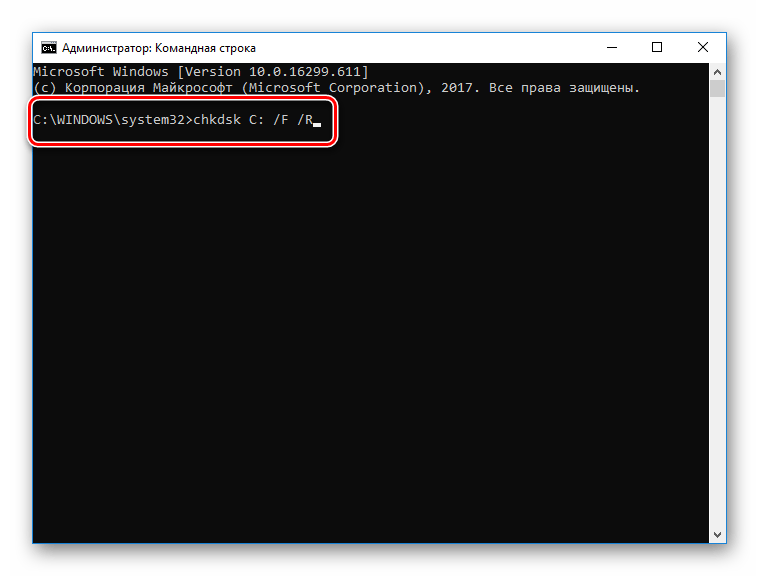
После этого начнется диагностика жесткого диска, по результатам которого станет понятно, были ли у него какие-либо неисправности.
Способ 6: Откат системы к точке восстановления
Если ни один способ из статьи не помог, можно попробовать использовать функцию восстановления системы до предыдущего состояния. Среди инструментов среды RE есть и такое средство:
- Перейдите в окно «Дополнительные параметры» среды RE, затем выберите плитку «Восстановление системы».
- Откроется окно стандартного средства «Восстановление системы», нажмите на кнопку «Далее».
- Выберите точку восстановления в отобразившемся списке и кликните по кнопке «Далее».
- Подтвердите выбор точки, выбрав «Готово».
Вам останется только дождаться возвращения системы к тому состоянию, которое было до точки восстановления.
Все пользовательские данные останутся на месте, но недавно установленный (после точки восстановления) софт будет удален, а настройки – сброшены.
Наша группа в TelegramПолезные советы и помощь
Table of contents
- What Causes Fatal Error C0000034 on Windows 10?
- Solution 1: Launch Startup Repair
- Solution 2: Utilize Windows Update Troubleshooter
- Solution 3: Refresh Windows Update components
- Solution 4: Clean up your Windows registry
- Solution 5: Disable your antivirus and firewall temporarily
- Conclusion
Updating your Windows OS is crucial for security and performance. However, encountering the “Fatal Error C0000034 Applying Update Operation” can halt this process, leaving many users frustrated. This guide provides updated and streamlined solutions to address this issue efficiently.
What Causes Fatal Error C0000034 on Windows 10?
The fatal error C0000034 typically occurs while you’re installing an update on your Windows OS. Instead of restarting after the Service Pack installation, the computer shuts down. The other reason would probably be repetitive update installations that come with the Service Pack.
Solution 1: Launch Startup Repair
This method involves utilizing the built-in Windows recovery tools to correct update errors . Starting with a simple restart to trigger an error report, you’ll dive into launching Startup Repair, a crucial step that prepares your system for the fix. Initiate Startup Repair
- Restart your PC. As it boots, force another restart to trigger the error report.
- Select “Launch Startup Repair” when prompted. If unavailable, insert your Windows OS installation disc and boot from it to access Startup Repair.

Access Command Prompt:
- In the Startup Repair window, cancel the automatic repair.
- In the subsequent dialog box, choose “View advanced options for recovery and support.”
- Open Command Prompt from the new window.
Modify the pending.xml File:
- In Command Prompt, enter notepad to open Notepad.
- Use Notepad to navigate to C:\Windows\Winsxs, open pending.xml, and make a copy for backup.
- Search for 0000000000000000.cdf-ms within pending.xml, delete the specified lines, save changes, and restart your PC.
Related:CMD Navigation: How to Change Directory in CMD (Command Prompt)
Solution 2: Utilize Windows Update Troubleshooter
This built-in feature is designed to automatically diagnose and resolve common issues with Windows Update. By simply navigating through a few menus in your system settings, you can activate this troubleshooter, allowing it to scan for and fix any problems that are obstructing your update process. Run Troubleshooter:
- Navigate to Settings -> Update & Security -> Troubleshoot -> Windows Update.
- Click Run the troubleshooter. Follow on-screen instructions to identify and fix issues.
Fix this issue quickly
You can try using a safe and totally free tool developed by the Auslogics team of experts.
A few simple steps to troubleshoot the issue:
Download the tiny Auslogics TroubleShooter tool.
Run the application (no installation is needed).
The app will check for the issue mentioned in the article. When the scan is done, check that this is the issue you were looking to solve and click ‘Apply now’ to apply the recommended fix.
You can use the app to troubleshoot other malfunctions for free by simply typing in a brief description of the issue your PC is experiencing. Or you can scan your PC for performance issues using the My Scanner tab.
Related:Windows Update Troubleshooter: Easily Fixing Windows Update Issues
Solution 3: Refresh Windows Update components
If you’ve tried the previous solution and yet the error persists, refresh the components of your Windows Update. Try the instructions we’ve listed below, remember to create a backup point. In this way, you can always restore a functional Windows 10 version should something go wrong.
- Go to the Search icon and type cmd in the bar. Right-click the Command Prompt and click Run as Administrator.

- Enter the commands below. Make sure you hit Enter after every command and wait until each task is completed before you enter the next command.
net stop bits
net stop wuauserv
net stop appidsvc
net stop cryptsvc
Related:Ultimate Guide: How to Manually Check and Install Windows Updates
Solution 4: Clean up your Windows registry
In some cases, the fatal error C0000034 issue may be caused by repetitive or invalid entries from your Windows registry. You can clear this manually, but it would be inconvenient and would take so much of your time.
The easier way to fix this error and get your computer running smoothly again is by using Auslogics Registry Cleaner .
Every step will be automated, so you can resolve issues with a click of a button.
Learn more: Auslogics Registry Cleaner
Related:Ultimate Guide: Why and How to Defrag Windows Registry?
Solution 5: Disable your antivirus and firewall temporarily
Sometimes, the security software installed on your system, including antivirus and firewall programs, can interfere with Windows Update processes, leading to errors such as the “Fatal Error C0000034”. Temporarily disabling these programs can help to resolve the update issue. However, it’s crucial to ensure your system’s security is not compromised for an extended period. So, once the error is resolved, make sure to turn your firewall back on.
To avoid errors like this in the future, consider using an anti-virus program that is fully compatible with all Windows processes.
Auslogics Anti-Malware is designed specifically for Windows and can work without conflict alongside your primary antivirus, providing an extra layer of protection against a wide range of malware.
Find out more: Auslogics Anti-Malware: Features and Reviews

Related:How to Check Firewall Settings in Windows 10 PC
Conclusion
Addressing the “Fatal Error C0000034” is crucial for maintaining your system’s integrity and performance. This guide simplifies the process, offering clear, actionable steps to get your Windows updates back on track. Remember, keeping your system and drivers up to date is key to avoiding similar issues in the future. If you have discovered other effective solutions or have insights to share, your feedback is welcome in the comments below!
Several Windows users are reportedly getting the Fatal Error C0000034 after installing a pending Windows update and restarting their computer as instructed. The error message below appears after the next failed system startup. This issue is confirmed to occur on Windows 8.1 and Windows 10.

After investigating this particular issue, it turns out that there are several different causes that might be triggering this error. Here’s a shortlist of potential culprits that might be responsible for this issue:
- Bad data blocks – This issue is quite widespread with traditional HDD that are beginning to fail. If your computer is no longer able to boot after a botched Windows Update, you should do a CHKDSK scan and replace the bad data sectors with unused equivalents.
- Corrupted Windows Update files – Some users that were dealing with the same issue have confirmed that they were finally able to fix the issue after running System File Checker and Deployment Image Servicing and Management scans in quick succession (using the Recovery Menu).
- Unsalvageable Windows Update component – Under certain special circumstances, your system might be unable to boot due because the initial check detected an underlying issue with Windows Update. In this case, you might be able to boot successfully without repairing your Windows installation by opening the MSconfig utility before the booting sequence and disabling the Windows Update service.
- Unidentified 3rd party Conflict – Some users have begun dealing with this issue after updating an existing driver or replacing a generic driver with the dedicated equivalent from a 3rd party. In this case, you can use System Restore to revert your computer back to a healthy state in which this issue was not occurring.
- System File Corruption – In case you are dealing with an underlying type of system file corruption and none of the other fixes allow you to bypass this error, the only viable fix at this point is to refresh every Windows component with a procedure like clean installing or repair install.
Not that you know every potential instance that might be responsible for the apparition of this issue, here’s a list of methods that other affected users have successfully used to fix the issue:
Method 1: Performing CHKDSK, SFC, and DISM scans
Since this issue is most likely related to some kind of system file corruption, you should start this troubleshooting guide by running a couple of utilities that are designed to tackle corrupted Windows files. Fortunately, every recent Windows version is equipped with CHKDSK (Check Disk utility) ( SFC (System File Checker) and DISM (Deployment Image Servicing and Management).
Our recommendation is to run both utilities in quick succession in order to maximize your chances of fixing the corrupted files without having to clean install your Windows installation.
However, since you won’t probably be able to boot normally, you will need to run these scans from the Advanced Startup menu by opening an elevated CMD prompt.
To make things easier for you, we’ve put together a step-by-step guide through the entire process:
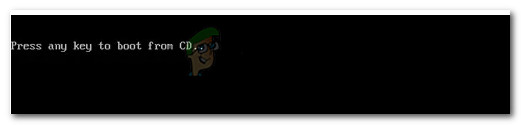
- Insert a compatible installation media, start your computer normally and press any key when you get asked if you want to boot from the installation media.

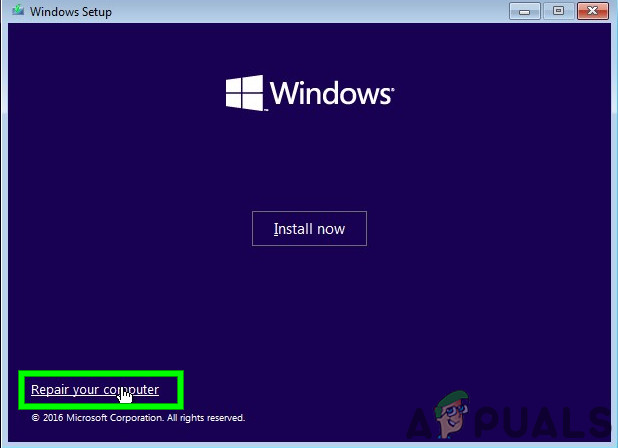
Boot from the Windows installation media - Once you get to the initial Windows installation screen, click on Repair your Computer to open up the Recovery Menu.

Repair your Computer via the Installation media Note: Keep in mind that even if you don’t have access to compatible installation media, you can still force the Recovery menu to appear by forcing 3 unexpected shutdowns while your computer is in the middle of the startup procedure. Additionally, you can create your own installation media that’s compatible with your Windows installation.
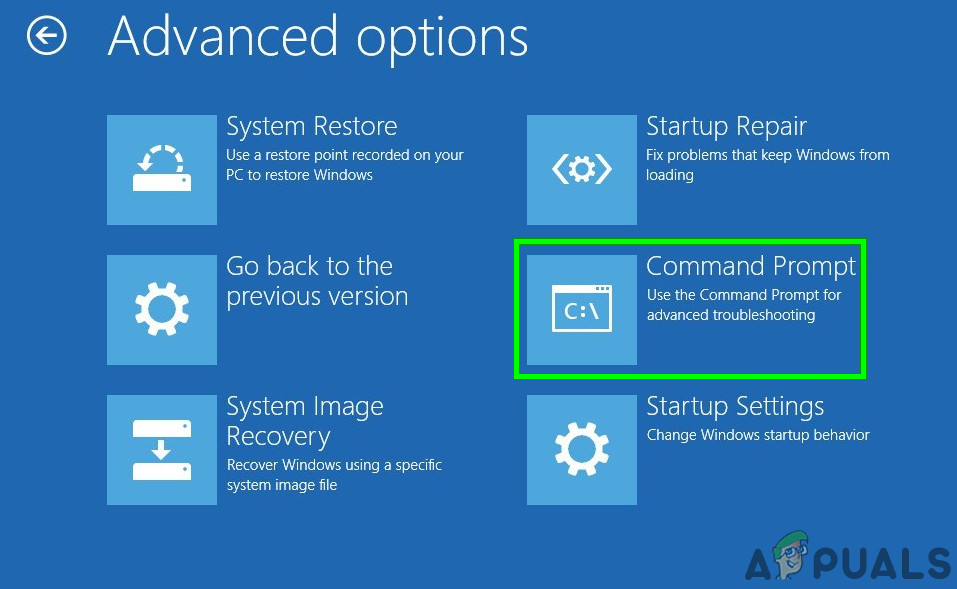
- Once you finally arrive inside the Recovery Menu, click on Troubleshoot from the list of available options, then click on Command Prompt from the list of available options.

Opening the Command Prompt via Recovery Menu - Once you are inside the elevated Command Prompt, type the following command and initiate a CHKDSK scan:
CHKDSK X:
Note: Keep in mind that X is just a placeholder for the driver that currently stores your Windows installation. Make sure to replace the letter with the drive that contains your Windows installation. Most commonly, that letter is C.
- Wait until the operation is complete, then restart your computer as instructed, then follow steps 1 to 3 above again to open another elevated CMD prompt via the Recovery menu if you still can’t boot.
- If the issue is still not resolved, type the following command and press Enter to initiate an SFC scan:
sfc /scannow
Note: Keep in mind that this utility might freeze during random times. When this happens, don’t interrupt the operation as you run the risk of creating additional logical errors.
- Once the operation is complete, reboot your computer and see if you are able to boot normally. In case you still run into the same kind of issues, follow steps 1 to 3 once again to open another elevated Command Prompt.
- Next, type the following command and press Enter to run a DISM scan:
DISM.exe /Online /Cleanup-Image /RestoreHealth /Source:C:\RepairSource\Windows /LimitAccess
Note: Before you start the DISM scan, ensure that you have a stable connection to the internet. This is important because DISM uses a sub-component of Windows Update to download healthy copies in order to replace corrupted system files.
- Once the DISM scan is finished, restart your computer one final time and see if you are able to boot normally.
In case you still see the same c0000034 fatal error after a failed boot attempt, move down to the next potential fix below.
Method 2: Disabling Windows Update via the Recovery Menu
According to some affected users, you might see this issue occurring due to a corrupted instance of Windows Update. If this is the main reason why your computer can’t boot, you might be able to fix the issue by opening MSConfig from the Recovery Menu and disabling the Windows Update component remotely.
Several affected users have confirmed that this method was the only thing that allowed them to bypass the Fatal Error C0000034. Users that managed to do this successfully have them managed to repair the broken Windows Update component by running the Windows Update troubleshooter.
Follow the instructions below to boot from the Recovery Menu and disable the Windows Update component:
Note: The instructions below are universal and will work on every recent Windows version including Windows 7, Windows 8.1, and Windows 10.
- Insert a compatible installation media, start your computer normally and press any key when asked if you want to boot from the Windows Setup disk.
Boot from the Windows installation media Note: If your computer doesn’t boot from the installation media by default, you might need to change the boot priority list from the BIOS or UEFI menu.
- Once you get to the initial Windows installation media, click on Repair your Computer to open up the Recovery menu.
Repair your Computer via the Installation media Note: If you don’t have access to a compatible installation or you don’t have the means to create one from scratch, you can also force the Recovery menu to appear by forcing 3 consecutive system interruptions during the booting sequence – You can do this by physically shutting down your computer right after the error pops up. After doing this a couple of times, your PC should restart directly in the Advanced Options menu.
- Once you’re inside the Advanced Options menu, access the Troubleshoot menu, then click on Command Prompt to open a prompt with admin access.

Opening the Command Prompt via Recovery Menu - Inside the elevated CMD prompt, type the following command to navigate to the System32 folder:
CD Windows\System32
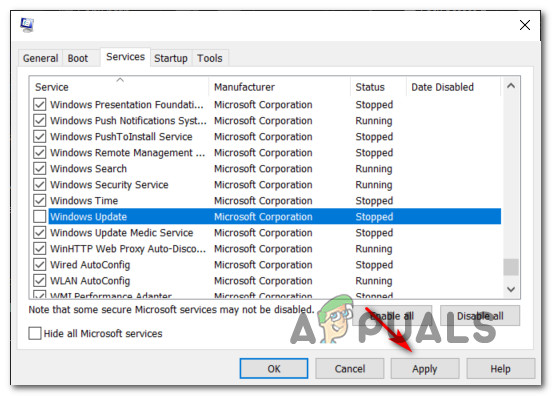
- Next, type ‘msconfig’ and press Enter to open up the System Configuration menu.
- Once the System Configuration menu pops up, click on the Services tab from the horizontal menu at the top, then search from the list of services and locate the Windows Update service.
- When you manage to locate it, simply uncheck the box associated with Windows Update and click Apply to save the changes.

Disabling the Windows Update Service - Close the CMD prompt, exit the Recovery menu and see if you are able to boot normally.
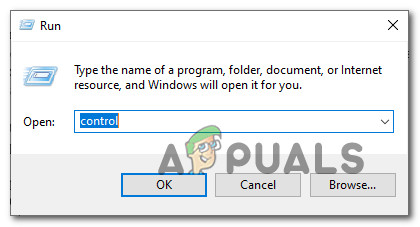
- In case this workaround allowed you to bypass the c0000034 fatal error, press Windows key + R to open up a Run dialog box. Once you’re inside, type ‘control’ inside the text box and press Enter to open up the Classic Control Panel interface.

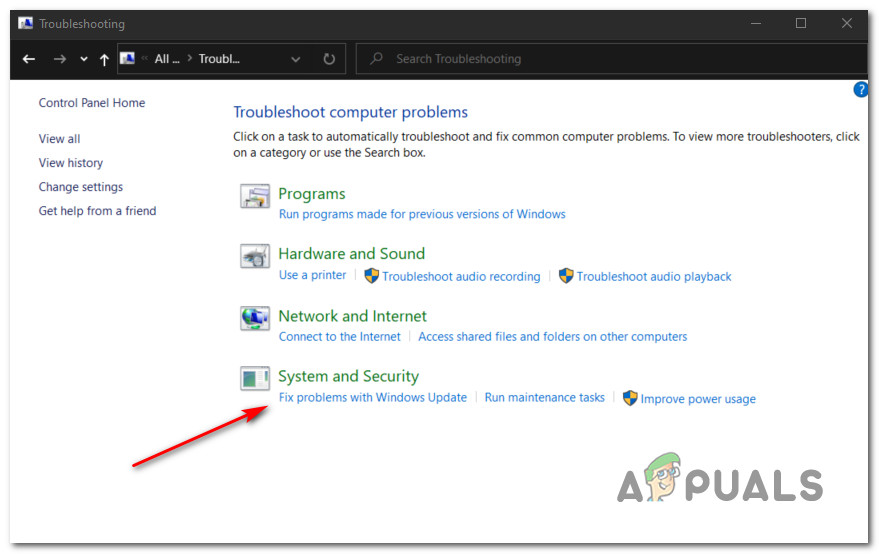
Accessing the classic Control Panel interface - Once you’re inside the classic Control Panel interface, use the search function in the top-right corner to search for ‘troubleshooter’ and press Enter. Next, from the list of results, click on Troubleshooting.

Accessing the Troubleshooting tab - Once you’re inside the Troubleshooting tab, click on the hyperlink named Fix problems with Windows Update (under System and Security).

Opening the Windows Update Troubleshooter Note: If you are prompted by the UAC (User Account Control) prompt, click Yes to grant admin access.
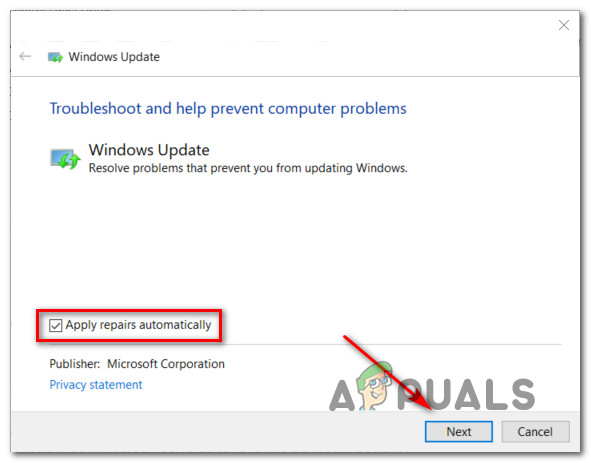
- Once you get to the first screen of the Windows Update troubleshooter, start by clicking on the Advanced hyperlink, then ensure that the box associated with Apply repairs automatically is checked before clicking Next.

Configuring the Windows Update utility - Wait until the scan is complete as the troubleshooter tries to detect underlying issues with your Windows Update component. If a viable repair strategy is found, follow the on-screen instructions to enforce the recommended fix.
- Restart your computer and see if you are able to boot normally at the next computer startup.

Note: Once you are finished with the steps above, take the time to re-enable the Windows Update component by enabling the service via MSConfig.
In case you still end up seeing the c0000034 fatal error while attempting to boot normally, move down to the next potential fix below.
Method 3: Using System Restore via Recovery menu
If you only started to see this error after installing a Windows Update or after a botched installation attempt, you might be able to revert your computer back to a healthy state by using the System Restore utility.
Keep in mind that System Restore is configured by default to create a new system restore snapshot during important system events. This includes the installation of new Windows Updates, the installation of 3rd party utilities, security updates, etc. So unless you modified the default behavior of Windows Update, you should have plenty of restore points to choose from.
However, since you are probably unable to boot normally, you will need to launch the System Restore utility from the recovery menu. Here’s a step-by-step guide on how to do so:
- Start your computer normally and insert / mount / plug in a Windows Installation media that is compatible with your Windows version.
Boot from the Windows installation media Note: If you don’t have access to an installation media, you can force the Recovery menu to show up by forcing 3 consecutive startup interruptions.
- At the first Windows installation setup screen, click on Repair your computer from the bottom-left corner of the screen to bring up the Advanced Options menu.
Repair your Computer via the Installation media - Once you’re inside the Advanced Options menu, click on System Restore from the list of available options.

System Restore in Advanced Options - Once you’re inside the System Restore utility, start by checking the box associated with Show more restore points. Once you get an overview with every available restore snapshot, select one that was created right before the apparition of this issue, click on it once to select it, then click on Next to advance forward.

Using a System Restore snapshot - On the next page, click on Finish and wait patiently until the utility will restore your computer back to a state in which the issue was not occurring.
- Boot normally and see if are still encountering the same error message.
In case you still see the same Fatal Error C0000034, move down to the next potential fix below.
Method 4: Performing an Install Repair / Clean install
If none of the methods above have worked for you, you should seriously consider the possibility that you might be dealing with some kind of underlying corruption issue that is beyond your control.
f this scenario is applicable, you should be able to fix the problem by refreshing every Windows component by performing a clean install or a repair install procedure. Since the potential drawbacks of both methods are different, we’ve created 2 separate guides:
- Repair install (in-place repair) – This should be the preferred approach if you have a Windows-compatible installation at the ready. Even though this procedure is a little tedious, the main advantage is that you get to preserve your personal files included on the OS drive (this includes personal media, applications, games, and even user preferences)
- Clean install (in-place repair) – If you’re looking for a quick and easy procedure and you already backed up your data or you don’t care about wiping your OS drive, this should be your choice. This operation can be performed directly from the GUI menu and will not require you to use compatible installation media.
Kevin Arrows
Kevin Arrows is a highly experienced and knowledgeable technology specialist with over a decade of industry experience. He holds a Microsoft Certified Technology Specialist (MCTS) certification and has a deep passion for staying up-to-date on the latest tech developments. Kevin has written extensively on a wide range of tech-related topics, showcasing his expertise and knowledge in areas such as software development, cybersecurity, and cloud computing. His contributions to the tech field have been widely recognized and respected by his peers, and he is highly regarded for his ability to explain complex technical concepts in a clear and concise manner.
После неправильного выключения, смены конфигурации дисков, а иногда и вовсе без каких-либо видимых причин, можно столкнуться с синим экраном с сообщением о повреждении данных конфигурации загрузки или непредвиденной ошибке и кодом 0xc0000034 при очередной попытке запустить систему.
В этой инструкции о том, чем может быть вызвана ситуация и как исправить ошибку 0xc0000034 при загрузке Windows 11/10.
Причины ошибки 0xc0000034 и варианты решения

Не касаясь предшествующих событий (неправильное экстренное выключение или потеря питания, замена дисков, сбои обновления или восстановления), остановимся на двух факторах, которые напрямую могут привести к синему экрану с ошибкой 0xc0000034:
- Повреждение файлов загрузчика, в данном случае в сообщении об ошибке вы увидите указание на BCD.
- Недоступность раздела с системой, на который указывает конфигурация загрузки — в этом случае вы увидите сообщение о непредвиденной ошибке без указания на конкретный файл.
В зависимости от ситуации в вашем случае действия будут отличаться.
Если предполагается, что повреждён загрузчик, используйте подробные инструкции по его восстановлению:
- Восстановление загрузчика Windows 11
- Восстановление загрузчика Windows 10
Если же в сообщении об ошибке нет указания на файл BCD:
- При изменении конфигурации дисков (а также разъемов их подключения), попробуйте вернуть исходную конфигурацию, отключить все внешние накопители. Если этот вариант не подходит, попробуйте повторно создать загрузчик, используя приведённые выше инструкции.
- В случае, если ошибка 0xc0000034 появилась без каких-либо действий с вашей стороны, можно попробовать загрузиться с загрузочной флешки Windows 11 или 10, после чего в программе установки нажать клавиши Shift+F10 (Shift+Fn+F10 на некоторых ноутбуках) — это откроет командную строку.
- По порядку введите следующие команды:
diskpart
list volume
- Обратите внимание на доступность, номер, букву и файловую систему раздела, где находится Windows (учитывайте, что при загрузке с флешки буква может отличаться от C, например, на моем скриншоте это раздел без буквы с файловой системой RAW, а раздел с буквой C — не системный).

- Если раздел имеет букву, введите
exit
и нажмите Enter, после чего перейдите к 7-му шагу.
- Если раздел не имеет буквы, введите команды (заменив N на номер раздела, а БУКВА — на любую свободную букву диска):
select volume N
assign letter=БУКВА
exit

- Введите команду (заменив C на нужную букву диска)
chkdsk C: /f
и нажмите Enter.
- Если в ходе проверки раздела будут обнаружены и исправлены ошибки файловой системы, можно закрыть окно командной строки и попробовать запустить систему как обычно, с большой вероятностью ошибка 0xc0000034 больше не появится.
- Если на 4-м шаге вы увидели, что системный раздел диска имеет файловую систему RAW, 7-й шаг это исправил, либо были исправлены иные ошибки файловой системы, но экран 0xc0000034 продолжает появляться, попробуйте перезаписать файлы загрузчика, используя инструкции в начале статьи.
- Когда системный раздел диска поврежден (не виден, отображается как RAW), при этом обычный chkdsk не срабатывает, можно использовать Active Partition Recovery или TestDisk с WinPE (например, от Sergei Strelec) для восстановления раздела. Там же можно использовать EasyBCD для восстановления записей в конфигурации загрузки.
- В сценарии, когда ошибка появляется при первом включении компьютера или ноутбука, но исчезает сама при повторной попытке включения, попробуйте отключить быстрый запуск Windows (инструкция для Windows 11, но для Windows 10 всё точно так же).


В случае если ни один из вариантов не помог исправить ошибку 0xc0000034, вы можете описать в комментариях ситуацию в деталях, включив информацию о том, что предшествовало её появлению — возможно, я смогу помочь. И, в крайнем случае, можете самостоятельно переустановить Windows.