
Вы можете столкнуться с ошибкой синхронизации времени в Windows, когда ваш компьютер не может автоматически синхронизировать свое время с серверами времени time.microsoft.com в Интернете. Из-за некорректного времени на компьютере у вас может возникать ошибка «
Your clock is ahead/ Ваши Часы спешат (отстают)
» при открытии HTTPS сайтов Chrome (и в других браузерах), не корректно работать сторонние программы, и появляться различные другие неприятности.
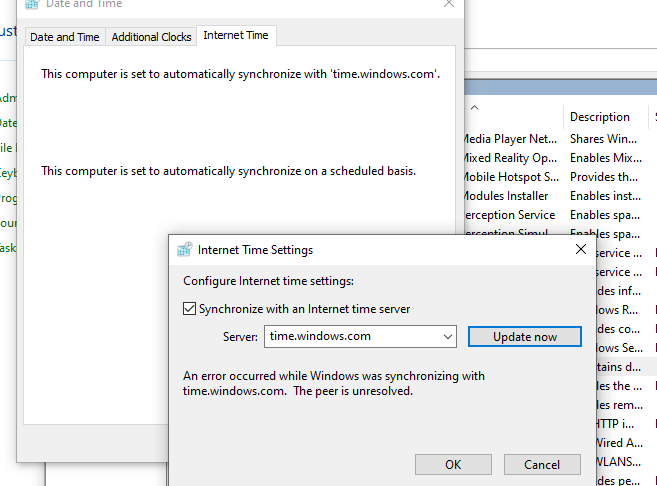
Если попытаться вручную выполнить синхронизацию времени из панели управления Windows (Control Panel -> Date and Time -> Internet Time -> Change Settings -> Update now), появляется ошибка:
An error occurred while windows was synchronizing with time.windows.com. The peer is unreachable.
Также здесь может быть ошибка:
The peer is unresolved.
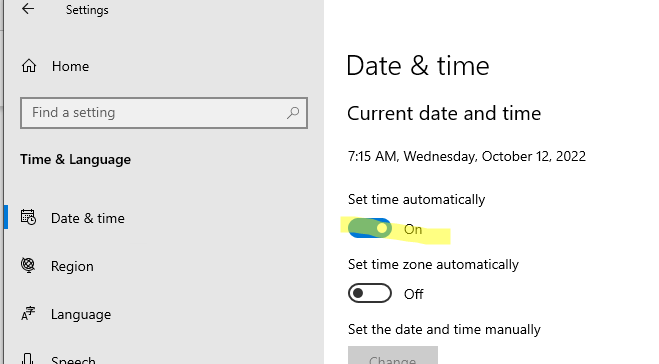
Проверьте, что у вас настроена автоматическая синхронизация времени с NTP серверами в Интернете. Перейдите в раздел Settings -> Time and Language -> Date and Time (можно перейти в этот раздел с помощью команды быстрого доступа по URI:
ms-settings:dateandtime
). Проверьте, что здесь включена опцию Set time automatically и выполните синхронизацию, нажав кнопку Sync now в разделе Additional settings.
Если синхронизация времени с Интернетом не работает, проверьте, с какого внешнего NTP сервера должен получить время ваш компьютер. Выполните команду:
w32tm /query /peers
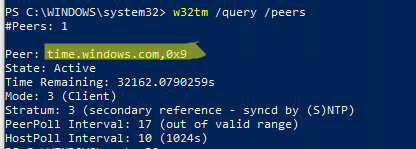
По умолчанию компьютеры в рабочих группах (не присоединенные к домену Active Directory) настроены на получение времени с серверов time.windows.com.
Если при запуске этой команды появилась ошибка “The following error occurred: The service has not been started. (0x80070426)”, проверьте состояние службы Windows Time. Она должна быть настроена на автоматический или ручной запуск. Можете проверить состояние службы с помощью PowerShell или консоли services.msc:
Get-Service w32time| Select DisplayName,Status, ServiceName,StartType
Перезапустите службу:
Restart-Service -Name w32time
Если служба отключена, включите ее.

Проверьте, что с вашего компьютера доступен хост time.microsoft.com.
Сначала проверьте, что ваш компьютер может разрешить это имя в IP адрес:
nslookup time.windows.com
Если ваш компьютер не может отрезолвить это имя в IP адрес (ошибка синхронизации времени The peer is unresolved), значит в настройках сетевого адаптера вашего компьютера указан DNS сервер, который не доступен, или изолирован от интернета. Попробуйте сменить адрес первичного DNS сервера на DNS сервер Google (8.8.8.8). Можно изменить настройки DNS для сетевого адаптера в Windows с помощью PowerShell.
Вывести список сетевых интерфейсов:
Get-NetAdapter

Изменить настройки DNS для сетевого адаптера с ifIndex 10:
Set-DNSClientServerAddress –InterfaceIndex 10 –ServerAddresses 8.8.8.8
Проверьте доступность сервера с помощью ping:
ping time.windows.com
И затем проверьте, что сервер времени Microsoft доступен по порту NTP (UDP 123). Для проверки доступности UDP порта можно использовать утилиту portquery или можно напрямую обратиться к серверу и запросить у него текущее время:
w32tm /stripchart /computer:time.windows.com
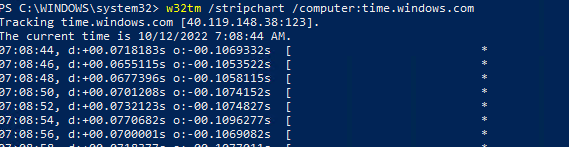
Если команда вернет ошибку error: 0x800705B4, значить указанный NTP сервер не доступен. Проверьте, что в Windows открыт исходящий порт UDP/123 для протокола NTP (по умолчанию порт должен быть открыт). Вы можете принудительно открыть порт в Windows Defender Firewall с помощью PowerShell:
New-NetFirewallRule -DisplayName "AllowOutNTP" -Direction Outbound -Protocol UDP -RemotePort 123 -Action Allow
Enable-NetFirewallRule -DisplayName AllowOutNTP
Также убедитесь, что исходящий NTP трафик не блокируется на сетевом уровне (провайдера, вашего файервола или другими сетевыми устройствами).
Если этот NTP сервер не доступен, вы можете использовать другой NTP сервер.
Можно указать
time.nist.gov
или ближайший к вам NTP сервер, который можно получить на сайте
https://www.ntppool.org
.
Можно изменить адрес вашего NTP сервера с помощью командной строки:
w32tm /config /manualpeerlist:time.nist.gov,0x1 /syncfromflags:manual /reliable:yes /update
Перезапустите службу времени (в данном примере вы запустим несколько команд в одну строку):
net stop w32time && net start w32time
Затем выполните синхронизацию времени:
w32tm /config /update
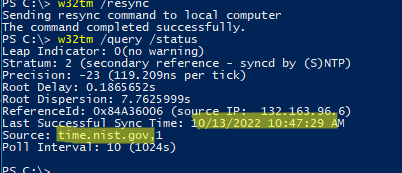
w32tm /resync
Проверьте, что ваш компьютер успешно получил время с нового источника времени (NTP сервера):
w32tm /query /status
Если ничего не помогло, попробуйте полностью сбросить настройки службы Windows Time:
net stop w32time
w32tm /unregister
w32tm /register
net start w32time
Выполните синхронизацию времени:
w32tm /resync
Также вы можете добавить NTP сервер в список серверов времени и выполнить синхронизацию из панели управления Windows. Перейдите в Settings -> Time & language -> Date & time -> Additional clocks –> Internet Time
Убедитесь, что включена опцию Synchronize with an Internet time, добавьте новый сервер time.nist.gov и нажмите кнопку Update Now.
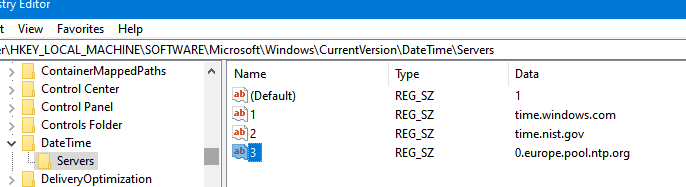
Вы можете добавить NTP сервера в этот список через реестр HKEY_LOCAL_MACHINE\SOFTWARE\Microsoft\Windows\CurrentVersion\DateTime\Servers.
Для автоматической синхронизации времени в Windows используется отдельно задание в планировщике Task Scheduler. Запустите консоль taskschd.msc и перейдите в раздел Task Scheduler (Local) -> Task Scheduler Library -> Microsoft -> Windows -> Time Synchronization. Проверьте, что задание SynchronizeTime включено.
Также вы можете проверить состояние задания Task Scheduler с помощью PowerShell:
Get-ScheduledTask SynchronizeTime
Чтобы включить его:
Get-ScheduledTask SynchronizeTime|Enable-ScheduledTask
Статьи
Узел time.windows.com может быть недоступен или ограничен\запрещен провайдеом, проверить можно так:
В командной строке запущенной от имени администратора введите:
ping time.windows.com
tracert time.windows.com
Если узел не отвечает, значит он недоступен, причины могут быть различные:
сам узел недоступен, неверная настройка сети, ограничения\запрет провайдером, программа защиты сети блокирует порт\узел, используется прокси-сервер и т.д.
При возникновении неполадок связи можно воспользоваться командой ping для проверки IP-адреса назначения и вывода результатов этой проверки на экран. Команда pingсообщает, ответил ли опрошенный узел и сколько времени прошло до получения ответа. Если при доставке пакета узлу назначения произошла ошибка, команда ping выводит сообщение об ошибке.
При возникновении неполадок связи можно воспользоваться командой tracert для проверки пути к IP-адресу назначения и вывода ее результатов. Команда tracert отображает последовательность IP-маршрутизаторов, используемых при доставке пакетов с данного компьютера на компьютер назначения, и время, затраченное на каждый прыжок. Если пакеты не могут быть доставлены по адресу назначения, команда tracert отображает последний маршрутизатор, успешно перенаправивший пакеты.
Используйте узел time.nist.gov (проверенно, работает).
AlexLine
Сообщ.
#10
,
Получите, распишитесь:
Настройка службы времени Windows на использование внешнего источника времени
Администратор может настроить службу времени Windows хозяина операций основного контроллера домена (PDC) в корне леса на использование в качестве источника времени внешнего сервера времени, поддерживающего протокол SNTP (Simple Network Time Protocol). Например, в качестве внешнего сервера времени SNMP можно использовать сервер времени Microsoft (time.windows.com). Чтобы служба времени Windows использовала в качестве источника внешний сервер времени SNTP, выполните следующие действия.
1. Нажмите кнопку Пуск, выберите пункт Выполнить, введите команду regedit и нажмите кнопку ОК.
2. Выполните следующие действия, чтобы изменить тип сервера на NTP.
a. Найдите и выделите следующий раздел реестра:
HKEY LOCAL MACHINE\SYSTEM\CurrentControlSet\Services\W32Time\Parameters
b. На правой панели щелкните правой кнопкой мыши параметр TYPE и выберите команду Изменить.
c. В появившемся окне Изменение строкового параметра в поле Значение введите NTP и нажмите кнопку ОК.
3. Чтобы сделать сервер надежным источником времени, выполните следующие действия.
a. На правой панели щелкните правой кнопкой мыши параметр ReliableTimeSource и выберите команду Изменить.
b. В появившемся окне Изменение параметра DWORD в поле Значение введите 1 и нажмите кнопку ОК.
4. Чтобы присвоить параметру LocalNTP сервера значение 1, выполните следующие действия.
a. На правой панели щелкните правой кнопкой мыши параметр LocalNTP и выберите команду Изменить.
b. В появившемся окне Изменение параметра DWORD в поле Значение введите 1 и нажмите кнопку ОК.
5. Чтобы указать источники времени, выполните следующие действия.
a. На правой панели щелкните правой кнопкой мыши параметр NtpServer и выберите команду Изменить.
b. В появившемся окне Изменение строкового параметра укажите Перечень_источников_времени в поле Значение и нажмите кнопку ОК.
Примечание. Перечень_источников_времени представляет собой перечень узлов, предоставляющих данные о текущем времени. Для разделения имен узлов в списке используются пробелы. Все имена DNS в данном списке должны быть уникальными.
6. Только в случае использования Windows 2000 с пакетом обновления 4 (SP4) необходимо задать параметр коррекции времени. Для этого выполните следующие действия.
a. Найдите и выделите следующий раздел реестра:
HKEY_LOCAL_MACHINE\SYSTEM\CurrentControlSet\Services\W32Time\Parameters
b. На правой панели щелкните правой кнопкой мыши параметр MaxAllowedClockErrInSecs и выберите команду Изменить.
c. В появившемся окне Изменение параметра DWORD укажите Интервал_в_секундах в поле Значение и нажмите кнопку ОК.
Примечание. Интервал_в_секундах представляет собой интервал времени (в секундах) между двумя опросами. Для данного параметра рекомендуется устанавливать значение 900. При этом опрос будет выполняться каждые 15 минут.
7. Чтобы задать интервал опроса, выполните следующие действия.
a. Найдите и выделите следующий раздел реестра:
HKEY LOCAL MACHINE\SYSTEM\CurrentControlSet\Services\W32Time\Parameters
b. На правой панели щелкните правой кнопкой мыши параметр Period и выберите команду Изменить.
c. В появившемся окне Изменение параметра DWORD в поле Значение введите 24 и нажмите кнопку ОК.
8. В меню Файл выберите команду Выход, чтобы закрыть редактор реестра.
9. В командной строке введите следующую команду и нажмите клавишу ВВОД, чтобы перезапустить службу времени Windows:
net stop w32time && net start w32time
10. На всех компьютерах, кроме сервера времени, выполните следующую команду, чтобы синхронизировать время этих компьютеров с сервером времени:
w32tm -s
Добавлено
От себя добавлю, что в статье имеется одна существенная неточность:
Цитата AlexLine @
a. На правой панели щелкните правой кнопкой мыши параметр NtpServer и выберите команду Изменить.
b. В появившемся окне Изменение строкового параметра укажите Перечень_источников_времени в поле Значение и нажмите кнопку ОК.
Примечание. Перечень_источников_времени представляет собой перечень узлов, предоставляющих данные о текущем времени. Для разделения имен узлов в списке используются пробелы.
Источники времени указываются следующим образом servername1,0x1 servername2,0x1 servername3,0x1
т.е значения серверов источников времени в строке разделяются символами ,0x1
Synchronizing Windows time is crucial for smooth operation of many Microsoft services and several Line-of-business(LOB) applications. This is why Windows automatically syncs it’s time with the selected server once a week to get the current date and time information.
When Windows runs into complications connecting with time servers, the OS fails to synchronize with Windows time and gives you a “Time Synchronization failed” error. These complications could be anything from request timeout error to the OS failing to start the right services.
As for fixing the said issue, all you need to do is make sure that Windows has no problems connecting with the time server. To do this, you might need to perform several fixes.
Troubleshooting Time Synchronization Failed Error
Before we jump into some detailed fixes, try force-syncing your computer time.
You can do this from the Time & language > Date & Time in Windows Settings.
If that does not work, try restarting your PC. Sometimes, minor bugs and errors in Windows could be why the system fails to synchronize time.
Restart Windows Time Service
Windows uses Windows Time Service to sync computer clocks with the time on the selected time server. Since it is one of the critical services that handles Windows time, you need to ensure it is running.
- Press the Windows + R key to open Run.
- Type
services.mscand press Enter to open Services. - Scroll down and double-click on Windows Time.

- In the General tab, set the Startup type to Automatic.
- In Service Status, Stop the service and select Apply.

- After a few seconds, click on Start.
- Click Apply and then OK.
- Open Settings to check if the date and time are synchronized.


Enable Time Synchronization
If the above method does not work, you can start time synchronization from Task Scheduler. Task scheduler lets the PC perform a routine task on a PC. Besides this, it can also force start a specific task if it does not start manually.
- Press the Windows + R key to open Run.
- Type
taskschd.mscand press enter to open Task Scheduler. - On the left panel, navigate to Task Scheduler library > Microsoft > Windows
. - Scroll down and click on Time Synchronization.
- Now on the middle panel, right-click Synchronize time and select Run.

- Again right-click ForceSynchronizeTime and choose Run.
- Now. check the date and time settings to see if it synchronizes.

Change Public Time Server
We talked about how Windows manages computer time using Windows Time Service. Windows Time Service also uses Public Time Servers to get an accurate time. Public Time Server reads the exact time from a reference clock and then sends this data to its client computer, in our case, your computer.
If the server address is incorrect, your PC cannot synchronize time. To fix this, you need to set the correct server address. Besides this, the problem could be with the server as well. Either way, changing the server could solve the issue with time synchronization.
- Press the Windows + R key to open Run.
- Type
timedate.cpland press Enter to open Date and Time. - Go to the Internet Time tab.
- Select Change settings.

- Change the Server to any other server from the dropdown menu and click Update now.

- Click OK.


If the server from the dropdown menu does not work, set any one of the following time servers
time.windows.compool.ntp.orgtime-a.nist.govtime-b.nist.govtime-a.timefreq.bldrdoc.govtime-b.timefreq.bldrdoc.gov
Enable NTP Port on Firewall.
Windows Time Service uses the NTP protocol to get information from Public Time servers through Port 123. If a firewall blocks this port, the system cannot receive an NTP packet from the time server to synchronize time.
To fix this, you will need to create inbound rules to allow connection to your computer.
- Press the Windows + R key to open Run.
- Type
firewall.cpland press enter to open Windows Defender Firewall. - Select Advanced settings.

- On the left panel, right-click on Inbound Rules and select New rule.

- Check Port and click on Next.

- Check both UDP and Specific local ports. Then, set Specific local ports to 123.

- Check Allow the connection and press Next.

- Check All Domains, Private and Public, and click on Next.

- Set any name(say Network Time Protocol) and select Finish.

- Again, right-click on Outbound rules and select New rules.
- Now follow steps 5 to 9.
- Now check if your Windows time synchronizes.


Use VPN
VPN uses a series of private networks to connect to the internet. Using a VPN, you can access servers that were previously inaccessible. If the default connection restricts your PC from connecting to the Public Time Servers, you can check if using a VPN synchronizes windows time.
Update Windows
Windows is not entirely free of errors and bugs. This is why Microsoft constantly provides updates to fix any issues with the system. Besides this, updating Windows also adds new features and security upgrades to your current version of Windows.
If the synchronization issue is due to random Windows bugs, updating it should fix it.
- Press the Windows + I key to open Settings.
- Go to Windows Update on the left panel.
- Select Check for updates or Download and install updates to update your Windows


The date and time that is set on your Windows 11 PC or laptop are more important than you might think. It essentially helps your PC or laptop to recognize the time zone of your region and connect to different servers on the internet. And as you clicked on this article, we are guessing that you are experiencing the time sync not working in Windows 11 issue on your device and are looking for working fixes!
Well, fret not, in this in-depth guide, we have listed some of the best solutions that you can try for the time sync not working in Windows 11 issue. Be sure to try them out on your device one by one to fix the date and time sync feature on your Windows 11 laptop or PC.
Fix Time Sync Not Working in Windows 11
Now, below you will find some of the top working fixes for the time and date sync not working in Windows 11 issue. Try them out on your device using the provided steps and make sure to follow them as they are.
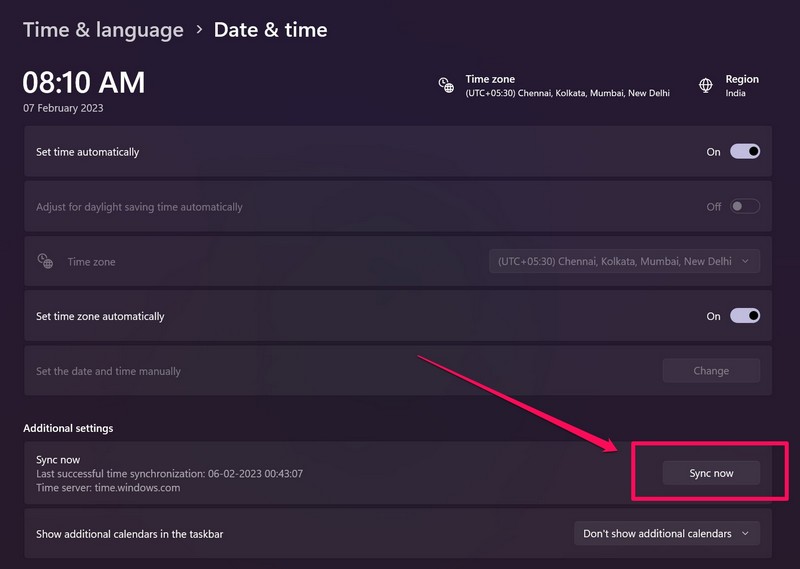
1. Check Your Internet Network
The time and date sync feature in Windows 11, as you might already know, relies on an active internet network to regularly connect with the Windows servers and update the time and the time zone of your PC or laptop. Hence, if your internet is not working properly or experiencing slow speeds, you might experience the time sync not working issue on your Windows 11 PC or laptop.
In this case, you can contact your internet provider to re-activate your data connection. After that, use the steps below to sync the date and time on your Windows 11 device:
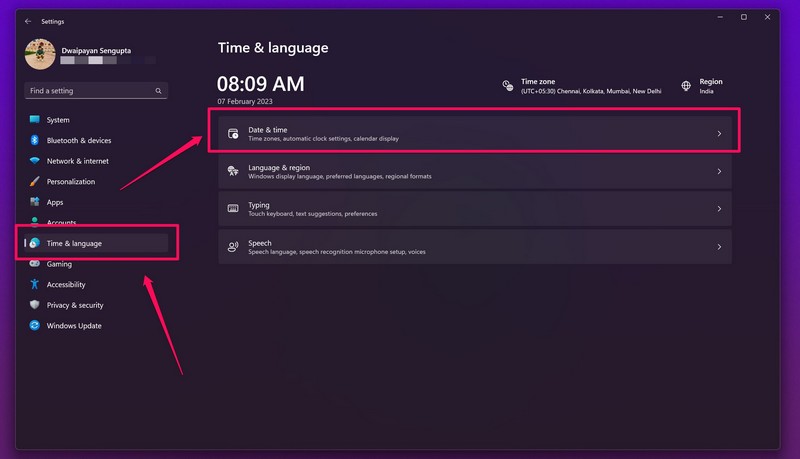
1. Press Windows + I to launch the Settings app in Windows 11.
2. Go to the Time & language tab on the left navigation bar and select the Date & time option.
3. Make sure that the toggles for Set time automatically and Set time zone automatically are enabled.
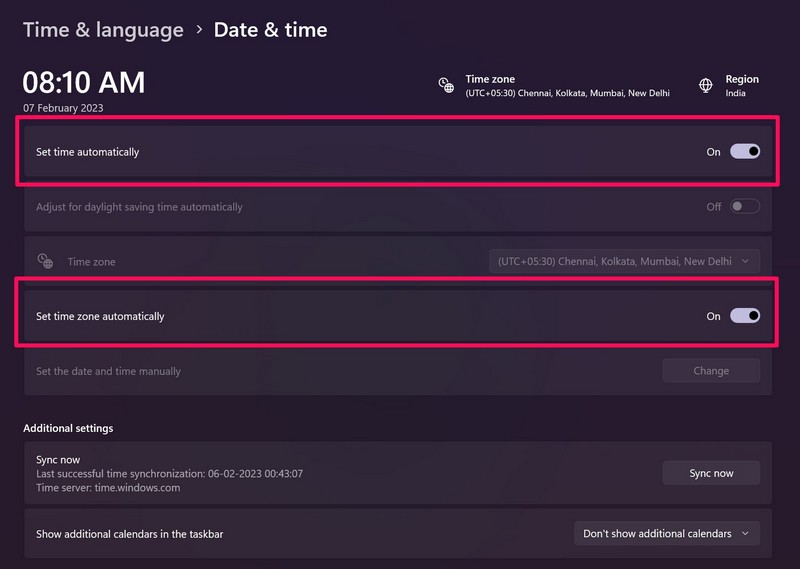
4. Click the Sync now button to sync the date and time on your Windows 11 PC or laptop.
2. Set the Date and Time Manually in Windows 11
Now, if the above method did not resolve the time sync not working issue on your Windows 11 device, you can try setting the date and time manually on your PC or laptop. To do that, use the steps right below:
1. Press the Windows + I shortcut to open Windows Settings.
2. Under the Time & language tab, select the Date & time option.
3. Now, disable the toggles for both the Set time automatically and Set time zone automatically options.
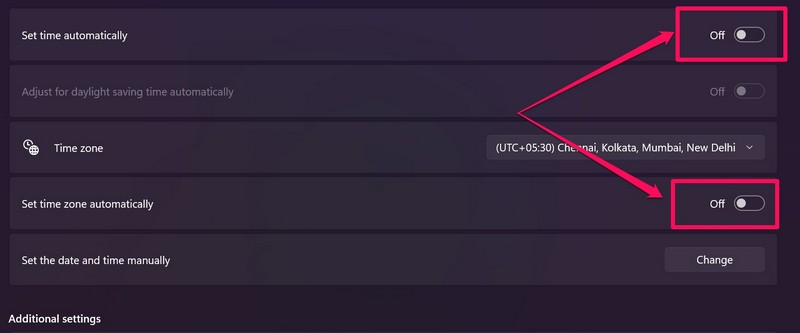
4. Next, click the Change button beside the Set the date and time manually option.
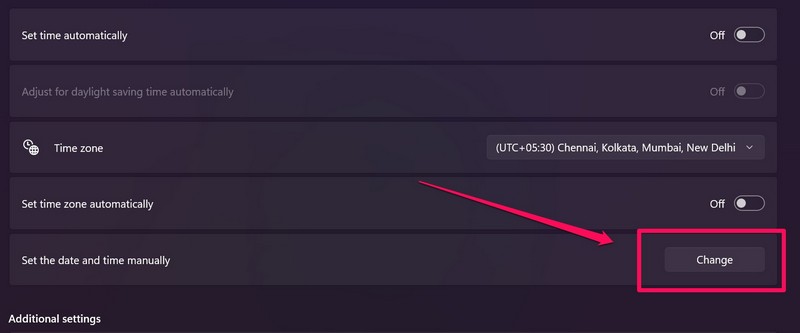
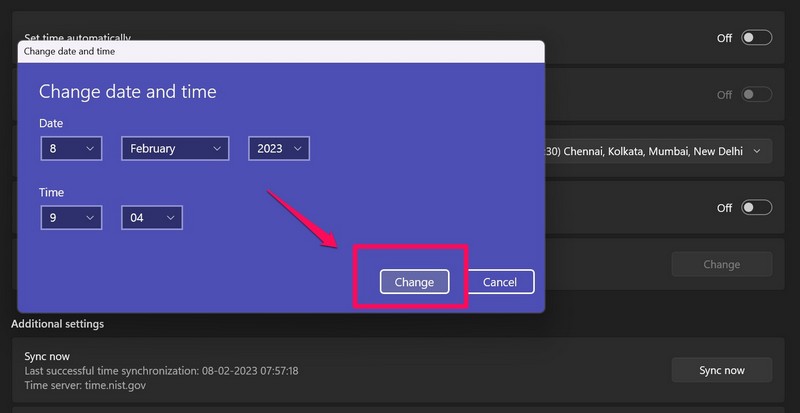
5. On the following UI, set the date and time manually according to your current time zone and region.
6. After that, click the Change button on the Change date and time window to save the changes.
3. Change the Time Server in Windows 11
The next thing that you can try to fix the time sync not working in Windows 11 issue is changing the time server on your PC or laptop. Follow the steps right below to manually change the time server on your PC or laptop and fix the date and time sync feature in Windows 11:
1. Press Windows + R to open the Run tool in Windows 11.
2. Type control in the text field and press Enter to launch the Control Panel.
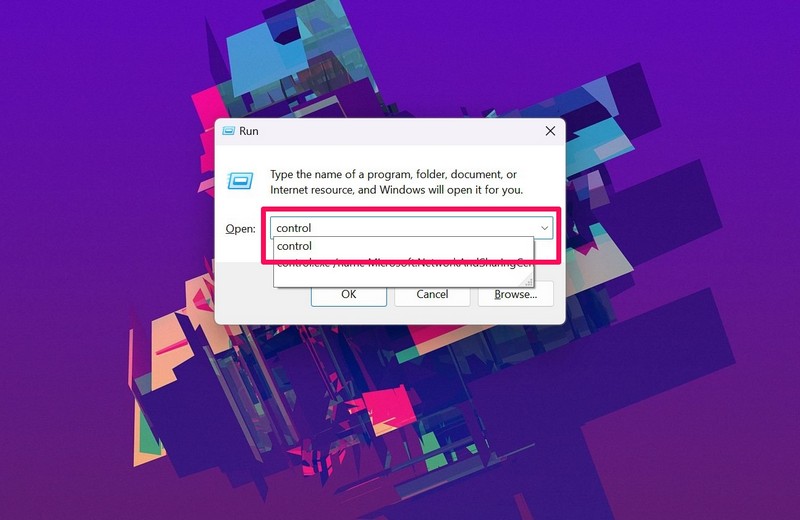
3. Go to the Clock and Region menu.
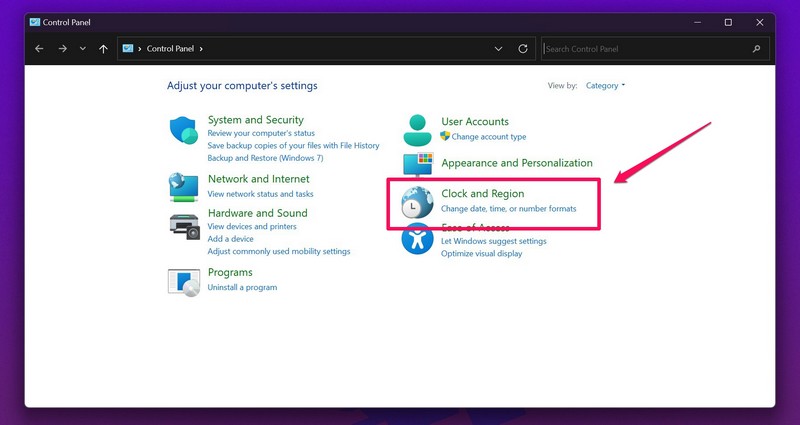
4. Click the Date and Time option.
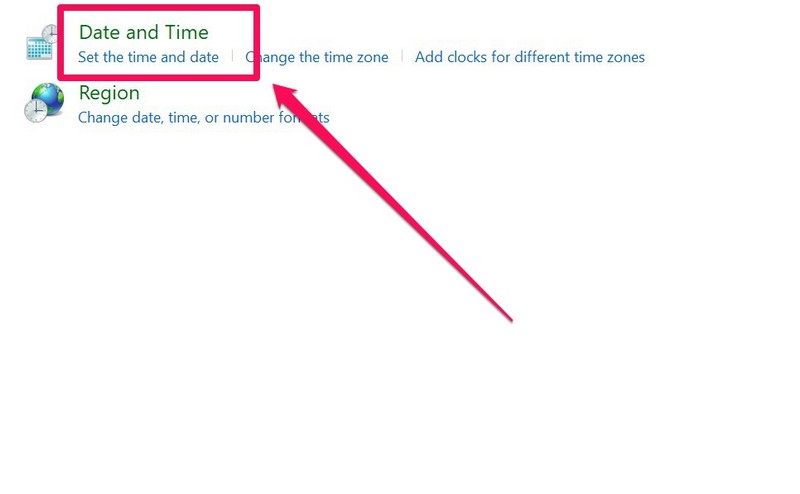
5. On the following UI, go to the Internet Time tab and click the Change settings… button.
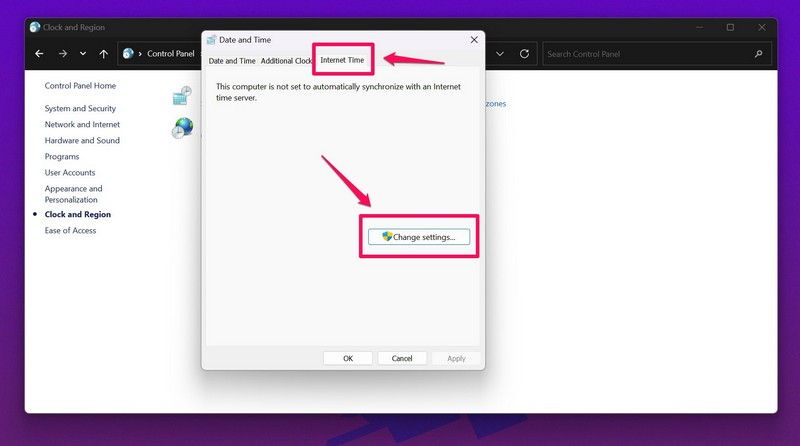
6. Now, make sure that the checkbox for Synchronize with an Internet time server option is marked.
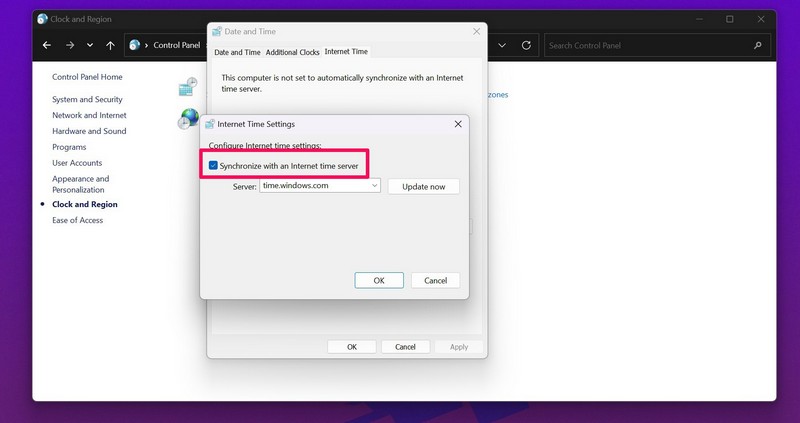
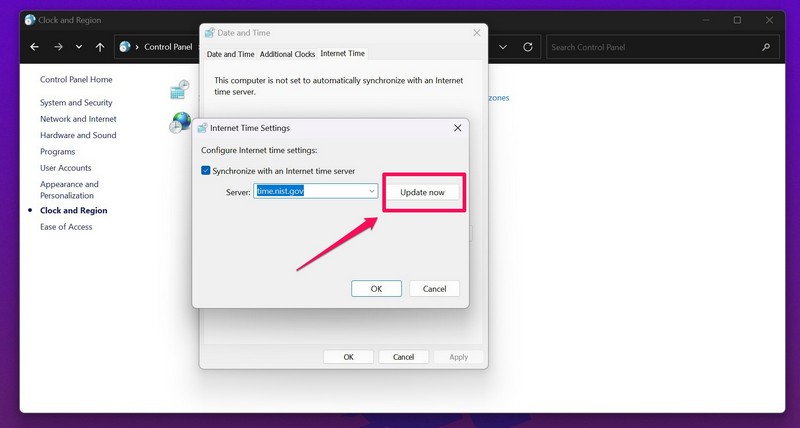
7. Next, click the arrow beside the Server field to open the drop-down box and select the secondary server.
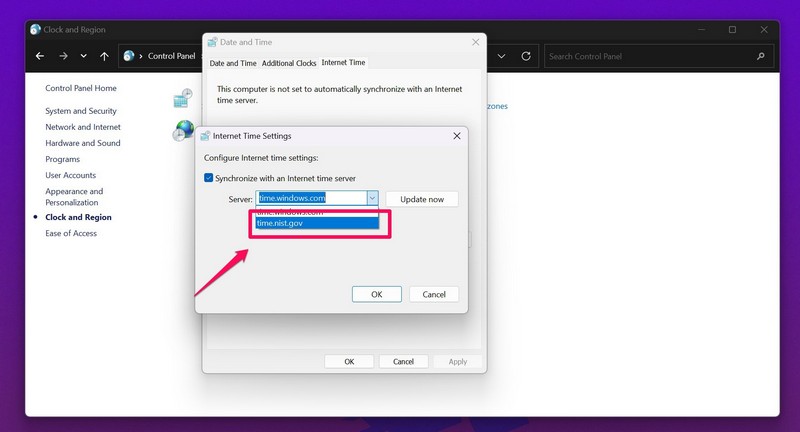
8. Click the Update now button to save the change.
9. Close the Control Panel and use the steps from Fix #1 to sync the time via Windows settings.
4. Restart Windows Time Service in Windows 11
The Windows Time service is essentially the Windows service that is responsible for handling the date and time in Windows 11. Hence, minor issues with the Windows Time service or conflicts with other processes or services in Windows can cause the time sync not working issue on your PC or laptop.
In this case, use the steps below to restart the Windows Time service in Windows 11 and fix the time sync issue on your device:
1. Press the Windows + R shortcut to open the Run tool in Windows 11.
2. Type in Services.msc in the text field and press Enter.
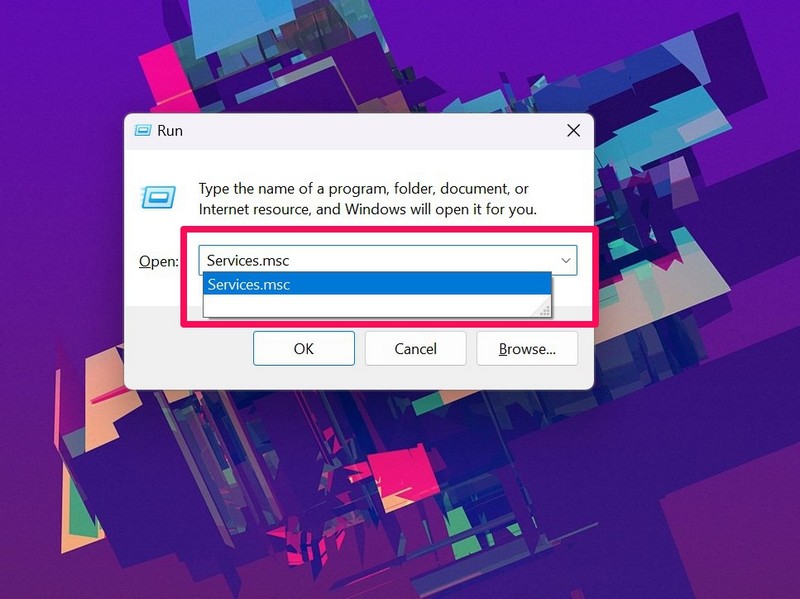
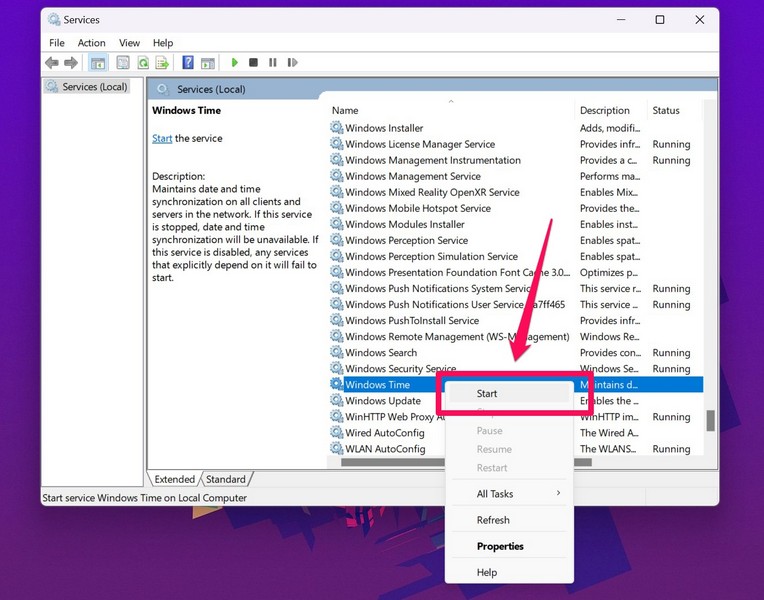
3. Next, find the Windows Time service on the left panel of the Services window.
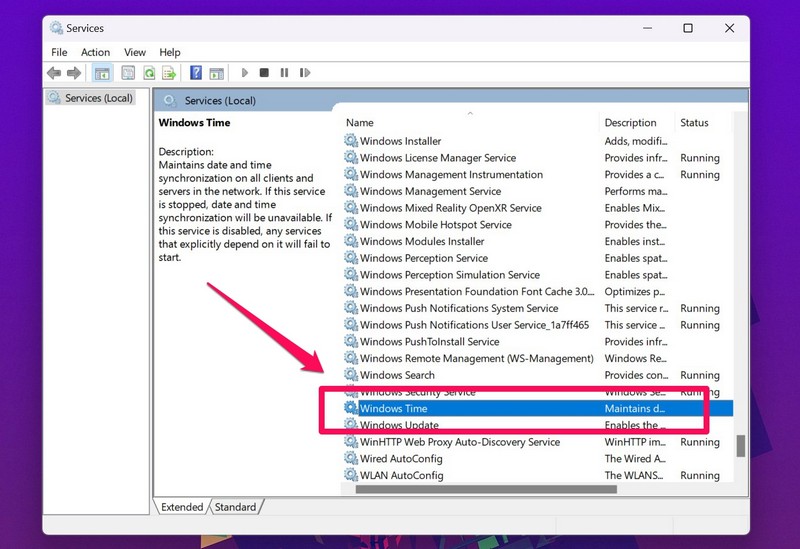
4. Right-click on it and click the Restart option.
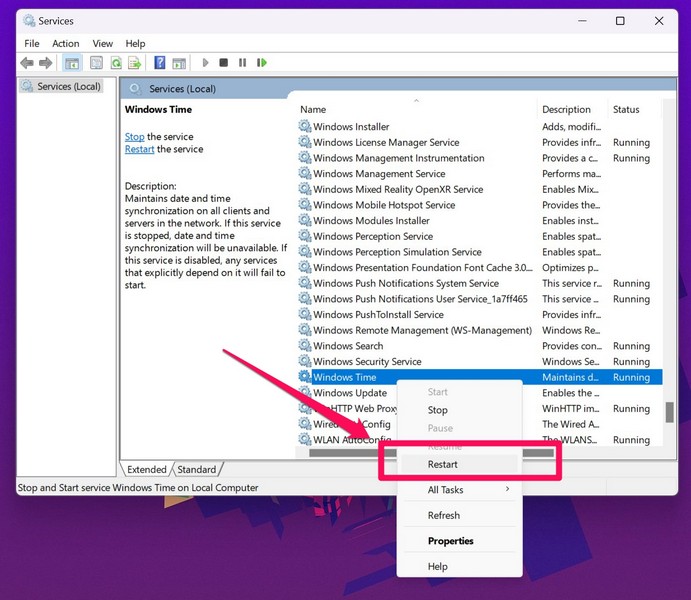
Note: If the Windows Time service is not running on your device, click the Start button on the context menu to initiate it.
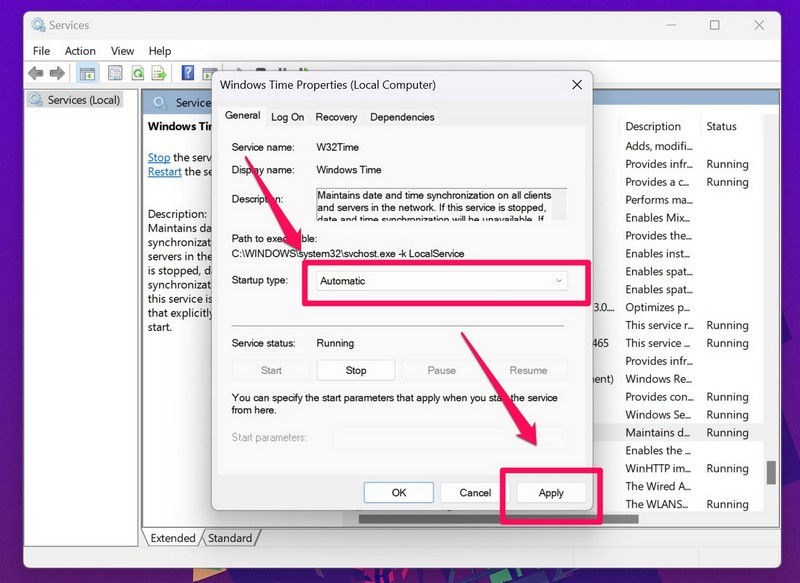
5. Then, double-click on the Windows Time service to open its Properties window.
6. In the Properties menu, make sure that the Startup type for the Windows Time service is set to Automatic.
7. If it is not, choose the said option from the drop-down menu and click the Apply button to save the change.
After making these changes, check whether or not the time sync not working issue has been fixed on your Windows 11 PC or laptop.
5. Use Command Prompt to Force Time Sync in Windows 11
Now, if the above methods did not fix the time sync not working in Windows 11 issue on your device, you can use the Command Prompt tool to force your device to sync the date and time. Check out the steps to do that right below:
1. Press Windows + S to open Windows search and search for cmd.
2. Click the Run as administrator button for the Command Prompt program in the search results.

3. Click Yes on the following User Account Control prompt.
4. Once the Command Prompt program opens, type in the following commands and press Enter one by one:
net stop w32timew32tm /unregisterw32tm /registernet start w32timew32tm /resync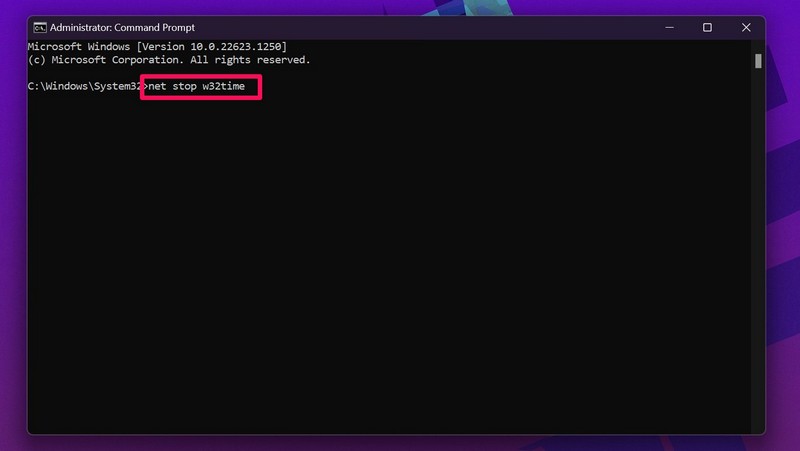
After executing all the above commands in Command Prompt, the date and time sync not working issue should be fixed on your Windows 11 laptop or PC.
6. Add a New Time Server in Windows 11
If the above method with Command Prompt did not resolve the time sync problem on your Windows 11 PC or laptop, you can try adding a new Time server to your system. For this, however, you’d have to use the Windows Registry Editor and that can be a bit tricky. You see, if you make an incorrect change in the Registry Editor in Windows 11, it may cause fatal system issues and you might have to reinstall Windows on your device.
So, we recommend you take a backup of your current Registry files before proceeding to the steps to add a new Time server in Windows 11. Also, be sure to follow the below steps just as they are to avoid nasty situations:
1. Use Windows + R to open the Run tool in Windows 11.
2. Type in regedit in the text field and press Enter.

3. Click Yes on the following UAC prompt.
4. Once the Registry Editor window opens, copy and paste the following path on the URL bar above and press Enter.
HKEY_LOCAL_MACHINE\SOFTWARE\Microsoft\Windows\CurrentVersion\DateTime\Servers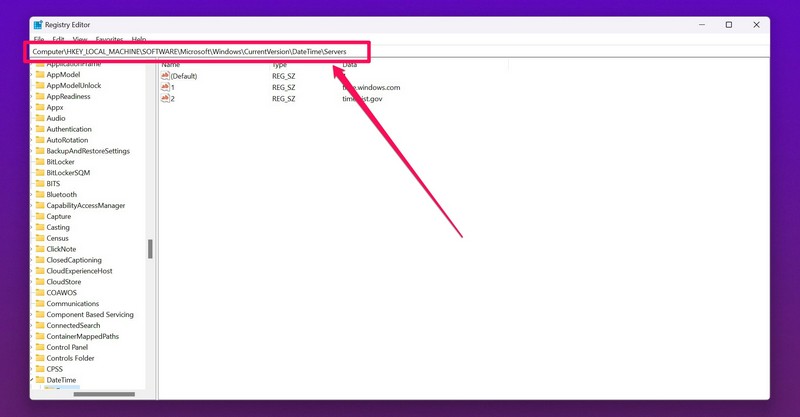
5. Now, right-click on a blank space on the right pane and place your cursor over the New option to expand the context menu.
6. Click the String Value option to create a new key.
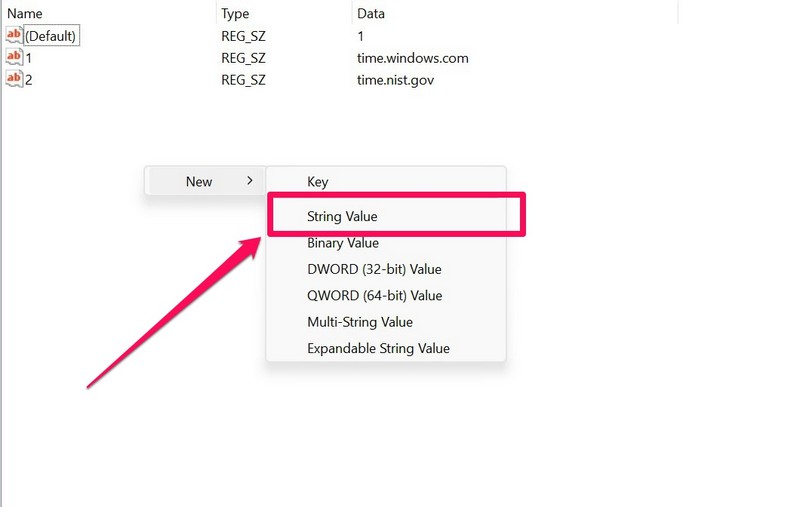
7. Type in the number for the server. In this case, it is the third server, so I am going to name it 3.
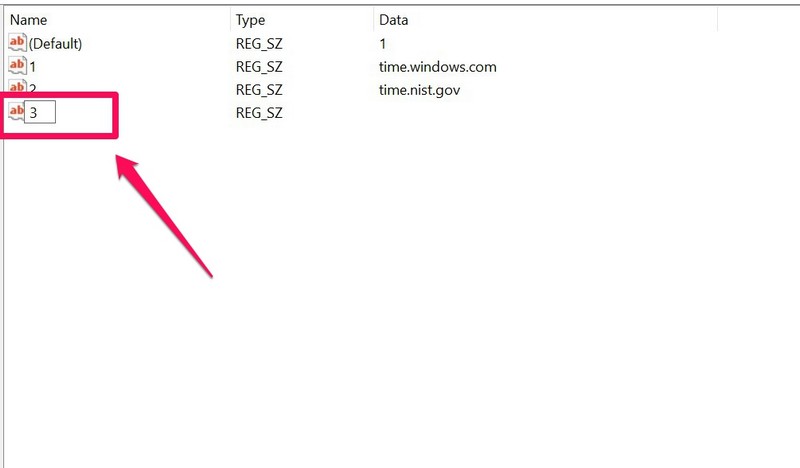
8. Next, double-click the newly-created string value.
9. Type time.google.com in the Value data field and click the OK button.

10. Now that you have added a new time server in Windows 11, use the steps in Fix #3 to change the current time server and set the new one on your PC or laptop.
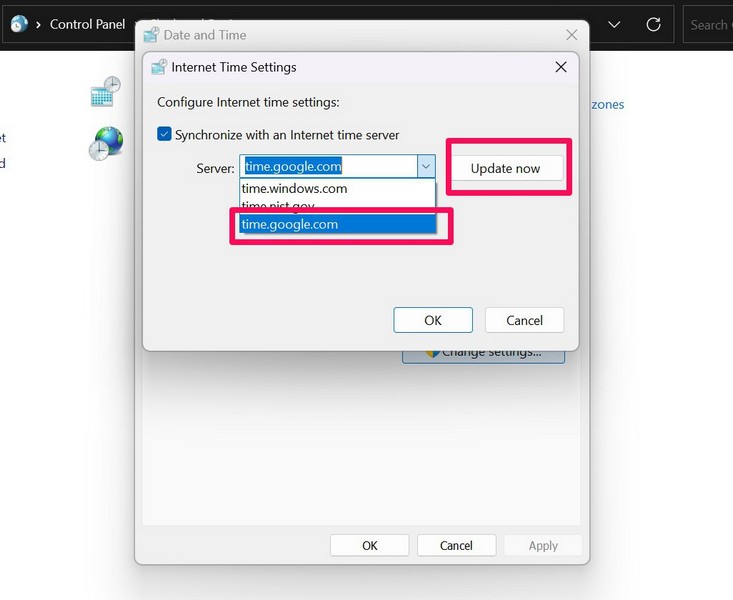
After that, check whether the time sync not working in Windows 11 issue has been fixed or not.
7. Run SFC Scan in Windows 11
An issue in any of the system files on your Windows 11 PC or laptop can also cause the time sync not working issue. In this case, the System File Checker scan (SFC scan), which is a command-line tool for checking the system file directory and replacing missing or corrupt system files in Windows 11, is your best option.
Follow the steps below to run the SFC scan on your Windows 11 device and fix the time sync not working problem:
1. Use Windows + S to open Windows search and search for cmd.
2. Select the Run as administrator button for Command Prompt.
3. Click Yes on the UAC prompt.
4. Type in the following command in Command Prompt and press Enter:
sfc /scannow5. After the SFC scan is completed, restart your Windows 11 PC or laptop.
Following the restart, the time sync not working issue on your device should be fixed and you will be able to sync the date and time in Windows 11 again.
FAQs
Why can’t I sync the date and time in Windows 11?
The time sync not working in Windows 11 issue is common among users and can be caused by various factors, including slow or no internet connection, server issues, misconfigured settings, issues in system files, and others.
Why are the date and time wrong on my Windows 11 laptop?
The date and time on your Windows 11 PC or laptop are automatically set as per your time zone and region. Hence, if your region is somehow set to a different location, your Windows 11 PC or laptop might show an incorrect date and time. In this case, you can sync them with available time servers via Windows settings.
Can I set the time automatically in Windows 11?
Yes, you can surely set the time automatically in Windows 11 to let your PC or laptop automatically detect the time zone and set the date and time accordingly. For this, make sure the toggle for Set time automatically and Set time zone automatically are enabled in Windows settings.
Final Words
So, these were some of the top solutions to fix the time sync not working issue in Windows 11. Be sure to try them all out on your PC or laptop and get the time sync feature up and running in Windows 11 again.
We hope that one of the above methods works for you and that you are able to fix the issue on your device as soon as possible. You can also check out some of our other fix guides for Windows 11-related issues from right here!