При установке Windows 11, а также при обновлении до новой версии или установке обновлений в Центре обновления Windows пользователи могут столкнуться с различными ошибками, код которых начинается с 0xc1900101 и может содержать дополнительный код и описания.
В этой инструкции подробно о наиболее частых причинах таких ошибок и способах, которые могут помочь их исправить.
Возможные причины ошибок 0xC1900101 и как её исправить

Ошибки с кодом 0xC1900101 имеют различные дополнительные коды и описания, в частности:
- 0xC1900101 — 0x2000C — ошибка на этапе установки SAFE_OS во время операции APPLY_IMAGE
- 0xC1900101 — 0x20017 — ошибка на этапе установки SAFE_OS во время операции BOOT
- 0xC1900101 — 0x30018 — ошибка на этапе установки FIRST_BOOT во время операции SYSPREP
- 0xC1900101 — 0x3000D — ошибка на этапе установки FIRST_BOOT во время операции MIGRATE_DATA
- 0xC1900101 — 0x4000D — ошибка на этапе установки SECOND_BOOT во время операции MIGRATE_DATA
- 0xC1900101 — 0x40017 — ошибка на этапе установки SECOND_BOOT во время операции BOOT
Несмотря на то, что на официальном сайте Майкрософт сообщается о том, что ошибки 0xc1900101 обычно вызваны драйверами, это — возможная, но не единственная причина.
Далее — по порядку возможные причины и способы исправить различные ошибки 0xC1900101:
- Недостаток места на системном разделе диска для выполнения установки обновления (особенно в случае дополнительного кода 0x2000C). Решение — освободить достаточное количество места, я рекомендую более 20 Гб, поскольку ошибка обычно возникает при установке объёмных обновлений компонентов и новых версий Windows. Начать очистку можно с использования встроенных средств системы.

- Наличие неподписанных или неподдерживаемых новой версией ОС драйверов устройств (в том числе виртуальных), а также драйверов, устанавливаемых программами: сторонними антивирусами, средствами для модификации сетевых подключений и других. Решение: удалить соответствующие драйверы, программы, сторонние антивирусы, отключить от компьютера необязательные периферийные устройства. Если ранее вы устанавливали драйверы устройств с помощью сторонних программ, рекомендую выполнить их установку с официального сайта производителя материнской платы или ноутбука для вашей модели устройства.
- Влияние сторонних служб и фоновых процессов. Можно попробовать выполнить обновление, загрузившись в режиме чистой загрузки.
- Проблемы с конфигурацией разделов на диске, часто — при наличии нескольких разделов с загрузчиком (от актуальной и предыдущих систем), разделе с загрузчиком на отдельном физическом диске. Возможный вариант решения — перенести раздел с загрузчиком на системный диск, избавиться от неиспользуемых EFI-разделов.
- Повреждение системных файлов текущей ОС Windows. Решение — запустить командную строку от имени администратора и по порядку выполнить команды:
dism /online /cleanup-image /restorehealth
sfc /scannow
- Проблемы с файловой системой на системном разделе диска. Попробуйте выполнить проверку диска на ошибки: запустите командную строку от имени администратора, выполните команду
chkdsk C: /f
вам будет предложено выполнить проверку после перезагрузки компьютера. Согласитесь (введите Y и нажмите Enter), после чего перезагрузите компьютер.

- Проблемы в работе устройств и драйверов: откройте диспетчер устройств (правый клик по кнопке «Пуск» — «Диспетчер устройств») и убедитесь, что в списке отсутствуют устройства с ошибками, при наличии — устраните их, посмотрев в свойствах устройства описание ошибки и найдя решение для неё.


Описанные выше методы могут сработать, но не во всегда. Если в вашем случае проблема не решилась, можно попробовать некоторые дополнительные варианты из следующего раздела.
Дополнительная информация
Если очевидных причин ошибки нет, рекомендую изучить журналы обновления Windows, возможно, в них вы найдёте, что именно привело к сбою при обновлении и установке. Подробная информация о расположении файлов журнала доступна на официальном сайте Майкрософт.
В случае, если журналы не помогли или разобраться с ними не получается, ниже — ещё несколько «общих» способов установить Windows 11 или её новую версию при ошибках 0xC1900101:
- Проверьте, производится ли установка, если отключить Secure Boot в БИОС/UEFI
- Загрузите образ ISO с системой, до которой вы хотите обновиться, смонтируйте его в системе (правый клик по ISO-образу — «Подключить»), отключитесь от Интернета и запустите файл setup.exe с подключенного образа. Выполняйте установку без подключения к Интернету и отказавшись от поиска и установки дополнительных обновлений.
- При наличии нескольких дисков на компьютере, физически отключите все кроме системного.
В крайнем случае вы можете выполнить установку новой версии системы путём чистой установки с флешки — этот вариант в большинстве случаев (за исключением проблем с дисками или иным оборудованием) проходит без ошибок.
Upgrading your Windows 10 OS version or installing a fresh copy of the OS should be an easy process. All you need to do is follow the on-screen instructions, and your computer will take care of everything. But the installation may sometimes fail in the Safe OS phase during the boot, apply_image, migrate_data, prepare_first_boot, or replicate_OC operations. Without further ado, let’s explore how you can fix this issue.
Contents
- 1 How to Fix Safe_OS Phase Errors on Windows 10?
- 1.1 Quick Checks
- 1.2 Update Your Drivers
- 1.3 Check Your Drive for Errors
- 1.4 Restart the Windows Update Service
- 1.5 Enable Your Recovery Tools
- 1.6 Use the Media Creation Tool
- 1.7 Conclusion
How to Fix Safe_OS Phase Errors on Windows 10?
Quick Checks
Safe OS errors may occur due to a variety of issues. Before we dive into more complex troubleshooting solutions, use this quick checklist to identify the source of the problem.
- Make sure your computer meets the system requirements for installing Windows 10 and passes the compatibility check.
- While Microsoft recommends having at least 16 GB of free space on the OS drive, make sure you have at least 20GB just in case.
- Disconnect all the peripherals connected to your computer before you launch the update or reinstall process.
- Disable your antivirus and firewall. Your security software may mistakenly flag the new update files as suspicious. False security alerts will block the OS update or install process.
- Ensure your computer is not on a Metered Connection.
- Go to Date and Time settings, and make sure your date and time are correct. Let your computer set the time and time zone automatically.
Update Your Drivers
Outdated drivers often block the Windows 10 update process. Make sure you’re running the latest driver versions on your computer.
Launch the Device Manager and check if there are any exclamation points next to your drivers—Right-click on the problematic drivers, and select Update Driver.
Alternatively, you can use a driver updater to automatically install the newest driver versions.
Check Your Drive for Errors
If the drive where you installed Windows 10 got corrupted, don’t be surprised if you can’t install the latest OS versions.
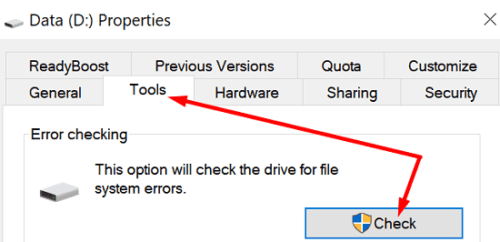
- Go to This PC and right-click on your drive.
- Select Properties and click on the Tools tab.
- Hit the Check button to check the drive for file system errors.

- Then go to the General tab and select Disk Cleanup.
- Select the same drive and delete all the temporary files listed there.
- Then, go back to the Disk Cleanup window, click on Clean up system files.
- Delete previous Windows installations.
- Restart your computer and try again.
Restart the Windows Update Service
- Go to the Windows search bar and type services.
- Double-click on the Services app and scroll down to Windows Update.

- If the service is already running, right-click on it and select Stop. Then restart it.
- If the service is disabled, right-click on it and select Start.
- Additionally, make sure the Background Intelligent Transfer Service and Cryptographic Service are running.
Restart the services, navigate to This PC, select your main drive and click on Windows. Locate the SoftwareDistribution folder and rename it to SoftwareDistributionOLD. Try to update Windows 10 again.
Enable Your Recovery Tools
Launch Command Prompt with admin rights and run the commands below, hitting Enter after each one:
reagentc /inforeagentc /disablereagentc /enable
Use the Media Creation Tool
If nothing’s working, install the Media Creation Tool and hit Upgrade this PC now. The tool automatically reinstalls Windows while keeping all your files and programs in place.
Conclusion
Safe OS errors usually occur when you install the latest Windows 10 version or reinstall the OS. To fix the problem, update your drivers, check your drive for errors, and restart the Windows Update service. Sometimes, you may need to go through all these steps to get rid of these errors. Hit the comments below and let us know if you’re still experiencing this problem.
-
Home
-
News
- Fixed – the Installation Failed in the Safe_OS Phase
By Vera | Follow |
Last Updated
When using Windows Setup to upgrade and install Windows 10, you may be bothered by the error message “the installation failed in the safe_os phase with an error during xxx.” To get rid of this issue, try these solutions offered by MiniTool Solution in this post.
Usually, Windows 10 installation failed in the safe_os phase with an error during different operations, and the error messages are various:
- The installation failed in the safe_os phase with an error during migrate_data operation
- The installation failed in the safe_os phase with an error during apply_image operation
- The installation failed in the safe_os phase with an error during replicate_oc operation
- The installation failed in the safe_os phase with an error during install_updates operation
- The installation failed in the safe_os phase with an error during prepare_first_boot operation
- More…
The reasons for this issue can be older drivers, incorrect system settings, etc. The upgrade stops when the problem occurs. You can exit the setup and go back to the previous version of Windows. Next, start to fix your issue and upgrade or install Windows again.
Method 1: Disconnect All Your External Devices
Some users reported that all your peripherals could be helpful to fix the Windows 10 installation failure on your computer. Thus, disconnect all your external devices, including flash drives, USB hubs, phones, printers, etc.
You can use a PS/2 keyboard and mouse instead of a USB keyboard and mouse. Additionally, if you are using a Wi-Fi card, you should also remove it before performing an upgrade.
Method 2: Set Services to Automatic
It is reported that setting some services to automatic is an effective way to fix “the installation failed in the safe_os phase with an error during boot operation or any other operation”.
See how to do that:
- Open Run by pressing the Windows logo + R
- Input services.msc and hit Enter.
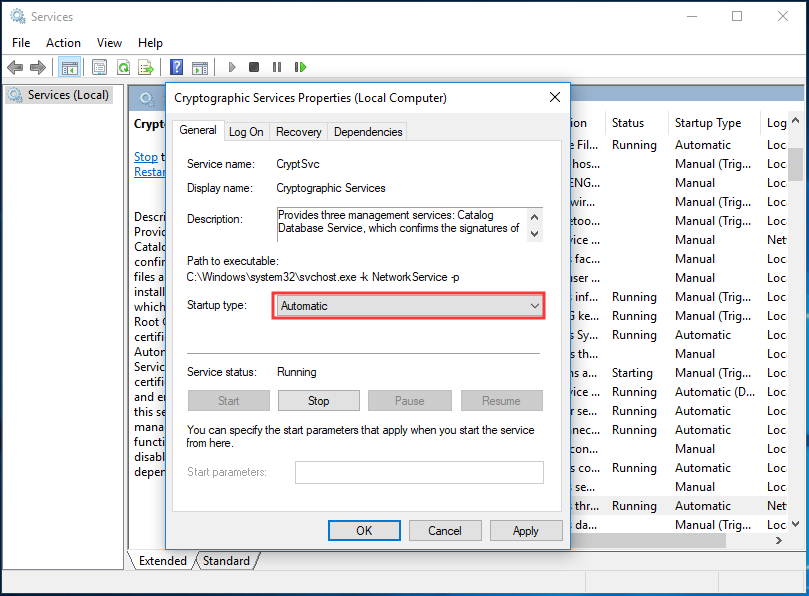
- Find these services: Background Intelligent Transfer Service, Cryptographic Service, and Windows Update Service.
- Double-click each service to the Properties window and set Startup type to Automatic.
- Save the change by clicking Apply and then OK.
Method 3: Update Your Drivers
According to users’ feedback, Windows 10 installation failed in the safe_os phase due to the problems with drivers. Your drivers may be outdated or faulty, so updating them is very important.
It is not a quick procedure to search for the latest drivers and install them on your computer. Luckily, you can go to Device Manager, find the device driver that you want to update, right-click it and let the manager search for necessary the driver online. But it is time-consuming to update all your drivers. Even this tool may fail to find the versions that you need.
In this case, we recommend you to use a third-party program to update your drivers. When searching for “best driver update software for PC” in Google, you will find many programs. Just get one and you can easily update PC drivers to fix the issue – we couldn’t install Windows 10 the installation failed in the safe_os phase.
Method 4: Disable Your Graphics Card
If you get the error message “the installation failed in the safe_os phase with an error during apply_image operation”, perhaps the issue is related to your graphics card that may be not fully compatible with Windows 10. To fix this problem, you can disable it from BIOS.
- Enter BIOS by pressing a specific key based on your PC. This post – [5 Ways] How to Get Into BIOS on Windows 11/10 on Restart could be helpful for you.
- In BIOS, find your dedicated graphics card and disable it by checking your instruction manual.
- Next, connect your monitor to the onboard graphics on the back of your computer. Then, install Windows 10 to check if you still encounter the issue.
Method 5: Tweak Your RAM
Sometimes RAM (Random Access Memory) issues may be behind this error. Reportedly, it is helpful to fix installation failed in the safe_os phrase by removing RAM modules or adding RAM. Just have a try.
Bottom Line
Are you facing “the installation failed in the safe_os phase with an error during xxx operation” while installing Windows 10? Now, after trying these methods above, you should easily get rid of the issue.
About The Author
Position: Columnist
Vera is an editor of the MiniTool Team since 2016 who has more than 7 years’ writing experiences in the field of technical articles. Her articles mainly focus on disk & partition management, PC data recovery, video conversion, as well as PC backup & restore, helping users to solve some errors and issues when using their computers. In her spare times, she likes shopping, playing games and reading some articles.
,
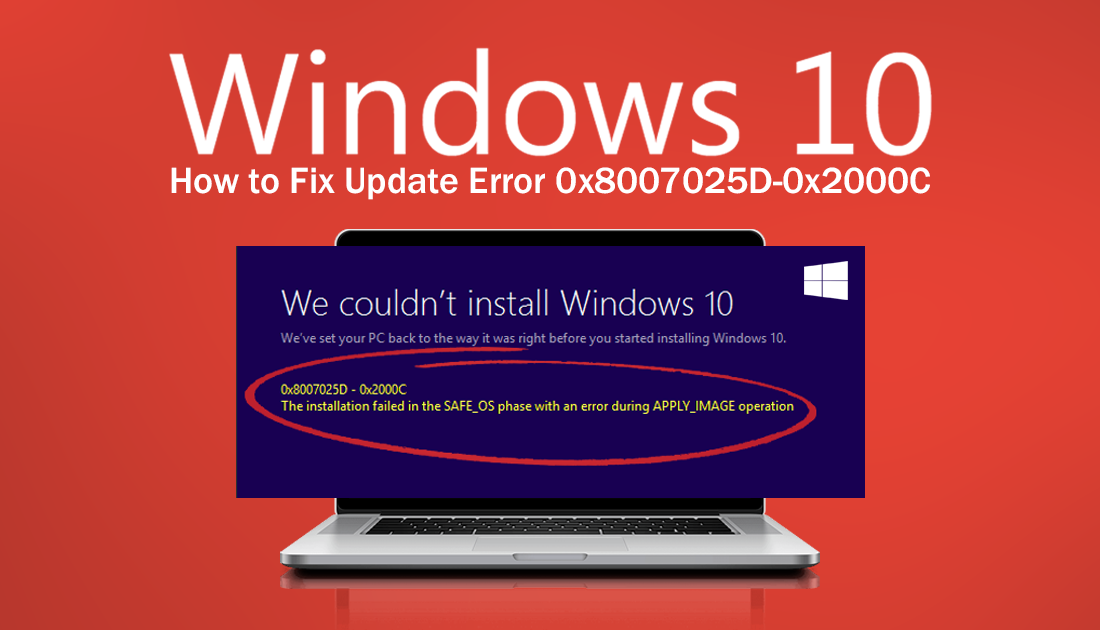
On a Lenovo laptop, the following error appears when trying to upgrade Windows 10 v1803 to v1903: «We couldn’t install Windows 10, 0x8007025D-0x2000C . The installation failed in the SAFE_OS phase with an error during APPLY_IMAGE operation.»

In this guide you’ll find step by step instructions to resolve the error 0x8007025D-0x2000C in Windows 10 upgrade: «We couldn’t install Windows 10, 0x8007025D-0x2000C. The installation failed in the SAFE OS phase with an error during APPLY IMAGE operation.»
How to FIX Windows 10 Update Error 0x8007025D-0x2000C «Installation failed in the SAFE_OS phase with an error during APPLY_IMAGE operation»
The error code 0x8007025D-0x2000C in Windows 10 update, indicates a problem with a connected USB device. So, to resolve the problem 0x8007025D-0x2000C, follow these steps:
Step 1. Ensure that you have enough free space on your disk. Windows 10 requires at least 32 GB of free space to upgrade.
Step 2. Run Disk Cleanup and delete all the useless files.
Step 3. Disconnect all external USB drives & SD cards and any other USB device that don’t needed.
Step 4. Temporarily uninstall any non-Microsoft Antivirus/Security software.
Step 5. Disable the Hard Drive Encryption (BitLocker, VeraCrypt, etc.).
Step 6. Install the latest drivers for all the devices on your system, especially for the Ethernet & the Wireless adapter (if any). *
* Note: If after applying the instructions in this article, the Windows 10 Upgrade Installation still fails, proceed and update also the BIOS (Firmware) on your system.
Step 7. Delete the ‘SoftwareDistribution’ Folder.
The «C:\Windows\SoftwareDistribution» folder, is the location where Windows store the Windows Updates. Many times, this folder becomes corrupted and you must re-create it in order to download the updates from scratch. To rebuild (re-create) the «SoftwareDistribution» folder follow the instructions below:
- Step 7A: STOP the Windows Update Service.
1. Open Windows Services control panel: To do that:
- Press Windows + R keys to open the run command box.
- In the Search box, type: services.msc & click OK.
- (Accept the UAC warning if appears).

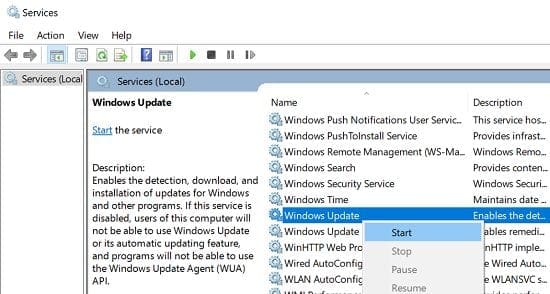
2. In Services control panel locate the «Windows Update» service.
3. Right-click on Windows Update service and select «Stop«.

- Step 7B: Delete the SoftwareDistribution folder.
1. Open Windows Explorer and navigate to: C:\Windows folder.
2. Find and Delete the «SoftwareDistribution» folder (or rename it. e.g. to «SoftwareDistributionOLD») . *
* Note: If you cannot delete the folder, start Windows in Safe Mode.

- Step 7C: START the Windows Update Service.
1. Open Windows Services control panel.
2. Right-click on Windows Update service and select «Start«.

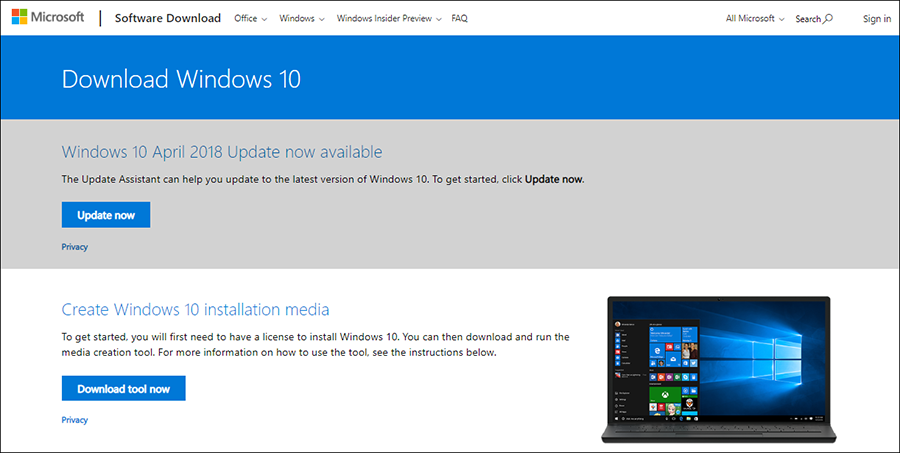
Step 8. Download Windows 10 in a ISO File.
The next step to resolve the Windows 10 update error «0x8007025D-0x2000C . The installation failed in the SAFE_OS phase with an error during APPLY_IMAGE operation» is to update Windows 10, from the Windows ISO file. To do that:
1. Navigate to Windows 10 download page and download the Media Creation Tool.

2. Run the ‘Media Creation Tool’ and Accept the License Terms at the first screen.
3. Select Create installation media for another PC.

4. At ‘Language, architecture and edition’ screen click Next.
5. Select ISO file and click Next.

6. Save the ‘Windows.iso’ file to your desktop.
7. The Media Creation Tool will now begin to download the Windows 10 in an ISO format.
8. When the download is completed, close the Media Creation Tool and continue to the next step.
Step 9. Update Windows 10 from the ISO file.
1. DISCONNECT all USB DEVICES that you don’t need.
2. Then, right click on the «Windows.iso» file (on your desktop) and click Mount.
3. Double click at Setup application.

5. Click Next to install Windows 10.

6. Accept the License Terms and then click Install.

7. Now wait the update process to complete. *
* Note: If the update fails again, I suggest to backup all your important files and settings to another storage media (e.g. to an external USB drive) and then to perform a clean Windows 10 installation.
That’s all folks! Did it work for you? Please leave a comment in the comment section below or even better: like and share this blog post in the social networks to help spread the word about this solution.
If this article was useful for you, please consider supporting us by making a donation. Even $1 can a make a huge difference for us.
- Author
- Recent Posts
Konstantinos is the founder and administrator of Repairwin.com. Since 1995 he works and provides IT support as a computer and network expert to individuals and large companies. He is specialized in solving problems related to Windows or other Microsoft products (Windows Server, Office, Microsoft 365, etc.).
Table of Contents
If you are struggling to get around Windows 10 update error “0x8007025D-0x2000C, The installation failed in the SAFE_OS phase with an error during APPLY_IMAGE operation” when trying to update Windows 10 using the Media Creation Tool or an Image/ISO file. This article will show you several fixes to stop the error preventing your system from updating.
How To Fix No Sound on Windows 10 After a Recent Update.
Microsoft has a terrible track record of releasing Windows 10 updates with bugs, errors and countless other issues. There hasn’t been a recent Windows update that was completely issue free, with the last two major releases having major, almost crippling bugs. Sadly the same can be said for Windows version 1809 which is also suffering a careless release.
Even the version 1809 update process is complicated with error 0x8007025D-0x2000C plaguing the installation process when trying to update Windows using the Media Creation Tool or an ISO file. Thankfully there are a few things you can try to fix this issue, so following along as this article guides you through them.
Related: How to Fix the Action Center Not Showing Notifications After Updating to Windows 10 Version 1809.
The first thing you need to do if you encounter error 0x8007025D-0x2000C when updating Windows 10 is check that you have the latest BIOS version installed on your system. If you’ve never done this before, visit your computer manufacturer’s website (motherboard manufacturers page if you have a custom build) and download the latest BIOS version. Once you have the latest BIOS for your system, Restart the installation process and you should be error free. If updating to the latest BIOS hasn’t helped, please continue with the other solutions below.
Create New Windows 10 Installation Media. (USB Installation Drive or ISO Image)
The next thing you should do is clear your current USB installation media and redownload a fresh copy. This will ensure the error isn’t being caused by faulty or damaged data within the current installation media. If you aren’t using the Media Creation Tool to create your media and are instead using an ISO file, you should also download a clean update ISO.
Go to Windows Media Creation Tool.
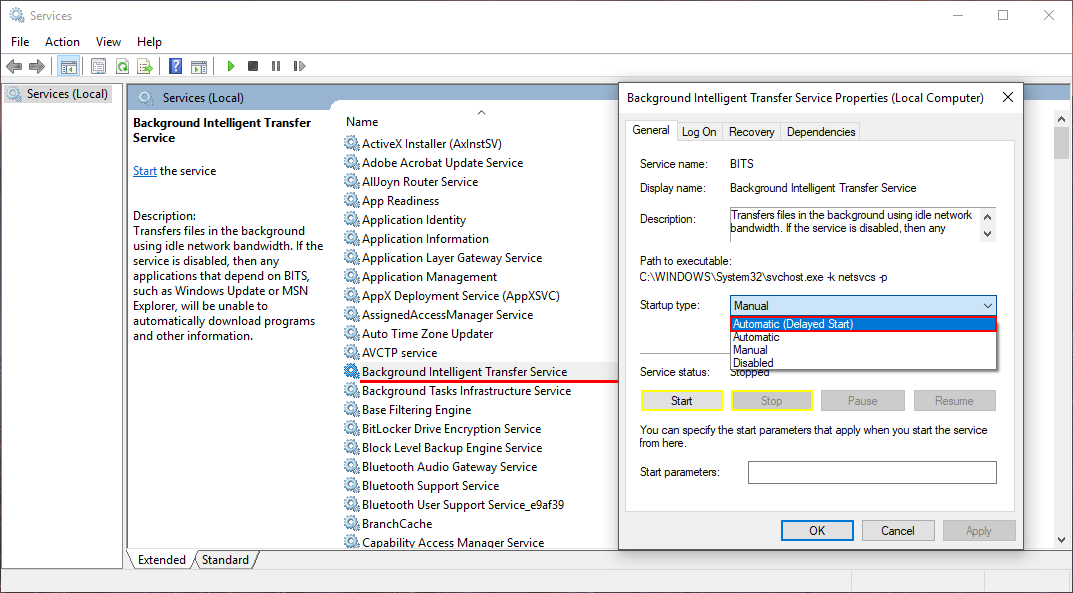
Restart the Windows 10 BITS service. (Background Intelligent Transfer Service)
To do this, type services into the start menu and select it when it appears, or open the Run tool, type services.msc then press Enter. Once you have the services window open, scroll down the list and find Background Intelligent Transfer Service. Next, double-click the entry, stay on the General tab, set the Startup type to Automatic (Delayed), then click Apply. Finally, click Stop then Start to restart the service.