
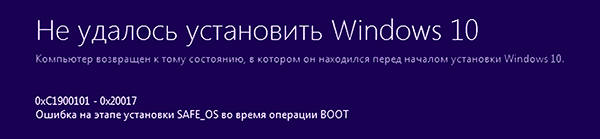
Среди распространенных ошибок при установке обновлений компонентов Windows 10 — ошибка 0xc1900101 с различными кодами и сообщениями, например: 0x4000d или 0x40017, сообщениями о SAFE_OS или SECOND_BOOT, а исправление ошибки и успешная установка новой версии ОС подчас сложная задача для начинающего пользователя.
Ранее эта же ошибка и по тем же причинам возникала при обновлении предыдущих версий ОС до Windows 10 (через Центр обновлений или с помощью утилиты Media Creation Tool) или при установке системы путем запуска setup.exe в уже установленной системе предыдущей версии — ошибка Windows Update c1900101 (0xC1900101) с различными цифровыми кодами: 20017, 4000d, 40017, 30018 и другими. Как правило, проблема бывает вызвана невозможностью программы установки обратиться к установочным файлам по той или иной причине, их повреждением, а также несовместимыми драйверами оборудования, недостаточным местом на системном разделе диска или ошибками на нем, особенностями структуры разделов и рядом других причин.
В этой инструкции — набор способов исправить ошибку Windows Update c1900101 (так она отображается в Центре обновлений) или 0xC1900101 (так эта же ошибка показывается в официальной утилите для обновления и установки Windows 10). При этом, дать гарантий того, что эти способы будут работать, не могу: это лишь те варианты, которые чаще всего помогают в указанной ситуации, но не всегда. Гарантированный способ избежать этой ошибки — чистая установка Windows 10 с флешки или диска (при этом для активации можно использовать ключ для предыдущей лицензионной версии ОС, а если ранее на компьютере уже была установлена 10-ка, ключ вводить не нужно вообще).
Как исправить ошибку 0xc1900101 при обновлении или установке Windows 10
Итак, ниже — способы исправления ошибки c1900101 или 0xc1900101, расположенные в порядке вероятности их способности решить возникшую проблему при установке Windows 10. Пробовать повторную установку можно, в общем-то после каждого из пунктов. А можно выполнять их по нескольку штук — как вам будет удобнее.
Простые способы исправления
Для начала 4 самых простых способа, которые срабатывают чаще других при появлении рассматриваемой проблемы.
- Удалите антивирус — если на вашем компьютере установлен какой-либо антивирус, полностью удалите его, желательно используя официальную утилиту от разработчика антивируса (можно найти по запросу Утилита удаления + название антивируса, см. Как удалить антивирус с компьютера). В качестве причин ошибки были замечены антивирусные продукты Avast, ESET, Symantec, но это вполне может происходить и с другими такими программами. После удаления антивируса обязательно перезагрузите компьютер. Внимание: такой же эффект могут оказывать утилиты для очистки компьютера и реестра, работающие в автоматическом режиме, удалите их тоже.
- Отключите от компьютера все внешние накопители и все не требующиеся для работы устройства, подключенные по USB (включая кард-ридеры, принтеры, геймпады, USB-хабы и подобные).
- Выполните чистую загрузку Windows и попробуйте выполнить обновление в этом режиме. Подробнее: Чистая загрузка Windows 10 (инструкция подойдет и для чистой загрузки Windows 7 и 8).
- Проверьте, достаточно ли свободного места на системном разделе жесткого диска (Диске C). В идеале, иметь 20-30 Гб свободными. См. Как очистить диск C от ненужных файлов, Как увеличить диск C за счет диска D.
- Если ошибка появляется в Центре обновления, то попробуйте обновиться до Windows 10 с помощью средства обновления до Windows 10 с сайта Microsoft (правда, оно может выдать ту же ошибку, если проблема в драйверах, дисках или программах на компьютере). Подробнее этот способ описан в инструкции Обновление до Windows 10.
Если ничто из указанного не сработало, переходим к более трудоемким способам (при этом не торопитесь устанавливать ранее удаленный антивирус и подключать внешние накопители).
Очистка файлов установки Windows 10 и повторная загрузка
Попробуйте такой вариант:
- Отключитесь от Интернета.
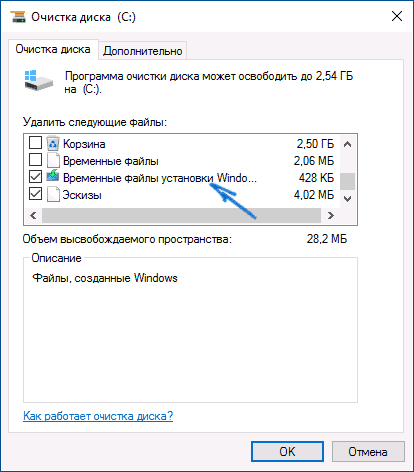
- Запустите утилиту очистки диска, нажав клавиши Win+R на клавиатуре, введя cleanmgr и нажав Enter.

- В утилите очистки дисков нажмите «Очистить системные файлы», а затем — удалите все временные файлы установки Windows.
- Зайдите на диск C и, если на нем имеются папки (скрытые, так что включите показ скрытых папок в Панель управления — Параметры проводника — Вид) $WINDOWS.~BT или $Windows.~WS, удалите их.

- Подключитесь к Интернету и либо снова запустите обновление через Центр обновлений, либо загрузите официальную утилиту с сайта Майкрософт для обновления, способы описаны в упомянутой выше инструкции по обновлению.

Исправление ошибки c1900101 в Центре обновлений
Если ошибка Windows Update c1900101 возникает при использовании обновления через Центр обновлений Windows, попробуйте следующие действия.
- Запустите командную строку от имени администратора и по порядку выполните следующие команды.
- net stop wuauserv
- net stop cryptSvc
- net stop bits
- net stop msiserver
- ren C:\Windows\SoftwareDistribution SoftwareDistribution.old
- ren C:\Windows\System32\catroot2 catroot2.old
- net start wuauserv
- net start cryptSvc
- net start bits
- net start msiserver
После выполнения команд закройте командную строку, перезагрузите компьютер и снова попробуйте выполнить обновление до Windows 10.
Обновление с использованием образа ISO Windows 10
Еще один простой способ «обойти» ошибку 0xc1900101 — использовать оригинальный образ ISO для обновления до Windows 10. Как это сделать:
- Скачайте образ ISO с Windows 10 к себе на компьютер одним из официальных способов (образ с «просто» Windows 10 включает в себя также и профессиональную редакцию, она не представлена отдельно). Подробно: Как скачать оригинальный образ ISO Windows 10.
- Смонтируйте его в системе (лучше стандартными средствами ОС, если у вас Windows 8.1).
- Отключитесь от Интернета.
- Запустите файл setup.exe с этого образа и произведите обновление (оно по результату не будет отличаться от обычного обновления системы).
Это основные способы исправить проблему. Но встречаются специфичные случаи, когда требуются иные подходы.
Дополнительные способы исправить проблему
Если ничто из описанного выше не помогло, попробуйте следующие варианты, возможно, в вашей конкретной ситуации рабочими окажутся именно они.
- Удалите драйвера видеокарты и сопутствующий софт видеокарты с помощью Display Driver Uninstaller (см. Как удалить драйвера видеокарты).
- Если в тексте ошибки присутствует информация про SAFE_OS во время операции BOOT, то попробуйте отключить Secure Boot в UEFI (БИОС). Также причиной этой ошибки может быть включенное шифрование дисков Bitlocker или иное.
- Выполните проверку жесткого диска с помощью chkdsk.
- Нажмите Win+R и введите diskmgmt.msc — посмотрите, не является ли ваш системный диск динамическим диском? Это может вызывать указанную ошибку. Однако, если системный диск — динамический, конвертировать его в базовый без потери данных не получится. Соответственно решение здесь — чистая установка Windows 10 с дистрибутива.

- Если на вашем компьютере установлены сторонние средства шифрования дисков или программы наподобие Крипто ПРО, они могут вызывать эту ошибку, в частности, с кодом 0x40017 SECOND_BOOT. Отключите стороннее шифрование, удалите такого рода утилиты. Для Крипто ПРО может сработать не удаление, а простое обновление программы.
- Для некоторых старых материнских плат, оснащенных контроллером FireWire IEEE 1394 помогает его отключение в БИОС.
- В некоторых случаях исправить ошибку помогает отключение технологий Intel VT-x/Vt-d или AMD-V в БИОС.
- Если у вас Windows 8 или 8.1, то можно попробовать следующие действия (предварительно сохранив важные данные): зайдите в параметры обновления и восстановления и запустите сброс Windows 8 (8.1) после того, как процедура будет завершена, не устанавливая никаких программ и драйверов, попробуйте выполнить обновление.

Пожалуй, это все, что я могу предложить на данный момент времени. Если вдруг помогли какие-то иные варианты, буду рад комментариям.
The update process for your computer gets severely disrupted when you
encounter 0xc1900101 errors which prevent Windows 11 security protection and
new features. This error known professionally as the «Windows update 0xc1900101» prevents Windows 11 updates from continuing which traps users in a state of
dissatisfaction.
This widespread error affects individuals through various causes which may
include driver conflicts and storage shortages as well as file damage.
However, the solution will bring tranquility. We will examine error causes
while presenting a comprehensive guide to fixing it using five easy solutions
that will restore your system’s optimal performance.
Part 1: Common 0xC1900101 Error Codes
The 0xc1900101 error brings additional specific codes that identify the
update process failures. The error codes function as your pointers for
repairing an update failed Windows 11. Microsoft support resources
indicate errors with 0xC1900101 initial codes represent problems between
drivers however disk space depletion along with hardware flaws can also
cause this issue. Understanding Windows 11 update failures requires an
examination of usual error codes that reveals their causes and solution
methods.
-
0xC1900101-0x20017: This code signals trouble during the boot
operation, often because of outdated or incompatible drivers. You might
see this when upgrading from an older Windows version to 11. To fix it,
update your drivers—especially for critical components like graphics or
storage—through Device Manager or your hardware manufacturer’s website
before retrying the update. -
0xC1900101-0x30018: This version suggests a glitch in the first
boot phase after the update begins installing. Corrupted system files or
incompatible hardware usually cause it. Running a System File Checker
scan, which we’ll cover later, can repair those files. Also, double-check
that your PC meets Windows 11’s minimum requirements, like TPM 2.0 and
Secure Boot. -
0xC1900101-0x4000D: This error crops up during the second boot
phase and often ties back to driver conflicts or insufficient disk space.
Freeing up storage on your system drive and ensuring all drivers are
current can resolve it. If third-party software like antivirus programs
interferes, consider disabling them temporarily during the update.
Part 2: How to Fix Windows 11 0xC1900101 Error
Nobody wants to stare at a failed update screen, especially when it’s the
0xc1900101 error holding things up. Fortunately, you can tackle this problem
with five practical methods that address its most common triggers—driver
issues, limited storage, and corrupted files. We’ll guide you through each
step-by-step so you can fix your Windows 11 update and get back to business.
Way 1. Use the Windows Update Troubleshooter
Microsoft built the Windows Update Troubleshooter to take the guesswork out
of fixing update problems like 0xc1900101. This tool scans your system,
spots issues like broken update files or settings conflicts, and tries to
correct them automatically. It’s a quick first step that can save you from
digging into more complicated solutions.
-
Press the Windows key and the I key together to open the Settings app on
your computer and click on Update & Security. -
Scroll down to Troubleshoot, and click on Additional troubleshooters.
-
Look for the Windows Update option in the list of troubleshooters
displayed on the screen. -
Click on Windows Update and then select the button that says Run the
troubleshooter. -
Follow the instructions that appear on your screen to let the tool
finish its job.
Way 2. Use Disk Cleanup
When your system drive lacks sufficient free space, it causes the 0xc1900101
error to stall a Windows 11 update process. The Disk Cleanup tool enables
users to reclaim storage space through file deletion containing unused items
like update caches and temporary data. The pending update needs this empty
space to operate.
-
Open Search by pressing Windows key along with S key and type Disk
Cleanup to display the Disk Cleanup application. -
Select the Disk Cleanup from the search results to initiate its launch.
-
Find and select your system drive label C: then proceed with clicking
OK. -
The tool now requires a short time period to determine the potential
free space capacity of your storage device. -
Select the boxes for Temporary files, Recycle Bin and Windows Update
Cleanup from the available list. -
Select Delete Files and click OK to permanently remove the selected
items.
Way 3. Update Disk Drivers
The update process may trigger the 0xc1900101 error when mismatched or
outdated drivers from disk drives interfere with the installation. You must
update these drivers to ensure Windows 11 compatibility which allows for a
successful operation.
-
Select Device Manager by right-clicking the Start button at the screen’s
bottom. -
Locate and expand the Disk drives section from the list.
-
Right-click on each disk drive listed there and select Update driver
from the options. -
Pick the option that says Search automatically for updated driver
software. -
Follow any prompts that pop up to install the updates if Windows finds
them.
Way 4: Run SFC Scan to Fix 0xC1900101 Error
Corrupted system files can derail updates and bring up the 0xc1900101 error
without warning. The System File Checker, or SFC, scans your computer for
these damaged files and repairs them, restoring order so the update can
proceed.
-
Press the Windows key and S key together, then type cmd into the search
field. -
Right-click on Command Prompt in the results and select Run as
administrator to open it with full privileges. -
Type sfc /scannow into the Command Prompt window and hit the Enter key
to start the scan. -
Sit tight while the tool checks your system files, which might take 10
to 20 minutes depending on your computer. -
Watch for a message when it finishes—if it finds problems, it will fix
them automatically.
Way 5: Check Your Storage Space
Windows 11 demands plenty of free space—64 GB at minimum—to install updates
without hiccups. If your system drive falls short, the 0xc1900101 error can
pop up as a result. Checking and managing your storage ensures the update
has the room it needs.
-
Press the Windows key and E key together to open File Explorer on your
screen. -
Click on This PC in the left sidebar to see your drives and their
details. -
Look at the system drive, typically C:, and note how much free space it
shows under its name.
Extra Tip: Backup System Before Update
Before you dive into any major Windows update, backing up your system is a
smart move to avoid losing data if something goes wrong. Cloning your OS
disk or backup your system with a tool like 4DDiG Partition Manager creates an exact backup of your
drive, giving you a safety net. This way, you can restore everything easily
if the update fails or causes issues.
4DDiG Partition Manager is an all-in-one tool that simplifies disk
management and backups. It offers a range of features to keep your system
safe and optimized:
Features
- Migrates Windows OS to an SSD with one click, no reinstallation needed.
-
Clones your entire hard drive to back up data or upgrade to a bigger drive
without losing anything. - Creates a WinPE bootable disk to clone or fix a computer that won’t start.
-
Repairs, recovers, and restores partitions from your PC or other storage
devices. -
Checks if your PC can upgrade to Windows 11 for free and bypasses
requirements with one click.
Steps to backup your system with 4DDiG Partition Manager:
-
Connect your target SSD to your computer and open 4DDiG Partition
Manager, then in Backup section select System Backup. -
Choose to backup system partition or the whole data, and select a place to store the backup. Click Start.
-
Once done, you have your system backuped. Click ok to go back to the software.
Conclusion
Dealing with the 0xc1900101 error doesn’t have to ruin your day or
leave your Windows 11 system outdated. This article has armed you with five
solid methods—running the Windows Update Troubleshooter, using Disk Cleanup,
updating disk drivers, performing an SFC scan, and checking storage space—to
knock out the error and get your update installed.
Each approach targets a common cause, from driver conflicts to cramped
drives, giving you a clear path to success. On top of that, backing up your
system with 4DDiG Partition Manager before you start adds an extra layer of
protection, ensuring your data stays safe no matter what happens. Don’t let
the 0xc1900101 error stop you—take these steps, keep your system current,
and enjoy the security and features Windows 11 has to offer.
William Bollson (senior editor)
William Bollson, the editor-in-chief of 4DDiG, devotes to providing the best solutions for Windows and Mac related issues, including data recovery, repair, error fixes.
Во время обновления Windows 7 или Windows 8, до Windows 10, многие пользователи сталкиваются с неизвестными ошибками. Установщик Windows 10 не дает подробную информацию о коде ошибки. В этой статье мы увидим наиболее распространенные коды ошибок, которые Windows 10 показывает пользователю при обновлении или чистой установке.
Windows 10 настроена на автоматическую проверку обновлений, если вы не отключите эту функцию вручную. При возникновении проблем в Центре обновления Windows, может оказаться полезной следующая таблица с общими кодами ошибок Windows Update.
Если вы видите код ошибки Обновления в Windows 10, см. Следующую таблицу. Вполне возможно, что вы найдете соответствующее описание этой ошибки.
Коды ошибок обновления Windows в Windows 10
Если вы не хотите, читать всю статью, просто нажмите на код ошибки, чтобы прочитать о ней более подробно.
- Error 0x0000005C
- Error 0x80070003 — 0x20007
- Error 0x8007002C — 0x4000D
- Error 0x8007002C — 0x4001C
- Error 0x80070070 – 0x50011
- Error 0x80070103
- Error 0x8007025D — 0x2000C
- Error 0x80070542
- Error 0x80070652
- Error 0x80072EE2
- Error 0x80073712
- Error 0x800F0922
- Error 0x800F0923
- Error 0x80200056
- Error 0x80240020 WU_E_NO_INTERACTIVE_USER
- Error 0x80240031
- 0x80242006 WU_E_UH_INVALIDMETADATA
- Error 0x80246007
- Error 0x80246017 WU_E_DM_UNAUTHORIZED_LOCAL_USER
- 0x8024402F WU_E_PT_ECP_SUCCEEDED_WITH_ERRORS
- Error 0x80D02002
- 0x80070BC9:ERROR_FAIL_REBOOT_REQUIRED
- 0x80200053 BG_E_VALIDATION_FAILED
- 0X8007000D ERROR_INVALID_DATA
- 0x8024A10A USO_E_SERVICE_SHUTTING_DOWN
- 0x80242014 WU_E_UH_POSTREBOOTSTILLPENDING
- 0x8024000B WU_E_CALL_CANCELLED
- 0x8024000E WU_E_XML_INVALID
- 0x8024D009 WU_E_SETUP_SKIP_UPDATE
- 0x80244007 WU_E_PT_SOAPCLIENT_SOAPFAULT
- Error 0xC0000001
- Error 0xC000021A
- Error 0xC0000428
- Error 0xC1900101 — 0x2000B
- Error 0xC1900101 — 0x20017
- Error 0xC1900101 — 0x30018
- Error 0xC1900101 — 0x40017
- Error 0xC1900200 — 0x20008
- Error 0xC1900202 — 0x20008
- Error 0xC1900208 — 0x4000C
- Error 0xC1900208 — 1047526904
- Error 0xC1900106
- Ошибка «Не удалось обновить раздел, зарезервированный системой»
Ошибки установки и обновления Windows 10.
0x0000005C Ошибка
HAL_INITIALIZATION_FAILED. Это может указывать на проблемы с аппаратным обеспечением. Чтобы устранить эту проблему, попробуйте сделать следующее:
Обновите BIOS компьютера.
Убедитесь, что ваше оборудование соответствует минимальным системным требованиям Windows 10 .
- Processor: 1 gigahertz (GHz) or faster processor or SoC
- RAM: 1 gigabyte (GB) for 32-bit or 2 GB for 64-bit
- Hard disk space: 16 GB for 32-bit OS 20 GB for 64-bit OS
- Graphics card: DirectX 9 or later with WDDM 1.0 driver
- Display: 1024×600
Ошибка 0x80070003 — 0x20007
Происходит, когда нет подключения к Интернету, во время установки Windows 10.
Для исправления, необходимо использовать автономный способ установки Windows 10. Скачать Windows 10 ISO, а затем установить Windows 10 еще раз.
0x8007002C Ошибка — 0x4000D
Эта ошибка возникает, когда повреждены системные файлы операционной системы. Чтобы исправить поврежденные системные файлы, выполните следующую команду в командной строке от имени администратора:
chkdsk /f c:
0x8007002C Ошибка — 0x4001C
Эта ошибка может возникнуть в одной из следующих причин:
- Конфликт с Антивирусным программным обеспечением.
- Аппаратные конфликты.
Чтобы устранить эту проблему, выполните следующие действия. Если антивирусное программное обеспечение работает на компьютере, отключите его во время процесса обновления.
Также возможно временно удалите ее, а затем попытайтесь снова перейти на Windows 10.
Ошибка 0x80070070 — 0x50011
Эта ошибка может означать, что на компьютере недостаточно свободного места для установки обновления. Освободите место на диске и повторите попытку.
0x80070103 Ошибка
Если при установке обновлений обнаруживается ошибка Центра обновления Windows 80070103, то, возможно, вы пытаетесь установить уже установленный драйвер или драйвер, который менее совместим с операционной системой, чем драйвер, уже установленный на компьютере.
Чтобы устранить эту проблему или получить дополнительные сведения, выполните одно из следующих действий.
- Выполните поиск по форумам или задайте вопрос на веб-сайте Microsoft Community.
- Скройте это обновление, чтобы предложения о его установке больше не отображались.
Чтобы скрыть обновление:
- Прокрутите экран справа налево и коснитесь элемента «Поиск». (Если вы используете мышь, переместите указатель в правый нижний угол экрана, затем нажмите Поиск.)
- Введите в поле поиска «Скрыть или показать обновления», а затем нажмите кнопку «Скрыть или показать обновления».
Выполните одно из указанных ниже действий:
- Если имеются важные обновления, кликните ссылку, позволяющую определить доступность важных обновлений.
- Если имеются необязательные обновления, кликните ссылку, позволяющую определить доступность необязательных обновлений.
- Выберите обновление, которое нужно скрыть, нажмите и удерживайте его либо кликните правой кнопкой мыши, а затем выберите команду «Скрыть обновление».
Применимо к следующим кодам ошибок:
- WindowsUpdate_80070103
- 0x80070103
Ошибка 0x8007025D — 0x2000C
Происходит, если указанный буфер содержит некорректные данные.
Для решения данной проблемы, повторно загрузите образ Windows 10 ISO и запустите установку заново.
0x80070542 Ошибка
С установкой обновлений возникли некоторые проблемы, но попытка будет повторена позже. Если вы продолжаете видеть это сообщение,
Попробуйте удалить содержимое директории C:\windows\SoftwareDistribution и произвести поиск обновлений вновь.
0x80070652 Ошибка
Происходит, когда процесс установки другой программы продолжается. Чтобы исправить это, просто дождитесь, пока установка других программ не завершится, а затем установите Windows 10.
Ошибка 0x80072ee2
Время операции вышло. Это может произойти, если компьютер не подключен к Интернету. Для устранения проблемы, выполните следующие действия:
Запустите Internet Explorer, убедитесь, что компьютер подключен к Интернету.
загрузите KB836941 , и запустите это исправление.
Попробуйте обновить Windows 10 снова.
Если вы по-прежнему получаете сообщение об ошибке, проверьте настройки брандмауэра и убедитесь, что следующие адреса веб-сайтов разрешены:
HTTP: //*.update.microsoft.com HTTPS: //*.update.microsoft.com http://download.windowsupdate.com
0x80073712 Ошибка
Эта ошибка может означать, что файл, необходимый Центру обновления Windows, поврежден или отсутствует.
Файл, необходимый для обновления Windows поврежден или отсутствует. Загрузите Windows 10 ISO, а затем запустите установку Windows 10 снова.
Ошибка 0x800F0922
Эта ошибка может означать, что вашему компьютеру не удалось подключиться к серверам Центра обновления Windows. Если вы используете VPN для подключения к рабочей сети, отключитесь от сети и выключите программное обеспечение VPN (если применимо), а затем попробуйте снова выполнить обновление.
Эта ошибка также может означать, что в разделе, зарезервированном системой, недостаточно свободного места. Возможно, эту проблему удастся решить, используя стороннее программное обеспечение для увеличения размера раздела, зарезервированного системой.
Вы могли бы решить эту проблему с помощью стороннего программного обеспечения для увеличения размера скрытого системного раздела. Убедитесь, что Зарезервированный системой раздел имеет по крайней мере 15 МБ свободного пространства.
Ошибка 0x800F0923
Эта ошибка может означать, существует серьезная несовместимость с приложением, службой или драйвером.
Вам нужно определить несовместимое приложение, службу или драйвер, просмотрев файл журнала по этому пути:
C:. \ $ WINDOWS ~ BT \ Sources \ Panther \ Setupact.log.
Примечание $ Windows. ~ BT папка скрыта.
0x80200056 Ошибка
Эта ошибка может означать, что процесс обновления был прерван, поскольку вы случайно перезагрузили компьютер или выполнили выход из системы. Попробуйте снова выполнить обновление и убедитесь, что компьютер подключен к электросети и остается включенным.
Детали этой ошибки могут быть найдены в
C:. \ $ WINDOWS ~ BT \ Sources \ Panther \ Setupact.log.
Примечание $ Windows. ~ BT папка скрыта.
Чтобы исправить эту ошибку, переименуйте следующие папки (смотри ошибку 0x80242006), а затем снова проверьте обновления.
C:\Windows\SoftwareDistribution\Download
C: \ WINDOWS $ ~ BT.
0x80240017 Ошибка
Указывает, что обновление недоступно для версии ОС Windows, которая работает на компьютере.
Ошибка 0x80240020 WU_E_NO_INTERACTIVE_USER
Эта ошибка возникает, если идентификатор сеанса запуска установки Windows 10 является недействительным. Это может произойти, если пользователь вышел из системы когда запущена установка. Операция не была завершена, так как не было зарегистрированного интерактивного пользователя. Войдите в систему, чтобы начать установку и разрешить перезагрузку системы Переименуйте следующие папки (см. как), а затем снова проверьте обновления.
C:\Windows\SoftwareDistribution\Download
C: \ WINDOWS $ ~ BT.
0x80240031 Ошибка
Происходит, когда установочный файл для Windows находится в неправильном формате.Загрузить Windows 10 ISO, а затем установите Windows 10 снова.
Ошибка 0x80242006 WU_E_UH_INVALIDMETADATA
Операция обработчика не может быть выполнена, поскольку обновление содержит недопустимые метаданные. Переименуйте папку «SoftwareDistribution» и повторите попытку загрузки обновлений.
Чтобы переименовать папку: Откройте «Командную строку» или «PowerShell» и введите следующие команды поочередно, нажимая клавишу Enter.
net stop wuauserv
net stop cryptSvc
net stop bits
net stop msiserver
Ren C:\Windows\SoftwareDistribution SoftwareDistribution.old
Ren C:\Windows\System32\catroot2 Catroot2.old
net start wuauserv
net start cryptSvc
net start bits
net start msiserver
Закройте окно командной строки и перезагрузите компьютер.
0x80246007 Ошибка
Происходит, если ОС Windows 10 не была загружена. Переименовать следующие папки (смотри ошибку выше), а затем снова проверьте обновления. Второй папка является скрытой.
C:\Windows\SoftwareDistribution\Download
C: \ WINDOWS $ ~ BT.
0x80246017 WU_E_DM_UNAUTHORIZED_LOCAL_USER
Ошибка 0x80246017 загрузка не удалась, поскольку учетная запись локального пользователя не имеет права администратора. Выйдите, а затем войдите в другую учетную запись с правами администратора. Затем попытайтесь установить Windows 10 снова. Ошибка происходит, поскольку локальному пользователю было отказано в авторизации для загрузки содержимого. Убедитесь, что пользователю, пытающемуся загрузить и установить обновления, были предоставлены достаточные привилегии для установки обновлений (локальный администратор).
Ошибка 0x80D02002,0x80072EFD, 0x80072EFE, TIME OUT ERRORS
Убедитесь, что нет правил брандмауэра или прокси-сервера, которые блокируют URL-адреса загрузки Microsoft. Выполните трассировку, чтобы лучше понять. Проверьте подключение к Интернету, а затем попытайтесь еще раз запустить обновление после короткого ожидания. В качестве альтернативы, скачать ISO Windows 10 файл и установить его с загрузочного носителя.
Ошибка 0x80070BC9: ERROR_FAIL_REBOOT_REQUIRED
Запрошенная операция не выполнена. Для отката внесенных изменений требуется перезагрузка системы. Убедитесь, что у нас нет каких-либо политик, которые бы запрещали запуск установщика модулей Windows. Эта служба не должна быть отключена и должна управляться ОС.
Ошибка 0x8024402F WU_E_PT_ECP_SUCCEEDED_WITH_ERRORS
Эта ошибка может означать, Обработка завершена с некоторыми ошибками. Одна из причин, по которой мы видим эту проблему, связана с программным обеспечением Lightspeed Rocket. IP-адреса компьютеров, на которые вы хотите получать обновления, должны быть добавлены в список исключений Lightspeed
Ошибка 0x80200053 BG_E_VALIDATION_FAILED
Убедитесь, что ваш брандмауэр, не имеет правил фильтрации загрузок. Фильтры брандмауэра могут привести к недействительным ответам, получаемым клиентом обновления Windows. Если проблема все еще сохраняется, запустите сценарий сброса WU.
Ошибка 0X8007000D ERROR_INVALID_DATA
Указывает на неверные данные, загруженные или произошедшие с ошибками. Попытайтесь повторно загрузить обновление и начать установку.
Ошибка 0x8024A10A USO_E_SERVICE_SHUTTING_DOWN
Указывает, что служба WU закрывается. Это может произойти из-за очень длительного периода бездействия, зависания системы, приводящего к тому, что служба простаивает и приводит к отключению службы. Убедитесь, что система остается активной и соединения остаются установленными для завершения обновления.
Ошибка 0x80242014 WU_E_UH_POSTREBOOTSTILLPENDING
Операция обновления все еще продолжается. Некоторым обновлениям Windows требуется перезагрузка системы. Перезагрузите систему, чтобы завершить установку обновлений.
Ошибка 0x8024000B WU_E_CALL_CANCELLED
Операция была отменена. Это означает, что операция была отменена пользователем / службой. Вы также можете столкнуться с этой ошибкой, когда мы не сможем проверить результаты фильтрации. Запустите сценарий Decline Superseded PowerShell, чтобы завершить процесс фильтрации.
Ошибка 0x8024000E WU_E_XML_INVALID
Агент обновления Windows обнаружил неверную информацию в XML-данных обновления. Некоторые драйверы содержат дополнительную информацию о метаданных в файле update.xml, что может привести к тому, что Orchestrator понимает это как недопустимые данные. Убедитесь, что на компьютере установлен последний агент обновления Windows.
Ошибка 0x8024D009 WU_E_SETUP_SKIP_UPDATE
Обновление агента обновления Windows было пропущено из-за директивы в файле wuident.cab. Вы можете столкнуться с этой ошибкой, когда WSUS не отправляет обновление клиентам. Ознакомьтесь с KB920659 для получения инструкций по устранению проблемы.
Ошибка 0x80244007 WU_E_PT_SOAPCLIENT_SOAPFAULT
Ошибка SOAP-клиента, поскольку произошла ошибка SOAP из-за кодов ошибок WU_E_PT_SOAP_ *. Эта проблема возникает из-за того, что Windows не может обновлять файлы cookie Центра обновления Windows. Ознакомьтесь с KB2883975 для получения инструкций по устранению проблемы.
Ошибка 0xC0000001
Эта проблема может возникнуть по одной из следующих причин:
- Есть ошибки файловой системы.
- Приложение виртуализации работает на компьютере.
Чтобы устранить эту проблему, выполните следующие действия:
Чтобы исправить поврежденные системные файлы, выполните следующую команду в командной строке от имени администратора :
CHKDSK / FC:
Отключить любые приложения виртуализации файловой системы.
Если вы используете виртуальную машину, отключите или временно удалите приложение во время процесса обновления.
Ошибка 0xC000021A
Системный процесс %Hs остановился неожиданно со статусом 0x% 08x (0x% 08x 0x% 08x). И Выключением компьютера в этой ситуации. Чтобы устранить эту проблему, обратитесь в службу поддержки Microsoft. KB969028 Подготовьте журнал дампа, прежде чем обращаться в службу поддержки Microsoft.
Ошибка 0xC0000428
Windows не может проверить цифровую подпись для Install.wim образа Windows 10. Скачать ISO Windows 10 файл и установить его с загрузочного носителя.
Ошибка 0xC1900101 — 0x2000B
В случае этой ошибки, Microsoft рекомендует, чтобы вы отключили устройства, которые не используются при обновлении компьютера.
Ошибка 0xC1900101 – 0x20017
Эта проблема возникает из-за проверки драйвера, ошибка возникает при обновлении Windows 10.
Убедитесь, что все, что драйвера были обновлены.
Откройте setuperr.log и setupact.log файлы в %windir%\Panther, а затем найдите проблемные драйверы .
Обновите или удалите проблемный драйвер.
Ошибка 0xC1900101 — 0x30018
Означает, что обновление для Windows не удалось установить после первой перезагрузки. Некоторые из драйверов являются несовместимыми на этапе PNP специализации. Обновите драйвера и программное обеспечение на компьютере до последних версий. Чтобы сделать это, перейдите на сайт производителя компьютера или обратитесь линию поддержки производителя компьютера. Если у вас установлено любое устройство, которое вы очень редко используете, необходимо удалить драйверы и ПО устройства.
Ошибка 0xC1900101 — 0x40017
Эти ошибки означают, что установка Windows 10 не удалась после второго перезапуска системы. Вероятно, вызвано неисправными драйверами или программным обеспечением. Вот известные драйвера и программное обеспечение, которые вызывают эти ошибки:
- SteelSeries — Мышь и клавиатуры.
- NVIDIA — Видеокарты. Убедитесь, что вы установили последнюю версию драйвера видео.
- ESET — См базу знаний ESET, чтобы узнать, как безопасно перейти на Windows 10 с установленными продуктами ESET.
- McAfee AntiVirus 8.8 Patch 3, несовместим с Windows 10.
Следующие решения могут быть использованы:
- Чистая загрузка Windows, и затем обновление до Windows 10.
- Запуск Setup.exe для Windows 10 вместе с параметром / DynamicUpdate.
Ошибка 0xC1900200 — 0x20008
Эта ошибка может означать, что компьютер не соответствует минимальным требованиям для загрузки или установки обновления до ОС Windows 10. Проверьте системные требования для получения подробной информации.
Ошибка 0xC1900202 — 0x20008
Эта ошибка означает, что компьютер не соответствует минимальным требованиям для загрузки обновления. Эта проблема возникает, когда обновления Windows не может загрузить установочный носитель из-за поврежденных компонентов клиента Центра обновления Windows.
Ошибка 0xC1900208 — 0x4000C
Эта ошибка может означать, что на компьютере установлено несовместимое приложение, которое не позволяет завершить процесс обновления. Удалите все несовместимые приложения, а затем попробуйте выполнить обновление снова.
Ошибка 0xC1900208 — 1047526904
Это сообщение об ошибке указывает, что компьютер не проходит проверку совместимости для установки WINDOWS 10. Для решения данной проблемы, Удалите несовместимое программное или аппаратное обеспечение.
Проверьте, есть ли в файле несовместимое оборудование «C:. \ $ WINDOWS ~ BT \ Sources \ DuHwCompat.TXT» .
Ошибка 0xC1900106
Процесс установки был завершен. Ошибка установки: Windows не может установить обновление. Это указывает на то, что программа установки завершилась неожиданно. Выполните следующие действия:
Если антивирусная программа работает, отключите ее во время процесса обновления.
Запустите Windows Update, чтобы убедиться, что ОС Windows обновляется.
Убедитесь, что последние версии драйверов и прошивки установлены.
Ошибка «Не удалось обновить раздел, зарезервированный системой»
Раздел, зарезервированный системой представляет собой небольшой раздел на жестком диске, который хранит информацию о загрузке для Windows. Чтобы устранить эту проблему, см KB3086249
Источник: Microsoft.
Update Error 0xc1900101-0x30018 mostly occurs when you try to upgrade your Windows 10 operating system to the latest one. These error codes are numerous and too many to count. In a specific post, Microsoft listed these potential error codes along with brief information.
However, these data are completely worthless since there are no signs of what might be causing the problem or how to actually approach the solution. In this blog post, we explain some easy and effective methods. By using them you will certainly get rid of this issue.
As per the user’s report, when they upgrade to Windows 10, it reaches a certain maximum limit. It then reverts back to the previous version of the operating system. It displays the following message.
We couldn’t install Windows 10
We’ve set your PC back to the way it was right before you started installing Windows 10.
0xC1900101 – 0x30018
The installation failed in the FIRST_BOOT phase with the error during SYSPREP operation.
Here is a series of driver-related errors that frequently appear while upgrading to Windows 10 –
0xC1900101 – 0x300180xC1900101 – 0x3000D0xC1900101 – 0x200040xC1900101 – 0x4000D0xC1900101 – 0x200170xC1900101 – 0x2000c0xC1900101 – 0x40017

List of Contents
- Remove your antivirus
- Disconnect all peripherals
- Run SFC Utility and DISM Command
- Perform Disk Cleanup
- Reset Windows Update Components
- Use the Media Creation Tool
- Update or remove corrupted drivers
- Remove problematic applications
- Upgrade your BIOS
If you are getting an error code 0xc1900101-0x30018 while updating Windows 11/10, try out these suggestions one by one.
1. Disable or Uninstall your antivirus
Antivirus is designed to prevent malicious applications related to worms and trojans but sometimes removing these programs solves problems like Update Error 0xc1900101-0x30018. If you are experiencing the same issue, be sure to uninstall it and try to upgrade your Windows again. Here is how to do that –
- Right-click on the Start button and select Apps and Features.
- Locate the application you want to remove from the programs list.
- Once you find it, select it and hit the Uninstall button.
- Click on the Uninstall button again.
- If UAC asks for permission, click on the Yes button.
- Follow the on-screen instructions and be sure all the antivirus components are removed properly.
If the above procedure works, this might be a good time to switch to a different antivirus solution.
2. Disconnect all peripherals/secondary devices
Several users have asserted that they successfully installed the latest version of Windows 10 after disconnecting all external devices from their computers. Although this may sound like a third-grade solution, you should try it out as it has proven useful for some users. So, it is still worth a resolution.
3. Run SFC/DISM command-line programs
Update Error 0xc1900101-0x30018 can sometimes occur due to corrupted system files, but you can effectively get rid of this by performing the SFC scan and DISM command. To do that, you just need to do the following –
- Press Win + S to open the Windows Taskbar search.
- Type cmd in the search box and press Ctrl + Shift + Enter.
- When UAC prompts, click on the Yes button.
- In the elevated Command Prompt, type the below command line and hit Enter –
DISM.exe /Online /Cleanup-image /Restorehealth

- After that, run the system file checker to scan the corrupted files.
- Open the elevated command prompt again as explained earlier.
- When UAC prompts, click on the Yes button.
sfc /scannow

- Press Enter and wait for a while.
- When the scan process completes, try to update Windows.
4. Perform Disk Cleanup
Sometimes, low storage hard drives of your device might be the reason for occurring Update Error 0xc1900101-0x30018. In order to upgrade to Windows 10, you must have at least 16GB of storage. Not meeting this requirement, you may guess why you’ve experienced this issue. To free up your hard drive space, check out the guidelines mentioned below –
- Click on the Start button, type
cleanmgr. - Select the Disk Cleanup application from the best match.
- When a popup prompts on the screen, select the C: drive and hit the OK button.
- This will start searching for the spaces that it can free up.
- Click on the “Clean up system file” button.
- Again select the C: drive and hit the OK button. It calculates how much storage can be retrieved by removing the system files.
- Mark all the check-boxes except Downloads and press the OK button.
- The process of cleaning junk files will start immediately start.
5. Reset Windows Update Components
This might be quite a lengthy process but according to the users’ report, it helps to solve various update error codes. For more information, you can also check out the solutions listed in our dedicated article. To do it, follow the instructions below –
- Click on the Start button and type cmd.
- Right-click on Command Prompt and select Run as administrator.
- When UAC prompts on the screen, hit Yes to give permission.
- Now, run the following codes sequentially and hit Enter after each one –
net stop wuauserv
net stop cryptSvc
net stop bits
net stop msiserver
rmdir %windir%SoftwareDistribution /S /Q
net start wuauserv
net start cryptSvc
net start bits
net start msiserver
5. Once over, Restart your PC to save the changes.
6. Use the Media Creation Tool
If you’re still experiencing the issue, make sure to run the Media Creation Tool as an administrator to complete the upgrade process. In order to avoid the Update Error 0xc1900101-0x30018 at hand, follow the below steps one by one –
- Go to the Windows Upgrade page and download the Media Creation Tool.
- Right-click on the downloaded tool and select Run as administrator.
- If UAC prompts on the screen, click the Yes button to give your permission.
- On the following page, Accept the Applicable notices and license terms.
- Select Upgrade this PC now and hit the Next button.
- Here it would help if you waited for a while as the software prepares the necessary files.
- Select Download and install updates and click Next.
- Follow the on-screen instructions until you reach the Ready to install screen.
- Click on Change what to keep.
- Select Keep personal files and apps and then click Next.
- The installation will now start, follow the guidelines to complete it.
7. Update or Remove problematic drivers
If you’re trying to upgrade from Windows 10 to the latest version, follow the below guidelines to locate and remove all the faulty drivers –
- Press Win + E together to launch the File Explorer.
- Once it opens, click on This PC and open Local Disk (C:).
- On the following page, navigate to Windows > Panther.
- Locate the Setuperr.log and Setupact.log files to identify the faulty drivers.
- Keep in mind that you can only open the files if you take ownership of them.
- Once you find the problematic drivers, uninstall them.
Note – Alternatively, navigate to the second method of this page and follow the instructions to remove the corrupted drivers.
8. Remove problematic applications
Sometimes third-party software conflicts with the upgrade process that causes the Update Error 0xc1900101-0x30018 to occur. Several users claimed that certain programs like Acronis True Image and Trusteer Rapport are the main culprits for this problem.
If you use either of these applications or any other similar tool, remove it completely from your device and then attempt to perform the upgrade process. Some users reported that their problem was fixed after removing the faulty software, so be sure to try that.
9. Upgrade your BIOS
Unfortunately, if none of the above methods work for you, then finally you need to upgrade your BIOS to get rid of Update Error 0xc1900101-0x30018. As per the reports of some users, you might not be able to install a specific update if you have outdated BIOS. If you are going to proceed with this method then be cautious while executing as even a small mistake can cause severe damage to your device. To do it, follow the instructions below carefully –
- Open the Run dialog box.
- Type msinfo32 in the search box and click OK.
- In the System Information window, locate BIOS Version/Date in the Items column.

- Once you find it, note down its Value and then close the window.
- Open your web browser and navigate to the manufacturer’s website for your BIOS.
- Download the updated files and install them on your PC properly.
That’s it, I hope this guide helps to address the 0xc1900101-0x30018 issue on your Windows 11 or 10 PC.
Error Code 0xC1900101, 0x30018? — What is it?
Users, when upgrading to Windows 10 from Windows 7 or Windows 8/8.1, or when upgrading to a new version, build, service pack, or major update of Windows 10, can encounter error code 0xC1900101, 0x30018. Windows 10 installation fails and stops or hangs. During the installation process, it will reach a certain maximum limit (normally at 6% or 32%) then reverts back to the previous version of the operating system and displays the following message:
We couldn’t install Windows 10. We’ve set your PC back to the way it was right before you started installing Windows 10.
0xC1900101 – 0x30018
The installation failed in the FIRST_BOOT phase with the error during the SYSPREP operation.
Solution
Error Causes
In attempting to fix Error Code 0xC1900101-0x30018, it is vital to know what causes this issue. The most probable causes of this error are:
- Incompatible hardware or driver
- Incompatible security programs or antivirus or incompatible utility software
- A device driver possibly stopped responding to setup.exe while on the installation process.
In some cases, you might be opened to other error messages when attempting to update to Windows 10, including error code 8007002c.
Further Information and Manual Repair
In fixing issues related to error codes, it is best to employ manual repair methods. Using these methods helps users pinpoint the root causes of the issue and apply solutions permanently to fix the issues.
While most manual repair methods can be done by every Windows user, even those without technical abilities, there are certain cases where help from a Windows professional is needed. If you’re not up to facing risks in implementing manual methods yourself, consider getting help from a professional Windows technician or you can use a powerful automated tool.
In fixing Error Code 0xC1900101-0x30018, you can repeat the same steps used for 0xc000021a (Method One) or you can try doing the following:
- Disable or uninstall your Antivirus program before proceeding to upgrade the system
- Ensure that the machine name is simple (having at least 8 characters) with no special characters like hyphens or dashes.
- Restart the device a few times then try again.
- Disable General USB Devices such as the Smart Card Reader.
- If you use an SCSI hard disk, ensure that you have available drivers you can use for your storage such as a thumb drive and make sure that it is connected. During the Windows 10 setup, select the Custom Advanced Option and use the Load Driver command to be able to load the suitable driver for the SCSI drive. If this fails, try switching to an IDE-based hard disk.
- You can now perform a clean boot. Restart your device then try again.
- If you are using the .ISO file for upgrading the system, you need to disconnect from the Internet first before proceeding to the setup. If you are connected to Wi-Fi or by Ethernet (LAN), make sure to disable both connections then you can proceed to set up again.
- If you’re performing the update through Windows Update, once the download reaches 100%, disconnect from the Internet, and then proceed with the installation.
NOTE: If this fails, if possible, you can try using the .ISO file in upgrading.
- Switch to a local account if the device is connected to a domain.
- Disconnect all external devices attached to the computer such as gaming controllers, printers, or USB keys.
If you’re using Windows Update in installing Windows 10, you can implement the following:
- Open the Command Prompt window by pressing Windows Key + X. Select Command Prompt (Admin) from the menu.
- Stop the BITS, Cryptographic, MSI Installer, and the Windows Update Services. In order to do this, Type or Copy and Paste the following commands one at a time:
NOTE: Don’t forget to hit Enter after every command.
net stop wuauserv
net stop cryptSvc
net stop bits
net stop msiserver
- Rename the Catroot2 and SoftwareDistribution In order to do this, Type or Copy and Paste the following commands one at a time:
NOTE: Don’t forget to hit Enter after every command.
ren
C:WindowsSoftwareDistribution SoftwareDistribution.old
ren
C:WindowsSystem32catroot2 Catroot2.old
- Restart the BITS, Cryptographic, MSI Installer, and the Windows Update Services. In order to do this, Type or Copy and Paste the following commands one at a time:
NOTE: Don’t forget to hit Enter after every command.
net start wuauserv
net start cryptSvc
net start bits
net start msiserver
- Type Exit in the Command Prompt then close the Command Prompt window then restart the computer.
Can’t seem to put up with the long and technical manual repair process? You can still fix this error by downloading and installing a powerful automated tool that will surely get the job done in a jiffy!
Do You Need Help with Your Device?
Our Team of Experts May Help
Troubleshoot.Tech Experts are There for You!
GET HELP
Troubleshoot.Tech experts work with all versions of Microsoft Windows including Windows 11, with Android, Mac, and more.
Share this article:
You might also like
Error 550 — What is it?
Error 550 is an SMTP (Simple Mail Transfer Protocol) outgoing server error code.
It usually occurs when you try to send emails through your Outlook account and the email message encounters a relay error. The email returns back without being delivered with a 550 error message.
The error message is prompted as either of the following:
«550 Requested action not taken: mailbox unavailable»
«550 5 2 1 mail from refused spam site»
In other words, the error code 550 means that your SMTP server was not able to deliver the sent email to the user.
Solution
Error Causes
There are multiple reasons for this error message including:
- The email address was typed incorrectly
- Incorrect SMTP Server settings
- ISP placing restrictions for outgoing mails on the email server
- System infected by virus or malware
Further Information and Manual Repair
Regardless of what the reason may be for the error 550 code occurrence, it is advisable to repair and fix the issue quickly to avoid inconvenience.
You may not be able to send emails from your Outlook account if the error continues. This can cause great hassle in corresponding with others timely and may create a big communication gap.
Here are some quick and efficient ways to resolve this issue on your system:
Solution 1:
There is no need to panic when you encounter error 550. Sometimes the error message may occur because you inserted the wrong/ incorrect email address of the recipient.
In such a case, cross-check the recipient’s email address to verify if it is correct. If not, insert the correct address and try sending the email again.
Solution 2:
If the error still persists, try other methods to resolve it. Sometimes error 550 can also occur due to incorrect SMTP settings.
Fix it to resolve the error. This can be done by opening your Outlook settings Tools and Accounts option. Now go to view/change the email account for the email account you are having problems with.
After that check, the SMTP server is set to mail.yourdomain.com. Then click more settings and then click the outgoing server tab. See if the ‘My server requires authentication for the outgoing server’ is checked. If not, then check on it. Then simply save to confirm changes. Now try emailing again.
Hopefully, this will resolve the issue.
Solution 3:
Another reason for the error occurrence can be ISP blockage.
When the junk email volumes increase, network administrators (the people who are responsible for managing ISP servers) place restrictions on SMTP email servers to prevent spam on their network. If this is the reason, contact your ISP administrator to resolve the issue.
Solution 4:
Malware and viral infection can also be the cause for error 550. To remove all kinds of viruses including Trojans and spyware and fix the issue right away without compromising on the speed of your PC it is advisable to download Restoro.
This is a highly functional and advanced PC Fixer embedded with multiple utilities like a powerful antivirus and a system optimizer.
It scans your entire PC in seconds, detects and removes all kinds of viruses. Simultaneously, the system optimizer feature ensures the speed of your PC does not slow down during the scanning and virus removal process.
This feature boosts your PC speed significantly.
It is user-friendly and has easy navigations making it quite simple for even those users who are not technically sound to work around it and operate it with ease. It is compatible with all Windows versions.
Click here to download Restoro and resolve the error 550 messages today!
Read More
Screen flickering in Windows 10 — What Is It?
Screen flickering when you’re using Windows 10 is quite a common problem. It is often caused by apps that are not compatible with the operating system, or faulty display drivers.
There are a lot of possibilities for why this issue occurs. If you are one of the many users that encounter this kind of problem, you might want to check on your task manager to see if everything is working fine. One common sign that something wrong has happened is if the task manager flickers, as well. To fix this, you will need to update an app, uninstall an app, or update your display driver.
Solution
Error Causes
Common causes of the screen flickering when running on Windows 10 are software issues. This is most likely caused by the following:
- Faulty display driver
- You have an application installed that is not compatible with your operating system
Further Information and Manual Repair
In order to fix the issue of your screen flickering when you have Windows 10 as your operating system, follow these simple steps.
Note: It is very important to consult with an authorized computer technician if you are not highly confident in solving this issue by yourself. Furthermore, you can also use software to fix this problem.
- The first method is by checking if your task manager is flickering. To open the task manager, all you have to do is right-click or press and hold the start button, then select task manager.
If you have confirmed that the task manager is the one causing the screen flickers, the display driver can possibly be your problem. To fix it, all you have to do is update your display driver.
How to update the display driver
- You have to reset your computer and boot it on Safe Mode.
-In order to do this, you have to hold the Shift key while selecting Power>Restart. When your computer boots up, you will be greeted by a Choose an option screen. From there, you have to select Troubleshoot, then Advanced Options, then Startup Settings, and then Restart. When your computer restarts, select 4 or hit the F4 key to enter into Safe Mode.
- When your computer finally boots up in Safe Mode, right-click or press and hold the Start button. From there, click Device Manager.
- From the Device Manager screen, you have to expand the Display Drivers section, right-click on the driver that might be causing the problem then select Uninstall. Don’t forget to tick the Delete the driver software for this device box, press the OK button, and then restart your computer.
— When you have two, or more, drivers installed on your computer, all you have to do is disable the other drivers. You can do this by right-clicking on the driver in the Device Manager and click the Yes box next to disable. Shut down your PC after this, disconnect the installation, and boot your computer back on.
- When your PC boots up after the restart, click on the Start button then click on Settings.
- You need to go to Update & Security, then Windows Update, and then check for updates.
— If you are using multiple drivers and this technique doesn’t work, repeat the process in Step 3 and try to disable a different driver.
Remove an incompatible app
There are two ways to remove an incompatible app to fix the issue of a screen flicker on Windows 10. Apps like Norton AV, iCloud, and IDT Audio are usually the ones causing the problem. Uninstalling these apps could solve the problem. Uninstall the apps by using the methods below:
First Solution: Uninstall an app in Settings
- Click Start, and then click Settings.
- Click on System, and then click on Apps & Features.
- A window will pop up and from there you will need to select the application you wish to uninstall. Click the app, and then click uninstall. Follow the screen prompt to fully uninstall the program.
Second Solution: Uninstall an app in the Start Menu
- Click Start, and then click All Apps.
- Look for the application you will need to uninstall, right-click the said app, and then click Uninstall. Follow the screen prompt to fully uninstall the program.
[/section]
Read More
One of the most interesting innovations that were released by Microsoft is the Surface Dial. This only goes to show that Microsoft is very competent not just in hardware but in overall innovation. Although it’s quite a piece of technology and as far as the consensus is concerned, it works pretty well, there are still some issues encountered by users. One of the particular issues experienced by users is that the Surface Dial fails to pair with every Windows 10 PC.
At a time of writing, it is still not clear what the cause of the problem really is. However, their possible solutions are provided in this post that might help you resolve the problem. Before you get started troubleshooting the problem, make sure that there are two AAA batteries fitted inside properly.
Option 1 – Check if your PC supports Bluetooth 4.0 LE
In case you don’t know, the Surface Dial only works with the Windows 10 Anniversary Update and later PCs that support Bluetooth 4.0 LE. Thus, you have to check if this is supported or not before you troubleshoot further.
- Tap the Win + R keys on your keyboard to open the Run dialog box.
- Next, type “devmgmt.msc” in the field and hit Enter to open the Device Manager.
- From there, click on Bluetooth and select “Microsoft Bluetooth LE Enumerator” from the drop-down menu. However, if it is not there, then it simply means that your computer does not support this standard which is most likely why you were unable to pair with other Windows 10 PCs. On the other hand, if you were able to see it, then proceed to the next troubleshooting steps below.
Option 2 – Check if Bluetooth is on
The next thing you have to do is to check if Bluetooth is turned on. As you know, the Surface Dial connects to your computer using Bluetooth and so you need to check if it’s really on or not. Aside from that, you also have to verify pairing.
- Tap the Win + I keys to open Windows Settings.
- Next, select Devices from the menu and click on Bluetooth.
- After that, make sure that the toggle switch for Bluetooth is turned on.
- Now all you have to do is to verify pairing by pressing and holding the pairing button located beside the batteries and then wait for a few seconds until the Bluetooth light begins to flash.
- Then go back to the Bluetooth section and click on Bluetooth or other devices.
- From there, click on Add Bluetooth and select Surface Dial.
- Follow the next instructions on the screen and click on Done once everything is completed. That should fix the problem.
Option 3 – Check if Surface Dial is connected to another PC
If you think that connecting a Bluetooth device to two different PCs at the same time is wise, then think again as it does not really bode well for the overall user experience. Thus, you need to disconnect the Surface Dial from the system that you are currently using.
On the other hand, if everything fails, then it’s most likely that the Bluetooth adapter is the one at fault. So you may have to get a third-party device that connects to your system via USB and then see if it works or not.
Read More
CoreFoundation dll Error – What is it?
The CoreFoundation dll error is a common error associated with Apple Software products. Most of the Apple Software products rely on this dll file to load and run. This dll file is Apple’s proprietary.
The error message is prompted in the following format:
“CoreFoundation.dll was not found”
or
“Apple Application Support is missing’.
Solution
Error Causes
The CoreFoundation.dll error message is triggered because of several reasons. These include:
- Deleted CoreFoundation dll file
- The CoreFoundation dll file has been overwritten
- Poor installation of the Apple software
- Corrupt software due to viral infection
- Registry problems
Further Information and Manual Repair
It is advisable to fix CoreFoundation dll error code right away to avoid inconvenience. This error may stop you from accessing and running your desired Apple application.
Here are some of the best ways to resolve this error on your system:
1. Restore the Deleted CoreFoundation dll File
Since Dynamic Link Library is a shared program, if you happen to delete an Apple program on your PC, chances are you might have deleted that file too in the process.
Therefore, the easiest way to recover and restore the CoreFoundation dll file and resolve the error is to look for the file in the recycle bin. If you can’t locate it, then another way to restore the missing CoreFoundation dll file is to download the files from the internet.
2. Reinstall Apple Software
If the error still persists then it is advisable to re-install Apple software via iTunes or any other Apple Software that you have on your PC.
For example, if you have iTunes, then to reinstall it first go to the start menu and then the control panel. Now click on Add/Remove programs and locate iTunes software. Click the Uninstall button next to iTunes. Wait for a while until the program is completely uninstalled.
After the installation is complete, restart your PC and then download the latest version on iTunes and install it. Now try running the software again. Hopefully, this will resolve the issue.
3. Scan for Viruses
Another way to resolve CoreFoundation dll error on your system is to scan for viruses. Run an antivirus to detect viruses and remove them from your PC.
4. Clean Your Registry
Remember DLL file errors also indicate a corrupt registry. When you don’t clean the registry it overloads with unnecessary and obsolete files like junk files, cookies, temporary internet history, and bad /invalid registry entries.
When these files accumulate, they damage the registry, dll, and system files too. It also causes disk fragmentation. To repair the registry and fix dll files again, download a registry cleaner.
Whether you want to scan for viruses or clean the registry, it is advisable to download Restoro.
This is a multi-functional and advanced PC Fixer deployed with an intuitive algorithm and multiple powerful utilities. These include an antivirus, a registry cleaner, Active X controls, and class scanner, and a system optimizer.
The registry cleaner detects all registry issues and resolves them instantly. It wipes out the unnecessary files cluttering and damaging the registry. It fixes and restores the damaged dll files including CoreFoundation dll file thereby resolving the error. It takes a few clicks to resolve this error.
The antivirus feature scans your entire PC and removes all kinds of malicious software including spyware, malware, viruses, and Trojans.
To ensure the antivirus does not slow down the speed of your PC, Restoro also features a system optimizer that boosts the performance of your computer significantly.
It is powerful and bug-free software with a user-friendly interface that makes it quite easy to operate. You can download it on any Windows version as it is compatible with all.
Click here to download Restoro and resolve CoreFoundation dll error now!
Read More
Sharing is caring, an old saying says. I completely agree and that is reason enough for this article filled with sharing goodness. Holidays are coming and I hope that the holiday spirit is strong with you, that you will spend them in peace and with loved ones. All that being said wouldn’t it be great if you can spend some joy with close ones and share some of your games on their account so they can enjoy them as well?

Well, you can and it is not complicated as well. Follow this easy guide to see how can you get someone’s account up and running with some of your games.
The steam Family sharing feature
The family Sharing feature inside Steam will let you share your games to another account so owners of that account can play games that you have purchased without the need to buy themselves. You can allow up to 5 accounts and 10 devices to play your library games, and owners of these accounts will have their own achievements.
Be aware that enabling this option will place your entire library on the share, you will not be able to choose which games you would like to share and therefore any kind of parental controls are not applying here. Also know that once the game is running on one device, others will have to wait for one playing to finish before they can get a spin on it.
Only the owner of the game can play whenever he wants as a priority but others will have to wait for the game to be not run by someone else.
How to Share Your Game Library
In order to share your game library have a person, you wish to share games with at his device on ready to go and enable steam guard on your account.
To enable steam guard login into your account and on the top left corner click on Steam and then on Settings. Inside settings click on the Manage Steam Guard Account Security button. Choose the way of authentication either by mail or steam guard mobile app. Check Get Steam guard codes by email radio button and re-login into account.
Sharing Games on another Steam account
Now that Steam Guard is enabled on the primary account let’s share some games!!!
Inside client again, in the top left click on Steam and again on settings. In the left panel choose and click on Family. Inside Family section check box beside Authorize Library Sharing on This Computer. Log out of your account and login into the client user account credentials you wish to share your library with (this is your friend or cousin account, they need to log in to Steam client on your computer but with their credentials). After they have successfully logged in, log them out and re-log with your account again.
Now go again into Steam > Family and now you should see an account in the box at the bottom with the user name or your friend or relative. Confirm that this is an account that you wish to share the library with by clicking on the checkbox next to the name. Now let users login into the desired device with their credentials and they will have access to your entire library. Happy gaming!
Read More
Resource hogging is a term when one single application or few of them are taking all system resources for themself causing extreme slow down in the computer and nonresponsiveness. It can be a very frustrating and time-consuming experience and it can cost you money if you can not finish work on time due to this effect.
I believe that everyone has experienced at least one slowdown in their IT carrier because of resource-hogging applications and most users do not know how to deal with this. We are here to help you with this issue.
Just to be aware that this method shown here is not a method to miraculously speed up your PC or anything similar, this is to be able to detect and recover from extreme slowdowns. Hardware components are still very important and if you can upgrade your computer if it is outdated, please do it because new applications will require a more modern system, and not any kind of tips and tricks will save you from outdated hardware.
Identifying resource hogging app
Now when we got that out of the way let’s talk about slowdowns, it is no secret that sometimes an application has bugs and memory leaks that can cause this kind of behavior, and sometimes the application simply takes up too much memory for any other application to work normally. The most simple and straightforward way is to bring up a Windows task manager and inspect running applications and services.
You can bring task manager by the key combination of CTRL + SHIFT + ESC
If the system is in deep memory deficit you will have to wait for the task manager to open and show itself on-screen. Once opened, click on more details if that view is not opened by default. Once the view expands you will see all running applications with how much RAM memory have they taken and how much CPU they are using.
What to do with app?
Now you are presented with a choice on what to do with the problematic application. If you press the end task button on the bottom right, Windows will kill the application and its processes but any unsaved work inside the application will be lost and unrecoverable in most cases. Or you can try to remove smaller applications running to free up more memory and CPU in order for the computer to catch up.
Any choice you make is up to you, but be very careful not to kill Windows essential service by mistake, that will cause immediate system instability with high chances of a system crash.
Read More
Recent Facebook, Instagram, WhatsApp, Messenger & Oculus fiasco and downtime reminded us that even big IT tech behemoth is vulnerable and can go offline. The situation has been resolve in not so fast manner but not long also, let’s say it was resolved in time that people have not left and switched to another platform.
That being said, now when services are back we stopped and reflected on the platform itself and on its users. If Facebook is vulnerable so are its users, but sometimes users themselves are responsible for being a target. We step back and take a look at posts that manifest on Facebook and have come with some advice on what things you should never post on Facebook and on other social platforms.
Pictures of any kind of ID, bill, vaccine cards or similar document
This should be a no-brainer at all but we see people posting this kind of information. They go on a rant about how the bill is too high and place a picture of it, or they took their vaccine shot and posted a vaccine card as proof. Why this is a bad idea is that any of these documents contain certain things like birthdays, names, and even more like addresses and other information that can be used against users.
Information about where you live
This could be tied to the previous point but it is very crucial that a living address is not something that you wish to share publicly. A lot of burglars are stalking social media for exactly this kind of information so they can then analyze when and how to strike and this time you have done all work for them providing them with the information on where to find your flat.
Daily routines and vacation plans
The most burglary happens to believe it or not during the day, in hours when people are at work. So by providing the world with your daily routines and when you are not at home you are putting your home at risk of being broken into. Posting vacation plans are even worse or posting pictures and status when you are on vacation will send a clear message to anyone that your home is empty and unattended.
Pictures of your home interior
This can also sadly disclosure more information that you wish like maybe some interesting facts like address or birthday on certificates, diplomas, or other documents accidentally caught in the taken picture. Also, these kinds of pictures can show much about your home security, alarm positions if you have some, how is your front door secured, etc.
Content that can get you fired
We hear all the time, famous star or director has some tweets that have resurfaced and now it is fired. I know that many of us are not famous stars but we can also be fired. Sharing some offensive opinions, inappropriate content or just plain pure lies like took sick leave to play this new game can have not so great resolution for your working relationship with your employer. We do not support lies nor do any kind of inappropriate content but posting it online on social media will just make things worse for you personally.
Your login info or sites and services that you are using
It is fairly safe to say hey we are chilling with Netflix or watching the new season of Mandalorian on Disney plus but speaking of things like made a new account on freelancer service of got my new e-banking in this cool new bank, etc. is not very wise. Cyber crooks are always on the lookout for identity theft and will use available information to steal data and money. You are risking also losing provided accounts this way leaving you with tons of work to explain that you got mugged to service providers.
Conclusion
We know that this article seems paranoid and maybe assumes that among your friends there are some crocks and people trying to take advantage of you. As this certainly was not our attention nor goal, we had to point to extremes in order to protect you the most.
Read More
A recent update in Windows 10 has caused a couple of glitches. One of these glitches is having trouble signing into Windows 10. Some users reported that they were not able to sign in to their computers using a PIN and they weren’t also able to reset it either. If you are one of these users, then you’ve come to the right place as this post will help you resolve issues that you are having in signing in to your computer using your PIN or fingerprint with Windows Hello.
When you encounter this issue, you will get an error message on your screen stating:
“Your PIN is no longer available due to a change in the security setting on this device on this device.”
To resolve this problem, you need to follow the steps laid out below carefully.
- Step 1: The first thing you need to do is to make sure that you are using an administrator account. After signing in as admin, tap the Win + E keys to open the File Explorer.
- Step 2: After that, under the View menu, enable Hidden items.
- Step 3: Next, navigate to the following path:
C:\Windows\Service\Profiles\Local\Service\AppData\Local\Microsoft
Note: From there, you should see a folder named “Ngc”. This folder might be the one that’s causing the problem so you are going to fix it by making some changes. This folder contains all the files responsible for any PIN-related settings. So if you are not able to access the Ngc folder, or it has gotten corrupted for some reason during an update here’s how to fix it.
- Step 4: Try opening the Ngc folder. If you are able to open it, just skip to step 11 but if you can’t open it and you got the “Permission Denied” error message, proceed to the next few steps.
- Step 5: Right-click on the Ngc folder and select Properties.
- Step 6: Under Properties, go to the Security tab and click on the Advanced button.
- Step 7: Next, click on the Change link which corresponds to the Owner field.
- Step 8: Then click on Object Types and ensure that everything is selected.
- Step 9: After that, enter your username in the field. You can just use the email that corresponds to your Microsoft account or you can also use the Check Names button to verify it. Now click OK.
- Step 10: You should now see a change in the owner’s name. Just make sure that you enable the checkbox below it which is labeled, “Replace owner on subcontainers and objects” and then click Apply and close everything.
- Step 11: Next, try opening the Ngc folder again. You should now be able to access it. After opening the folder, delete all of its contents and make sure that it’s empty.
- Step 12: Restart your PC. After your computer has booted, go to the Account Settings and try setting up a new PIN. You should now be able to set up a new PIN and use it to sign in to your PC.
Read More
In previous versions of Windows changing the system, the font was a pretty straightforward process, but it seems Microsoft did not want this feature to keep for whatever reason and there is no option as of the time of the writing of this article to do it in standard options in Windows 10.
But do not worry, you are still able to customize your Windows and choose which font would you like to see inside it in all of its dialogs. You can choose whichever font you desire, the only prerequisite is it to be installed on your system.
This guide will require you to change values in the registry of Windows itself so please follow step-by-step instructions and always make a backup of the registry before changing it in order to prevent some permanent Windows issues.
All of that being said, let’s start.
Setting new font
First thing is to open notepad, in the notepad paste the next block of code:
Windows Registry Editor Version 5.00
[HKEY_LOCAL_MACHINE\SOFTWARE\Microsoft\Windows NT\CurrentVersion\Fonts]
«Segoe UI (TrueType)»=»»
«Segoe UI Bold (TrueType)»=»»
«Segoe UI Bold Italic (TrueType)»=»»
«Segoe UI Italic (TrueType)»=»»
«Segoe UI Light (TrueType)»=»»
«Segoe UI Semibold (TrueType)»=»»
«Segoe UI Symbol (TrueType)»=»»
[HKEY_LOCAL_MACHINE\SOFTWARE\Microsoft\Windows NT\CurrentVersion\FontSubstitutes]
«Segoe UI»=»NEW_FONT»
Where in «Segoe UI»=»NEW_FONT» instead of NEW_FONT you need to write the exact name of the font that you wish to use as a system font.
Once you have replaced the default system font with your desired one, go to File and save as, from file type drop-down menu, choose all files and save this file as .REG type giving it whatever name you wish.
When the file is saved, close notepad, right-click on the saved file and choose the merge option. Confirm with YES and click on OK. Reboot your system and your Windows will now use the font of your choice as its default system font.
Restoring default font
If you wish to return the old default system font as it was, follow the same steps but in your notepad paste this code:
Windows Registry Editor Version 5.00
[HKEY_LOCAL_MACHINE\SOFTWARE\Microsoft\Windows NT\CurrentVersion\Fonts]
«Segoe UI (TrueType)»=»segoeui.ttf»
«Segoe UI Black (TrueType)»=»seguibl.ttf»
«Segoe UI Black Italic (TrueType)»=»seguibli.ttf»
«Segoe UI Bold (TrueType)»=»segoeuib.ttf»
«Segoe UI Bold Italic (TrueType)»=»segoeuiz.ttf»
«Segoe UI Emoji (TrueType)»=»seguiemj.ttf»
«Segoe UI Historic (TrueType)»=»seguihis.ttf»
«Segoe UI Italic (TrueType)»=»segoeuii.ttf»
«Segoe UI Light (TrueType)»=»segoeuil.ttf»
«Segoe UI Light Italic (TrueType)»=»seguili.ttf»
«Segoe UI Semibold (TrueType)»=»seguisb.ttf»
«Segoe UI Semibold Italic (TrueType)»=»seguisbi.ttf»
«Segoe UI Semilight (TrueType)»=»segoeuisl.ttf»
«Segoe UI Semilight Italic (TrueType)»=»seguisli.ttf»
«Segoe UI Symbol (TrueType)»=»seguisym.ttf»
«Segoe MDL2 Assets (TrueType)»=»segmdl2.ttf»
«Segoe Print (TrueType)»=»segoepr.ttf»
«Segoe Print Bold (TrueType)»=»segoeprb.ttf»
«Segoe Script (TrueType)»=»segoesc.ttf»
«Segoe Script Bold (TrueType)»=»segoescb.ttf»
[HKEY_LOCAL_MACHINE\SOFTWARE\Microsoft\Windows NT\CurrentVersion\FontSubstitutes]
«Segoe UI»=-
Reboot your system and your Windows will now revert the font of your choice as its default system font.
Read More
As you know, the Mobile Hotspot feature is used to share the internet connection with other devices using Wi-Fi signals. These Wi-Fi signals are later caught by other devices using their Wi-Fi and then the internet connection is shared once they are connected. However, recently, some users reported that their devices weren’t able to see the Wi-Fi network even if their Wi-Fi is on.
This kind of problem could be caused by several factors but one of the main ones include the frequency at which the Wi-Fi network is being broadcasted. If you are one of the users who are currently facing this problem, read on as this post will guide you on what you can do if the Mobile Hotspot or Wi-Fi connection does not show up or is not detected on your Windows 10 device.
In most cases, there are only two frequencies at which a Wi-Fi network is broadcasted. They are broadcasted either at 2.4 GHz and 5 GHz. The ones that are broadcasted at 5 GHz need specific hardware since it is a newer technology compared to the ones at 2.4 GHz. There are several other pieces of equipment as well as electrical appliances that operate at 2.4 GHz that includes microwaves as well which causes disruption in the signal strength of the Wi-Fi network.
Moreover, aside from signal interruption, this issue with the mobile hotspot might also have something to do with the network-related drivers in your computer. Thus, to fix the problem, here are some suggestions you should follow.
Option 1 – Try toggling the Network band or the frequency at which the Wi-Fi network is broadcasted
- First, open the Windows 10 Settings app and then navigate to Network & Internet > Mobile hotspot.
- From there, click on the Edit button located under the Network name, Network password, and Network band.
- After that, set the Network band to be at 2.4 GHz and then click on the Save button.
- Once done, restart the Mobile hotspot in your Windows 10 device as well as the Wi-Fi connection of the device that’s trying to connect to the hotspot.
Option 2 – Try running the Network Adapter Troubleshooter
If the first option didn’t work, you might also want to run the Network Adapter Troubleshooter. You can use it to troubleshoot the problem with the Mobile hotspot, to run it, follow these steps:
- Open the Search bar on your computer and type in “troubleshoot” to open the Troubleshoot settings.
- Next, scroll down and select the “Network Adapter” option from the right pane.
- Then click on the Run Troubleshooter” button.
- After that, your computer will check for any possible errors and will pinpoint the root cause of the problem if possible.
Option 3 – Try updating the Network adapter driver
As mentioned, the problem could also be due to the network-related drivers. So it probably might be the reason why you’re mobile hotspot did not appear or was not detected. That’s why it is recommended that you update the Network adapter driver and to do it, refer to these instructions:
Follow the steps below to update your Network Adapter Driver:
- Tap the Win + R keys to launch the Run window and then type in the “MSC” command and hit Enter to open the Device Manager window.
- From there, expand the list of all the network drives and update each one of them.
- Restart your PC and see if it helped in fixing the issue with the mobile hotspot.
Note: If updating the network drivers didn’t help in fixing the problem, you can also try to uninstall the very same drivers and restart your Windows 10 PC. After that, the system itself will reinstall the drivers you just uninstalled. Alternatively, you can also download and install the drivers from the manufacturer’s website directly.
Read More
Copyright © 2023, ErrorTools. All Rights Reserved
Trademark: Microsoft Windows logos are registered trademarks of Microsoft. Disclaimer: ErrorTools.com is not affiliated with Microsoft, nor claims direct affiliation.
The information on this page is provided for information purposes only.