
После обновления до Windows 10 возникает ошибка 0xC1900101 – 0x20017.
После выхода ОС Windows 10 нам сообщали об ошибках, возникающих при обновлении систем, подверженных миграции на SSD/HDD, до новой версии Windows. Мы провели большое исследование этой проблемы и можем с уверенностью сказать, что эта ошибка обновления Windows возникает на разных компьютерах, а также на только что установленных операционных системах Windows, и не связана с процессом миграции ОС.
Ошибка возникает из-за того, что Windows почему-то не удаётся получить информацию о некоторых системных файлах, связях реестра или GUID-идентификаторах разделов.
Кроме того, мы нашли возможный способ устранения, который сработал на наших тестовых компьютерах:
1) Отсоедините все внешние устройства от компьютера, оставив только диск с установленной ОС Windows, мышь и клавиатуру. Сетевой адаптер тоже может вызывать проблему.
2) Выполните следующую команду в командной строке администратора 2-3 раза:
sfc /scannow
3) Перезагрузите ПК, затем попытайтесь выполнить обновление до Windows 10. Это должно сработать в большинстве случаев.
Если у вас всё ещё возникает сообщение об ошибке, следует выполнить исправление загрузки с помощью Диска Восстановления Системы или Режима Восстановления. Существует ряд статей, посвящённых использованию следующих команд:
Bootrec /rebuildbcd

Bootrec /FixMbr

Bootrec /FixBoot
Migrate OS to SSD, Продукты для Windows
Tags: windows, обновление, ошибка, проблема, совместимость
Loading…
Код ошибки 0xC1900101 — 0x20017 чаще всего возникает при установке Windows 10, а точнее обновлении к ОС с более старых версий. Сложность его понимания заключается в том, что сбой может появляться по совершенно разным причинам. Порой дело в банальном антивирусе, который мешает инсталляции, но бывает причина и в более серьезных неполадках. Так читатель уже мог догадаться, не существует и универсального решения, придется перебирать разные подходы в надежде добиться поставленной цели. Шансы есть, и они в вашу пользу.
0xC1900101 — 0x20017 Сбой установки на этапе SAFE_OS с ошибкой во время операции BOOT
Причины
Первое, на что нужно обратить внимание, это процессор. Если речь об устаревшем ЦП Intel G3258, то вам нужно идти совершенно по другому пути. Он описан ниже. В остальных случаях, причины проблемы довольно банальны:
- некорректная работа антивируса;
- конфликт операционной системы с драйверами;
- помехи со стороны сторонних устройств;
- неполадки с данными учетной записи;
- устаревшая версия BIOS.
Что делать владельцам ЦП Intel G3258?
Подобного рода сбой может возникать и на некоторых других процессорах. У вас есть не такой большой выбор, один из рабочих вариантов – отключение второго ядра. Однако работать на одном ядре будет весьма неудобно. Поэтому мы нашли дополнительный способ.
Как убрать ошибку 0xC1900101 — 0x20017 на Intel G3258:
- Заходим в BIOS и отключаем одно ядро процессора.
- Пробуем загрузить операционную систему и завершить обновление. Высоки шансы, что все пройдет без ошибки.
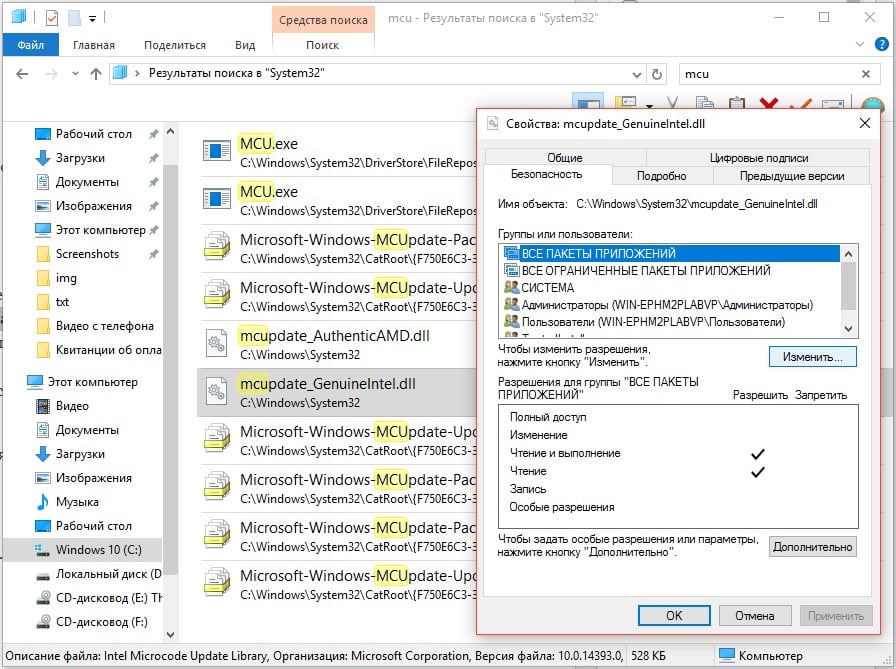
- Когда Windows 10 будет загружена, переходим в раздел C:\Windows\System32 и ищем файл mcupdate_GenuineIntel.dll.
- Переходим в «Свойства» — «Безопасность» — «Изменить» и получаем полномочия для работы с файлом. Это нужно сделать по той причине, что файл является системным и просто так с ним ничего не сделать.
- Переименовываем файл, просто добавляем слово в конец строки. Таким образом у нас получится запасная копя элемента.
- Включаем второе ядро и все должно работать.
К сожалению, одного лишь отключения ядра может быть недостаточно. Нередко дополнительно приходится выполнять сброс компьютера к заводским настройкам.
Как исправить ошибку 0xC1900101 – 0x20017?
В общем-то все действия по исправлению сбоя вытекают из причин, да и многие из них являются базовыми. Мы быстро их перечислим, остановившись только на важных моментах.
Что нужно сделать:
- Отключить антивирус.
- Деактивировать внешние устройства. Только на момент установки и обновления ОС.
- Отключить все дополнительные SATA-устройства, кроме того диска, куда будет устанавливаться Windows.
- Во время обновления нужно отключить интернет.
- Обновить драйвера. Чтобы получить больше информации о работе драйверов при обновлении, нужно перейти по пути %windir%\Panther и посмотреть данные в файлах Setuperr.log и Setupact.log. В Windows 7 также можно посмотреть логи в файле C:\WINDOWS\setupapi.log, C:$WINDOWS.~BT\Sources\Panther\miglog.xml и PreGatherPnPList.log.
- Переключиться на локальную учетную запись.
- Обновить BIOS.
- Сбросить Windows к заводским настройкам.
- Используйте для обновления Media Creation Tool.
Другие базовые проблемы тоже могут иметь место в некоторых случаях. Например, недостаток места или неправильно выбранные места чтения и записи файлов. Однако с ними большинство и сами могут разобраться. Основные причины ошибки 0xC1900101 – 0x20017, а также способы ее исправления описаны выше.
Будет благодарны за любой осмысленный комментарий, особенно тот, что поможет лучше понять природу происхождения проблемы.
Microsoft releases cumulative updates every second Tuesday of the month so as to ensure the smooth functioning of Windows 10 OS. However, while doing so, several users encounter different installation errors. Today, in this post, we will discuss one such error 0xC1900101 – 0x20017, the underlying causes, and six solutions. As per the user’s view, installation completes and reaches the 100% mark but fails at the time of Rebooting Windows.

What in general causes this installation error on Windows PC?
The presence of external devices like Printers, Network/ WiFi interface cards, and Bluetooth adapters may cause this error. Remove all peripheral devices and restart your PC. If this error is still appearing, this must be due to erroneous settings under BIOS or the device drivers have been corrupted.
Re-configure BIOS setup and update all drivers on your computer via Device Manager or Windows Update. Deleting certain entries inside the Registry might also help to overcome this installation error.
Windows Update fails with error code 0xC1900101-0x20017
The most effective way to resolve such errors is by manually installing the update that is failing on your computer. You may find all recent updates uploaded to Microsoft Update Catalog. For this, you need to have the cumulative update number starting with “KB”. This number is associated with the failing update and you may find the same in Windows 10 Update history.
- Here’s a stepwise guide on how to manually download and install pending updates on Windows 10.
Ways to Solve Installation Error 0xC1900101 – 0x20017
To resolve the installation error 0xC1900101 – 0x20017 on Windows 10, follow these workarounds –
Create a Restore Point
Since this is an installation failed error, performing the below methods incorrectly may corrupt the BIOS. This is why we suggest you create a System Restore Point to save the system files. The same may work as a repairing tool if anything goes wrong. Here are the steps to follow –
- Press Win and S together to open the Search.
- Type Create a Restore Point in the text area then hit the Enter key.
- Switch to the System Protection tab and select Create.
- Henceforth, type the description in the text box and thereafter hit the Create option again.
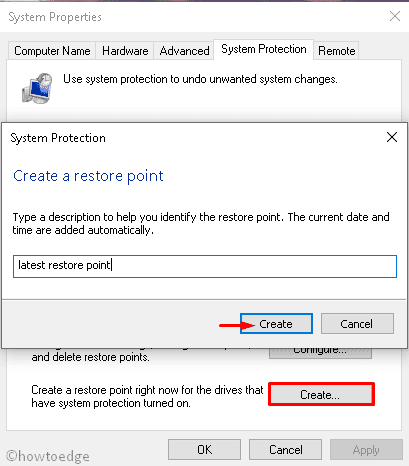
- Wait till this creates the image file of the System files and folders then Close all running windows.
- Now try the below fixes to resolve the installation error 0XC190010 – 0x20017.
1] Remove the Peripheral devices
Sometimes attached additional devices like Printer, Wireless or Network adapter, USB printer, SSD, and USB disk may prevent Windows 10 from being updated. If that’s the case, you should remove external devices and then try reinstalling the operating system again.
Disconnecting the Wireless adapter is rather a simple task. To do this, shut down the system and unplug all the cables from its USB port carefully then remove the Wireless adapter. If the system is under warranty, you may take help from the official service center.
Note: If doing this does solve the issue, replace the existing wireless adapter with a new one.
2] Uninstall the conflicting device driver
The incompatible Bluetooth and Wireless device driver may also result in installation error 0xC1900101 – 0x20017 on your Windows 10 PC. Hence, uninstalling them before updating the Windows OS works as the diagnostic tool. Here’s how to proceed –
- Right-click on Start and select the Device Manager option.
- From the list, locate the installed Bluetooth driver.
- Next, right-click on it and select Uninstall device.
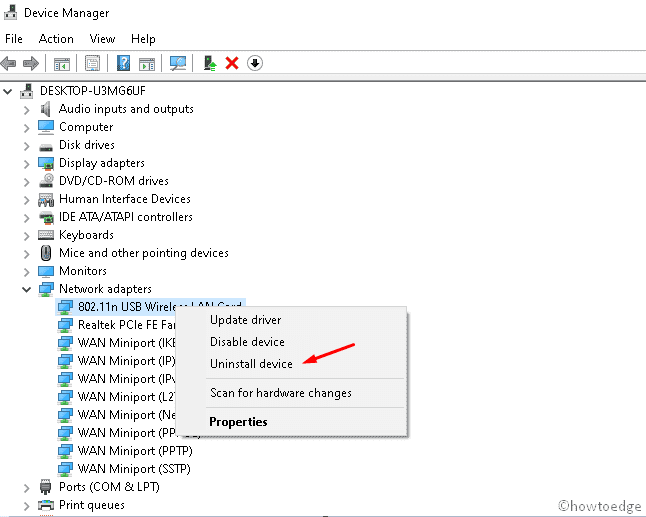
- If any confirmation dialog appears, hit Uninstall again.
- Repeat the same process for all the drivers under the Network Adapters section.
- Once over, Restart the PC to save the changes performed so far.
3] Update Windows 10
The outdated BIOS may also evolve the installation Error 0xC1900101 – 0x20017. To overcome this problem, update your operating system to the latest released version of Windows 10 following these steps –
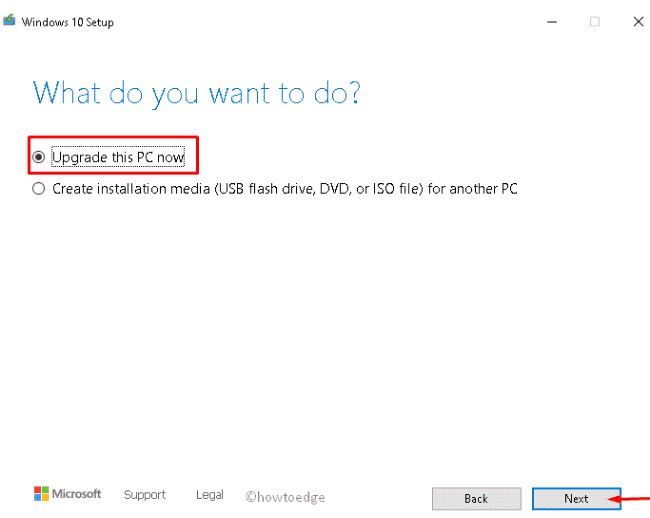
- First of all, visit the Microsoft official page and tap over the Update now button.
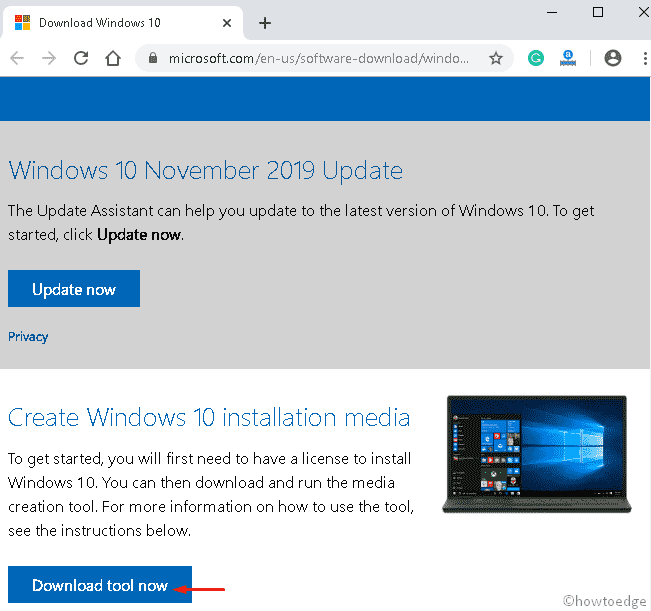
- Once downloaded, double-click the setup file to begin the installation.
- Henceforth, select Upgrade this PC now.
- Afterward, hit Next at the bottom of the page.
- Now select Download and install updates (recommended) thereafter Next again.
- On the succeeding wizard, tap Accept to agree to the license terms and conditions.
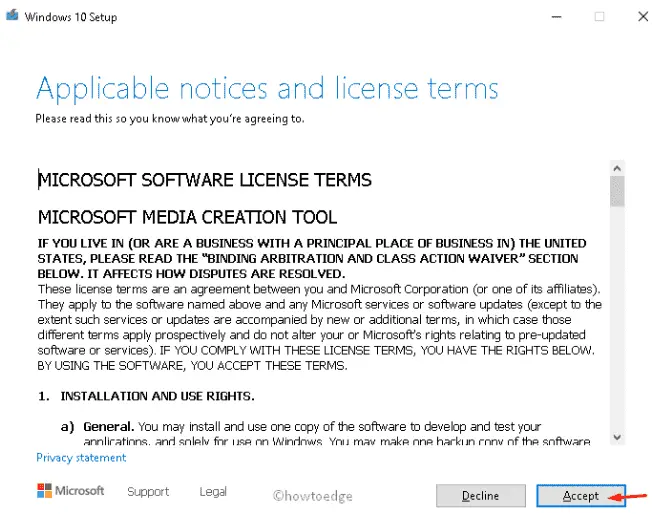
- Mark the Keep personal files and apps option and press the Next button.
- Succeeding that follows the on-screen instructions to complete the installation process.
4] Disable Wireless and Bluetooth adapter
If the above solutions didn’t resolve the error code 0xC1900101 – 0x20017, disable the wireless and Bluetooth settings under BIOS. Here are the steps to follow –
- Restart the running computer.
- When the BIOS is loading, press F2, F4, Del, F10, or Esc to enter the boot mode.
- Under the Advanced tab, navigate to the Wireless option.
- Here you will get two consecutive options i.e. Internal Bluetooth and Internal WLAN.
- Go to each section separately and press Enter to select the Disabled option.
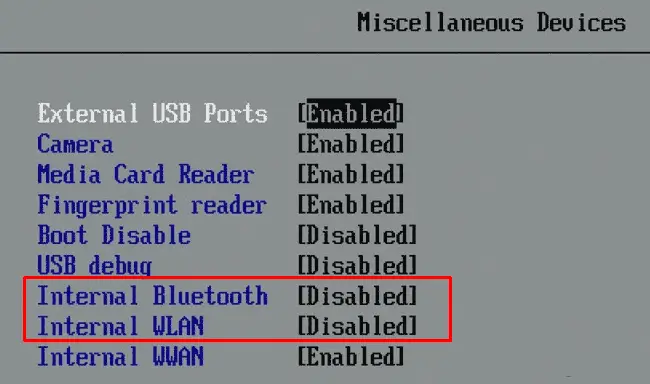
- Press Esc to return to the main screen.
- Next, select the Save button to confirm the recent changes.
5] Change the BIOS settings
Sometimes the Installation Error 0xC1900101 – 0x20017 may also occur appear due to erroneous settings inside the BIOS. To fix this, one needs to re-configure the hardware by enabling the setup changes such as AHCI to IDE mode. Once performed, re-install the Windows and check if the problem has been addressed this way.
6] Modify the registry settings
If none of the above solutions work, try modifying certain key values under the registry to fix the installation error 0xC1900101 – 0x20017. Here’s how to proceed –
- Press Window and R hotkey.
- Type
regeditin the Run command and press Enter. - If the User Account Control window appears, tap Yes.
- Next, copy/paste the following path into the address bar of the succeeding screen and hit Enter.
HKEY_LOCAL_MACHINE\SOFTWARE\Microsoft\WindowsSelfHost\Applicability
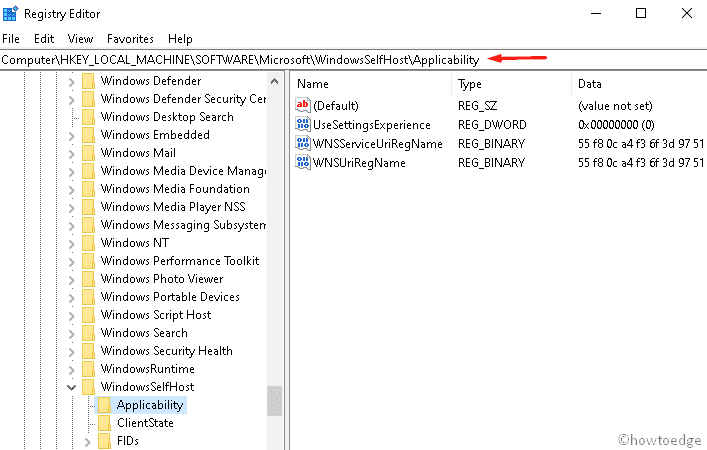
- Here, change the following key values to –
Ring = WIF
RingBackup = WIS or Enabled
EnablePreviewBuilds = 2
BranchName = TH1
UserPreferredBranchName = TH1
- When the above process completes, close the Registry editor.
- Lastly, do the Restart to save the recent changes.
Note: The modification under the registry might be dangerous for the system. Hence, it is recommended to export the registry before making any changes.
- To do this, go to the File Menu and select the Export option.
- Here, select All as the Export range then put the desired file name.
- Next, navigate to the specific location and click the Save button.
This will create a registry backup so that it becomes easy to restore the existing OS just in case something went wrong.
,

How to FIX Windows 10 Update Error 0XC1900101 – 0x20017 «Installation failed in the SAFE_OS phase with an error during BOOT operation»
Usually, the update error 0XC1900101 – 0x20017 in Windows 10, indicates a problem with the device drivers and in most cases with the Network adapter’s drivers. So, before you continue to apply the methods below, check and try the following:
1. First of all, make sure that the Date & Time settings are correct.
2. Then, ensure that you have enough free space. Your device requires at least 20GB of free space to upgrade a 32-bit OS, or 32GB for a 64-bit OS. To free up disk space use Disk Cleanup.
3. Install the latest drivers for all the devices on your system, especially for the Ethernet & the Wireless adapter (if any). *
4. Temporarily uninstall any non-Microsoft security software (Antivirus, Firewall).
5. Disable the Hard Drive Encryption (If enabled).
6. After the first system restart and before the Windows boot:
Method 1. Disable the Secure Boot .
1. Power On your system and press the corresponding key* to enter into BIOS SETUP.
* Note: Usually to enter in BIOS, you have to press the DEL or F1 or F2 or F10 key. (depends on manufacturer)
2. Look at Security or at Boot Options settings,* to find the Secure Boot option and Disable it.
* Note: The location of the ‘Secure Boot’ setting in BIOS, depends on device’s manufacturer.
3. Save settings and EXIT BIOS Setup.
4. Let Windows to boot normally and try to install the update. If the update fails again continue to next method.
Method 2. Run the Windows Update Troubleshooter.
The first method to fix the Windows 10 update error 0XC1900101 – 0x20017, is to run the Windows Update Troubleshooter.
1. Navigate to Windows Control Panel, set the ‘View By’ to Small icons and open Troubleshooting.

2. In Troubleshooting options, click Fix problems with Windows Update.

3. Click Next to troubleshoot Windows update problems.

5. When the troubleshooting process is complete, close the troubleshooter and restart your PC.
6. Check for updates.
Method 3. Delete the SoftwareDistribution Folder.
The “C:\Windows\SoftwareDistribution“, is the location where Windows store the Windows Updates. Many times this folder becomes corrupted and you must re-create it in order to download updates and install from scratch. To rebuild (re-create) the “SoftwareDistribution” folder follow the steps below:
Step 1: Stop Windows Update Service.
1. Open Windows Services control panel: To do that:
- Press Windows + R keys to open the run command box.
- In the Search box, type: services.msc & click OK.
- (Accept the UAC warning if appears).

2. In Services control panel locate the Windows Update service.
3. Right-click on Windows Update service and select “Stop”.

Step 2: Delete the SoftwareDistribution folder.
1. Open Windows Explorer and navigate to: C:\Windows folder.
2. Find and Delete the “SoftwareDistribution” folder (or rename it. e.g. to “SoftwareDistributionOLD”) .

Step 3: Start the Windows Update Service.
1. Open Windows Services control panel.
2. Right-click on Windows Update service and select “Start”.

Step 4: Check and Install Windows 10 Update.
1. Navigate to Settings -> Update and Security and click Check for Updates.
Method 4. Disable the Intel Virtualization Technology.
In some cases, the Windows 10 update error 0XC1900101 – 0x20017, appears if the Intel Virtual Techonology is enabled on your system. So, proceed and disable the Intel_VT technology from Bios settings. To do that:
1. Enter BIOS settings.
2. Disable the Intel VT-d features in Advanced settings -> Chipset.
3. Save and Exit from BIOS settings.
4. Try to install the update.
Method 5. Repair Windows 10.
The final method to resolve Windows 10 Update installation problems, is to repair Windows 10 with In-Place Upgrade.
That’s all folks! Did it work for you?
Please leave a comment in the comment section below or even better: like and share this blog post in the social networks to help spread the word about this solution.
If this article was useful for you, please consider supporting us by making a donation. Even $1 can a make a huge difference for us.
- Author
- Recent Posts
Konstantinos is the founder and administrator of Repairwin.com. Since 1995 he works and provides IT support as a computer and network expert to individuals and large companies. He is specialized in solving problems related to Windows or other Microsoft products (Windows Server, Office, Microsoft 365, etc.).