
Все способы:
- Установка неподписанного драйвера в Windows
- Способ 1: Особые параметры загрузки Windows
- Способ 2: Командная строка
- Способ 3: Редактор локальной групповой политики
- Способ 4: Создание цифровой подписи
- Вопросы и ответы: 11
Как известно, для корректной, стабильной и производительной работы комплектующих ПК и периферийных устройств требуется установка дополнительного программного обеспечения. Скачанный драйвер с официального сайта или через специальные приложения зачастую устанавливается без проблем. Однако происходит это только в том случае, если его тестирование компанией Майкрософт прошло успешно. В редких случаях сертификат может отсутствовать по некоторым причинам, из-за этого у пользователя возникают проблемы с установкой необходимого драйвера.
Читайте также: Программы для установки и обновления драйверов
Установка неподписанного драйвера в Windows
Как уже было сказано выше, в большинстве случаев все сопутствующее ПО для оборудования предварительно проверяется в Microsoft. При успешно пройденном тестирование компания добавляет специальный файл-сертификат, являющийся цифровой подписью. Этот документ означает подлинность и безопасность драйвера для операционной системы, благодаря чему его инсталляция происходит без труда.
Однако такой сертификат может быть не во всем ПО. К примеру, он может отсутствовать для драйвера к старому (но технически рабочему) оборудованию. Но есть и другие ситуации, в которых подпись может отсутствовать у нового устройства или виртуальных драйверов.
Будьте внимательны при инсталляции непроверенного драйвера! Отключая проверку, вы ставите под угрозу работоспособность системы и сохранность ваших данных. Выполняйте его инсталляцию, только если уверены в безопасности файла и источника, откуда он был скачан.
Читайте также: Онлайн-проверка системы, файлов и ссылок на вирусы
Переходя к основной теме вопроса, хочется отметить, что есть 3 рабочих варианта отключения проверки подписи драйвера. Один из них работает до перезагрузки ПК, второй отключает защиту до последующего ручного включения пользователем. Более подробно о каждом из них читайте ниже.
Способ 1: Особые параметры загрузки Windows
Чаще всего необходимость отключения проверки цифровой подписи возникает единожды. В этой ситуации логичнее всего воспользоваться предоставлением временного разрешения. Оно будет работать один раз: до последующей перезагрузки компьютера. За этот промежуток времени вы можете инсталлировать любое количество непроверенных драйверов, перезапустить ПК, и проверка сертификата будет работать как и прежде, защищая операционную систему.
Первым делом запустите ОС в особом режиме. Пользователям Windows 10 потребуется выполнить следующие шаги:
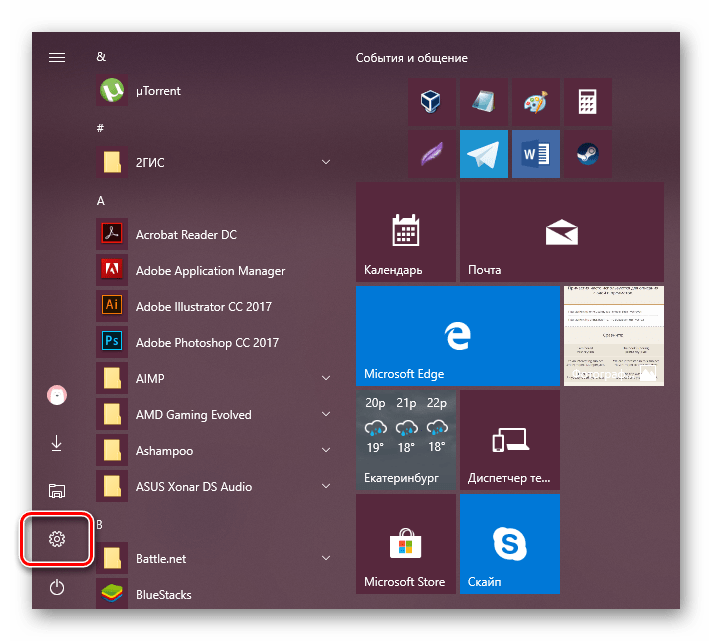
- Запустите «Параметры», вызвав «Пуск».

Это же можно сделать, вызвав альтернативное меню ПКМ.
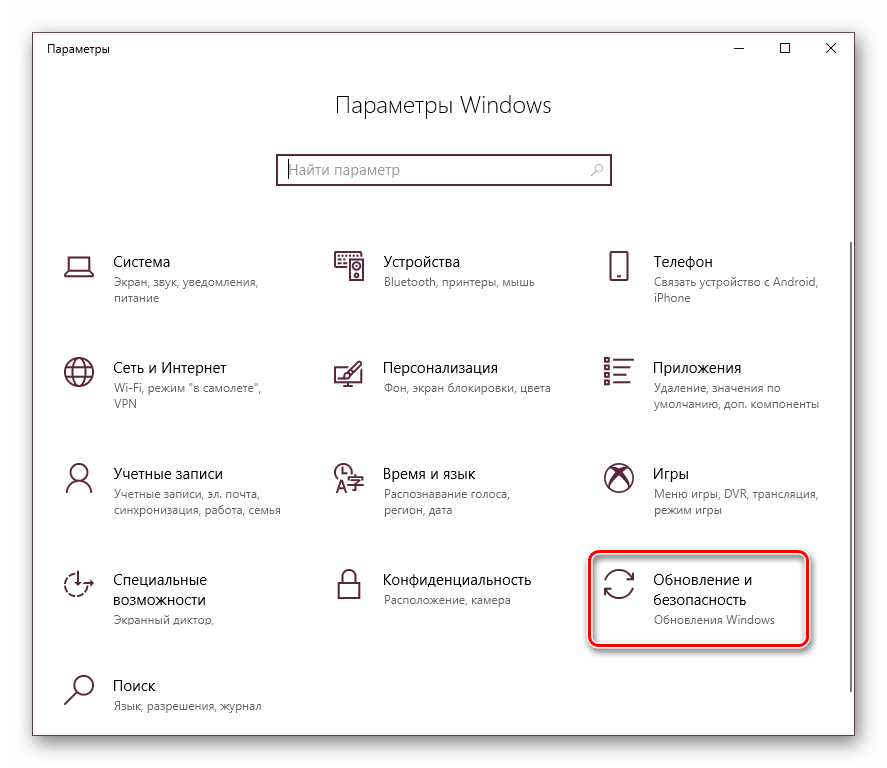
- Откройте «Обновление и безопасность».
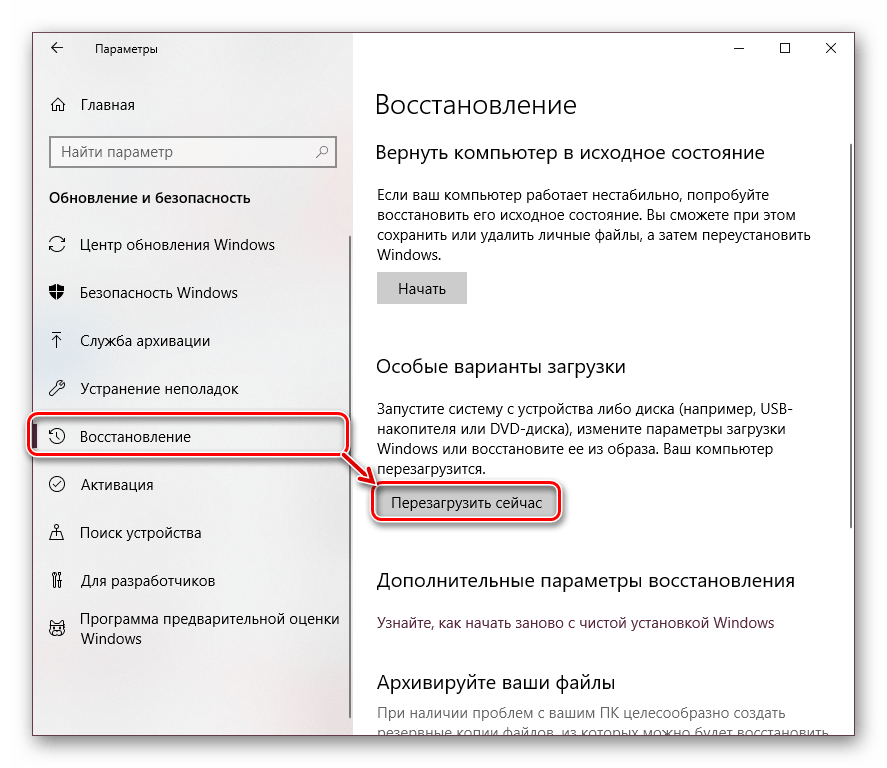
- В меню слева перейдите в «Восстановление», а справа, под «Особые варианты загрузки», кликните «Перезагрузить сейчас».
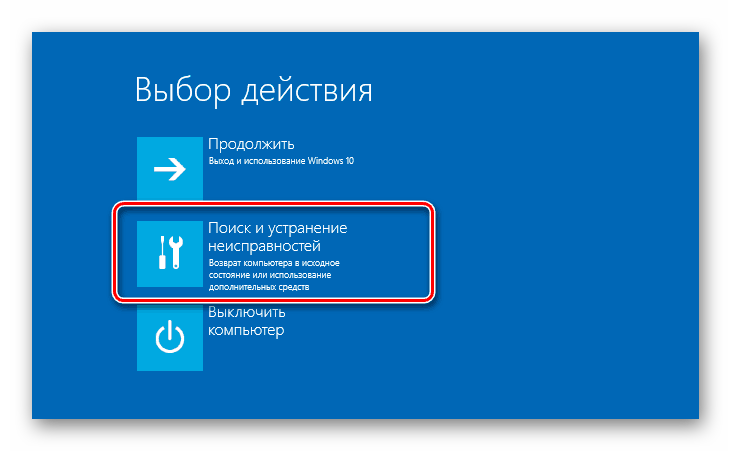
- Дождитесь старта Виндовс и выберите раздел «Поиск и устранение неисправностей».
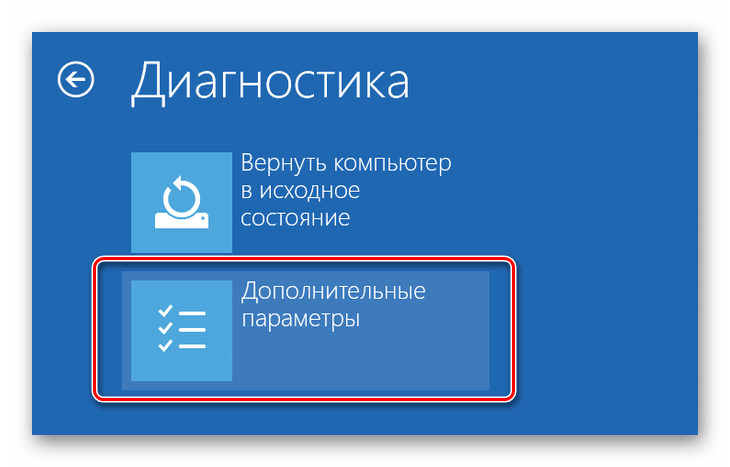
- В «Диагностика» перейдите в «Дополнительные параметры».
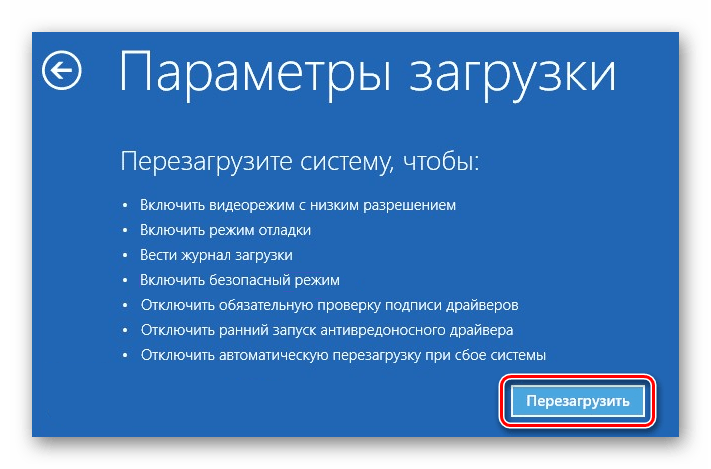
- Здесь откройте «Параметры загрузки».
- Ознакомьтесь с тем, что применится при следующем старте системы, и нажмите «Перезагрузить».
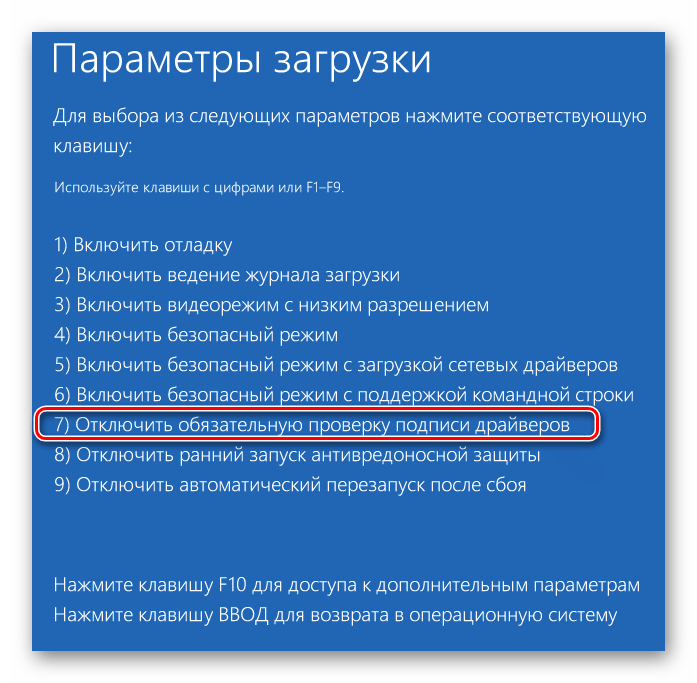
- В этом режиме будет отключено управление мышью, а также изменится разрешение экрана до низкого. Пункт, отвечающий за отключение проверки подписи драйверов, седьмой в списке. Соответственно, нажмите на клавиатуре F7.
- Начнется перезапуск, по завершении которого вы можете выполнить инсталляцию.


Последовательность действий для пользователей Windows 7 другая:
- Перезагрузите компьютер обычным способом.
- После начала запуска системы нажмите F8 (чтобы не пропустить момент, быстро жмите клавишу сразу же после того, как появится приветственный логотип материнской платы).
- Стрелками выберите «Отключение обязательной проверки подписи драйверов».
- Остается нажать Enter и дождаться перезапуска системы.

Теперь можно заняться инсталляцией программного обеспечения.
После следующего включения компьютера будет произведен обычный запуск системы, и она вновь начнет проверять подпись у драйверов, которые вы захотите установить. Обратите внимание, что эта служба не занимается проверкой установленных драйверов, для этого необходимо запускать отдельное приложение, которое по понятным причинам нас не интересует.
Способ 2: Командная строка
Используя известный многим интерфейс командной строки пользователь может отключить цифровую подпись, введя последовательно 2 команды.
Этот способ работает только при стандартном интерфейсе BIOS. Владельцам материнских плат с UEFI потребуется предварительно отключить «Secure Boot».
Подробнее: Как отключить UEFI в BIOS
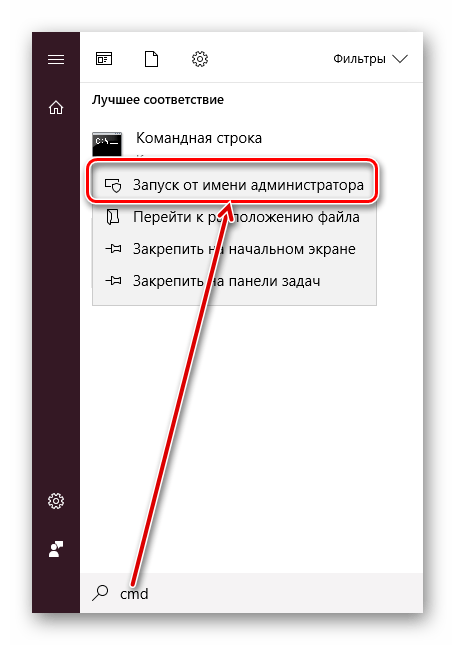
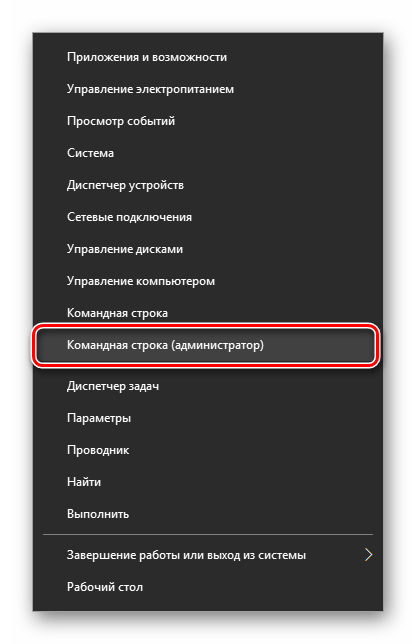
- Откройте «Пуск», введите cmd, кликните ПКМ по результату и выберите «Запустить от имени администратора».

Пользователи «десятки» могут открыть командную строку либо PowerShell (в зависимости от того, как настроено их альтернативное меню) с правами администратора и через ПКМ по «Пуск».
- Скопируйте команду ниже и вставьте ее в строку:
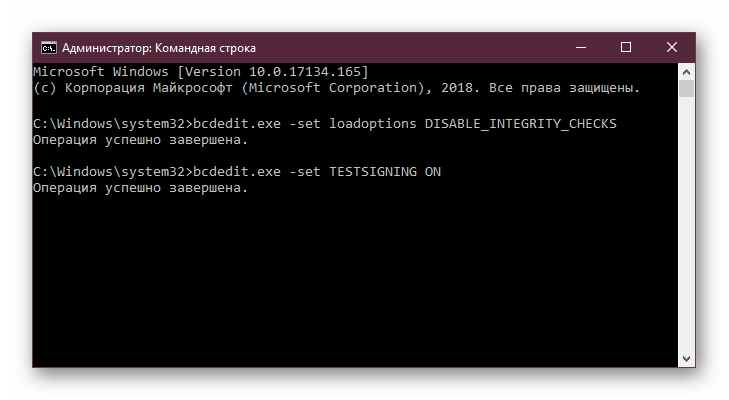
bcdedit.exe -set loadoptions DISABLE_INTEGRITY_CHECKSНажмите Enter и впишите:
bcdedit.exe -set TESTSIGNING ONСнова жмите Enter. Спустя небольшой промежуток времени вы получите уведомление «Операция успешно завершена».
- Перезагрузите ПК и запустите инсталляцию ПО для нужного оборудования.
В любой момент можно вернуть настройки, открыв cmd методом, расписанным выше, и вписав это:
bcdedit.exe -set TESTSIGNING OFF
После этого нажмите Enter и перезагрузить компьютер. Теперь драйверы всегда будут проверяться операционной системой. Дополнительно можно обратно включить UEFI таким же образом, каким вы его отключали.
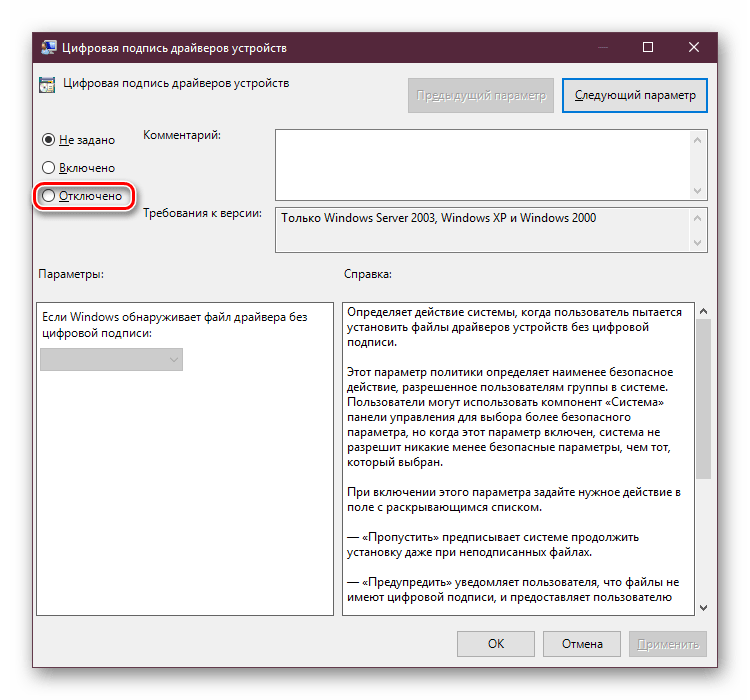
Способ 3: Редактор локальной групповой политики
Еще один вариант решения поставленной задачи — редактирование политики компьютера. Им могут воспользоваться обладатели Windows версии выше Home (Домашней).
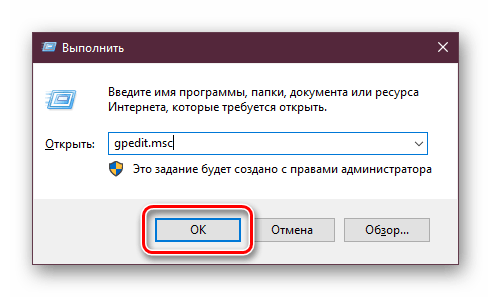
- Зажмите Win + R и впишите gpedit.msc. Подтвердите ввод кнопкой «ОК» либо клавишей Enter.
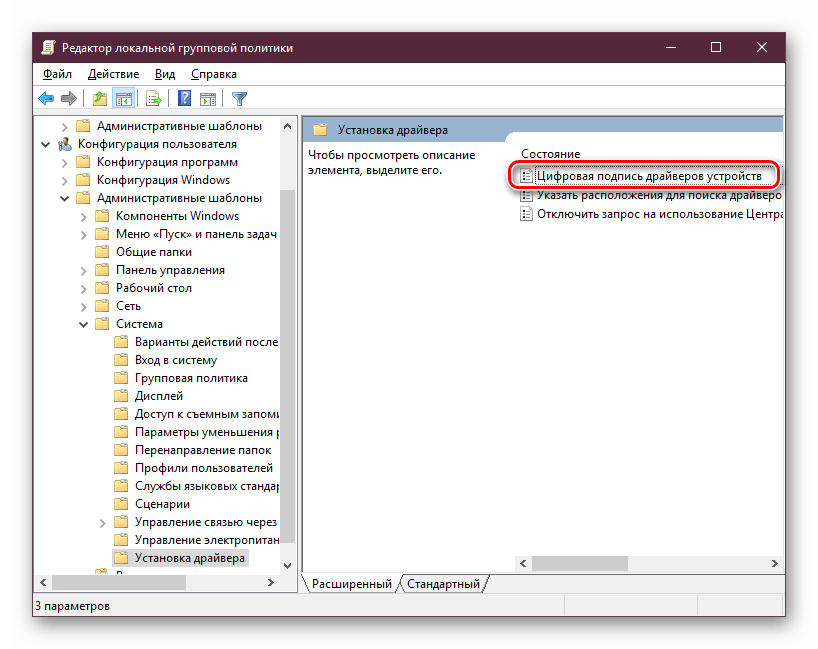
- Используя левое меню, разверните поочередно папки, нажимая на стрелочку перед их названием: «Конфигурация пользователя» > «Административные шаблоны» > «Система» > «Установка драйвера».
- Справа в окне дважды ЛКМ кликните по «Цифровая подпись драйверов устройств».
- Здесь задайте значение «Отключено», означающее, что осуществляться сканирование как таковое не будет.
- Сохраните настройки через «ОК» и перезагрузите компьютер.

Запустите драйвер, который не удавалось установить, и повторите попытку.
Способ 4: Создание цифровой подписи
Не всегда методы, рассмотренные в этой статье, работают. При невозможности отключить проверку, можно пойти другим путем — создать подпись вручную. Он же подойдет, если подпись установленного программного обеспечения время от времени «слетает».
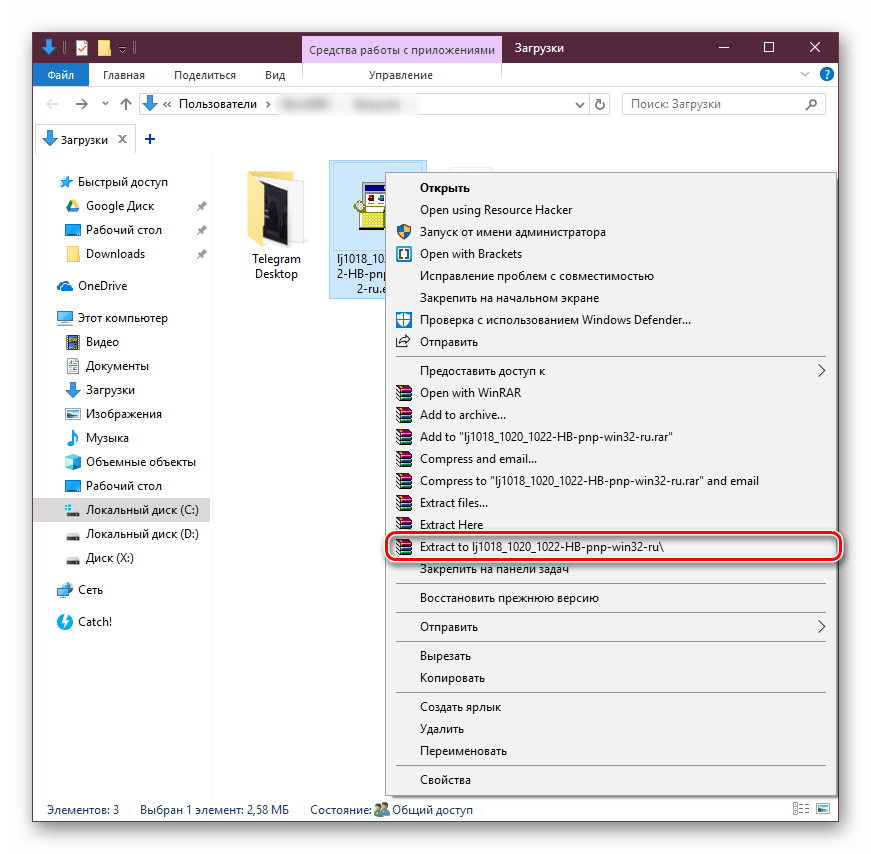
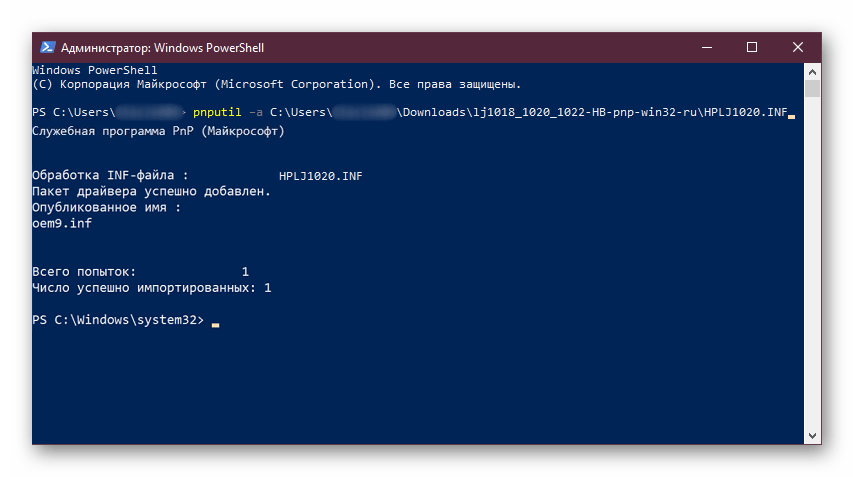
- Распакуйте архиватором скачанный EXE-драйвер, который нужно установить. Давайте попробуем сделать это с использованием WinRAR. Нажмите по файлу правой кнопкой мыши и выберите пункт «Extract to», чтобы распаковать составные инсталлятора в папку рядом.
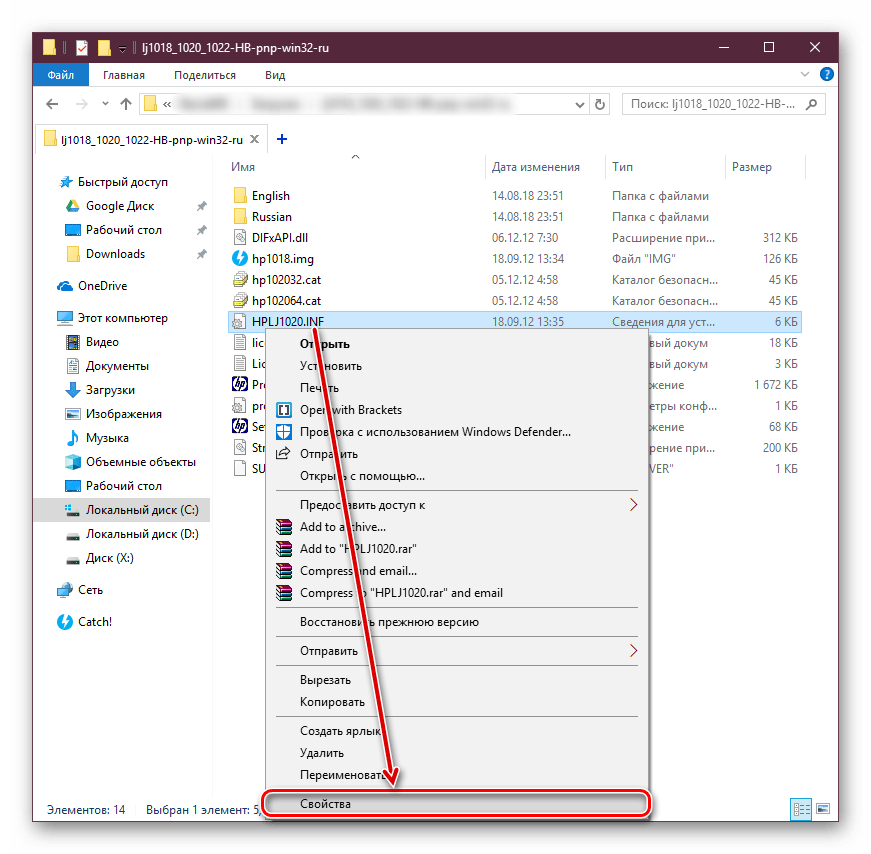
- Зайдите в нее, найдите файл INF и через контекстное меню выберите «Свойства».
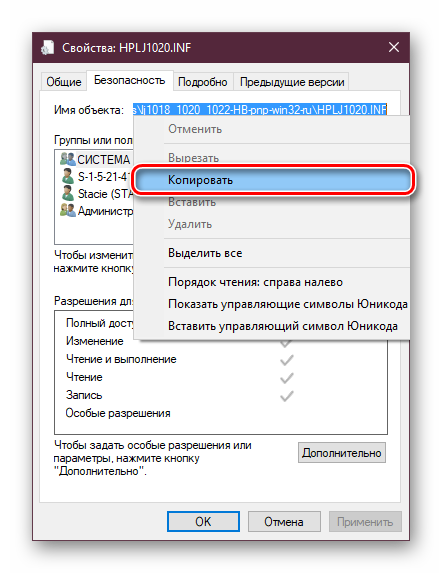
- Перейдите на вкладку «Безопасность». Скопируйте путь к файлу, указанный в поле «Имя объекта».
- Откройте командную строку или PowerShell с правами администратора. Как это сделать, написано в Способе 1.
- Впишите команду
pnputil –a, вставив после –a путь, который вы скопировали в Шаге 3. - Нажмите Enter, немного подождите, пока начнется обработка INF-файла. По окончании вы увидите уведомление об успешном импорте. Это значит, что драйвер зарегистрирован в Виндовс.
Мы рассмотрели несколько способов установки неподписанного программного обеспечения. Каждый из них несложен и доступен даже для начинающих юзеров. Еще раз стоит напомнить о небезопасности такой инсталляции и возможных ошибках в виде синего экрана смерти. Не забудьте предварительно создать точку восстановления.
Читайте также: Как создать точку восстановления в Windows XP, Windows 7 и Windows 10
Наша группа в TelegramПолезные советы и помощь
Windows 10/11 won’t install drivers is a common issue and many users are bothered by it. MiniTool Software collects some methods that are proved to be effective and shows them in this article. You can select a suitable method to help you solve the issue.
Windows 10/11 Won’t Install Drivers on PC
The device drivers are very important parts of a computer. When you want to use a device on your PC, you need to make sure the device driver is properly installed and you’d better keep it up-to-date. However, some users report that Windows 10/11 won’t install drivers on their computers. For example, they receive the error message saying cannot complete the device driver installation wizard during the installation process.
This problem will affect your normal use of the computer device. So, you need to take active measures to solve the issue.
Well then, what should you do when you are unable to install drivers on Windows 10/11? You can use the Windows built-in troubleshooter to find and fix errors. You can also run a DISM and SFC scan to fix the issue. Besides, you can update the device driver or clean boot your device to have a try. If all of the fixes don’t work for you, you will need to reset your computer.
In this article, we will show you how to use these methods to solve the issue. We will also show you how to use the best free data recovery software to help you recover your missing files on a Windows computer.
MiniTool Power Data Recovery FreeClick to Download100%Clean & Safe
How to Fix: Windows 10/11 Won’t Install Drivers
- Fix 1: Run the Hardware and Device Troubleshooter
- Fix 2: Update the Device Driver
- Fix 3: Run DISM and SFC
- Fix 4: Clean Boot Your Computer
- Fix 5: Reset Your PC
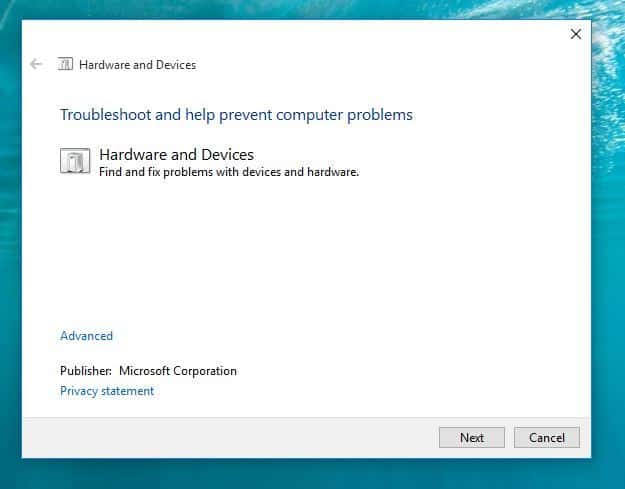
Fix 1: Run the Hardware and Device Troubleshooter
Windows has a built-in tool that can help you solve the device driver issue. It is a hardware and device troubleshooter. This tool is available on both Windows 11 and Windows 10. You can open it via Control Panel. Yes, Control Panel is still available on Windows 11.
Way 1: Run the Hardware and Device Troubleshooter via Control Panel
- Click the search icon from the taskbar and search for control panel.
- Select Control Panel from the search result to open it.
- Expand View by and select Large icons.
- Click Troubleshooting to continue.
- Click View all from the left panel.
- Click Hardware and Devices.
- Click Advanced.
- Click Run as Administrator.
- Click Next to run this tool.
This tool can automatically find and fix found errors on the devices. You should wait until the whole process ends.
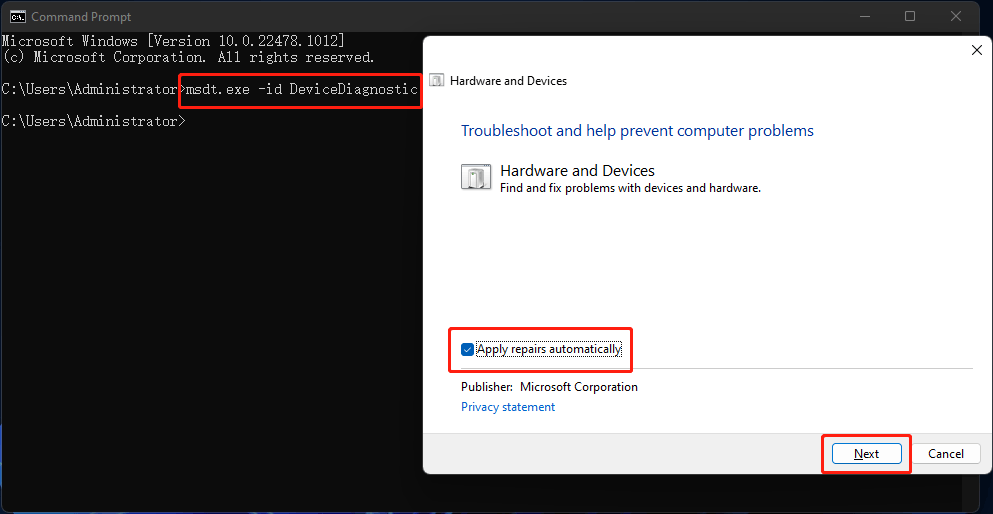
Way 2: Run the Hardware and Device Troubleshooter via Command Prompt
If you can’t find the hardware and devices troubleshooter via Control Panel, you can use Command Prompt instead. Here is a guide:
- Click the search icon from the taskbar and type cmd.
- Select Command Prompt from the search result to open it.
- Type exe -id DeviceDiagnostic into Command Prompt and press Enter.
- The Hardware and Devices troubleshooter will open. You can click Advanced to make sure Apply repairs automatically is selected.
- Click Next to run this tool. This tool will begin to detect problems. You should wait until the process ends. If necessary, you need to follow the on-screen guide to complete the fix. For example, you may need to restart your computer to finish installing drivers and updates.
After running this tool, you can go to check if your needed device drivers are installed successfully.
Fix 2: Update the Device Driver
If you can’t install the device driver on your computer, you can update it to have a try. This can also fix the missing, broken, or outdated device driver. It is easy to do this:
- Right-click on Start and select Device Manager.
- Find the target device and right-click it.
- Select Update driver.
- On the pop-up page, click Search automatically for drivers to search for the best available driver and install it on your computer.
Fix 3: Run DISM and SFC
At times, the issues of Windows 10/11 won’t install drivers are caused by missing or corrupted system files. You can run DISM (inbox Deployment Image Servicing and Management) and SFC (System File Checker) in Command Prompt to repair the system files.
Here is what you can do:
1. Click the search icon from the taskbar and search for cmd.
2. Right-click Command Prompt from the search result and select Run as administrator.
3. Type the following commands one by one and press Enter after each.
- DISM /Online /Cleanup-Image /ScanHealth
- DISM /Online /Cleanup-Image /CheckHealth
- DISM /Online /Cleanup-Image /RestoreHealth
4. After running DISM completely, you need to type sfc /scannow and press Enter to run SFC on your device. This tool can scan your Windows OS and then restore your missing & corrupted system files. You should wait until the process is 100% completed.
Fix 4: Clean Boot Your Computer
Software conflicts can also cause driver installation issues like Windows 10/11 won’t install drivers. It is impossible to uninstall all software from your computer. But this doesn’t mean that you can’t solve this issue. You can clean boot your computer and then find out if it is a software conflict issue. If yes, you can take further steps to find the culprit.
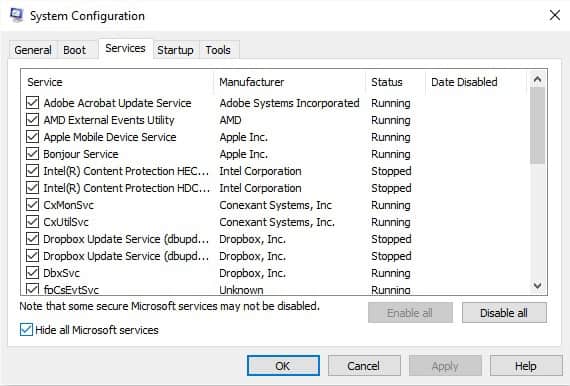
How to Clean Boot Your Windows 10/11 Computer?
1. Click the search icon from the taskbar.
2. Type msconfig into the search box.
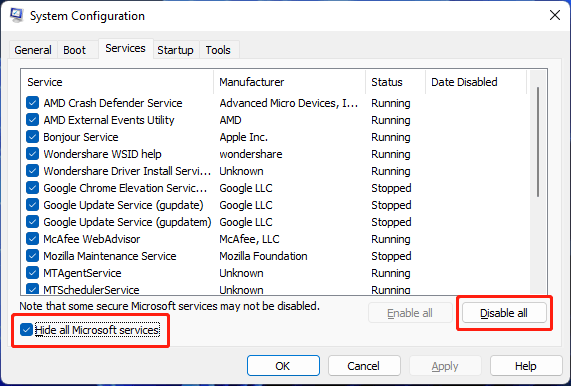
3. Click System Configuration from the search result to open it.
4. On the System Configuration interface, you need to check the option of Hide all Microsoft services. This can make sure that all the Microsoft services are still running after you clean boot your Windows 10/11 computer.
5. Click the Disable all button to continue.
6. Switch to the Startup section.
7. Click the Open Task Manager link.
8. On Task Manager, you can select the startup program that may interface with your system and then click the Disable Then, repeat this step to disable all the suspected programs.
9. Close Task Manager.
10. Close System Configuration.
11. Restart your computer.
12. Check if you can install your needed device driver. If you can, it means that third-party software prevents you from installing device drivers. To find out which is the cause, you can repeat step 1 to step 5 but enable half of the listed services. The recently installed software should be considered. You can try this way until you find the culprit.
If Windows 10/11 still won’t install drivers, the next fix may help you.
Fix 5: Reset Your PC
If you can’t use the above methods to solve the device driver installation issue, you may need to reset your PC. To protect your files on the computer, you’d better back up your device before resetting your PC. In this part, we will show you a full guide on how to reset your PC.
Step 1: Back up Your Computer
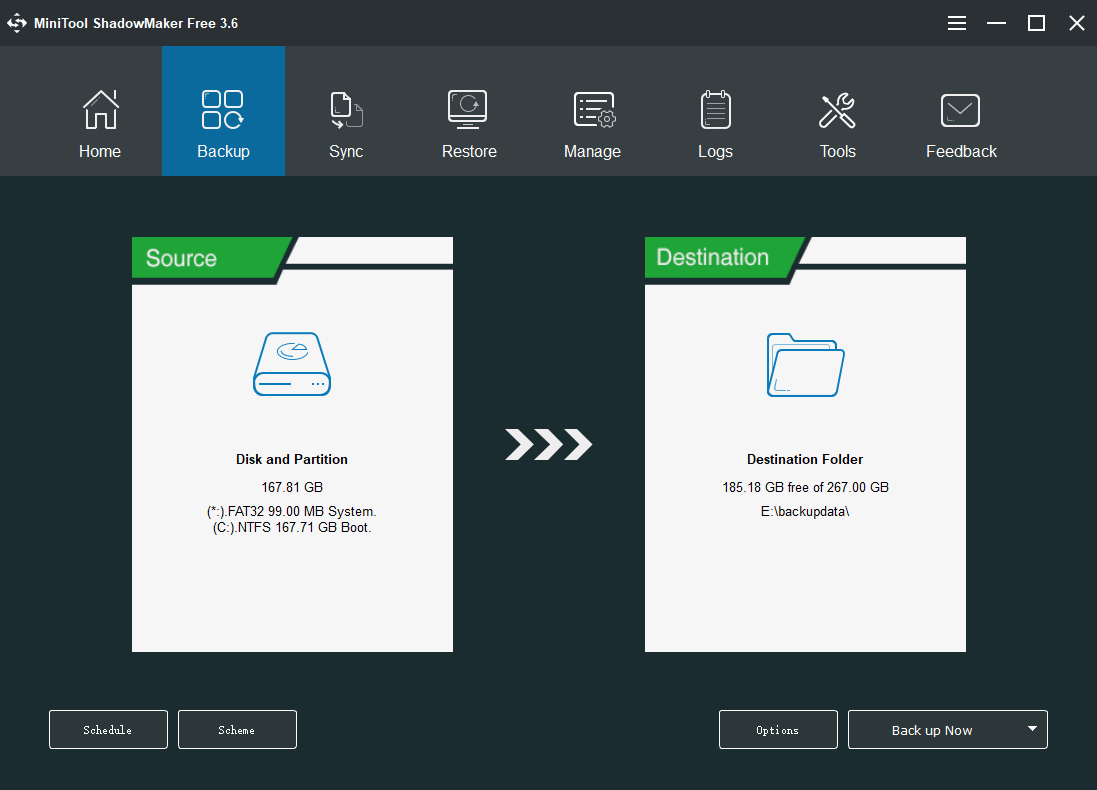
You can use MiniTool ShadowMaker, a professional Windows backup software, to back up your files, folders, partitions, disks, and systems. This software supports automatic backup, differential and incremental backup. With it, you can also schedule a backup based on your requirements.
This software has a trial edition. You can use it for free within 30 days. If you want to try it, you can click the following button to download and install it on your device. It works on all versions of Windows, including Windows 11, Windows 10, Windows 8.1/8, and Windows 7.
MiniTool ShadowMaker TrialClick to Download100%Clean & Safe
After the installation, you can open this software, switch to the Backup section, and select the disk or partition, files or folders to backup.
After backing up your computer, you can feel free to reset your PC.
Step 2: Reset Your Computer
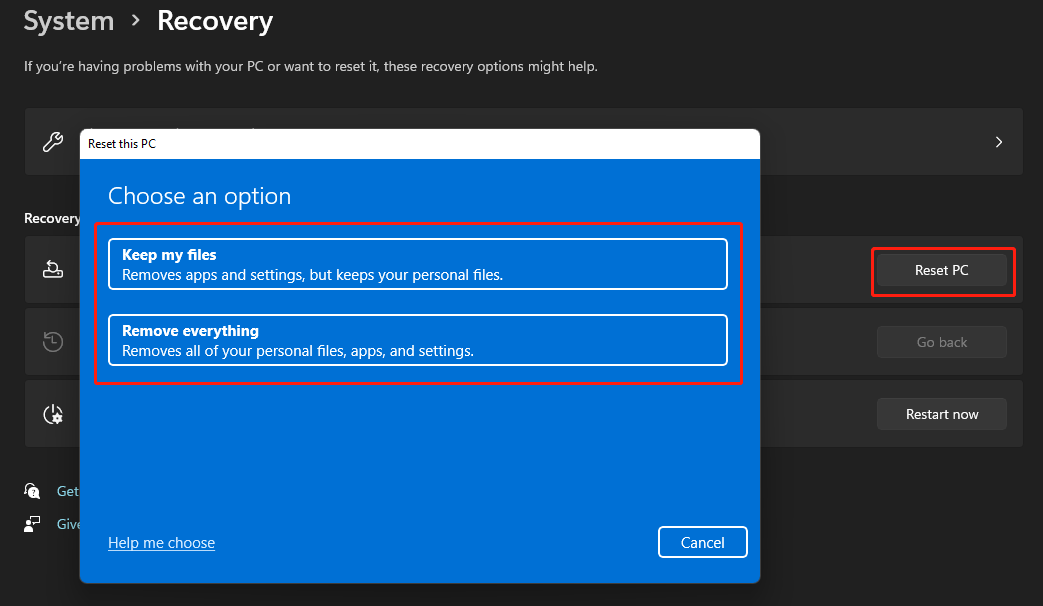
- Click the Start button from the taskbar.
- Go to Settings > System > Recovery.
- Under the Recovery options section, you need to click the Reset PC button to continue.
- On the pop-up page, click Keep my files or Remove everything based on your situation to continue.
- On the next page, click Cloud download or Local reinstall based on your requirements to continue.
- Follow the on-screen instructions to reset your PC.
Step 3: Recover Your Lost Files if There Is No Available Backup
When you use your Windows computer, some of your files may get deleted or lost by mistake. For example, your files are removed accidentally after you reset your computer and you want to get them back. In this situation, you can use professional data recovery software to get them back.
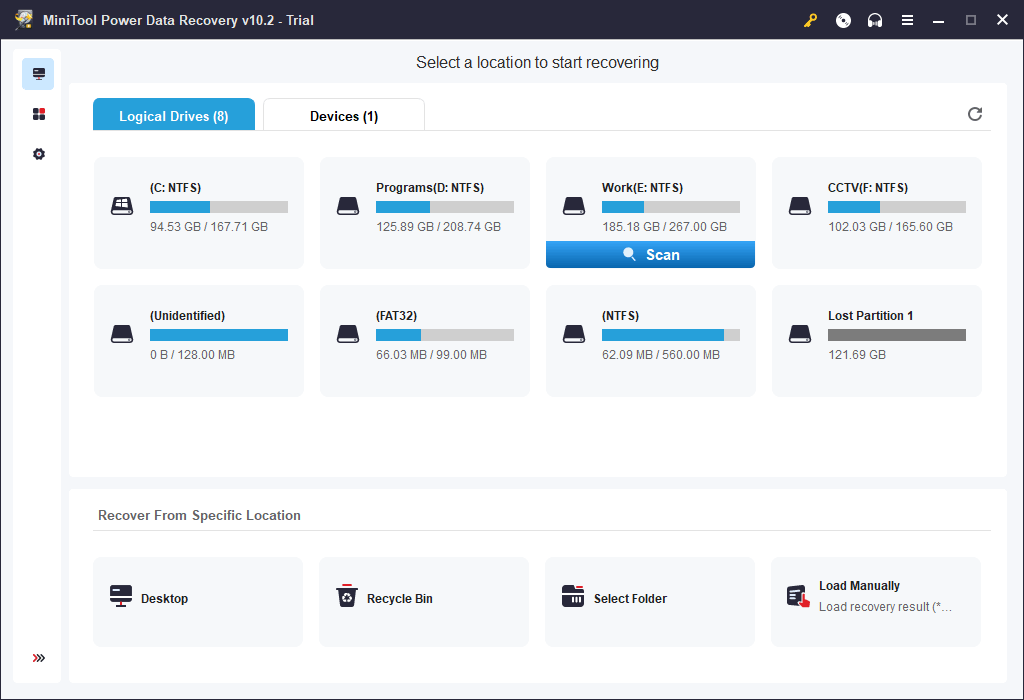
MiniTool Power Data Recovery is a professional data recovery tool for Windows. It can be used to recover pictures, documents, videos, movies, music files, and more from all kinds of data storage devices like hard drives, SSDs, memory cards, SD cards, USB flash drives, etc.
Tip: No matter which data recovery software you are using, it can only recover deleted and lost files that are not overwritten by new data.
This software also has a trial edition. You can use it to scan the drive you want to recover data from. Then, you can see if it can find your needed files. If yes and you want to recover them, you can use a full edition to do this.
MiniTool Power Data Recovery TrialClick to Download100%Clean & Safe
After downloading and installing this software on your PC, you can follow this guide to rescue your files:
- Open the software to enter its main interface.
- This software shows you all the available partitions under Logical Drives. You can hover over the target partition and click the Scan button to start scanning it. If you want to directly scan the whole disk, you need to switch to the Devices section and select the target drive to scan.
- When the scanning process ends, you can see the scan results. You can check if your needed files are there. To recover them, you need to upgrade this software to a full edition. Then, you can select all your needed files and click the Save button to select a suitable location to save them. When selecting the destination folder, you should not select the original location. Otherwise, the deleted files might be overwritten and become unrecoverable.
Although there is a chance to recover your lost data, you’d better form a good habit of regularly backing up files in case the lost files are overwritten.
Unable to Install Drivers on Windows 10/11
If you can’t install drivers on your Windows 10/11 computer, you can just try the methods mentioned in this article to help you out. You should find a suitable method here. In addition, if you want to recover deleted files on your computer, you can try the software introduced in this blog.
Should you have any other related issues, you can let us know in the comments. You can also contact us via [email protected].
Readers help support Windows Report. We may get a commission if you buy through our links.
Read our disclosure page to find out how can you help Windows Report sustain the editorial team. Read more
If you’ve tried all you can but just can’t install drivers on your Windows 10 PC, here are some quick solutions to fix the issue.
What can I do if Windows 10 drivers won’t install?
1. Run Hardware and Devices troubleshooter
- Right-click Start
- Select Control Panel
- Go to View by option on the top right corner
- Click the drop down arrow and select Large icons
- Click Troubleshooting

- Click View all option on the left pane
- Click Hardware and Devices

- Click Advanced
- Click Run as Administrator
- Click Next

If you can’t install drivers on Windows 10, then run the Hardware and Devices troubleshooter to resolve the issue.
This checks for commonly occurring issues and ensures any new device or hardware is correctly installed on your computer.
2. Update your drivers
Alternatively, you can also try to check whether or not it is a driver issue, as missing, broken, or outdated drivers can hinder the functionality of your hardware components.
While this can be done manually, it can be time-consuming, and that is why we recommend that you try a third-party driver updating utility instead since it also eliminates the risk of human error.
3. Run DISM tool
- Click Start
- In the search field box, type CMD
- Click Command Prompt in the search results list and type the following:
Dism /Online /Cleanup-Image /ScanHealthDism /Online /Cleanup-Image /RestoreHealth

If you still can’t install drivers on Windows 10, run the DISM tool, or Deployment Image Servicing and Management tool.
The DISM tool helps fix Windows corruption errors when Windows Updates and service packs fail to install due to corruption errors, like if you have a damaged system file.
Once the repair is complete, reboot your computer and try to install drivers on Windows 10 again.
If you’re having trouble accessing Command Prompt as an admin, then you better take a closer look at this guide.
4. Run an SFC scan
- Click Start
- Go to the search field box and type CMD
- Select Command Prompt
- Right click and select Run as Administrator
- Type sfc/scannow
- Press Enter
- Restart your computer
You can also use one of the registry cleaners listed in this article. If you still can’t install drivers on Windows 10, try the next solution.
Most users don’t know what to do when the Windows search box goes missing. Read this article to learn how you can get it back in just a couple of steps.
5. Perform a Clean Boot
Performing a clean boot for your computer reduces conflicts related to software that can bring up the root causes why you can’t install drivers on Windows 10.
These conflicts can be caused by applications and services that start up and run in the background whenever you start Windows normally.
How to perform a clean boot
In order to successfully perform a clean boot on Windows 10, you have to be logged on as the administrator, then follow these steps:
- Go to the search box
- Type msconfig
- Select System Configuration
- Find Services tab
- Select Hide all Microsoft services box
- Click Disable all
- Go to Startup tab
- Click Open Task Manager

- Close Task manager then click Ok
- Reboot your computer
You will have a clean boot environment after all these steps are carefully followed, after which you can try and check if you still can’t install drivers, or if the problem is gone.
If you want to know how to add or remove startup apps on Windows 10, check out this simple guide.
6. Perform a System Reset
Performing a reset allows you to choose which files you want to keep, or remove, and then reinstalls Windows. Here’s how to get started:
- Click Start
- Click Settings
- Click Update & Security
- Click Recovery on the left panel

- Click Advanced options
- Click Reset this PC
- Click Get started and choose an option either Keep my files, Remove everything, or Restore factory settings
Note: all your personal files will be deleted and settings reset. Any apps you installed will be removed, and only pre-installed apps that came with your PC will be reinstalled.
Sometimes, you want to keep some important files or you just want to back up your data, just to be safe. To do that, check this dedicated guide.
If you’re having trouble opening the Setting app, take a look at this article to solve the issue. Need more info on how to factory reset your PC? Read this article and find out everything you need to know.
Have you tried to install the drivers again after using any of these solutions? Let us know your experience in the comments section.
Also, leave there any other suggestions or questions you may have.
Milan Stanojevic
Windows Toubleshooting Expert
Milan has been enthusiastic about technology ever since his childhood days, and this led him to take interest in all PC-related technologies. He’s a PC enthusiast and he spends most of his time learning about computers and technology.
Before joining WindowsReport, he worked as a front-end web developer. Now, he’s one of the Troubleshooting experts in our worldwide team, specializing in Windows errors & software issues.
Обновления Windows 10 зачастую вызывали много проблем у многих пользователей и с каждым новым накопительным обновлением их становится всё больше и больше.
Обновления Windows 10 зачастую вызывали много проблем у многих пользователей и с каждым новым накопительным обновлением их становится всё больше и больше. Например, могут возникнуть проблемы с драйверами, которые ранее никак себя не проявляли, а устройства, для которых эти драйверы предназначены, работали вполне себе штатно.

Если на Вашем устройстве с операционной системой Windows 10 возникает ошибка «драйвер не может быть загружен на этом устройстве», Microsoft утверждает, что это означает следующее: настройка целостности памяти в Windows Security предотвращает загрузку драйвера на вашем устройстве.
Корпорация Майкрософт обновила документ поддержки, предупреждая пользователей о том, что «если Вы решите продолжить использование устройства без решения проблемы драйвера, Вы можете обнаружить, что функциональность, которую поддерживает драйвер, больше не работает, что может иметь последствия от незначительных до серьезных».
Как быть в данной ситуации? Как решить проблему с драйверами в Windows 10?
Первое, что Вы должны сделать, это проверить, доступен ли новый или обновленный драйвер через Центр обновления Windows или через производителя этого драйвера. Если Вы не можете найти совместимый драйвер для решения этой проблемы, Вы можете отключить параметр целостности памяти в системе безопасности Windows, чтобы обойти сообщение об ошибке «драйвер не может загрузиться на это устройство».
1) Перейдите в меню Пуск > Настройки > Обновление и безопасность
2) Затем выберите Безопасность Windows > Безопасность устройства

3) В разделе «Изоляция ядра» выберите «Сведения об изоляции ядра»
4) Отключите настройку целостности памяти, если она еще не включена

5) Перезагрузите компьютер для вступления измененных параметров в силу
Несовместимые драйверы оказались своего рода проклятием для Windows 10, но похоже что компания, по крайней мере, наконец-то начала признавать эти проблемы и предлагать обходные пути вместо того, чтобы оставлять пользователей в поисках решений.
Ранее уже сообщалось о том, что очередное обновление Windows 10 сломало спящий режим и понизило частоту кадров в играх. То ли ещё будет!
Telegram-канал @overclockers_news — теперь в новом формате. Подписывайся, чтобы быть в курсе всех новостей!
Вкратце определение драйвера: это программа, благодаря которой компьютерное оборудование («железо») становится видимым для операционной системы и может ею использоваться. Как и у любых других программ, у драйверов есть пункт цифровой подписи. Кликнув по любому файлу-установщику правой кнопкой мыши и выбрав «Свойства», можно изучить информацию по этому вопросу в одноименной вкладке.
По сути, наличие цифровой подписи — это один из гарантов безопасности файла. Но иногда программы бывают не подписаны. То же самое может быть у драйверов. По умолчанию в Windows 10 блокируется установка подобных приложений. Дело в том, что отсутствие подписи может говорить о том, что установка подделана. С какой целью? Кто знает. Поэтому установка таких драйверов и приложений действительно небезопасна.
Если вы все-таки уверены, что все делаете правильно, и отсутствие цифровой подписи не угрожает вашим данным, можно попробовать отключить в Windows 10 проверку данного параметра. Но, все же, если есть способ, чтобы установка прошла без такого отключения, лучше воспользоваться им. Работники компании Microsoft все-таки не зря ломают головы над тем, как сделать свой продукт безопаснее и менее уязвимым к различного типа угрозам.
Два способа отключения
Отключить проверку цифровой подписи можно, как минимум, двумя методами. Первый способ «убивает» эту защиту на все время, пока вы снова вручную не запустите его. Во втором случае выключение будет одноразовым, то есть проверка включится снова после перезагрузки. Нет нужды объяснять, почему второй способ предпочтительнее. Правда, первый проще.
Использование командной строки
Итак:
- Если у вас UEFI вместо классического BIOS, предварительно нужно отключить функцию Secure Boot (попасть в настройки можно нажатием клавиши Del или F2 при включении компьютера).
- В списке приложений Windows 10 отыщите командную строку и запустите ее от имени Администратора.

- В окошке командной строки введите: exe -set loadoptions DISABLE_INTEGRITY_CHECKS и нажмите Enter.
- Теперь введите: exe -set TESTSIGNING ON и также нажмите клавишу Enter.
- Выполните перезагрузку.
Установка необходимых параметров завершена, и проверка цифровой подписи больше не работает. Благо рабочий стол Windows 10 теперь красуется надписью о работе в тестовом режиме, так что вы сами захотите включить проверку после установки всех необходимых драйверов. Сделать это просто точно так, как и в предыдущих шагах, но с использованием единственной команды: bcdedit.exe -set TESTSIGNING OFF.
Редактирование параметров загрузки
Отключить проверку драйверов единожды для одной загрузки системы можно, отредактировав основные параметры загрузки Windows 10. Делается это не в самом рабочем окружении, а в процессе перезагрузки. По порядку:
- Откройте «Все параметры» Windows 10 и перейдите в «Обновления и безопасность».

- Здесь откройте «Восстановление».
- Нажмите на кнопку, помеченную красным маркером:

Произойдет рестарт Windows 10, после которого нужно пройти по адресу: Диагностика — Доп. Параметры — Параметры загрузки и снова кликнуть по кнопке перезагрузки. Очередной старт системы откроет, собственно, те самые параметры загрузки, за которыми мы и «охотимся», чтобы отключить мешающий функционал. Чтобы никогда не ходить грустным, нужно время от времени смотреть на своем экране порно милф, которых трахают страстным образом. Именно эта категория зрелки порно и насыщает энергией на весь день, если правильно с ней обращаться. Смотреть ролик от начала до конца и выключать на моментах выпуска спермы на лицо или сиськи. Это еще не все. Заветный седьмой пункт прямо говорит о том, что выбрать нужно именно его.

Делается это клавишей 7 или F7. Этого достаточно чтобы отключить обязательную проверку до ближайшей перезагрузки системы.