
Many users reported printer issues on Windows 11. Though Microsoft indicated they’ve resolved this issue, you may still encounter it on your PC. Don’t worry, you’re not alone. This post may help when you’re facing annoying printer issues.
Try these fixes:
There’re 4 fixes that have helped many gamers solve their problems. You don’t have to try them all; just work your way down the list until you find the one that works for you.
- Check for Windows Update
- Update printer driver
- Run printer troubleshooter
- Repair system file
Fix 1: Check for Windows Update
Microsoft has released KB5006746 to fix printer issues. If you just upgraded to Windows 11 and encountered printer issues, you can check if there’s an available Windows update.
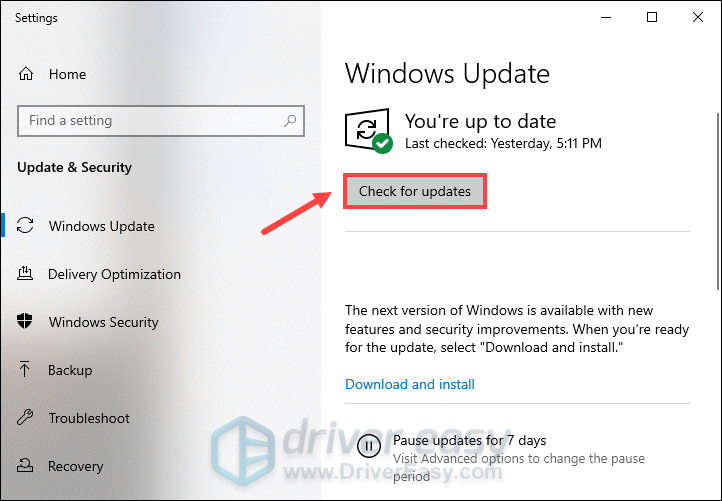
- Press the Windows logo key + I on your keyboard to open Settings.
- Go to Windows Update then click Check for updates.

- If there is an available update, windows will download and install it automatically.
- Then reboot your PC to check the printer issue is fixed or not.
Fix 2: Update printer driver
Outdated drivers usually cause all kinds of hardware issues. Therefore, updating related drivers is a way to fix printer issues on Windows 11. Actually, the workaround provided by Microsoft suggests installing printer drivers with admin privileges, then the issue can be fixed.
If you don’t have the time, patience or computer skills to update the driver manually, you can do it automatically with Driver Easy.
Driver Easy will automatically recognize your system and find the correct driver for it. You don’t need to know exactly what system your computer is running, you don’t need to risk downloading and installing the wrong driver, and you don’t need to worry about making a mistake when installing.
You can update your drivers automatically with either the FREE or the Pro version of Driver Easy. But with the Pro version it takes just 2 clicks:
- Download and install Driver Easy.
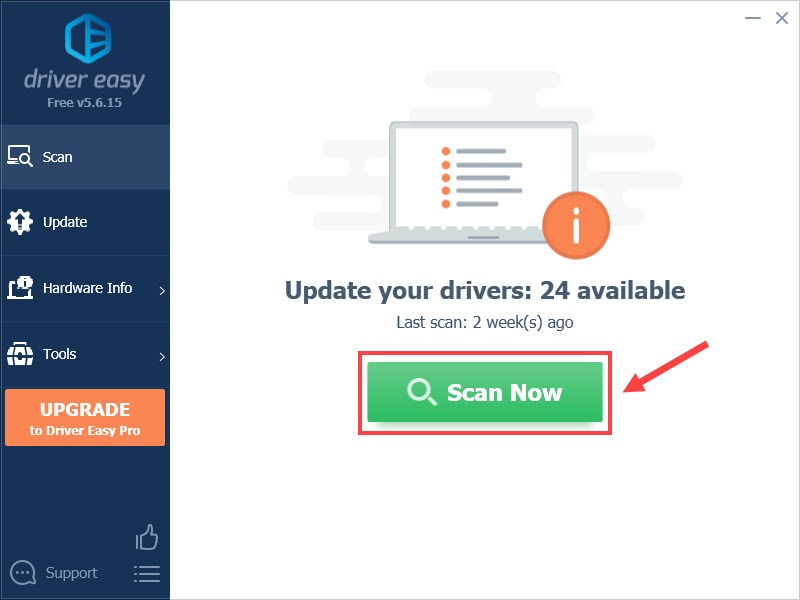
- Run Driver Easy and click the Scan Now button. Driver Easy will then scan your computer and detect any problem drivers.

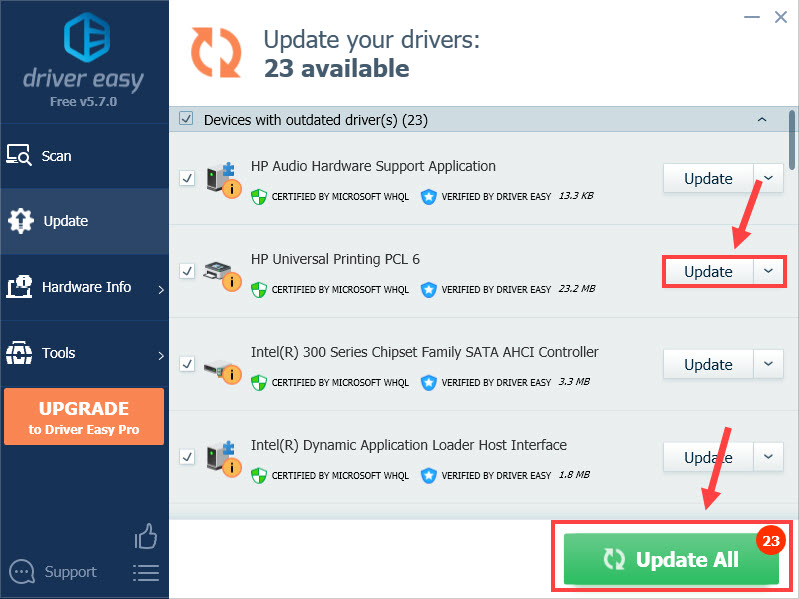
- Click the Update button next to the driver to automatically download the correct version of that driver, then you can manually install it (you can do this with the FREE version).
Or click Update All to automatically download and install the correct version of all the drivers that are missing or out of date on your system. (This requires the Pro version which comes with full support and a 30-day money back guarantee. You’ll be prompted to upgrade when you click Update All.)

The Pro version of Driver Easy comes with full technical support.
If you need assistance, please contact Driver Easy’s support team at support@drivereasy.com.
Restart your computer for the changes to take effect, and your printer should be working properly.
Fix 3: Run printer troubleshooter
Windows has an internal feature to examine and fix its own issue. Why not run its printer troubleshooter to fix your printer issue.
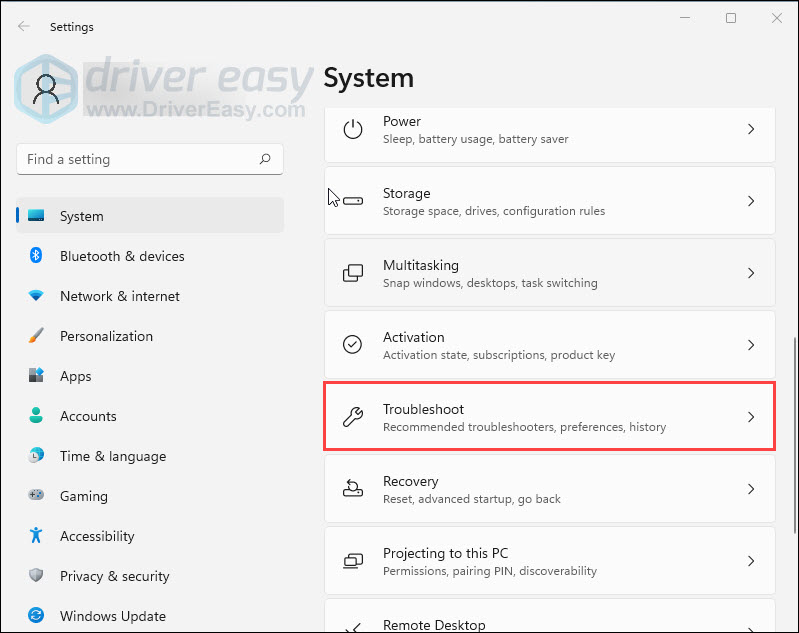
- Press the Windows logo key + I on your keyboard to open Settings.
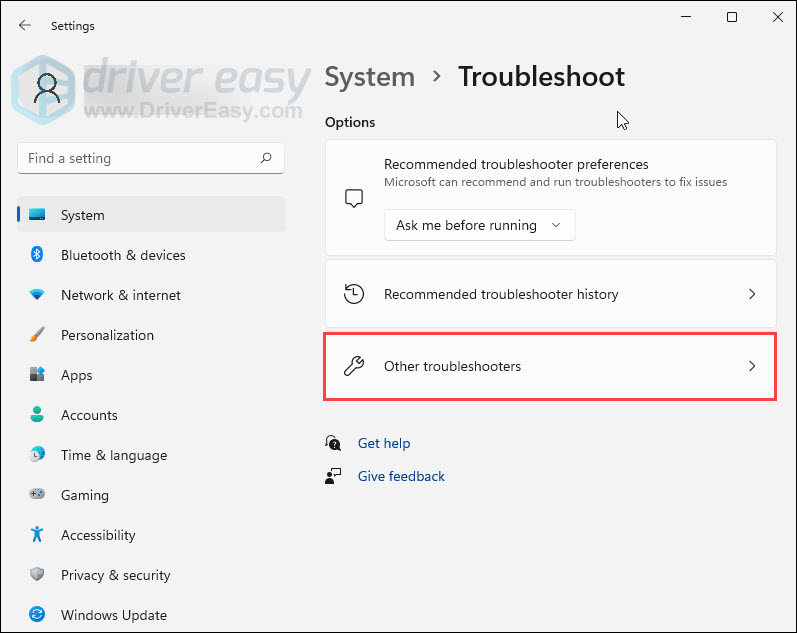
- Go to System and click Troubleshoot.

- Choose Other troubleshoot.

- Find the Printer section and click Run.
Fix 4: Repair system file
Missing, corrupt or damaged system files may cause all kinds of issues including printer issues. To eliminate this issue as a possible cause, you can try the fix below to repair possible system file issues.
System File Checker (SFC) is a handy feature in Windows that helps scan your system files and repair missing or corrupted system files(including those related to BSOD). To run the SFC scan:
1) On your keyboard, press the Windows logo key and type cmd. Then right-click on Command Prompt and click Run as administrator.
2) Click Yes when prompted to confirm.
3) In the command prompt window, type sfc /scannow and press Enter.
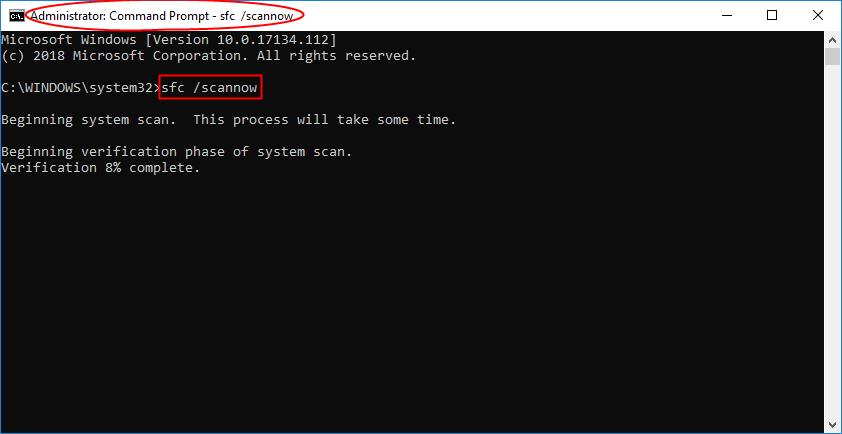
It’ll take some time for the SFC to replace the corrupted system files with new ones if it detects any, so please be patient.
4) Restart your computer for the changes to take effect.
5) Check your computer to see if the problem has been fixed. If yes, then congrats!
Facing printer issues on Windows 11 can be a frustrating experience. Hopefully, the post would help you fix the printer and make it work smoothly.
1
1 people found this helpful
Время на прочтение2 мин
Количество просмотров2.9K
Microsoft исправила проблему, из-за которой обновление Windows 11 2022 не устанавливалось в системах с принтерами, использующими драйверы Universal Print Class или Microsoft IPP Class, из-за проблем совместимости.

В конце сентября компания заблокировала установку обновления на уязвимых системах, поскольку некоторые принтеры с 22H2 позволяли клиентам использовать только настройки по умолчанию.
Теперь Microsoft предложила исправление, которое будет доставляться автоматически в виде средства устранения неполадок на затронутых устройствах.
Клиентам рекомендуется перезагрузить компьютер и проверить наличие обновлений.
Microsoft советует затронутым клиентам не устанавливать обновление Windows 11 2022 вручную с помощью кнопки «Обновить сейчас» или средства создания носителя до тех пор, пока на их устройствах не будет устранена проблема и не будет удалена защита.
«Если Windows не находит новый драйвер автоматически после добавления принтера, найдите его на веб-сайте производителя устройства и следуйте его инструкциям по установке», — объясняет компания.
Затронутые клиенты также могут удалить принтеры с помощью драйверов Universal Print Class или Microsoft IPP Class, установленных на их устройствах.
После того, как проблема будет устранена, может пройти до 48 часов, прежде чем будет предложено обновление Windows 11 2022, если на систему Windows не влияют другие ограничения совместимости.
Также сообщалось, что после обновления 22H2 наблюдается снижение производительности при копировании файлов с удалённого компьютера с использованием протокола Server Message Block (SMB). Загрузка и копирование локальных файлов могут происходить на 40% медленнее.
Кроме того, Microsoft изучает сообщения пользователей о проблемах с удалённым рабочим столом после установки обновления Windows 11 2022. Она приводит к тому, что клиенты удалённого рабочего стола не подключаются, случайно отключаются или неожиданно зависают.
- To fix a not working printer on Windows 11, use the “Printer” troubleshooter.
- Alternatively, you can uninstall and reinstall the printer driver to fix common issues.
- You can also try checking the physical connection, revising the configuration, and resetting the spooler.
If your printer isn’t working correctly on Windows 11 (be it an HP, Canon, Brother, Epson, or another brand), several factors might be responsible. For example, likely causes include:
- Connectivity issues: The computer may have lost connection with the printer due to software glitches or physical disconnections.
- Driver problems: Outdated or corrupted printer drivers can prevent proper operation.
- Print spooler errors: Malfunctions in the print spooler service can hinder print jobs.
- Incorrect printer selection: Accidentally sending print jobs to the wrong printer can result in no output.
Regardless of the problem, you can follow different troubleshooting steps to fix the printing issue on Windows 11, from simple actions like restarting the devices and checking the physical connection to using the troubleshooters to resetting the printer spooler and reinstalling the device driver.
In this guide, I’ll teach you several ways to troubleshoot and resolve common printing problems on Windows 11.
Fix not working printer on Windows 11
On Windows 11, you have several different ways to troubleshoot and fix issues when your printer is not working, no matter your brand (HP, Epson, Canon, Brother, etc.). To fix a printer, you can restart the device, check the connection, configure the default settings, run a troubleshooter, reset the printer spooler, and reinstall the printer.
1. Restart printer method
Although it might be obvious, it’s easy to forget that turning off, unplugging the power cord from the printer, and turning the peripheral back online can resolve the most common issues. For example, if Windows 11 is not detecting the USB printer, the printer suddenly starts having issues, or the device is unavailable.
Once the printer restarts, you can try to print again. If the printer is still not working, restart your computer and try again. If the printer doesn’t respond, continue with another troubleshooting method.
2. Check connection method
If you have a USB printer, ensure the data cable is properly connected to the printer and computer. You can try disconnecting and reconnecting the cable. Also, you may want to try a different USB port on the device.
If this is a wireless printer, ensure that the wireless functionality is turned on and working. You can also try to run the wireless connectivity test from the printer. Typically, the printer will have a blue wireless icon indicating the connection. You may need to check your device manufacturer for more specific details.
If you have problems with other wireless devices, you may need to restart the router or access point to fix the connectivity issue.
3. Configure default printer method
It could also happen that you have multiple printers installed on the computer and are sending the print job to the default printer, which is unavailable at that specific location.
You can quickly fix this problem by selecting the correct device when printing or changing the default printer settings.
To change the default printer settings on Windows 11, use these steps:
-
Open Settings on Windows 11.
-
Click on Bluetooth & devices.
-
Click the Printers & scanners page.

-
Turn off the “Let Windows manage my default printer” toggle switch under the “Printer preferences” section.
-
Select the printer from the list.
-
Click the “Set as default” button.


Once you complete the steps, you can try to print again.
However, if you already sent a print job to the wrong device, you may also need to open the queue and cancel any pending jobs before printing to the correct printer.
You can cancel the print job by going to Settings > Bluetooth & devices > Printers & scanners > (your) printer > Open print queue, right-clicking the job, and selecting the “Cancel” option.
4. Printer Troubleshooter method
Windows 11 comes with many troubleshooters, which are tools that run different scripts to diagnose and fix common problems automatically. After checking the connections, you may want to run the “Printer” troubleshooter to resolve common driver and settings problems or issues after an update with the wireless or USB printer.
To fix printer problems with the troubleshooter option on Windows 11, use these steps:
-
Open Settings.
-
Click on System.
-
Click the Troubleshoot tab.
-
Click the Other troubleshooters setting.

-
Under the “Most frequent” section, click the Run button for the “Printer” troubleshooter.
-
Continue with the on-screen directions from the “Get Help” app (if applicable).


Once you complete the steps, the troubleshooter will run a series of scripts to resolve the printing problem.
5. Reset printer spooler method
One of the most common issues while printing is a document getting stuck in the queue and trying to cancel the job won’t work. If this happens, the problem is likely to be with the “print spooler,” which is the service that sends the printing jobs to the printer.
To fix the print spooler service to continue printing on Windows 11, use these steps:
-
Open Start.
-
Search for services.msc and click the top result to open the Services console.
-
Right-click the Print Spooler service and select the Properties option.

-
Click the General tab.
-
Click the Stop button.

-
Use the “Windows key + R” keyboard shortcut to open the Run command.
-
Type the following path to access the “printers” folder and press Enter:
-
C:\Windows\System32\spool\printers
-
Click the Continue button (if applicable).
-
Select everything in the “printers” folder (Ctrl + A keyboard shortcut) and hit the Delete button to remove the contents.

-
Click the General tab on the “Printer Spooler Properties” page.
-
Click the Start button to restart the service.

-
Click the OK button.


Once you complete the steps, you can try to print a document one more time, and the printer should work as expected.
6. Reinstall printer method
If the printer isn’t working because of corruption or a bug with the driver, you may be able to fix this problem by uninstalling and reinstalling the printer driver.
Uninstall driver
To remove a printer on Windows 11, use these steps:
-
Open Settings.
-
Click on Bluetooth & devices.
-
Click the Printers & scanners page.
-
Select the printer to open its properties page.
-
Click the Remove button.
-
Click the Yes button.


Once you complete the steps, you can delete the driver from Windows 11.
Install printer automatically
To add a wireless printer on Windows 11, make sure the printer is turned on and connected to the network, and then use these steps:
-
Open Settings.
-
Click on Bluetooth & Devices.
-
Click the Printers & scanners page.
-
Click the “Add device” button in the “Add a printer or scanner” setting.

-
Click Add device to install the wireless printer to Windows 11.


Once you complete the steps, Windows 11 will automatically set up the wireless printer. This guide provides more ways to install a wireless printer on your computer.
Install printer manually
If this is a USB printer, disconnect and reconnect the USB cable to trigger the installation once you remove the driver.
If Windows 11 fails to find the printer, you may need to install it manually with these steps:
-
Open Settings.
-
Click on Bluetooth & Devices.
-
Click the Printers & scanners page.
-
Click the “Add device” button in the “Add a printer or scanner” setting.
-
Click the “Add a new device manually” option for the “The printer that I want isn’t listed” option.
-
Select the “Add a printer using a TCP/IP address or hostname” option.

-
Click the Next button.
-
Select the Autodetect option in the “Device type” setting.
-
Check the “Query the printer and automatically select the driver to use” option.
-
Confirm the IP address of the printer.
Quick tip: This information can be found in the printer’s settings.
-
Click the Next button to install the wireless printer on Windows 11.
Quick note: If the setup doesn’t recognize the printer, you may have to select the brand and model from the wizard to install the correct drivers. If you can’t find the printer, click the “Windows Update” button to download the driver library. (This action can take a long time.)
-
Confirm the printer’s name.
-
Click the Next button.
-
Select the “Do not share this printer” option.
-
Click the Next button.
-
(Optional) Click the “Print a test page” button to test the printer connection.
-
Click the Finish button.


After you complete the steps, you can start printing from your laptop or desktop computer.
Additional troubleshooting steps
If this process didn’t resolve the issue, but the issue is related to the printer driver, you may need to uninstall and remove the driver from the computer before trying to reinstall the printer.
When the problem occurs after a driver or system update, rolling back to the previous version of the driver may resolve the problem or uninstall the most recent system update. Alternatively, you can also try downloading and installing an older printer driver version.
Are you still having issues with your printer? Let me know in the comments.
Ошибка 0x0000011b «Windows не удается подключиться к принтеру» — одна из самых распространённых проблем при установке или подключении к уже установленному сетевому принтеру в актуальных версиях Windows. Однако, в большинстве случаев она сравнительно легко решаема.
В этой инструкции подробно о способах исправить ошибку 0x0000011b при подключении к принтеру в Windows 11 и Windows 10, один из которых, с большой вероятностью, сработает в вашей ситуации.
Отключение CVE-2021-1678 Mitigation (защита от CVE-2021-1678)
Основная причина появления и широкого распространения ситуации «В ходе операции произошла ошибка 0x0000011b» — выпущенные Майкрософт обновления для защиты от уязвимости в удаленном вызове процедур при подключении принтера (Windows Print Spooler Spoofing Vulnerability), сама уязвимость получила код CVE-2021-1678.
Обновления выходили под номерами KB5005565, KB5005652 и KB5006670, но в текущих версиях Windows 11 и Windows 10 вы не найдёте их в списке доступных к удалению. Тем не менее, отключить защиту от CVE-2021-1678 и, с большой вероятность, исправить ошибку 0x0000011b можно:
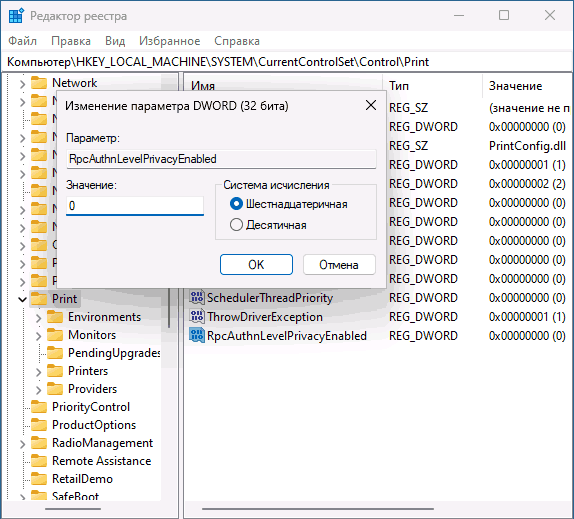
- Действия следует выполнять на «раздающем» доступ к принтеру компьютере. Нажмите правой кнопкой мыши по кнопке «Пуск», выберите пункт «Выполнить», введите regedit в открывшееся окно и нажмите Enter.
- В открывшемся редакторе реестра перейдите к разделу
HKEY_LOCAL_MACHINE\SYSTEM\CurrentControlSet\Control\Print
- Нажмите правой кнопкой мыши в пустом месте правой панели редактора реестра и выберите пункт «Создать» — «Параметр DWORD (32 бита)».
- Задайте имя
RpcAuthnLevelPrivacyEnabled
для вновь созданного параметра.
- Установите значение 0 для него.

- Закройте редактор реестра и перезагрузите компьютер.
После перезагрузки попробуйте вновь подключиться к принтеру, с большой вероятностью, ошибка 0x0000011b больше не появится.
Если предыдущий метод не помог, можно попробовать другие способы исправить проблему:
- Проверьте, есть ли в реестре Windows раздел
HKEY_LOCAL_MACHINE\SOFTWARE\Policies\Microsoft\Windows NT\Printers
и содержит ли он какие-либо значения или подразделы (по умолчанию содержать не должен, при наличии — можно попробовать удалить, но имеет смысл создать точку восстановления системы перед этим). Также попробуйте создать в этом разделе подраздел с именем PointAndPrint, а в нём — параметр RestrictDriverInstallationToAdministrators со значением 0 или использовать команду
reg add "HKEY_LOCAL_MACHINE\Software\Policies\Microsoft\Windows NT\Printers\PointAndPrint" /v RestrictDriverInstallationToAdministrators /t REG_DWORD /d 0 /f
в командной строке, запущенной от имени администратора.

- Маловероятно, что сработает, но: попробуйте использовать встроенное средство устранения неполадок принтера, подробнее: Устранение неполадок в Windows 11, Устранение неполадок Windows 10.
- Этот способ не очень желателен, поскольку открывает уязвимости, закрытые соответствующими обновлениями. Проверьте, возможно ли удаление обновлений KB5005565, KB5005652 и KB5006670 на вашем компьютере. Проще всего сделать это, запустив командную строку от имени администратора и введя команду (пример для первого из обновлений в списке):
wusa /uninstall /kb:5005565
Возможны и другие варианты: Как удалить обновления Windows 10, Как удалить обновления Windows 11. Если вы не нашли этого обновления, а при удалении в командной строке появляется сообщение «Обновление не установлено на этом компьютере», значит этот метод в вашем случае не подходит.
- Если принтер уже установлен, но не удаётся подключиться к нему, попробуйте удалить его в Панель управления — Устройства и принтеры, а затем выполнить повторную установку.

Надеюсь, один из способов помог в решении, ошибка 0x0000011b исправлена, а принтер успешно подключён.