
-Source
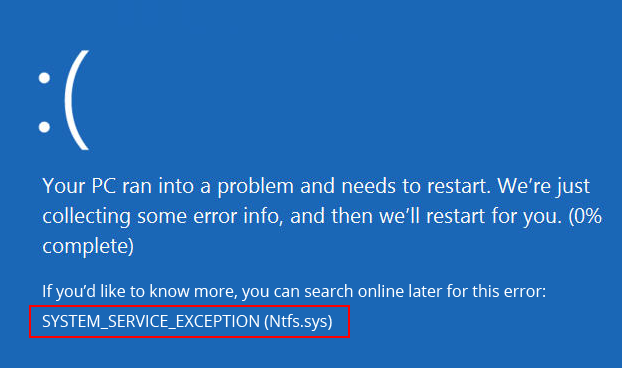
If you encounter NTFS.SYS blue screen error on your system, it is probably because of corrupt NTFS, bad sectors on the hard drive, or incompatible device drivers. Sometimes, depletion of non-paged pool memory, malware attack on your PC, and corrupt system files may also induce this error. You may see this error showing up with the stop code – System_Service_Exception (See Image 1).
Due to this error, your system may shut down abruptly, get stuck at a booting loop, or even crash, making you lose access to your data. Read this guide to learn some popular methods to fix NTFS.sys problem on your own.
Recover data lost due to Ntfs.sys crash with a professional Data Recovery Software.
Fix Failed NTFS.SYS (System_Service_Exception) in Windows 10
Enable the safe mode with networking before performing any methods to make sure you don’t face any interruption/problem while trying to solve this error.
Follow the given steps to Enable Safe Mode with Networking:
a. If you see this blue screen error on your system, turn it off.
b. Reboot it and as it starts showing up Windows logo on the screen, turn it off with the power button.
c. Repeat this step thrice and then allow your PC to restart.
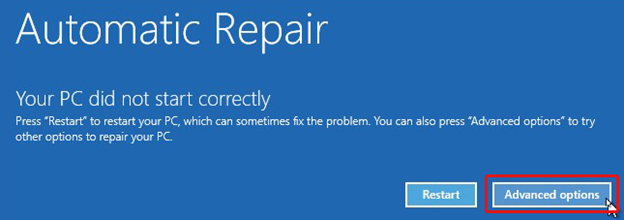
d. After this, choose Advanced options from the Automatic Repair environment. (See Image 2)
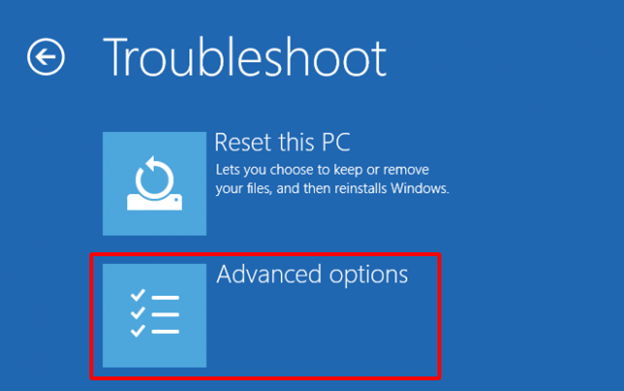
e. On the Choose an option screen, click Troubleshoot. (See Image 3)
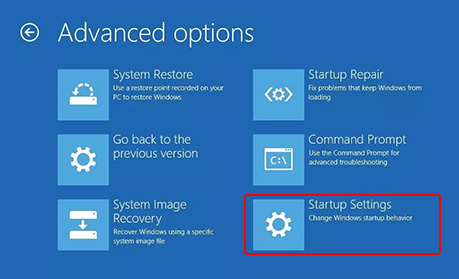
f. Next, on the Troubleshoot screen, choose Advanced options. (See Image 4)
g. On the Advanced options screen, click Startup Settings. (See Image 5)
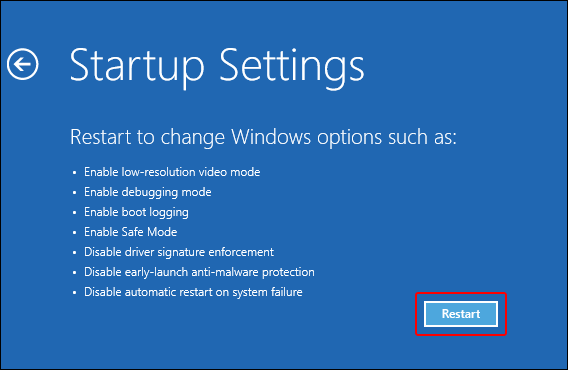
h. Afterward, click Restart on the Startup Settings screen. (See Image 6)
i. Once the PC restarts, choose option 5 from the list or press F5 for enabling safe mode with networking.
j. After enabling the Safe Mode, you may start performing the following fixes to solve error- Ntfs.sys system service exception on windows 10.
Method 1: Update Device Driver
Sometimes, the outdated, incompatible, or corrupt device drivers may cause this blue screen of death error. You may download and install updated device drivers by following the given steps:
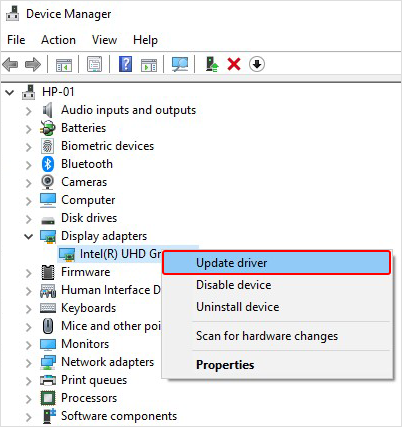
a. Open Device Manager and navigate to Display Adapters. (See Image 7)
b. Expand Display Adapters and select the problematic driver.
c. Right-click on the driver and select Update driver from the available options. (See Image 8)
d. On the next prompt, click ‘Search automatically for drivers.’ (See Image 9)
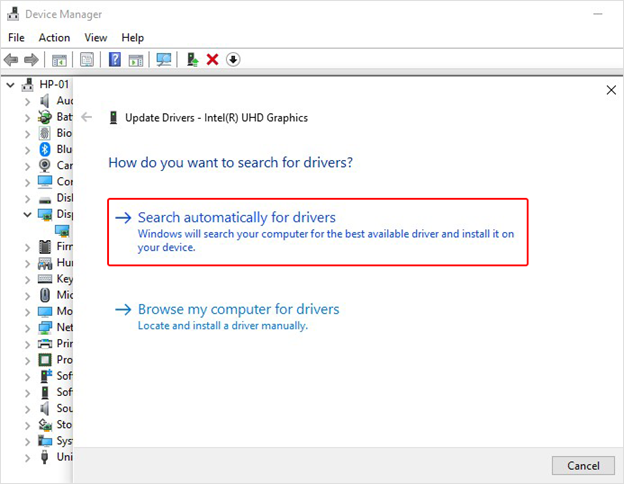
e. Windows starts searching for an updated version of the drivers. You may install the latest driver software to fix the error ‘System Service Exception Windows 10.’
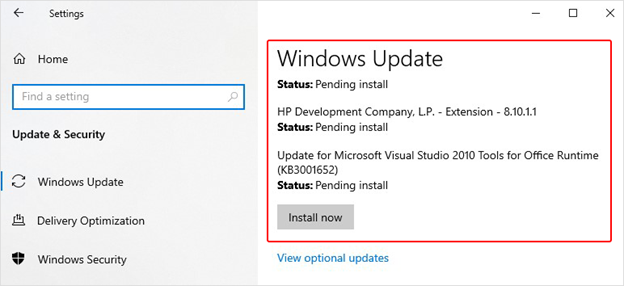
You may also update the driver through Windows Update. Follow the given steps to do so:
a. Open System Settings and follow Update & Security > Windows Update.
b. Check for the latest updates available. If the updates are available, click ‘Install now’ and then restart your system. (See Image 10)
c. Reboot your PC and check whether the error is resolved.
Method 2: Scan your computer for computer viruses
If the system is affected by a virus or malware, you may encounter this error. You may scan for malware ‘Windows Security’ utility. To do so, follow the given steps:
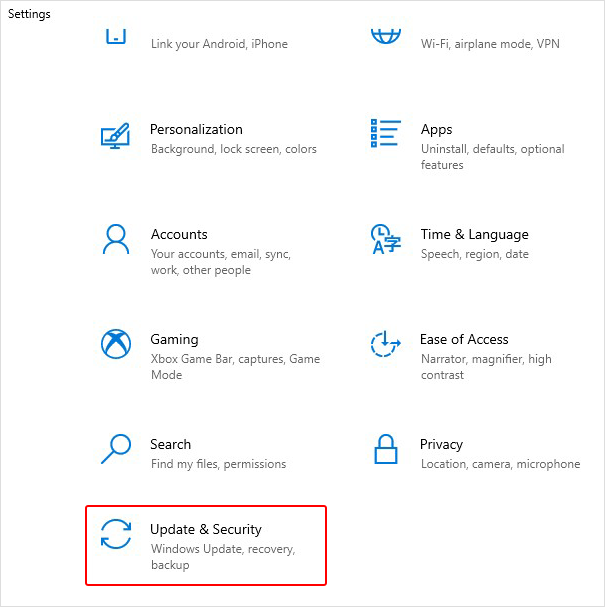
a. Open System Settings and go to Update & Security. (See Image 11)
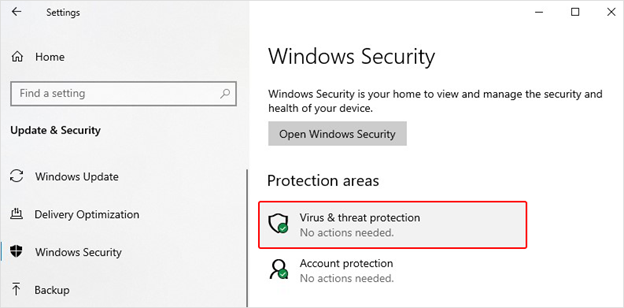
b. Navigate to Windows Security and open it. (See Image 12)
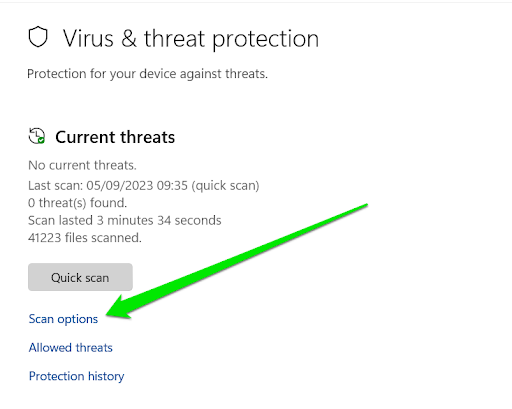
c. Move to the Virus & threat protection on the right panel. (See Image 13)
d. Follow the given instructions on the screen to check malware and get rid of it.
Method 3: Remove BitDefender and/or Webroot
Some of the third-party antivirus programs may lead Windows to malfunction and cause NTFS.SYS BSOD error with stop code ‘System Service Exception’. You may fix this by removing BitDefender or Webroot using the following steps:
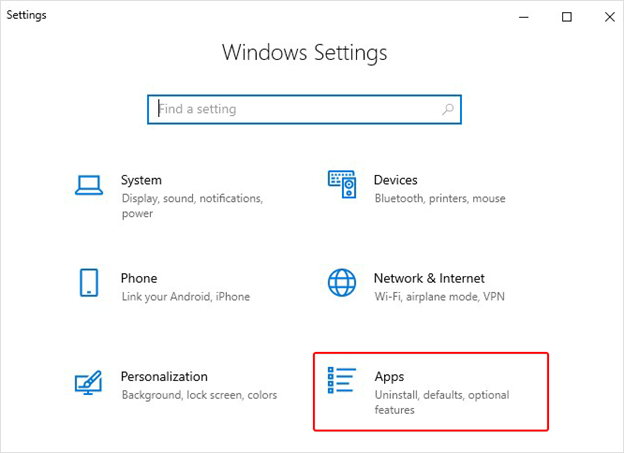
a. Open System Settings and go to Apps. (See Image 14)
b. Find if you have BitDefender or Webroot installed on your system.
c. If it is installed in your PC, right-click on it to Uninstall. (See Image 15)
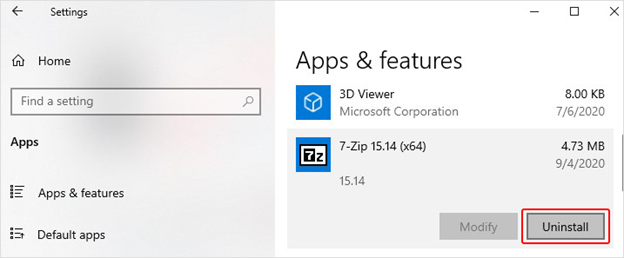
d. Restart the system to see if the stop code system service exception persists.
Method 4: Run SFC Scan
This error may also occur due to missing or corrupt system files. You may run SFC (System File Checker) utility to check for any system files’ corruption and fix it. Follow the below-given steps:
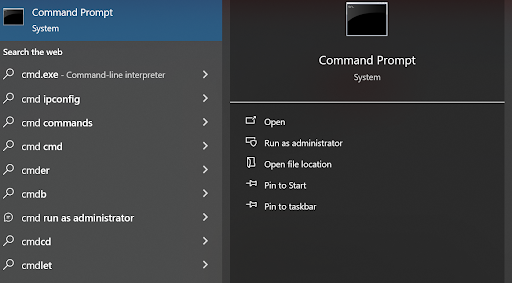
a. Type cmd in Windows’ search box to open Command Prompt and run it as an administrator. (See Image 16)
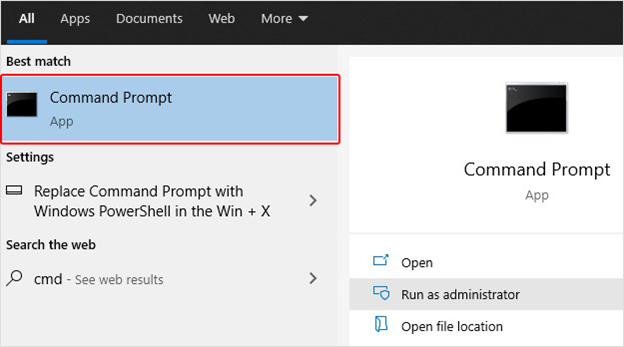
b. Click ‘Yes’ to open Command Prompt.
c. On Command Prompt screen, type sfc/scannow and hit Enter. (See Image 17)
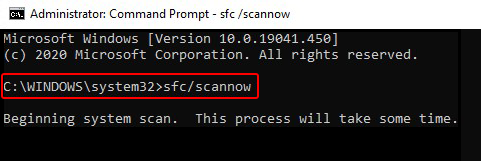
d. The process will take time to check the corrupt system files and fix it to resolve the error code: System Service Exception in Windows 10.
Method 5: Run CHKDSK Command
Sometimes, this problem may occur if the hard drive is faulty or consists of bad sectors. You may check your hard disk for errors and fix it by running the CHKDSK command. Follow the below-said steps:
a. Open Command Prompt, run it as administrator and type chkdsk f: /f and press Enter. (See Image 18)
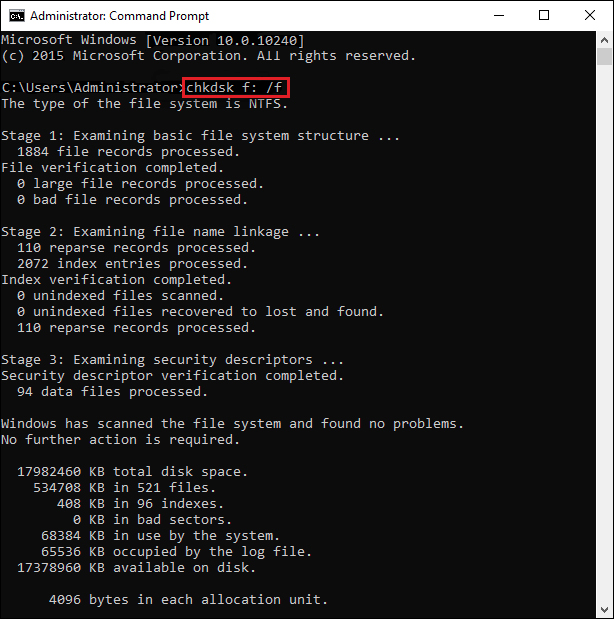
b. Wait until the process is completed and then exit the Command Prompt.
c. Restart the system and check if you have fixed the issue.
[Caution: Running the CHKDSK command can fix the hard drive corruption. However, you will end up losing your data after performing this method as it scans the drive and marks down the bad sectors on it, helping Windows understand not to read or store data from bad sectors.]
It is suggested to use a powerful data recovery tool such as Stellar Data Recovery Professional to recover lost data after using the CHKDSK command. This do-it-yourself (DIY) software can efficiently extract multiple kinds of data simultaneously. Be it your favorite pictures and videos or your essential official documents, emails, files, etc. you may recover them quickly using this software. The software facilitates data recovery from formatted, corrupted, or missing drive partitions and storage devices. It features ‘Create Recovery Drive’ utility. Using this utility, you may create a bootable media to restore data from unbootable, dead, crashed, or BSOD affected systems. Check out this video:
Method 6: Run Memory Diagnostic Tool
Non-paged pool memory may be another cause of the error- System Service Exception Windows 10. The non-paged pool, containing the virtual memory addresses, always remains in the physical memory as long as the corresponding kernel objects are allocated. It can never be paged out into pagefile when the system runs out of the free physical memory.
If you encounter stop code- system_service_exception on your system, the depletion of non-paged pool memory may be the reason. Other related reasons could be as following:
- Low amount of available non-paged pool memory during the indexing process
- Another kernel-mode driver requiring this memory
To resolve the depletion of non-paged pool memory, you may add new physical memory to the system to improve the non-paged pool memory available to the kernel. Also, you may try running the Windows Memory Diagnostic Tool to check and fix the stop code System Service Exception. Follow the below-mentioned steps:
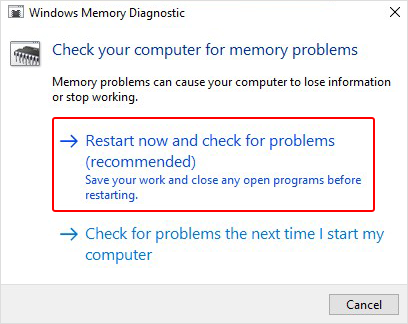
a. Type Windows Memory Diagnostic in Windows’ search bar and hit Enter to open it. (See Image 19)
b. On the Windows Memory Diagnostic screen, select ‘Restart now and check for problems (recommended.) (See Image 20)
c. The Windows Memory Diagnostic tool screen will display on the screen.
d. Let the test begin and wait until it is done. (See Image 21)
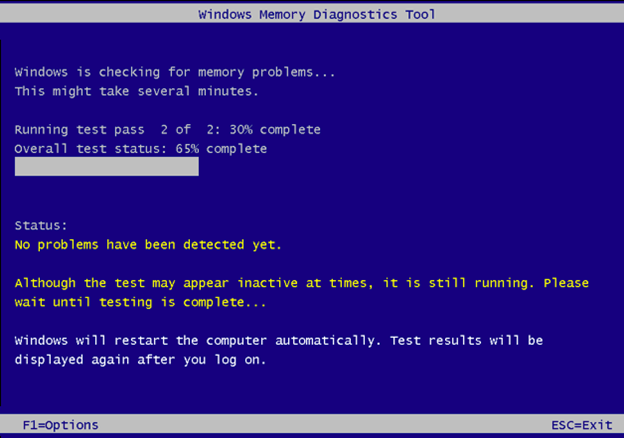
e. When the test is completed, the system will restart automatically and return to the Windows desktop.
f. You may check the test results and see if the error is fixed.
Wrapping up
The System_Service_Exception error may occur without any warning and make you lose access to your PC and data stored on it. There could be several reasons behind this error, as explained above. To fix this error, try methods such as CHKDSK command, SFC Scan, Windows update, etc. However, if you’ve lost your data due to this Ntfs.sys error, try using an efficient data recovery tool such as Stellar Data Recovery Professional. This software can get back your data from Windows PCs and storage devices such as HDD, SSD, USB and SD card, etc.
Also read – Fixed: Critical Process Died BSOD Error in Windows 10
Was this article helpful?
YES5
NO
Ntfs.sys Blue Screen error in Windows 11/10 is a critical issue that can lead to system crashes. This error is generally accompanied by System Service Exception, NTFS_FILE_SYSTEM, or Kmode_Exception_File_Not_Handled. This problem is specifically associated with the Ntfs.sys file which is a crucial component responsible for NTFS file system operations. When this file encounters problems, it triggers a Blue Screen of Death (BSOD) error and hampers the overall operations. Potential reasons for this error include corrupted Ntfs.sys file, driver conflicts, hardware issues, or problems with the storage device. You may encounter this error during system start-up or while performing disk-related operations on your computer.
Here, we will focus on all the possible methods of fixing this critical What failed: Ntfs.sys Blue Screen error in Windows 11 and 10. It will cover a number of solutions such as checking for disk errors, updating drivers, scanning for malware, and other troubleshooting measures to resolve the issue and ensure stable system performance. Let’s get to the solutions to address this challenging problem and restore the integrity of the NTFS file system of your Windows.
Ntfs.sys Blue Screen error in Windows 11/10
Here is how to fix What failed: Ntfs.sys Blue Screen error in Windows 11/10:
Perform SFC and DISM Scanning
SFC (System File Checker) and DISM (Deployment Image Service and Management Tool) can contribute to NTFS Blue Screen error if they detect or encounter corrupted system files. These tools can be used effectively to scan the affected files and help resolve the issue by restoring the integrity of critical system components. Here is the process for the scanning:
- Open the Windows Search menu with “Windows+S”, type “cmd”, and Run it as an administrator.
- Then, copy-paste this command and press Enter (without quotes):
“DISM.exe /Online /Cleanup-image /Restorehealth”.
- After the completion of the DISM scan, input and Enter:
sfc /scannow. - Wait a bit to allow the System File Checker to complete the scanning process.
- Restart the device and see if the error is fixed.
Run Memory Check
Running a memory check in Windows can also resolve Ntfs.sys Blue Screen error by identifying and addressing potential issues with the computer’s RAM. This process can ensure the stability of your system by detecting and correcting memory-related flaws to prevent the recurrence of NTFS Blue Screen error. You can run memory checks through these steps:
- Press “Win+R” to open the Run dialog.
- Type “mdsched.exe” and press “Enter” or click OK.
- Then, select “Restart now and check for problems (recommended)”. It will automatically scan the memory of your computer and solve the error.
Use the CHKDSK Disk Checking
CHKDSK (Check Disk) may help to fix NTFS.SYS Blue Screen errors if it finds file system or disk issues. Scanning and repairing with CHKDSK can solve this problem by fixing file system inconsistencies and ensuring the integrity of the NTFS file system. Here is the process to run it:
- Use “Windows+R” to open Run, type “cmd”, and press “Ctrl+Shift+Enter”.
- Then, type
chkdsk /f c:and hit Enter. - Type “Y” and “Enter”.
- In the end, open “Start”, select “Power”, and click on “Restart” to begin the scan.
Check if the NTFS error on your computer is resolved after the computer restarts.
Go for an Antivirus Scan
Sometimes, viruses can attack and trigger this Ntfs.sys Blue Screen error by infecting your PC’s critical system files. Conducting an antivirus scan can effectively help to overcome the issue by identifying and eliminating malicious software while restoring the NTFS files.
- Type “Windows Security” in the search bar and open the app.
- Choose “Virus and threat protection”.
- Now, click “Scan options”.
- Then, select “Full Scan”.
- In the end, press “Scan now”.
- Follow the recommendations after the scanning is completed.
Run the Blue Screen Troubleshooter
The Blue Screen Troubleshooter in Windows is a diagnostic tool designed to identify and resolve system crashes which include the Ntfs.sys Blue Screen error as well. It can analyze crash dumps, identify potential causes like driver issues or hardware problems, and offer guidance for you to solve the issue.
- Open Windows Search bar and type “Get Help”.
- Click on the “Get Help” app from the results.
- Then, enter keywords like “troubleshoot BSOD error” or “fix blue screen error” and hit Enter.
- You will see a Blue Screen Troubleshooting wizard. Follow the instructions to get things done.
It will track the reason for this blue screen error and help you troubleshoot it. If it does not come in handy, move to the next methods one by one.
Conduct Startup Repair
Startup Repair in Windows 11 and 10 may help rescue NTFS Blue Screen error if any issue occurs during the boot process. Running Startup Repair can resolve the problem by addressing startup-related issues and ensuring a smooth boot sequence on your computer. Follow these to run the repair:
- Open Settings with “Windows+I”.
- Now, go to “Recovery”.
- Click “Restart now” from the “Advanced startup”.
- Choose “Troubleshoot”, then “Advanced options”.
- Then, select “Startup Repair” and run the tool to resolve startup-related issues on your Windows 11 or 10.
Rebuild Your Boot Manager
Boot manager or BOOTMGR issues in Windows can also lead to the aforementioned error during startup. Rebuilding the boot manager can effectively solve this problem by correcting any errors or corruption in the boot configuration to ensure a stable system operation.
- Right-click on “Start” and choose “Run”.
- Enter or paste “cmd” in the Run box.
- Press “Ctrl+Shift+Enter”.
- Type each command separately and hit “Enter” after each:
bootrec.exe /fixmbr
bootrec.exe /fixboot
bootrec.exe /rebuildbcd
bootrec /scanos
See: How to Skip Boot Manager During Windows 10 Startup
Run Your Driver Verifier
Driver Verifier can, as well, resolve Ntfs.sys Blue Screen errors by identifying faulty drivers on your Windows. Here is the process:
- First, enter Safe Mode on your Windows using the above method (shown in the above section).
- Now, press “Windows+R” to launch the run window.
- Then, type “verifier” and hit “Enter”.
- Navigate to “Driver Verifier Manager”, choose “Create standard settings,” and select “Next”.
- Follow the instructions provided on your screen to get the results.
Reset Windows 10/11
Occasionally, resetting Windows 11 or 10 can resolve the NTFS Blue Screen error by restoring the operating system to its default state. This process removes potential system configuration issues, software conflicts, or corrupted files to provide a clean slate for you. Here is the process:
- Go to the “Start” menu and click on “Settings”.
- Choose “Recovery” to access more options.
- Now, click “Reset PC” from Recovery.
- A window will be opened, select “Keep my files” from here.
- Then, go for the “Cloud download” or “Local reinstall” based on your preference.
- Click “Next” and “Finish”.
- Restart your PC.
Consider a Disk Scan under Safe mode
Conducting a disk scan in Safe Mode on your Windows may also effectively resolve the Ntfs.sys Blue Screen error. Operating in Safe Mode with minimal processes ensures a comprehensive examination of Windows to identify and correct potential issues.
First, enable safe mode by following these steps:
- Shut down your computer system.
- Then, power your PC ON and force shutdown immediately after seeing the brand logo during the turning-on process.
- Start your PC again; repeat 3 times to access the Recovery Environment.
- When your PC is in a recovery environment, click “Advanced options”.
- Now, click “Troubleshoot” and then “Advanced options”.
- Select “Startup Settings”.
- Click on “Restart”.
- After the restart, hit the “F5” button for “Enable Safe Mode with Networking.”
Now, follow these for the disk scanning:
- Press “Windows key+E” to open “File Explorer”.
- Navigate to “This PC”.
- Right-click on the driver where the Windows has been installed and select “Properties.”
- Now, go to “Tools”.
- Then, move to Error checking and click “Check” to initiate the disk scanning in safe mode.
Replace Your Hard Drive
If all the above methods have gone down, here is the final solution for you. It is possible that your hard drive has disk-related or other complex issues which is creating this Ntfs.sys Blue Screen error. Replacing this problematic hard drive with a new and reliable one can effectively resolve the issue. Here is how you can replace it:
- Turn off the computer.
- Remove the side panel of your PC and disconnect the old hard drive.
- Replace this hard drive with a new one.
- Recover the case and restart your computer system. Make sure that you are aware of entering the BIOS for the new hard drive.
Note: Replacing a hard drive requires expert-level knowledge. So, you have to be 100% sure of what you are doing!
Methods:
Perform SFC and DISM Scanning
Run Memory Check
Use the CHKDSK Disk Checking
Go for an Antivirus Scan
Run the Blue Screen Troubleshooter
Conduct Startup Repair
Rebuild Your Boot Manager
Run Your Driver Verifier
Reset Windows 10/11
Consider a Disk Scan under Safe mode
Replace Your Hard Drive
That’s all!!
Table of contents
- What Is Ntfs.sys?
- What Causes the Ntfs.sys BSOD in Windows?
- How to Fix the “Ntfs.sys Failed” BSOD on Windows 10 and 11
- Run SFC and DISM scans
- Update device drivers
- Check for disk errors
- Scan for malware
- Restore Windows
- Check for RAM issues
- Reset Windows to factory settings
- Ntfs.sys Failed: Fixed
- FAQ
In this article, you will learn the meaning of the “Ntfs.sys failed” error, its causes, and how to fix it.
What Is Ntfs.sys?
Ntfs.sys is a critical system file in Windows. It is a driver for the New Technology File System (NTFS), which determines how Windows stores and organizes data on your hard drive. The file is crucial for read and write operations on your hard drive.
What Causes the Ntfs.sys BSOD in Windows?
The error “Ntfs.sys failed” in Windows 11 or 10 is linked to many disk-related problems, such as bad sectors, faulty hard drives, and corrupted file system. The issue could also be caused by problematic drivers, malfunctioning system memory, malware infection, damaged or missing system files, and software conflicts.
You can follow our guide on figuring out the cause of BSODs to find the specific underlying cause of the issue in your system.
How to Fix the “Ntfs.sys Failed” BSOD on Windows 10 and 11
There are different solutions to the error “Ntfs.sys failed” in Windows 10, and one will work for you.
Follow the steps below in their presented order.
Run SFC and DISM scans
The System File Checker (SFC) and Deployment Image Servicing and Management (DISM) tools are built-in Windows utilities designed to find and replace corrupted and missing system files, such as Ntfs.sys. The following steps will show how to run these tools to resolve the issue:
- Type in
CMDon the search bar of your Windows computer, then right-click on Command Prompt. Then click on Run as administrator. Click Yes if prompted.
- Start by running the DISM command once Command Prompt opens. Type
DISM /Online /Cleanup-Image /ScanHealth
in the window and hit the
Enterkey. - After the DISM operation completes, type in the following command and press
Enterto run the SFC scan:sfc /scannow
- Wait for the scanning process to complete and do not interrupt this process.
- Close the Command Prompt window once SFC reports that it found and replaced faulty system files.
Follow our guide on resolving the “Windows resource protection cannot perform the requested operation ” error if you see that message.
Update device drivers
Incompatible device drivers can also trigger the BSOD error. That’s because Windows depends on drivers to communicate with almost every device, including storage controllers and other drivers that interact with your hard drive.
Finding these drivers manually could be a steep challenge, especially if you’re not a technical expert. Hence, you’re better off using a program that can automatically detect and fix malfunctioning or outdated device drivers.
Auslogics Driver Updater is one of the best free tools to use. It has many features that ensure you don’t have to deal with driver-related problems again. Apart from automatically finding and updating outdated drivers, it also helps you back up and repair them.
It can also notify you when new updates are released for specific devices.
You can follow our complete guide on updating Windows device drivers to learn more.
Check for disk errors
The CHKDSK tool is a built-in Windows utility that scans your hard drive and system files for errors, lost clusters, and bad sectors and attempts to fix them.
Follow these steps:
- Click the Folder icon in the taskbar.
- Go to the left side of the File Explorer window, right-click This PC , and select Properties .
- Head to the Tools tab after the Properties window opens.
- Click on the Check option under the Error checking section, then click Start to run the check.
Further reading: Ultimate Guide: How to Check For and Fix Disk Errors with CHKDSK Command
Scan for malware
Malware can corrupt system files, interfere with critical processes, or damage the hard drive, all of which can lead to BSOD errors.
You can run a malware scan with your antivirus software to fix it. In the absence of third-party antivirus software, the built-in Windows antivirus program also works.
Here’s how to use the Windows Security tool:
- Click the Start icon and type Virus into the search bar. You should see Virus & threat protection as the best match.
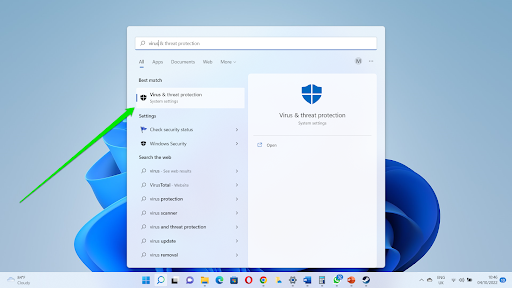
- Click Virus & threat protection and select Scan options .
- Select Full scan on the next page and click the Scan now button.
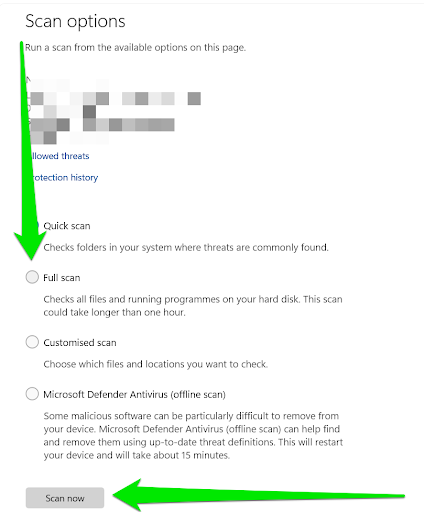
- The antivirus program will now check your entire system for malware that may be causing the BSOD issue.
- You can also run Microsoft Defender Antivirus (offline scan) to go even deeper. This time, the program will turn off your computer and take some critical programs offline to run the scan.
While Windows Security is an effective antivirus program, we recommend using Auslogics Anti-Malware alongside it. That way, your computer has an extra layer of protection against viruses that may slip past Windows’ protection software.
You can follow our malware removal guide to learn more about getting rid of viruses and malicious applications .
Restore Windows
A system restore once rescued me from a serious BSOD challenge. I had installed a problematic driver, and restoring the computer got rid of it.
If the Ntfs.sys blue screen started appearing after you installed an application or update, you can restore Windows to fix the problem. The System Restore utility reverts all the changes you made to your computer up to a specific date, undoing the settings and configurations that may be causing the error.
Note that you must have set up a system restore point for this method to work. Thankfully, though, Windows automatically creates automatic restore points after installing updates.
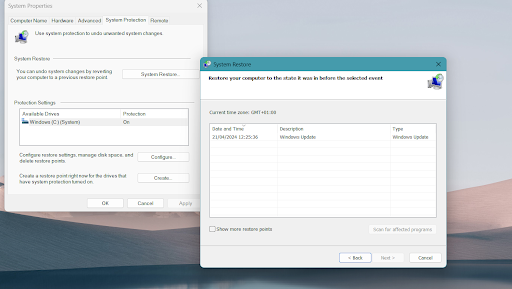
You can follow our system restore guide to resolve the issue.
Check for RAM issues
System memory problems, such as faulty or incorrectly set up RAM modules and memory leaks, can cause the “Ntfs.sys failed” BSOD error. You can manually check that by uninstalling each RAM module and reinstalling them one after the other to determine the faulty one.
Fix this issue quickly
You can try using a safe and totally free tool developed by the Auslogics team of experts.
A few simple steps to troubleshoot the issue:
Download the tiny Auslogics TroubleShooter tool.
Run the application (no installation is needed).
The app will check for the issue mentioned in the article. When the scan is done, check that this is the issue you were looking to solve and click ‘Apply now’ to apply the recommended fix.
You can use the app to troubleshoot other malfunctions for free by simply typing in a brief description of the issue your PC is experiencing. Or you can scan your PC for performance issues using the My Scanner tab.
You can also follow our guide on fixing memory leaks to troubleshoot the error.
Reset Windows to factory settings
Resetting your computer should be your last option if nothing else has worked so far. Please ensure to back up your system before attempting this process. While you can prompt Windows to keep your files, it’s always better to be cautious.
Note that you will lose all your installed apps after performing the reset.
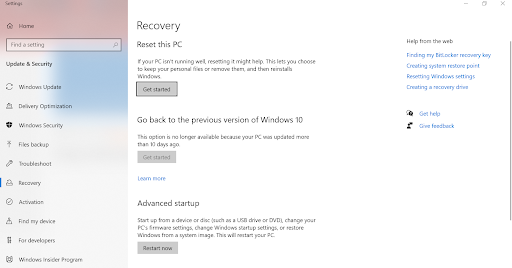
Our guide on factory resetting Windows 10 and 11 will show you everything you need to know.
Ntfs.sys Failed: Fixed
Following the fixes outlined in this post should help you tackle the Ntfs.sys BSOD error on Windows 10 or 11. Remember, systematically trying each fix and restarting your computer after each step is important in figuring out the root cause.
If these solutions don’t resolve the issue, consider seeking assistance from a computer technician or contacting Microsoft support for further guidance.
Head to the comments section to tell us which solution helped you resolve the problem.
FAQ
What is a BSOD?
A BSOD (blue screen of death) is a critical error that crashes your Windows system. It displays a blue screen with technical information and forces a restart. BSODs indicate a severe issue that needs troubleshooting.
What causes the Ntfs.sys BSOD error?
The Ntfs.sys error stems from problems with the driver managing your hard drive. It can arise from corrupted system files, outdated drivers, damaged hard drive sectors, or software conflicts.
Does Windows have internal protection against BSODs?
Yes, Windows has features to monitor system health and prevent crashes, like Driver Verifier and SFC, but they aren’t foolproof. BSODs still occur due to various hardware or software issues that bypass these safeguards.