
fltmgr.sys is a system file that ensures all files existing on the hard drive to be in the respective directories. Full form of the file is Microsoft Filesystem Filter Manager that also makes sure that the data written to the HDD is correct and not corrupted. Error fltmgr.sys BSOD occurs when this process can’t perform its duty properly and system keeps crashing with random restarts. This blue screen of death mostly appears with Kmode exception not handled, Page fault in nonpaged area, Memory_management, and Irql_not_less_or_equal.
File System Filter Manager becomes damaged or unreadable if the communication between CPU and hardware is lost or malfunctioned. Other potential reasons that cause fltmgr.sys blue screen error is missing system components, malware infection, outdated device drivers, and cracked software programs. Sometimes, a simple restart works as a tweak to fix fltmgr.sys BSOD. On the other hand, the same blue screen of death occasionally doesn’t let you login into your system thus resolving the issue becomes difficult.
fltmgr.sys BSOD Error in Windows 10
Here is how to fix fltmgr.sys BSOD Error in Windows 10 –
1] Boot into Safe mode with Networking
To solve this Blue screen issue you need to boot in safe mode with networking in the condition you cannot access the desktop. Suppose you are able to log in after encountering fltmgr.sys BSOD error, you can directly move to method 2.
- Click the search icon on the taskbar.
- Type – advanced startup.
- Press – Restart now.
- On the coming screen, go to Troubleshoot => Advanced options => Startup Settings successively.
- Next, click – Restart.
- Once the system powers up, press 5 or f5 to enable Safe Mode with Networking.
2] Perform Virus scan
fltmgr.sys with page fault in nonpaged area, kmode exception not handled, memory_management
, or irql_not_less_or_equal might occur when malware enters the system. During this process, some fundamental elements that are necessary to make sure the smooth functioning of Windows 10 PC either go missing or become corrupted.
Threat or attack is nearly impossible for Windows 10 because the version has built-in utility Windows security that ensures online and offline safety. Despite, an outdated operating system, broken device drivers, disabled security suite oftentimes make it easy for malware to get access. So, before you try out any other solutions, it’s important to eliminate existing malware so that it can’t overspread.
- Press – Windows + S.
- Type in – Virus & threat protection.
- Hit – Enter.
- Click the link reading – Scan options.
- Hit the radio button set for – Full scan.
- Click – Scan now.
- If the utility traces out any malware, hit – Clean Threat.
- Thereafter, click Remove and then Start actions.
- Once the removal process ends, reboot Windows.
3] Restore missing system elements
Some system files might be disappeared or misplaced due to malware infection or software conflict or other reasons. If any of these items are related to File System Filter Manager, you need to restore the missing components. System File Checker comes to the rescue in such conditions. Sfc /Scannow mainly is a command-line utility that scans the integrity to resolve the defective system files and restore lost system elements. To run the same –
- Click the search icon from taskbar.
- Type – cmd.
- Press – Ctrl + Shift + Enter.
- When User Account Control asks for approval, click – Yes.
- In the elevated Command Prompt, insert – sfc /scannow.
- Hit – Enter.
- After completion of the scanning process, restart the Windows PC.
4] Update Windows 10
fltmgr.sys BSOD still persists even after following the above ways then there is a chance that your system lacks some critical updates. To get –
- Press – Windows + I.
- Click – Update & Security.
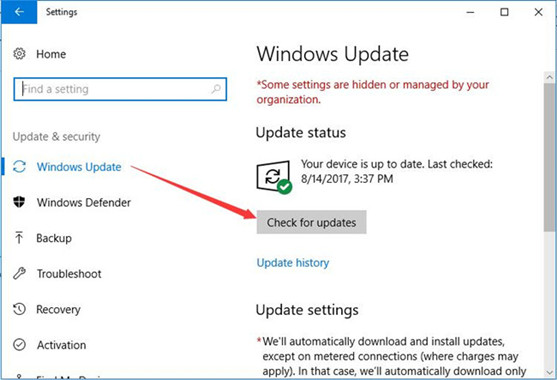
- From the right-hand side, click – Check for updates.
- If there is an available patch, click – Download.
- After downloading when the installation process finishes, hit – Restart now.
5] Make sure all device drivers are up-to-date
Automatic update also installs OEM drivers but sometimes they are broken or incompatible. That’s why some users keep device drivers excluded from updates. There might be some other situations too when you need to search for device drivers update manually.
- Press – Windows key.
- Type – devmgmt.msc.
- Hit – Enter.
- When “Device Manager” appears, look for the device that may cause fltmgr.sys BSOD.
- Double-click the same.
- Find out which driver is causing issue or outdated.
- Right-click on that ‘driver’ and choose – Update driver.
- Opt for – Browse my computer for drivers.
- Click – Let me pick from a list of available drivers on my computer.
- Select the correct model.
- Hit – Next.
- After installing the update, reboot the device.
6] Check external hardware to fix fltmgr.sys BSOD
fltmgr.sys BSOD is often caused by connected peripherals like printers, external hard drives, second monitors, and Bluetooth devices. So, disconnecting them may solve the problem. However, you can keep the mouse and keyboard attached.
To check whether any of your connected hardware is damaged, disjoint their USB cables from the individual ports. After that, restart Windows 10 and see if the blue screen error still exists. If no, connect the peripherals one after another. In the meantime, check if any particular hardware is triggering the blue screen error.
7] Resolve disk error
Malfunctioned or corrupted hard drive can also cause fltmgr.sys BSOD. If the problem is non-physical, CHKDSK command-line can be a lifesaver, or else you will have to replace the hard disk with a new one. Disk checking utility analyzes the hard drive to find out existing error moreover fix found issue automatically. To execute the same –
- Open Command Prompt as administrator.
- Type in – chkdsk c: /f /r.
- Hit – Enter.
8] Replace corrupted fltmgr.sys
To replace the original fltmgr.sys that is probably corrupted, you need to download the file first and then insert it into the correct directory. This procedure is super easy if follow the below steps precisely. Steps are as followed –
- Download – fltMgr file.
- Unzip the file and copy fltmgr.sys.
- Visit the fltmgr.sys location folder – C:\Windows\System32\drivers.
- Delete the existing file paste the downloaded one.
9] Reinstall Microsoft Office access to fix fltmgr.sys BSOD
Many Windows 10 users reported that they started finding fltmgr.sys BSOD after installing Microsoft office access program. If the same happens to you, uninstall the app first. Here’s how –
- Press – Windows + R.
- In the void text bar, put – appwiz.cpl.
- Click – OK.
- Find – Microsoft Office Access.
- Right-click the same and choose – Uninstall.
- Keep following on-screen directions to complete the removal process.
- Once done, restart the Windows system.
- Check if fltmgr.sys BSOD is fixed.
- Now, visit the Download Center of Microsoft.
- Reach to Microsoft Access 2010 Runtime segment.
- Choose the preferred language and click – Download.
- After downloading, install the program in the usual way.
10] Reset the OS
Installing new software programs or making any changes in the settings or services modify Windows components along with registry keys. If these modifications don’t go with your system, fltmgr.sys BSOD may be generated. To eliminate the blue screen error, you can reinstall Windows 10 afresh. Steps are as followed –
- Click – Start icon.
- Type – reset this PC.
- Hit – Enter.
- From the right-pane, click – Get started.
- Select – Keep my files.
- Choose – Local reinstall.
- Click – Next.
- Hit – Reset.
11] Use Blue Screen Troubleshooter
To fix BSOD occurring on Windows 10, Microsoft offers a walkthrough troubleshooter escorting you till the end of the error. You can try the series of steps there to figure out the issue on your PC.
Go to this – BSOD troubleshoot page, select the correct reason, and follow the stepwise instructions provided there.
12] Repair Windows 10 to fix fltmgr.sys BSOD Windows 10
If you are still struggling with fltmgr.sys BSOD after trying out the above workarounds, there must be some serious corruption. This generally happens due to sudden power failure, virus attack, improper shutdown, and hardware as well as software errors.
In such a case, the last resort you can try out is repairing the Windows. This way, all defective and broken files will be replaced with fresh ones moreover the operational speed of the system will be smoother. To repair the system, you will have to use the Windows CD that comes with the device.
Methods list
1] Boot into Safe mode with Networking
2] Perform virus scan
3] Restore missing system elements
4] Update Windows 10
5] Make sure all device drivers are up-to-date
6] Check external hardware
7] Resolve disk error
8] Replace corrupted fltmgr.sys
9] Reinstall Microsoft Office access
10] Reset the OS
11] Repair Windows 10
That’s all!!
BSoD or Blue screen of death errors are the most dreaded errors in Windows. They indicate a major issue and unexpectedly crash computers. One such BSoD is the fltMgr.sys blue screen of death, which occurs due to multiple reasons like virus infection, corrupted data, and more.
The fltMgr.sys or Microsoft File system Filter Manager file is an important part of the OS, which handles data storage drives like hard drives. Windows uses this file to interact with the system storage and file manager. This file also ensures that the hard drives are accessible and their data readable.
If the fltMgr.sys fails, users encounter an unexpected crash along with the fltMgr.sys blue screen right away. This error screen displays an error code that varies depending upon the trigger behind the error. Some of these error codes are –
- SYSTEM_SERVICE_EXCEPTION
- PAGE_FAULT_IN_NONPAGED_AREA
- KMODE_EXCEPTION_NOT_HANDLED
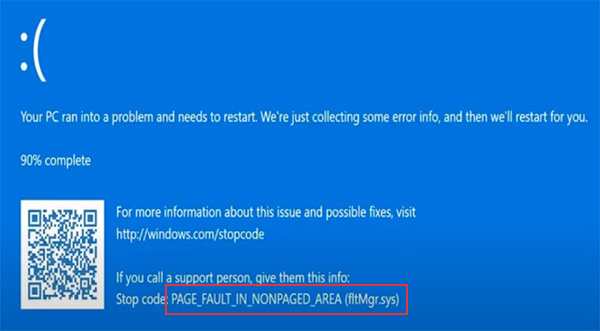
In most cases, the error is caused by corrupted data present on the drive or due to a hardware failure. However, there could be more reasons behind this pesky issue. If you are encountering this error, the reasons could be –
- Bad Windows update
- Power outage
- Corrupt system files
- Corrupted data
- Corrupted hard drive
- Hardware damage
- Malware infection due to illegitimately obtained software
As the fltMgr.sys BSoD is displayed without any bug check value; it becomes a bit tricky to resolve it using the simple code mentioned along with it. However, there are ways you can try to get rid of this error. Let’s dive in to the methods to fix the fltMgr.sys error.
Methods to Fix the fltMgr.sys BSoD Error
Here, we will discuss some methods you can use to easily get rid of the fltMgr.sys blue screen error.
Pre activity –
Before moving on to the methods, let’s perform a few steps to see if there’s a problematic application or hardware causing the fltMgr.sys BSoD error screen to occur frequently.
- Load your PC into safe mode to check for any problematic application.
- Check hardware for any physical damage using the hardware troubleshooter. Also, use Memtest86 to check the RAM.
These preliminary checks will allow you to gauge the extent of the damage. If you encounter the fltMgr.sys BSoD while trying to enter the safe mode, it means there is severe damage.
To fix the fltMgr.sys BSoD error, we will first use System Restore to restore the PC to a previous healthy state. While this has helped a lot of users, it might not work every time. In such a scenario, we will reinstall Windows, which is the last resort to fix any Windows error.
Performing System Restore doesn’t affect the data present on your hard drive. It simply restores the system to a previously known healthy state. On the other hand, clean installing Windows will remove everything, including the data and files present on the storage media. Hence, always back up your critical data on an external storage drive before proceeding with these methods.
If the fltMgr.sys has failed and your computer is stuck in an endless loop of the fltMgr.sys BSoD error, your data present on the HDD/SSD will become inaccessible.
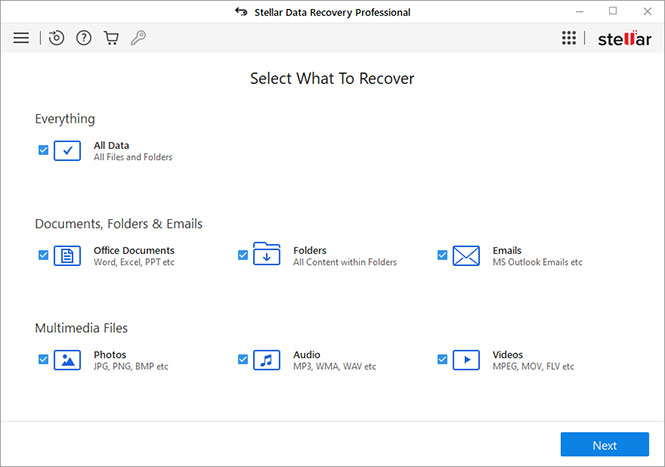
Get hold of a professional data recovery software like Stellar Data Recovery Professional to recover your data stuck in an inaccessible system. Simply create a bootable recovery media (USB) using another PC and boot into the problematic PC. Refer to our guide to perform data recovery from an unbootable PC.
Once you have retrieved your data, it is time to start troubleshooting the fltMgr.sys blue screen error.
Method 1: Perform System Restore
Here, we will take the help of Windows Installation media to enter WinRE and then perform the system restore. You can use an old system restore point to revert to a previous error-free state. Doing so will bring back all the system settings of the selected state and will remove any changes made after that save point. Here’s how you can do this –
- Connect your Windows installation media to your computer and boot your computer with it.
- On the installation screen, click on Repair your computer.
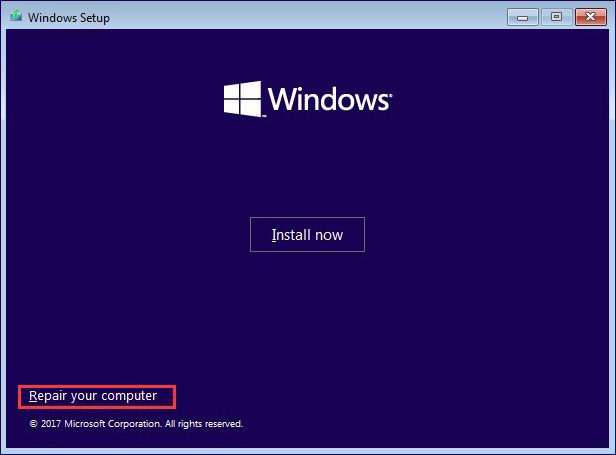
- Go into WinRE and then click on Troubleshoot > Troubleshoot > Advanced options.
- Click on the System Restore option.
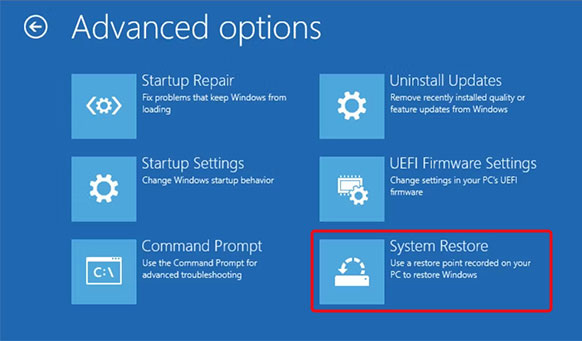
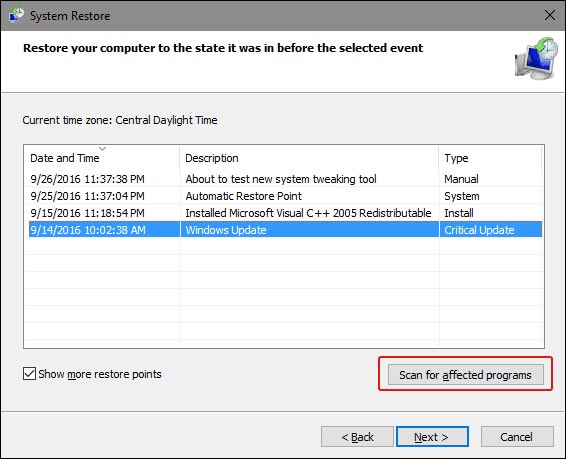
- In the System Restore window, click on the version you wish to restore and click on Scan for affected programs.
- Then, click on Next to proceed with your selection.
- On the final screen, click on Finish.
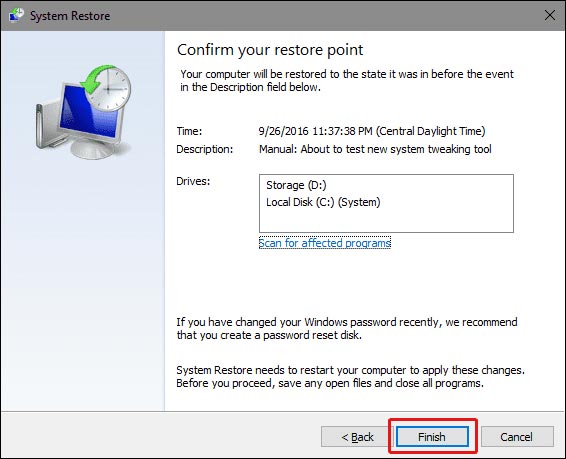
Wait for the process to end. This will restore your Windows 10 computer to the selected state. Check if this fixes the fltMgr.sys blue screen error on your PC.
Once you have restored the system to a healthy state, install any available driver and software updates. Keeping your system updated will help you avoid such errors.
Method 2: Reinstall Windows
Using the system restore point to load a previous healthy state is a great way to resolve errors, such as the fltMgr.sys BSoD. However, if that doesn’t work, you will have to clean install the Windows as a last resort. For this, you will have to use your Windows version-specific installation media and use it to boot your computer.
For booting your computer via installation media, you will have to change the boot sequence by going into the BIOS. Once it is done, your computer will restart automatically and display the installation screen. Follow the instructions on screen to proceed with the OS installation procedure. You can also refer to this guide for detailed steps.
Reinstalling Windows from scratch should eliminate the fltMgr.sys blue screen error from your system. You can now reinstall applications and restore all your data backed up on an external drive.
Conclusion
Like any other BSoD error, the fltmgr.sys blue screen error can unexpectedly crash the computer and make it unstable. We hope one of the methods explained above helped you quickly resolve the blue screen error.
P.S. – Always keep your drivers & OS updated, avoid downloading software from unreliable sources, and regularly maintain a data backup.
Related Topics –
PAGE_FAULT_IN_NONPAGED_AREA
kmode_exception_not_handled
FAQs
Can a faulty RAM module cause thefltMgr.sys BSoD?
Yes, a faulty RAM module can make the PC unstable by generating frequent BSoD errors including the fltMgr.sys error.
Why am I getting the kmode_ exception_not_handled BSoD error?
This could be due to reasons, such as outdated network drivers, missing device drivers, installing a problematic update, memory or hardware issue, etc.
How do I fix the fltMgr.sys blue screen error?
Clean junk files in Windows Registry using the built-in Disc Cleanup utility to remove irrelevant files clogging up the system and causing the fltMgr.sys error.
Was this article helpful?
YES2
NO
Fltmgr.sys BSOD (blue screen of death) is common. For instance, Fltmgr.sys BSOD appears after you create an email in outlook. Like many other BSOD errors such as internal power BSOD, blue screen due to the fltmgr.sys file is a system problem that may disable users from running the computer smoothly.
More often than not, you may hit upon various variants of Fltmgr.sys BSOD errors like System_Service_Exception, Irql_not_less_or_equal, or kmode_exception_not_handled, or page_fault_in_nonpaged_area fltmgr.sys. This post will show you common but useful solutions to get out of the blue screen.
What is FltMgr.sys? Is it Virus, Trojan, Spyware, and Malware?
Fltmgr.sys, short for Microsoft File System Filter Manager, is a system file that ensures files on the hard drive to be located in the right directories and data on the hard drive is correct. Users can normally locate this find in C drive > Windows > System 32.
As a system file on the Windows system, fltmgr.sys is not a virus, Trojan, spyware, or malware. However, once Microsoft File System Filter Manager (fltmgr.sys) is infected or even damaged by viruses, it will stop working and fail to realize the communication between the computer CPU and hardware. In this case, a blue screen error may pop up due to the malfunctioned fltmgr.sys file.
How do I Fix FltMgr.sys Blue Screen of Death on Windows 11, 10, 8, 7?
As it has been suggested, when the system file fltmgr.sys is corrupted, it may result in various system errors, mostly, endless BSODs and tasks randomly being killed due to the fltmgr.sys blue screen error. Common culprits of the File System Filter Manager BSOD are corrupted files, drivers, malware, and computer hardware like disk errors.
Or sometimes, system conflicts or crashes are the root cause of your blue screen System_Service_Exception (fltmgr.sys) or any other BSOD errors caused by this system file. You can remove the filed fltmgr by following the solutions below.
Solutions:
- 1: Restart the Computer
- 2: Enter the Safe Mode
- 3: Check the Hardware
- 4: Run SFC
- 5: Update Device Drivers
- 6: Check Disk Drives
- 7: Check for Updates
Solution 1: Restart the Computer
Sometimes, a simple computer restart may help you deal with various computer problems, with no exception for system crashes like BSODs.
Once you noticed that blue screen with the error message of fltmgr sys, you may as well reboot your device to see if the blue screen will disappear and whether you can use the device as smoothly as before.
Solution 2: Enter the Safe Mode
If restarting the computer does not help, your device is trapped into fltmgr.sys blue screen of death loop. Whether you can boot up the Windows system or not, try to enter the safe mode using different ways.
In the safe mode, users can run the computer with minimal programs and features so that file and program corruptions will be removed to allow you to troubleshoot the tricky fltmgr.sys blue screen problem.
You can choose to get into the safe mode with networking or command prompt and then fix the file manager error more easily.
Solution 3: Check the Hardware
Windows 10 BSOD system_thread_exception_not_handled FLTMGR.sys when accessing programs over the network also requires users to make sure there are not any hardware issues.
Understandably, any hardware problems like Windows setup could not configure Windows to run on this computer’s hardware may result in BSOD. Therefore, you need to disconnect all the external devices and then check the fltmgr.sys error persists and then connect them if needed.
Solution 4: Run SFC
Corrupted system files will also
cause FLTMGR.sys Windows 10 blue screen. In this way, it is necessary for you
to run the System File Checker, a Windows-based file checker, to automatically
troubleshoot and correct file corruption. As a system file, fltmgr.sys will be
checked by the system checker easily.
1. Search Command Prompt in the search box and then right click the result to Run as administrator.
2. In Command Prompt, enter sfc/scannow and then press Enter to run System File Checker.
Wait until SFC finishes checking all the system files on Windows 10, 8, 7. You then will be prompted what system files are corrupted and whether SFC can correct them itself.
After that, fltmgr.sys BSOD errors will disappear and you are advised to run SFC regularly to prevent fltmgr.sys blue screen.
Solution 5: Update Device Drivers
Fltmgr.sys kmode_exception_not_handled or System_Service_Exception or any other BSOD errors demand users to ensure all the device drivers like the network and graphics card drivers updated to achieve the communication between the hardware and the system.
That is to say, you might as well check all the driver versions and update all the device drivers to make them compatible with the system without any system crashes.
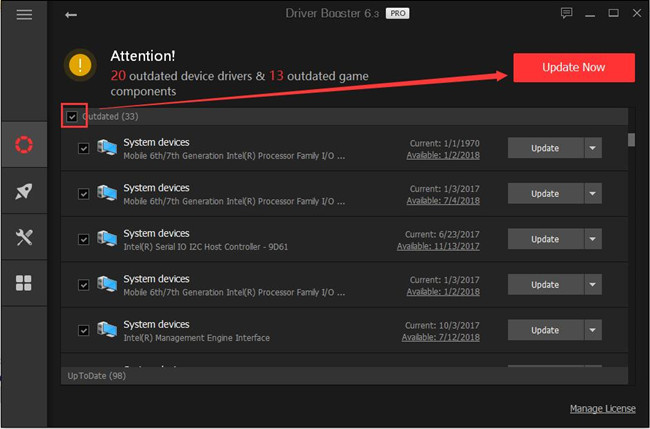
Here, Driver Booster
is a recommendable driver tool for you to search for, download, and install all the device drivers automatically and quickly. This driver tool will then help you fix the blue screen due to the File System Filter Manager more easily.
1. Download, install and run Driver Booster on Windows 11 or 10.
2. Hit Scan.

3. Find out Update all to get all the device drivers updated at the same time.
With all the drivers installed,
you will see no more memory management blue screen of death on Windows 10, 8,
7. You can access any program as you wish.
Solution 6: Check Disk Drives
Since fltmgr.sys is a system
file, corrupted files or disk drives may give rise to blue screen Fltmgr.sys on
Windows 10. It is also a necessity to troubleshoot the hard drive problem
regularly to keep your computer safe and away from viruses and malware.
1. Type File Explorer in the search box and then press Enter to navigate to File Explorer.
2. Right-click the hard drive that you are to troubleshoot, such as hard drive E to open its Properties.
3. Under Tools, locate Error checking and then hit Check.
After that, you can observe that
the disk error checking tool is troubleshooting your hard drive. If possible,
you can also check the disk errors in other hard drives to ensure there is no
hard drive corruptions that may lead to fltmgr.sys blue screen error.
Solution 7: Check for Updates
The window system may also be one of the culprits of the BSOD error caused by the File Memory Manager. Sometimes, you may run into the blue screen labeled by fltmgr.sys due to system corruption.
Microsoft may have sometimes provided you with fixes for various system problems. Therefore, you can try to install the system updates to prevent BSOD issues.
1. Find out Start > Settings > Update & Security.
2. Under Windows Update, hit “Check for updates”.
In a word, this article shows you how to fix fltmgr.sys BSOD on Windows 7, 8, 10 using different solutions. You can get out of the blue screen loop caused by the fltmgr.sys with one or more methods.
More Articles:
Fixed: Faulty Hardware Corrupted Page Blue Screen on Windows 10/11
8 Ways to Fix Kernel Security Check Failure on Windows 10/11
Solved: NTFS File System Error on Windows 10/11
The fItmgr.sys file, also known as the Microsoft File system Filter Manager file responsible for making sure that the data on the hard drives is readable and accurate. If your operating system fails to read the data on your hard drive because of an issue with the fItmr.sys file, you may encounter a Bluescreen of Death (BSOD) that lists fItmr.sys as the culprit.
These issues are typically caused due to corrupt/outdated relevant drivers or hardware problems. Below, we have listed several troubleshooting methods that you can try to fix the blue screen under discussion.
1. Check for Hardware Problems
Before we proceed with this method, we recommend that you restart your PC. There have been instances where the error occurred because the fItmr.sys file was not launched correctly. If the issue occurs after booting as well, proceed with the steps below.
The first thing that you should do is check your computer for any faulty hardware that might be causing the issue. If the error started occurring after you switched the old hardware components with the new ones, then that might be causing the problem.
You can try switching back to the older hardware or test the new one on a different device.
Another thing that you can do in this regard is run the CHKDSK scan, which can analyze your hard drive for errors and fix the ones identified. Follow these steps below to do that:
- Press Win + R to open Run.
- Type cmd in the text field of Run and press Ctrl + Shift + Enter to launch Command Prompt as an administrator.
-
In the Command Prompt window, type the command mentioned below and hit Enter to execute it.
chkdsk c: /f /r

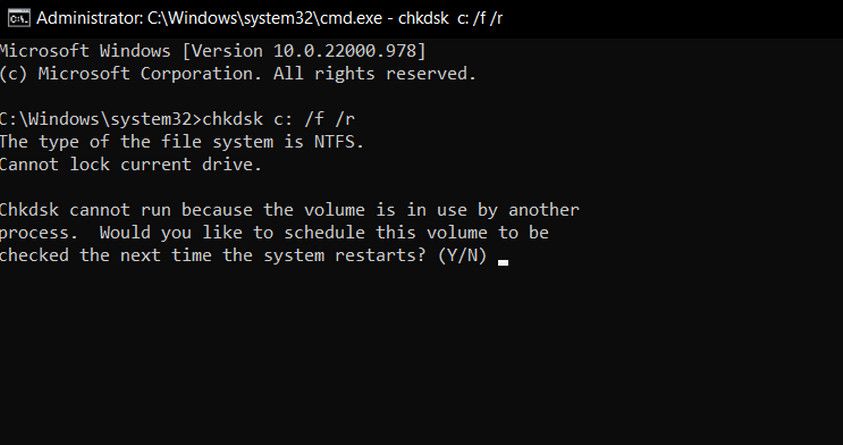
Once the command is executed, close Command Prompt and check if the issue is resolved.
2. Fix the Device Drivers
If the issue is not with the hardware, then the next thing you should check is the device drivers. Unfortunately, this error code does not specify which driver could be problematic, so we will be attempting to update all the critical drivers.
You can either do this manually using the Device Manager, or you can get your hands on a third-party utility that can scan your system for outdated or corrupt drivers and then update/reinstall them.
For the former, you can head over to our dedicated guide on updating drivers in Windows. If the problem started after you updated/installed a driver, you can downgrade or uninstall the problematic driver and see if that helps.
However, if you want to leave this job to a third-party tool, here are a few options to consider:
- DriverFix — This tool will scan the system for outdated/broken drivers and recommend updates that are officially released by the manufacturer. All you need to do is give the tool access to the necessary files, and it will automatically install the drivers for you.
- Driver Easy — It is another simple tool that will identify the drivers that need to be updated or reinstalled. It comes in two versions; free and paid.
- Ashampoo Driver Updater — This program scans your hardware and drivers, and then installs the latest updates of any outdated drivers that might be hidden in the system.
For a more extensive list, you can head over to our guide on the best driver updaters for Windows.
3. Undo the Recent Changes
If the error started appearing after you made certain changes to the system, then you can try undoing those and check if that fixes the problem.
If this scenario is applicable, then the first thing we recommend doing is uninstalling the recent Windows updates. Microsoft’s updates can be buggy at times and can cause new issues within the system rather than addressing existing ones.
If uninstalling the recent updates does not do the trick, then the next thing we will do is check if any new or old third-party apps are causing the problem. For this purpose, we will first launch Windows into Safe Mode.
This mode launches Windows with a basic set of drivers and programs only, making it easier to identify if a background app is a culprit.
Here is how you can launch Windows into Safe Mode:
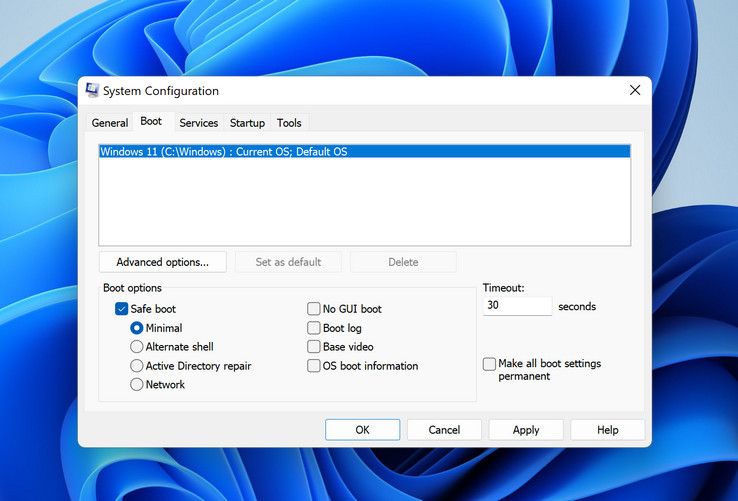
- Press Win + R to open Run.
- Type msconfig in Run and click Enter.
-
In the System Configuration window, navigate to the Boot tab and checkmark the box associated with Safe Boot.

- Next, choose Minimal in the Safe Boot option.
- Click Apply > OK to save the changes and then restart your computer.
Upon reboot, Windows will automatically launch in Safe mode. Once you are in Safe Mode, check if the issue appears again. If not, then you can try uninstalling any recently installed apps since there is a good chance of them being the culprit.
If you aren’t sure about the apps, navigate to the Services tab in the System Configuration dialog.
Now divide the services into two parts and enable all services in the first part. Wait to see if the error pops up again. As such, keep narrowing down the culprit until you find it.
If the methods listed above have not fixed the issue for you, then you can report the problem to the official Microsoft support team. Hopefully, they will assist you in determining the exact cause of the issue and suggest you a relevant fix accordingly. Alternatively, you can also use the Event Viewer utility on Windows to check the BSOD log file to identify the culprit yourself.
The fltmgr.sys Stop Code, Now Fixed
Hopefully, one of the methods listed above resolved your issue. We highly recommend keeping your device drivers updated at all times to avoid such problems in the future. Regularly installing available system updates is also important, since they contain bug fixes and protect your system.
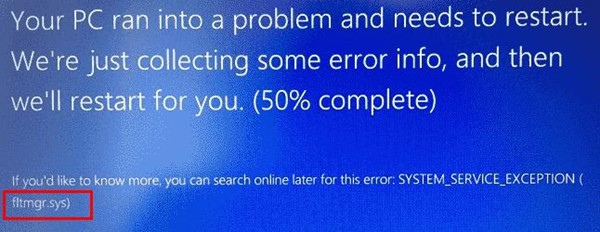
The fltmgr.sys file or the Filter Manager is the one that’s responsible in making sure that all the file stored in a computer’s hard drive stays on their respective locations and is located in C:/Windows/System32/drivers. Now when you encounter a Blue Screen of Death or BSOD error saying, “Your PC ran into a problem that it couldn’t handle, and now it needs to restart. SYSTEM_SERVICE_EXCEPTION”. This kind of Stop error is due to an error with the driver that’s responsible for enabling the communication between the hardware and the computer. It indicates that this driver allows direct access to the internal hardware from the CPU itself.
What’s worse about the SYSTEM_SERVICE_EXCEPTION BSOD error is that there are times when you won’t be able to log in to your computer even after it reboots. However, you need not worry as this post will guide you into fixing this BSOD error. All you have to do is follow the given options below carefully and that before you proceed make sure that you create a System Restore point just in case something goes wrong.
Option 1 – Run the Windows Update
Obviously, since the fltmgr.sys file is a system file from Microsoft, you can try running the Windows Update and see if it fixes the problem or not.
Option 2 – Run the System File Checker
The System File Checker, also known as the SFC scan, is a built-in utility in Windows that can be found in the C:/Windows/System32 folder. This tool allows you to scan and restore any corrupted system files in Windows that might be causing the SYSTEM_SERVICE_EXCEPTION BSOD error. To use this tool, follow the steps below.
- Tap Win + R to launch Run.
- Type in cmd in the field and tap Enter.
- After opening Command Prompt, type in sfc /scannow
The command will start a system scan which will take a few whiles before it finishes. Once it’s done, you could get the following results:
- Windows Resource Protection did not find any integrity violations.
- Windows Resource Protection found corrupt files and successfully repaired them.
- Windows Resource Protection found corrupt files but was unable to fix some of them.
- Restart your computer and then check if it has fixed the error or not.
Option 3 – Run the Blue Screen Troubleshooter
The Blue Screen troubleshooter is a built-in tool in Windows 10 that can be found on the Settings Troubleshooters page. To use it, refer to these steps:
- Tap the Win + I keys to open the Settings panel.
- Then go to Update & Security > Troubleshoot.
- From there, look for the option called “Blue Screen” on your right-hand side and then click the “Run the troubleshooter” button to run the Blue Screen Troubleshooter and then follow the next on-screen options. Note that you might have to boot your PC into Safe Mode.
Option 4 – Check your hardware for any physical issues
There are times when faulty hardware can result in serious problems in the system such as the SYSTEM_SERVICE_EXCEPTION Blue Screen error. Thus, it is highly recommended that you check the internal components of your CPU to find out if there are any problems. And if there is any physical damage, you need to bring that to a technician to get it fixed or have it replaced.
Option 5 – Run the CHKDSK utility
You can also run the Chkdsk utility to resolve the BSOD error. The Chkdsk utility is the one that repairs hard drive errors that might be causing the problem.
- Open Command Prompt with admin privileges.
- After opening Command Prompt, execute the commands listed below, and don’t forget to hit Enter right after you type in each one of them and if you have installed Windows to some different directory, you must replace “C” with the name of the drive you’ve installed Windows with.
- chkdsk C: /r /x
- chkdsk C: /f
Do You Need Help with Your Device?
Our Team of Experts May Help
Troubleshoot.Tech Experts are There for You!
GET HELP
Troubleshoot.Tech experts work with all versions of Microsoft Windows including Windows 11, with Android, Mac, and more.
Share this article:
You might also like
Code 33 — What is it?
Code 33 is a typical Device Manager error. This error code occurs when Windows is unable to start a device that you are trying to use on your PC. The error code 33 is usually displayed in the following format:
“Windows cannot determine which resources are required for this device. Code 33”
Solution
Error Causes
Error code 33 may be triggered due to two reasons. One reason can be the translator’s failure to find the correct resource for the device driver.
And since this error code is associated with the Device Manager, another reason can be an outdated or corrupted device driver. In most cases, the underlying problem for Device Manager error code is outdated/corrupted drivers.
The good news is that Device Manager error code 33 is not detrimental. However, if the error is not resolved timely, it can lower the functionality and the performance of your PC. You may not be able to use the hardware device.
Further Information and Manual Repair
To resolve code 33, you don’t need to be technically sound or hire a professional computer programmer. Just like any other Device Manager error code, code 33 is also easy to repair.
To help you fix this issue on your system, below are some of the best, easy, and effective DIY solutions.
Method 1 — Configure Hardware Device
Properly configure the problematic hardware device to fix error code 33. It is important to understand that when you install a device that is not plug-and-play, the resource settings are not configured automatically.
This means for such devices you will have to perform device configuration manually.
For device configuration, here’s what you should do:
- Go to the start menu
- Click Control Panel, then click Performance and Maintenance, and then System
- Now on the hardware tab, click on Device Manager and then double click the device you wish to configure
- Click the resources tab and then click on the check box next to the Use Automatic Setting
- After that click, the ‘Setting Based On’ and then click the hardware configuration you wish to change
- Press the ‘Resource Type’ you will like to configure in the ‘Resource Settings’ box
- Now go to the Change Settings tab and type a new value for the Resource Type
Method 2 — Update the Problematic Drivers
Code 33 can also be generated due to driver problems. In such a scenario, it is recommended to update the outdated or corrupted drivers.
Identifying all problematic drivers and updating them individually can be frustrating and time-consuming. Therefore to save time and avoid the hassle involved in updating drivers manually, it is advisable to download DriverFIX.
Method 3 — Download DriverFIX to Update Drivers Automatically
DriverFIX is a next-generation and user-friendly program compatible with all Windows versions.
This software is exclusively designed to repair and resolve device driver-related problems and error codes.
Once installed, its intelligent and intuitive programming system detects all outdated, corrupted, and misconfigured device drivers on your PC. It automatically updates all the problematic drivers in a few seconds. It makes sure that the driver versions are the latest and compatible with your operating system.
Furthermore, it also ensures that drivers are continuously updated whenever new versions are available. So, you don’t have to worry about keeping device drivers up to date.
Click here to download DriverFIX to resolve Device Manager error code 33 today!
Read More

It is officially confirmed, Windows 11 release date is October 5th. Windows 11 will be released as a free upgrade to all registered Windows 10 users that have supported hardware for it.
The rest of the users will be able to install it via ISO file as a clean installation if their computer supports Windows 10 hardware requirements. The official price for the license for Windows 11 has not yet been set but I assume after release it will be set.
Priority for W11 will have users who are upgrading from W10 as stated by Microsoft.
Also, it was officially confirmed that Android apps will not be running natively in this first release of Windows 11, that feature will come in a future update, official statement below:
«We look forward to continuing our journey to bring Android apps to Windows 11 and the Microsoft Store through our collaboration with Amazon and Intel; this will start with a preview for Windows Insiders over the coming months,»
The rest of the features will be all included inside Windows 11 on launch.
Read More
When you try to open Outlook 20016 and other programs on your Windows 10 PC and end up getting an error instead saying, “Failed to register a VB Script DLL. Reinstall or run Regsvr32.exe Vbscript.dll to self-register”, read on as this post will help you resolve the problem and help you re-register the vbscript.dll file. Follow each one of the steps below carefully to fix the problem.
- Step 1: In the Start search, type “cmd” and from the search results that appear, right-click on Command Prompt and select the “Run as administrator” option from the context menu.
- Step 2: After opening Command Prompt as admin, type the regsvr32.exe vbscript.dll command and hit Enter to execute it.
- Step 3: After entering the command, it will re-register the concerned DLL file using the regsvr32.exe, a Windows OS tool. The Regsvr32 tool is a command-line utility that allows users to register or unregister OLE controls like the DLL and ActiveX (OCX) controls in the Windows operating system. After the command you entered has successfully run, you will see a message saying, “DllRegisterServer in vbscript.dll succeeded.”
On the other hand, if re-registering the DLL file didn’t work, you might have to log on to your computer using an administrator account and then try re-registering the DLL file once more. But before you do that, you need to create a system restore point first so that if anything goes wrong, you can always undo the changes you’ve made. After creating a system restore point, double-click on the downloaded .reg file to add its contents to the Registry. After that, try opening the program you were trying to open but weren’t able to because of the error.
If it doesn’t work, you can always reinstall the affected programs that throw up the error and see if it resolves the problem. You could also seek the help of a one-click solution to fix the problem for you. This program is a useful tool that does not only repair corrupted registries and optimize your PC’s overall performance but also resolves any DLL issues like the Failed to register a VB Script DLL. Reinstall or run Regsvr32.exe Vbscript.dll to self-register” error. Aside from that, it also cleans out your computer for any junk or corrupted files that help you eliminate any unwanted files from your system. This is basically a solution that’s within your grasp with just a click. It’s easy to use as it is user-friendly. For a complete set of instructions for downloading and using it, refer to the steps below.
Read More
As you know, the Windows File Explorer is quite a responsive program and contains tons of features. It allows you to do various customizations by changing Settings or changing the value of a Registry key or Group Policy modification. Either way, you will be guided on how you can enable or disable the Status Bar in File Explorer on your Windows 10 computer.
The Status Bar is located at the bottom of the File Explorer and shows you how many items are inside the folder and how many items you’ve selected. In addition, it also shows you information about each item and can display items using large thumbnails with just a single click.
In order to enable or disable the Status Bar in File Explorer, you can use the two given options below as reference. You can either use the Folder Options or the Registry Editor.
Option 1 – Enable or Disable Status Bar via Folder Options
- Tap the Win + E keys on your keyboard to open File Explorer.
- Then tap the Alt + F keys and click on Options.
- From there, make sure that you are in the View tab and look for the “Show Status Bar” option in the list that gets populated.
- After that, check if the Show Status Bar option is enabled or disabled. It is supposed to be enabled by default so if it is enabled and you want to disable it, just simply uncheck its checkbox otherwise, leave it as it is.
- Now click on Apply and then OK to save the changes made
Option 2 – Enable or Disable Status Bar via Registry Editor
- Tap the Win + R keys to open the Run dialog box.
- Then type “Regedit” in the field and hit Enter to pull up Registry Editor.
- Next, navigate to this registry key: HKEY_CURRENT_USERSoftwareMicrosoftWindowsCurrentVersionExplorerAdvanced
- Afterward right-click on Advanced and select New > DWORD (32-bit) Value and then input “ShowStatusBar as the name of the newly created DWORD.
- Now double click on the new DWORD and change its value to “0” if you want to disable Status Bar and “1” if you want to enable it.
- Then exit the Registry Editor and restart your computer to apply the changes made.
Read More
We have all been there, unfortunately, the application freezes, and sometimes it can even freeze whole windows.
Well if the whole Windows freezes because of the application there is not much we can do except hard reset but if only the application freezes we can still kill it and return the PC in working condition.
The first thing you can try is to press ALT + F4, this shortcut is for closing the program, if the application is frozen Windows will try to close it when using this shortcut, and if it succeeds you will find yourself on the desktop environment in Windows with non-responsive application taken care of.
If however, this fails and the application is not closed, try ending it in the task manager. To open task manager press CTRL + SHIFT + ESC, locate unresponsive application select it, and click on the end task button on the bottom right.
Read More
What Is STOP Code 0x0000008e
The STOP Code 0x0000008E is essentially an error code that is displayed on the STOP message. This STOP message is also commonly known as Blue Screen of Death or BSOD for short. When this error occurs, usually messages like,
“STOP: 0x0000008E” or “KERNEL_MODE_EXCEPTION_NOT_HANDLED”
are displayed to the user.
Solution
Download Available to Completely Repair Error 0x0000008e
Error Causes
These errors are commonly caused by failures of memory hardware. However, viruses, hardware failures or issues with the device drivers may also trigger them.
If this error code appears but Windows is successfully able to recover from it, then the message ‘Windows has recovered from an unexpected shutdown’ is displayed to the users.
Regardless of what causes these errors, it is of paramount importance that counteractive measures are taken as soon as the error appears.
Further Information and Manual Repair
While this error can be removed in many ways, the most effective ones are listed below as follows.
- The screen might be a fluke. Restart your system; the blue screen that appears to you may not be what it seems.
- Have you just modified or installed new hardware or driver? If yes, it is highly likely that the change you have made has triggered the error. If this is the case, it is strongly recommended that you revert back to the original settings and check whether the blue screen appears again or not. If it does, you can fix it by reconfiguring or removing the hardware you have recently installed. You can perform System Restore or you can go back to the previous versions if you have installed a new driver.
- To keep this error from occurring in the future, it is strongly advised that you test your RAM. Damaged memory or one that’s unable to perform in the usual manner is often the reason this error occurs.
- Ensure appropriate installation of your system memory. If you have installed memory in a way other than advised by your memory manufacturer that it may lead to STOP 0x0000008E error or other problems.
- Misconfigured or over-clocked memory settings can cause STOP 0x0000008E errors as well. To remedy this situation, it is best advised to return the BIOS settings to their default level.
- If you haven’t updated your Windows, apply all the updates you come across. Patches and service packs specifically address such issues.
Read More
If you suddenly encountered Error Code 0xc1900130 while trying to update your Windows 10 computer, read on for this post will help you fix the problem. This kind of Windows Update error may occur when the network connection between the Windows Update server and the client machine is interrupted and the install can’t continue since the instance hash was not found. In such cases, you will see the following error message in Settings:
“Failed install attempt – 0xc1900130”
Here are the technical details of the error:
“Error Code: 0XC1900130
Message: MOSETUP_E_INSTALL_HASH_MISSING
Description: The install cannot continue because the instance hash was not found.”
If you are currently facing this problem when you tried to install a Feature Update, you might have to check your internet connection and then try to install the Windows Update again. However, if it didn’t work, then you can refer to each one of the given options below to fix the error.
Option 1 – Reset the Windows Update components
If by any chance that the second option didn’t work, resetting the Windows Update components could also help you resolve the problem. How? Refer to the following steps:
- Open Command Prompt with admin privileges.
- After that, type each one of the following commands and hit Enter after you key in one after the other.
- net stop wuauserv
- net stop cryptsvc
- net stop bits
- net stop msiserver
Note: The commands you entered will stop the Windows Update components such as Windows Update service, Cryptographic services, BITS, and MSI Installer.
- After disabling WU components, you need to rename both the SoftwareDistribution and Catroot2 folders. To do that, type each one of the following commands below, and don’t forget to hit Enter after you type one command after the other.
- ren C:WindowsSoftwareDistribution SoftwareDistribution.old
- ren C:WindowsSystem32catroot2 Catroot2.old
- Next, restart the services you’ve stopped by entering another series of commands. Don’t forget to hit Enter after you key in one command after the other.
- net start wuauserv
- net start cryptsvc
- net start bits
- net start msiserver
- Close Command Prompt and reboot your PC.
Option 2 – Try configuring the Windows Update-related Services
- Tap the Win + R keys to open the Run dialog box.
- Then type “cmd” in the field and tap Enter to open an elevated Command Prompt.
- Next, execute the following commands. Note that you have to type and enter each command one after the other.
- SC config wuauserv start= auto
- SC config bits start= auto
- SC config cryptsvc start= auto
- SC config trustedinstaller start= auto
- The commands you executed will make sure that the Windows Update-related services are available. Once it’s done, restart your computer and see if the Windows Update error is now fixed.
Option 3 – Try downloading and installing the Windows Updates manually
Windows Upgrade Error Code 0xc1900130 might be due to a Windows Update that has failed. So if it is not a feature update and only a cumulative update, you can download the Windows Update and install it manually. But first, you need to find out which update has failed, and to do so, refer to the following steps:
- Go to Settings and from there go to Update and Security > View Update History.
- Next, check which particular update has failed. Note that Updates that have failed to install will be displayed under the Status column which has a label of “Failed”.
- After that, go to the Microsoft Download Center and look for that update using its KB number and once you find it, download and then install it manually.
Note: You can also use the Microsoft Update Catalog, a service from Microsoft that provides a list of software updates that can be distributed over a corporate network. With the help of this service, it can be easier for you to find Microsoft software updates, drivers as well as fixes.
Option 4 – Try to run the Windows Update troubleshooter
Windows 10 have various troubleshooters that can help you resolve many system issues. So if you’re dealing with Windows Update errors like Error Code 0xc1900130, you can run the Windows Update troubleshooter to resolve it.
To run it, go to Settings and then select Troubleshoot from the options. From there, click on Windows Update and then click the “Run the troubleshooter” button. After that, follow the next on-screen instructions and you should be good to go.
Option 5 – Try to flush the DNS cache
You could also try to flush the DNS cache as it might fix the problem. To do so, follow these steps:
- Right-click on the Start button and click on Command Prompt (administrator) so you can pull up an elevated Command Prompt.
- After that, execute the following command to flush the DNS cache
ipconfig /flushdns
- Next, restart your PC and check if the problem’s fixed.
Note: You might also check your internet connection or reboot your router or plug out and then plug in your Ethernet connection manually to verify the reliability of your internet connection since intermittent connection could also cause Windows Update errors like Error Code 0xc1900130.
Read More
If you always use Google Chrome when browsing the internet, then you might have come across an error saying, “This webpage is not available, DNS PROBE FINISHED BAD CONFIG”. If you do, then this problem certainly has something to do with the DNS since any error code which has “DNS” in it points out a network issue in the computer.
Getting the DNS_PROBE_FINISHED_BAD_CONFIG error indicates that your computer is not able to connect the website because the Domain Name Server or DNS wasn’t able to resolve the website name into IP address or it is not available at all. So in this guide, we’ll help you sort out this issue in Chrome on your Windows 10 PC.
Option 1 – Check the Network Cables and restart your router then reconnect
The most obvious thing you can do first is to try checking if the network cables connected to your computer or router are properly connected or not. If it turns out that some network cables are not connected properly, then it’s probably why you’re getting the DNS_PROBE_FINISHED_BAD_CONFIG error in Chrome.
And if your computer is connected via Wi-Fi, you need to make sure to restart your router once. In addition, you can also forget the Wi-Fi your computer is currently connected to and then try reconnecting again to see if it would work.
Option 2 – Flush the DNS and reset TCP/IP
Flushing the DNS and reset TCP/IP could also help in fixing the DNS_PROBE_FINISHED_BAD_CONFIG error in Chrome. To do so, refer to these steps:
- Click the Start button and type in “command prompt” in the field.
- From the search results that appear, right-click on Command Prompt and select the “Run as administrator” option.
- After opening Command Prompt, you have to type each one of the commands listed below. Just make sure that after you type each command, you hit Enter
- ipconfig /release
- ipconfig /all
- ipconfig /flushdns
- ipconfig /renew
- netsh int ip set dns
- netsh winsock reset
After you key in the commands listed above, the DNS cache will be flushed and the Winsock, as well as the TCP/IP, will reset.
Option 3 – Try to remove the Proxy
You can also try to remove the Proxy as it might also help you in fixing the DNS_PROBE_FINISHED_BAD_CONFIG error. Here’s how you can do it:
- Tap the Win + R keys to open the Run dialog box.
- Then type “inetcpl.cpl” in the field and hit Enter to pull up the Internet Properties.
- After that, go to the Connections tab and select the LAN settings.
- From there. Uncheck the “Use a Proxy Server” option for your LAN and then make sure that the “Automatically detect settings” option is checked.
- Now click the OK and the Apply buttons.
- Restart your PC.
Note: If you are using a third-party proxy service, you have to disable it.
Option 4 – Change the DNS
Try to use the Google Public DNS
If the first option didn’t work, you can try to use the Public DNS by Google and see if it can help fix the DNS error. You have to modify the DNS settings in your system explicitly and use the DNS IP addresses.
- The first thing you have to do is right-click on the network icon in the Taskbar and select Network and Sharing Center.
- Next, click on the “Change Adapter Settings” option.
- After that, search for the network connection that you are using to connect to the internet. Note that the option might be “Wireless Connection” or “Local Area Connection”.
- Right-click on your network connection and click on Properties.
- Then select the new window to choose the “Internet Protocol 4 (TCP/IPv4)” option.
- After that, click on the Properties button and click the checkbox in the new window for the option “Use the following DNS server addresses”.
- Type in “8.8.8” and “8.8.4.4” and click OK and exit.
Option 5 – Clear Chrome’s browsing data
If your browsing data in Chrome hasn’t been cleared for some time now then that might be the reason why you’re suddenly getting the DNS_PROBE_FINISHED_BAD_CONFIG error when you browse the web. To fix this error, you need to clear your web browsing data. Refer to the following steps to do so.
- Tap the Ctrl + Shift + Delete buttons to go to the Clear browsing data section in Chrome.
- Next, set the time range to “All time” and tick all the boxes and then click on the Clear data button.
- After that, restart the Chrome browser and try to open the website you were trying to open earlier.
Option 6 – Try running the Chrome Cleanup tool
In case you don’t know, there is actually a built-in malware scanner and cleanup tool in Chrome that helps you get rid of any unwanted ads, pop-ups, and even malware, as well as unusual startup pages, toolbars, and other things that could affect the performance of the browser.
Read More
If you are starting to get into the “wonderful” world of coding there is a high chance that you have heard of GitHub or Git for short and there is a slight chance that you might be confused about what exactly GitHub is. If this is the case, we are welcoming you to go through our article and find everything about it and why it is so popular and used all around the world.

What exactly is GitHub?
If we want to go all technical and just point the obvious we could say that GitHub is basically a WEB site and cloud service used for storing and managing code in all languages. But to truly understand why you should use GitHub and not Dropbox or any storage service instead you need to understand concepts like Version Control and Git.
Version Control
Version control is meant to help developers to work separately on different parts of codes and update is separately not breaking the original one. Take note that this option is meant when there is a big project and has more than one coder working on it. If you are a solo coder on your personal project this might not be anything groundbreaking for you personally.
But let’s now assume that you are part of a team and that your task is to edit only one function of a project and other people working will also have their tasks. With version control, you could take only part of the code and work on it and once you are finished merge it back into the main repository. All changes in the main code are automatically tracked and can be easily reverted back if needed.
The good stuff is that rolling back can be used only let’s say on a code you submitted and other changes made to the source can be kept. As you can see this makes a very good and efficient working space and a good coding environment.
Git
Git itself is a specific version control system, an open-source version control system to be more precise created by Linus Torvalds in 2005. It is a distributed version control system, which means that the entire codebase and history is available on every developer’s computer, which allows for easy branching and merging.
Currently, over 87% of worldwide developers are using Git on a daily basis.
So GitHub is?
GitHub is a profit company that offers a cloud-based Git repository hosting service, in other words, it automates and makes it easy for everyone to use Git for version control and collaboration. It focuses on user interface and ease of use so even beginner coders can use it right away without any large confusion and using command lines and setting it themselves manually.
GitHub also has a free personal plan in which you can host a public code repository completely free. This option placed GitHub very popular with open source projects.
If you are a company you can purchase a plan to have a private code repository shared only to members of your team or company.
Conclusion
As stated almost every developer on a planet uses some version of Git, many of them are on GitHub and there is a lot of open source projects on it. Some employers even ask to see your GitHub repository when deciding if they want to employ you, think of it as a portfolio for coders.
There is not a single disadvantage and not a single argument against using it, especially it has a personal free option. So if you want to look better and more professional in the coding world go, make an account and place some code on it, share it with the world, and see how it goes. You might even get some help on projects from other coders if you need it.
Read More
Installing a Windows 10 upgrade is definitely not an easy task since the process is not always smooth sailing and you could encounter some errors when doing so. This isn’t unusual since there are various software configurations and hardware configurations as well as services it depends on in order to properly work. So if any of them malfunctions or becomes corrupted, it will affect the process which will result in errors like the error code 0x80300002. When you encounter this kind of Windows Update error, you will see the following error message on your screen:
“We couldn’t install Windows in the location you choose. Please check your media drive. Here’s more info about what happened: 0x80300002”
You can encounter this kind of error if there is corruption in the partition table of the drive where the installation is in progress. In addition, corruption on the Media device could also cause this problem. So if you encounter this error when running Windows Setup, read on as this post will guide you in fixing it.
There are several ways to resolve this issue. The first thing you can do is to verify the compatibility between the BIOS and the installation media. You could also try recreating all the partitions as well as recreating the bootable USB drive. For more detailed information, follow the given options below.
Option 1 – Check if the BIOS is compatible with the installation media
The first thing you can do to fix the error is to check if there are any compatibility issues between the BIOS and the installation media you’re using. This is actually one of the most likely reasons why you’re getting the error since this is a complicated point for the Windows installation process. If the installation media is based on GPT, then your BIOS must be based on UEFI. So if you have your bootable media with the MBR partitioning, you need to set your BIOS to Legacy.
- In the Windows Search box, type “command prompt” and from the search results that appear, right-click on Command Prompt and select the “Run as administrator” option.
- After that, execute this command: exe /convert /allowfullOS
- Now, wait until the process is completed since you can track its process on your screen.
- Once it’s done, go to Settings > Update & Security > Advanced Startup options and from there, click on Restart Now. This will restart your computer and give you advanced options.
- Next, select Troubleshoot > Advanced Options where you will see further options including System Restore, Startup Repair, Go back to the previous version, Command Prompt, System Image Recovery, and UEFI Firmware Settings.
- Now select the “Legacy” option. This will take you to the BIOS. Boot Mode is typically available under Boot > Boot Configuration. Once you’re there, set it to Legacy and then save the changes you’ve made. After that, your computer will restart.
Option 2 – Try recreating a new bootable drive
- Insert your USB drive into your PC.
- Tap the Win + R keys to open the Run dialog box and type in “cmd” and tap Enter to open the Command Prompt. Alternatively, you can also search for “cmd” in the Cortana search box to open Command Prompt.
- Once you’ve opened CMD, type in this command to open the DISPART utility – diskpart
- After that, you should see a new black and white window that would say, “DISKPART>”.
- Next, type in “list disk” in the command line and tap Enter to see the list of all the Storage devices as well as your hard disk connected to your PC. Here, you have to identify your disk’s number.
- Type in this command where “X” is the disk number you have identified and then tap Enter – disk X
- Type in this command and hit Enter to clear the table records and all the visible data on the drive – clean
- Now you have to recreate a new primary partition of the drive so you’ll have to type in this command and tap Enter right after – create part pri
- A new primary partition has been created so you have to select it by typing this command and tapping Enter – select part 1
- Now you have to format it to make it visible to normal users by typing – format fs=ntfs quick
Note: If your platform supports the Unified Extensible Firmware Interface or UEFI, replace the “NTFS” with “FAT32” in the command on Step 10.
- After that, type in this command and tap Enter after – active
- Finally, type this command and hit Enter to exit the utility – exit
- After you prepare the image for the operating system, save it to the root of your USB Storage device.
Option 3 – Try to recreate all the partitions
If none of the first two options given above worked, then you can try to recreate all the partitions instead. All you have to do is restart the Windows installation process and wait until you get to the part that says, “Where do you want to install Windows?”. From there, you will see options like delete, format, extend, create new partitions, and many more. Now you have to select the Delete all the partitions options and then use the “New” button to create new partitions. Just make sure that you have one primary partition at least where you can install Windows 10. After that, continue the installation of Windows on the new partition. Keep in mind that when you create a new partition, it also recreates the partition table configuration which means that the chances of getting an error are very unlikely.
Read More
Copyright © 2023, ErrorTools. All Rights Reserved
Trademark: Microsoft Windows logos are registered trademarks of Microsoft. Disclaimer: ErrorTools.com is not affiliated with Microsoft, nor claims direct affiliation.
The information on this page is provided for information purposes only.