
The “Windows Sandbox Failed to Initialize” error is a message that users may encounter when attempting to launch the Windows Sandbox feature on their Windows operating system. Windows Sandbox allows users to run applications in an isolated and secure environment. When users see the “Windows Sandbox Failed to Initialize” error, it means that there is an issue preventing the proper startup of the Windows Sandbox environment. In this guide, we’ll fix the Windows Sandbox Failed to Initialize error on Windows 11/10, the causes behind this error, and straightforward solutions to get your Windows Sandbox back on track.
Page Contents
Here are common reasons for the Windows Sandbox failed to initialize error:
- Virtualization not enabled: Virtualization needs to be enabled in the BIOS/UEFI settings.
- Hyper-V conflicts: Hyper-V may conflict with Windows Sandbox. Ensure only one is enabled at a time.
- Windows Sandbox feature not installed: The Windows Sandbox feature must be installed through the Windows Features menu.
- Windows Update: Ensure the Windows operating system is up to date with the latest updates.
- Third-party software conflicts: Some third-party antivirus or security software may interfere with Windows Sandbox.
- Hardware requirements: Check if the system meets the hardware requirements for Windows Sandbox.
- Graphics driver issues: Outdated or incompatible graphics drivers can cause problems with Windows Sandbox.
Below are several effective solutions to fix the “Windows Sandbox Failed to initialize” error:
Solution 1: Run the Windows Services Required by Sandbox
1. Press the Windows key + R. Type “services.msc” and click OK.
2. Right-click on the “Hyper-V Remote Desktop Virtualization Service” option and select “Properties”.
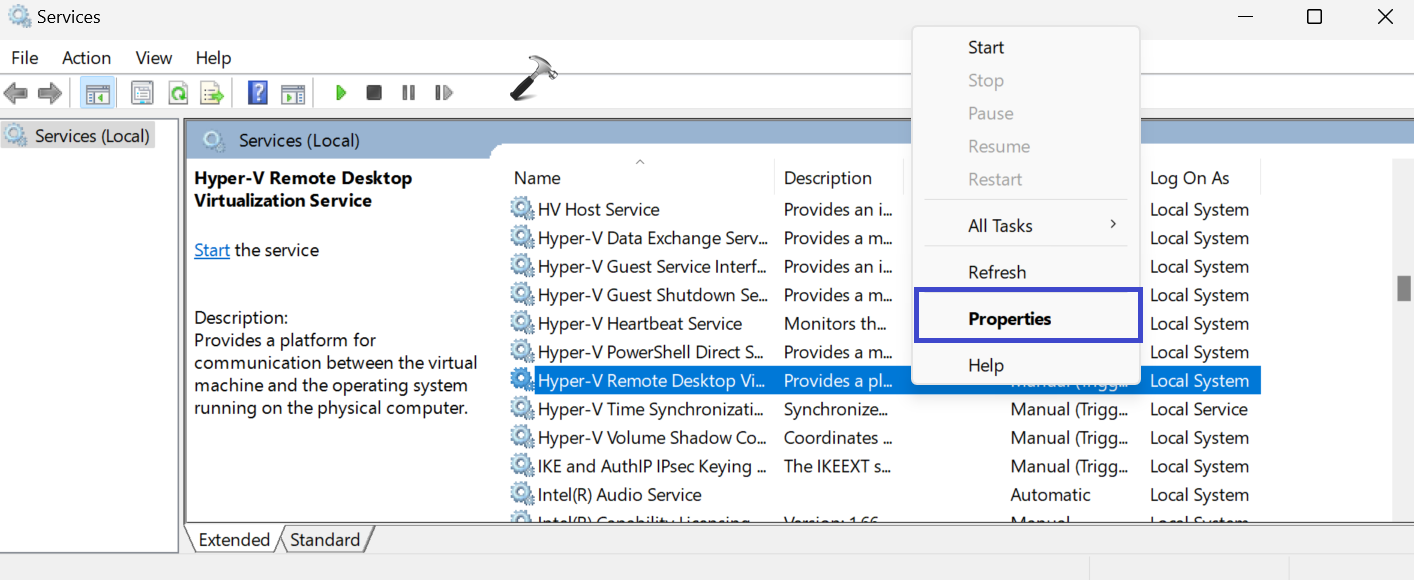
3. Make the startup type “Automatic” and then click on the “Start” button.

4. Click OK followed by Apply.
Solution 2: Use Built-in Troubleshooting Tools
1. Open the Command Prompt and run as administrator.
2. Type the following command and press Enter:
msdt.exe -id DeviceDiagnostic

Press Enter.
3. This will open the Device Diagnostic troubleshooter. (See the below image)
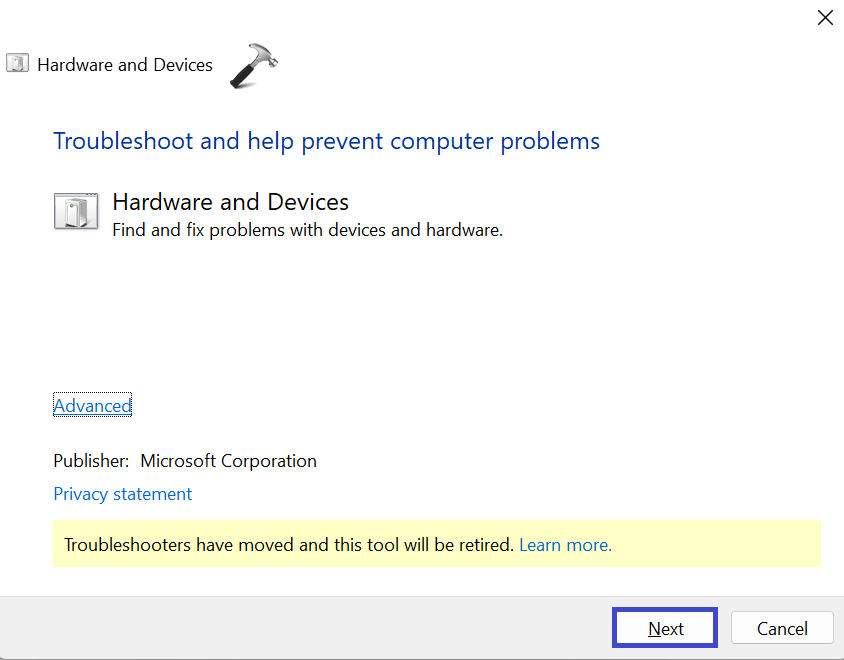
Click Next.
Follow the on-screen instructions to troubleshoot the problem.
Solution 3: Restore Windows
1. Open the search bar and type “Create a Restore Point” and select “Best match“.
2. Under the System Protection tab, click on the “System Restore” option. Press Next.
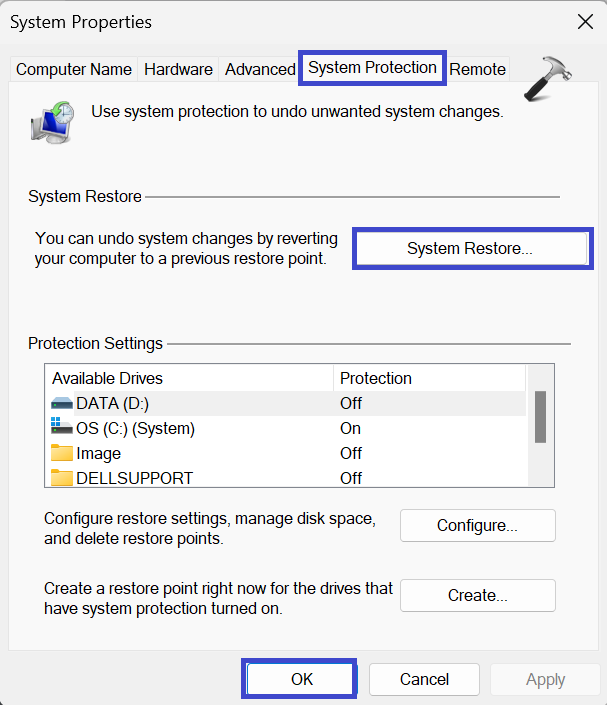
3. Now, select “Show more restore points“.
4. Select the preferred restore point and then click Next.
5. Finally, click the “Finish” option.
Solution 4: Update Your Device
1. Open the Settings App and go to Windows Update.
2. Now, click on “Check for Updates“.

3. If there is any update available, then update your device.
Solution 5: Restart Hyper-V on Windows Features
1. Press the Windows key + R. Type “optionalfeatures” and press Enter.
2. Expand the Hyper-V option.
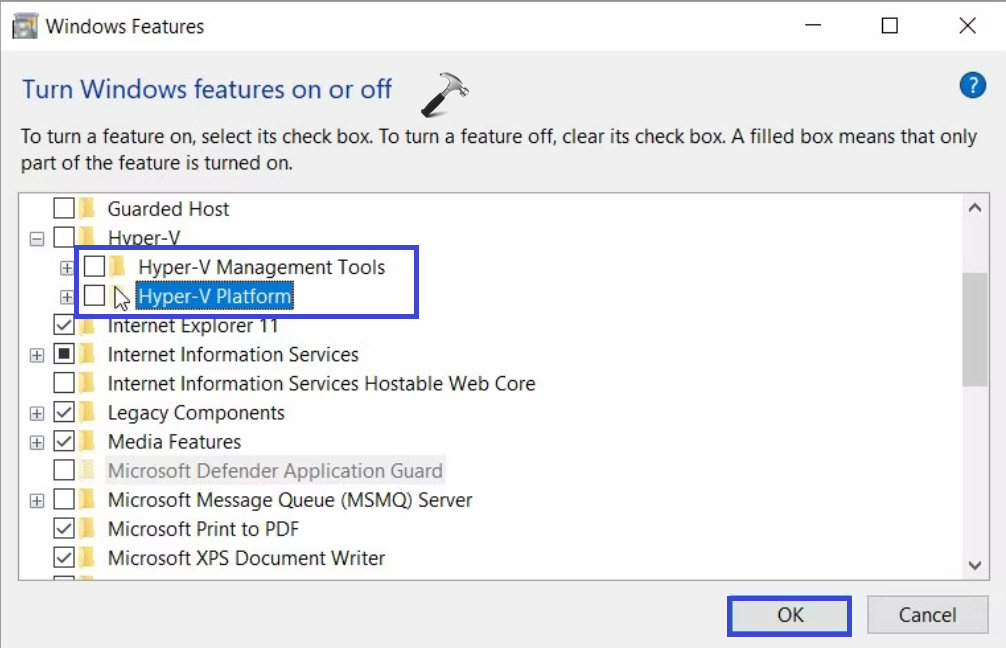
3. Uncheck the “Hyper-V Management Tools” and “Hyper-V Platform” options.
4. Click OK.
Solution 6: Repair Corrupted or Missing System Files
1. Open the command prompt and run as administrator.
2. Copy and paste the below command:
DISM /Online /Cleanup-Image /ScanHealth
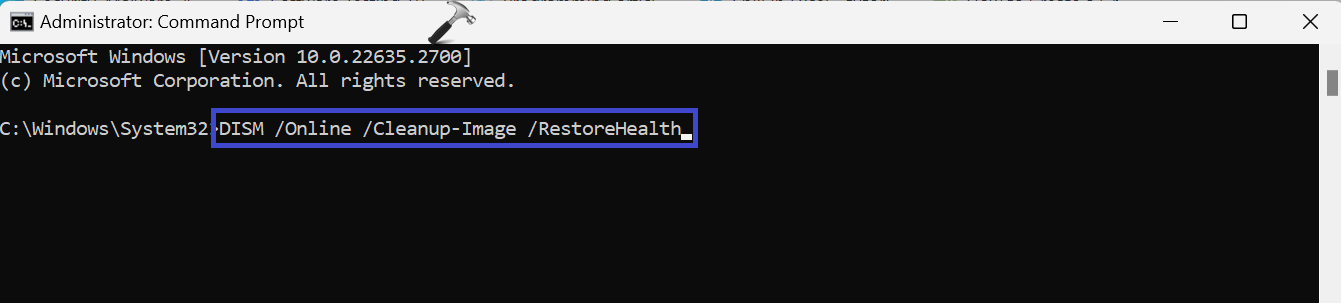
Press Enter.
Wait for the command to execute.
3. Now, copy and paste the below command:
sfc /scannow
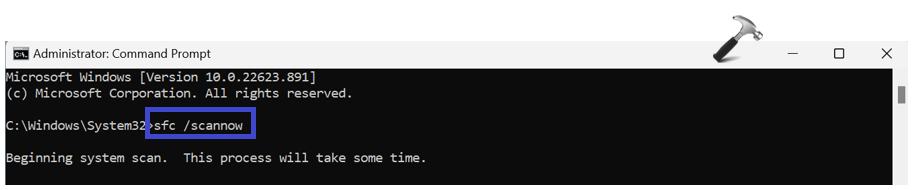
Press Enter.
4. Restart the PC after executing the above commands.
Solution 7: Disable/Re-Enable Windows Sandbox Tool
1. Press the Windows key + R. Type “optionalfeatures” and press Enter.
2. Uncheck the “Windows Sandbox” option. Click OK.
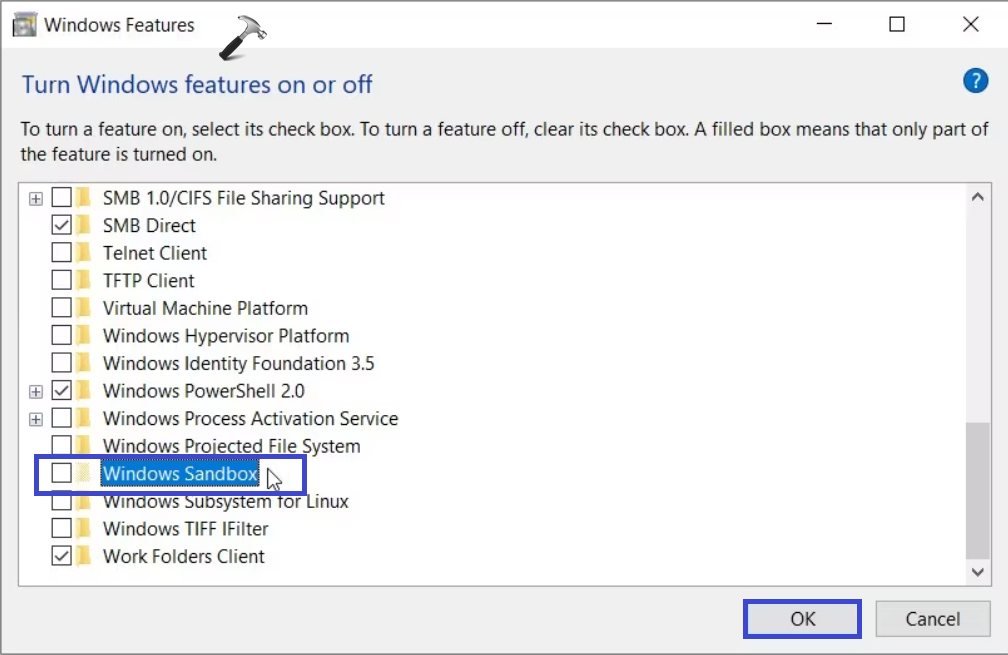
3. A dialog box will appear. Select the “Restart now” option.
4. When the device boots up, check the “Windows Sandbox” box.
5. Again, a dialog box will appear. Select the “Restart now” option.
That’s It!
RELATED ARTICLES
Although Windows 10 is one of the most preferred operating systems, it is not free of errors at all. One such common error is Configuration system failed to initialize which occurs in your computer when you boot your PC, open a recently installed application or an old application after an update or modification. As of now, there are no particular reasons that cause this error, yet how to fix configuration system failed to initialize Windows 10 is very simple. Sometimes, a third-party application prevents the programs to be opened up, and in another case, the .NET framework also triggers this error. Nevertheless, the steps to fix the problem are instructed in this article. Continue reading and get benefitted!

Table of Contents
Here are some reasons that cause Configuration system failed to initialize error in your Windows 10 PC.
- Corrupt program files or components in PC
- The configuration files are incompatible
- Outdated applications, drivers, and Operating systems
- Presence of malicious programs on PC
- Conflicts in the user account
- Corrupt Windows installation files
Now, move ahead to the troubleshooting methods that will help you fix how to fix failed to initialize errors. In this section, you will come through some amazing troubleshooting hacks that will help you fix Configuration system failed issue in your Windows 10 PC. Follow them in the same order to get benefited.
Method 1: Repair System Files
If there are any bad configuration files on your computer, several conflicting errors occur. These corrupt bad configuration files may raise to due incomplete installation files, improper shutdown of your PC, and due to virus attacks. To prevent integrity violations, you have to run SFC (System File Checker) and DISM (Deployment Image Servicing and Management) scans. These two inbuilt repair tools can be executed very easily with a set of command lines as instructed in our guide How to Repair System Files on Windows 10. If you are confused about how to fix failed to initialize, follow as instructed in our guide and check if the issue is resolved or not,

Once all the corrupt configurations are repaired on your PC, check if how to fix failed to initialize issue is fixed. If you face it again, move to the next troubleshooting method.
Method 2: Modify Configuration Files
The Configuration system failed to initialize error occurs due to bad configuration files of the Microsoft framework. The .NET framework has a large storage of class libraries and it is responsible for language interoperability across several applications. So, many applications rely on these files for their normal function. All you need to do is to ensure whether the first child of the config file is the configSections element. Follow as instructed to do the same.
Note: Before you go with these troubleshooting steps, install Notepad ++ on your PC. The steps demonstrated here make use of Notepad. Follow the same with your newly installed Notepad ++ version.
1. Press Windows + E keys together to open File Explorer.
2. Now, navigate to the following location path.
C:\Windows\Microsoft.NET\Framework64\v4.0.30319\Config
Note: The version v4.0.30319 may vary according to the framework on your PC.

3. Now, right-click on the config file of the application or program that causes you the trouble and choose the Edit with Notepad++ option.

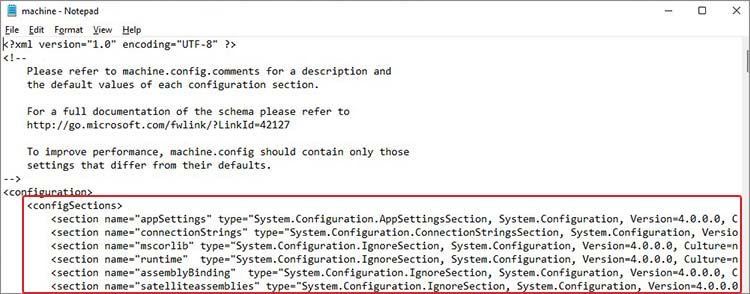
4. In the config file, go to the <configuration> element. Make sure the first child below this element is <configSections>.

5. If you find some other child elements after <configuration>, remove all the entries between <configuration> and <configSections>.
6. Save your changes by hitting Ctrl + S keys together and close all the windows.
7. Finally, reboot the PC.
Also Read: How To Install Hex Editor Notepad++ in Windows 10
Method 3: Delete Config File of Application
In any case, if the configuration file of the application is corrupt or damaged, you may face failed to initialize error. In this case, you have to delete the configuration files of your application and try relaunching it. Don’t worry! When you restart your application, the configuration files will be automatically created and hopefully, the issue will be fixed now.
1. Launch the File Explorer as shown in Method 2.
2. Now, move to the following location paths.
C:\Users\USERNAME\AppData\Local
C:\Users\USERNAME\AppData\Roaming
Note: Make sure you check the Hidden items box in the View tab to view the AppData folder.

3. Now, in both the locations, right-click on the application folder (that causes you the trouble) and click on the Delete option.
Note: You can also rename or move the folder to some other location if you want it back.

Method 4: Run Malware Scan
Many applications when downloaded from unauthorized sites, are subjected to virus attacks and malicious contents on your PC. Several tech experts suggest that, before running a newly installed application from your device, run a malware scan that could prevent any harmful attacks. If you do not know how to scan your PC, check our guide How do I Run a Virus Scan on my Computer? and follow as instructed.

Also, if you want to remove malware from your computer, follow our guide How to Remove Malware from your PC in Windows 10. This will help you learn how to fix Configuration system failed to initialize Windows 10.
Also Read: 26 Best Free Malware Removal Tools
Method 5: Modify Antivirus Settings
Sometimes, your antivirus program will prevent any application or program from being opened on your computer, considering it a threat. There are several third-party antivirus programs available online. If you have installed one of them, you have to either whitelist the app in your antivirus program or disable it temporarily.
Option I: Whitelist Apps
Firstly, let us check how to fix failed to initialize by whitelisting the conflicting app in your antivirus program.
Note: Here, Avast is taken as an example, follow the steps according to your antivirus program.
1. Press the Windows key, type avast and click on Open.

2. Now, click on the Menu option in the right corner as depicted.

3. Select Settings from the drop-down list.
4. Now, in the General tab, click on the Blocked & Allowed apps tab, and in the right pane, click on ALLOW APP under the List of allowed apps field.

5. Now, click on ADD > option corresponding to the application to add the application to the whitelist.
Note: Here App Installer is taken as an example, follow the steps according to your application.

Note: You can browse for the app installation path by selecting the SELECT APP PATH option.
6. Finally, click on ADD to confirm the prompt, and now, you have added your application to Avast Whitelist.

Note: Here, you may check/uncheck the Avast features (like Ransomware Shield) depending upon your convenience.
7. If you want to remove the app (later if you wish) from the Avast whitelist, then click on the three-dotted icon in the main Settings window. You will see two options over here. Click on Remove.
- Change allowed features: You can modify the features that you have enabled while whitelisting the program.
- Remove: Remove the app from the Avast whitelist.

Option II: Disable Antivirus Temporarily (If Applicable)
If whitelisting the app does not help you fix the problem, then you can try how to fix configuration system failed to initialize Windows 10 by disabling the antivirus app temporarily, as instructed in our guide How to Disable Antivirus Temporarily on Windows 10.

Once you can run the conflicting application on Windows 10 PC, make sure to re-enable the antivirus suite since a PC without a security suite is always a threat.
Method 6: Disable Windows Defender Firewall (Not Recommended)
Similar to an antivirus program, the inbuilt firewall security suite in your computer might block some applications due to some security reasons. So, you may face a Configuration system failed to initialize issue. If there are any features and rights that are blocked by Windows Defender Firewall, check our guide How to Disable Windows 10 Firewall, and follow the same instructions. Usually disabling the defender suite is not recommended due to threat attacks. So, some users prefer to allow an app or program in the Windows Defender Firewall whitelist. Follow our guide Allow or Block Apps through the Windows Firewall if you want to whitelist any app on Windows Firewall.
Note: Always re-enable Windows Firewall once you have fixed any conflicts with your Windows 10 apps and programs. This helps you prevent any malicious attacks.

Also Read: Fix Stuck on Preparing to Configure Windows 10
Method 7: Update Windows
To maintain and support any features in your Windows PC, Microsoft provides a free service of updates. This helps you fix any bugs and errors within the PC and it improves the end-user experience and PC performance. This Windows update service also helps you update the drivers within the device. Every second Tuesday of the month is called Patch Tuesday since several security updates and patches are released on this day. Here are a few points you should know.
- You can decide for yourself whether you have to install the updates manually or automatically. We suggest you configure automatic updates for any important applications and manually update any optional updates.
- You can also check the history of updates by referring to the update history. Here, you can see the entire history of installed updates along with the date and time.
Hence, ensure if you have updated your Windows Operating System and if any updates are pending in action, use our guide How to Download and Install Windows 10 Latest Update

After updating your Windows Operating System, check whether how to fix configuration system failed to initialize Windows 10 is resolved.
Method 8: Update Device Drivers
To ensure your hardware communicates with your software smoothly, you must check whether all the drivers in your device are updated to their latest version. You can manually update your drivers from the official site of the manufacturer for every single hardware in your Windows 10 PC. You can also rely on a third-party device driver updater application to do this task. Any, faulty or corrupt drivers lead to the discussed issue and to deal with how to fix Configuration system failed to initialize Windows 10 issue, update your drivers. Many users have reported that updating network drivers have helped them fix the issue. You are advised to update WLAN drivers (network drivers ) to enhance the reliability of the network adapters, fix compatibility issues, and resolve the discussed issue. Follow our guide on How to Update Network Adapter Drivers on Windows 10 to do so.

Once you have updated the drivers on your PC, check if how to fix failed to initialize is resolved.
Also Read: Fix Your Computer Appears to be Correctly Configured but DNS Not Responding in Windows 10
Method 9: Create New Local Account
If the above-listed solutions do not help you learn how to fix Configuration system failed to initialize Windows 10, there are a few possibilities that you might have some issues with the user account. In this case, you are advised to create a new local account. Confused about what is a local account? A local account on your PC does not collaborate with your Microsoft email. It just has a username and password credentials. If your current local account/ administrator account is corrupt or has any wrong configurations, read our guide How to Create a Local User Account on Windows 10, and follow as instructed. If you do not face Configuration system failed to initialize issue in your new local account, you can transfer all your data to the new account and remove the conflicting account safely from your device.

Method 10: Reinstall Device Drivers
Sometimes, you may find all the device drivers are in the latest version, but still, you are facing the same trouble. In this case, your drivers are not compatible with the current drivers due to some incompatibility issues. To deal with any incompatibility problems that occur in drivers, you can reinstall them. The steps to reinstall drivers are very easy and you can do the same by following the instructions given in our guide How to Uninstall and Reinstall Drivers on Windows 10 to reinstall drivers in your Windows 10 computer.

After reinstalling network drivers, check if how to fix configuration system failed to initialize Windows 10 is resolved.
Also Read: Fix the Wireless Autoconfig Service wlansvc Is Not Running in Windows 10
Method 11: Roll Back Device Driver Updates
If the current version of device drivers is not compatible with your PC, you will face Configuration system failed to initialize issue. Restoring them to the previous version will help you in some cases. This process is called rollback of drivers and you can implement the steps to roll back drivers as instructed in our guide How to Rollback Drivers on Windows 10.

After your Windows 10 computer has installed the previous version of drivers, check if how to fix failed to initialize is resolved.
Method 11: Perform Clean Boot and Uninstall Unwanted Apps
If all the listed methods in this article do not help you get an idea of how to fix failed to initialize issue, try clean booting your PC. The clean boot of the PC activates only a minimal set of drivers and programs. The most essential drivers and services are enabled while others are disabled. Boot your PC in safe mode and launch your application. Check if it works for you. If this works, enable the apps one by one and identify the culprit which application is causing you the trouble. Once you have found which program is the culprit, try uninstalling it. If you do not know how to clean boot your PC in safe mode, check our guide How to Perform Clean boot in Windows 10, and implement the same steps are instructed.

Once you have booted your computer in safe mode, check if you can open the application without any errors. If so, then uninstall any recent program or application you have added to your computer. Follow the below-mentioned steps to uninstall any apps and programs on your Windows 10 computer.
1. Press the Windows + I keys together to open Windows Settings.
2. Now, click on Apps.

3. Now, search and click on the app and select Uninstall option.
Note: Here, the Minecraft launcher is taken as an example.

4. Now, confirm the prompt if any, and reboot your PC once you have uninstalled the app. Once you have uninstalled the app, check if you can open your app.
Also Read: Fix: The Boot Configuration Data File Doesn’t Contain Valid Information
Method 12: Reset PC
If none of the methods have helped you deal with how to fix failed to initialize, then you have to clean install your Windows Operating System. This process deletes all of your hard disk data and installs a new copy of Windows 10. But, you have to back up your data, download all the necessary device drivers, be aware of system requirements, check Windows 10 activation, buy a product key, disconnect all attached devices and then begin your process. Follow the given instructions listed below.
- To reset your PC, implement the steps as instructed in our guide How to do a Clean Install of Windows 10.
- Once you have freshly installed a copy of Windows 10, check for an activated copy of Windows 10 in Settings.
- Install all the updates on your device as instructed in Method 7.
This will fix all the issues associated with the device, including the issue that we are discussing now.

Recommended:
- Fix Android Screen Flickering
- Fix Server IP Address Could Not be Found on Windows 10
- Fix There is a System Repair Pending Which Requires Reboot to Complete
- Fix Field Browser Doesn’t Contain a Valid Alias Configuration
That’s the end of the tutorial and I hope by now you will be able to fix configuration system failed to initialize on Windows 10 using the above-listed methods. But if you still have any questions or would like to add anything then feel free to reach out using the comment section.
Issue: Hello. I encounter the error about configuration system failure. The full error – Error: Another instance is running Configuration System failed to initialize – Windows 10. I installed a program a few days ago and this issue bothers me every time I log in on the computer. I can log in, but then the screen goes black. Help me.
Solved Answer
Configuration system failed to initialize in Windows is the problem that is appearing when users[1] try to access the newly installed applications. These error messages state about corrupted system files or wrong configurations. Such a pop-up message and the error can be solved pretty quickly.
The problem comes to the screen at random times and even at the reboot of the machine, but this is a common error that requires some changes to settings and interference with applications. It can be fixed by uninstalling apps, updating the operating system to the latest version[2] and other solutions for the Configuration system failed to initialize error listed below.
Configuration system failure to initialize in Windows is mainly caused by some third-party application that is running on the machine. It is not a malware-related problem.[3] However, previous intruders and security issues on the machine might leave some damage and cause corruption to files.
In most cases, issues with system files that get damaged or corrupted can be fixed automatically and it is recommended to rely on certain tools like FortectMac Washing Machine X9 instead of altering the registry and other pats manually. There might be more difficult issues triggered by the incorrect alterations in such directories on the system. So we offer to run the application designed for the PC repair as the first step.
Then you can move on to the manual solutions below and try to fix the Configuration system that failed to initialize in Windows. You can find a few methods, and we recommend trusting a few of them before you give up entirely because all of them should work for different instances.

#1 Run an SCF scan to fix the Configuration system failed to initialize in Windows
- Type in cmd in Windows search.
- Right-click on Command Prompt and select Run as administrator.
- Type in sfc /scannow and hit Enter.

- The scan will begin – wait till it is complete.
- Once finished, reboot your PC.

#2 Check the Configuration file
Fix it now!
To repair damaged system, you will have a 24hr Free Trial and the ability to purchase the licensed version of the Fortect.
- Press the Windows logo key and E at the same time to open the File Explorer.
- Go to C:\\ Windows \\ Microsoft.NET \\ Framework64 \\ v2.0.50727 \\ CONFIG.
- Right-click on the config file of the app which exist the error.
- Choose Edit.
- When the config file is open, check inside the configuration element, ensure the first child is configSections element.
- Then you can remove the configuration element between <configuration> and <configSections>.
- Save the changes and close the edit window.
- Check if the error still appears.

#3 Delete the old Config file
- Press the Windows logo and E keys to open the File Explorer.
- Go to C: \\ Users \\ username \\ AppData \\ Local \\ appname and delete the app config file.
- Go to C: \\ Users \\ username \\ AppData \\ Roaming \\ appname and delete the app config file.
- Restart your app and check if the error still occurs.
Fix it now!
To repair damaged system, you will have a 24hr Free Trial and the ability to purchase the licensed version of the Fortect.
Repair your Errors automatically
ugetfix.com team is trying to do its best to help users find the best solutions for eliminating their errors. If you don’t want to struggle with manual repair techniques, please use the automatic software. All recommended products have been tested and approved by our professionals. Tools that you can use to fix your error are listed bellow:
do it now!
Download Fix
Happiness
Guarantee
Compatible with Microsoft Windows
Still having problems?
If you failed to fix your error using Fortect, reach our support team for help. Please, let us know all details that you think we should know about your problem.
Fortect will diagnose your damaged PC. It will scan all System Files that have been damaged by security threats. To repair damaged system, you will have a 24hr Free Trial and the ability to purchase the licensed version of the Fortect malware removal tool.
Access geo-restricted video content with a VPN
Private Internet Access is a VPN that can prevent your Internet Service Provider, the government, and third-parties from tracking your online and allow you to stay completely anonymous. The software provides dedicated servers for torrenting and streaming, ensuring optimal performance and not slowing you down. You can also bypass geo-restrictions and view such services as Netflix, BBC, Disney+, and other popular streaming services without limitations, regardless of where you are.
Don’t pay ransomware authors – use alternative data recovery options
Malware attacks, particularly ransomware, are by far the biggest danger to your pictures, videos, work, or school files. Since cybercriminals use a robust encryption algorithm to lock data, it can no longer be used until a ransom in bitcoin is paid. Instead of paying hackers, you should first try to use alternative recovery methods that could help you to retrieve at least some portion of the lost data. Otherwise, you could also lose your money, along with the files. One of the best tools that could restore at least some of the encrypted files – Data Recovery Pro.
The Configuration System Failed to Initialize error is bugging many Windows users, preventing them from running the desired application or program. Majorly, users who have installed any new application on their system are affected. You may receive this error during the app launch and during system reboot (suggesting that even restarting your system won’t help you bypass this bug.) You may also experience other issues such as system malfunctioning and frequent app crashes. Any abrupt data loss due to this error will not affect you if you have data backup available. However, if there’s no backup, you must find ways to fix this error and recover your data immediately. Let’s identify the underlying causes behind the error and then take the right course of action.
Several factors can cause this system error:
- Corrupted or missing system files
- Buggy or outdated Config file required to run the application
- Problematic third-party app or service
- Pending or missing Windows Updates
Fix Configuration System File to Initialize on System Error
Irrespective of the reasons, you can fix this system error by following the shared workarounds.
#1 Run System File Checker Tool
Missing or corrupted system files could be responsible for the Configuration System File to Initialize error and several other errors like SYSTEM_SERVICE_EXCEPTION and PFN_LIST_CORRUPT errors. You can run the System File Checker (SFC) utility, a Windows built-in troubleshooting utility that can replace the corrupted or damaged versions of system files with the correct ones. Thus, solving the error.
- Open Windows Search by pressing Windows + S.
- Type cmd and select the Run as administrator option from the right panel.
- In the elevated cmd window, type SFC/Scannow command and press Enter.
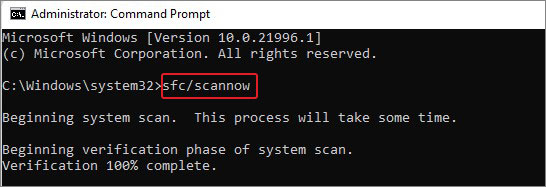
The process may take a while to complete. Once done, see the results; if further instructions are given, follow them. Finally, exit the command prompt and reboot your system to check if the issue is fixed.
Note: Windows 8, 8.1, and 10 users can run DISM/ online /cleanup-image /restorehealth command first and then proceed with SFC Scan.
#2 Check and Delete the Old Config File
Applications require Config files to run correctly. If there’s corruption or another issue within the Config file, you may receive the Configuration failed to initialize error on Windows 11. You can check and then delete the damaged/corrupted Config file with the following steps:
Steps to Check Config File
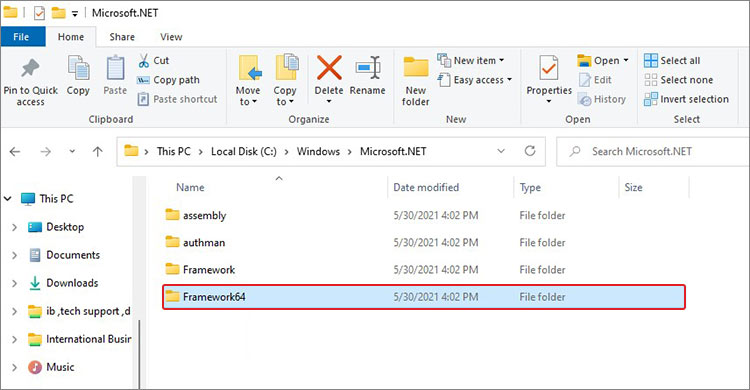
- Go to This PC and open Local Disk (C:).
- Now, follow Windows > Microsoft.NET > Framework64.
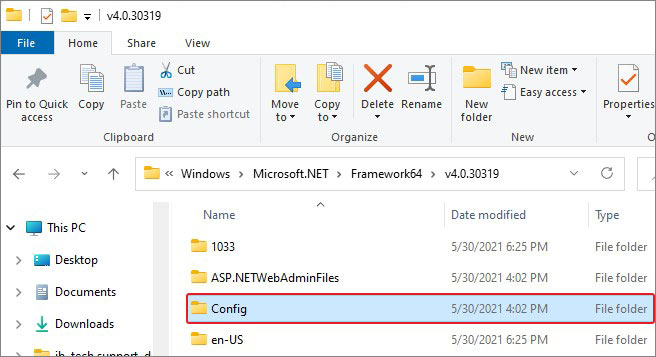
- Now, expand v4.0.30319 folder and look for Config folder.
- Now, double-click on machine.config file.
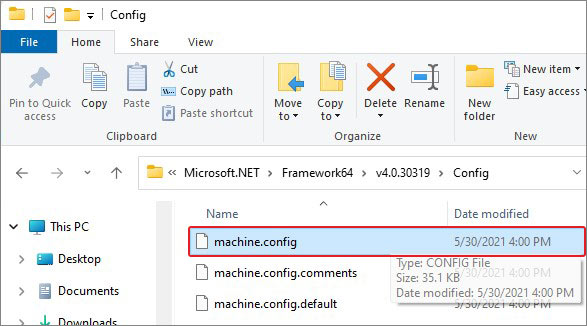
- Click More apps on the next prompt.
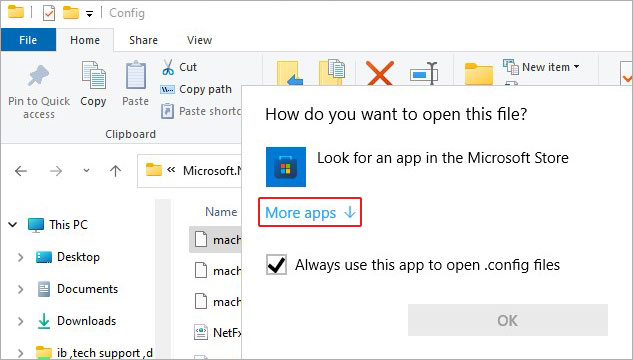
- Select Notepad from the available options.

- Now, check if there’s anything written in between <Configuration> and <ConfigSections>.
Save the change, close the window, and see if the issue resolves. If the error persists, delete the old/corrupted or buggy Config file with the following steps.
Steps to Delete Old/Buggy Config File
- Open File Explorer, go to This PC, and open Local Disk (C:).
- Follow Users > username > AppData > Local > appname.
- There, find and delete the Config file.
Note: If you see a Roaming folder after following Users > username > AppData, that’s normal. Expand the Roaming folder and then go to appname and delete the Config file.
#3 Perform Clean Boot
Sometimes, third-party applications and related services could be the reason behind Configuration System Failed to Initialize error. You can also perform a clean boot with the following steps to solve the issue.
- Access Windows + S to open Windows Search and type msconfig. The System Configuration option will appear in the results; click Open.
- Go to Services tab on the System Configuration window and then click Hide all Microsoft services > Disable all.
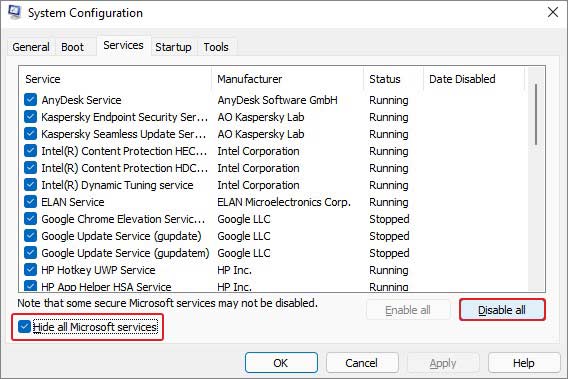
- Click Apply to save the changes.
- Now, move to Startup tab and click Open Task Manager.
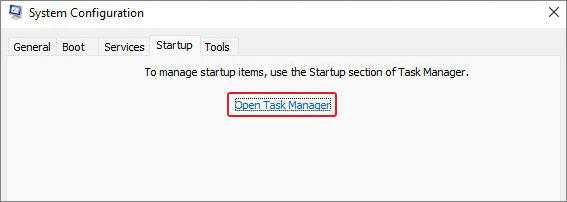
- Select the application with which you face the error and click Disable.
- Once done, close the window and see if the issue is fixed.
#4 Uninstall Problematic Application
If disabling the problematic application doesn’t fix the error, you can uninstall it with the following steps:
- Open Settings by pressing Windows + I and then go to Apps > Apps & features.
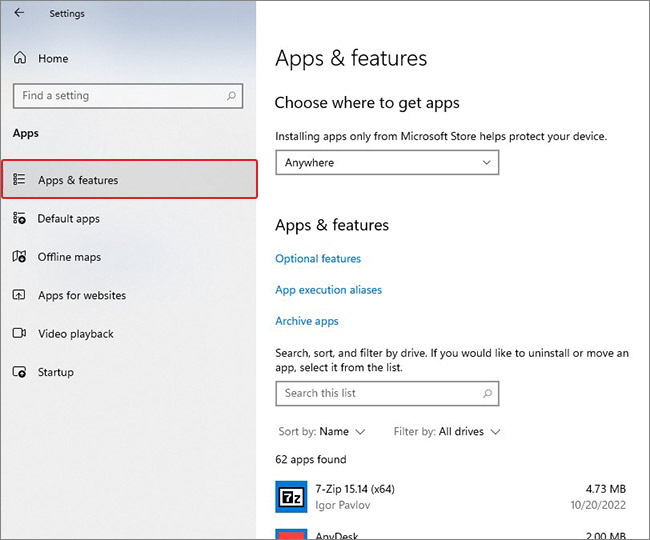
- Look for the buggy application there, select it and click Uninstall > Uninstall.
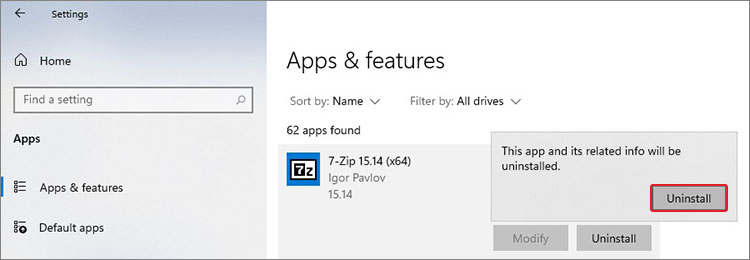
- Finally, click Yes to confirm the deletion.
- Once done, close the window and reboot your system to see if the problem is solved.
#5 Update Windows
Update Windows as a last resort. Outdated Windows may also cause issues with your perfectly running system and apps or services and throw the configuration system failed to initialize error. You can look for the pending updates and install them following the given steps:
- Open Settings (Windows + I) and then follow Update & Security > Windows Update > Install now.
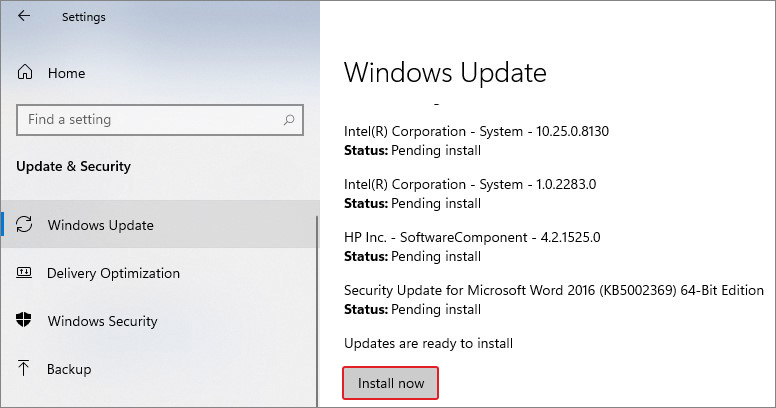
Your system may restart once the updates are installed. Once the system is rebooted, see if the problem is fixed.
Don’t forget that the configuration system failed to initialize is a not-so-common system error. It occurs while you try to run any specific application/program or even at the system boot-up, which means there could be a buggy app, service, or system files responsible for causing this issue. Fortunately, the methods shared above have helped many users overcome the problem.
Remember that since the error can occur at your system boot-up, you may have difficulty accessing your data. Boot your PC in safe mode and use Windows data recovery software to retrieve data. If you’ve the complete backup available, you’re already on the safer side.
People Also Ask
What is Bad System Config Info Error?
Bad System Config error is a BSoD (Blue Screen of Death) category error. This error is also called a system configuration error that contains the bug check value of 0xc0000001. It could occur due to outdated device drivers, faulty hard drives, corrupted Windows registry, etc.
Can I lose data due to system configuration errors?
System configuration errors may prevent you from accessing your device and its data, leading to data loss.
How do I recover my lost data after system error?
System errors can cause issues accessing your programs, services, files and other data. You can use a dedicated data recovery software such as Stellar Data Recovery to recover data even after receiving any error.
Was this article helpful?
YES0
NO
If you see the error message Windows Sandbox failed to initialize, Error 0x800736b3, 0x80070490, etc. on your Windows 11/10 PC, read this post to learn how to fix the issue. Windows Sandbox provides a temporary desktop environment to run untrusted or questionable applications in isolation. It allows users to try out new software or browse potentially unsafe websites without risking the main operating system.

A few users have reported that when they try to launch Windows Sandbox, a message appears on their screen and it fails to start. The complete message reads:
Windows Sandbox failed to initialize.
The above message is sometimes accompanied by different error codes, such as:
Windows Sandbox failed to initialize.
Error 0x80370106. The virtual machine or container exited unexpectedly.
Would you like to submit feedback about this issue?
or,
Windows Sandbox failed to initialize.
Error 0x800736b3. The referenced assembly is not installed on your system
Would you like to submit feedback about this issue?
or,
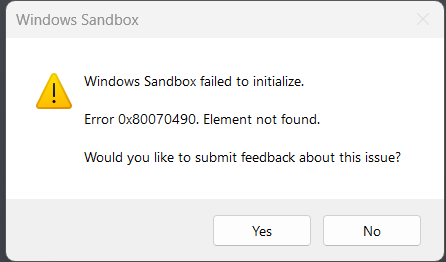
Windows Sandbox failed to initialize.
Error 0x80070490. Element not found
Would you like to submit feedback about this issue?
There’s another variation of the same message that you may encounter on your system. The message reads Windows Sandbox failed to start and is linked to error codes 0x80070002, 0x80070569, 0x800706d9, 0xc0370106, 0x80070057, etc.
Why is my Windows Sandbox not working?
There could be many reasons behind the issue when Windows Sandbox fails to initialize. This may happen when virtualization is not enabled or the Windows Sandbox feature is not enabled on your system. This could also happen due to Hyper-V conflicts, third-party software conflicts, and outdated or incompatible drivers.
If you’re experiencing issues with loading Windows Sandbox on your Windows 11/10 PC, read this post to learn how to fix the issue.
TheWindowsClub has over 15K posts that can help you troubleshoot Windows, and based on our experience, we suggest the following solutions to fix the error message Windows Sandbox failed to initialize, Error 0x800736b3, 0x80070490, etc:
- Check system requirements
- Enable supported components
- Enable relevant services
- Install missing Visual C++ Redistributables
- Reset Windows Sandbox
Let us see this in detail.
1] Check system requirements
First and foremost, make sure your system meets the minimum requirements for Windows Sandbox. It is currently not supported on Windows Home, so make sure you’re running it on Windows 10 Pro or Enterprise, build 18305, or Windows 11 (64-bit version). The rest of the hardware requirements are as follows:
- ARM64 (for Windows 11, version 22H2 and later) or AMD64 architecture
- At least 4 GB of RAM (8 GB recommended)
- At least 1 GB of free disk space (SSD recommended)
- At least two CPU cores (four cores with hyper-threading recommended)
2] Enable supported components
Windows Sandbox relies on virtualization technology to create an isolated environment for installing and running applications, and it requires specific components and processes to function properly. Following are some key components required for running Windows Sandbox:
A] Virtualization Technology: Make sure virtualization is enabled in your computer’s BIOS or UEFI settings. The virtualization technology is usually referred to as Intel Virtualization Technology (VT-x) for Intel processors or AMD Virtualization (AMD-V) for AMD processors. Refer to your system’s documentation for detailed instructions on how to enable virtualization on Windows 11/10.

B] Hyper-V: Hyper-V is a hypervisor-based virtualization software that comes bundled with Windows 10 Pro and Enterprise editions. You need to install and enable Hyper-V on your system for Windows Sandbox to work.
Press Win+R and type ‘optionalfeatures’ in the Run dialogue box. Press the Enter key. In the Windows Features popup, make sure the option for Hyper-V is checked.

C] Windows Sandbox: Certain advanced features, including Windows Sandbox, are disabled by default in Windows. You need to enable Windows Sandbox on your PC before trying to launch the app.

Navigate to Windows Sandbox in the Windows Features popup, and make sure the option is checked. Alternatively, open PowerShell and execute the following command
Enable-WindowsOptionalFeature -FeatureName "Containers-DisposableClientVM" -All -Online
Note: You need administrative privileges to enable and configure Windows Sandbox and Hyper-V. Make sure you have the necessary permissions or log in as an administrator to enable these features.
3] Enable relevant services
A few services (background processes in Windows) are specific to Windows Sandbox and are required for it to function properly. If these services are stopped, you need to start them manually to run the Sandbox environment.
Type ‘services’ in the Windows Search bar and click on the Services app on top of the search results. In the Services window, navigate to Hyper-V Remote Desktop Virtualization Service and double-click on it. Select Automatic under Startup type and click on the Start button. Click Apply and then OK.

Apply the same setting to all Hyper-V services, including:
- Hyper-V Host Service
- Hyper-V Time Synchronization Service, and
- Virtual Disk
4] Install missing Visual C++ Redistributables
Visual C++ Redistributables are necessary code libraries that can prevent Windows Sandbox from initializing if they are missing or improperly installed. You may reinstall them on your PC to ensure the proper working of Windows Sandbox.
Navigate to the official Microsoft Visual C++ download page and download the required version of Visual C++ Redistributables. Double-click on the downloaded files to install them on your PC. Reboot if prompted.
5] Reset Windows Sandbox
Next, try resetting Windows Sandbox to its default state.
Press Win+R, type ‘optionalfeatures’ in the Run dialogue, and click OK. In the Windows Features dialog, scroll down and uncheck the Windows Sandbox option. Click OK and wait for Windows to uninstall and disable the feature. Restart your PC to apply the changes.
Again, open the Windows Features dialogue and check the Windows Sandbox option. Click OK and wait for Windows to install and enable a clean version of Sandbox on your system. Reboot the PC and check if Windows Sandbox is now able to initialize.
If the issue persists, run the SFC and DISM tools to fix corrupt or missing system files. Also, install pending Windows updates if any, and check for software conflicts by running Windows in a clean boot state.
I hope this helps.
Read: How to transfer Files to Windows Sandbox.
Is Windows Sandbox available for Windows 11 Home?
Windows Sandbox is currently supported only on Pro/Enterprise/Education editions. Though it is officially not available for Windows Home, you may install and enable Windows Sandbox in the Home edition using workarounds, provided your system meets the minimum hardware requirements for running Sandbox.
Read Next: Windows Sandbox item is greyed out.