
Applies ToWindows 7 Enterprise Windows 7 Professional Windows Server 2008 R2 Datacenter Windows Server 2008 R2 Enterprise Windows Server 2008 R2 Standard
Symptoms
Consider the following scenario:
-
You have Windows 7 clients in your Windows Server 2008 R2 domain.
-
You apply a Group Policy preferences setting that is filtered by Item Level and that targets a security group.
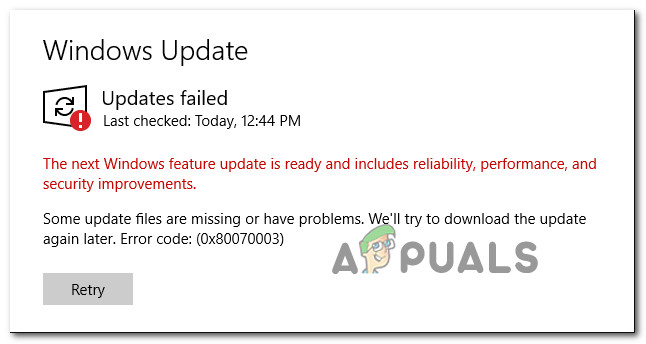
In this scenario, Group Policy processing may fail on the Windows 7 clients, and an environment variable is not set correctly. Additionally, an error that resembles the following is logged in the Application log:
Log Name: ApplicationSource: Group Policy EnvironmentDate: datetimeEvent ID: 8194Task Category: (2)Level: ErrorKeywords: ClassicUser: SYSTEMComputer: Client.Contoso.comDescription:The client-side extension could not apply user policy settings for ‘policy_name‘ because it failed with error code ‘0x80070003’ The System cannot find the path specified
Cause
This problem occurs because of a race condition that may occur when user and computer policies are applied at the same time.
Resolution
Hotfix information
A supported hotfix is available from Microsoft Support. However, this hotfix is intended to correct only the problem that is described in this article. Apply this hotfix only to systems that are experiencing the problem described in this article. This hotfix might receive additional testing. Therefore, if you are not severely affected by this problem, we recommend that you wait for the next software update that contains this hotfix.
If the hotfix is available for download, there is a «Hotfix download available» section at the top of this Knowledge Base article. If this section does not appear, contact Microsoft Customer Service and Support to obtain the hotfix.
Note If additional issues occur or if any troubleshooting is required, you might have to create a separate service request. The usual support costs will apply to additional support questions and issues that do not qualify for this specific hotfix. For a complete list of Microsoft Customer Service and Support telephone numbers or to create a separate service request, go to the following Microsoft website:
Prerequisites
To apply this hotfix, you must have Service Pack 1 for Windows 7 or Windows Server 2008 R2 installed.
Restart requirement
You may want to restart the computer after you apply this hotfix. By default, Group Policy is updated every 90 minutes in the background. If you want Group Policy updated sooner, run the following command after this hotfix is installed:
gpupdate /force
Hotfix replacement information
This hotfix does not replace any previously released hotfix.
The English (United States) version of this hotfix installs files that have the attributes that are listed in the following tables. The dates and the times for these files are listed in Coordinated Universal Time (UTC). The dates and the times for these files on your local computer are displayed in your local time together with your current daylight saving time (DST) bias. Additionally, the dates and the times may change when you perform certain operations on the files.
Windows 7 and Windows Server 2008 R2 file information and notesImportant Windows 7 hotfixes and Windows Server 2008 R2 hotfixes are included in the same packages. However, hotfixes on the Hotfix Request page are listed under both operating systems. To request the hotfix package that applies to one or both operating systems, select the hotfix that is listed under «Windows 7/Windows Server 2008 R2» on the page. Always refer to the «Applies To» section in articles to determine the actual operating system that each hotfix applies to.
-
The files that apply to a specific product, SR_Level (RTM, SPn), and service branch (LDR, GDR) can be identified by examining the file version numbers as shown in the following table.
Version
Product
SR_Level
Service branch
6.1.760 1. 22xxx
Windows 7 and Windows Server 2008 R2
SP1
LDR
-
GDR service branches contain only those fixes that are widely released to address widespread, extremely important issues. LDR service branches contain hotfixes in addition to widely released fixes.
-
The MANIFEST files (.manifest) and the MUM files (.mum) that are installed for each environment are listed separately in the «Additional file information for Windows 7 and Windows Server 2008 R2» section. MUM and MANIFEST files, and the associated security catalog (.cat) files, are extremely important to maintain the state of the updated components. The security catalog files, for which the attributes are not listed, are signed with a Microsoft digital signature.
For all supported x86-based versions of Windows 7
|
File name |
File version |
File size |
Date |
Time |
Platform |
|---|---|---|---|---|---|
|
Gpprefcl.dll |
6.1.7601.22498 |
590,336 |
01-Nov-2013 |
01:59 |
x86 |
For all supported x64-based versions of Windows 7 and of Windows Server 2008 R2
|
File name |
File version |
File size |
Date |
Time |
Platform |
|---|---|---|---|---|---|
|
Gpprefcl.dll |
6.1.7601.22498 |
790,528 |
01-Nov-2013 |
02:49 |
x64 |
|
Gpprefcl.dll |
6.1.7601.22498 |
590,336 |
01-Nov-2013 |
01:59 |
x86 |
|
Gpprefcl.dll |
6.1.7601.22498 |
590,336 |
01-Nov-2013 |
01:59 |
x86 |
For all supported IA-64-based versions of Windows Server 2008 R2
|
File name |
File version |
File size |
Date |
Time |
Platform |
|---|---|---|---|---|---|
|
Gpprefcl.dll |
6.1.7601.22498 |
1,522,176 |
01-Nov-2013 |
01:56 |
IA-64 |
|
Gpprefcl.dll |
6.1.7601.22498 |
590,336 |
01-Nov-2013 |
01:59 |
x86 |
Status
Microsoft has confirmed that this is a problem in the Microsoft products that are listed in the «Applies to» section.
Additional file information for Windows 7 and for Windows Server 2008 R2
Additional files for all supported x86-based versions of Windows 7
|
File name |
Package_1_for_kb2904034~31bf3856ad364e35~x86~~6.1.1.0.mum |
|
File version |
Not Applicable |
|
File size |
1,835 |
|
Date (UTC) |
01-Nov-2013 |
|
Time (UTC) |
07:42 |
|
Platform |
Not Applicable |
|
File name |
Package_2_for_kb2904034~31bf3856ad364e35~x86~~6.1.1.0.mum |
|
File version |
Not Applicable |
|
File size |
1,816 |
|
Date (UTC) |
01-Nov-2013 |
|
Time (UTC) |
07:42 |
|
Platform |
Not Applicable |
|
File name |
Package_for_kb2904034_sp1~31bf3856ad364e35~x86~~6.1.1.0.mum |
|
File version |
Not Applicable |
|
File size |
1,933 |
|
Date (UTC) |
01-Nov-2013 |
|
Time (UTC) |
07:42 |
|
Platform |
Not Applicable |
|
File name |
X86_7f95a9966436155972750a3b648e1d13_31bf3856ad364e35_6.1.7601.22498_none_3cd5909061c43049.manifest |
|
File version |
Not Applicable |
|
File size |
711 |
|
Date (UTC) |
01-Nov-2013 |
|
Time (UTC) |
07:42 |
|
Platform |
Not Applicable |
|
File name |
X86_microsoft-windows-g..ppolicy-policymaker_31bf3856ad364e35_6.1.7601.22498_none_3987a2ddc09910ee.manifest |
|
File version |
Not Applicable |
|
File size |
53,968 |
|
Date (UTC) |
01-Nov-2013 |
|
Time (UTC) |
02:30 |
|
Platform |
Not Applicable |
Additional files for all supported x64-based versions of Windows 7 and of Windows Server 2008 R2
|
File name |
Amd64_18fc96383997d280c9779cdf0a7b3b9e_31bf3856ad364e35_6.1.7601.22498_none_7c03b0e2a73c85ca.manifest |
|
File version |
Not Applicable |
|
File size |
715 |
|
Date (UTC) |
01-Nov-2013 |
|
Time (UTC) |
07:42 |
|
Platform |
Not Applicable |
|
File name |
Amd64_40a072e9153564b7116a7bd79290d120_31bf3856ad364e35_6.1.7601.22498_none_606cd2c193aba444.manifest |
|
File version |
Not Applicable |
|
File size |
715 |
|
Date (UTC) |
01-Nov-2013 |
|
Time (UTC) |
07:42 |
|
Platform |
Not Applicable |
|
File name |
Amd64_7f95a9966436155972750a3b648e1d13_31bf3856ad364e35_6.1.7601.22498_none_98f42c141a21a17f.manifest |
|
File version |
Not Applicable |
|
File size |
713 |
|
Date (UTC) |
01-Nov-2013 |
|
Time (UTC) |
07:42 |
|
Platform |
Not Applicable |
|
File name |
Amd64_afb2997e1f08899bbbd700755cf00e66_31bf3856ad364e35_6.1.7601.22498_none_9c805e27611af343.manifest |
|
File version |
Not Applicable |
|
File size |
1,070 |
|
Date (UTC) |
01-Nov-2013 |
|
Time (UTC) |
07:42 |
|
Platform |
Not Applicable |
|
File name |
Amd64_microsoft-windows-g..ppolicy-policymaker_31bf3856ad364e35_6.1.7601.22498_none_95a63e6178f68224.manifest |
|
File version |
Not Applicable |
|
File size |
53,972 |
|
Date (UTC) |
01-Nov-2013 |
|
Time (UTC) |
03:22 |
|
Platform |
Not Applicable |
|
File name |
Package_1_for_kb2904034~31bf3856ad364e35~amd64~~6.1.1.0.mum |
|
File version |
Not Applicable |
|
File size |
2,049 |
|
Date (UTC) |
01-Nov-2013 |
|
Time (UTC) |
07:42 |
|
Platform |
Not Applicable |
|
File name |
Package_2_for_kb2904034~31bf3856ad364e35~amd64~~6.1.1.0.mum |
|
File version |
Not Applicable |
|
File size |
1,843 |
|
Date (UTC) |
01-Nov-2013 |
|
Time (UTC) |
07:42 |
|
Platform |
Not Applicable |
|
File name |
Package_3_for_kb2904034~31bf3856ad364e35~amd64~~6.1.1.0.mum |
|
File version |
Not Applicable |
|
File size |
2,045 |
|
Date (UTC) |
01-Nov-2013 |
|
Time (UTC) |
07:42 |
|
Platform |
Not Applicable |
|
File name |
Package_4_for_kb2904034~31bf3856ad364e35~amd64~~6.1.1.0.mum |
|
File version |
Not Applicable |
|
File size |
2,055 |
|
Date (UTC) |
01-Nov-2013 |
|
Time (UTC) |
07:42 |
|
Platform |
Not Applicable |
|
File name |
Package_for_kb2904034_sp1~31bf3856ad364e35~amd64~~6.1.1.0.mum |
|
File version |
Not Applicable |
|
File size |
3,123 |
|
Date (UTC) |
01-Nov-2013 |
|
Time (UTC) |
07:42 |
|
Platform |
Not Applicable |
|
File name |
Wow64_microsoft-windows-g..ppolicy-policymaker_31bf3856ad364e35_6.1.7601.22498_none_9ffae8b3ad57441f.manifest |
|
File version |
Not Applicable |
|
File size |
34,836 |
|
Date (UTC) |
01-Nov-2013 |
|
Time (UTC) |
02:15 |
|
Platform |
Not Applicable |
|
File name |
X86_microsoft-windows-g..ppolicy-policymaker_31bf3856ad364e35_6.1.7601.22498_none_3987a2ddc09910ee.manifest |
|
File version |
Not Applicable |
|
File size |
53,968 |
|
Date (UTC) |
01-Nov-2013 |
|
Time (UTC) |
02:30 |
|
Platform |
Not Applicable |
Additional files for all supported IA-64-based versions of Windows Server 2008 R2
|
File name |
Ia64_4f52cb834d7007bfa1648838f7d21ce4_31bf3856ad364e35_6.1.7601.22498_none_b4324014ddc95cd1.manifest |
|
File version |
Not Applicable |
|
File size |
1,068 |
|
Date (UTC) |
01-Nov-2013 |
|
Time (UTC) |
07:42 |
|
Platform |
Not Applicable |
|
File name |
Ia64_microsoft-windows-g..ppolicy-policymaker_31bf3856ad364e35_6.1.7601.22498_none_398946d3c09719ea.manifest |
|
File version |
Not Applicable |
|
File size |
53,970 |
|
Date (UTC) |
01-Nov-2013 |
|
Time (UTC) |
02:25 |
|
Platform |
Not Applicable |
|
File name |
Package_1_for_kb2904034~31bf3856ad364e35~ia64~~6.1.1.0.mum |
|
File version |
Not Applicable |
|
File size |
2,069 |
|
Date (UTC) |
01-Nov-2013 |
|
Time (UTC) |
07:42 |
|
Platform |
Not Applicable |
|
File name |
Package_for_kb2904034_sp1~31bf3856ad364e35~ia64~~6.1.1.0.mum |
|
File version |
Not Applicable |
|
File size |
1,464 |
|
Date (UTC) |
01-Nov-2013 |
|
Time (UTC) |
07:42 |
|
Platform |
Not Applicable |
|
File name |
X86_microsoft-windows-g..ppolicy-policymaker_31bf3856ad364e35_6.1.7601.22498_none_3987a2ddc09910ee.manifest |
|
File version |
Not Applicable |
|
File size |
53,968 |
|
Date (UTC) |
01-Nov-2013 |
|
Time (UTC) |
02:30 |
|
Platform |
Not Applicable |
References
See the terminology Microsoft uses to describe software updates for more information.
Need more help?
Want more options?
Explore subscription benefits, browse training courses, learn how to secure your device, and more.
Have you ever tried updating your system only to get interrupted? If yes then you might have encountered the most common Error 0X80070003. This is a Windows 10 update-related issue that prevents you from getting your hands on the latest update available. Moreover, you might also encounter that some update files are missing or have problems Window 10. This article will discuss how to fix Error 0X80070003 in beginner-friendly ways that are easy peasy lemon squeezy.
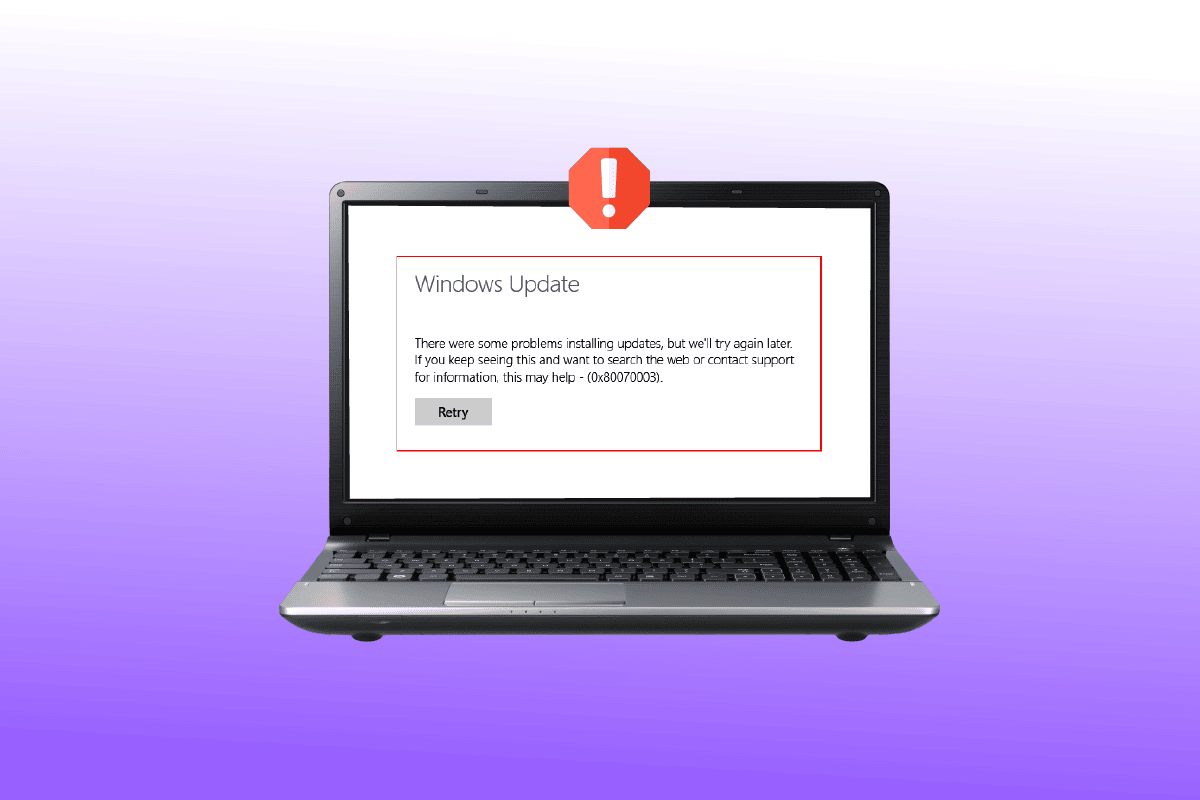
Table of Contents
Windows is one of the most popular operating systems in the world. Reports state that more than 1 billion active devices are operating on Windows 10 and 11. Accordingly, it is likely that you, along with many others, might be facing occasional issues such as the error 0X80070003. This error simply means that some update files are missing or have become corrupted.
What Causes This Error 0x80070003?
Although this is a pretty common error, only a few are aware of its causes. Here is what you need to know:
- Corrupted files: Damaged and inoperable files are the most common causes of error 0X80070003. In this case, all you need to do is get rid of malware and replace damaged files with healthy ones.
- Misconfiguration: Error 0X80070003 often highlights misconfigured files in your system. It can also occur if the Windows update settings are incorrectly configured and need immediate attention.
- Wobbling internet connection: If your internet connection speed is slow and unsteady then your system might fail to download all the files. Therefore, you will get a system update error unless the speed restores shortly. This may also cause windows update some files are missing issue for many users.
- Incorrect windows registry: If the system contains inorganized Windows registry entries then your OS will be unable to locate the necessary files. Consequently, your system will fail to boot correctly and display error 0X80070003.
Do you feel like the error 0X80070003 is driving you up the wall? If yes, this article will help you ease the sores effortlessly. Here are the top 10 ways to fix error 0X80070003 without frittering away your money.
Method 1: Run Windows Update Troubleshooter
If you’re having issues with Windows Update and a large number of pending WU updates are failing to install with the same 0X80070003 error, we recommend running the Windows Update troubleshooter.
If you haven’t used Windows Update Troubleshooter before, it is designed to automatically identify and fix common problems. If you haven’t tried this method before, follow the steps in our guide to run Windows Update troubleshooter and have the suggested fix applied automatically.

When the repair is finished, restart your computer and run the Windows update to see if the problem has been resolved.
Method 2: Modify Registry Keys
You need to follow the below-mentioned steps to modify the registry and fix error 0X80070003 accordingly:
Note: Make a backup of registry keys to restore to previous settings in case of manual errors during modification.
1. Press the Windows + R keys simultaneously to open the Run dialog box.
2. Type regedit and click on OK to launch the Registry Editor.

3. Next, go to the following key folder path in Registry Editor.
HKEY_LOCAL_MACHINE\SYSTEM\CurrentControlSet\Services\WIMMount

4. Click on ImagePath under the Name category and ensure that its Value data states:
system32\drivers\wimmount.sys
5. Now, open File Explorer manually or using the keyboard shortcut Windows + E keys together. paste the following in the address bar and click on OK.
C:\Windows\System32\drivers\
6. Verify the wimmount.sys file and restart your laptop.
Also Read: Fix Windows 10 Update Error 0xc1900204
Method 3: Conduct In-place Upgrade
Do you think manually upgrading the system is labor-intensive work and requires intensive technical know-how? If yes, you will be surprised to know how easy it is in reality:
1. Go to the Windows 10 download page on your browser.
2. Click on the Download too now option to download the Media Creation Tool on your system.

3. Once the download is complete, right-click on it and select the Run as administrator option.
4. Next, click Yes in the prompt and wait while the tool gets everything ready for the main action.
5. Select Accept to consent with the Microsoft License Terms and choose Upgrade this PC now option.
6. Let the download complete and wait for the Choose what to keep option to display. Select keep everything and follow the remaining instructions on your screen to proceed with the upgrade.
Method 4: Restore Old Spupdsvc.exe File
The spupdsvc.exe file is a software component of the Windows 10/11 operating system that can be found in the C:\Windows\System32 folder. It is a process file that periodically updates the Windows operating system. If Windows Update isn’t working, you can try replacing the old Spupdsvc.exe file with a new one. Here’s how to go about it:
1. Hit the Windows key, type Command Prompt, then click on Run as administrator.

2. After typing the following command, press Enter. This will replace the previous Spupdsvs.exe file with a new one:
cmd /c ren%systemroot%System32Spupdsvc.exe Spupdsvc.old Spupdsvc.old

To see if the Window update error 0X80070003 has been resolved, run a Windows update. If this did not help, proceed to the next step to fix some update files are missing or have problems Window 10.
Also Read: Fix Error Code 0xc1800103 0x90002
Method 5: Repair Corrupt System Files
SFC or the System File Checker is an in-built tool that allows you to repair corrupt files. This is how you can get things going and fix error 0X80070003. Check our guide to repair system files on Windows 10.

Method 6: Manually Install Updates
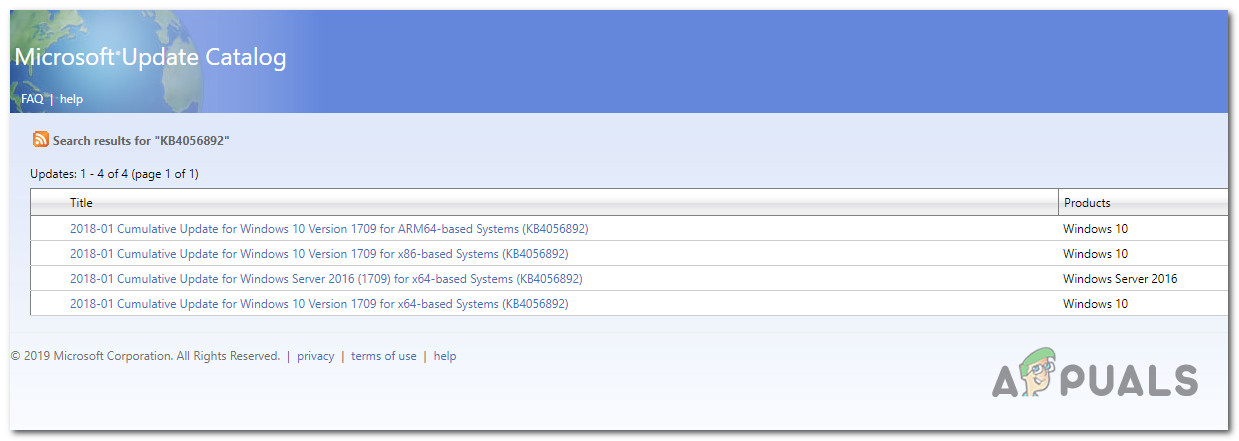
Sometimes you will face this kind of error when the file is not correctly being downloaded. So, you can manually download and install updates from Microsoft Update Catalog to fix error 0X80070003.
1. Hit the Windows + I keys simultaneously to launch Windows Settings.
2. Here, open the Update & Security setting.

3. Then, select the View update history option.

4. In the list, note down the KB number pending to be downloaded due to an error message.
5. Next, go to the Microsoft Update Catalog website.

6. Enter the (Knowledge Base) KB Number in the search bar and click on Search.

7. Select the desired Update from the given list, as shown.

Note: The complete information about the update can be viewed on the Update Details screen.

8. Click on the corresponding Download button of the particular update.

9. In the window that appears, click on the hyperlink to download the respective update.

10. Once downloaded, press Windows + E keys to open File Explorer. Double-click on the .msu file from the folder where it was saved.
11. Choose Open with Windows Update Standalone Installer (default) and click on OK.

12. Click on Yes to confirm and allow Windows to install the desired update.
Note: It may take a few minutes for the installation to be completed, and you will receive a notification.
13. Finally, reboot your PC after saving unsaved data to implement the update.
Also Read: Fix 0x80004002: No Such Interface Supported on Windows 10
Method 7: Reset Windows Update Components
The Windows Update service could be to blame for the Windows 10/11 Update error code 0x80070003. If the Windows Update troubleshooter was ineffective, restart the Windows Update service. Here’s how to go about it:
1. Launch the Run dialog box.
2. Type services.msc and hit the Enter key to open the Services window.

3. Right-click on Background Intelligent Transfer services and click on Stop from their drop-down menus.

4. Load the File Explorer and paste the following in the address bar:
C:\Windows\SoftwareDistribution\Download
5. Next, press Ctrl+A to deal with all the folders at once and press delete.
6. Finally, go back to Services and right-click on Windows Update services, Cryptographic Services, and Background Intelligent Transfer. But this time, select Start from the drop-down menu and get things done.
Method 8: Disable Third-party Antivirus (If Applicable)
To your surprise, many users throughout the globe reported disarming third-party antivirus software useful to fix error 0X80070003. This prevents the software from blocking timely updates and thus, facilitating unobstructed updates. Check our guide to disable Antivirus on Windows 10.

Also Read: How to Fix Windows Update Error 80072ee2
Method 9: Reset Windows 10
It is essential to keep in mind that resetting Windows 10 uninstalls the software which did not came along initially with the device. Therefore, this must be the last resort to some update files are missing or have problems Window 10 issue. Follow the steps given in our guide to reset Windows 10 without losing data.

Recommended:
- 6 Ways to Earn Free Walmart Gift Cards
- How to View Windows 10 Crash Logs and Error Logs
- Fix Error 0x800705b3 in Windows Update
- Fix 0x800f0831 Windows 10 Update Error
Error 0x80070003 has been haunting Windows 10 users for a long time. Although the terms may seem daunting and unintelligible, it is not that tricky. We have mentioned the top 10 best ways to resolve and fix error 0x80070003. We hope this article helped you grasp the basics and eliminate the issue from its root.
Error code 0x80070003 occurs when Windows is trying to install a system update. Deconstructing this error code, the initial four digits (0x800) belong to the system error code range, and the subsequent four digits (0x70003) pertain to a precise error known as (ERR_PATH_NOT_FOUND). This error code has a singular interpretation, which applies specifically when faced with challenges during the update installation process.
Main cause of this error:
As confirmed by Microsoft, The BITS (Background Intelligent Transfer Service), a service that is responsible for configuring and installing Windows update causes this error code when it fails to start properly.
Basically, error 0x80070003 during update installation indicates that Windows is encountering difficulties in locating the necessary files to properly apply the update, potentially due to issues with file paths or references.
Other reported causes of this error:
After we’ve investigated this particular issue thoroughly, it turns out that there are actually several different underlying causes that might end up causing this error code. Here’s a shortlist of culprits:
- Common WU inconsistency: Running the Windows Update Troubleshooter and applying recommended fixes can resolve issues caused by common update inconsistencies.
- Corrupted DataStore logs: Deleting the DataStore.edb file can help if corrupted references in the Windows log file are causing the problem.
- Stuck Windows Update service: Sometimes, essential services get stuck in a limbo state, obstructing update installation. Restarting necessary services through the Services screen can resolve this.
- Corrupted WU dependencies: The error might be due to corrupted Windows Update dependencies. Resetting the entire Windows Update component can address this.
- Broken Windows Update component: If the Windows Update component is malfunctioning, quick fixes include using Microsoft Update Catalog, the Media Creation Tool, or the Windows Update Assistant.
- System File corruption: Corruption affecting WU system files or associated dependencies can lead to the error. Running SFC and DISM scans or utilizing System Restore snapshots can help. In extreme cases, a clean install or repair install might be necessary.
Now that we went over every potential scenario that might end up causing the 0x80070003 error in your case, let’s go over each verified fix in order until you find the method that’s effective in your case.
1. Reset the BITS Service Configuration
As this issue is mainly caused by BITS service failing to start, it indicates that the BITS service is misconfigured. To resolve this issue, we are going to reset the BITS service and it’s configurations to default by following the instructions provided by Microsoft. Follow these steps:
- Right-click on the Start Menu and Press ‘Command Prompt (Admin)‘
- Then put these commands in one-by-one and press enter:
sc config bits binpath= "%systemroot%\system32\svchost.exe –k netsvcs"
sc config bits depend= RpcSs/EventSystem
sc config bits start= delayed-auto
sc config bits type= interact type=own
sc config bits error= normal
sc config bits obj= LocalSystem
sc privs bits privileges= SeCreateGlobalPrivilege/SeImpersonatePrivilege/SeTcbPrivilege/SeAssignPrimaryTokenPrivilege/SeIncreateQuotaPrivilege
sc sidtype bits unrestricted
sc failure bits reset= 86400 actions=restart/60000/restart/120000?
- Now restart your computer and try updating Windows again.
2. Run the Windows Update Troubleshooter
Windows Update Troubleshooter, is designed to automatically identify and fix common Windows Update problems.
If you haven’t tried this method yet, follow the instructions below to run the Windows Update Troubleshooter and apply the recommended fix automatically:
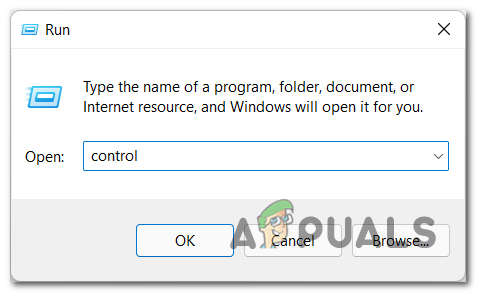
- Open a Run dialog box by pressing the Windows key + R.
- Type ‘control’ inside the text box and press Enter to open up the Control Panel interface.

Accessing the Control Panel Menu Note: You may be prompted by the User Account Control – if so, click Yes to grant admin access.
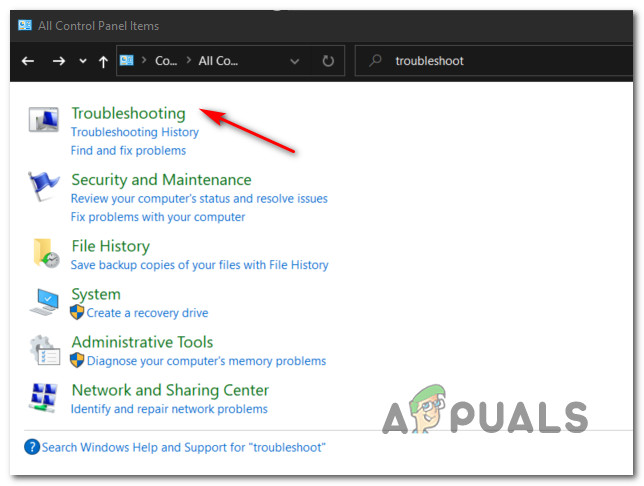
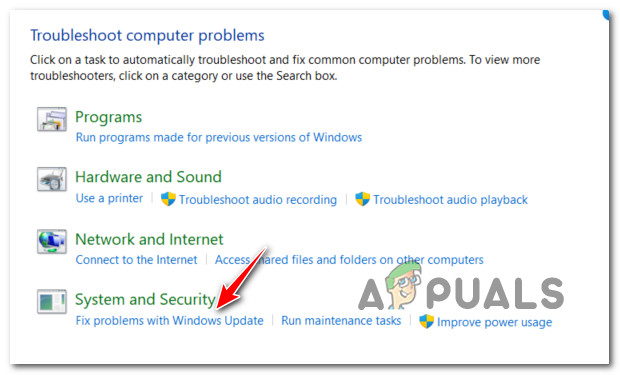
- Once you’re inside the Control Panel window, use the search function to look for ‘troubleshoot’.
- From the list of results, click on all the different categories Troubleshooting.

Accessing the Troubleshooting tab - Go under System and Security and click on Fix problems with Windows Updates.

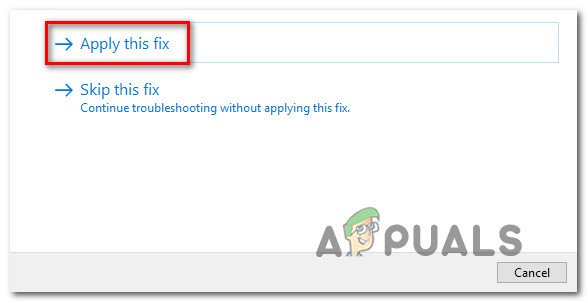
Fix Problems with Windows Update - After you get to the first Windows Update Troubleshooter prompt, click Next and wait for the initial scan to finish.
- If a viable fix is found, click on Apply this fix to apply it to the recognizable scenario.

Apply the recommended fix Note: Keep in mind that with some types of recommended fixes, you might be required to do a series of manual steps.
- After applying the fix successfully, restart your PC and attempt to install the failing update once again.
If the Windows Update still fails to install with the same 0x80070003, move down to the next method below.
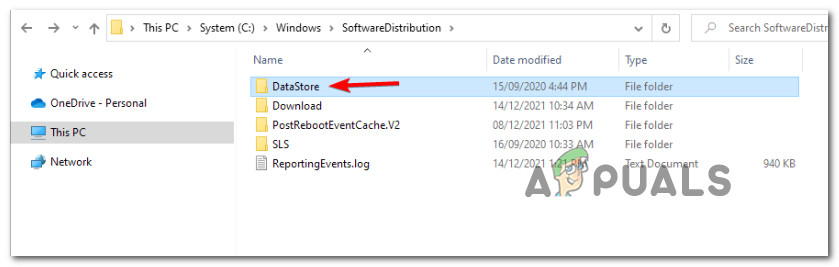
3. Clear the DataStore Folder
- First things first, open up File Explorer by pressing the Windows key + E or by clicking on the appropriate icon inside the taskbar.
- Once you’re inside File Explorer, navigate to the following location:
C:\Windows\SoftwareDistribution
- Once you’re inside the SoftwareDistribution folder, double-click on DataStore.

Accessing the DataStore menu - From the SoftwareDistribution folder, double-click on Download from the list of subfolders.
- Once you’re inside the Download folder, press Ctrl + A to select everything inside, then right-click on a selected item and click on Delete from the context menu.
- After the Download folder of DataStore is completely empty, restart your PC and wait for the next startup to complete.
- After your PC boots back up, attempt to install the pending update once again and see if the problem is now fixed.
In case the same issue is still occurring, move down to the next method below.
4. Restart the main Windows Update Service
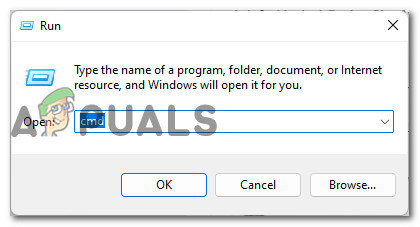
- Press Windows key + R to open up a Run dialog box.
- Next, type ‘cmd’ inside the text box.
- Press Ctrl + Shift + Enter to open up an elevated Command Prompt window with admin access.

Open up a CMD prompt - At the User Account Control prompt, click Yes to grant admin access to the CMD Prompt.
- Type the following commands in the same order and press Enter after each one to effectively restart and re-register the main Windows Update service:
net stop wuauserv
regsvr32 %windir%\system32\wups2.dll
net start wuauserv
- Once every command has been processed successfully, close the elevated Command Prompt and attempt to install the failing update once again.
If the same kind of error is still occurring, move down to the next method below.
5. Reset the Windows Update component
- The first step is to open a Run dialog box by pressing the Windows key and R simultaneously.
- After that, type “cmd” into the text box and press Ctrl + Shift + Enter to open an elevated Command Prompt with admin access.
- Keep in mind that you will need to click ‘Yes’ when the User Account Control prompt appears in order to grant administrative privileges.
- Once you’re in the elevated Command Prompt, use the following commands (in order) to stop all Windows Update-related services:
net stop wuauserv

net stop cryptSvc

net stop bits

net stop msiserver
Note: These commands will effectively stop the Windows Update Services, MSI Installer, Cryptographic services, and BITS services.
- After every relevant service has been stopped, you can clear and rename the SoftwareDistribution and Catroot2 folders by using these commands:
ren C:\Windows\SoftwareDistribution SoftwareDistribution.old
ren C:\Windows\System32\catroot2 Catroot2.old
Note: These two very important folders store updated files used by the WU component. Renaming these folders will force your OS to create new healthy equivalents that will not be affected by corruption.
- Now that the folders have been cleared, run the following commands to re-enable the services we disabled earlier:
net start wuauserv
net start cryptSvc
net start bits
- Restart your PC one final time and see if the 0x80070003 error has been eliminated.
If the same kind of issue is still occurring, move down to the next method below.
6. Install the pending update manually
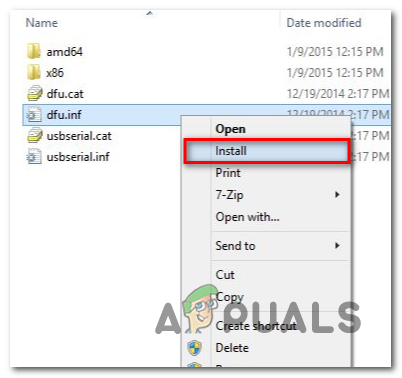
- Start by visiting the home page of the Microsoft Update Catalog (MUC) directory in your preferred browser.
- In the MUC root directory, use the search function to look for the update that’s failing in your particular case (for example KB5005188).

Install the failing update - When the results come up, go through them and choose the appropriate update versions that you need to install, taking into account your current OS architecture and the Windows versions you’re using.

Download and install the correct update via MUC - Once you know which update is compatible with your machine, click on the Download button next to the correct driver.
- After the download is finally done, open File Explorer and navigate to the folder where the update was downloaded (most likely in the Download folder).
- After you’re inside the right folder, find the .ini file and right-click it before clicking Install from the context menu.

Install the update from the ini file - Follow the remaining directions on the screen to finish installing the Windows Update that was failing to install previously.
- Restart your PC one final time and see if the problem is now fixed.

If the issue is still not fixed as you’re seeing the 0x80070003 even when attempting to install the pending update using the Microsoft Update Catalog, move down to the next method below.
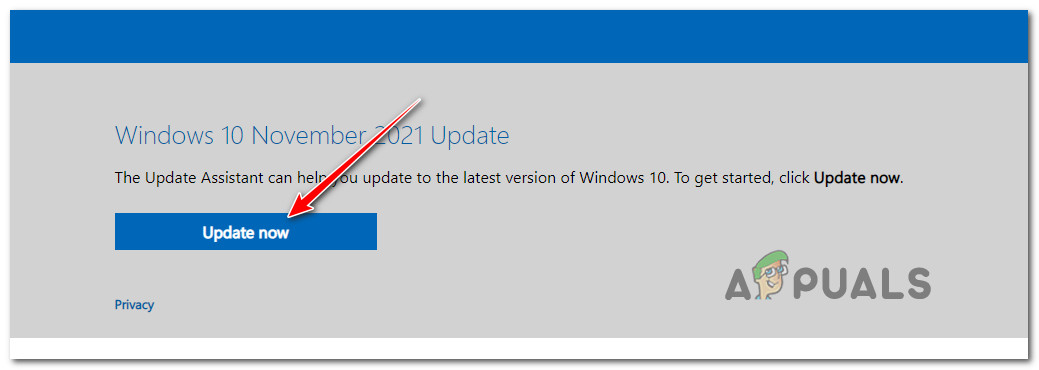
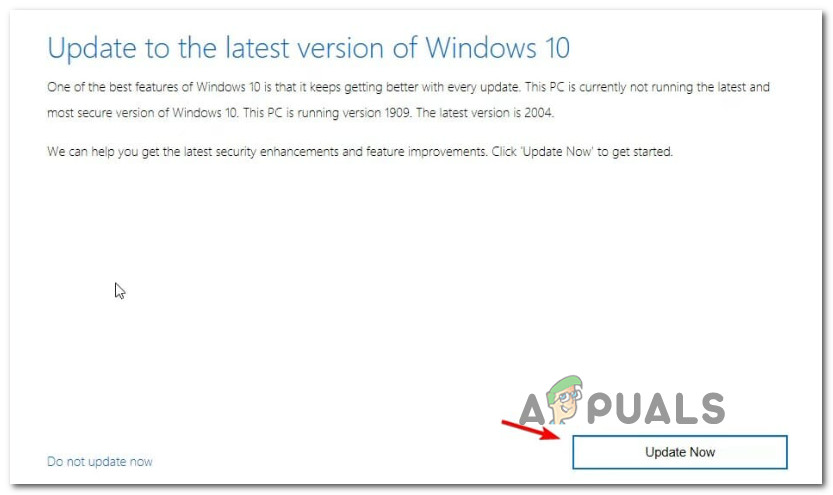
7. Bring Your Windows up to date using Windows Update Assistant
- Start by opening up any browser and visit the official download page of Windows.
- Once you get to the correct page, click on the Update now button under (Windows 10).

Update Now - Wait until the download is complete, then right-click on the executable that you’ve just downloaded and click on Run as Administrator.
- At the confirmation prompt, click on Yes to grant admin privileges.
- Once you’ve successfully opened the Windows Update Assistant, click on the Update Now button and wait until the update is downloaded.

Install the latest update available via Windows Update - Once the download is complete, you will be asked to restart your PC in order to allow the update to install.
- Once your PC restarts you will see a “Finishing Up’ window as the installation of the pending update is complete.
If the steps above we’re interrupted at some point by the 0x80070003 error (or a different one), try the next method below.
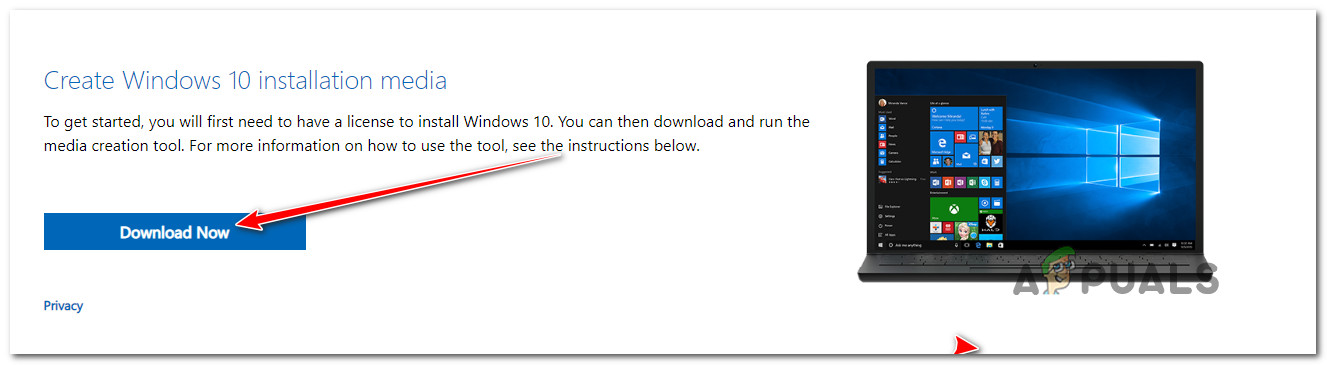
8. Bring Your Windows up to date using Media Creation Tool
- Open any browser and visit the official download page of Windows.
- Once you arrive at the correct page, click on the Download button (under Create Windows 10 installation media).

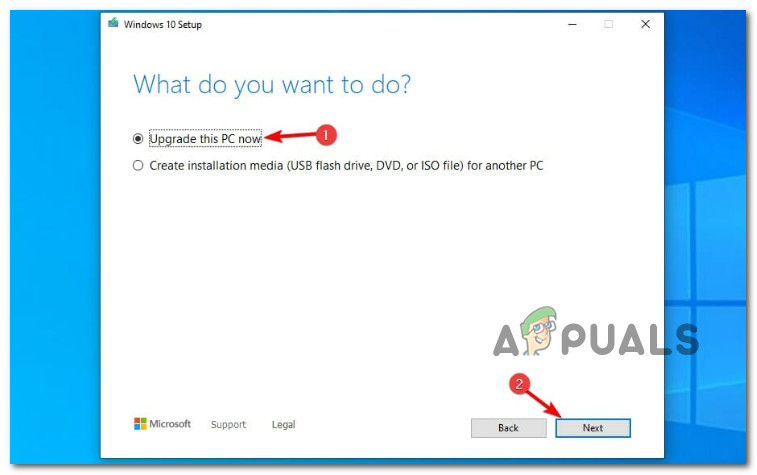
Downloading the latest version of the media creation tool - Once the executable of the tool is downloaded locally, double-click on it and click Yes at the UAC (User Account Control) prompt.
- Accept the Terms of Service, then select the Upgrade this PC now toggle before clicking on Next.

Upgrading this PC - Wait for all the downloads to finish, then choose to Keep everything in order to ensure that you aren’t clean installing.
- Follow the remaining instructions to complete the upgrade operation, then restart your PC and see if the problem is now fixed.
If you’re still experiencing the 0x80070003 error during the updating process or something else interrupts the upgrading, move down to the next method below.
9. Deploy SFC and DISM Scans
Begin with a basic SFC scan.
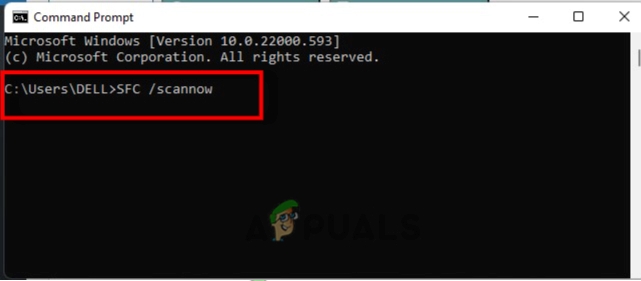
Note: Keep in mind that this tool only works locally and won’t require an internet connection.
After the SFC scan is complete, reboot your computer and check if the issue has been fixed once the startup is finished.
If you’re still seeing the 0x80070003 error when trying to run the Windows Update Troubleshooter, try running a DISM scan next and follow the on-screen prompts to finish up.

Important: One key difference between SFC and DISM is that DISM uses a sub-component of Windows Update to download healthy equivalents of any corrupted system files it finds. Because of this, you need to make sure you have a stable internet connection before beginning this operation.
After the DISM scan is successful, restart your computer once again and see if that has fixed the 0x80070003 error. If not, move on to the next potential fix below.”
10. Deploy a Clean Install or Repair install
If you haven’t had any success so far, it’s likely because you’re dealing with some kind of inconsistency that can’t be fixed in a conventional way.
There are two available options:
- Repair install (in-place repair) – This procedure only touches your system files and leaves everything else intact. This should be your first approach if you have essential personal data that you can’t afford to lose. But keep in mind that you’ll need compatible installation media.
- Clean install – This is the easiest procedure out of the bunch. You can deploy this operation without compatible installation media, but keep in mind that you’ll lose any personal files, documents, and media present on the operating system partition.
Kamil Anwar
Kamil is a certified MCITP, CCNA (W), CCNA (S) and a former British Computer Society Member with over 9 years of experience Configuring, Deploying and Managing Switches, Firewalls and Domain Controllers also an old-school still active on FreeNode.
Error code 0x80070003 may sometimes prevent you from updating Windows to the latest version. This error indicates that some of your update files are missing or have become unusable. For example, if the files got corrupted, your computer won’t access and read them. Fortunately, there are a few things that you can do to get rid of this error.
Contents
- 1 Error 0x80070003: Some Update Files Are Missing or Have Problems
- 1.1 Run the Update Troubleshooter
- 1.2 Restart the Update Components
- 1.3 Disable Your Antivirus
- 1.4 Repair and Restore Broken System Files
- 1.5 Download the Updates Manually
- 1.6 Conclusion
Error 0x80070003: Some Update Files Are Missing or Have Problems
Run the Update Troubleshooter
- First, disconnect all the peripherals connected to your computer.
- Restart your machine.
- Then, go to Settings.
- Select Update and Security.
- Click on Troubleshoot (left-hand pane).
- After that, click on View additional troubleshooters.
- Locate and run the Update troubleshooter.
- Check for updates again.
Restart the Update Components
Restart the Windows Update components to establish a new connection to Microsoft’s servers. Check if this solution solves the problem.
- Launch Command Prompt with admin rights.
- Then run the commands below one by one (hit Enter after each one):
net stop wuauservnet stop cryptSvcnet stop bitsnet stop msiserverRen C:\Windows\SoftwareDistribution SoftwareDistribution.oldRen C:\Windows\System32\catroot2 Catroot2.oldnet start wuauservnet start cryptSvcnet start bitsnet start msiserver
- Check for updates again.
⇒ Note: If the error persists, unplug your router and leave the device unplugged for two minutes. Then plug it back into the wall outlet. Connect your computer to the network and check for updates again.
Disable Your Antivirus
The apps and programs installed on your device may interfere with the Windows update process. Third-party antivirus, antimalware, and firewall solutions often block the Windows Update service. The quickest way to solve the problem is to disable all the unnecessary third-party programs running on your computer. This includes security tools as well. Do that using the Task Manager or clean boot your device. Then check if error 0x80070003 persists.
Repair and Restore Broken System Files
If your system files got corrupted or your computer can’t access them, you won’t be able to install the latest updates. Run SFC and DISM to solve the problem.
- Launch Command Prompt with admin privileges.
- Run the following commands one by one:
SFC /scannowDISM /Online /Cleanup-Image /CheckHealthDISM /Online /Cleanup-Image /ScanHealthDISM /Online /Cleanup-Image /RestoreHealth
- Restart your computer and check for updates again.

Download the Updates Manually
Download the latest Windows updates manually, and check if error code 0x80070003 still pops up on the screen. If you’re trying to install a feature update, use the Update Assistant to get the job done. If you’re trying to install a specific update or a security patch, download it from Microsoft’s Update Catalog website.
Conclusion
To fix error code 0x80070003 on Windows, first, run the Update Troubleshooter. Then restart the update components, disable your antivirus, and repair broken system files. If the error persists, download the problematic updates manually. Did you find other ways to fix error 0x80070003? Feel free to share your ideas in the comments below.