
Во время установки одного или нескольких обновлений для Windows 8.1 и 10 можно наткнуться на ошибку 0x80246010. Как правило, данная ошибка возникает по следующим причинам:
- баг в работе Центра обновления Windows;
- службы, участвующие в процессе обновления системы, не работают;
- повреждение системных файлов.
В сегодняшней статье мы во всех подробностях расскажем вам, как избавиться от ошибки 0x80246010 и нормально обновить свою Windows.
Решаем ошибку 0x80246010

Метод №1 Запуск средства устранения неполадок
Первым делом вам необходимо запустить в своей Windows системное средство устранения неполадок Центра обновления. Верно, некоторые из вас могут знать, что данное средство срабатывает не в каждом случае, но попробовать определенно нужно.
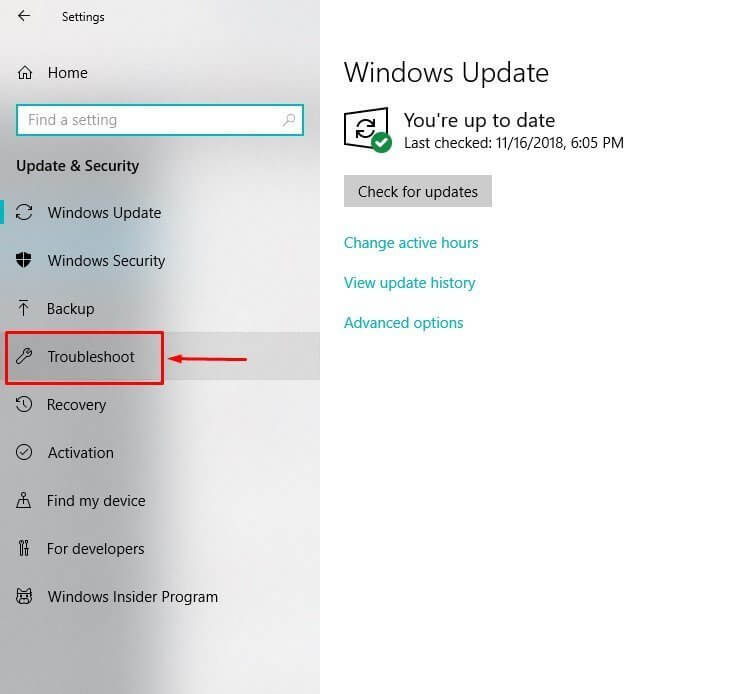
Нажмите правой кнопкой мыши на Пуск и выберите пункт «Параметры». Далее откройте раздел «Обновление и безопасность», а затем перейдите в подраздел «Устранение неполадок». Найдите в предоставленном списке Центр обновления Windows, выберите его и нажмите на кнопку «Запустить средство устранения неполадок».
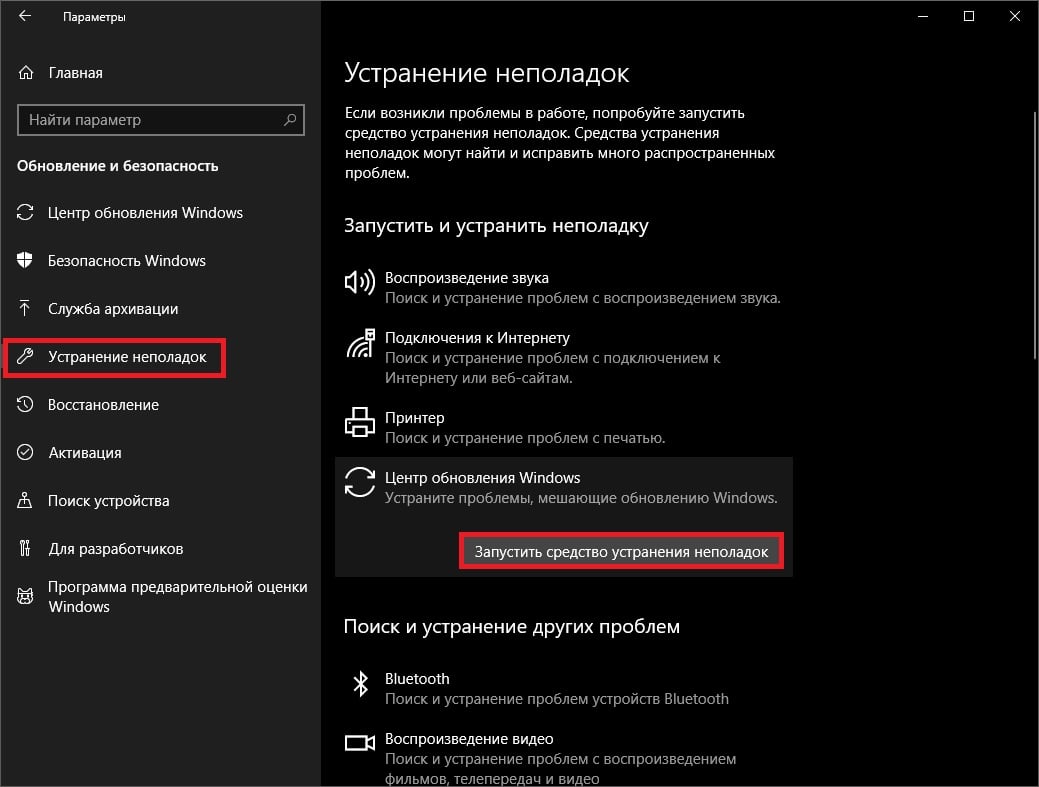
Подождите, пока средство просканирует ваш ПК на наличие неполадок с Центром обновления, а затем нажмите на кнопку «Применить это исправление» либо следуйте другим инструкциям, чтобы попытаться разрешить ошибку 0x80246010.
Метод №2 Установка обновление вручную
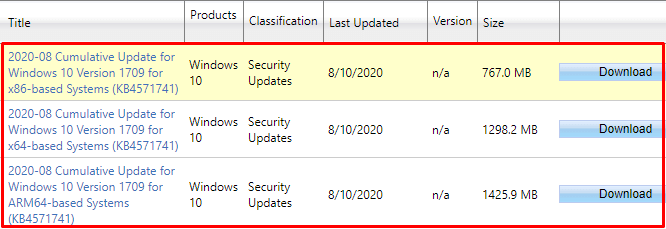
Вы всегда можете исключить Центр обновления (WU) из процесса обновления системы, установив проблемный апдейт собственноручно. Для начала вам нужно понять, при установке какого обновления возникает ошибка.
Откройте параметры системы, а затем перейдите в: Обновление и безопасность→Центр обновления Windows. Теперь кликните на строчку «Просмотр журнала обновлений». Внимательно осмотрите журнал и найдите обновление, возле которого «красуется» ошибка 0x80246010.

Копируйте название обновления и его номер куда в удобное место на компьютере, например, в текстовый файл на Рабочем столе, после чего перейдите по этой ссылке на страничку Каталога Центра обновления Майкрософт.
Впишите номер обновления в поисковую строку на сайте и кликните на кнопку «Найти». Выберите подходящий апдейт и списка найденных обновлений и нажмите «Загрузить». Все, что вам остается — это запустить скачанный MSU-файл и следовать инструкциям на экране (если они будут), чтобы установить обновление.
Метод №3 Включение всех важных для WU служб
Бывает и такое, что некоторые службы, активно участвующие в процессе обновления Windows, перестают по той или иной причине работать в системе. Вам нужно подкорректировать настройки этих служб, а затем перезагрузить компьютер.
Нажмите ПКМ на Пуск и выберите «Командная строка (администратор)». Теперь выполните в ней следующий набор команд:
- SC config trustedinstaller start=auto
- SC config bits start=auto
- SC config cryptsvc start=auto
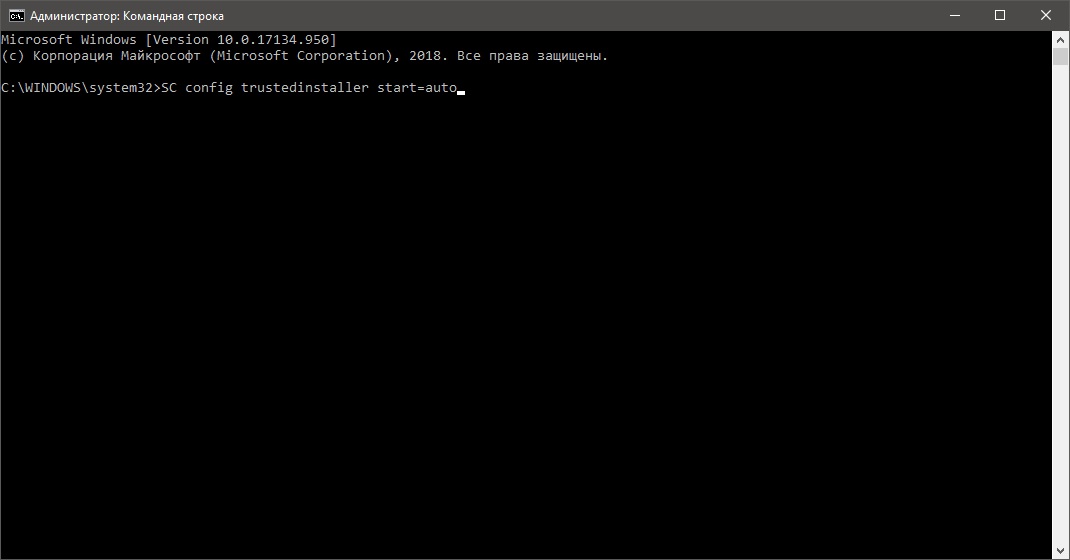
Как только закончите с вводом команд, закройте окошко и перезагрузите компьютер. Попытайтесь еще раз обновить Windows и посмотрите, была ли устранена ошибка 0x80246010.
Метод №4 Сброс компонентов Центра обновления
Если ничего из вышеуказанного вам не помогло, то пора переходить в «тяжелой артиллерии». Сейчас мы займемся с вами сбросом всех компонентов Центра обновления Windows. Некоторые пользователи проводят данный процесс вручную, но рекомендуем воспользоваться удобным BAT-файлом.
Итак, создайте у себя на Рабочем столе обычный текстовый файл, после чего вставьте в него весь список команд:
:: Run the reset Windows Update components.
:: void components();
:: /*************************************************************************************/
:components
:: —— Stopping the Windows Update services ——
call :print Stopping the Windows Update services.
net stop bitscall :print Stopping the Windows Update services.
net stop wuauservcall :print Stopping the Windows Update services.
net stop appidsvccall :print Stopping the Windows Update services.
net stop cryptsvccall :print Canceling the Windows Update process.
taskkill /im wuauclt.exe /f:: —— Checking the services status ——
call :print Checking the services status.sc query bits | findstr /I /C:»STOPPED»
if %errorlevel% NEQ 0 (
echo. Failed to stop the BITS service.
echo.
echo.Press any key to continue . . .
pause>nul
goto :eof
)call :print Checking the services status.
sc query wuauserv | findstr /I /C:»STOPPED»
if %errorlevel% NEQ 0 (
echo. Failed to stop the Windows Update service.
echo.
echo.Press any key to continue . . .
pause>nul
goto :eof
)call :print Checking the services status.
sc query appidsvc | findstr /I /C:»STOPPED»
if %errorlevel% NEQ 0 (
sc query appidsvc | findstr /I /C:»OpenService FAILED 1060″
if %errorlevel% NEQ 0 (
echo. Failed to stop the Application Identity service.
echo.
echo.Press any key to continue . . .
pause>nul
if %family% NEQ 6 goto :eof
)
)call :print Checking the services status.
sc query cryptsvc | findstr /I /C:»STOPPED»
if %errorlevel% NEQ 0 (
echo. Failed to stop the Cryptographic Services service.
echo.
echo.Press any key to continue . . .
pause>nul
goto :eof
):: —— Delete the qmgr*.dat files ——
call :print Deleting the qmgr*.dat files.del /s /q /f «%ALLUSERSPROFILE%\Application Data\Microsoft\Network\Downloader\qmgr*.dat»
del /s /q /f «%ALLUSERSPROFILE%\Microsoft\Network\Downloader\qmgr*.dat»:: —— Renaming the softare distribution folders backup copies ——
call :print Deleting the old software distribution backup copies.cd /d %SYSTEMROOT%
if exist «%SYSTEMROOT%\winsxs\pending.xml.bak» (
del /s /q /f «%SYSTEMROOT%\winsxs\pending.xml.bak»
)
if exist «%SYSTEMROOT%\SoftwareDistribution.bak» (
rmdir /s /q «%SYSTEMROOT%\SoftwareDistribution.bak»
)
if exist «%SYSTEMROOT%\system32\Catroot2.bak» (
rmdir /s /q «%SYSTEMROOT%\system32\Catroot2.bak»
)
if exist «%SYSTEMROOT%\WindowsUpdate.log.bak» (
del /s /q /f «%SYSTEMROOT%\WindowsUpdate.log.bak»
)call :print Renaming the software distribution folders.
if exist «%SYSTEMROOT%\winsxs\pending.xml» (
takeown /f «%SYSTEMROOT%\winsxs\pending.xml»
attrib -r -s -h /s /d «%SYSTEMROOT%\winsxs\pending.xml»
ren «%SYSTEMROOT%\winsxs\pending.xml» pending.xml.bak
)
if exist «%SYSTEMROOT%\SoftwareDistribution» (
attrib -r -s -h /s /d «%SYSTEMROOT%\SoftwareDistribution»
ren «%SYSTEMROOT%\SoftwareDistribution» SoftwareDistribution.bak
if exist «%SYSTEMROOT%\SoftwareDistribution» (
echo.
echo. Failed to rename the SoftwareDistribution folder.
echo.
echo.Press any key to continue . . .
pause>nul
goto :eof
)
)
if exist «%SYSTEMROOT%\system32\Catroot2» (
attrib -r -s -h /s /d «%SYSTEMROOT%\system32\Catroot2»
ren «%SYSTEMROOT%\system32\Catroot2» Catroot2.bak
)
if exist «%SYSTEMROOT%\WindowsUpdate.log» (
attrib -r -s -h /s /d «%SYSTEMROOT%\WindowsUpdate.log»
ren «%SYSTEMROOT%\WindowsUpdate.log» WindowsUpdate.log.bak
):: —— Reset the BITS service and the Windows Update service to the default security descriptor ——
call :print Reset the BITS service and the Windows Update service to the default security descriptor.sc.exe sdset wuauserv D:(A;;CCLCSWLOCRRC;;;AU)(A;;CCDCLCSWRPWPDTLOCRSDRCWDWO;;;BA)(A;;CCDCLCSWRPWPDTLCRSDRCWDWO;;;SO)(A;;CCLCSWRPWPDTLOCRRC;;;SY)S:(AU;FA;CCDCLCSWRPWPDTLOCRSDRCWDWO;;WD)
sc.exe sdset bits D:(A;;CCLCSWLOCRRC;;;AU)(A;;CCDCLCSWRPWPDTLOCRSDRCWDWO;;;BA)(A;;CCDCLCSWRPWPDTLCRSDRCWDWO;;;SO)(A;;CCLCSWRPWPDTLOCRRC;;;SY)S:(AU;FA;CCDCLCSWRPWPDTLOCRSDRCWDWO;;WD)
sc.exe sdset cryptsvc D:(A;;CCLCSWLOCRRC;;;AU)(A;;CCDCLCSWRPWPDTLOCRSDRCWDWO;;;BA)(A;;CCDCLCSWRPWPDTLCRSDRCWDWO;;;SO)(A;;CCLCSWRPWPDTLOCRRC;;;SY)S:(AU;FA;CCDCLCSWRPWPDTLOCRSDRCWDWO;;WD)
sc.exe sdset trustedinstaller D:(A;;CCLCSWLOCRRC;;;AU)(A;;CCDCLCSWRPWPDTLOCRSDRCWDWO;;;BA)(A;;CCDCLCSWRPWPDTLCRSDRCWDWO;;;SO)(A;;CCLCSWRPWPDTLOCRRC;;;SY)S:(AU;FA;CCDCLCSWRPWPDTLOCRSDRCWDWO;;WD):: —— Reregister the BITS files and the Windows Update files ——
call :print Reregister the BITS files and the Windows Update files.cd /d %SYSTEMROOT%\system32
regsvr32.exe /s atl.dll
regsvr32.exe /s urlmon.dll
regsvr32.exe /s mshtml.dll
regsvr32.exe /s shdocvw.dll
regsvr32.exe /s browseui.dll
regsvr32.exe /s jscript.dll
regsvr32.exe /s vbscript.dll
regsvr32.exe /s scrrun.dll
regsvr32.exe /s msxml.dll
regsvr32.exe /s msxml3.dll
regsvr32.exe /s msxml6.dll
regsvr32.exe /s actxprxy.dll
regsvr32.exe /s softpub.dll
regsvr32.exe /s wintrust.dll
regsvr32.exe /s dssenh.dll
regsvr32.exe /s rsaenh.dll
regsvr32.exe /s gpkcsp.dll
regsvr32.exe /s sccbase.dll
regsvr32.exe /s slbcsp.dll
regsvr32.exe /s cryptdlg.dll
regsvr32.exe /s oleaut32.dll
regsvr32.exe /s ole32.dll
regsvr32.exe /s shell32.dll
regsvr32.exe /s initpki.dll
regsvr32.exe /s wuapi.dll
regsvr32.exe /s wuaueng.dll
regsvr32.exe /s wuaueng1.dll
regsvr32.exe /s wucltui.dll
regsvr32.exe /s wups.dll
regsvr32.exe /s wups2.dll
regsvr32.exe /s wuweb.dll
regsvr32.exe /s qmgr.dll
regsvr32.exe /s qmgrprxy.dll
regsvr32.exe /s wucltux.dll
regsvr32.exe /s muweb.dll
regsvr32.exe /s wuwebv.dll:: —— Resetting Winsock ——
call :print Resetting Winsock.
netsh winsock reset:: —— Resetting WinHTTP Proxy ——
call :print Resetting WinHTTP Proxy.if %family% EQU 5 (
proxycfg.exe -d
) else (
netsh winhttp reset proxy
):: —— Set the startup type as automatic ——
call :print Resetting the services as automatics.
sc.exe config wuauserv start= auto
sc.exe config bits start= delayed-auto
sc.exe config cryptsvc start= auto
sc.exe config TrustedInstaller start= demand
sc.exe config DcomLaunch start= auto:: —— Starting the Windows Update services ——
call :print Starting the Windows Update services.
net start bitscall :print Starting the Windows Update services.
net start wuauservcall :print Starting the Windows Update services.
net start appidsvccall :print Starting the Windows Update services.
net start cryptsvccall :print Starting the Windows Update services.
net start DcomLaunch:: —— End process ——
call :print The operation completed successfully.echo.Press any key to continue . . .
pause>nul
goto :eof
:: /*************************************************************************************/
Сохраните текстовый документ вместе со вставленными командами, а затем переименуйте его в «WindowsUpdateReset.bat». Далее дважды кликните левой кнопкой мыши на созданный батник и проследите за сбросом компонентов Центра обновления. Процесс завершится очень быстро. Как только все закончится, перезагрузите компьютер и проверьте наличие ошибки 0x80246010.
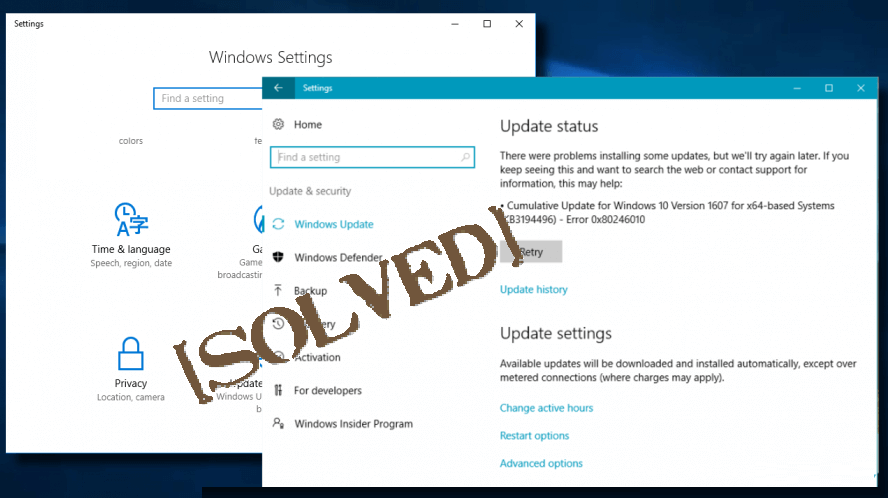
The Update Error 0x80246010 first appeared while upgrading Windows 10 to the feature update 1709. Recently, a few users reported getting this issue after installing the latest cumulative patches. Well, this bug occurs because of missing system files, damaged Windows Image, and mainly due to a corrupt registry.
In this post, we have covered almost all potential workarounds that seem to be useful in solving the 0x80246010 issue. Run SFC, DISM works to address the bug due to damaged system files and Windows Image respectively. Resetting Windows Update Components is another effective tool to solve different update-related troubles. Let’s explore the solutions in detail –
To solve the Update Error 0x80246010 on Windows 10 PC, try the following suggestions –
1] Manually install the latest Cumulative Updates
Manually installing the latest cumulative update is the best way to get rid of the 0x80246010 error. However, for that, you must know the recent patch number matching the system architecture. Here’s how to perform this task –
- First of all, go to the Windows 10 Update history webpage.
- Select Windows 10 Edition available on the left column.
- Next, scroll down to “In this Release” section and click the top link. Here, copy the “KB” number available on the right pane.
- Now that you have the recent CU number, visit Microsoft Update Catalog and type the copied “KB” number in the search field.
- Press Enter to view a list of matching results, choose one as per your PC architecture.
- Click the Download button thereafter the top link on the succeeding window.

- After the download completes, double-click the setup file to start upgrading Windows 10 OS.
2] Repair Registry
If you are still getting the error 0x80246010, this might be due to corruption inside the registry. To fix this, use the below steps –
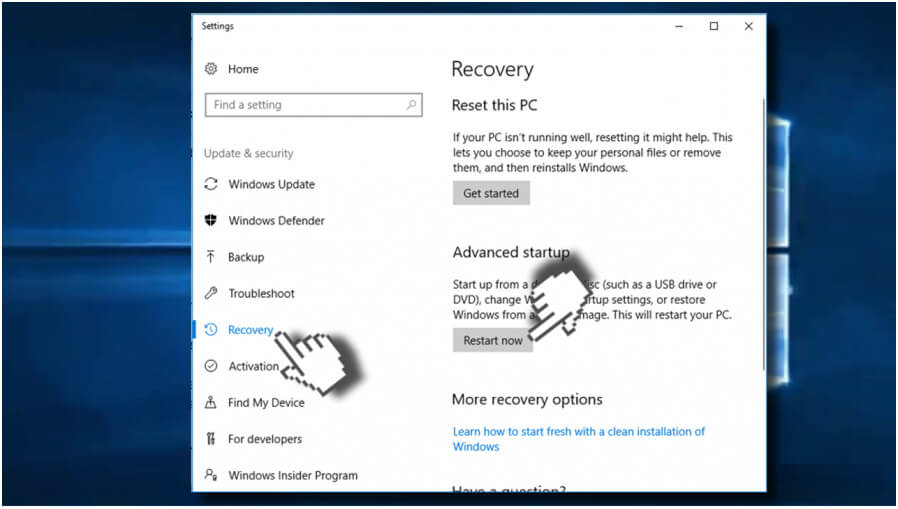
- Use Win + I to start the Settings app.
- Click Recovery then “Restart Now” under the Advanced startup section.
- Your PC will next boot into the Advanced Start mode.
- Click Troubleshoot followed by Advanced options.
- Here, you will find “Startup Repair” at the top, click this link to start repairing the registry.

- If the system prompts to use an account, use the Administrator one.
When the PC boots into Windows normally, check whether the 0x80246010 bug still occurs or gets resolved.
3] Run System File Checker
The presence of corrupt or damaged system files often causes different update-related issues on the computer. To repair such files, you should use the System File Checker utility program. Here are the essential steps –
Step-1: Launch Command Prompt having administrative privileges.
Step-2: On the elevated console, type sfc/scannow and hit Enter.

Step-3: This tool immediately starts scanning for corrupt files and repair them as well.
Step-4: Wait for a while as this takes approx. 15-20 minutes to correct damaged files.
Lastly, Restart Windows to incorporate the above changes.
4] Run DISM
If the 0x80246010 error appears again while updating Windows 10, use the DISM tool to solve any corruption on the Windows Image. Here’s how to use this tool –
- Use Win & R to launch the Run dialog.
- In the text area, type cmd, and press Ctrl+Shift+Enter keys combination.
- When the UAC window comes into view, tap Yes. This will open Command Prompt having full Admin rights.
- On the elevated console, copy/paste the below code, and hit Enter.
DISM.exe /Online /Cleanup-image /Restorehealth

- The above process usually takes a few minutes to complete scanning/repairing, so wait accordingly.
- Once over, Restart PC to implement the recent changes.
5] Clear Windows Update temporary cache folder
At times, the 0x80246010 error comes into existence due to unnecessary stored cache inside the update folder. If that’s the case, you may follow the below steps to clear the update folder –
- Press Win+Q to launch the Search App.
- In the text field, type services and click the top result.
- When the Services window comes into view, locate Windows Update.
- Once found, do the right-click and hit the Stop button.
Now that you have stopped update services, it’s time to clean the unnecessary stored cache using below steps –
- Use the Win+R shortcut to start Run.
- Copy/paste the below code and press Enter.
%windir%\SoftwareDistribution\DataStore
- Running the above command-line will take you to the SoftwareDistribution folder.
- Use Ctrl+A to select all the items and hit Delete to remove them all.
- Re-visit the Services window and put right-click on the Windows Update.
- Next, choose to restart using the shortcut menu.
After completing the above steps successfully, Reboot PC so that changes made come into effect from the next logon.
6] Use Restore Points or Clean Install
If you had created system backup on the computer, it’s the perfect time to go back to the state where everything was working fine. Learn how to use system restore points in case you have created one previously. If not, do the clean installation of Windows 10.
That’s it, I hope this article useful addressing the 0x80246010 error on Windows 10.
Read Next: How to reset this PC using Cloud Download on Windows 10
Several Windows users have been reporting that they are unable to install one (or multiple updates) using Windows Update. The error code that comes up is 0x80246010. The issue doesn’t seem to be exclusive to a certain WIndows version since the same error is encountered on Windows 8, Windows 7 and Windows 10.
What is causing the 0x80246010 Error?
We investigated this particular issue by looking into various user reports and analyzing several fixes that are commonly being used to fix this particular issue. As it turns out, there are several potential causes that might produce this error code. Here’s a shortlist of potential culprits that might trigger the 0x80246010 error:
- Windows Update Glitch – Under some circumstances, this particular issue can occur because the updating component is trying to install an update that is not actually compatible with the system at hand. In this case, you should be able to resolve the issue by updating manually or by using the Windows Update troubleshooting utility.
- Essential WU services aren’t enabled – It’s also possible that you’re seeing this error code because some services used during this procedure are forcefully disabled. If this scenario is applicable, you should be able to resolve the issue by changing the startup type so that WIndows can call on them when needed.
- System file corruption – the WU component is also prone to being affected by System File corruption. In situations such as this one, the only viable fix is to reset the entire suite of WU dependencies in order to eliminate the culprit.
If you’re currently struggling to resolve the same error message and one of the scenarios above is applicable, this article will provide you with several different troubleshooting guides. In the next section, you’ll discover a collection of methods that other users in a similar situation have successfully used to get the issue resolved.
If you want to remain as efficient as possible, we advise you to follow the methods above in order since we ordered them by efficiency and difficulty. Regardless of the culprit that’s causing the issue, one of the potential fixes below should end up resolving the issue.
Method 1: Running the Windows Update troubleshooter
Before you try any other repair strategies, you should start by seeing whether your OS is not capable of resolving the issue by itself. Some users that we’re also encountering the 0x80246010 error have reported that they managed to resolve the issue by using the Windows Update troubleshooter to fix the issue automatically.
This utility is equipped with various repair strategies that will be enforced if a covered scenario is recognized. Here’s a quick guide on running the Windows Update troubleshooter:
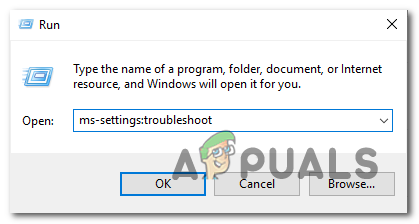
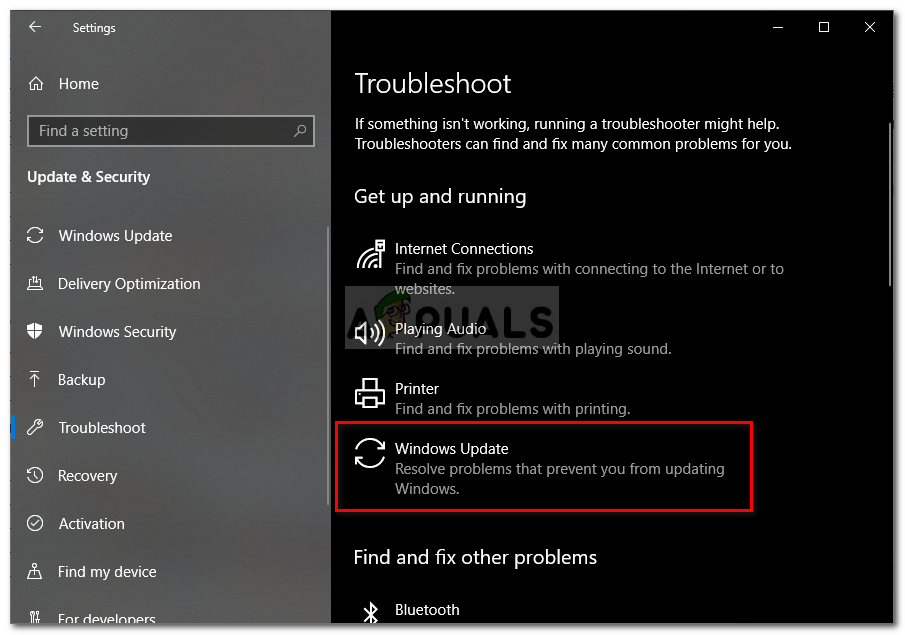
- Open Run command by pressing the Windows key + R. Then, type “ms-settings:troubleshoot” and press Enter to open up the Troubleshooting tab of the Settings app.

Opening the Troubleshooting tab of the Settings app via a Run box - Once you find yourself inside the Troubleshooting tab, scroll down to the Get up and running section, click on Windows Update, then click on Run the troubleshooter.

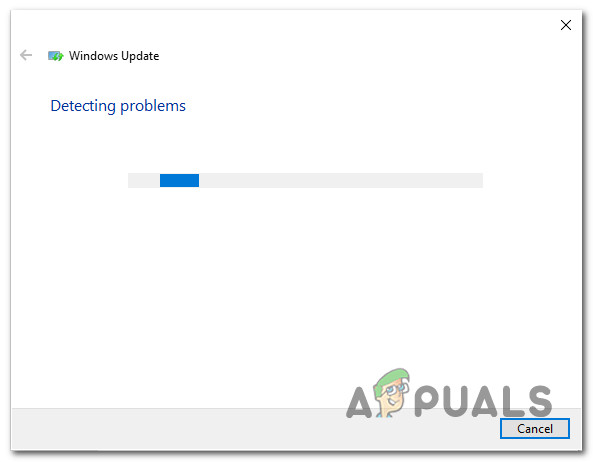
Running Windows Update Troubleshooter - Once the utility has been started, wait and see if the initial scan reveals any problem with the WIndows update component.

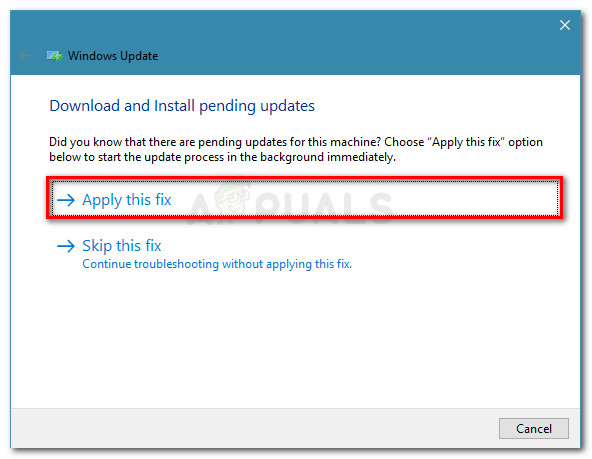
Detecting problem with Windows Update - If an issue is identified, click on Apply this fix, then follow the on-screen instructions to apply the recommended repair strategy.

Apply this fix for Windows Update - Once the repair strategy is applied, restart your computer and see if the issue is resolved at the next system startup.
Method 2: Updating manually via the Microsoft Update Catalog
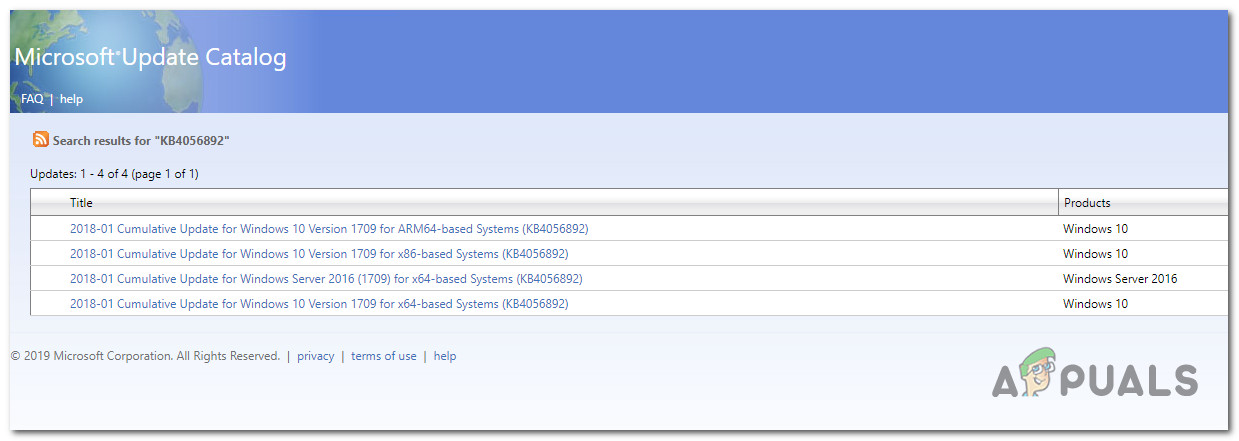
If you don’t mind going the manual route, you can probably circumvent the issue altogether by installing the update that is failing manually. The most convenient way to do this is via the Microsoft Update catalog website.
Some users encountering this same issue have reported that the error code 0x80246010 no longer occurred while they used the manual method. Here’s a quick guide on installing the failing update manually:
- Visit the Microsoft Update catalog website on this link (here).
- Once you get there, use the search function in the top-right corner to search for the update that is failing when you try to install it conventionally.

Searching for the update that you want to install manually - Once the results appear, look for the appropriate according to your CPU architecture and Windows version.

Choosing the right Windows Update - Once you manage to find the correct version, hit the Download button to start the downloading process.
- When the download is complete, double-click on the executable and follow the instructions to install the update manually.
- If the update installs successfully, restart your computer and see if the issue is resolved at the next system startup.

If you still encountered the error code 0x80246010 even when trying to install manually, move down to the next method below.
Method 3: Enabling all essential WU services
Another possible reason that can potentially cause the 0x80246010 error is that one or multiple services essential to the updating process are disabled. Several users finding themselves in a similar situation have managed to resolve the issue by ensuring that all essential services are enabled.
There are two different methods that you can follow in order to ensure that all WU services involved in the updating operating are enabled. Feel free to follow whichever guide you feel more comfortable with.
Enabling services via Command Prompt
This is hands-down the quickest and most effective method of ensuring that all essential services are enabled. Here’s a quick guide on enabling them via an elevated Command Prompt:
- Press Windows key + R to open up a Run dialog box. Next, type “cmd”, then press Ctrl + Shift + Enter to open up an elevated Command Prompt. If you’re prompted by the UAC (User Account Prompt), click Yes to grant administrative privileges.
Running Command Prompt as an administrator - Once you’re inside the elevated Command prompt, type the following commands in order and press Enter after each one to set the Startup type of each service to Automatic:
SC config trustedinstaller start=auto
SC config bits start=auto
SC config cryptsvc start=auto
- After all these services have been adjusted successfully, restart your computer and see if the issue has been resolved once the next startup is complete.
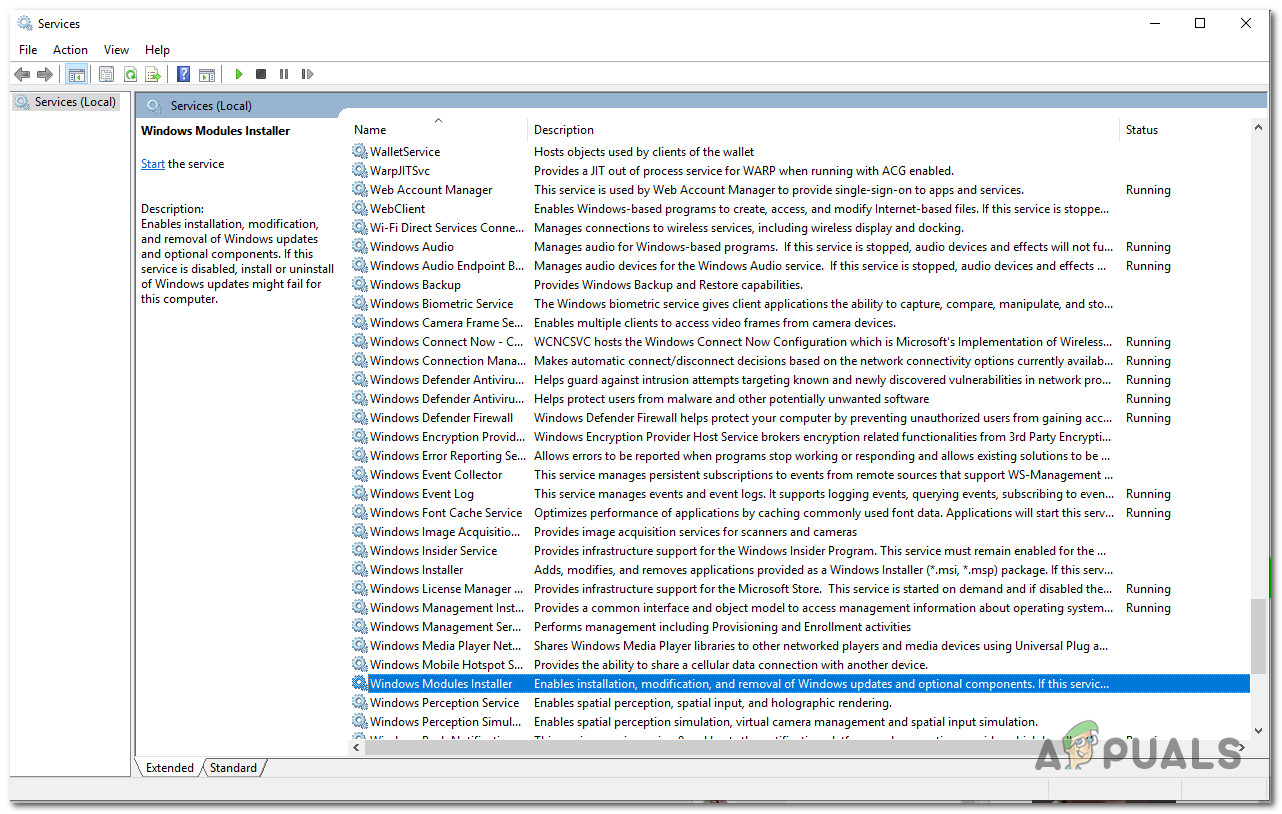
Enabling services via GUI
If you’re not comfortable with using the CMD terminal, you can also enable the same services by using the Windows GUI (Services screen). The steps are more tedious that the terminal approach, but the results are exactly the same. Here’s what you need to do:
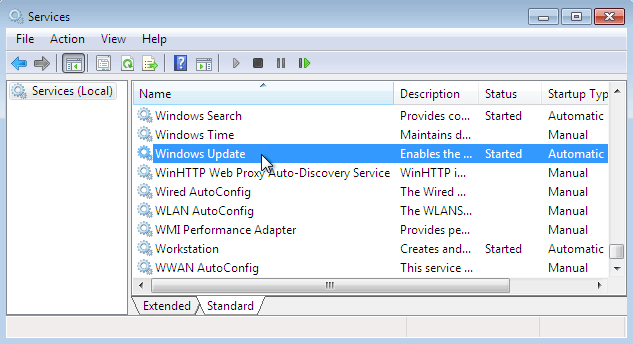
- Press Windows key + R to open up a Run dialog box. Then, type “services.msc” and press Enter to open up the Services screen.
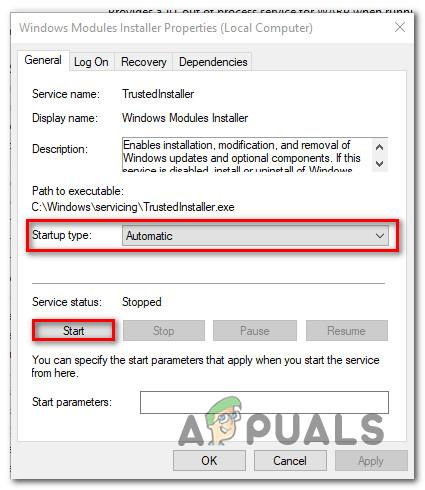
Running the Services tool - Once you’re inside the Services screen, scroll down through the list of services and locate the Windows Module installer service. Once you see it, double-click on it to open up the Properties screen.

Accessing the Properties screen of the Windows Module Installer service - Once you’re inside the Windows Module Installer Properties screen, go to the General tab and change the Startup type to Automatic, then click on Apply to enforce the changes.

Making the required changes to the Windows Module Installer service. - Next, repeat steps 2 and step 3 with Cryptographic Services and Trusted Installer service.
- Once all involved services have been enabled, restart your computer and see if the issue has been resolved.
If this method didn’t allow you to resolve the issue, move down to the next method below.
Method 4: Reset all Windows Update components
If none of the methods above have allowed you to resolve the issue, chances are you’re dealing with a persisting bug having to do with the Windows 10 update components. t’s possible that one or more WU (Windows Update) components have become stuck in a limbo state. If this scenario is applicable, you will be able to fix the problem by resetting all WU components that are involved in the updating process.
Here are two different methods that you can follow in order to reset all Windows Update components:
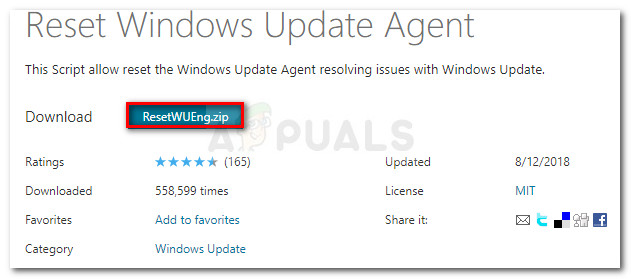
Resetting WU via the WU Agent
- Visit this Microsoft Technet page (here) and download the Reset Windows Update Agent script.

Download Windows Update Reset Agent - Once the download is complete, extract the zip archive with a utility like WinRar, WinZip or 7Zip.
- Double-click on the ResetWUENG.exe file and then follow the instructions to run the script on your computer. Immediately after you do so, it will reset all your WU components.
- When the process is complete, restart your computer and see if you’re able to install the failing update once the next startup sequence is complete.
Resetting WU via elevated CMD
- Press Windows key + R to open up a Run dialog box. Then, type “cmd” and press Ctrl + Shift + Enter to open up an elevated Command Prompt. When you see the UAC (User Account Control) prompt, click Yes to grant administrative privileges.
Running Command Prompt as an administrator - Inside the elevated Command Prompt, type the following commands in order and press Enter after each one to stop all WU related services:
net stop wuauserv
net stop cryptSvc
net stop bits
net stop msiserver
Note: These commands will stop the Windows Update Services, MSI Installer, Cryptographic services, and BITS services.
- Once all services have been stopped, run the following commands to clear and rename SoftwareDistribution and Catroot2 folders:
ren C:\Windows\SoftwareDistribution SoftwareDistribution.old
ren C:\Windows\System32\catroot2 Catroot2.old
Note: These folders are responsible for holding update files use by the WU component.
- Now that the folders have been cleared, run the following commands to re-enable the services that we’re previously disabled:
net start wuauserv
net start cryptSvc
net start bits
net start msiserver
- Restart your computer once again and see if the issue has been resolved.
Kevin Arrows
Kevin Arrows is a highly experienced and knowledgeable technology specialist with over a decade of industry experience. He holds a Microsoft Certified Technology Specialist (MCTS) certification and has a deep passion for staying up-to-date on the latest tech developments. Kevin has written extensively on a wide range of tech-related topics, showcasing his expertise and knowledge in areas such as software development, cybersecurity, and cloud computing. His contributions to the tech field have been widely recognized and respected by his peers, and he is highly regarded for his ability to explain complex technical concepts in a clear and concise manner.
Is your Windows 10 system show error code 0x80246010 at the time of updating or installing the update, looking what went wrong or how to fix the Windows update error 0x80246010.
Then stay tuned with us, learn the complete information about the error 0x80246010 and the possible solutions.
The Error Code 0x80246010 may appear when the user tries to download the available update on their Windows 10 system. And once this error appears then it prevents the user from installing the available Windows updates for both PC/Laptop and apps.
This update error is very common and reported by many of the Windows 10 users. Windows 10 update error Code 0x80246010 generally appears when the user tries to install the KB4038782 Update for Windows 10 Operating System, but there are also many other updates that trigger the Windows update error.
Before applying any solution to fix the error 0x80246010 in Windows 10, first, know the causes responsible for this error.
- Missing/corrupt DLL files
- Corrupted or damaged registry keys
- Incomplete updates
- Computer malware
- And other similar problems
Now, follow the given possible fixes to get rid of the error 0x80246010. But before heading towards the manual solutions it is recommended to scan your system with the automatic Windows repair tool, to fix the error and other Windows 10 problems easily.
How to Fix Error 0x80246010 in Windows 10
Solution 1: Run Windows Update Troubleshooter
Very first it is recommended to run the Windows troubleshooter this is designed to fix various windows update errors related issues.
Follow the steps to run it:
- Press Windows + I key and navigate to Update & Security
- And click Run the troubleshooter.
- Follow the instruction and restart your system
I hope this works for you but if not then follow the next solution.
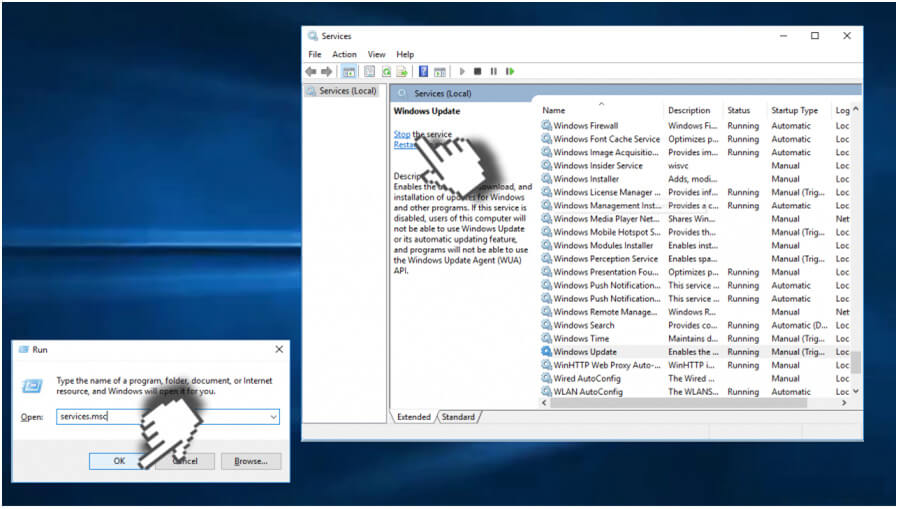
Solution 2: Restart Windows Update Service
- Open run dialogue box by pressing Windows key + R.
- In the run box, enter services.msc and hit Enter key.
- Search for the Windows Update service by scrolling down.
- After finding, right-click on it and choose Start, as shown in the below image.
Solution 3: Repair Corrupt Registry Entries
Please Note: Repairing registry manually is a little difficult and not safe for your PC/Laptop, so it is recommended to go with the automatic Registry Repair Tool as it will fix all corrupt registry entries and system files without the need of doing anything manually.
Get the Registry Repair Tool, to fix registry errors
However, if you are technically advanced then follow the given manual steps carefully.
- Press the Windows key and then type Advanced Startup Options.
- Choose the Change Advanced Startup Options and open the Recovery tab.
- After it, click on the Restart now button present under the Advanced Startup section to restart your PC in advanced startup mode.
- Choose the Troubleshoot button and click on the Advanced Options.
- After it, click on the Automatic Repair.
- This will restart your system, choose the administrative account.
- After the completion of the repairing process, check if the required update can successfully be installed.
Now check if the error 0x80246010 in Windows 10 is fixed or not.
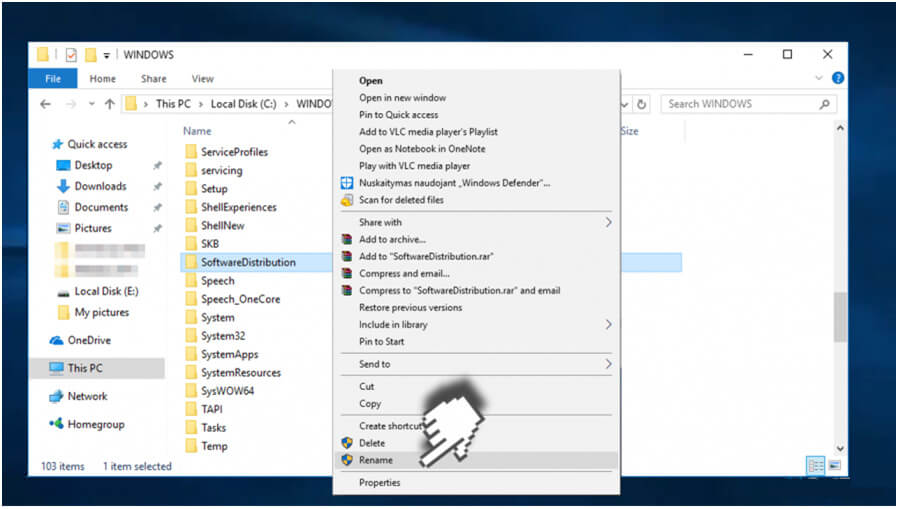
Solution 4: Rename Software Distribution Folder
- Open the run dialogue box by pressing Windows key + R.
- In the run box, type services.msc and hit Enter key
- Now, search the Windows Update service and right-click on the Windows Update service and choose Stop

- Go to the Local Drive (C:)-> Windows and find the SoftwareDistribution
- Now, you need to rename the SoftwareDistribution folder. To do this right-click on it and choose Rename option from the cascading menu.
- Replace the name with SoftwareDistributionOld.
- You need to repeat the steps from 1 to 4, but instead of clicking on the Stop you need to choose
- At last, restart your PC and make sure that the problem is fixed or not.
Solution 5: Download the Update Manually.
If none of the above-given solutions works for you then it is advised to download the update manually.
Follow the steps to update Windows 10 manually:
- In the browser open Microsoft Update Catalog.
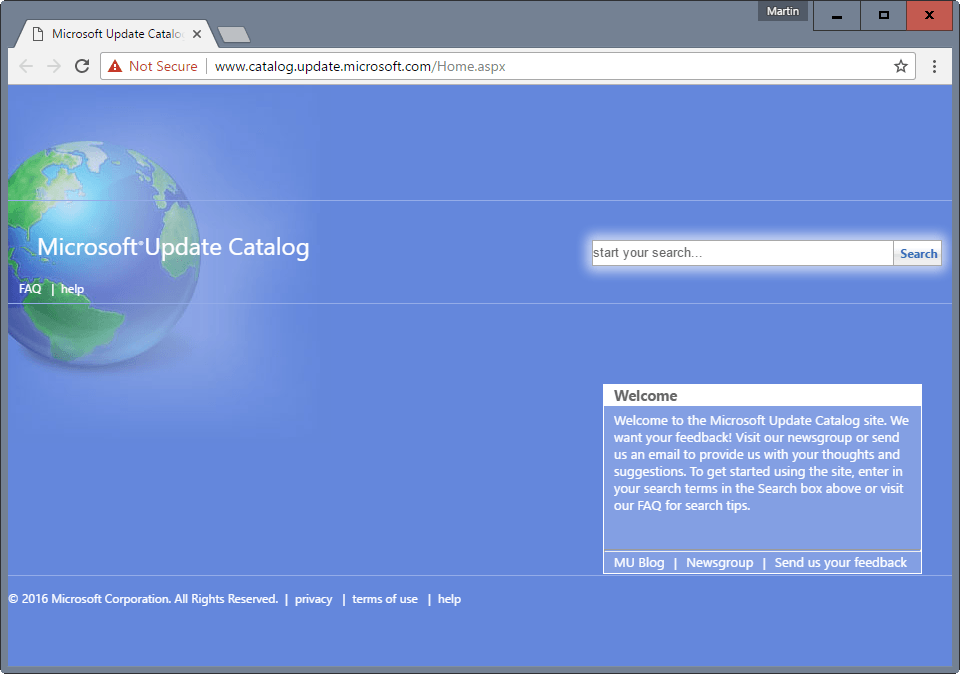
- And in the search box type the update code you get in the error message
- Open the search results and choose to download the update
- Now open the downloaded update file and install it.
It is estimated after downloading the Windows 10 update manually the error code 0x80246010 is fixed.
Best & Easy Solution to Fix Windows Update Error 0x80246010
Well, if the given manual solutions won’t work for you then here it is suggested to try running the PC Repair Tool. This is a powerful professional recommended solution to fix various Windows related issues and errors.
It also helps you to fix other PC issues like hardware failure, virus/malware, Windows files corruption, registry corruption, DLL errors and more
This not only fixes errors but also optimizes your Windows PC performance and is easy to use.
Get PC Repair Tool, to fix Windows update error 0x80246010
Conclusion
So, this is all about the Windows update error 0x80246010, try the given solutions, and check which one works for you.
I tried my best to provide possible working solutions to fix the Windows update error
Despite this, I would like to listen from you, don’t forget to share your valuable comments, queries with us.
Good Luck!!!
Hardeep has always been a Windows lover ever since she got her hands on her first Windows XP PC. She has always been enthusiastic about technological stuff, especially Artificial Intelligence (AI) computing. Before joining PC Error Fix, she worked as a freelancer and worked on numerous technical projects.
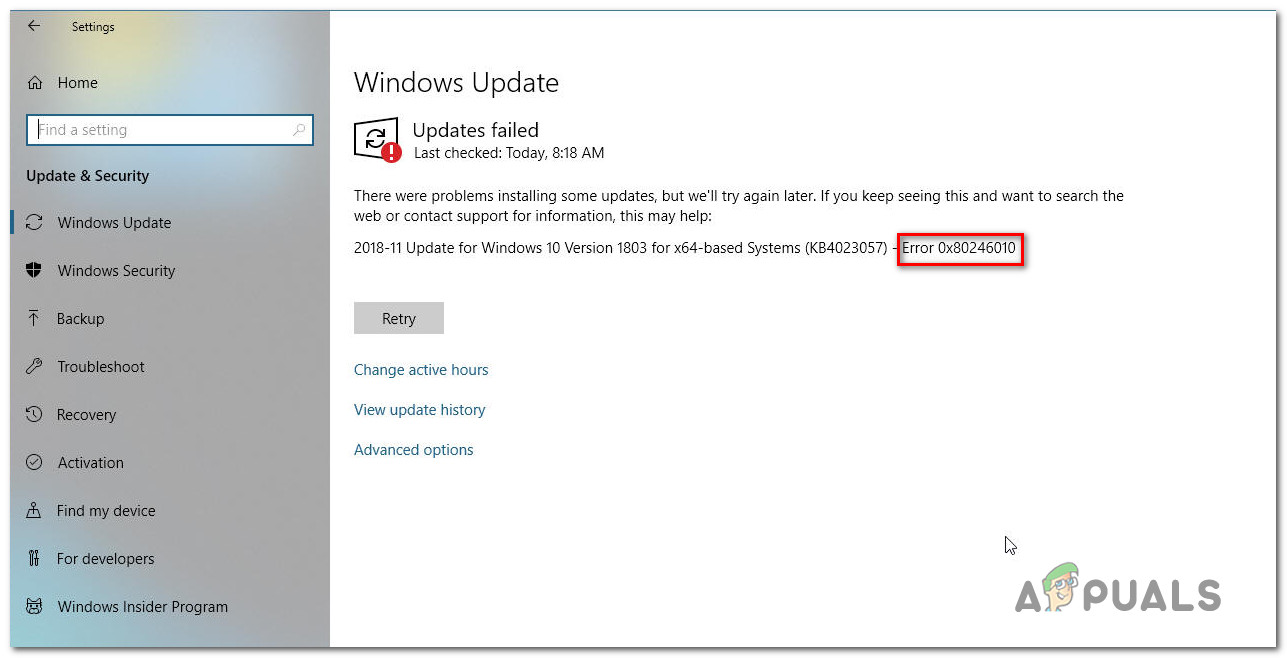
Issue: Hello. I can’t update my PC. Currently I’m trying to install cumulative update KB4038782, but it fails with an error code 0x80246010. The update gets almost done, but then the error shows up saying that the changes have to be undone. Can’t find any relevant information about it, so I would highly appreciate your help!
Solved Answer
The Error Code 0x80246010 is a Windows Update[1] error, which prevents people from installing Windows updates for both system and apps. Many people reported the problem when installing Cumulative Update KB4038782 for Windows 10 OS, but we’ve detected quite a lot of threads escalating on this problem and indicating different cumulative updates.
Users complain about different issues caused by this Update and associated with the particular Error 0x802460010.[2] Microsoft’s technicians are aware of the problem, but they are not very active in responding to people’s comments. One of the solutions offered by them is to install the needed update manually from Windows Update Catalog. However, those who tried this method encountered another error – 0x80073712.
A plausible cause for this 0x80246010 error can be the issue with Microsofts’s servers and the overload. Also, various third-party software may disturb the Windows Update Download Manager. It can be caused by antivirus program. VPN tool or other software. Although these issues should be fixed when the user updates the OS to the newest version, other methods can be used.

In most cases, the 0x80246010 error appears on the screen when Windows 10 gets updated. The error 0x80246010 may be triggered by missing/corrupt DLL files, corrupted registry keys, incomplete updates, malware[3] and similar problems. The particular error with a pattern of 0x80246*** can be called Download Manager Error and it means that the main issue causing these problems relates to the Microsoft update servers.
Ways to fix issues related to error 0x80246010
In case the problem happens due to corrupted system’s files, we would strongly recommend running a scan with a powerful optimization utility,[4] say FortectMac Washing Machine X9. If the scan did not reveal integrity violations, check your Internet connection. Quite frequently the problem behind the 0x80246010 error is an unreliable Internet connection. Try to restart your router or reconnect the LAN cable. If there are no problems with the Internet connection, try the following fixes.
Method 1. Restart Windows Update service
Fix it now!
To repair damaged system, you will have a 24hr Free Trial and the ability to purchase the licensed version of the Fortect.
- Press Windows key + R to open Run dialog.
- Type services.msc and press Enter.

You can fix 0x80246010 error by starting the Windows Update Server.
- Scroll down until you find Windows Update service.
- Right-click on it and select Start.

Method 2. Repair the Registry keys
Try to fix 0x80246010 error with an automatic repair tool, which will fix all corrupted registry entries and system files.
- Press Windows key and type Advanced Startup Options.
- Select the Change Advanced Startup Options and open Recovery tab
- Click on the Restart now button under Advanced Startup section.
Automatic system repair is the method of fixing issues with the 0x80246010 error.
- This will reboot your PC in advanced startup mode.
- Select the Troubleshoot button and click on Advanced Options.
- Now click Automatic Repair.
- When the system restarts, select administrative account. Once the repair process is finished, check if the needed update can successfully be installed.

Method 3. Rename Software Distribution Folder
Fix it now!
To repair damaged system, you will have a 24hr Free Trial and the ability to purchase the licensed version of the Fortect.
- Press Windows key + R to open Run.
- Type services.msc and press Enter.
- Scroll down until you find Windows Update service.
Follow the steps to stop the Windows Update.
- Right-click on Windows Update service and select Stop.
- Now navigate to the Local Drive (C:) -> Windows.
- Locate the SoftwareDistribution folder on it.
- Right-click on SoftwareDistribution folder and select Rename.
Renaming the folder and restart your device after that. The 0x80246010 error should no longer appear.
- Rename it to SoftwareDistributionOld.
- Now perform the 1-4 steps above, but instead Stop select Start.
- Finally, reboot your PC and check if the problem was resolved.


If none of the methods provided on this post helped to fix 0x80246010 error, you can find a couple of applicable methods on the 6 Tips to Fix Most of the Windows Update Problems article.
Repair your Errors automatically
ugetfix.com team is trying to do its best to help users find the best solutions for eliminating their errors. If you don’t want to struggle with manual repair techniques, please use the automatic software. All recommended products have been tested and approved by our professionals. Tools that you can use to fix your error are listed bellow:
do it now!
Download Fix
Happiness
Guarantee
Compatible with Microsoft Windows
Still having problems?
If you failed to fix your error using Fortect, reach our support team for help. Please, let us know all details that you think we should know about your problem.
Fortect will diagnose your damaged PC. It will scan all System Files that have been damaged by security threats. To repair damaged system, you will have a 24hr Free Trial and the ability to purchase the licensed version of the Fortect malware removal tool.
Access geo-restricted video content with a VPN
Private Internet Access is a VPN that can prevent your Internet Service Provider, the government, and third-parties from tracking your online and allow you to stay completely anonymous. The software provides dedicated servers for torrenting and streaming, ensuring optimal performance and not slowing you down. You can also bypass geo-restrictions and view such services as Netflix, BBC, Disney+, and other popular streaming services without limitations, regardless of where you are.
Don’t pay ransomware authors – use alternative data recovery options
Malware attacks, particularly ransomware, are by far the biggest danger to your pictures, videos, work, or school files. Since cybercriminals use a robust encryption algorithm to lock data, it can no longer be used until a ransom in bitcoin is paid. Instead of paying hackers, you should first try to use alternative recovery methods that could help you to retrieve at least some portion of the lost data. Otherwise, you could also lose your money, along with the files. One of the best tools that could restore at least some of the encrypted files – Data Recovery Pro.