
После установки нового сервера WSUS в сети нашей компании многие клиенты не смогли получить новые обновления с сервера с ошибкой 0x80244010. Как оказалось, эта ошибка характерна не только для компьютеров, обновляющихся с внутреннего сервера WSUS, но и для устройств, получающих обновления напрямую с Windows Update. Рассмотрим, основные способы исправления ошибки 0x80244010 и восстановления работоспособности системы обновлений.
Если вы увидели ошибку получения или установки обнволения в графической Control Panel или панели Settings, нужно открыть лог агента WindowsUpdate.log. В старых версиях Windows 7 и 8 это файл
%Windir%\WindowsUpdate.log
. В современных Windows 10/11 и Windows Server 2022/2019 вы можете сгенерировать файл WindowsUpdate.log с помощью PowerShell:
Get-WindowsUpdateLog -logpath C:\PS\Logs\WindowsUpdate.log
В моем случае в журнале обновлений обнаружились такие ошибки:
PT WARNING: Exceeded max server round trips: 0x80244010 PT WARNING: Sync of Updates: 0x80244010 PT WARNING: SyncServerUpdatesInternal failed: 0x80244010 Agent * WARNING: Failed to synchronize, error = 0x80244010 Agent * WARNING: Exit code = 0x80244010 Agent ********* Agent ** END ** Agent: Finding updates [CallerId = AutomaticUpdates] Agent ************* Agent WARNING: WU client failed Searching for update with error 0x80244010 AU >>## RESUMED ## AU: Search for updates [CallId = {128CCEAD-F84D-405E-9BC2-607D1694894B}]

AU # WARNING: Search callback failed, result = 0x80244010 AU # WARNING: Failed to find updates with error code 80244010
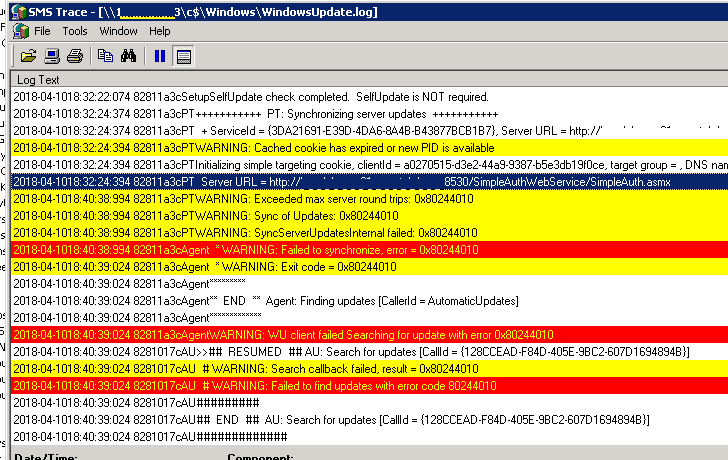
Обратите внимание на строку Exceeded max server round trips: 0x80244010. Эта ошибка говорит, что при обращении к серверу обновлений (в моем случае это WSUS) было превышено максимальное количество обращений. В результате чего сервер обновлений отключает клиента, который превысил лимит обращений (по умолчанию лимит — 200 обращений).
Также в Windows Update есть ограничение в 200 Кб на максимальный размер XML файла, который клиент получает с сервера в рамках одного обращения. Чем большее количество обновлений на сервере для клиента нужно проверить, тем больший размер XML файла. Если клиент не смог получить необходимые данные с сервера обновлений за 200 сессий, он временно отключается от сервера и возвращает ошибку.
Чаще всего такая ошибка возникает из-за плохого или нестабильного сетевого соединения с сервером обновлений, или когда клиенту нужно получить слишком большое количество обновлений (новый клиент сервера WSUS или компьютер, на котором давно не устанавливались обновлений).
В большинстве случаев пользователю достаточно через несколько минут повторно нажать на кнопку Retry/ Check for Updates в панели управления или выполнить команду:
wuauclt.exe / detectnow
В большинстве случаев это решает проблему, но в том случае если клиентов в сети много, такой способ решения проблемы неприемлем.
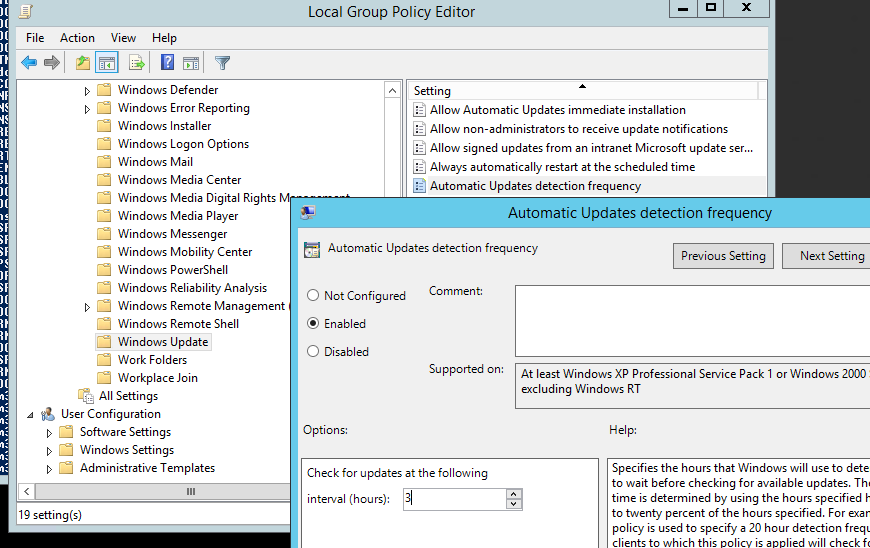
По умолчанию клиент проверяет обновления на сервере каждые 22 часа. Вы можете изменить этот интервал с помощью параметров групповых политик компьютера. Откройте редактор локальной GPO (
gpedit.msc
) или отредактируйте доменные политику в консоли Group Policy Management Console (
gpmc.msc
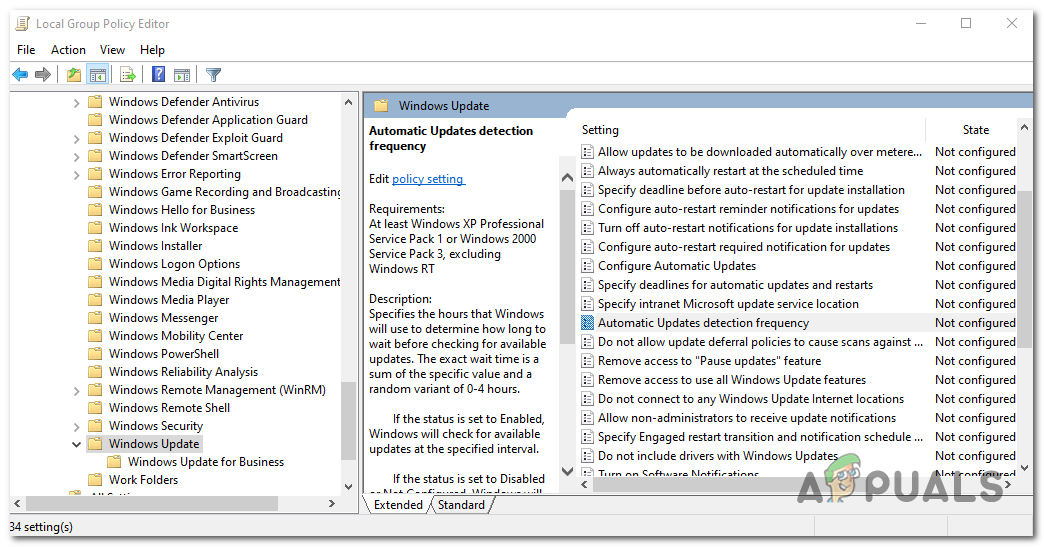
). Перейдите в раздел Computer Configuration -> Administrative Templates -> Windows Components -> Windows Update.
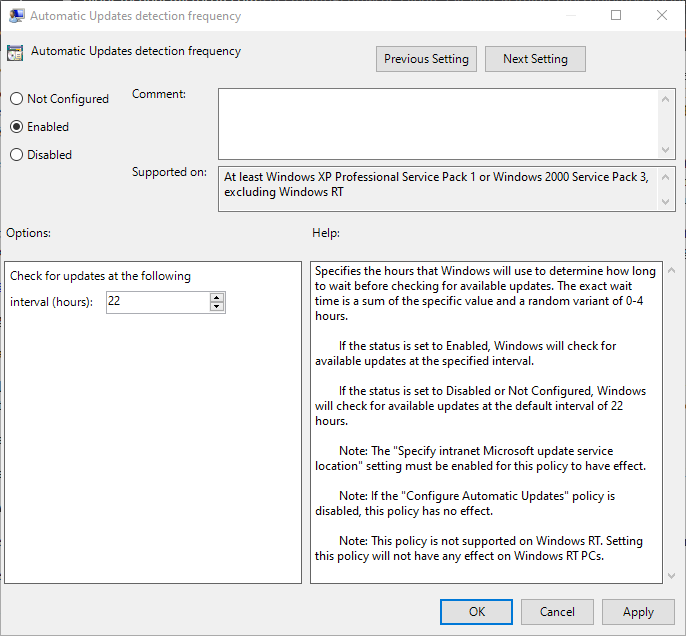
Включите параметр Automatic Update detection frequency и увеличьте частоту синхронизаций клиента с сервером обновлений до 3 часов.
Также можно на стороне сервера WSUS убрать ограничение на максимальный размер XML файла, который может скачать клиент с сервера. Для этого откройте SQL Server Management Studio и подключитесь к базе данных SUSDB. Выполните выполнить следующую команду T-SQL.
USE SUSDB
GO
Проверьте и запомните текущее значение:
select MaxXMLPerRequest from tbConfigurationC
Отключите ограничение:
UPDATE tbConfigurationC SET MaxXMLPerRequest = 0
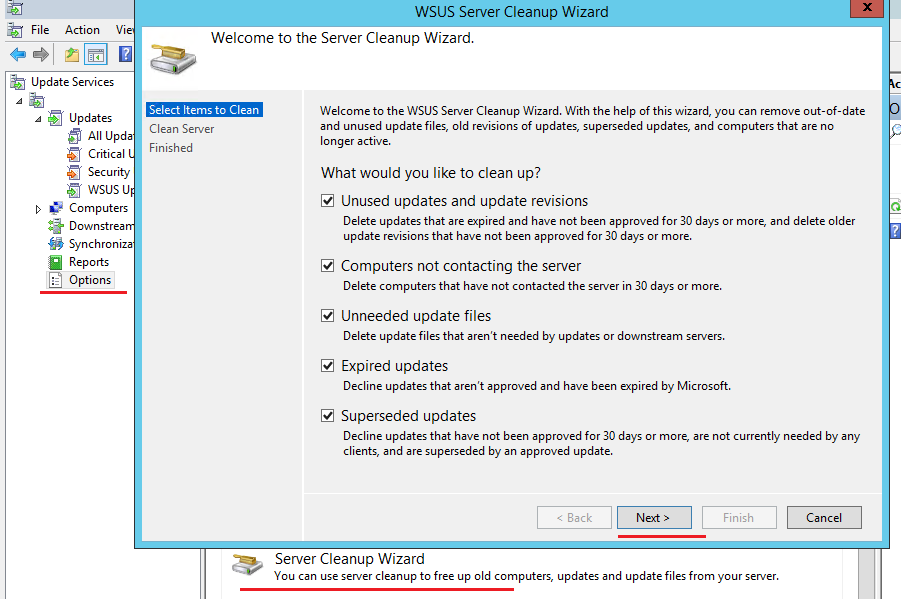
Чтобы не менять настройки в базе WSUS, можно выполнить очистку WSUS сервера с помощью встроенного мастера очистки (Консоль Update Service -> Options -> Server Cleanup Wizard -> все опции -> Next). Это удалит старые, неиспользуемые, и замененные обновления (особенно много мусора от обновлений MS Office), из-за которых может долго выполняться сканирование.
В результате такой операции, клиент Windows Update будет получать намного меньше мета-информации с WSUS сервера, и его взаимодействие должно уместиться в 200 сессий по 200кб.
Также попробуйте увеличить производительность пула WsusPool в IIS на сервере WSUS по рекомендация из стати Ошибка обновления Windows 80244022
WsusPool (Application Pools -> WsusPool -> Advanced settings):
- Private Memory Limit (KB) – 0 (убрать лимит 1.2 на использование RAM рабочим процессов WSUS)
- Queue Length — 25000 (увеличить длину очереди к пулу приложения с 10000)
- Limit Interval (minutes) — 15 (увеличить минут время для сброса счетчиков и выполнения CPU Throttling с 5 минут до 15)
- Service Unavailable Response — TcpLevel (при старом значение HttpLevel клиенту возвращается ошибка HTTP 503)
Отредактируйте файл config ( C:\Program Files\Update Services\WebServices\ClientWebService\web.config), заменив строку
httpRuntime maxRequestLength="4096"
на
httpRuntime maxRequestLength="204800" executionTimeout="7200"
Если все рассмотренные способы не помогли исправить ошибку обновления на клиенте, попробуйте полностью сбросить на нем настройки Windows Update и восстановить настройки по-умолчанию. После чего выполните несколько циклов поиска обновлений.
Время на прочтение6 мин
Количество просмотров266K
Windows 7 по-прежнему остается популярной операционной системой в корпоративной среде, несмотря на то, что уже вышли две новые версии клиентских ОС. Расширенная поддержка «семёрки» закончится лишь 14 января 2020 г., а это значит, что ближайшие 4 года для нее будут выходить обновления, исправляющие обнаруженные уязвимости.
Существует правило – если есть обновления, то есть и проблемы с их установкой. Давайте разберем, какие основные проблемы возникают при обновлении Windows 7 через Windows Server Update Services (WSUS) и как их исправить с наименьшими затратами.
Ошибка #1. Failed to find updates with error code 80244010
Эту ошибку вы практически гарантированно будете наблюдать на любой системе, впервые обратившейся к серверу WSUS. В WindowsUpdate.log также встретится предупреждение:
WARNING: Exceeded max server round trips
Причина проблемы в том, что список обновлений стал слишком большим, и клиент не может принять его за один заход. Подробности — blogs.technet.microsoft.com/sus/2008/09/18/wsus-clients-fail-with-warning-syncserverupdatesinternal-failed-0x80244010
Какое решение предлагает Microsoft? Если после ошибки запустить повторный поиск обновлений, то процесс загрузки метаданных продолжится с момента возникновения ошибки. Терпение господа, терпение. Три, пять попыток wuauclt /detectnow – и все образуется. Не забудьте при повторном поиске дождаться окончания предыдущего цикла поиска, иначе магия не сработает!
Ошибка #2. Не устанавливаются обновления Windows с ошибкой 0x80070308
Встречается эпизодически, и в одном случае из 100 у нее есть единственное и очень специфическое решение — удалить ключ
HKLM\Components\PendingRequired=1
Перезагрузиться. Здесь важно не переусердствовать, не следует удалять никакие другие ключи в этом разделе, даже если они вам очень не нравятся, потому что после этого обновления прекратят ставиться навсегда.
Ошибка #3. Все другие ошибки
Практически 100% других ошибок может решить System Update Readiness Tool (SURT) из статьи support.microsoft.com/en-us/kb/947821
Скачиваете пакет для вашей системы, устанавливаете, читаете лог %windir%\Logs\CBS\CheckSUR.log и если он заканчивается примерно так:
Summary:
Seconds executed: 1164
Found 16 errors
Fixed 4 errors
то вы наш клиент.
Проблема заключается в том, что во время установки обновлений в системе могут появиться битые файлы. Что является причиной — неисправная сеть, диск, оперативная память, сам Windows Update – выяснить не получится, а исправить ошибки для установки последующих обновлений придется.
Как правило, повреждаются *.cat, *.mum, *.manifest файлы. У кого-то повреждаются *.dll, но я на практике не сталкивался. И вроде бы средство SURT должно само исправить ошибки, поскольку внутри него есть огромный каталог эталонных файлов. Только в последний раз SURT обновлялся в октябре 2014 года, а исправлений на операционную систему с тех пор вышло бесчисленное множество, и многих файлов в каталоге не хватает.
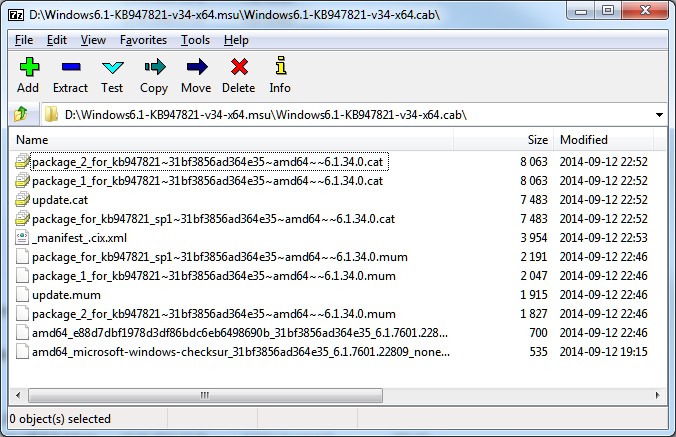
Ниже я опишу последовательность действий, необходимых для исправления ошибок установки обновлений на Windows 7 x64 с использованием SURT. Для редакции x86 просто потребуется другой пакет SURT из KB947821.
Последовательность действий будет следующая.
1. Запустить первый проход Windows6.1-KB947821-v34-x64.msu
Пользователя от работы отвлекать не потребуется, все сделаем удаленно. Создаем следующий командный файл и запускаем его:
set machine=BUHWKS02
xcopy Windows6.1-KB947821-v34-x64.msu \\%machine%\admin$\temp
psexec -s \\%machine% wusa "c:\windows\temp\Windows6.1-KB947821-v34-x64.msu" /quiet /norestart
pause
где BUHWKS02 – целевая машина.
Когда скрипт отработает и встанет на паузу, проверяем %windir%\Logs\CBS\CheckSUR.log
Если ошибок не найдено – дело не в битых обновлениях.
Если он заканчивается
Summary:
Seconds executed: 1164
Found 16 errors
Fixed 4 errors
CSI Manifest All Zeros Total count: 6
CSI Catalog Corrupt Total count: 3
Fixed: CSI Catalog Corrupt. Total count: 3
CBS MUM Corrupt Total count: 3
CBS Catalog Corrupt Total count: 3
CSI Catalog Thumbprint Invalid Total count: 1
Fixed: CSI Catalog Thumbprint Invalid. Total count: 1
Unavailable repair files:
winsxs\manifests\wow64_microsoft-windows-gdi32_31bf3856ad364e35_6.1.7601.19091_none_c19fa2719495aca9.manifest
winsxs\manifests\amd64_microsoft-windows-capi2-weakcrypto_31bf3856ad364e35_6.1.7601.23290_none_5e936c9c5ce2e8e6.manifest
winsxs\manifests\wow64_microsoft-windows-gdi32_31bf3856ad364e35_6.1.7601.23290_none_c22840d8adb43043.manifest
winsxs\manifests\amd64_microsoft-windows-gdi32_31bf3856ad364e35_6.1.7601.19091_none_b74af81f6034eaae.manifest
winsxs\manifests\amd64_microsoft-windows-capi2-weakcrypto_31bf3856ad364e35_6.1.7601.19091_none_5e0ace3543c4654c.manifest
winsxs\manifests\amd64_microsoft-windows-gdi32_31bf3856ad364e35_6.1.7601.23290_none_b7d3968679536e48.manifest
servicing\packages\Package_2_for_KB3123479~31bf3856ad364e35~amd64~~6.1.1.0.mum
servicing\packages\Package_2_for_KB3123479~31bf3856ad364e35~amd64~~6.1.1.0.mum
servicing\packages\Package_for_KB3123479_SP1~31bf3856ad364e35~amd64~~6.1.1.0.mum
то будем исправлять.
2. Копируем эталонные файлы на целевую машину
Microsoft предлагает нам длинную, путанную процедуру с извлечением хороших файлов из обновлений и размещением их в определенные каталоги средства SURT. При этом пути в статьях неверные. Где-то и вовсе рекомендуют подкладывать оригинальные msu файлы.
Самый простой и правильный вариант следующий — скопировать эталонные файлы с рабочей системы:
*.mum and *.cat из C:\Windows\servicing\Packages складываются в %windir%\Temp\CheckSUR\servicing\packages
*.manifest из C:\Windows\winsxs\Manifests складываются в %windir%\Temp\CheckSUR\winsxs\manifests\
Проблема в том, что битых файлов обычно десятки, и их очень сложно выбрать и скопировать. Тогда на помощь приходит следующий скрипт PowerShell (эталонной считается машина, с которой вы запускаете скрипт)
cls
$flag = $false
$destPC = "\\BUHWKS02"
$log=get-content $($destPC + "\admin$\Logs\CBS\CheckSUR.log")
$MUMCATSource = "C:\Windows\servicing\Packages\"
$MUMCATDest = $destpc + "\admin$\Temp\CheckSUR\servicing\Packages\"
$MANIFESTSource = "C:\Windows\winsxs\Manifests\"
$MANIFESTDest = $destpc + "\admin$\Temp\CheckSUR\winsxs\Manifests\"
If ((Test-Path -Path $MUMCATDest -PathType Container) -eq $false) {New-Item -Path $MUMCATDest -ItemType directory }
If ((Test-Path -Path $MANIFESTDest -PathType Container) -eq $false) {New-Item -Path $MANIFESTDest -ItemType directory}
foreach ($line in $log) {
    if ($flag -eq $True){
        if ($line.trim().Length -ne 0) {
            $fileArray=$($line.Split("\"))
            $file = $FileArray[$FileArray.Length-1]
            $extArray = $file.split(".")
            $ext = $extArray[$extArray.length-1]
            if ($ext -eq "manifest") {
                Write-Warning $("Copying " + $($MANIFESTSource+$file)+" to " + $MANIFESTDest)
                Copy-Item $($MANIFESTSource+$file) $($MANIFESTDest+$file)
            }
            if (($ext -eq "mum") -or ($ext -eq "cat") ) {
                Write-Warning $("Copying " + $($MUMCATSource+$file)+" to " + $MUMCATDest)
                Copy-Item $($MUMCATSource+$file) $($MUMCATDest+$file)
            }
        }
    }
    if ($line -eq "Unavailable repair files:") {$flag = $true}
}
Как видите, скрипт прост и может быть легко заточен напильником под вашу инфраструктуру.
3. Запускаем второй проход Windows6.1-KB947821-v34-x64.msu
После копирования файлов мы повторно запускаем SURT, используя командный файл из первого шага. При повторном запуске средство сможет подхватить скопированные нами эталонные файлы из %windir%\Temp\CheckSUR и заменить ими испорченные.
Если мы сделали все правильно, то %windir%\Logs\CBS\CheckSUR.log примет следующий вид:
=================================
Checking System Update Readiness.
Binary Version 6.1.7601.22471
Package Version 26.0
2016-03-03 09:15
Checking Windows Servicing Packages
Checking Package Manifests and Catalogs
Checking Package Watchlist
Checking Component Watchlist
Checking Packages
Checking Component Store
Summary:
Seconds executed: 1435
No errors detected
Теперь можно продолжить установку обновлений на целевую машину, например, следующими командными файлами:
set machine= BUHWKS02

psexec -i -s \\%machine% wuauclt /detectnow

pause
set machine= BUHWKS02
psexec -i -s \\%machine% wuauclt /updatenow
pause
Ошибка #4. Если SURT отработал нормально, а обновления все равно не ставятся
Попробуйте прибегнуть к старому приему – сбросить службу Windows Update в исходное состояние. Для этого необходимо удалить каталог %windir%\SoftwareDistribution.
Создаем файл WU-cleanupCMD.cmd:
net stop wuauserv

rmdir /s /q %windir%\SoftwareDistribution

net start wuauserv

wuauclt /detectnow
Запускаем:
set machine= BUHWKS02

psexec -c -s \\%machine% WU-cleanupCMD.cmd

pause
После этого возникнет Ошибка #1, но как бороться с ней мы уже знаем.
Ошибка #5
Клиент исчезает из консоли WSUS. Любопытная ошибка, связанная с неправильным клонированием машин и задвоением (затроением и т.д.) идентификаторов клиентов. Решается так:
net stop wuauserv
REG DELETE "HKLM\SOFTWARE\Microsoft\Windows\CurrentVersion\WindowsUpdate" /v SusClientId /f
REG DELETE "HKLM\SOFTWARE\Microsoft\Windows\CurrentVersion\WindowsUpdate" /v SusClientIdValidation /f
net start wuauserv
wuauclt /resetauthorization /detectnow /reportnow
Ошибка #6
GetCookie failure, error = 0x8024400D, soap client error = 7, soap error code = 300, HTTP status code = 200
SyncUpdates failure, error = 0x80072EE2, soap client error = 5, soap error code = 0, HTTP status code = 200
Windows Update Client failed to detect with error 0x80072ee2
Ошибка связана с нехваткой ресурсов в AppPool WSUS. Решение — снять лимит на потребляемую память. Как это сделать — статья.
Коротко: Открываем IIS, Application Pools, WsusPool, Advanced Settings.
Параметр Private Memory Limit устанавливаем в 0.
Продолжение темы настройки WSUS — в моей следующей статье: https://habrahabr.ru/post/329440/
PS:
Многие ошибки решены в новом клиенте WSUS:
1. KB3125574 «Windows 7 post SP1 Convenience Rollup Update». Внимательно ознакомьтесь с разделом Known issues!
Предварительно необходимо установить KB3020369 «April 2015 servicing stack update for Windows 7 and Windows Server 2008 R2».
Удачного администрирования!
Readers help support Windows Report. We may get a commission if you buy through our links.
Read our disclosure page to find out how can you help Windows Report sustain the editorial team. Read more
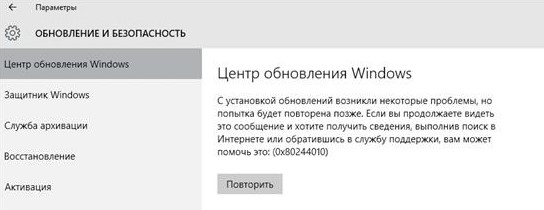
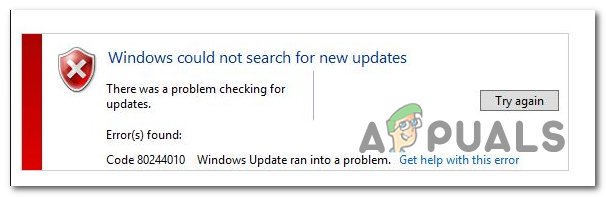
The Windows Update error 80244010 can arise in various Windows platforms. When Windows can’t search for and find new updates, users see an 80244010 error code.
The error message states:
Windows could not search for new updates.
It’s an issue that often arises on desktops or laptops connected to a LAN network. If you need to fix error code 80244010, check out the potential resolutions below.
What causes the windows update error 80244010?
There are several possible causes for the Windows Update error 80244010. Some of the most common causes include:
- Network connectivity issues – This error can sometimes occur if your computer cannot connect to the internet or the Windows Update servers.
- Firewall or antivirus software – Your firewall or antivirus software may be blocking the Windows Update process.
- Corrupted system files – This error can also be caused by corrupted system files, preventing the Windows Update process from completing successfully.
- Insufficient disk space – If your hard drive is full or almost full, this can cause the Windows Update process to fail.
- Pending updates – If you have pending updates waiting to be installed, this can also cause the error 80244010 to occur.
To fix this error, you may need to troubleshoot your network connectivity, and try the suggestions listed below.
How do I fix the Windows Update error 80244010?
1. Run the Windows Updater troubleshooter
First, open the Windows Update troubleshooter, which might provide some resolutions for error 80244010.
- To do that via the Control Panel, press the Windows key + R hotkey.
- Input Control Panel in the Open text box, and click the OK button.
- Select the All Control Panel Items option shown below.

- Click Troubleshooting to open the applet directly below.
- Click View All, and then select Windows Update.
- Click Advanced to select an Apply all repairs automatically option.

- Press the Next button.
- Select the Apply this fix option.


2. Run a System File Checker Scan
As error 80244010 can be due to corrupted system files, a System File Checker scan might resolve it.
- Press the Windows key + S hotkey.
- Enter cmd in the search box.
- Right-click Command Prompt to select Run as administrator.
- Enter this command first:
- DISM.exe /Online /Cleanup-image /Restorehealth.
- Press the Return key after entering.
- Then enter sfc /scannow in the Command Prompt, and press the Return key.

- Wait for the SFC scan to finish. Restart Windows if the scan repairs files.

3. Reset the update components
Resetting Windows Update’s components might fix error 80244010.
- To do that, open the Command Prompt as an administrator.
- Then input the separate commands below:
- net stop wuauserv
- net stop cryptSvc
- net stop bits
- net stop msiserver
- net stop wuauserv
- Enter the command ren C:WindowsSoftwareDistribution SoftwareDistribution.old, and press the Return button.
- Then input ren C:WindowsSystem32catroot2 Catroot2.old in the Prompt, and press the Enter key.

- Input these commands separately to restart their services:
- net start wuauserv
- net start cryptSvc
- net start bits
- net start msiserver
- net start wuauserv

4. Enable the Detection Frequency in Group Policy Editor
If you’re encountering error 80244010 on a network server or client, try enabling Detection Frequency with the Group Policy Editor.
- Open the Run accessory.
- Input gpedit.msc in the Open box and click OK to open Group Policy Editor.
- Then click Computer Configuration, Administrative Templates, Windows Components, and Windows Updates on the left of Group Policy Editor.

- Double-click the Automatic Update detection frequency policy on the right of the window.
- Select the Enabled option.
- Then enter a value less than the default 22 in the interval text box.
- Click the Apply option.
- Click OK to close the window.

5. Reset Windows
Resetting Windows to refresh it might also fix error 80244010.
- You can reset Windows 10 by entering reset in the search box.
- Click Reset this PC to open the Settings window as shown directly below.

- Click Get started to open the Reset this PC window.
- Select the Keep my files option.

- Press the Next and Reset buttons.


- Microsoft says a “really bad” bug halted Windows 11 25H2 rollout to Canary channel
- Windows 11 is getting new Start menu, Notepad upgrades, and more
- Windows 11 KB5055653 Beta improves HDR and Windows Update
- Windows 11 KB5055651 Dev introduces Dolby Vision, improved HDR & more
- Microsoft fixes Group Policy bug that prevented Windows 11 24H2 installation
Those are a few of the confirmed fixes for error 80244010. Let us know which of these solutions worked for your PC by leaving us a message in the comments section below.
Matthew Adams
Windows Hardware Expert
Matthew is a freelancer who has produced a variety of articles on various topics related to technology. His main focus is the Windows OS and all the things surrounding it.
He is passionate about the tech world, always staying up-to-date with the latest and greatest. With an analytical view, he likes problem-solving, focusing on errors and their causes.
In his free time, he likes to read and write about history and tries to always develop new skills.
Windows Error 0x80244010 generally triggers while installing a new WSUS server for many of the Windows clients.
Our Server Administration Techs handles different issues that cause this error on a daily basis.
Today, let us discuss various methods to fix ‘Windows Error 0x80244010’ and restore Windows update subsystem functionality.
Windows Error 0x80244010 – Causes

After installing a new WSUS server, many Windows clients could not receive new updates, resulting in the error 0x80244010. This error is typical also for the devices that receive updates directly from Windows Update servers.
An Overview:
- Causes of Windows Error 0x80244010
- Reasons Behind System File Corruption
- Methods to troubleshoot Windows Error 0x80244010
Causes of Windows Error 0x80244010
Major causes of Windows Error 0x80244010 include:
-
Generic glitch
Generic glitch is quite common on Windows endpoint machines. Microsoft already has a selection of built-in repair strategies that are ready to deploy.
We can attempt to fix it by running the built-in Windows Update troubleshooter and by applying the fix that it recommends.
-
Corrupt File in the WU temp folders
Similarly, another scenario is a corrupt temp file in the SofwareDistribution or Catroot2folders. This may occur after a botched update or after an AV scan.
In this scenario, we can fix the issue by running a series of commands capable of resetting every WU component including the two temp folders.
-
The machine cannot update conventionally
Under certain circumstances, the WU component might not work automatically.
If the WU function is blocked at a system level, we can most likely fix the issue. Use the System Update Readiness tool to install the updates that are failing to install conventionally.
-
Disabled Detection Frequency policy
When the client exceeds the default number of allowed trips to the WSUS server, it encounters this issue on a Windows Server.
To fix this issue, we have to use the Local Group Policy editor to enable the Automatic Update detection policy and set a global updating interval.
-
System File Corruption
On the other hand, if the Windows Update troubleshooter isn’t able to fix the issue automatically, the affected system may have an underlying corruption issue that cannot resolve conventionally.
In this case, we can fix the issue by refreshing every Windows component with Clean install or Repair install (in-place repair).
First, to diagnose the problem, open the WindowsUpdate.log, which is located in %Windir% folder.
2018-10-04 16:10:28:661 121 2a2b2 PT WARNING: Exceeded max server round trips: 0x80244010 2018-10-04 16:10:28:661 121 2a2b2 PT WARNING: Sync of Updates: 0x80244010 2018-10-04 16:10:28:661 121 2a2b2 PT WARNING: SyncServerUpdatesInternal failed: 0x80244010 2018-10-04 16:10:28:661 121 2a2b2 Agent * WARNING: Failed to synchronize, error = 0x80244010 2018-10-04 16:10:29:042 282 2a2b2 Agent * WARNING: Exit code = 0x80244010 2018-10-04 16:10:29:042 282 2a2b2 Agent ********* 2018-10-04 16:10:29:042 282 2a2b2 Agent ** END ** Agent: Finding updates [CallerId = AutomaticUpdates] 2018-10-04 16:10:29:042 282 2a2b2 Agent ************* 2018-10-04 16:10:29:042 282 2a2b2 Agent WARNING: WU client failed Searching for update with error 0x80244010 2018-10-04 16:10:29:042 282 2221c AU >>## RESUMED ## AU: Search for updates [CallId = {128CCEAD-F84D-405E-9BC2-607D1694894B}] 2018-10-04 16:10:29:042 282 2221c AU # WARNING: Search callback failed, result = 0x80244010 2018-10-04 16:10:29:042 282 2221c AU # WARNING: Failed to find updates with error code 80244010
Make note of the error, “Exceeded max server round trips: 0x80244010″. It means that the maximum number of requests to the update server (WSUS) exceeds while scanning for updates.
This is also indicated by the Windows Update error code, according to the table (SUS_E_PT_EXCEEDED_MAX_SERVER_TRIPS).
The server disconnects a client that exceeds the maximum trip number. The trip limit in the Windows update receiving protocol is set as 200 trips by default.
Similarly, there is a limit on the maximum size of an XML file the client can download from the update server during a trip – 200 KB. The greater number of updates on the server, the larger the size of the downloading XML file.
If a client fails to obtain the necessary data in 200 trips, it disconnects from the server, resulting in error 0x80244010.
Let us now look into system file corruption in detail.
Reasons Behind System File Corruption
There are dozens of reasons why Windows files or system files might get corrupt, but among the most common are:
-
Unstable network connection:
As a rule, this occurs due to the poor or unstable network connection to the WSUS server or if a client wants to receive too many updates.
The easiest way is to click the ‘Try Again’ button on a client several times in the Windows Update section of the Control Panel or run the command:
Once we start the search for updates, wait for 15 minutes for the previous cycle of update search to finish.
In most cases, this can solve the problem, but if there are a lot of clients in the network, this method is not acceptable.
-
Unsynchronized updates
We can synchronize the updates using the group policy, “Automatic Update detection frequency”. Go to, Computer Configuration -> Administrative Templates -> Windows Components -> Windows Update.
Automatic Update detection frequency specifies the number of hours that Windows will wait before checking for available updates. The exact wait time is found by using the number of hours specified minus a random value between 0 and 20 percent of that number.
For example, if this policy is used to specify a 20-hour detection frequency, then all computers with this policy will check for updates anywhere between 16 and 20 hours.
If the status is set as Enabled, Automatic Updates will check for available updates at specific intervals.
Similarly, If the status is set as Disabled or Not Configured, Automatic Updates will check for available updates at the default interval of 22 hours.
We can also remove the limit on the maximum XML file size that the client can download from the WSUS server.
To do it, run the following command in WSUSDB database:
USE SUSDB GO UPDATE tbConfigurationC SET MaxXMLPerRequest = 0
If we do not want to change our WSUS database settings, clean up the WSUS server using the integrated Cleanup Wizard (Update Service console -> Options -> Server Cleanup Wizard -> all options -> Next). Then, remove old, not in use updates.
As a result, the Windows Update client will get less meta-information from the WSUS server, and the interaction will fit in 200 sessions of 200 KB each.
[Bobcares support techs rely on a systematic troubleshooting approach as much as we focus on the right tools for the job.]
Methods to troubleshoot Windows Error 0x80244010
Windows Error 0x80244010 and its solution involve various steps. Let’s have a detailed look into it:
-
Run the Windows Update troubleshooter
To launch the Windows Update troubleshooter on Windows 7 in order to fix the 80244010 error, follow the below steps:
- Press Windows key + R to open up a Run dialog box
- Type ‘control’ and press Enter to open up the classic Control Panel interface
- Once inside, use the search function in the top-right corner to search for ‘troubleshoot’
- Then, from the list of results, click on Troubleshooting to expand on the list of integrated troubleshooters
- In Troubleshoot computer problem screen, click on System and Security from the list of available options
- Click on ‘Windows Update’ under the ‘Windows category’
- After we successfully manage to open the troubleshooter, start by clicking on the Advanced button and checking the box along with Apply repairs automatically
- Once its done, click on Next to advance to the next menu.
- Wait for the initial scan to complete, then click on Apply this fix if the repair strategy is not done automatically.
- When prompted to restart, do so and see if the issue is resolved at the next system startup by attempting to use the Windows Update feature again.
-
Reset WU components
- Press Windows key + R to open up a Run dialog box
- Type ‘cmd‘ inside the text box and press ‘Ctrl + Shift + Enter’ to open up a Command Prompt
- In case you find the UAC (User Account Control), click Yes to grant admin access.
- Once inside, type the following commands and press ‘Enter’ after each one:
net stop wuauserv
net stop cryptSvc
net stop bits
net stop msiserver
- These successive commands will stop the Windows Update service, the MSI Installer, the Cryptographic service, and the BITS service.
- Run the following commands in the same CMD window and press Enter after each one to rename the two folders responsible for storing temporary WU files (SoftwareDistribution and Catroot2):
ren C:WindowsSoftwareDistribution SoftwareDistribution.old ren C:WindowsSystem32catroot2 Catroot2.old
- Renaming these two folders will force the Windows Update component to create new folders and prevent any corrupt files from affecting the updating operations
- After the two folders rename, run these final commands in quick succession (press Enter after each one) to start the same services that we disabled at step 2:
net start wuauserv net start cryptSvc net start bits net start msiserver
- Once the service restarts, repeat the action that was previously causing the Windows Update 80244010 error and see if the resolve it done.
-
Run the System Update Readiness Tool
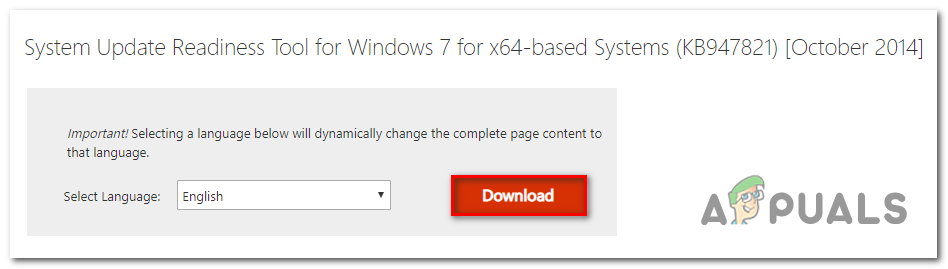
- Visit the URL https://www.microsoft.com/en-us/download/details.aspx?id=20858 and download the latest version of the System Update Readiness Tool. Once it’s done, select the language and click the Download button for the latest version.
- Keep in mind that the download is quite large, so wait patiently.
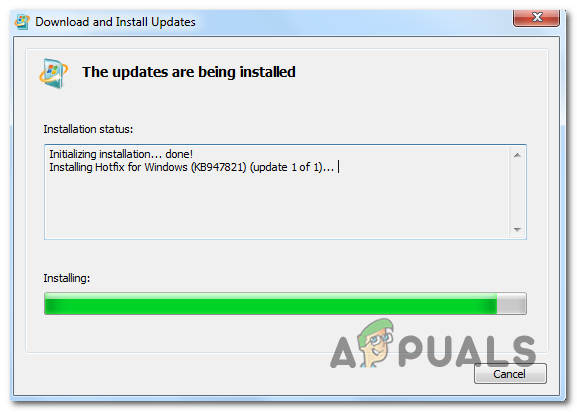
- Once the download is complete, open the System Update Readiness Tool executable and wait for the initial scan to complete.
- We can see the utility downloading and installing the updates that were previously failing with the 80244010 error.
- After the operation is complete, restart your computer and see if the fix is done.
-
Enable the Detection Frequency policy
To set Automatic Update detection frequency, follow the steps given below:
- In the Group Policy Object Editor, expand Computer Configuration, expand Administrative Templates, expand Windows Components
- Then click ‘Windows Update’
- In the details pane, click Automatic Update detection frequency, click Enabled, and type the number of hours for the detection interval
- Click OK
- Refresh OS components
-
Clean install:
On one hand, this procedure is the easiest, but the disadvantage is that unless you back up your data, you will lose personal files. As opposed to a clean install, this procedure does not require compatible installation media.
-
Repair install (in-place upgrade):
Likewise, this procedure will require to use a compatible installation media. We will have to be technical, but the advantage is that the operation will only touch the Windows files. This means, all your personal files & settings will remain untouched.
If neither of the methods helps fix the update error, clear Windows Update temporary cache and try to search for updates several times.
-
Stop Windows Update service
- Click ‘Start’ and type for “services.msc”,
- In search results “services.msc” should show up. Open it,
- A new window will open containing all Windows services,
- Search for ‘Windows Update’
- Right-click on ‘Windows Update’ and click ‘Stop’.
-
Clear the Windows Update temporary cache folder
- Hold windows-key pressed and hit “R” key simultaneous,
- A small new window will appear,
- Type %windir%SoftwareDistributionDataStore in this new window and click OK,
- This will open Windows Explorer in the correct location,
- Delete all contents of this folder.
-
Start the Windows Update Service again
- Switch back to the windows Services,
- Locate Windows Update,
- Right-click on it and choose Start.
[Looking for assistance to fix windows errors? We are here for you!]
Conclusion
To conclude, WSUS Windows Error 0x80244010 can occurs due to several reasons including, generic glitch, corrupt file in the WU temp folders, system file corruption and so on. Today, we saw how our Support Engineers systematically troubleshoot the WSUS Windows Error 0x80244010.
PREVENT YOUR SERVER FROM CRASHING!
Never again lose customers to poor server speed! Let us help you.
Our server experts will monitor & maintain your server 24/7 so that it remains lightning fast and secure.
GET STARTED
var google_conversion_label = «owonCMyG5nEQ0aD71QM»;
The Windows Update Error Code 80244010 typically occurs when the operating system (most commonly Windows 7 and Windows Server) is no longer able to search and find new updates (even though the build is outdated). This issue is more frequent with WSUS (Windows Server Update Services).
Some of the most common reasons behind Windows Update failing with the above error code are:
- Generic glitch – This issue is quite common on Windows 7 endpoint machines, and Microsoft already has a selection of built-in repair strategies that are ready to be deployed. If this scenario is applicable, you can attempt to fix the problem by running the built-in Windows Update troubleshooter and applying the fix that will get automatically recommended.
- Corrupted File in the WU temp folders – Another scenario in which this error will occur is a corrupted temp file located in the SofwareDistribution or Catroot2folders. This might occur after a botched update or after an AV scan that ended up quarantining some items related to the Windows Update component. In this case, you can fix the issue by running a series of commands capable of resetting every WU component including the two temp folders.
- The machine cannot be updated conventionally – Under certain circumstances, the WU component might not work automatically. If the WU function is blocked at a system level, you can most likely fix the issue and bring your OS to build up to date by using the System Update Readiness tool to install the updates that are failing to install conventionally.
- Disabled Detection Frequency policy – If you’re encountering the issue on a Windows Server edition, it’s most likely due to the fact that one of the clients has exceeded the number of trips allowed by default to the WSUS server. To fix this issue in this case, you will need to use the Local Group Policy editor to enable the Automatic Update detection policy and set a global updating interval for all the involved machines.
- System File Corruption – If the Windows Update troubleshooter isn’t able to fix the issue automatically, chances are the affected system is suffering from an underlying corruption issue that cannot be resolved conventionally. In this case, you can fix the issue by refreshing every Windows component with a procedure like a Clean install or Repair install (in-place repair).
Methods to Troubleshoot the Windows Update Error Code 80244010
1. Run the Windows Update troubleshooter
If you’re encountering this issue on an end-user version of Windows 7, there’s a chance that the culprit causing the problem is already covered by a Microsoft-deployed repair strategy. Several affected users that also struggled to resolve this issue have confirmed that running the Windows Update troubleshooter allowed them to fix the issue automatically.
This built-in utility holds a collection of automated repair strategies that will fix a wide variety of Windows Update errors. This tool will start by looking for any inconsistencies, then deploy the appropriate fix automatically if the problem is already covered by a repair strategy.
Here’s a quick guide on how to launch the Windows Update troubleshooter on Windows 7 in order to fix the 80244010 error:
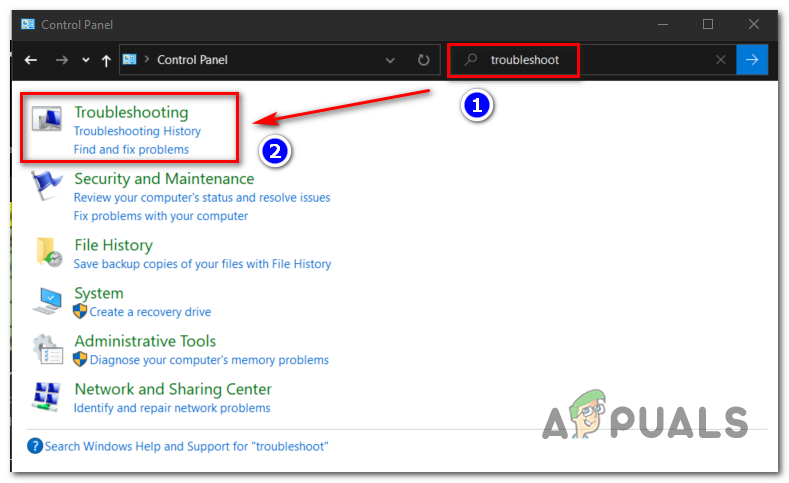
- Press Windows key + R to open up a Run dialog box. Next, type ‘control’ and press Enter to open up the classic Control Panel interface.
Accessing the Classic Control Panel interface - Once you’re inside the Classic Control Panel interface, use the search function in the top-right corner to search for ‘troubleshoot’. Then, from the list of results, click on Troubleshooting to expand on the list of integrated troubleshooters.

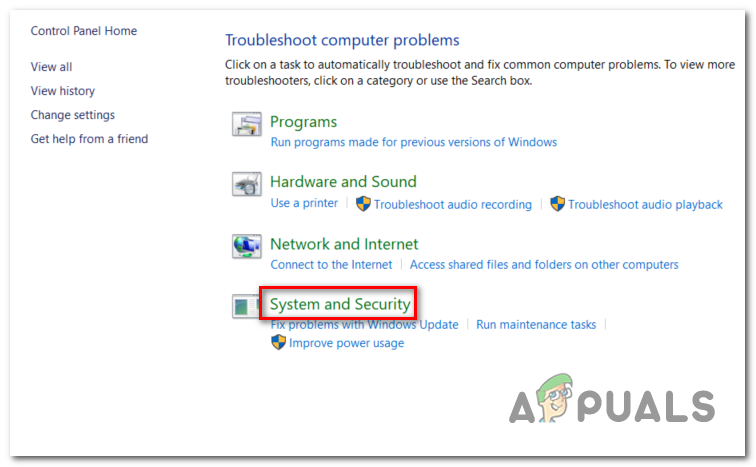
Accessing the classic troubleshooting menu - Once you see the Troubleshoot computer problem screen, click on System and Security from the list of available options.

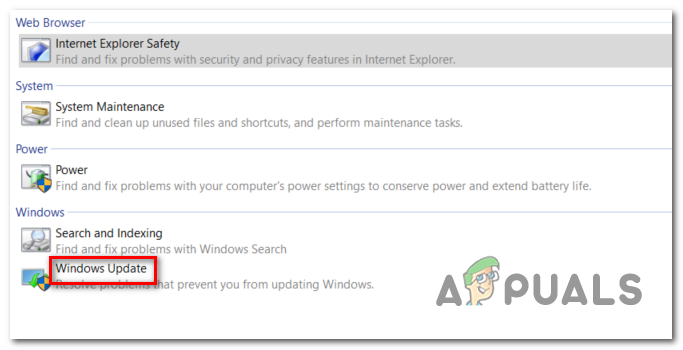
Accessing the System and Security Troubleshooting menu - Once you’re inside the Troubleshoot problems menu, click on Windows Update under the Windows category.

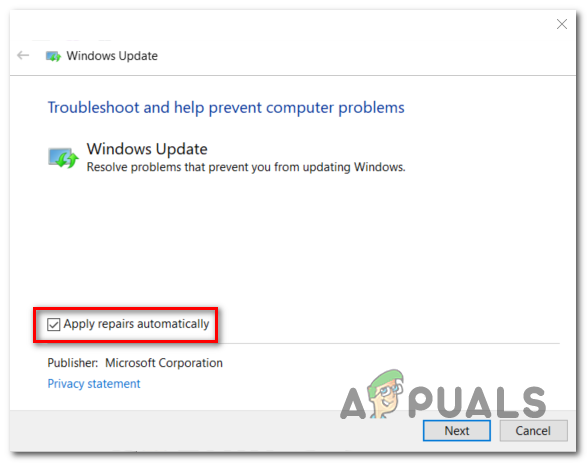
- After you successfully manage to open the troubleshooter, start by clicking on the Advanced button and checking the box associated with Apply repairs automatically. Once this is checked, click on Next to advance to the next menu.

Configuring the Windows Update troubleshooter - Wait for the initial scan to complete, then click on Apply this fix if the repair strategy isn’t applied automatically.

Apply this fix - If you are prompted to restart, do so and see if the issue is resolved at the next system startup by attempting to use the Windows Update feature again.

Restart after Windows Update repair strategy was enforced

If you’re still encountering the same Windows Update 80244010 error when you attempt to use the WU function, move down to the next potential fix below.
2. Reset WU components
Another potential cause that might end up triggering the Windows Update 80244010 error is a network inconsistency. In most cases, the problem will be facilitated by a glitched WU component or by a corrupted temporary file located in the SofwareDistribution or Catroot2 folders.
If this scenario is applicable, you can fix the issue swiftly by resetting all WU (Windows Update) components and dependencies involved in this process. There are several different users that confirmed this operation as being the successful fix that allowed them to eliminate the error.
Here’s a quick guide on doing this:
- Press Windows key + R to open up a Run dialog box. Next, type ‘cmd‘ inside the text box and press Ctrl + Shift + Enter to open up an elevated Command Prompt. In case you’re prompted by the UAC (User Account Control), click Yes to grant admin access.
Running the Command Prompt - Once you’re inside the elevated CMD prompt, type the following commands in order and press Enter after each one to stop a selection of key Windows Update services:
net stop wuauserv net stop cryptSvc net stop bits net stop msiserver
Note: These successive commands will stop the Windows Update service, the MSI Installer, the Cryptographic service, and the BITS service.
- After you manage to disable all relevant service, run the following commands in the same elevated CMD window and press Enter after each one to rename the two folders responsible for storing temporary WU files (SoftwareDistribution and Catroot2):
ren C:\Windows\SoftwareDistribution SoftwareDistribution.old
ren C:\Windows\System32\catroot2 Catroot2.old
Note: Renaming these two folders will force the Windows Update component to create new folders that will take the place of the old ones and prevent any corrupted files from affecting the updating operations.
- After the two folders have been renamed, run these final commands in quick succession (press Enter after each one) to start the same services that you disabled at step 2:
net start wuauserv
net start cryptSvc
net start bits
net start msiserver
- Once the services have been restarted, repeat the action that was previously causing the Windows Update 80244010 error and see if the issue is now resolved.
In case the issue is still not resolved, move down to the next potential fix below.
3. Run the System Update Readiness Tool
As it turns out, a lot of Windows 7 users have managed to fix the issue by downloading the latest version of the System Update Readiness Tool. Although this tool is included with almost all Windows installations, it’s likely not the latest version available.
Ensuring that you download and use the latest version of the System Update Readiness Tool will allow you to fix the issue swiftly with no additional steps.
Here’s a quick guide on downloading & using the latest version of the System Update Readiness Tool:
- Visit this link (here) and download the latest version of the System Update Readiness Tool. Once you get there, select your language and click the Download button to start the download of the latest version.

System Update Readiness Tool Note: Keep in mind that the download is quite large, so wait patiently until the entirety of the tool is downloaded.
- Once the download is complete, open the System Update Readiness Tool executable and wait for the initial scan to complete.
- Depending on the issues discovered, you might see the utility downloading and installing the updates that were previously failing with the 80244010 error.

Running the Update Readiness Tool - After the operation is complete, restart your computer and see if the issue is resolved at the next system startup.
In case the same issue is still occurring, move down to the next potential fix below.
4. Enable the Detection Frequency policy
If you’re encountering this issue on a Windows Server version, it’s very likely that the error 0x80244010 is evidence that a client has exceeded the number of trips allowed to a WSUS server. The error code can be translated to WU_E_PT_EXCEEDED_MAX_SERVER_TRIPS and typically occurs on new machines.
To fix this, you will need the Local Group Policy Editor to make a modification to a policy called Automatic Update detection frequency. By enabling this policy, you will force all machines part of the group to use the same specified updating interval.
Here’s a quick guide on using the Local Group Policy Editor to modify the Automatic Update detection frequency policy to fix the 80244010 error:
Note: Keep in mind that not all Windows versions will have the GPEDIT utility installed by default.
- Press Windows key + R to open up a Run dialog box. Next, type ‘gpedit.msc’ inside the text box and press Enter to open up the Local Group Policy Editor. In case you’re prompted by the UAC (User Account Control), click Yes to grant administrative privileges.
Running the Local Policy Group Editor - Once you’re inside the Local Group Policy Editor, use the left-hand section of the screen to navigate to the following location:
Computer Configuration > Administrative Templates > Windows Components > Windows Updates
- After you arrive at the correct location, move down to the right section and find the Automatic Update detection frequency policy from the list of available options. Once you see it, double-click on it.

Automatic Update Detection Frequency policy - Inside the Automatic Update detection policy, start by setting the state to Enabled. Next, move down to the Options section and set an acceptable interval that will be used globally by all affected machines.

Modifying the Automatic Update Detection policy - Once everything is set up, click on Apply to save the changes, then restart every affected machine and see if the problem has been resolved.
If your WSUS component is still triggering the 80244010 error message, move down to the final fix below.
5. Refresh OS components
If none of the methods presented above have allowed you to resolve the issue, it’s very likely that you’re encountering the due to a Windows inconsistency that you can’t resolve conventionally. In this case, the only viable fix is to reset every Windows component in order to ensure that any type of corruption is removed.
If it all boils down to this, you have a couple of ways forward:
- Clean install – This procedure is the easiest out of the bunch, the major disadvantage is that unless you back up your data in advance, you will lose any personal files including applications, games, and personal media. But as opposed to a clean install, this procedure does not require a compatible installation media.
- Repair install (in-place upgrade) – This procedure will require you to use a compatible installation media. You will need to get a little technical, but the major advantage is that the operation will only touch the Windows files. This means that all your personal files & settings (including videos, photos, music folder, apps, games, and even some user preferences) will remain untouched.
Kevin Arrows
Kevin Arrows is a highly experienced and knowledgeable technology specialist with over a decade of industry experience. He holds a Microsoft Certified Technology Specialist (MCTS) certification and has a deep passion for staying up-to-date on the latest tech developments. Kevin has written extensively on a wide range of tech-related topics, showcasing his expertise and knowledge in areas such as software development, cybersecurity, and cloud computing. His contributions to the tech field have been widely recognized and respected by his peers, and he is highly regarded for his ability to explain complex technical concepts in a clear and concise manner.