
При установке компонентов .NET Framework 3.5 или других версий как через Панель управления, так и путем загрузки установщика с официального сайта, вы можете столкнуться с сообщением об ошибке 0x8024402C или же бесконечным ожиданием на этапе «Скачивание необходимых файлов».
В этой инструкции о том, чем может быть вызвана такая ошибка в Windows 11 и Windows 10 и способах её исправить. Коды ошибки 0x80072EFD, 0x80072EE2, 0x80072EF3, а также эти коды ошибки в других расположениях, таких как Центр обновления или Microsoft Store обычно имеют те же причины.
Прокси-сервер и другие проблемы подключения

Как правило, как бесконечное скачивание необходимых файлов, так и ошибка вызваны проблемами с подключением к серверам Майкрософт, с которых происходит загрузки, что может быть вызвано:
- Использованием VPN и настройками прокси-сервера
- Работой сторонних файрволлов или средств защиты в Интернете сторонних антивирусах
- Целенаправленной блокировкой доступа к серверам Майкрософт в нелицензионных версиях Windows
Чаще всего причина именно в настройках прокси-сервера, причем сам по себе Интернет может исправно работать. Решение в данном случае состоит из следующих шагов:
- Отмените установку .NET Framework (может отменяться долго, «зависнуть», но в результате отменяется).
- Нажмите клавиши Win+R на клавиатуре, введите inetcpl.cpl и нажмите Enter.
- Перейдите на вкладку «Подключения» и нажмите кнопку «Настройка сети».

- Снимите все отметки, включая «Автоматическое определение параметров», примените настройки и закройте окно.
- Запустите командную строку от имени администратора (способы это сделать), после чего введите команду
netsh winhttp import proxy source=ie
и нажмите Enter.

- Закройте командную строку и снова попробуйте выполнить установку необходимых компонентов.


Если это не сработало, рекомендую дополнительно проверить файл hosts на наличие блокировок серверов Майкрософт (и убрать их при наличии), попробовать временно отключить брандмауэр Windows. При наличии сторонних файроволлов, средств защиты в Интернете в антивирусах, попробуйте отключить и их тоже.
Установка из образа вручную
Если предыдущий подход не сработал, вы можете выполнить установку .NET Framework 3.5 с локального образа, для этого:
- Подключите флешку с установочными файлами Windows, либо смонтируйте в системе ISO образ с вашей версией Windows 11 или 10 (способы скачать Windows 11 ISO или Windows 10, различия в сборках с установленной системой обычно не играют роли) — для этого нажмите по образу ISO правой кнопкой мыши и выберите пункт «Подключить».
- Введите команду (заменив букву диска D: на фактическую букву подключенного накопителя):
DISM /online /enable-feature /featurename:NetFx3 /All /Source:D:\sources\sxs /LimitAccess
и нажмите Enter.

- Дождитесь завершения установки.
- В результате компонент .NET Framework 3.5 будет установлен:

Если проблема сохраняется, опишите ситуацию в деталях в комментариях ниже, я постараюсь помочь с решением.
Applies ToWindows 7 Service Pack 1 Windows Server 2008 R2 Service Pack 1 Windows Server 2008 Service Pack 2
Введение
В соответствии с политикой устаревания Microsoft Secure Hash Algorithm (SHA)-1 в конце июля 2020 г. клиентский компонент Центра обновления Windows прекращает работу с конечными точками на основе SHA-1. Это означает, что более старые устройства Windows, которые не были обновлены до SHA-2, больше не будут получать обновления через клиентский компонент Центра обновления Windows. Старые устройства Windows могут продолжать использовать клиентский компонент Центра обновления Windows, вручную установив определенные обновления SHA-2.
Все остальные платформы Windows будут по-прежнему получать обновления через клиентский компонент Центра обновления Windows, так как они подключаются к конечным точкам службы SHA-2.
Почему происходит это изменение?
Устаревшая конечная точка службы клиентский компонент Центра обновления Windows, используемая только для старых платформ, прекращена. Это изменение происходит из-за слабых мест в алгоритме хэширования SHA-1 и в соответствии с отраслевыми стандартами.
Несмотря на то, что конечная точка SHA-1 прекращена, более поздние устройства Windows будут продолжать получать обновления через клиентский компонент Центра обновления Windows так как эти устройства используют более безопасный алгоритм SHA-2. Сведения о том, затронуты ли ваши устройства, см. в таблице в разделе «Какие устройства Windows затронуты».
Дополнительные сведения об этом изменении см. в статье Требование поддержки подписывания кода SHA-2 для Windows и WSUS за 2019 год.
Какие устройства Windows затронуты?
Это изменение не повлияет на большинство пользователей. Начиная с Windows 8 desktop и Windows Server 2012 подключения к конечным точкам службы клиентский компонент Центра обновления Windows используют более современный алгоритм (SHA-256). Более старые версии Windows подключаются к конечным точкам службы клиентский компонент Центра обновления Windows с помощью менее безопасного алгоритма SHA-1.
Для большинства затронутых версий Windows обновление SHA-2 добавит поддержку, необходимую для продолжения получения обновлений через клиентский компонент Центра обновления Windows. В следующей таблице показано влияние на различные версии Windows. Некоторые платформы больше не поддерживаются, поэтому они не будут обновляться.
|
Рабочий стол Windows |
Состояние поддержки |
|
Windows 2000 |
Устройство не поддерживается Windows Обновления больше не будут поддерживаться. |
|
64-разрядная версия Windows XP |
|
|
Windows XP с пакетом обновления 3 (SP3) |
|
|
Windows Vista |
|
|
Windows Vista с пакетом обновления 1 (SP1) |
|
|
Windows Vista с пакетом обновления 2 (SP2) |
|
|
Windows 7 |
клиентский компонент Центра обновления Windows будет затронута поддержка.Можно устранить проблему путем установки KB вручную. |
|
Windows 7 с пакетом обновления 1 (SP1) |
|
|
Windows 8 и более поздних версий |
Не затронуто |
|
Windows Server |
Состояние поддержки |
|
Windows 2000 Server |
Устройство не поддерживается Windows Обновления больше не будут поддерживаться. |
|
Windows Server 2003 |
|
|
Windows Server 2003 с пакетом обновления 2 (SP2) |
|
|
Windows Server 2008 |
клиентский компонент Центра обновления Windows будет затронута поддержка.Можно устранить проблему путем установки KB вручную. |
|
Windows Server 2008 с пакетом обновления 2 (SP2) |
|
|
Windows Server 2008 R2 |
|
|
Windows Server 2008 R2 с пакетом обновления 1 (SP1) |
|
|
Windows 2012 и более поздних версий |
Не затронуто |
Что произойдет с затронутыми устройствами?
Согласно предыдущей таблице, это изменение влияет только на старые устройства Windows, которые не были обновлены до SHA-2. Затронутые устройства больше не смогут получать обновления через клиентский компонент Центра обновления Windows, пока вы не обновите их вручную до SHA-2. Сведения об обновлении устройств Windows вручную см. в разделе «Обновление устройств Windows до SHA-2».
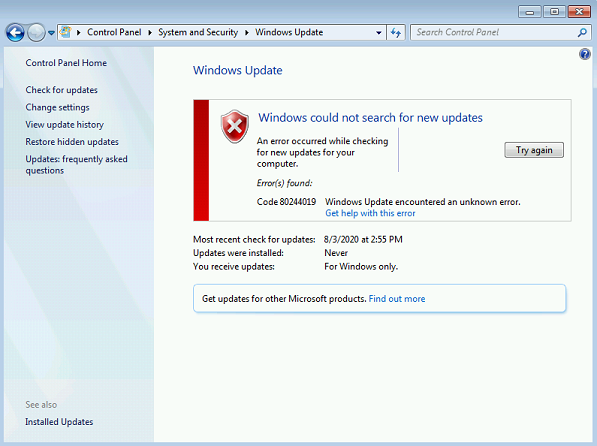
Устройство Windows, которое не обновлено до SHA-2, попытается проверить наличие обновлений и вернет одну из следующих ошибок:
-
Код ошибки 80072ee2: Устройство не может подключиться к клиентский компонент Центра обновления Windows.

-
Код ошибки 8024402c: Устройству не удается найти клиентский компонент Центра обновления Windows.
-
Код ошибки 80244019: Устройство не может подключиться к клиентский компонент Центра обновления Windows.


Некоторые проверки обновлений выполняются без прямого взаимодействия пользователя с пользовательским интерфейсом, например автоматических обновлений, драйверов устройств, подписей антивирусной программы Defender, обновлений Microsoft Office и т. д. Для этих «фоновых» проверок эти сбои не будут очевидны. В этом случае можно проверка файл журнала клиентский компонент Центра обновления Windows (c:\windows\windowsupdate.log) для кодов сбоев: 0x8024402c, 8024402c, 0x80072ee2, 80072ee2, 0x80244019 или 80244019.
Обновление устройств Windows до SHA-2
Чтобы продолжить использовать клиентский компонент Центра обновления Windows для более старых устройств с Windows, необходимо скачать и установить следующие два конкретных обновления:
Обновление 1. Поддержка
подписывания кода SHA-2
При применении этого обновления добавляется поддержка проверки подписей с помощью более безопасных алгоритмов хэширования SHA-2. Применяйте только обновление, соответствующее вашему устройству с Windows.
-
KB4474419: обновление поддержки подписывания кода SHA-2
Область применения: Windows 7 с пакетом обновления 1 (SP1), Windows Server 2008 R2 с пакетом обновления 1 (SP1) и Windows Server 2008 с пакетом обновления 2 (SP2) -
KB4484071: поддержка SHA2 для Windows Server Update Services
Область применения: Windows Server Update Services 3.0 с пакетом обновления 1 (SP1) и Windows Server Update Services 3.2
Примечание Большинство пользователей должны устанавливать только обновления KB4474419. Администраторы предприятия также могут устанавливать обновления KB4484071.
Обновление 2. Стек обслуживания, связанный с SHA-2, Обновления
При применении этого обновления в стек обслуживания клиентский компонент Центра обновления Windows добавляется поддержка для проверки подписей SHA-2 и направляет затронутые устройства Windows на обмен данными с современными конечными точками службы на основе SHA-2 в клиентский компонент Центра обновления Windows. Применяйте только обновление, соответствующее вашему устройству с Windows.
-
KB4490628: обновление стека обслуживания
Область применения: Windows 7 с пакетом обновления 1 (SP1) и Windows Server 2008 R2 с пакетом обновления 1 (SP1) -
KB4493730: Обновления стек служб WU
Область применения: Windows Server 2008 с пакетом обновления 2 (SP2)
Нужна дополнительная помощь?
Нужны дополнительные параметры?
Изучите преимущества подписки, просмотрите учебные курсы, узнайте, как защитить свое устройство и т. д.
Updated May 2025: Stop error messages and fix your computer problem with this tool. Get it now at this link
- Download and install the software.
- It will scan your computer for problems.
- The tool will then fix the issues that were found.
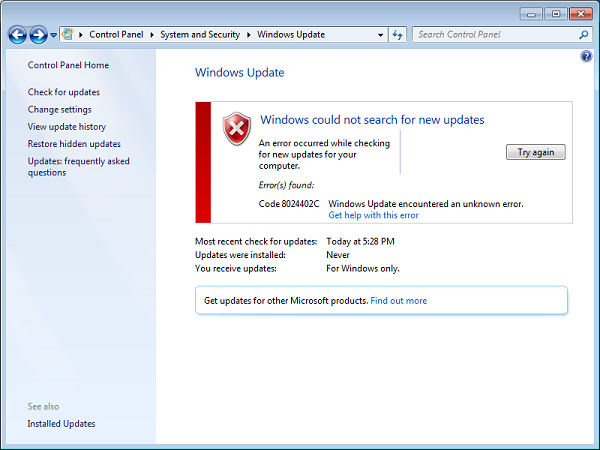
Windows Update is essential for your PC to function properly. For this reason, an update error can be a big problem. Windows Update error 8024402c is one of the most common ways a Windows Update problem appears.
It will appear on your computer screen as the following message:
Windows was unable to check for new updates.
An error occurred when searching for your computer.
Found the error:
Code 8024402C Windows Update Center found an unknown error.
What Causes Windows Update Error 8024402c
This error occurs when Windows Update is unable to connect to Microsoft’s update servers. If you are using Windows Update or a scheduled update is running and you do not have an Internet connection or this connection is blocked, there is a high chance that you will see error 8024402c.
There are many reasons why a computer cannot connect. Then there are more technical reasons that are more difficult to pinpoint.
The trick is to find out who it is. These four are the most common technical causes for error 8024402c.
Reset the proxy settings
This solution can be very useful because it is easy to do and can solve the problem by resetting your computer’s proxy server settings that have been damaged since the last update. Follow the instructions below to solve the problem.
Use Windows + X to open a menu where you need to select the command line (administrator) option. You can also right-click on the Start menu for the same effect or just find the command line, right-click and select “Run as administrator”.
Type in the commands listed below and press Enter after each command to execute it correctly.
- network
- broken
- Reset Proxy
Go back to the Windows Update Center and see if the problem persists on your computer.
Run Windows Update Troubleshooter
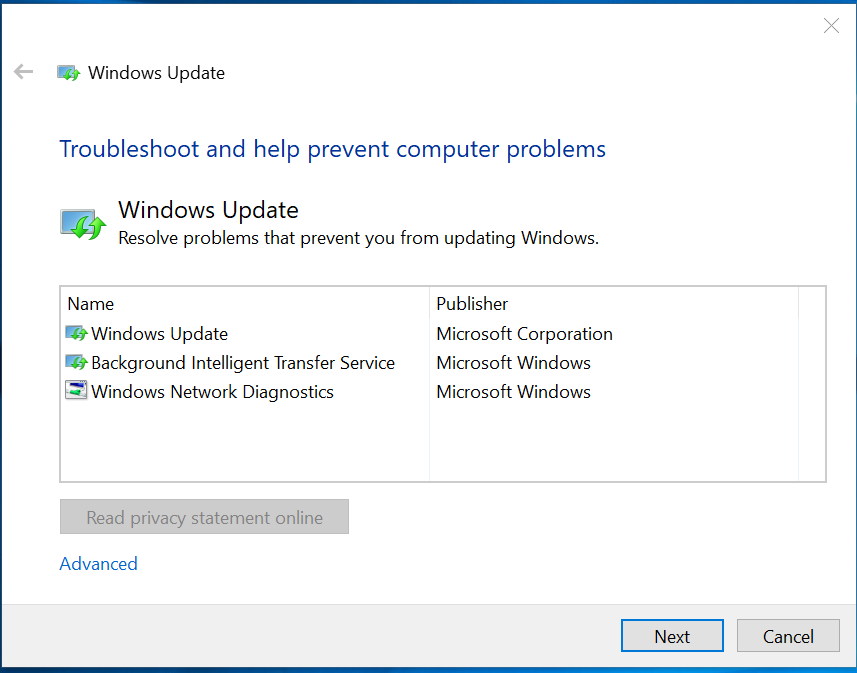
- Run the Windows Update troubleshooter.
- Accept the license agreement on the first screen.
- Click Detect Issues and apply the fixes (recommended).
- Wait while the program finds and fixes problems with Windows Update.
- Restart your computer and see if error code 8024402C disappears.
Updated: May 2025
We highly recommend that you use this tool for your error. Furthermore, this tool detects and removes common computer errors, protects you from loss of files, malware, and hardware failures, and optimizes your device for maximum performance. This software will help you fix your PC problems and prevent others from happening again:
- Step 1 : Install PC Repair & Optimizer Tool (Windows 11, 10, 8, 7, XP, Vista).
- Step 2 : Click Start Scan to find out what issues are causing PC problems.
- Step 3 : Click on Repair All to correct all issues.
Change your DNS address
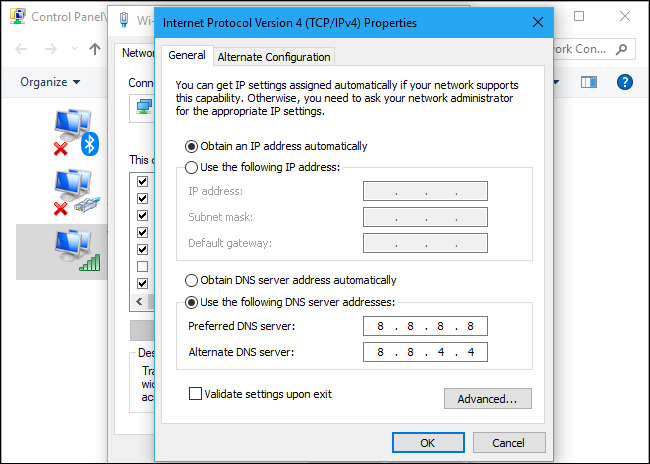
If your ISP does cause these problems, other solutions may be useless as they cannot resolve the fact that your current DNS address is simply incompatible with Microsoft servers. Fortunately, changing your DNS address is very easy if you follow these instructions carefully. You can just interrupt the process if something goes wrong.
- Open the Run dialog by simultaneously pressing the keys with the Windows + R logo. Then type “ncpa.cpl” and press “OK”.
- When the Internet connection window opens, double-click the active network card.
- Then click on “Properties” and double-click on “Internet Protocol Version 4 (TCP / IPv4)”.
- Search Use the following option for DNS server addresses.
- Set the preferred DNS server to 8.8.8.8.
- Set the alternative DNS server to 8.8.4.4.
Turn off the antivirus software
Temporary disconnect the security software and see if the problem persists.
a: click the Windows + Q logo to open the search box.
b: Now click “Settings”, go to Support Center and press Enter.
c: Click on the chevron next to “Security”.
d: Disable any anti-virus protection installed on your computer.
Warning: Antivirus software may protect your computer from viruses and other security threats. In most cases, you should not turn off your antivirus software. If you need to temporarily turn it off to install other software, you should turn it back on when you are done. If you are connected to the Internet or network with antivirus software turned off, your computer is vulnerable to attack.
Use Regedit
This process requires modifying your registry, which can be very useful but also dangerous. It is recommended that you close all running programs before proceeding with this solution. It is recommended that you back up your registry in case something goes wrong during editing.
- Open the Run dialog box by pressing the Windows logo key + R keys at the same time. Then type regedit and click OK. Click Yes when prompted for User Account Control.
- In the Registry Editor window, navigate to HKEY_LOCAL_MACHINE >> SOFTWARE >> Policies >> Microsoft >> Windows >> WindowsUpdate >> AU.
- In the right pane of the AU button, double-click UseWUServer, change the data value to 0, and click OK.
If you cannot find WindowsUpdate, you need to create it. Follow the instructions below.
- Right-click the Windows folder, then choose New> Key and name the new key WindowsUpdate.
- Right click on the Windows Update folder then select New >> Key and name the new key AU.
- Right-click on the right side of the AU button and select New >> DWORD (32-bit) Value. Name the new value UseWUServer. Set the value to 0.
- Now try installing Windows updates.
RECOMMENATION: Click here for help with Windows errors.
-
Home
-
News
- How to Fix Windows Update Error 8024402c? Try These Methods
By Sonya |
Last Updated
Meeting the Windows Update error 8024402c is pretty disappointing, but luckily, you can find multiple efficient methods to get rid of the error in this post. And if you meet other Windows Update error codes, you can go to the MiniTool website to find effective methods.
Although the Windows system is very popular, you could meet some errors when using it, such as Windows Update error 0x80070057 and DRIVER VERIFIER DMA VIOLATION. In this post, we will focus on how to fix Windows Update error code 8024402c.
Method 1: Run Windows Update Troubleshooter
Running Windows Update Troubleshooter is the first and quickest method to get rid of the Windows Update error 8024402c. It is a built-in feature that can easily fix many Windows Update errors. Now follow the instructions below to do it:
Step 1: Press the Win key and the I key at the same time to open Settings.
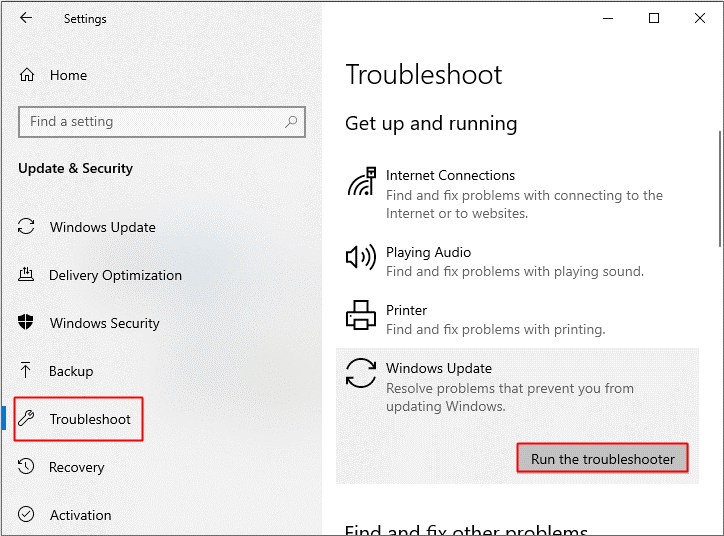
Step 2: Choose Update & Security and then go to the Troubleshoot tab in the left panel.
Step 3: Click Windows Update under the Get up and running section in the right panel and then click Run the troubleshooter.
Step 4: Follow the prompts showing on the screen to finish the troubleshooting process.
Step 5: After the process is finished, reboot your computer and then check if the error 8024402c disappears.
Related post: 8 Useful Fixes for an Error Occurred While Troubleshooting!
Method 2: Change the DNS Servers
DNS servers are an important part of your computer to make a connection with the Windows Update servers. Therefore, if the DNS servers are corrupted, then you may meet the Windows Update error 8024402c. So you can try to change the DNS servers to fix the error. Here is the way to do that:
Step 1: Press the Win + R keys at the same time to open the Run box.
Step 2: Type ncpa.cpl in the box and then click OK to open Network Connections.
Step 3: Locate your network connection, right-click it to choose Properties.
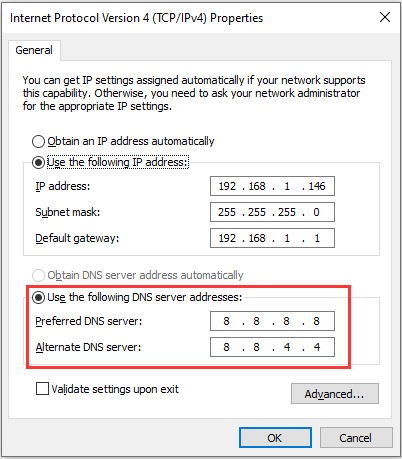
Step 4: In the Properties window, choose Internet Protocol Version 4 (TCP/IPv4) and then click Properties.
Step 5: A new window pops out, under the General section, choose Use the following DNS server addresses, set the Preferred DNS server as 8.8.8.8 and set Alternate DNS server as 8.8.4.4. Click OK to save changes.
Step 6: Reboot your PC to check if the error is fixed.
Related post: Full Guide to Fix DNS Server Unavailable in Windows 10
Method 3: Edit the Registry Editor
You can also try to edit the Registry Editor to fix the Windows Update error 8024402c. And it is recommended to back up your registry keys. Here is a simple guide:
Step 1: Open the Run box, type regedit in the box, and then click OK to open Registry Editor.
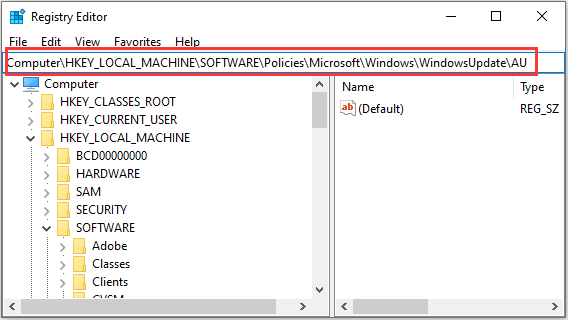
Step 2: Navigate to the following path:
HKEY_LOCAL_MACHINE\SOFTWARE\Policies\Microsoft\Windows\WindowsUpdate\AU
Note: If there is no WindowsUpdate key, then you have to create it: right-click on Windows key (on the left pane) and select New > Key. Give the name: WindowsUpdate. Then right-click at WindowsUpdate and perform the same operation to create the AU key.
Step 3: On the right pane of AU key, double-click UseWUServer, change its Value data to 0, and click OK.
Step 4: Restart your computer and then update your Windows again to check if the error is gone.
The End
This post has listed three brilliant methods for you to fix the Windows Update error code 8024402c, so if you meet the error, try the methods mentioned above.
About The Author
Position: Columnist
Author Sonya has been engaged in editing for a long time and likes to share useful methods to get rid of the common problems of Windows computers, such as Windows Update error. And she aims to help more people to protect their data. What’s more, she offers some useful ways to convert audio and video file formats. By the way, she likes to travel, watch movies and listen to music.
Windows update errors are one of the worst errors to experience because Windows constantly forces you to install and download new updates but when you finally decide to install them, some error pops up and prevents you from doing so. One such errors is definitely the 8024402c error which is common amongst Windows 7 and Windows 10 users.
There are quite a few different solutions to the problem and you can sometimes even blame your Internet provider as their address is sometimes not allowing your PC to connect to Microsoft’s servers. Anyway, follow the methods below in order to solve your problem.
Solution 1: Change Your DNS Address
If your Internet provider is really causing these problems, you may find other solutions quite unhelpful because they can’t fix the fact that your current DNS address is simply incompatible with Microsoft servers. Luckily, changing the DNS address is quite an easy process if you follow the instructions below carefully. You can reverse the process quite easily if something goes wrong.
- Open the Run dialog box by pressing the Windows logo key + R key together. Then type “ncpa.cpl” in it and click OK.
- Now that the Internet Connection window is open, double-click on your active Network Adapter.
- Then click Properties and double-click on Internet Protocol Version 4 (TCP/IPv4).
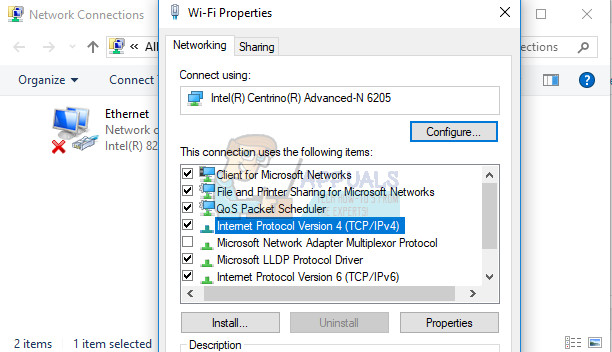
- Locate Use the following DNS server addresses option.
- Set Preferred DNS server to be 8.8.8.8
- Set Alternate DNS server to be 8.8.4.4
Note: That’s Google’s public DNS server addresses.
- Now try to install Windows Updates again and check to see if the same error code still appears.
Solution 2: Update Your HDD and SSD Drives
Some users shared their experience regarding the same error code and they said that updating their HDD or SDD drivers helped them solve many problems on their computer, including this specific Windows Update error code. We recommend you do the same, especially if you have recently added a new storage device to your computer.
- Select the Start button, type Device Manager, and select it from the list of results.
- Expand one of the categories to find the name of your device, then right-click (or tap and hold) it, and select Update Driver. For storage devices, expand the Disk drives category, right-click on the device you want to update and choose the Update option from the context menu.
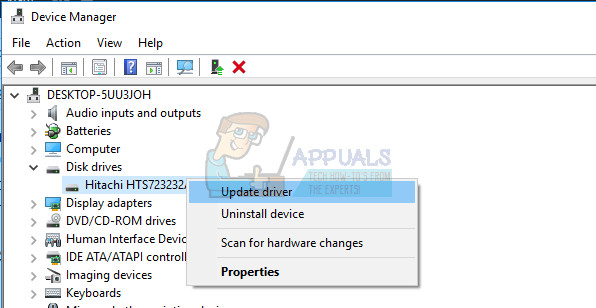
- Select Search automatically for updated driver software.
- If Windows doesn’t find a new driver, you can try looking for one on the device manufacturer’s website and follow their instructions.
Note: If you are using Windows 10, the latest drivers are often installed alongside other Windows updates so make sure you keep your computer up to date. Windows Update is run automatically on Windows 10 but you can check by following the instructions below for a new update.
- Use the Windows Key + I key combination in order to open Settings on your Windows PC. Alternatively, you can search for “Settings” by using the search bar located at the taskbar.
- Locate and open the “Update & security” section in the Settings app.
- Stay in the Windows Update tab and click on the Check for updates button under the Update status in order to check whether there is a new version of Windows available.
- If there is one, Windows should proceed with the download process automatically.
Solution 3: Disable IPV6 on Your PC
This Windows Update error sometimes occurs if you have enabled IPv6 and you don’t have a local gateway that is needed to connect. There are several users who were able to solve the problem this way whereas it didn’t work for others. Your safest bet is to try and see if it’s working yourself.
- Open the Run dialog box by pressing the Windows logo key + R key together. Then type “ncpa.cpl” in it and click OK.
- Now that the Internet Connection window is open, double-click on your active Network Adapter.
- Then click Properties and locate the Internet Protocol Version 6 entry on the list. Disable the checkbox next to this entry and click OK. Restart your computer in order to confirm the changes and check to see if the error appears again.
Solution 4: Command Prompt Tweak
This solution can be quite helpful as it can be performed easily and it can solve the problem by resetting the proxy settings on your computer which may have gone corrupt since the last time you ran the update. Follow the instructions below in order to solve the problem.
- Use the Windows Key + X key combination in order to open the menu where you should select the Command Prompt (Admin) option. Alternatively, you can right-click on the Start menu for the same effect or you can simply search for Command Prompt, right-click on it and select Run as administrator.
- Type in the commands presented below and make sure you press Enter after each one in order to run it properly.
netsh
winhttp
reset proxy
- Return to Windows Update and check to see if the problem still appears on your PC.
Solution 5: Reset Windows Update Components
This method is somewhat advanced and it takes a while to accomplish it. However, users have reported that, even when the other methods failed, resetting the components was still able to fix their issue.
Before proceeding with this solution, it’s recommended that you close all of your running programs and it’s advisable to create a backup of your registry just in case something goes terribly wrong while you edit it.
- Let’s proceed with the solution by killing the following services which are the core services related to Windows Update: Background Intelligent Transfer, Windows Update, and Cryptographic Services. Disabling them before we start is crucial if you want the remainder of the steps to perform smoothly.
- Search for “Command Prompt”, right-click on it, and select the “Run as administrator” option. Copy and paste the following commands and make sure you click Enter after each one.
net stop bits
net stop wuauserv
net stop appidsvc
net stop cryptsvc
- After this, you will have to delete some files which should be deleted if you want to continue with resetting the update components. This is also done via Command Prompt with administrative privileges.
Del “%ALLUSERSPROFILE%\Application Data\Microsoft\Network\Downloader\qmgr*.dat”
- The following step can be skipped if this is not a last resort. This step is considered to be the aggressive approach but it will definitely reset your updating process from its very core. So we can recommend that you try this out. It has been suggested by a lot of people on online forums.
- Change the name of the SoftwareDistribution and catroot2 folders. In order to do this, at an administrative command prompt, copy and paste the following commands and click Enter after copying each one.
Ren %systemroot%\SoftwareDistribution SoftwareDistribution.bak
Ren %systemroot%\system32\catroot2 catroot2.bak
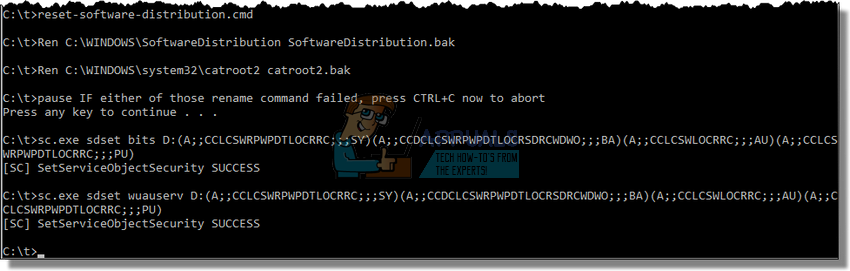
- The following commands will help us reset the BITS (Background Intelligence Transfer Service) and the wuauserv (Windows Update Service) to their default security descriptors. Make sure you don’t modify the commands below so it’s for the best if you simply copy them.
exe sdset bits D:(A;;CCLCSWRPWPDTLOCRRC;;;SY)(A;;CCDCLCSWRPWPDTLOCRSDRCWDWO;;;BA)(A;;CCLCSWLOCRRC;;;AU)(A;;CCLCSWRPWPDTLOCRRC;;;PU)
exe sdset wuauserv D:(A;;CCLCSWRPWPDTLOCRRC;;;SY)(A;;CCDCLCSWRPWPDTLOCRSDRCWDWO;;;BA)(A;;CCLCSWLOCRRC;;;AU)(A;;CCLCSWRPWPDTLOCRRC;;;PU)
- Let’s navigate back to the System32 folder in order to proceed with the solution at hand.
cd /d %windir%\system32
- Since we have completely reset the BITS service, we will need to reregister all of the files necessary for the service to run and operate smoothly. However, each of the files requires a new command in order to make it reregister itself so the process may end up being lengthier than what you are used to. Copy the commands one by one and make sure you don’t leave out any of them. Here is a list of files that need to be reregistered along with the corresponding commands next to them.
- Some files may have been left behind after these processes so we are going to look for them in this step. Open the Registry Editor by typing “regedit” in either the search bar or the Run dialog box. Navigate to the following key in Registry Editor:
HKEY_LOCAL_MACHINE\COMPONENTS
- Click on the Components key and check the right side of the window for the following keys. Delete them all if you locate any of them.
PendingXmlIdentifier
NextQueueEntryIndex
AdvancedInstallersNeedResolving

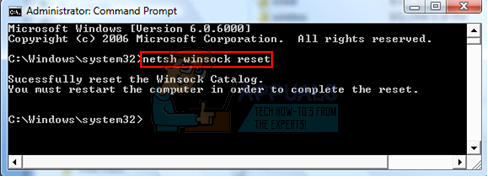
- The next thing we are going to do is reset Winsock by copying and pasting the following command back into the administrative Command Prompt:
netsh winsock reset
- If you are running Windows 7, 8, 8.1, or 10, at a command prompt, copy the following command, and tap the Enter key:
netsh winhttp reset proxy
- If all of the steps above have gone through painlessly, you can now restart the services you killed in the very first step by using the commands below.
net start bits
net start wuauserv
net start appidsvc
net start cryptsvc
- Restart your computer after following through with all of the steps which are listed.
Solution 6: Edit Certain Settings in Internet Explorer
Internet Explorer is usually the first place where you should look if you encounter certain errors regarding Windows Update and your Internet Connection overall. These settings are quite easy to adjust so make sure that this solution is your first step in approaching the problem.
- Open Internet Explorer and click on the Gear icon located in the top right corner.
- From the menu which opens, click on Internet options.
- Navigate to the Connections tab and click on LAN Settings.
- Mark the checkbox next to Automatically Detect Settings and make sure the Proxy servers are blank unless you actively use one, which is not recommended while updating Windows.
- Make sure you apply the changes you made and restart your computer before you check to see if the update error still appears.
Solution 7: Turn off UAC until Your Update Your Computer
UAC is designed to keep you safe but it appears that there is a bug that causes this error to occur if UAC is turned on. It’s recommended that you keep it on at all times but you can disable UAC for a while until the update is installed but make sure you re-enable it as soon as possible.
- Open Control Panel by searching for it in the Start menu.
- Switch the View by option in Control Panel to Large Icons and locate the User Accounts option.
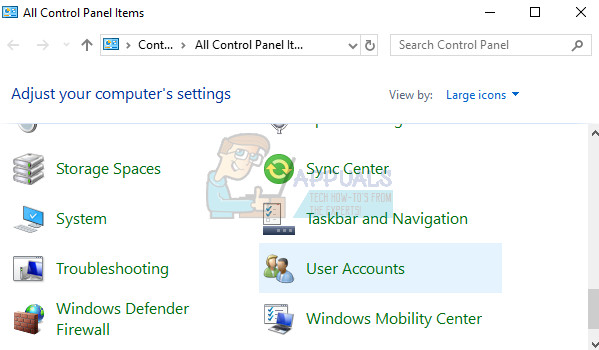
- Open it and click on “Change User Account Control Settings”.
- You will notice that there are several different options you can choose on the slider. If your slider is set at the top level, you will definitely receive more of these pop-up messages than usual. Also, the error messages similar to the one you are experiencing right now are usually caused by User Account Control.
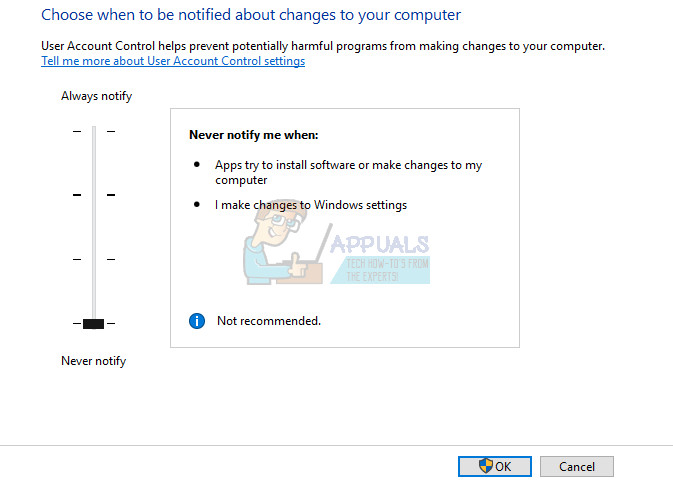
- We recommend you turn it off for now as the update should probably install successfully. This may have helped solve your current problem but you should definitely leave it on as it serves to protect your PC.
Solution 8: A Simple Registry Hotfix
This process requires editing your registry which can be quite helpful but also dangerous. Before proceeding with this solution, it’s recommended that you close all of your running programs and it’s advisable to create a backup of your registry just in case something goes terribly wrong while you edit it.
- Open Run dialog box by pressing Windows logo key + R key together. Then type regedit in it and click OK. Click Yes when prompted by User Account Control.
- In the Registry Editor window, head to HKEY_LOCAL_MACHINE >> SOFTWARE >> Policies >> Microsoft >> Windows >> WindowsUpdate >> AU
- On the right pane of AU key, double-click on UseWUServer, change its value data into 0, and click OK.
Note: If you can’t find WindowsUpdate, you should create one. Follow the steps below.
- Right-click on the Windows folder, then choose New > Key and name the new key WindowsUpdate.
- Right-click on the WindowsUpdate folder, then choose New >> Key and name the new key AU.
- Right-click on the right pane of AU key, choose New >> DWORD (32-bit) Value. Name the new value UseWUServer. Set its value to 0.
- Now try to install Windows Updates now.
Solution 9: Install the Latest Version of .NET Framework
Having the latest version of this tool is a must if you want the updating process to proceed smoothly.
Navigate to this link and click the red download button in order to download the latest version of the Microsoft .NET Framework. After the download has finished, locate the file you downloaded and run it. Note that you will need to have constant access to the Internet.
- After installing the latest version, it’s time to check its integrity. On your keyboard, use the Windows Key + R key combination to open the Run dialog box.
- Type in Control Panel and click OK in order to open it.
- Click the Uninstall a Program option and click Turn Windows features on or off. Make sure you locate the .NET Framework 4.6.1 entry and make sure it’s enabled.
- If the checkbox next to .NET Framework 4.6.1 is not enabled, enable it by clicking the box. Click OK to close the Windows Feature window and reboot the computer.
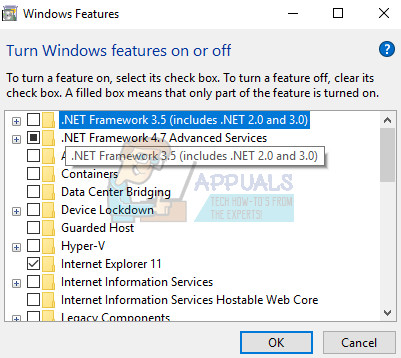
- If .Net Framework 4.6.1 is already enabled, you can repair .Net Framework by clearing the box and rebooting the computer. After the computer has restarted, re-enable .Net Framework and restart the computer again.
Note: If you are using a version of Windows other than Windows 10, the latest version may be different which you should also install.
Kevin Arrows
Kevin Arrows is a highly experienced and knowledgeable technology specialist with over a decade of industry experience. He holds a Microsoft Certified Technology Specialist (MCTS) certification and has a deep passion for staying up-to-date on the latest tech developments. Kevin has written extensively on a wide range of tech-related topics, showcasing his expertise and knowledge in areas such as software development, cybersecurity, and cloud computing. His contributions to the tech field have been widely recognized and respected by his peers, and he is highly regarded for his ability to explain complex technical concepts in a clear and concise manner.