
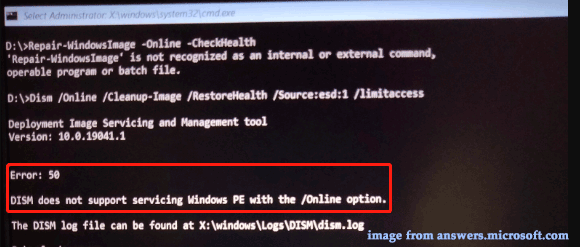
При использовании команд DISM для восстановления системных файлов Windows 11/10 и других версий вы можете получить сообщение об ошибке с кодом 50, обычно с пояснением «Средство DISM не поддерживает обслуживание среды предустановки Windows с использованием параметра /Online».
В этой инструкции о том, чем вызвана ошибка 50 при использовании команд DISM и как выполнить необходимые действия по проверки и восстановлению хранилища компонентов в случае, если вы столкнулись с этой ошибкой. На близкую тему: Ошибка 87 при использовании команд DISM.
Использование команд DISM в среде WinPE

Как правило, причина ошибки 50 при использовании команд DISM — сочетание следующих двух факторов:
- Запуск команды не из запущенной системы, а из среды WinPE, например, с загрузочной флешки.
- Использование параметра /Online при этом (который сообщает DISM, что действия нужно производить над текущей запущенной системой).
В среде WinPE использовать параметр /Online не получится и правильным подходом будет указание конкретного образа системы, с которым нужно выполнить действия.
Например, для системы, расположенной на разделе с буквой C: команда проверки целостности хранилища компонентов может иметь следующий вид:
dism /image:C: /cleanup-image /scanhealth

При этом следует учитывать, чтоб в WinPE буква системного раздела может отличаться от C:.
Более подробно про применение команд DISM вне работающей системы можно прочитать в материалах:
- Восстановление системных файлов в WinPE
- Восстановление образа системы (хранилища компонентов) в Windows 11 (подойдёт и для Windows 10).
Раздел MiniNT в реестре
Если вы получаете сообщение об ошибке 50 при попытке выполнить команды DISM в обычной Windows, проверьте наличие раздела MiniNT в реестре, для этого:
- Нажмите клавиши Win+R на клавиатуре, введите regedit и нажмите Enter
- В редакторе реестра перейдите к разделу
HKEY_LOCAL_MACHINE\SYSTEM\CurrentControlSet\Control
- При наличии в этом разделе подраздела с именем MiniNT нажмите по нему правой кнопкой мыши и удалите его.

- Перезагрузите компьютер.

После перезагрузки попробуйте повторно выполнить нужную команду DISM.
В случае, если предыдущие два варианта не подходят к вашей ситуации, можно попробовать следующие подходы:
- Создайте нового пользователя Windows, предоставьте ему права администратора, зайдите под новой учетной записью и попробуйте выполнить команды DISM.
- Попробуйте использовать точки восстановления системы на дату, когда проблема не наблюдалась.
Если ваш сценарий появления ошибки отличается от описанных, опишите в комментариях, как именно вы столкнулись с проблемой, я постараюсь помочь.
Вам интересно, почему сообщение об ошибке Ошибка: 50 — DISM появился на вашем экране? В этом посте объясняется, почему вы должны запускать DISM в консоли восстановления Windows 10 и как это сделать, не получая этой проблемы. Это сообщение об ошибке появляется, потому что вы пытались запустить DISM из консоли восстановления Windows 10 с выбранным параметром /Online. Только запущенные в данный момент операционные системы Windows можно использовать для выполнения команды DISM с параметром Online.
В результате команда завершается сбоем при выполнении из Windows 10 или любой другой консоли восстановления Windows, поскольку ОС там неактивна. В этой статье будут показаны два исправления для этого сообщения о проблеме и способы правильного запуска DISM. Первый подход демонстрирует, как устранить это сообщение о проблеме без установочного диска Windows 10.

- Часть 1: Что и почему Dism Error-50
- Часть 2. Решения для исправления ошибки Dism Error-50
- Часть 3. Часто задаваемые вопросы о Dism Error-50
Часть 1. Что и почему Dism Error-50
Система обслуживания образов развертывания и управления ими, также известная как DISM, представляет собой утилиту командной строки. Он может подготавливать, изменять и восстанавливать установочные образы Windows, включая образы для программы установки Windows, среды предустановки Windows, среды предустановки Windows и Windows RE или Среда восстановления Windows. Сбои системы и другие проблемы часто устраняются с помощью DISM. Однако при выполнении любой из команд DISM, перечисленных ниже, некоторые пользователи видели ошибка 50 DISM не поддерживает обслуживание Windows PE с параметром /Online сообщение:
- 1. Cleanup-Image Dism/Online/CheckHealth
- 2. Clean-Up-Image/ScanHealth/Dism/Online
- 3. Clean-Up-Image/RestoreHealth/Dism
Почему возникает эта ошибка? Утилита DISM ошибочно полагает, что вы запускаете команды в Windows при использовании программы в работающей операционной системе. В этом виноват неуместный раздел реестра. Кроме того, когда клиенты пытаются запустить определенные команды с помощью этого инструмента, входящего в состав Windows 10, они получают ошибку DISM 50. Операционная система предполагает, что расположение, из которого выполняется команда, находится внутри WinPE, которая является основным источником этой проблемы или предварительной установки среды Windows. В этом предположении Windows виноват неуместный раздел реестра.
Вы все знаете, что DISM обычно используется для подготовки и обновления образа Windows, но он также помогает в восстановлении файлов, когда системный инспектор выявляет поврежденные файлы на основе результатов сканирования. Однако в последнее время ошибка DISM 50 не была предметом многочисленных жалоб пользователей. Они запускали команду DISM на своих машинах, но продолжают получать одно и то же сообщение об ошибке.
Часть 2. Решения для исправления Dism Error-50
Решение 1. Обновление DISM
Обновление инструмента DISM — это первое, что вы можете попробовать, если столкнулись с ошибкой DISM 50 в Windows 10. Это довольно просто.
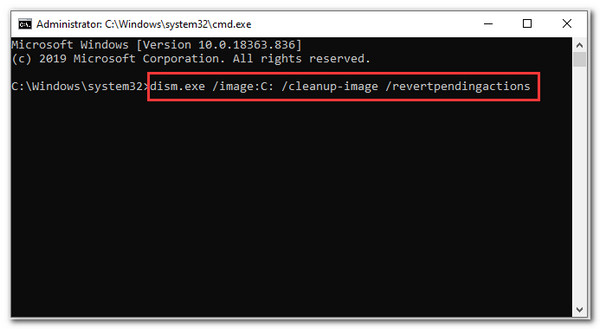
1. Сначала откройте Run окно, нажав Win + R. Запускать Командная строка от имени администратора введите cmd в поле и нажмите Shift + Ctrl + Ввод. Скопируйте следующую командную строку и вставьте ее в командную строку. Dism.exe /image: C: /cleanup-image /revertpendingactions следует запускать, нажимая кнопку Enter .
2. Для начала Конфигурация системы, Открой Run диалоговое окно и введите MSConfig. Потом выберите Cеть под Boot меню и отметьте Безопасной загрузки коробка. Вам нужно будет перезагрузить компьютер после нажатия OK. Вам нужно только нажать Restart войти Безопасный режим.
3. Откройте Командная строка с правами администратора в Безопасный режим. После этого введите команду sfc /scannow. Вы должны быть терпеливы, так как это может занять некоторое время.
Вы можете выйти из безопасного режима на своем компьютере, когда он будет завершен, и посмотреть, устранена ли ошибка DISM 50. Если он все еще существует, попробуйте следующее исправление.
Решение 2. Удаление связанного ключа реестра
Удаление соответствующего раздела реестра — еще одно средство от ошибки DISM 50 в Windows 10. Вот конкретные действия.
1. Сначала откройте Run окно. После этого введите regedit и нажмите OK , чтобы открыть Редактор реестра. Найдите следующий путь, перейдя к нему: HKEY ЛОКАЛЬНАЯ МАШИНА\СИСТЕМА\CurrentControlSet\Control.
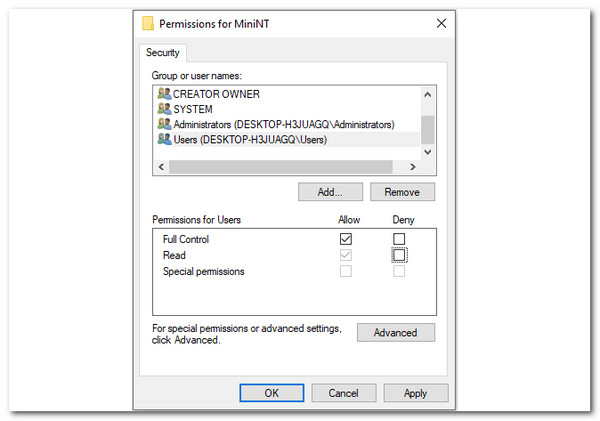
2. Щелкните правой кнопкой мыши МиниНТ папку на левой панели и выберите Разрешения…. Во всплывающем диалоговом окне при выборе В группе или имена пользователей, выберите свое имя пользователя. Полный доступ затем следует проверить разрешение.
3. Чтобы сохранить внесенные изменения, нажмите ОК. Затем выберите «Удалить», еще раз щелкнув правой кнопкой мыши клавишу MiniNT. В окне подтверждения выберите Да.
Теперь ваш компьютер можно перезагрузить, и вы можете использовать командную строку, чтобы узнать, устранена ли проблема DISM 50.
Решение 3. Сброс BIOS
В качестве дополнительного решения может потребоваться восстановление BIOS к исходным настройкам, если вы испробовали все средства, но по-прежнему получаете сообщение о том, что ошибка 50 DISM не разрешает обслуживание Windows PE с параметром /Online. Вы всегда должны сбрасывать BIOS, следуя документации и инструкциям производителя, поскольку конкретные процессы различаются от модели компьютера к модели. Кроме того, соблюдайте осторожность при выполнении процесса, чтобы предотвратить потерю данных. Если вы не знакомы с BIOS, обратитесь за помощью к квалифицированному специалисту.
Решение 4. Восстановление данных AnyMP4
В следующем решении, которому предпочло следовать большинство пользователей. Они говорят, что нам нужен отличный инструмент, который поможет вам в сканировании и быстром восстановлении отсутствующих или недоступных данных, если они потеряны из-за повреждения системы, сбоя системы или системного формата, такого как ошибка DISM-50 в Windows. Поэтому мы можем использовать AnyMP4 Восстановление данных с этим вопросом, если мы говорим об инструменте. Это потому, что этот инструмент обладает любой функцией, которая нам нужна, чтобы облегчить проблему на вашем компьютере с Windows. Давайте продолжим чтение, чтобы узнать, что он может нам предложить.
Рекомендация
- Восстановление различных типов файлов, таких как видео, фотографии, документы, тексты, электронные письма и многое другое с различных устройств.
- Ускоренный процесс сканирования в 60 раз быстрее, что значительно экономит ваше время.
- Предотвращение компьютерных сбоев и ошибок путем восстановления данных.
1. Пожалуйста, загрузите AnyMP4 Восстановление данных на вашем Mac.
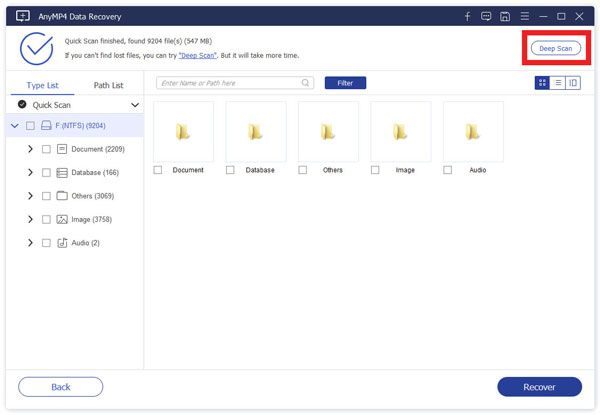
2. После этого коснитесь жесткого диска и данных, которые вы хотите восстановить. Выбирать Сканировать продолжить после этого.

3. Предварительное сканирование происходит быстро. Если вы не можете обнаружить необходимые файлы, нажмите Глубокий анализ. Кроме того, наша программа найдет файлы во второй раз более точно. Обязательно найдите на своем ПК поврежденный файл, который необходимо восстановить.
4. Информация скоро будет отображаться и сортироваться по видам на левой панели. Кроме того, вы можете просмотреть их, выбрав Тропа список в меню порядка путей.
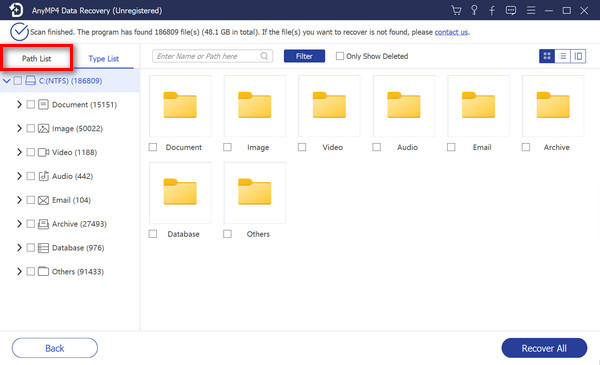
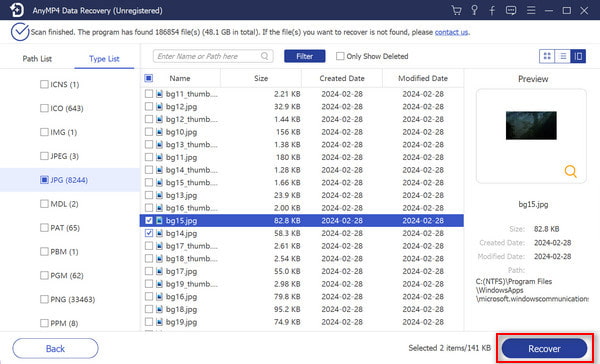
5. После перепроверки файлов, которые вы хотите восстановить, нажмите Восстановить скачать их на свой компьютер.
Использование AnyMp4 Data Recovery для исправления DISM Error-50 в нашей Windows включает в себя всего несколько простых шагов. Мы видим, что использовать его просто. Благодаря этому вы можете сразу же использовать его для решения своей проблемы.
Часть 3. Часто задаваемые вопросы о DISM Error-50
1. Как можно исправить DISM, чтобы онлайн-параметр не поддерживался при обслуживании Windows PE?
Сообщение об ошибке DISM не поддерживает обслуживание Windows PE обычно подключается к определенной учетной записи пользователя. Вы можете создать другую учетную запись пользователя и войти в свой компьютер, чтобы предотвратить эту проблему. Это только одно из решений, которое вы можете применить, и оно также распространено, но практично для многих пользователей.
2. Файлы удаляются через DISM?
Во время установки утилита DISM проверяет вашу машину на наличие ошибок и исправляет их. Любые проблемы, обнаруженные или устраненные этим средством, записываются в создаваемый файл журнала. Ни одно из ваших приложений или данных не будет затронуто.
3. SFC или DISM, что мне запустить в первую очередь?
По словам экспертов, нам нужно сначала запустить SFC и запускать DISM только в том случае, если SFC обнаружит проблему. Сначала запустите SFC, а затем DISM, независимо от того, что сообщает SFC.
4. Сколько времени потребуется DISM?
В зависимости от вашей системы и количества поврежденных файлов может потребоваться до десяти минут или больше, чтобы начать работу после того, как вы включите ее. После завершения сканирования вы можете перезагрузить компьютер для чистого запуска.
Заключение
Компонент DISM активно обновляет и подготавливает образ для восстановления поврежденных файлов. Из-за этого любая неисправность этого прибора недопустима. В итоге мы рассказали о том, как исправить ошибку DISM 50 на машине с Windows 10. Мы надеемся, что они работают для вас, поэтому вы можете продолжить пользоваться DISM.
DISM, aka Deployment Image Servicing and Management, is a built-in command-line tool in Windows OS that’s mostly used in repairing common software-related issues. Basically, it services and prepares Windows images, including those used for Windows PE, Windows RE, and Windows Setup. However, even tools like DISM, meant to resolve issues can bump into errors, one of them being Error 50. So, what is DISM Error 50, and how to fix it on Windows? Find out in this article.

Table of Contents
DISM is available on Windows through the command line or from Windows PowerShell. Error: 50 DISM does not support servicing Windows PE with the /Online option. The DISM log file can be found at x:windows\dism\dism.log” usually occurs when the user is trying to run one of these commands to repair system files on Windows:
- Dism /Online /Cleanup-Image /CheckHealth
- Dism /Online /Cleanup-Image /ScanHealth
- Dism /Online /Cleanup-Image /RestoreHealth
It emerges when DISM mistakenly identifies the environment as Windows PE (Pre-installation Environment) or Windows RE (Recovery Environment) rather than the active Windows system. Windows PE is a minimal version of the OS, used for deployment and recovery purposes. It does not have the same level of features and components as a complete Windows installation and /Online is not designed to work with it.
Among other factors, this misidentification is associated with a corrupt or misplaced registry key: HKEY_LOCAL_MACHINE\SYSTEM\CurrentControlSet
How to Fix DISM Error 50 on Windows
DISM is an essential utility tool for system administrators and advanced users to manage and maintain the health of Windows installations on their PCs, While such errors can be worrisome, let’s fix it.
Method 1: Delete the Associated Registry Key
Firstly as we already know the root cause related to the error is the corrupt registry key, let’s begin with deleting it. Follow the steps mentioned below:
1. Press the Windows+R keys together to launch the Run dialog.
2. Type Regedit and press Enter to open the Registry Editor.

3. Click on Yes in the UAC prompt to confirm.
4. In the Registry Editor, navigate to the following path:
HKEY_LOCAL_MACHINE\SYSTEM\CurrentControlSet\Control
You can also copy this address from here and paste it into the Registry Editor’s address bar and press Enter.
5. In the left pane, look for the MiniNT folder, right-click on it, and select Permissions.

5. In the Permissions for MiniNT pop-up window, select your username in the Group or user names section.
6. Under Permissions for Users, tick the Allow checkbox for Full Control.

7. Click on Apply and OK to save the changes.
8. Now, again right-click on the MiniNT folder and choose Delete.

7. Select Yes to confirm the action and then Restart the PC to apply the changes.
Also Read: Windows Server vs Windows 10: What are the Differences?
Method 2: Refresh DISM Software
When you refresh the DISM software, it resets the internal components and downloads fresh files which help resolve issues related to corrupt o missing system files. Follow the steps below:
1. Press the Windows + R keys together to launch the Run dialog box.
2. In the text field, type cmd, and press Ctrl+Shift+Enter to launch the Command Prompt with administrative privileges.
3. Paste the following command in the terminal and press Enter:
dism.exe /image:C: /cleanup-image /revertpendingactions

4. Now launch the Run dialog box again and in the text field, type msconfig. Press Enter.

5. In the Boot tab, check the box next to Safe Boot.
6. Select the Network option and click on OK.

7. Restart the PC now to enter into Safe mode.
8. Once restarted, run the Command Prompt as an administrator and execute the system file checker command: sfc /scannow
9. Wait and once the process is completed, Restart the PC again.
This should fix the discussed error for you.
Method 3: Update Windows
Outdated OS are vulnerable to bugs and software glitches, which could also occasionally trigger the DISM error 50. It is essential that the Windows OS on the PC is up to date to fix the error. You can refer to our guide on How to Download and Install Windows 10 Latest Update.

Method 4: Repair Corrupt Files
We already know that Error: 50 prompts when a user executes the Dism /Online /Cleanup-Image /RestoreHealth command, which indicates issues with the /RestoreHealth parameters. However, executing a few commands to identify available drives, run DISM with the appropriate parameters, and perform system file checks on the Windows 10 PC can potentially resolve this.
1. Insert your Windows 10 installation media (such as a bootable USB drive or DVD) and boot the PC using it.
2. In the first installation screen, press Shift + F10 keys to launch Command Prompt as administrator.
3, Paste the following command in the WinRE Command Prompt window and press Enter to execute:
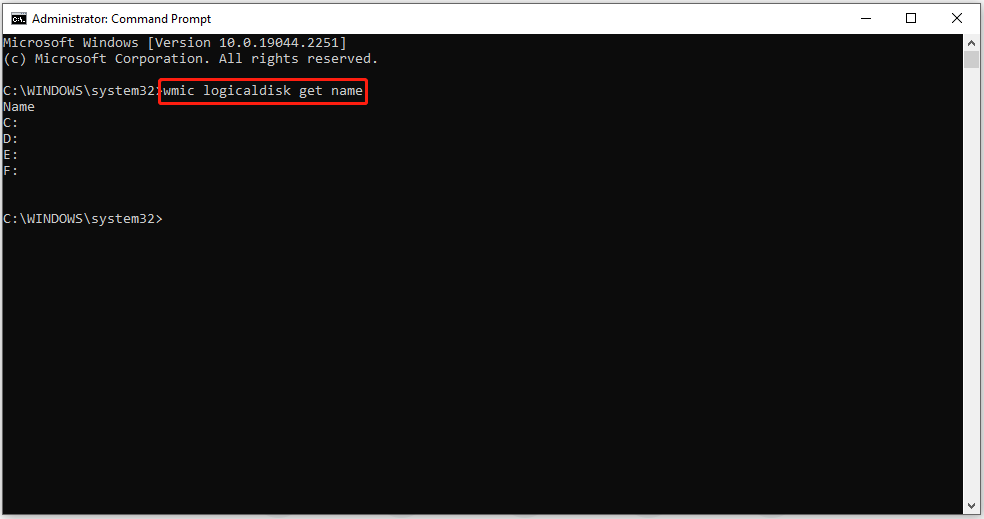
wmic logicaldisk get name

4. Now type the following command to find the drive with the Windows folder.
dir drive-letter:
Note: Replace drive-letter with the correct drive containing the Windows folder.
For example: dir C: or dir D:

5. Once you found the drive containing the Windows folder, execute the command mentioned below:
dism.exe /Image:D:\ /Cleanup-Image /Restorehealth
Note: Replace the letter with the driver on your PC containing the Windows folder.

Important: If you face Error 0x800f081f, perform a repair upgrade following Steps 6 to 8. If not, skip to Step 9.
6. For repair upgrade, boot using Windows Installation Media and at the Windows Setup wizard, click on Next.
7. Follow the on-screen instructions and once the upgrade process is completed, reboot Windows in Safe Mode.
8. Run the Command Prompt in administrative mode and execute the following command:
DISM /Online /Cleanup-Image /RestoreHealth
9. Finally, execute the following command:
SFC /SCANNOW /OFFBOOTDIR=D:\ /OFFWINDIR=D:\Windows
Note: Make sure to use the letter of the driver containing the Windows folder instead of D.

10. Restart the PC at last.
Check if the error is fixed now. If not, proceed to the next method.
Method 5: Run Windows Update Troubleshooter
Windows Update Troubleshooter is a helpful tool for resolving various Windows-related problems. It might potentially identify and fix any issues related to Windows updates that might be causing DISM errors.
1. Open Settings on the PC and click on Update & Security.
2. Click on Troubleshoot and then under Get up and running, select Windows Update.
3. Now click on Run the troubleshooter and follow the on-screen instructions to complete the troubleshooting process.

4. Restart the PC and check if the DISM Error 50 is resolved.
Also Read: How to Download Classic Paint for Windows 10
Method 6: Use DISM with the /Source Option
This method introduces the use of the DISM tool with the /Source option. As we specify the source files from the Windows installation media to repair the DISM component, this might fix Error 50.
1. Insert your Windows 10 installation media into the PC and boot using it.
2. During the boot-up process, choose your preferred Language to install and click Next.

3. Select the Repair your computer option at the bottom left corner.
4. Click on Troubleshoot, followed by Command Prompt.

4. Execute the following command, replacing X with the drive letter of your installation media (e.g., D; E, or F):
dism.exe /Online /Cleanup-Image /RestoreHealth /Source:X:\Sources\Install.wim
5. Allow the process to complete, and then Restart the PC.
Method 7: Create New User Account
Sometimes the error is related only to a specific user account. You can create a new one and log in to the PC using it to prevent the issue. Follow the steps mentioned below:
1. In the Control Panel, click on User Accounts, followed by Manage another account.
2. At the bottom left corner, click on Add a new user in PC settings.
3. Under Other users, click on Add someone else to this PC.

4. Now follow the on-screen instructions to create a new account. Once created, you can log in through the new account.
Method 8: Update BIOS
Updating BIOS ensures that the current system software is compatible with other modules as well, which could ultimately fix the DISM error. Moreover, it also increases stability in the performance of the PC. You can follow our guide on What is BIOS and how to update BIOS?

Method 9: Reset BIOS
If updating BIOS did not help, you can reset the BIOS settings to their default or factory values as certain configurations can sometimes interfere with DISM operations. A reset can help eliminate this conflict.
1. In the first step, access the BIOS settings on your Windows 10 PC (the key to enter BIOS varies by manufacturer).
2. Move to the Advanced BIOS section and select Reset Configuration Data.
Note: There could be other variations to it such as Reset to Default, Load Factory Defaults, Clear BIOS Settings, Load Setup Defaults, or something similar. So, click on the appropriate option.
3. Lastly select Save and Exit.

4. Restart the PC, the error should be resolved now.
Method 10: Perform Windows Repair Installation
As a last resort, a Windows repair installation, also known as an in-place upgrade, can be considered. It involves reinstalling Windows while preserving your files and applications. Our guide on How to Repair Install Windows 10 Easily can help you with this, and potentially fix persistent issues like DISM Error 50.

DISM Error 50 can be a hindrance when trying to perform critical tasks on the Windows system. We hope with the methods outlined in our guide, you were able to easily resolve the issue. If you have any queries or suggestions for us, do let us know in the comments box below. Stay tuned to TechCult for solutions to more such tech-related errors.
The Deployment Image Service and Management Tool (DISM) is a powerful utility in Windows that helps users repair and prepare Windows images. However, like any tool, DISM is not immune to encountering errors. One such common issue is DISM Error 50, which can be frustrating for users trying to perform system repairs or maintenance. In this guide, we will delve into the causes of DISM Error 50 and provide step-by-step solutions to resolve it.
Understanding DISM Error 50
DISM Error 50 typically occurs when the tool encounters problems while attempting to execute certain commands or tasks. The error message may appear as “DISM Error 50: DISM does not support servicing Windows PE with the /Online option.” This error is commonly associated with attempts to repair a Windows image in a Windows Preinstallation Environment (Windows PE) or while using the /Online option.
Solutions to Fix DISM Error 50
1. Use the Correct Command Syntax
Ensure that you are using the correct syntax for the DISM command. When dealing with Windows PE, avoid using the /Online option, as it is not supported in this environment. Instead, specify the path to the offline Windows image.
Example:
DISM /Image:C:\offline /Cleanup-Image /RestoreHealth
2. Run DISM from a Different Environment
If you’re encountering DISM Error 50 while trying to repair the active Windows installation, consider running DISM from a different environment. Booting from a Windows installation media or recovery drive and running DISM in an offline mode can sometimes resolve the issue.
3. Check for Windows Update Issues
Ensure that your Windows installation is up to date. Run Windows Update to install any pending updates, as DISM errors can sometimes be linked to inconsistencies in the system files.
4. Run SFC (System File Checker)
Use the System File Checker tool to scan and repair corrupted system files. Open Command Prompt as an administrator and run the following command:
sfc /scannow
5. Perform a Clean Boot
Booting Windows in a clean environment can help identify if third-party applications or services are causing conflicts with DISM. Follow these steps to perform a clean boot:
- Press Windows + R to open the Run dialog.
- Type “msconfig” and press Enter.
- Go to the “Services” tab, check “Hide all Microsoft services,” and click “Disable all.”
- Go to the “Startup” tab and click “Open Task Manager.”
- Disable all startup items and close Task Manager.
- Click “OK” in the System Configuration window and restart your computer.
6. Use DISM with Windows Update Standalone Installer
Download the latest Windows Update Standalone Installer (WUSA) from the Microsoft Update Catalog. Run the installer, and then use DISM to apply updates from the standalone installer.
DISM Error 50 can be resolved by carefully following the steps outlined above. By understanding the causes and employing the appropriate solutions, users can overcome this error and ensure the smooth operation of the DISM tool for Windows image maintenance and repair. If the issue persists, seeking assistance from Microsoft support or community forums may provide additional insights into specific scenarios.
DISM is a very useful command tool in Windows 10 and it is used to fix corrupted or missing system files frequently. Some of you may receive DISM does not support servicing Windows PE when using some DISM commands from Windows Recovery Environment Command Prompt. On MiniTool Website, we will show you how to fix it step by step.
DISM Does Not Support Servicing Windows PE with the /Online Option
DISM is a Windows inbuilt command-line tool that is designed for users to prepare, modify and repair system files that are used for Windows Setup, Windows PE, and Windows RE. In most cases, you can use this tool together with the SFC tool to scan & repair the computer and return it to a normal state without reinstalling the system from scratch.
However, some of you may receive an error message saying Error 50 DISM does not support servicing Windows PE with the /Online option when running the following commands in Windows RE:
- Dism /Online /Cleanup-Image /CheckHealth
- Dism /Online /Cleanup-Image /ScanHealth
- Dism /Online /Cleanup-Image /RestoreHealth
The /Online option specifies that the action is taken on the operating system that is running currently. If the operating system is not running in Windows RE, the DISM does not support servicing Windows PE message will crop up.
In this post, we will show you 5 solutions to work out this issue step by step and you can try them one by one until the problem disappears.
How to Fix DISM Does Not Support Servicing Windows PE?
Fix 1: Delete the Associated Registry Key
There is a specific registry key that can identify Windows PE. When you start to run the DISM tools in Windows PE, it will check for that registry key. DISM does not support servicing Windows PE may occur due to the misplacement of the corresponding registry key. To address this issue, you can delete the associated registry key.
Warning:
Warning: Editing the registry key incorrectly may damage your operating system severely. You had better back up the registry keys and your data before making any changes to them.
Step 1. Press Win + R altogether to launch the Run dialog.
Step 2. Type regedit and hit Enter to open Registry Editor.
Step 3. Navigate to the following path: HKEY_LOCAL_MACHINE\SYSTEM\CurrentControlSet\Control\MiniNT

Step 4. Right-click on the MiniNT folder and select Permissions in the context menu.
Step 5. Under Group or user names, find your user name and hit it. Tick Full Control and hit OK to save the changes.
Step 6. Right-click on the MiniNT folder again and choose Delete.
Step 7. Reboot your PC and run the DISM tool again.
Fix 2: Refresh DISM
Refreshing the DISM tool will help you to fix most minor software-related problems including DISM does not support servicing Windows PE with the online option. Follow the guidelines below:
Step 1. Type run in the search bar and hit Enter to open the Run box.
Step 2. Type cmd and press Ctrl + Shift + Enter to run Command Prompt as an administrator.
Step 3. Copy & paste the following command in the command window and hit Enter.
dism.exe /image:C: /cleanup-image /revertpendingactions
Step 4. Then, type msconfig in the Run dialog and hit Enter to open System Configuration.
Step 5. Under the Boot tab, tick Safe boot > select Minimal > hit OK to save your settings. Reboot your PC and it will boot into Safe Mode.

Step 6. In Safe Mode, type cmd in the search bar to locate Command Prompt and right-click on it to choose Run as administrator.
Step 7. Type sfc /scannow > hit Enter and then the DISM tool will be refreshed.
Fix 3: Use Command Prompt
To cope with DISM does not support servicing Windows PE, you can choose to use some commands in Command Prompt.
Step 1. Boot your computer from the Windows 10 installation media and press Shift + F10 on the first installation screen to launch Command Prompt.
Step 2. In the Windows RE Command Prompt window, run wmic logicaldisk get name to see a list of all available system partitions.
Step 3. Type dir drive-letter: (replace drive-letter with your system drive letter) and hit Enter. For example, if you want to view the contents of the C: system partition, run the dir C: command.
Step 4. Then, type dism.exe /Image: C:\ /Cleanup-Image /Restorehealth and hit Enter to repair the offline Windows image. (C: refers to the Windows system partition, you should replace it with yours.)
Tips:
There is a chance that you might receive error code 0x800f081f in this step. If you suffer from it, you can find fixes in this guide — Fix: Error 0x800f081f Occurs When Installing .NET Framework 3.5.
Step 5. Run the SFC /SCANNOW /OFFBOOTDIR=C:\ /OFFWINDIR=C:\Windows command to complete the repair. Also, don’t forget to replace C: with the drive letter of the system partition containing the Windows folder.
Step 6. Reboot your computer to check for any improvements.
Fix 4: Reset BIOS
BIOS (Basic Input Output System) controls the startup process of a computer and resetting it can start the input & output system to the last saved configuration. Therefore, some Windows PC problems including error 50 DISM does not support servicing Windows PE with the /online option will be fixed. Here’s how to reset the BIOS:
Move 1: Enter BIOS
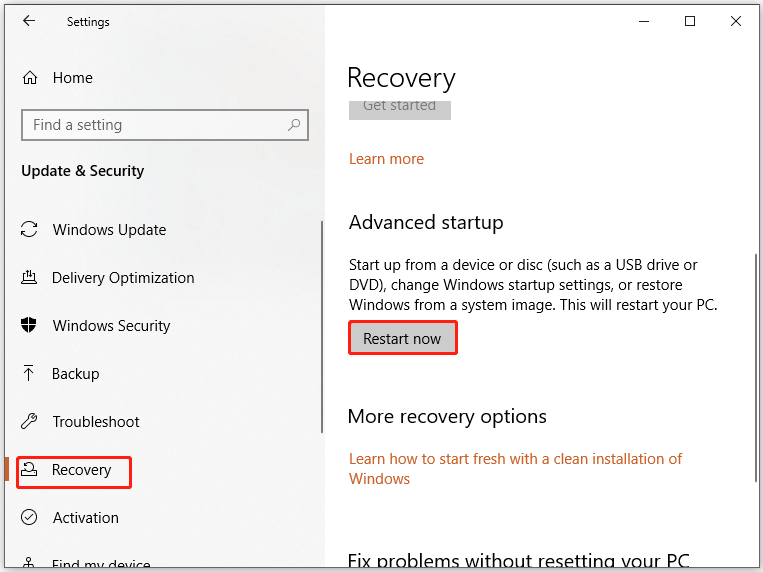
Step 1. Go to Windows Settings > Update & Security > Recovery.
Step 2. In the Recovery tab, click on Restart now under Advanced startup to reboot your computer into Windows Recovery Environment.
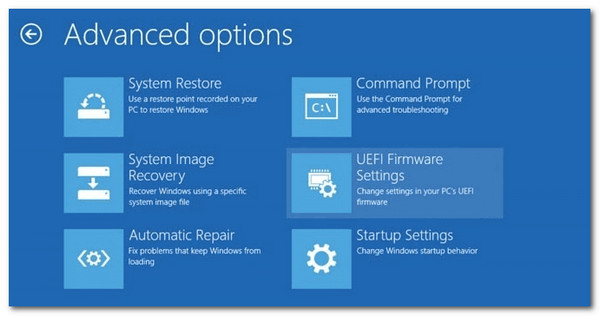
Step 3. Press Troubleshoot > Advanced Options > UEFI Firmware Settings > Restart.
Move 2: Reset BIOS
Step 1. Select the Exit item and use the arrow keys to find Setup Defaults, Load Default, Load Setup Defaults, Load Default Settings, Load BIOS Defaults, or Load Optimal Defaults.

Step 2. Choose it and hit Enter.
Step 3. Press F10 to save the settings and exit BIOS.
Tips:
If you are not familiar with the operating system structure, you can follow the guidelines in this tutorial — How to Reset BIOS/CMOS in Windows 10 — 3 Steps.
Fix 5: Create a New User Account
The occurrence of error 50 DISM does not support servicing Windows PE with the /online option Windows 10 is usually related to a certain user account, so you can create another account to avoid this issue.
Step 1. Press Win + R, type netplwiz and hit Enter to open User Accounts.
Step 2. In the User tab, hit Add and then tap on the Sign in without a Microsoft account (not recommended) option.
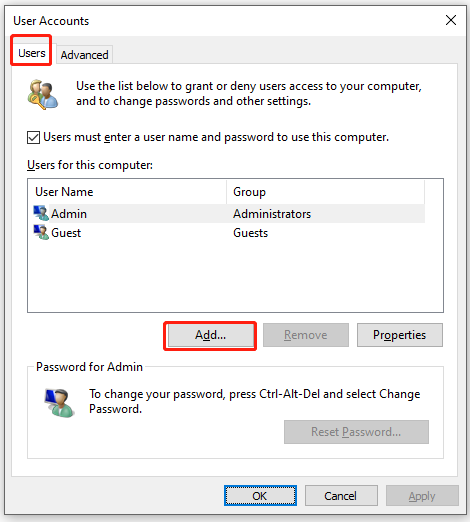
Step 3. Click on Local account > enter User name, Password, Confirm password, and Password hint > hit Next & Finish.

By now, you may probably solve the DISM does not support servicing Windows PE issue. As you can see, the repairing process is difficult and time-consuming. If you are not an expert in computers, it is easy to make some fatal mistakes and cause huge losses.
Therefore, if you are afraid that your computer will crash again, you can consider backing up your system in advance. Here, we sincerely advise you to use a piece of professional backup software – MiniTool ShadowMaker to simplify the repairing process.
This free tool is easy to use especially for those who are not proficient in computer. It enables you to back up & restore your systems, partitions, disks, folders and files in Windows PCs. When the system is crashed, you can use the system backup image file to repair your system and restore it to a healthy state to secure your data.
MiniTool ShadowMaker provides you with a one-click system resolution. Here’s how to back up your computer with it:
Step 1. Download, install and launch MiniTool ShadowMaker.
MiniTool ShadowMaker TrialClick to Download100%Clean & Safe
Step 2. Tap on Keep Trial to get a 30-day free trial and then go to the Backup page.
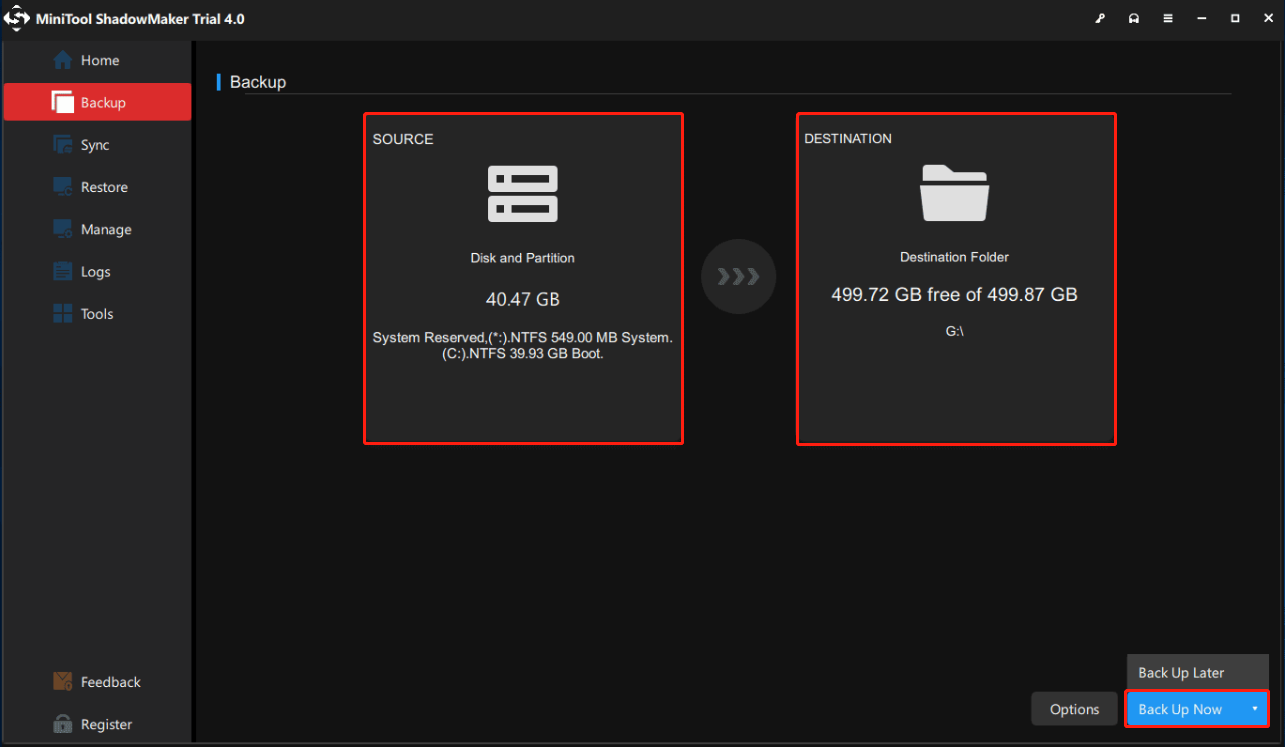
Step 3. In this page, you can see that the operating system is selected by default in SOURCE. In DESTINATION, MiniTool ShadowMaker has chosen a default destination path for your backup files.
Tips:
Here, it is advisable to choose an external drive as the destination path. You just need to connect your external drive > hit DESTINATION > choose this drive as the storage path > hit OK.
Step 4. Click on Back Up Now to start the backup task immediately.
After the backup process is complete, you can create a bootable USB disk with MiniTool ShadowMaker. When your system crashes or even fails to boot the next time, you can boot your computer from this drive to perform a system restore.
How to Create a Bootable USB Disk?
Step 1. Prepare a USB flash drive and connect it to your computer.
Step 2. Launch MiniTool ShadowMaker and go to the Tools page.
Step 3. Click on Media Builder and WinPE-based media with MiniTool plug-in.
Step 4. Select USB Flash Disk > choose your USB drive > hit Yes to confirm this action.
Step 5. After the boot file is generated successfully, hit Finish.
Does this guide work for you? If you extract much benefit from it, click here to share your joy with your friends on Twitter so that the solutions in this guide will help others in the same boat.Click to Tweet
Wrapping Things up
To sum up, we have introduced 5 solutions to help you solve the DISM does not support servicing Windows PE with the /Online option error and a better way to provide all-round protection for your system – back up your computer with MiniTool ShadowMaker.
We sincerely hope that these workarounds can help you out. For more problems about computer or our product, don’t hesitate to leave your idea in the comment section below or send an email to our support team via [email protected]. Thanks a million!
DISM Does Not Support Servicing Windows PE FAQ
How do you fix DISM does not support servicing Windows PE with the online option?
- Delete the associated registry key
- Refresh DISM
- Use Command Prompt
- Reset BIOS
- Create a new user account
Can you run DISM from Windows PE?
Yes, you can. When you are in Windows PE, press Shift + F10 altogether to open Command Prompt and then you can run the DISM commands in the command window. However, you are likely to encounter an error message saying Error 50 DISM does not support servicing Windows PE with the /Online option.
How do I fix DISM Error 50 in CMD?
In Windows Recovery Environment CMD window, you need run the following commands one after another (replace drive-letter with your Windows drive letter):
- wmic logicaldisk get name
- dir drive-letter:
- dism.exe /Image: drive-letter:\ /Cleanup-Image /Restorehealth
- SFC /SCANNOW /OFFBOOTDIR= drive-letter:\ /OFFWINDIR= drive-letter:\Windows
Finally, don’t forget to reboot your computer.
Can DISM repair Windows?
Yes, you can use DISM to repair Windows. Usually, the DISM commands will use the Windows Update files to repair any corrupt or missing system files for you.