
| Номер ошибки: | Ошибка 4096 | |
| Название ошибки: | Windows Setup Error Code 4096 | |
| Описание ошибки: | Ошибка 4096: Возникла ошибка в приложении Windows. Приложение будет закрыто. Приносим извинения за неудобства. | |
| Разработчик: | Microsoft Corporation | |
| Программное обеспечение: | Windows | |
| Относится к: | Windows XP, Vista, 7, 8, 10, 11 |
Продукт Solvusoft
Загрузка
WinThruster 2024 — Улучшение стабильности и производительности ПК
Совместима с Windows 2000, XP, Vista, 7, 8, 10 и 11
Установить необязательные продукты — WinThruster (Solvusoft) | Лицензия | Политика защиты личных сведений | Условия | Удаление
Основы «Windows Setup Error Code 4096»
«Windows Setup Error Code 4096» также считается ошибкой во время выполнения (ошибкой). Когда дело доходит до Windows, инженеры программного обеспечения используют арсенал инструментов, чтобы попытаться сорвать эти ошибки как можно лучше. К сожалению, многие ошибки могут быть пропущены, что приводит к проблемам, таким как те, с ошибкой 4096.
Некоторые пользователи могут столкнуться с сообщением «Windows Setup Error Code 4096» при использовании Windows. Таким образом, конечные пользователи предупреждают поставщиков о наличии ошибок 4096 проблем, предоставляя информацию разработчику. Команда программирования может использовать эту информацию для поиска и устранения проблемы (разработка обновления). Эта ситуация происходит из-за обновления программного обеспечения Windows является одним из решений ошибок 4096 ошибок и других проблем.
Что на самом деле вызывает ошибку времени выполнения 4096?
Сбой во время выполнения Windows, как правило, когда вы столкнетесь с «Windows Setup Error Code 4096» в качестве ошибки во время выполнения. Вот три наиболее распространенные причины, по которым происходят ошибки во время выполнения ошибки 4096:
Ошибка 4096 Crash — Номер ошибки вызовет блокировка системы компьютера, препятствуя использованию программы. Это возникает, когда Windows не работает должным образом или не знает, какой вывод будет подходящим.
Утечка памяти «Windows Setup Error Code 4096» — ошибка 4096 приводит к постоянной утечке памяти Windows. Потребление памяти напрямую пропорционально загрузке ЦП. Это может быть вызвано неправильной конфигурацией программного обеспечения Microsoft Corporation или когда одна команда запускает цикл, который не может быть завершен.
Ошибка 4096 Logic Error — «логическая ошибка», как говорят, генерируется, когда программное обеспечение получает правильный ввод, но генерирует неверный вывод. Это связано с ошибками в исходном коде Microsoft Corporation, обрабатывающих ввод неправильно.
Как правило, ошибки Windows Setup Error Code 4096 вызваны повреждением или отсутствием файла связанного Windows, а иногда — заражением вредоносным ПО. В большинстве случаев скачивание и замена файла Microsoft Corporation позволяет решить проблему. В качестве последней меры мы рекомендуем использовать очиститель реестра для исправления всех недопустимых Windows Setup Error Code 4096, расширений файлов Microsoft Corporation и других ссылок на пути к файлам, по причине которых может возникать сообщение об ошибке.
Типичные ошибки Windows Setup Error Code 4096
Общие проблемы Windows Setup Error Code 4096, возникающие с Windows:
- «Ошибка программного обеспечения Windows Setup Error Code 4096. «
- «Windows Setup Error Code 4096 не является приложением Win32.»
- «Извините за неудобства — Windows Setup Error Code 4096 имеет проблему. «
- «Windows Setup Error Code 4096 не может быть найден. «
- «Отсутствует файл Windows Setup Error Code 4096.»
- «Проблема при запуске приложения: Windows Setup Error Code 4096. «
- «Не удается запустить Windows Setup Error Code 4096. «
- «Windows Setup Error Code 4096 остановлен. «
- «Ошибка пути программного обеспечения: Windows Setup Error Code 4096. «
Ошибки Windows Setup Error Code 4096 EXE возникают во время установки Windows, при запуске приложений, связанных с Windows Setup Error Code 4096 (Windows), во время запуска или завершения работы или во время установки ОС Windows. Запись ошибок Windows Setup Error Code 4096 внутри Windows имеет решающее значение для обнаружения неисправностей электронной Windows и ретрансляции обратно в Microsoft Corporation для параметров ремонта.
Windows Setup Error Code 4096 Истоки проблем
Проблемы Windows Setup Error Code 4096 могут быть отнесены к поврежденным или отсутствующим файлам, содержащим ошибки записям реестра, связанным с Windows Setup Error Code 4096, или к вирусам / вредоносному ПО.
Более конкретно, данные ошибки Windows Setup Error Code 4096 могут быть вызваны следующими причинами:
- Недопустимая (поврежденная) запись реестра Windows Setup Error Code 4096.
- Файл Windows Setup Error Code 4096 поврежден от вирусной инфекции.
- Вредоносное удаление (или ошибка) Windows Setup Error Code 4096 другим приложением (не Windows).
- Другая программа, конфликтующая с Windows Setup Error Code 4096 или другой общей ссылкой Windows.
- Windows (Windows Setup Error Code 4096) поврежден во время загрузки или установки.
Продукт Solvusoft
Загрузка
WinThruster 2024 — Улучшение стабильности и производительности ПК
Совместима с Windows 2000, XP, Vista, 7, 8, 10 и 11
Установить необязательные продукты — WinThruster (Solvusoft) | Лицензия | Политика защиты личных сведений | Условия | Удаление
-
lisman4uk
- Новичок
- Сообщения: 1
- Зарегистрирован: Сб ноя 21, 2009 21:33:46
ув. админы профи юзеры !!!
изначально была ошибка hal.dll
решил переустановить винд
при попытке установить винд хр на нотебук после определения партишенов и начала форматирования села батарейка
при повторной попытке после «boot from cd» выдаёт :
«INF file txtsetup.sif is corrupt or missing, status 4096
setup cannot continue. press any key to exit.»
и так повторяется каждый раз,после замены загр.диска до запроса «boot from cd» выдаёт :
«NTLDR is missing press CTRL+ALT+DEL»
что делать ???
-
Noutbukov
- Site Admin
- Сообщения: 5914
- Зарегистрирован: Ср ноя 01, 2006 00:01:24
- Откуда: Россия
- Контактная информация:
Сообщение Noutbukov » Вс ноя 22, 2009 13:24:20
через стороннюю программу управления дисками отформатировать хард нормально
что-то вроде Acronis Disk Director Suite
Вернуться в «Софт»
Кто сейчас на конференции
Сейчас этот форум просматривают: нет зарегистрированных пользователей и 0 гостей
What is Error 4096?
Error 4096 is a kind of Runtime error that is found in the Microsoft Windows operating systems. The file can be found for Windows. Windows Setup Error Code 4096 has a popularity rating of 1 / 10.
Errors
This tutorial contains information on Error 4096 or otherwise known as Windows Setup Error Code 4096. Errors such as Windows Setup Error Code 4096 indicate your machine has faulty hardware or software that should be fixed when possible. Below is information on how to repair Error 4096 and get your computer back to normal.
Signs of Error 4096:
- When your computer freezes or locks up at random.
- When your computer crashes when you are running Windows.
- If Windows Setup Error Code 4096 pops up and causes a program to shutdown or your computer to crash.
- Your computer is running slow, taking a long time to boot up, and you suspect Error 4096 by Windows is the cause.
What Causes Runtime Errors Like Error 4096?
There are several causes of runtime errors like Windows Setup Error Code 4096, such as viruses, out of date drivers, missing files or folders, incomplete or poor installation, and registry errors. They can also occur due to an issue with the computer’s memory, which may often be due to a hardware problem. In some cases there was an issue installing Windows and an error occurred.
How to Fix Windows Setup Error Code 4096
Follow the step by step instructions below to fix the Error 4096 problem. We recommend you do each in order. If you wish to skip these steps because they are too time consuming or you are not a computer expert, see our easier solution below.
Step 1 — Uninstall and Reinstall Windows
If the Windows Setup Error Code 4096 is a result of using Windows, you may want to try reinstalling it and see if the problem is fixed. Please follow these steps:
Windows XP
- Click “Start Menu”.
- Click “Control Panel”.
- Select the “Add or Remove” program icon.
- Find the Error 4096 associated program.
- Click the Change/Remove button on the right side.
- The uninstaller pop up will give you instructions. Click “okay” or “next” or “yes” until it is complete.
- Reinstall the software.
Windows 7 and Windows Vista
- Click “Start Menu”.
- Click “Control Panel”.
- Click “Uninstall a Program” which is under the “Programs” header.
- Find the Error 4096 associated program.
- Right click on it and select “Uninstall”.
- The uninstaller pop up will give you instructions. Click “okay” or “next” or “yes” until it is complete.
- Reinstall the software and run the program.
Windows 8, 8.1, and 10
- Click “Start Menu”.
- Click “Programs and Features”.
- Find the software that is linked to **insert file name**.
- Click Uninstall/Change.
- The uninstaller will pop up and give you instructions. Click “okay” and “next” until it is complete.
- Restart your computer.
- Reinstall the software and run the program.
Step 2 — Remove Registry Entry related to Error 4096
WARNING: Do NOT edit the Windows Registry unless you absolutely know what you are doing. You may end up causing more trouble than you start with. Proceed at your OWN RISK.
- Create a backup of registry files.
- Click “Start”.
- Type regedit, select it, and grant permission in order to proceed.
- Click HKEY LOCAL MACHINE>>SOFTWARE>>Microsoft>>Windows>>Current Version>>Uninstall.
- Find the Windows Setup Error Code 4096 software from the list you wish to uninstall.
- Select the software and double click the UninstallString icon on the right side.
- Copy the highlighted text.
- Exit and go to the search field.
- Paste the data.
- Select Okay in order to uninstall the program.
- Reinstall the software.
Step 3 – Ensure Junk Isn’t Causing Windows Setup Error Code 4096
Any space that isn’t regularly cleaned out tends to accumulate junk. Your personal computer is no exception. Constant web browsing, installation of applications, and even browser thumbnail caches slow down your device and in the absence of adequate memory, can also trigger a Windows Setup Error Code 4096 error.
So how do you get around this problem?
- You can either use the Disk Cleanup Tool that comes baked into your Windows operating system.
- Or you can use a more specialized hard drive clean up solution that does a thorough job and flushes the most stubborn temporary files from your system.
Both solutions may take several minutes to complete the processing of your system data if you haven’t conducted a clean up in a while.
The browser caches are almost a lost cause because they tend to fill up quite rapidly, thanks to our constantly connected and on the go lifestyle.
Here’s how you can run the Window’s Disk Cleanup Tool, without performance issues or surprises.
- For Windows XP and Windows 7, the program can be ran from “Start” and from the “Command Prompt”.
- Click “Start”, go to All Programs > Accessories > System Tools, click Disk Cleanup. Next choose the type of files you wish to remove, click OK, followed by “Delete Files”.
- Open up the Command Prompt, type “c:\windows\cleanmgr.exe /d” for XP and “cleanmgr” for Windows 7. Finish by pressing “Enter”.
- For Windows 8 and Windows 8.1, the Disk Cleanup Tool can be accessed directly from “Settings”. Click “Control Panel” and then “Administrative Tools”. You can select the drive that you want to run the clean up on. Select the files you want to get rid of and then click “OK” and “Delete Files”.
- For Windows 10, the process is simplified further. Type Disk Cleanup directly in the search bar and press “Enter”. Choose the drive and then the files that you wish to wipe. Click “OK”, followed by “Delete Files”.
The progressive ease with which the Cleanup Tool can be used points to the growing importance of regularly deleting temporary files and its place in preventing Windows Setup Error Code 4096.
PRO TIP:
Remember to run the Disk Cleanup as an administrator.
Step 4 – Fix Infections and Eliminate Malware in Your PC
How do you gauge if your system is infected with a malware and virus?
Well, for one, you may find certain applications misbehaving.
And you may also see the occurrence of Error 4096.
Infections and malware are the result of:
- Browsing the Internet using open or unencrypted public Wi-Fi connections
- Downloading applications from unknown and untrustworthy sources
- Intentional planting of viruses in your home and office networks
But thankfully, their impact can be contained.
- Enter “safe mode” by pressing the F8 key repeatedly when your device is restarting. Choose “Safe Mode with Networking” from the Advanced Boot Options menu.
- Back up all the data in your device to a secure location. This is preferably a storage unit that is not connected to your existing network.
- Leave program files as is. They are where the infection generally spreads from and may have been compromised.
- Run a thorough full-system scan or check of an on-demand scanner. If you already have an antivirus or anti-malware program installed, let it do the heavy lifting.
- Restart your computer once the process has run its course.
- Lastly, change all your passwords and update your drivers and operating system.
PRO TIP: Are you annoyed by the frequent updates to your antivirus program? Don’t be! These regular updates add new virus signatures to your software database for exponentially better protection.
Step 5 – Return to the Past to Eliminate Error 4096
The steps outlined up until this point in the tutorial should have fixed Windows Setup Error Code 4096 error. But the process of tracking what has caused an error is a series of educated guesses. So in case the situation persists, move to Step 5.
Windows devices give users the ability to travel back in time and restore system settings to an uncorrupted, error free state.
This can be done through the convenient “System Restore” program. The best part of the process is the fact that using System Restore doesn’t affect your personal data. There is no need to take backups of new songs and pictures in your hard drive.
- Open “Control Panel” and click on “System & Security”.
- Choose the option “System”.
- To the left of the modal, click on “System Protection”.
- The System Properties window should pop-up. You’ll be able to see the option “System Restore”. Click on it.
- Go with “Recommended restore” for the path of least hassles and surprises.
- Choose a system restore point (by date) that will guarantee taking your device back to the time when Error 4096 hasn’t been triggered yet.
- Tap “Next” and wrap up by clicking “Finish”.
If you’re using Windows 7 OS, you can reach “System Restore” by following the path Start > All Programs > Accessories > System Tools.
Step 6 — Error 4096 Caused by Outdated Drivers
Updating a driver is not as common as updating your operating system or an application used to run front-end interface tasks.
Drivers are software snippets in charge of the different hardware units that keep your device functional.
So when you detect an Windows Setup Error Code 4096 error, updating your drivers may be a good bet. But it is time consuming and shouldn’t be viewed as a quick fix.
Here’s the step-by-step process you can go through to update drivers for Windows 8, Windows 8.1 and Windows 10.
- Check the site of your hardware maker for the latest versions of all the drivers you need. Download and extract them. We strongly advice going with original drivers. In most cases, they are available for free on the vendor website. Installing an incompatible driver causes more problems than it can ever fix.
- Open “Device Manager” from the Control Panel.
- Go through the various hardware component groupings and choose the ones you would like to update.
- On Windows 10 and Windows 8, right-click on the icon of the hardware you would like to update and click “Update Driver”.
- On Windows 7 and Vista, you right-click the hardware icon, choose “Properties”, navigate to the Driver panel, and then click “Update Driver”.
- Next you can let your device automatically search for the most compatible drivers, or you can choose to update the drivers from the versions you have on your hard drive. If you have an installer disk, then the latter should be your preferred course of action. The former may often get the driver selection incorrect.
- You may need to navigate a host of warnings from the Windows OS as you finalize the driver update. These include “Windows can’t verify that the driver is compatible” and “Windows can’t verify the publisher of this driver”. If you know that you have the right one in line, click “Yes”.
- Restart the system and hopefully the Windows Setup Error Code 4096 error should have been fixed.
Step 7 – Call the Windows System File Checker into Action
By now the Windows Setup Error Code 4096 plaguing your device should have been fixed. But if you haven’t resolved the issue yet, you can explore the Windows File Checker option.
With the Windows File Checker, you can audit all the system files your device needs to operate, locate missing ones, and restore them.
Sound familiar? It is almost like “System Restore”, but not quite. The System Restore essentially takes you back in time to a supposedly perfect set up of system files. The File Checker is more exhaustive.
It identifies what is amiss and fills the gaps.
- First and foremost, open up an elevated command prompt.
- Next, if you are using Windows 8, 8.1 or 10, enter “DISM.exe /Online /Cleanup-image /Restorehealth” into the window and press Enter.
- The process of running the Deployment Image Servicing and Management (DISM) tool may take several minutes.
- Once it completes, type the following command into the prompt “sfc /scannow”.
- Your device will now go through all protected files and if it detects an anomaly, it will replace the compromised version with a cached version that resides at %WinDir%\System32\dllcache.
Step 8 – Is your RAM Corrupted? Find Out.
Is it possible? Can the memory sticks of your device trigger Error 4096?
It is unlikely – because the RAM chips have no moving parts and consume little power. But at this stage, if all else has failed, diagnosing your RAM may be a good move.
You can use the Windows Memory Diagnostics Tool to get the job done. Users who are on a Linux or Mac and are experiencing crashes can use memtest86.
- Open up your device and go straight to the “Control Panel”.
- Click on “Administrative Tools”.
- Choose “Windows Memory Diagnostic”.
- What this built-in option does is it burns an ISO image of your RAM and boots the computer from this image.
- The process takes a while to complete. Once it is done, the “Status” field at the bottom of the screen populates with the result of the diagnosis. If there are no issues with your RAM/memory, you’ll see “No problems have been detected”.
One drawback of the Windows Memory Diagnostic tool pertains to the number of passes it runs and the RAM segments it checks.
Memtest86 methodically goes over all the segments of your memory – irrespective of whether it is occupied or not.
But the Windows alternative only checks the occupied memory segments and may be ineffective in gauging the cause of the Windows Setup Error Code 4096 error.
Step 9 – Is your Hard Drive Corrupted? Find Out.
Your RAM or working memory isn’t the only culprit that may precipitate an Windows Setup Error Code 4096 error. The hard drive of your device also warrants close inspection.
The symptoms of hard drive error and corruption span:
- Frequent crashes and the Blue Screen of Death (BSoD).
- Performance issues like excessively slow responses.
- Errors like Error 4096.
Hard drives are definitely robust, but they don’t last forever.
There are three things that you can do to diagnose the health of your permanent memory.
- It is possible that your device may have a hard time reading your drive. This can be the cause of an Windows Setup Error Code 4096 error. You should eliminate this possibility by connecting your drive to another device and checking for the recurrence of the issue. If nothing happens, your drive health is okay.
- Collect S.M.A.R.T data by using the WMIC (Windows Management Instrumentation Command-line) in the command prompt. To do this, simply type “wmic” into the command prompt and press Enter. Next follow it up with “diskdrive get status”. The S.M.A.R.T status reading is a reliable indicator of the longevity of your drive.
- Fix what’s corrupt. Let’s assume you do find that all isn’t well with your hard drive. Before you invest in an expensive replacement, using Check Disk or chkdsk is worth a shot.
- Open the command prompt. Make sure you are in Admin mode.
- Type “chkdsk C: /F /X /R” and press “Enter”. “C” here is the drive letter and “R” recovers data, if possible, from the bad sectors.
- Allow the system to restart if the prompt shows up.
- And you should be done.
These steps can lead to the resolution you’re seeking. Otherwise the Windows Setup Error Code 4096 may appear again. If it does, move to Step 10.
Step 10 – Update Windows OS
Like the software applications you use to render specific tasks on your device, the Operating System also requires periodic updates.
Yes, we’ve all heard the troubling stories.
Devices often develop problems post unfinished updates that do not go through. But these OS updates include important security patches. Not having them applied to your system leaves it vulnerable to viruses and malware.
And may also trigger Error 4096.
So here’s how Windows 7, Windows 8, Windows 8.1 and Windows 10 users can check for the latest updates and push them through:
- Click the “Start” button on the lower left-hand corner of your device.
- Type “Updates” in the search bar. There should be a “Windows Update” or “Check for Updates” option, based on the OS version you’re using.
- Click it. The system will let you know if any updates are available.
- You have the convenience of choosing the components of the update you’d like to push through. Always prioritize the security updates.
- Click “OK” followed by “Install Updates”.
Step 11 – Refresh the OS to Eliminate Persistent Windows Setup Error Code 4096 Error
“Windows Refresh” is a lifesaver.
For those of you who are still with us and nothing has worked to eliminate the Error 4096, until recently, a fresh install of Windows would have been the only option.
Not anymore.
The Windows Refresh is similar to reinstalling your Windows OS, but without touching your personal data. That’s hours of backup time saved in a jiffy.
Through the Refresh, all your system files become good as new. The only minor annoyance is the fact that any custom apps you’ve installed are gone and the system applications you had uninstalled are back.
Still, it is the best bet as the final step of this process.
- Enter the “Settings” of your PC and click on “Change Settings”.
- Click “Update and recovery” and then choose “Recovery”.
- Select “Keep my files”. This removes apps and settings, but lets your personal files live on.
- You’ll get some warning messages about the apps that will be uninstalled. If you’ve gone through a recent OS upgrade, the Refresh process makes it so that you can’t go back to your previous OS version – if you should ever feel the need to do it.
- Click the “Refresh” button.
Are you using an older version of Windows that doesn’t come with the power to “Refresh”?
Maybe it is time to start from scratch.
- Enter your BIOS set-up.
- This is where you need to change your computer’s boot order. Make it so that the boot happens not from the existing system files, but from the CD/DVD Drive.
- Place the original Windows disk in the CD/DVD drive.
- Turn on or restart the device.
- Choose where you’d like the system files to be installed.
- Your PC will restart several times as the process runs its course.
FAQ’s
Do Runtime Errors Like Error 4096 Mean My Computer is Infected?
Runtime errors are usually not associated with viruses. Sometimes they will come disguised as false alerts which are actually viruses in disguise. These are mostly pretty easy to distinguish, however. In these cases, it is recommended that you scan your computer with an antivirus software.
Do I Need to Reinstall Windows Because of Runtime Errors?
Usually no. The errors can typically be fixed by diagnosing and solving the problem yourself or using a specialized software to do the work for you. When these fails, however, reinstalling may be an option to try as a last resort. Make sure you follow the instructions and properly backup all data before doing so.
How Can I Keep My Computer Running Fast and Error Free?
Make sure the hardware is not dated and works well. Use an antivirus software to keep viruses at bay and ensure the OS is carefully installed. Do not delete Windows files and always install all your programs properly. You should also ensure that there is enough hard drive space and memory to support all your programs. Running out of space or memory can cause the computer to slow down, also often leading to multiple errors.
Start Download Now
Author:
Curtis Hansen has been using, fiddling with, and repairing computers ever since he was a little kid. He contributes to this website to help others solve their computer issues without having to buy a new one.
by
·
Published
· Updated
Error 4096 is a major problem that is usually due to a corrupted registry key. In order to repair and then prevent the problem from occurring again, it’s necessary to fix the problem immediately. It’s best to fix it at once because otherwise, continued corruption will just lead to other problems like blue screens and system crashes. It’s also possible for the system to experience hardware failure. There are several causes of the error 4096. It helps to understand these to prevent further damage.
What Causes Error 4096?
There are many causes of the 4096 error but one of the most dominant reasons is because the computer is not being maintained properly. Other reasons include: i
- Installation of new programs over old applications
- Incomplete program installations.
In some cases, trying to overwrite a program leads to errors, because components in the registry will get piled up. Also, when programs are not properly installed, the system cannot access the right settings and information to support the application. When this happens, error messages will show. Further, error 4096 may also be due to malware infections caused by malicious entities. When malicious programs get inside the system, they wreck havoc and infect as many components as possible. They can even delete important files and settings in the system. Fortunately, there’s a way around the problem. The troubleshooting methods are outlined in the following sections.
How to Fix Error 4096?
Step 1 – Try Changing the Hard Drive & RAM Of Your PC
Since problems contributing to the registry error may be well within the system it’s often best to change the hard drive and RAM of the computer. While it may seem to be a daunting and tedious task, replacing the hard drive is not that difficult, so long as you understand the procedures involved. Remember, before proceeding with any hard drive installation, it’s essential to backup files and programs stored in the system.
Replacing the hard drive will delete all files or render them inaccessible unless they have a backup. To replace the hard disk, make sure to remove all power cables first. Detach the back of the CPU and then slide the hard disk out. Depending on the kind of hard disk to use, instructions are usually provided together with the hard disk.
Step 2 – Scan for Viruses
Scanning for viruses should also be helpful since the error may be due to malware infections. Use an antivirus program and scan the computer for any threats or malicious components. In doing this procedure, make sure to use a reliable program. We recommend using a tool called “XoftSpy” to fix the various viruses on your PC.
Step 3 – Clean Registry
- Download This Registry Cleaner
Cleaning the registry will also be extremely helpful in solving the error 4096 problem. Since the problem lies within the registry itself, it’s important that any corruptions there should be removed. To do this job properly, a registry cleaner application should be installed. This type of application is available online and can be downloaded easily. Follow the instructions provided on how to run the program and clean your PC registry.
Помянем легендарную «Хрюшку».
Ошибка при установке Windows XP – самое страшное, что может случиться с начинающим юзером в период его профессионального созревания.

Только вспомните, свою первую переустановку винды, когда каждый щелчок мышки давался с трудом. И вдруг, откуда не возьмись появился синий экран или экран смерти, как его прозвали в народе. Но все это страхи детства, о которых давно пора бы забыть. Несмотря на то, что в настоящее время Windows XP, официально, не существует, миллионы юзеров по всему свету по прежнему любят бессмертную классику. И правильно, «хрюшка» имеет массу плюсов, первый из которых очевиден – это же Windows XP! Наверняка вам уже захотелось поглазеть на классический интерфейс, знакомый каждому до уровне рефлексов. Старенькая винда надежна, как автомат Калашникова. Трудно поверить, но во времена ее популярности, народ еще мало представлял, что такое проблемы с реестром, при этом, все в жизни было хорошо.
О плюсах классической операцинки можно говорить бесконечно, но тема сегодняшнего поста к этому мало относится. Если вы читаете данную рукопись, вполне возможно, вы захотели вспомнить об этой прелестной операционке или же ставите ее первый раз по совету друзей, а так же опытных юзеров. Ошибка при установке Windows XP встречаются, от появления всякой дряни на основном окне. От этого никто не застрахован. Сегодня мы постараемся разобраться с этим вопросом на примере самых распространенных проблем, с которыми сталкиваются при первой наладке «хрюшки».
Чаще всего, ошибка при установке Windows XP дает о себе знать при неисправности в конкретном оборудовании. Пока мы не продвинулись дальше заголовка для этого раздела, скажу сразу, что проблем с аппаратурой может быть столько же, сколько производители понапичкали транзисторов на системную плату. Короче говоря, неисправность можно выявить всегда, но для этого придется пошевелить не только пальцами, но и запястьями, пытаясь снять крышку системника с помощью отвертки.
Неисправность считывающего устройства(дисковод, USB-разъем).
В процессе установки может неожиданно отключиться дисковод или USB-порт. Ошибка в этом случае будет звучать следующим образом «Указан неверный путь…Проверьте правильность настройки пути и т.д. Ошибка при установке Windows XP может выскочить не в начале установки, а уже через полчаса после ее старта, ну или за пять минут до завершения. К сожалению, для такого случая есть лишь один универсальный совет – проверить приводы, разобрать системник и проверить, все ли провода на месте. После этого начинаем все по новой.
Не исключена проблема, вызванная ошибкой с оперативной памятью.
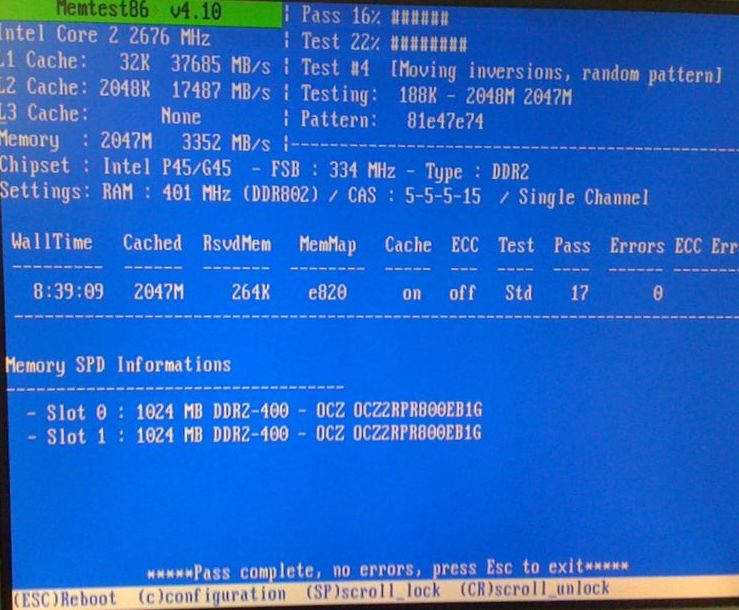
Проверить планки ОЗУ можно замечательной программкой memtest. Для начала её нужно правильно записать на флешку или диск(что вам удобнее) затем загрузиться с этого устройства и запустить memtest. По сути больше ничего делать не нужно, тест будет запущен, и по окончании этих тестов программа выдаст сообщение “*****Pass complete, no errors, press Esc to exit*****” – если все в порядке.
Если же программа обнаружила ошибки как на рисунке ниже, то скорее всего оперативная память вышла из строя, хотя возможно и такое- корректно ОЗУ мешает работать пыль.
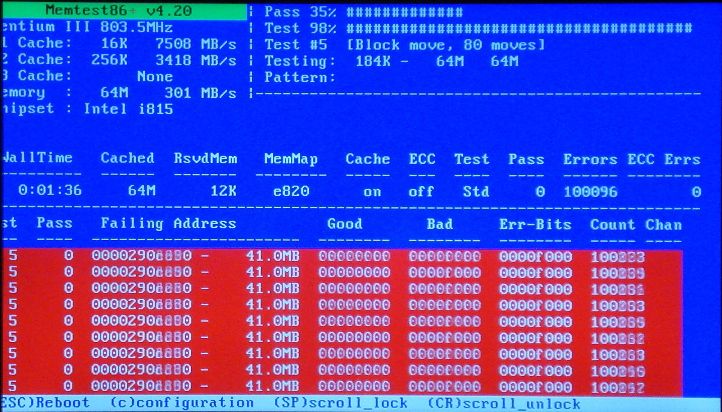
В данной ситуации необходимо в первую очередь разобрать корпус, вытащить все ОЗУ платы и хорошенько продуть и протереть все слоты +платы сухой тряпкой или кисточкой. Вполне возможно, что причина кроется в этом. Вообще желательно почистить весь системник, что бы исключить версию с пылью… Ну дело хозяйское. (Как правильно почистить компьютер от пыли вы можете узнать здесь, а ноутбук- вот здесь)
Далее, если вы уверены, что ошибка возникает не из за пыли, либо вы почистили ПК а результата это не дало- нужно (если у вас стоит несколько планок ОЗУ) вытащить все кроме одной и по очереди их протестировать в memtest. Сломанные выкинуть и заменить новыми. Если плата ОЗУ одна- идите в магазин за новой, а эту скормите мусорному ведру.
В случаях, если неисправен процессор, материнская плата или хотя бы блок питания, не переживайте, вам не придется долго искать источник проблемы. В таких случаях, компьютер вообще может не включиться, а вам ничего не останется, как идти в ближайший магазин или сервисный центр, после чего с истерическим смехом пройти мимо кассы.
Поцарапанный диск, плохая флешка.
Самый популярный тип ошибок связан с работой дисковода или USB-порта. Да, да, «Хрюшка» является довольно древней системой, но ее можно поставить на комп с помощью простой флешки. Ошибка при установке Windows XP выдаст себя неожиданно. Наверняка вы слышали баллады о том, что поцарапанные диски – это плохо сказывается на их работе. Так вот, это не баллады, это суровая реальность. Одна небольшая царапина не позволяет приводу прочитать или скопировать данные с определенного сектора. Файлы не копируются, время ожидания прерывается, после чего наступает капут, а система больше не может продолжать работу. Выход из такой ситуации очевиден – нужно воспользоваться другим диском. Вы можете повторно записать этот же образ винды или же раздобыть другой. А можно пойти по более продвинутому пути, используя высокую скорость передачи данных USB-портов. К сожалению, данные порты – это обычное железо, пластик с распайками и прочей ерундой. Естественно, при возникновении неисправности, можно воспользоваться другими портами формата USB, учитывая, что на стационарном компьютере их будет, как минимум, четыре. Подключите флешку к другому компу и проверьте ее работоспособность… В общем, необходимо действовать по стандартным процедурам, после чего повторно записать образ винды на исправный носитель.
Проблема с жестким диском.
Помните, что Windows XP ставится на жесткий диск, который тоже может сломаться. Ошибка при установке Windows XP такого рода возникает часто, а до пользователя не сразу доходит, где собака зарыта. При возникновении сей беды, можно проверить винчестер с помощью программы Victoria. Ниже приведен коротенький видеоурок, где показано, как правильно пользоваться этой прогой и при каких обстоятельствах следует ее запускать. Последний вариант выхода из такого положения – покупка нового винта. Грустно, но маленькие победы над упертым железом требуют больших жертв.
Неисправности на программном уровне.
Помним о том, что по вине BIOS, ошибка при установке Windows XP может потревожить вас при любых обстоятельствах. Обычно, БИОС просто не хочет устанавливать эту операцинку на современное оборудование, предназначенное для высших целей. Рекомендую порыскать в настройках BIOS и найти вкладку BOOT, после чего перейти на SecureBoot и выбрать Disabled. (Обычно такая проблема скрывается в новых ноутбуках, где стоит Windows 8, которая блочит все предидущие версии операционных систем.)
Неисправности при установке винды могут случаться так же по вине того программера, который потрудился над вашей версией ПО. К Windows XP существует куча модификаций или отдельных сборок, где народ менял, что хотел. При этом, никто не боялся, что их за это могут наказать и все такое… Ошибка при установке Windows XP может крыться в неисправности самой винды, которую вы скачали с торрент-трекера с дурной репутацией. Попробуйте другую версию. Спросите у знакомых, наверняка, у них сохранился этот антиквариат.
Самое страшное на последок…
Синий экран (экран смерти) – еще одно проклятие, которое прибыло к нам с далекой звезды смерти. Случается, что это чудо с кучей белых иероглифов выскакивает в самый неожиданный момент, а процесс установки винды – самый подходящий момент, как раз в этот момент силы зла не дремлют. Но довольно юмора, как убрать это безобразие? Необходимо войти в BIOS, после чего переключить режим SATA в IDE. Это интерфейсы, через которые подключается жесткий диск к остальному железу. Сей параметр регулируется опцией «SATA Mode», найти который очень просто. Скорее всего после этого синий экран вас более не потреважит.

На это мой пост подходит к завершению. Помните, что Windows XP – великая вещь, на которой выросло наше поколение. Установите ее и наслаждайтесь воспоминаниями об шикарном детстве. Удачи!
(Visited 1 094 times, 2 visits today)