
При попытке подключения к сетевым ресурсам в Windows 11 или Windows 10 — открытии сетевой папки, доступе к NAS и в других ситуациях некоторые пользователи могут столкнуться с сообщением о сетевой ошибке «Windows не может получить доступ к (адрес ресурса)», код ошибки 0x80004005 Неопознанная ошибка (или Error Code 0x80004005 Unspecified error в англоязычном варианте).
В этой инструкции подробно о способах исправить ошибку 0x80004005 при доступе к сетевым папкам и другим ресурсам. Ошибка с тем же кодом, но применительно к виртуальным машинам рассмотрена в отдельном материале: Ошибка E_FAIL 0x80004005 в VirtualBox.
Разрешение анонимного гостевого доступа к сетевым папкам

Начиная с Windows 10 версии 1709 и Windows Server 2019, клиент SMB2 и SMB3 по умолчанию не допускает подключения с гостевой учетной записью к удаленному серверу: при попытке выполнить такое подключение вы получите либо окно «Сетевая ошибка» с сообщением «0x80004005 Неопознанная ошибка», либо схожий сбой — 0x80070035 Не найден сетевой путь. В Windows 11 24H2 появились дополнительные нюансы.
Варианты решения проблемы:
- Если вы столкнулись с ошибкой после обновления до Windows 11 24H2, выполните следующие шаги: зайдите в редактор локальной групповой политики (Win+R — gpedit.msc), перейдите в раздел Конфигурация компьютера — Конфигурация Windows — Параметры безопасности — Локальные политики — Параметры безопасности, дважды нажмите по Клиент сетей Майкрософт использовать цифровую подпись (всегда), установите «Отключить» и примените настройки. Тем же способом в Конфигурация компьютера — Административные шаблоны — Сеть — Рабочая станция Lanman — Включить небезопасные гостевые входы установите «Включить». Перезагрузите компьютер.
- Убедитесь, что для службы SMB включен автоматический запуск, для этого используйте команду
sc.exe qc lanmanworkstation
в командной строке, запущенной от имени администратора, тип запуска должен быть установлен в AUTO_START.

Если это не так, по порядку используйте следующие команды:
sc.exe config lanmanworkstation depend= bowser/mrxsmb10/mrxsmb20/nsi
sc.exe config mrxsmb20 start= auto
- В командной строке выполните две команды:
reg add HKLM\SYSTEM\CurrentControlSet\Services\LanmanWorkstation\Parameters /v AllowInsecureGuestAuth /t reg_dword /d 00000001 /f
net stop LanmanWorkstation && net start LanmanWorkstation
- На компьютере, к которому выполняется подключения откройте Локальную политику безопасности (Win+R — secpol.msc), перейдите в Локальные политики — Назначение прав пользователя — Отказать в доступе к этому компьютеру из сети, удалите «Гость» в этом параметре локальной безопасности. Не забудьте отключить общий доступ с парольной защитой для гостевого доступа к общим папкам.

Обычно уже второе действие позволяет исправить ошибку 0x80004005, но не всегда. Если ошибка при подключении к сетевым папкам сохраняется, можно попробовать использовать описанные далее дополнительные подходы к решению проблемы.
Некоторые дополнительные способы исправить ошибку 0x80004005 при доступе к сетевым папкам:
- Проверьте, решает ли проблему отключение протокола IPv6 для сетевого подключения (Win+R — ncpa.cpl — открыть свойства нужного подключения и снять отметку с соответствующего протокола).
- Попробуйте включить протокол SMB 1.0: Win+R — appwiz.cpl — Включение или отключение компонентов Windows и установка соответствующей отметки. Подробно и другие способы в инструкции: Как включить SMB 1.0 в Windows 11 и Windows 10

- Убедитесь, что следующие службы не отключены: «Публикация ресурсов обнаружения функции», «Хост поставщика функции обнаружения», «Обнаружение SSDP», «DNS-клиент» и «DHCP-клиент».
- При доступе к сетевым ресурсам с учетными данными, зайдите в Панель управления — Диспетчер учетных данных — Учетные данные Windows — Добавить учетные данные Windows. Введите имя пользователя и пароль для доступа (сетевой путь, имя и пароль пользователя, у которого есть доступ к указанному расположению).
- При наличии в разделе реестра
HKEY_LOCAL_MACHINE\SYSTEM\CurrentControlSet\Control\Lsa\MSV1_0
параметров RestrictReceivingNTLMTraffic и RestrictSendingNTLMTraffic попробуйте удалить их и перезагрузить компьютер.
- Проверьте, исчезает ли ошибка, если временно отключить антивирус или файрволл на компьютере.
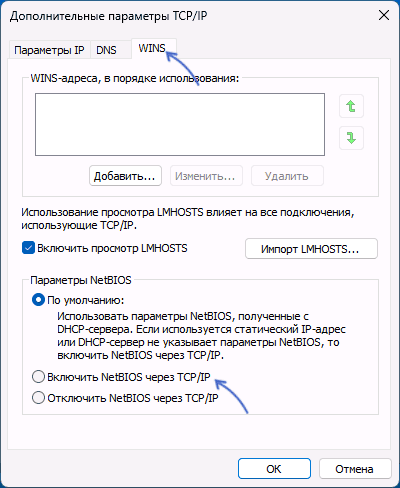
- В свойствах протокола IPv4 подключения нажмите кнопку «Дополнительно» на вкладке «Общие», и включите NetBIOS через TCP/IP на вкладке WINS.

- Попробуйте указать статический IP-адрес, маску подсети и шлюз для IPv4 подключения на компьютере.

Надеюсь, один из вариантов сработал. Будет отлично, если в комментариях вы сможете поделиться информацией о том, какой именно из них оказался результативным.
Пользователи Windows достаточно часто сталкиваются с ошибкой 0x80004005. Она может появляться при установке обновлений операционной системы, попытке получить доступ к общим папкам или виртуальным машинам и даже изменении атрибутов файлов. Код ошибки 0x80004005, по сути, означает неопределенную ошибку. Но на самом деле все не так страшно, как кажется. Сегодня мы разберем основные причины ее появления и расскажем о нескольких способах решения проблемы.
Содержание
- Ошибка 0x80004005 в VirtualBox
- Ошибка при работе с поврежденными файлами
- Ошибка при доступе к общим файлам и папкам
- Выводы
Ошибка 0x80004005 в VirtualBox
В первом случае для решения проблемы достаточно включить в BIOS поддержку виртуализации. В зависимости от версии BIOS эта опция находится в ветке Advanced и называется Virtualization Technology или Intel(R) VT for Directed I/O. Просто переключите соответствующую опцию в положение Enabled, и проблема исчезнет.
В случае неудачного сохранения последней сессии необходимо переименовать файлы, связанные с запуском операционной системы в виртуальной машине. Чаще всего они находятся в папке VirtualBox VMs, а имена файлов звучат как [придуманное вами название].vbox и [придуманное вами название ОС].vbox-prev. Скопируйте первый файл в другое место, а в названии второго удалите окончание «-prev». Аналогичные действия нужно произвести в папке C:\Users\имя_пользователя\.VirtualBox. Только на сей раз имена нужных нам файлов звучат как VirtualBox.xml и VirtualBox.xml-prev.
Ошибка e fail 0x80004005 часто возникает после обновления виртуальной машины. В этом случае все достаточно просто — вам нужно откатиться до прежней, гарантированно рабочей версии VirtualBox. Для этого удалите текущую версию программы (не забудьте сохранить все нужные файлы в отдельную папку), и установите более ее старую версию. Для простой переустановки VirtualBox нужно запустить инсталлятор приложения и выбрать пункт меню «Repair».
Кроме того, достаточно часто проблемы с VirtualBox вызывает гипервизор Hyper-V, конфликтующий со сторонней виртуальной машиной на 64-разрядных системах. Для исключения этого конфликта кликните на «Включение или отключение компонентов Windows» в «Панели управления Windows». А в открывшемся окне снимите галку напротив компонента Hyper-V и подтвердите изменения. Таким образом, вы отключите Hyper-V, и конфликт исчезнет.

В подавляющем большинстве случаев описанных выше мер хватит для исчезновения в VirtualBox ошибки e fail 0x80004005.
Ошибка при работе с поврежденными файлами
Надпись 0x80004005 часто можно увидеть при повреждении системных файлов Windows. Но здесь решение проблемы выглядит еще более простым. Вам достаточно провести проверку целостности файлов встроенными средствами операционной системы.
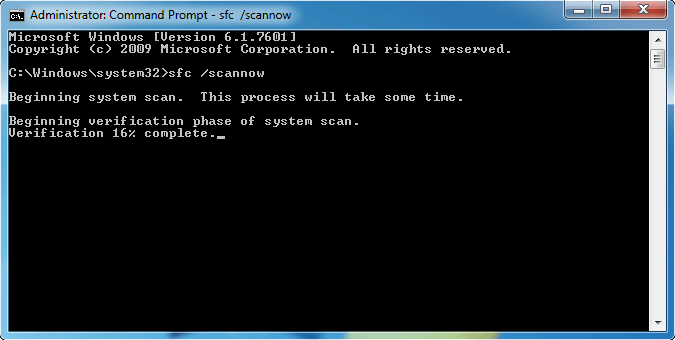
Для этого запустите командную строку или PowerShell от имени администратора и введите там команду sfc /scannow. После сканирования системы вы получите сообщение об отсутствии проблем, успешном восстановлении поврежденных файлов или невозможности их восстановления.
Если системе не удалось восстановить поврежденные файлы, можно пойти более долгим, но эффективным путем. Введите в командной строке «findstr /c:»[SR]» %windir%\Logs\CBS\CBS.log >»%userprofile%\Desktop\sfclogs.txt». После этого на рабочем столе появится файл sfclogs.txt с логом сканирования. Посмотрите, какие файлы операционной системы были повреждены и замените их — такие файлы можно найти на любом компьютере с этой же версией Windows.
Кроме того, исправлению поврежденных файлов может мешать сама Windows. Поэтому здесь может помочь загрузка и восстановление с флешки или диска с дистрибутивом Windows. Нажмите сочетание клавиш Win + I. Найдите там раздел «Обновление и безопасность» -> «Восстановление» -> «Особые варианты загрузки» и нажмите кнопку «Перезагрузить сейчас».
Подождите немного, и вы увидите меню, один из пунктов которого звучит как «Поиск и устранение неисправностей». Перейдите в него, нажмите «Дополнительные параметры» и выберите командную строку. После этого действуйте по приведенной выше инструкции.
Ошибка при доступе к общим файлам и папкам
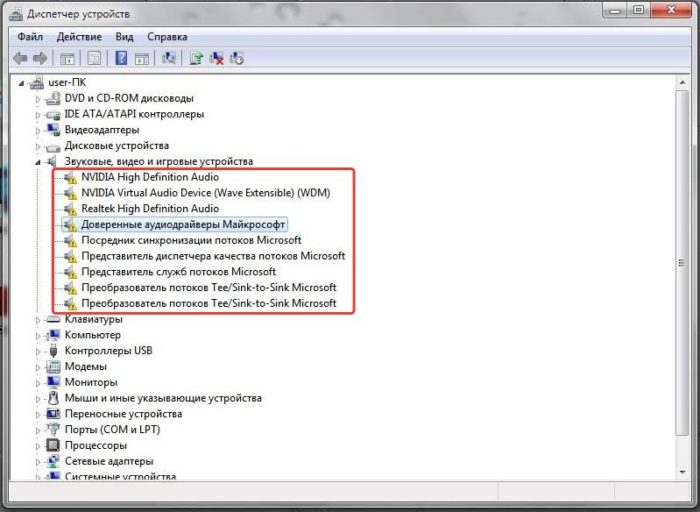
Ошибка 0x80004005 в Windows 10 может возникать и при попытке доступа к общим файлам и папкам. В этом случае, в первую очередь, стоит проверить операционную систему на лишние виртуальные сетевые адаптеры. Кликните правой кнопкой мышки по меню «Пуск» и выберите в выпадающем списке «Диспетчер устройств». Затем откройте меню «Вид» -> «Показать скрытые устройства. Откройте ветку «Сетевые адаптеры» и удалите все устройства, в названиях которых есть «Microsoft 6to4».
Эта же проблема может возникать и из-за проблем с реестром. Запустите командную строку сочетанием клавиш Win + R и откройте редактор реестра командой «regedit». Перейдите в ветку \HKEY_LOCAL_MACHINE\SOFTWARE\Microsoft\Windows\CurrentVersion. В случае 32-битной операционной системы создайте там параметр DWORD с названием LocalAccountTokenFilterPolicy и значением «1», а 64-битной — QWORD с такими же названием и значением.
Перезагрузите компьютер. Проблема должна исчезнуть.
Выводы
Как вы видите, причин появления ошибки 0x80004005 может быть совсем немало. Но во всех случаях ее исправление не представляет собой особой сложности. Достаточно лишь четко придерживаться предложенной нами инструкции. Хотя, конечно, вы всегда можете решить эту проблему и банальной переустановкой Windows, но такой способ больше напоминает лечение головной боли отрубанием головы, и мы не советуем им злоупотреблять.
Читайте также
- Ошибка с библиотекой msvcp140.dll: как от нее избавиться
- Ошибка 0xc0000005 при запуске игры или приложения: как ее исправить
Resolving Error Code 0x80004005 on Windows 10 and 11
Published
6 min read
How to Fix Error Code 0x80004005 on Windows 10 and 11
Error Code 0x80004005, commonly referred to as an «unspecified error,» can be a frustrating hurdle for Windows 10 and 11 users. Whether this error appears during file transfers, software installations, or while attempting to access a virtual machine, it signifies some underlying problem that requires attention. This guide will provide a detailed look into the causes of Error Code 0x80004005 and step-by-step solutions designed to resolve the issue efficiently.
Understanding Error Code 0x80004005
Before diving into the solutions, it’s essential to understand what the 0x80004005 error is. The error is categorized as an «unspecified error,» meaning it doesn’t provide a clear indication of what went wrong. It’s often associated with operations such as:
- File extraction and compression
- Windows updates
- Virtual machine issues
- Network-related tasks
- Problems with certain Windows services or settings
The error can arise from various issues, including software conflicts, corrupted files, outdated operating systems, or incorrect permissions.
Common Causes of Error Code 0x80004005
Identifying the root cause of the error can streamline your troubleshooting efforts. Here are some common culprits behind the 0x80004005 error:
-
Corrupted Files: Damage to system files, application files, or Windows components can trigger the error.
-
Permission Issues: Insufficient permissions for accessing files or folders can lead to this error.
-
Windows Update Problems: Incomplete or failed Windows updates often produce this error message.
-
File System Errors: Problems within the NTFS file system can cause instability and errors in file operations.
-
Virtual Machine Configuration: Issues pertaining to configurations in VirtualBox, Hyper-V, or other virtual machine software.
General Troubleshooting Steps
Before diving into more specific solutions, it’s essential to perform some preliminary troubleshooting steps:
-
Restart Your PC: This simple action can resolve many transient issues. If the error persists after restarting, proceed to the next steps.
-
Check for Updates: Ensure that your Windows operating system is up to date. Sometimes, simply applying the latest updates can resolve compatibility issues.
-
Scan for Malware: Use a reputable antivirus program to perform a full system scan. Malware can disrupt system operations and generate various errors, including 0x80004005.
-
Free Up Disk Space: Low disk space can cause issues with file transfers or installations. Ensure your drive has enough space for the operations you’re trying to conduct.
Specific Solutions for Windows 10 and 11
Now that you understand the error and have tried some preliminary troubleshooting, let’s delve into specific solutions that can help you resolve Error Code 0x80004005.
Solution 1: Check and Repair Corrupted Files
Using the built-in System File Checker (SFC) tool can help repair corrupted system files that may cause the 0x80004005 error. Here’s how to perform an SFC scan:
-
Open Command Prompt as Administrator:
- Type «cmd» in the Windows search bar.
- Right-click on «Command Prompt» and select «Run as administrator.»
-
Run the SFC Scan:
- In the Command Prompt, type the following command and press Enter:
sfc /scannow - The scan will take some time, and it will attempt to repair any corrupted system files it finds.
- In the Command Prompt, type the following command and press Enter:
-
Reboot Your Computer: After the scan is complete, restart your PC to apply the changes.
Solution 2: Modify Security Permissions
Insufficient permissions may lead to the 0x80004005 error. Modifying the security permissions of the affected file or folder may resolve the issue:
-
Locate the Folder or File that you’re having issues with in File Explorer.
-
Right-click on the File/Folder and select Properties.
-
Go to the Security tab and click on Edit.
-
Select Your User Account and check the permissions. Ensure that «Full Control» is checked.
-
Click Apply and then OK to save your changes.
-
Attempt the action that caused the error again.
Solution 3: Disable Third-Party Antivirus or Firewall
Sometimes, third-party security software may interfere with file operations and cause the 0x80004005 error. If you have antivirus software or a firewall installed, try disabling it momentarily to see if it resolves the issue:
-
Locate the antivirus program icon in the taskbar.
-
Right-click on the Icon and look for an option to disable the protection temporarily.
-
Proceed with the Action that was causing the error and see if it works now.
-
Remember to re-enable your antivirus after testing to keep your system safe.
Solution 4: Perform a Clean Boot
A clean boot can help determine if background programs are causing the error. Here’s how to perform it:
-
Press Win + R to open the Run dialog.
-
Type
msconfigand press Enter to open the System Configuration window. -
In the Services tab, check the box for Hide all Microsoft services, then click on Disable all.
-
Switch to the Startup tab and click on Open Task Manager.
-
Disable all startup items listed in the Task Manager.
-
Close Task Manager, return to the System Configuration window, and click OK.
-
Restart your PC.
If the error no longer occurs, you can re-enable services and startup items one at a time to identify which one caused the issue.
Solution 5: Use the Windows Update Troubleshooter
If the 0x80004005 error appears during a Windows update, using the onboard troubleshooter can help pinpoint and fix issues:
-
Open Settings: Press Win + I to open the Settings app.
-
Navigate to Update & Security.
-
Click on Troubleshoot on the left sidebar.
-
Under «Additional troubleshooters,» find and click on Windows Update.
-
Click Run the troubleshooter and follow the prompts.
The troubleshooter will detect problems and attempt to resolve them automatically.
Solution 6: Check Disk for Errors
A corrupted disk can lead to the 0x80004005 error. Checking your disk for errors using the CHKDSK utility can help:
-
Open Command Prompt as Administrator.
-
Type the following command and press Enter:
chkdsk C: /f /r(Replace «C:» with the drive letter you want to check.)
-
You’ll be informed that CHKDSK cannot run while the volume is in use and asked if you want to schedule it at the next restart. Type «Y» and press Enter.
-
Restart your computer to let CHKDSK scan and fix any errors.
Solution 7: Reinstall Windows Update
If you suspect a Windows Update might be the cause of the error, you can uninstall the recent updates:
-
Open Settings and go to Update & Security.
-
Under Windows Update, click on View update history.
-
Click on Uninstall updates.
-
Find the most recent updates, right-click on them, and choose Uninstall.
-
Restart your PC and check if the error persists. You can try reinstalling the updates afterward.
Solution 8: Check Windows Services
Some Windows services that aren’t running can lead to this error. Ensuring the correct services are active may resolve the issue:
-
Press Win + R to open the Run dialog.
-
Type
services.mscand hit Enter to open the Services manager. -
Locate the following services and ensure they are running and set to Automatic:
- Windows Update
- Background Intelligent Transfer Service
- Cryptographic Services
- Windows Installer
- Remote Procedure Call (RPC).
-
If any services are stopped, right-click on them and select Start.
-
After checking all the relevant services, restart your computer.
Solution 9: Adjust Virtual Machine Settings
If the 0x80004005 error pertains to a virtual machine issue, adjusting the settings can help:
-
Ensure you have the necessary permissions to access the virtual machine’s files.
-
Check the Virtual Machine Software: If using Hyper-V or VirtualBox, confirm that the virtualization is enabled in your BIOS/UEFI settings.
-
Check configuration settings within the virtual machine software. Ensure:
- The path to virtual hard disks is accessible.
- The configuration matches the specifications required.
-
If necessary, recreate the virtual machine after backing up essential data.
Conclusion
Error Code 0x80004005 can be a persistent issue for users of Windows 10 and 11, impacting various system operations. However, with systematic troubleshooting and targeted solutions, you can often resolve the error efficiently. By following the detailed steps outlined in this guide, you should be well-equipped to tackle the 0x80004005 error, restore your Windows experience, and ensure that your system operates smoothly. Remember always to follow best practices with regular backups and updates to minimize the potential for errors in the future.
-
Причины неполадки
-
Варианты решения
-
Устранение неполадки активации системы
-
Установка драйверов
-
Исправление Центра обновлений
-
Восстановление поврежденных файлов
-
Редактирование реестра
-
Выводы
Пользователи компьютера нередко сталкиваются с проблемой при обновлении системы, сопровождающейся ошибкой 0x80004005 в Windows 10. Доступ по сети также может «ломаться» по этому поводу. В этой статье рассказано, что это за проблема и как ее исправить.
Причины неполадки
К основным факторам, вызывающим ошибку, относятся:
- проблема с активацией ОС;
- не установлены необходимые драйверы;
- неполадка с самим обновлением;
- повреждение файлов системы.
Варианты решения
Ниже приведены возможные варианты исправления ошибки.
Обратите внимание! После каждой проделанной инструкции стоит перезагрузить компьютер и проверить наличие проблемы.
Устранение неполадки активации системы
На этом этапе необходимо проверить правильность активации Windows.
- Откройте «Пуск» → «Параметры».

- Перейдите в «Обновление и безопасность».

- Выберите «Активация» → «Устранение неполадок».


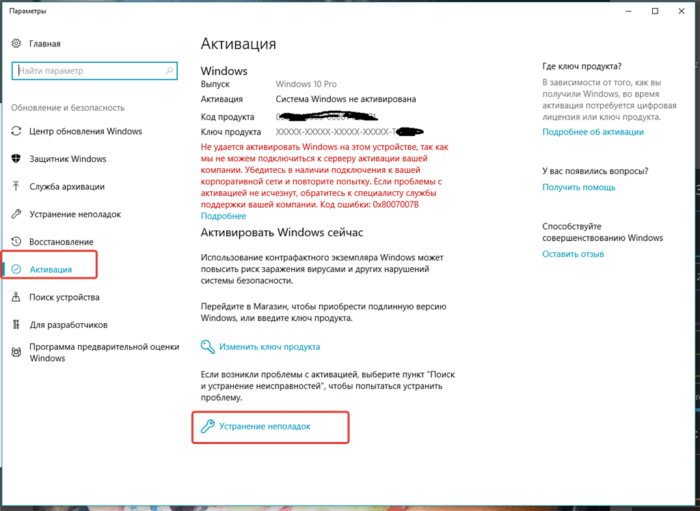
При обнаружении проблем ОС исправит их, и активация Windows будет корректной.
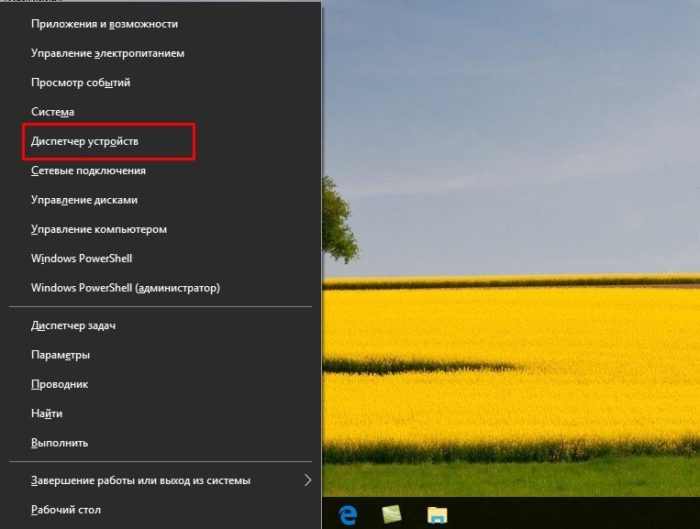
Установка драйверов
Здесь нужно проверить, установлены ли все, необходимые для обновления Windows, драйверы.
- Щелкните ПКМ по «Пуск» → «Диспетчер устройств».

- В списке устройств слева обратите внимание, есть ли устройств с желтыми треугольниками возле своих иконок.

В таком случае, установите недостающие драйверы в этом же окне, щелкнув ПКМ по проблемному устройству → «Обновить драйверы» и следуйте предлагаемым инструкциям.
Совет! Если вы точно знаете, на какие устройства отсутствуют драйверы, скачайте их с официальных сайтов их производителей. В крайнем случае, воспользуйтесь утилитой с автоустановкой необходимых пакетов по типу DriverPack Solution.
Исправление Центра обновлений
Иногда проблема кроется в самом Центре обновлений Windows, и исправляется встроенной утилитой.
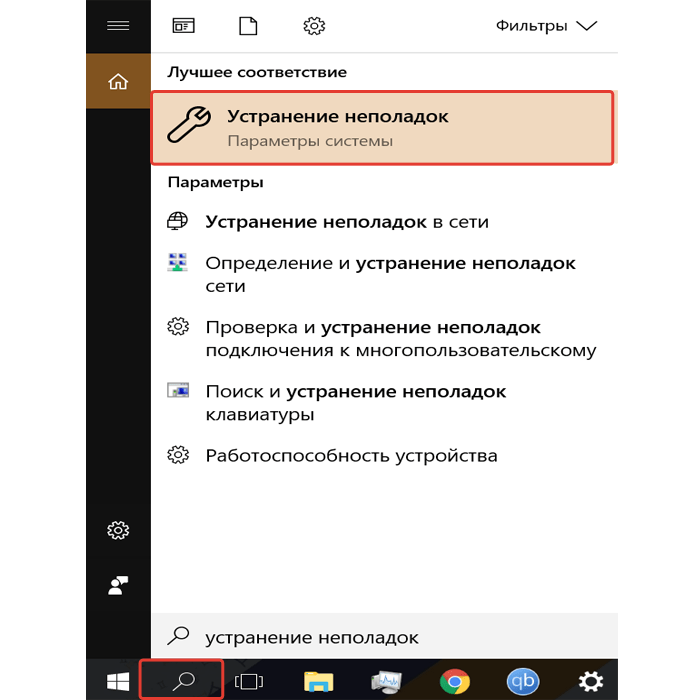
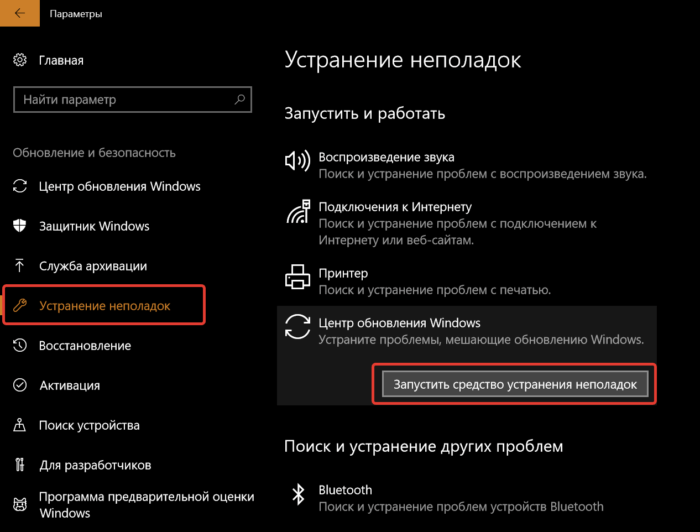
- Откройте поиск → наберите «устранение неполадок» → выберите пункт, относящийся к параметрам системы.

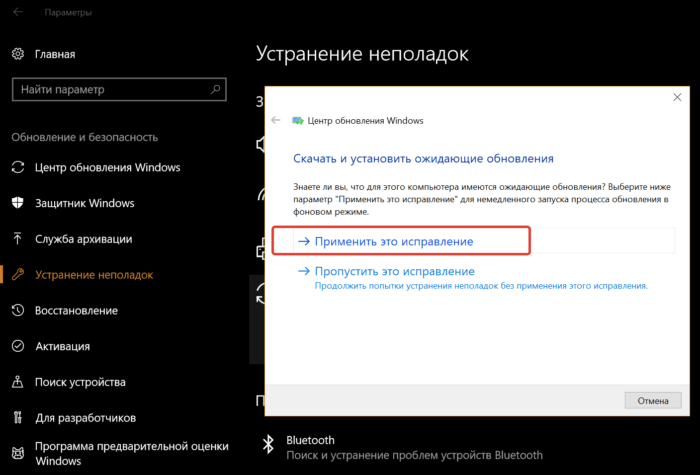
- Выберите «Устранение неполадок» → «Запустить средство…».

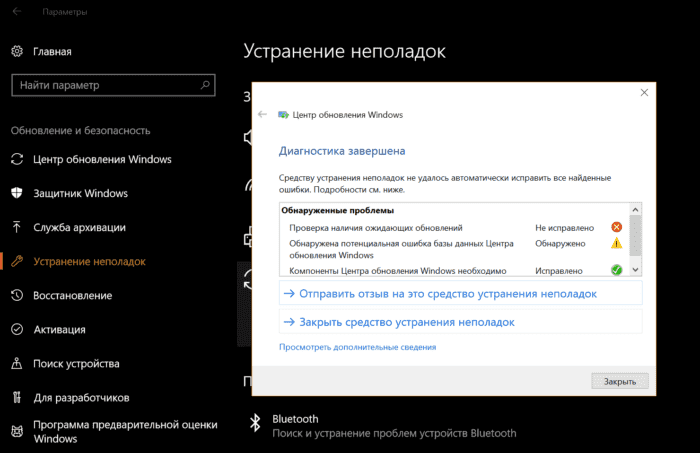
- Начнется поиск проблем. При необходимости, в процессе нажимайте «Применить это исправление».

- По окончанию действия откроется отчет об обнаруженных неполадках. Нажмите «Закрыть».

Также стоит удалить журнал обновлений ОС.
- Откройте поиск → введите «Командная строка» → щелкните ПКМ по классическому приложению → «Запуск от имени администратора».
- Выполните по очереди следующие команды:
net stop wuauserv;net stop bits;net stop cryptsvc;ren %systemroot%System32Catroot2 Catroot2.old;ren %systemroot%SoftwareDistribution SoftwareDistribution.old;net start wuauserv;net start bits;net start cryptsvc.
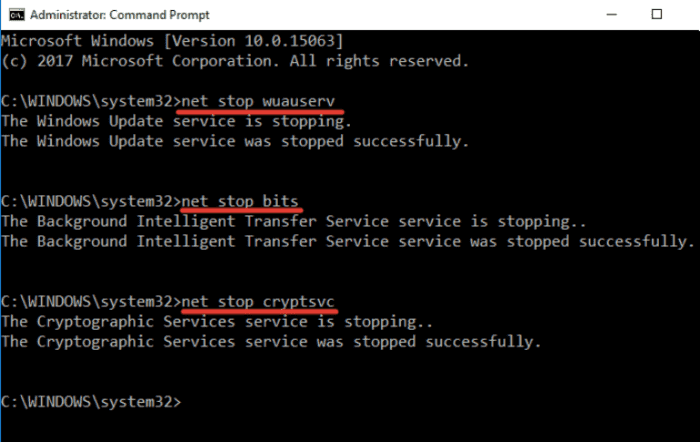
После этого проверьте возможность обновления Windows.
Восстановление поврежденных файлов
Нередко системные файлы повреждаются из-за намеренных или случайных действий пользователя. Также виной этому бывают вирусы. Такие файлы необходимо восстановить штатным средством.
- Нажмите Win + R → введите
cmd→ «OK».
- Выполните команду
sfc /scannow.
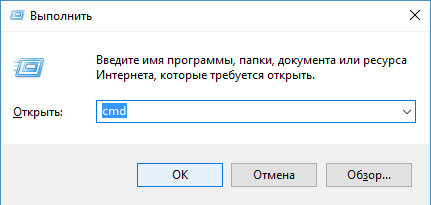
По завершению процесса утилита выведет информацию об результате своего выполнения.
Редактирование реестра
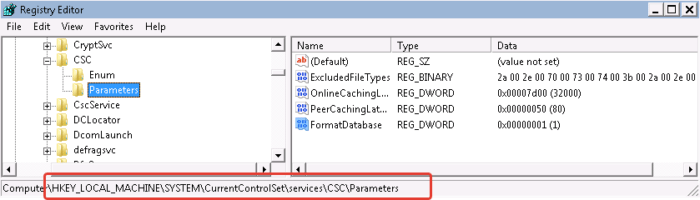
Не лишним будет заново инициализировать кэш автономных файлов.
- Нажмите Win + R → введите
regedit→ «OK».
- Перейдите в ветку
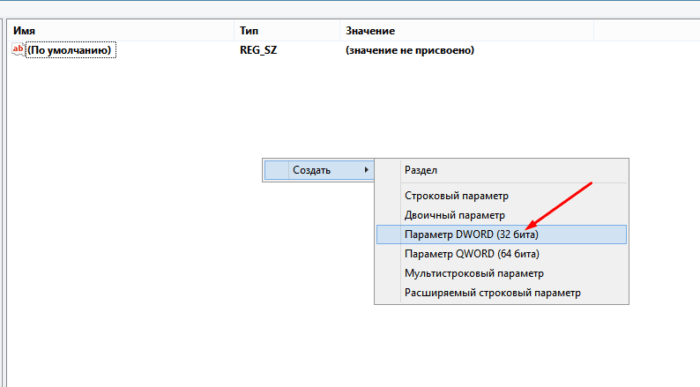
\ HKEY_LOCAL_MACHINE \ SYSTEM \ CurrentControlSet \ services \ CSC \ Parameters.
- Щелкните ПКМ по пустой области → «Создать» → «Параметр DWORD (32 бита)».

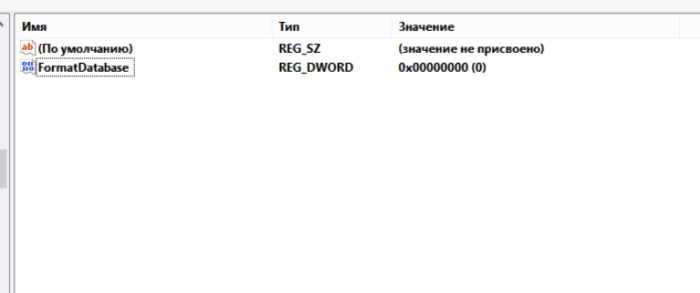
- Переименуйте созданный объект в
FormatDatabase.
- Дважды щелкните по объекту → поставьте значение
1в поле «Value data» → «OK».
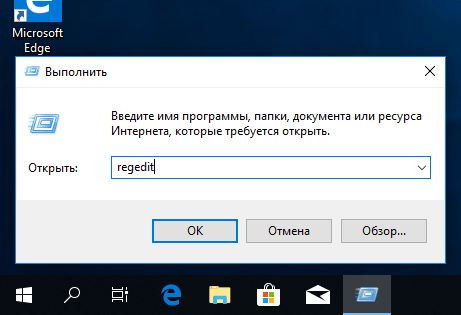
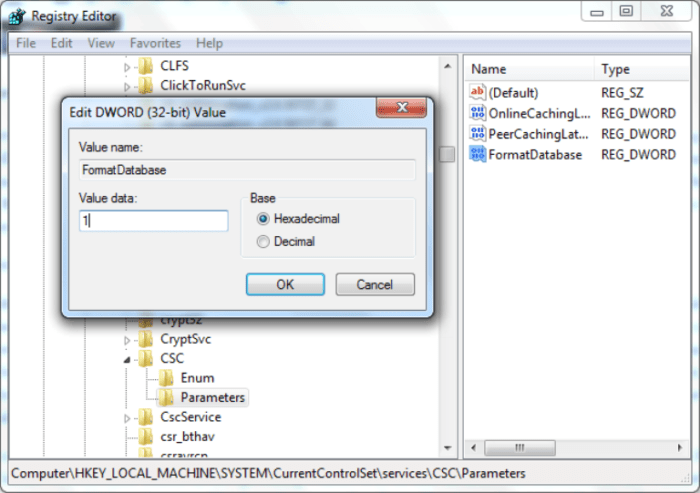
Перезагрузите компьютер и проверьте наличие ошибки.
Выводы
Чтобы исправить ошибку 0x80004005 в Windows 10, необходимо проверить правильность активации ОС, установку необходимых драйверов, наличие неполадки в Центре обновлений, восстановить поврежденные файлы и добавить новое значение в реестре.
For a 37-year-old operating system, Windows sure has a lot of problems. While most of them are easily solvable, what do we do when the error doesn’t have a specific origin?
Each error in windows is accompanied by cryptic code, one such error has the code 0x80004005 and is classified as an ‘unspecified error’ by Microsoft themselves. Error 0x80004005 is encountered in relation to a wide range of other problems. One might encounter this error while installing or updating Windows OS, extracting a compressed file, trying to access a shared file or folder, starting/setting up a virtual machine, receiving mails in Outlook among other things.

Table of Contents
Make sure to create a restore point, just in case something goes wrong.
There is no one method to solve the 0x80004005 error and the troubleshooting process varies depending on where and how the error is being experienced. Having said that, we will be elaborating on each of the different scenarios/cases where the error might pop up while also giving you a few methods for resolving it.
Case 1: Fix Error 0x80004005 When Updating Windows
The 0x80004005 error is most commonly experienced when trying to update windows. While the reason behind the error isn’t known, it may be due to corrupt files and services. The error is also tied explicitly to the KB3087040 update. The update was specifically sent to rectify security issues with Internet Explorer, however, users have reported the update fails to download and the error message that arrives contains the code 0x80004005.
Try the below methods if you are also experiencing the Error Code 0x80004005 or 0x80070490 when trying to update Windows 10.
Solution 1: Run Windows Update troubleshooter
The first go-to solution for any error experienced on Windows is to run the troubleshooter for the same. Follow the below steps to run the Windows Update troubleshooter:
1. Click on the start button or press the Windows key and search for the Control Panel. Press enter or click on Open once the search results return.

2. From the list of Control Panel items, click on Troubleshooting.
Note: Change the size of icons to make looking for the same easier. Click on the drop-down menu next to View by and select small icons.

3. In the troubleshooting window, click on View All present in the left panel to check all the computer problems you can use the troubleshooter for.

4. Scroll all the way down to find Windows Update and double-click on it.
Windows 7 and 8 users can download Windows Update troubleshooter from the following webpage: Windows Update Troubleshooter.

5. Click on Advanced.

6. Check the box next to ‘Apply repairs automatically’ and press Next.

Let the troubleshooter run its course and follow the on-screen prompts/instructions to finish troubleshooting.
Solution 2: Run a System File Checker Scan
Running an SFC scan is one of the easiest methods to check for corrupted files and restore them. To run an SFC scan-
1. Launch Command Prompt As Administrator
a. Press Windows Key + X and select Command Prompt (Admin)
b. Search for Command Prompt in the search bar and select Run As Administrator from the right-panel
2. Type the following command line sfc /scannow and press enter.

The scan may take some time to complete depending on the computer.
Solution 3: Delete the contents of the Windows Update download folder
The error may also be caused by corrupt files inside the Windows Update download folder. Manually deleting these files should help resolve the 0x80004005 error.
1. First, Launch File Explorer by either double-clicking on its shortcut icon on your desktop or pressing the keyboard hotkey Windows Key + E.
2. Head down to the following location – C:\Windows\SoftwareDistribution\Download
(Click on the negative space in the address bar, copy-paste the above path and press enter)

3. Press Ctrl + A to select all the items, right-click and select Delete (or directly press the delete key on your keyboard)

A confirmation message should appear when you select delete, confirm your action to delete everything. Also, go ahead and clear your recycle bin after you are done deleting the Downloads folder.
Solution 4: Restart Windows Update Services
All Windows update related activities like actually downloading the update file and installing it are handled by a bunch of different services. If any of these services aren’t working properly/are corrupted, the 0x80004005 may be experienced. Simply stopping the update services and then restarting them should help.
1. Open Command Prompt As Administrator by using any of the methods mentioned earlier.
2. Type the following commands one by one (press enter after each command) to stop/terminate the update services:
net stop wuauserv
net stop bits
net stop trustedinstaller
net stop appidsvc
net stop cryptsvc

3. Now, restart all the services again by typing the following commands. Again, remember to enter them one by one and press the enter key after each line.
net start wuauserv
net start bits
net start trustedinstaller
net start appidsvc
net start cryptsvc

4. Now, try to update Windows and check if the “Error Code 0x80004005: Unspecified Error” pops up again.
Solution 5: Update Windows Manually
Finally, if none of the above methods worked, it may be best to manually update windows.
To manually update windows – Launch your preferred browser, open the following link Microsoft Update Catalog and in the search box type the KB code of the update you wish to install.
Download the update file and once downloaded, double-click on it and follow the on-screen prompts to install the update manually.

Case 2: When Extracting Files
The 0x80004005 error is also experienced while extracting a compressed file. If the error explicitly occurs when extracting, first, try using an alternate extracting application (Download 7-zip or Winrar Free Download). Also, make sure the file is actually an extractable file and isn’t password protected.
Another reason for the error may be the over-protective nature of your antivirus. Certain anti-virus applications prevent extracting zipped files to protect your computer, but if you are sure the compressed file you are trying to extract doesn’t contain any malicious files then go ahead and disable your antivirus temporarily. Now try extracting the file. If you were successful in extracting the file, consider permanently removing your current anti-virus application and installing another one.
Nevertheless, if both the above methods failed, we will try solving the issue by re-registering two Dynamic link libraries (DLL) using the command prompt.
1. Launch Command Prompt as Administrator using any of the methods explained earlier.
2. In the command prompt window, type the following command and press enter.
regsvr32 jscript.dll

3. Now, type regsvr32 vbscript.dll and press enter.

Finally, restart your computer and try unzipping the file on return. The 0x80004005 error should not arise anymore.
If the 0x80004005 error appears while performing other file operations like copying or renaming, try running the Files & Folder troubleshooter. To do so:
1. Head over to the following webpage and download the necessary files: Automatically diagnose and repair Windows file and folder problems. Once downloaded, click on the winfilefolder.DiagCab file to run the File and Folder Troubleshooter.

2. Click on advanced and check the option to ‘Apply repairs automatically’. Click on the Next button to start troubleshooting.

3. A window inquiring about the problems being experienced will appear. Select the problems you have been facing by ticking the box next to them and finally click on Next.

Let the troubleshooter run its course, meanwhile, follow any and all on-screen instructions being displayed. Once done check if you’re able to fix Error Code 541 or 0x80004005 on Windows 10 .
Case 3: On Virtual Machine
The 0x80004005 may also be caused when you are trying to access shared files or folders or due to a virtual machine error. In either access, deleting a registry key or updating the registry editor is known to solve the problem.
Solution 1: Delete Registry Key
Be extremely cautious when following the below guide as Registry Editor is a powerful tool and any mishaps can cause multiple other problems.
1. Open Windows Registry Editor by any of the following methods
a. Launch Run Command (Windows Key + R), type regedit, and press enter.
b. Click on the Start button or press the Windows key on your keyboard and search for the Registry Editor. Press Enter when the search returns.
Irrespective of the method of access, a user account control message requesting permission to allow the application to make changes to the system will appear. Click on yes to grant permission.
2. Head down the following registry path
HKEY_LOCAL_MACHINE\SOFTWARE\Microsoft\Windows NT\CurrentVersion\AppCompatFlags\Layers

3. Now, check the right-panel to see if a key exists. If it does, right-click on the key and select Delete. If the key doesn’t exist, try the next method.

Solution 2: Update Windows Registry
1. Launch Windows Registry Editor again using any of the methods explained previously.
2. Navigate to the following path
HKEY_LOCAL_MACHINE\SOFTWARE\Microsoft\Windows\CurrentVersion\Policies\System

3. Right-click on an empty area in the right-panel and select new. Depending on your system architecture, create one of the below keys.
For 32-bit systems: Create a DWORD value and name it as LocalAccountTokenFilterPolicy.
For 64-bit systems: Create a QWORD (64 bit) value and name it as LocalAccountTokenFilterPolicy.

4. Once created, double-click on the key or right-click and select Modify.

5. Set the Value Data to 1 and click on OK.
Restart your computer and check if the error still persists.
Solution 3: Uninstall Microsoft 6to4
In the final method, we uninstall all Microsoft 6to4 devices from the device manager.
1. Launch Device Manager by any of the following methods.
a. Open Run (Windows Key + R), type devmgmt.msc or hdwwiz.cpl and press enter.

b. Click on the start button or press the Windows key, search for Device Manager, and click on Open.
c. Press Windows key + X (or right-click on the start button) and select Device Manager from the power user menu.
2. Click on View located in the top row of the window and select Show hidden devices.

3. Double-click on Network Adapters or click on the arrow next to it.
4. Right-click on Microsoft 6to4 Adapter and select Uninstall. Repeat this step for all the Microsoft 6to4 devices listed under Network Adapters.
After deleting all the Microsoft 6to4 devices, restart your computer and check if you’re able to fix Error Code 0x80004005 on Windows 10.
Case 4: When accessing mails in Outlook
Microsoft Outlook is another application that is often associated with 0x8004102a error or 0x80004005 error. The error arises on a variety of occasions – when the user tries to access his or her mails, on the arrival of new messages, and sometimes even while sending an e-mail. There are two main reasons for the error. First, your antivirus application is blocking new messages, and second, there is something wrong with notifications for fresh mails.
Disable your antivirus software for a temporary period and check if the error still persists. If disabling the antivirus didn’t help, follow the below guide and disable the new mail notifications feature in Outlook to get rid of the error.
1. As obvious, first, launch Outlook and open your account. Click on Tools.
2. Next, click on Options and switch to the Preferences tab.
3. Click on Email options and uncheck the box next to “Display a notification message when new mail arrives” to disable the feature.
4. Click on OK and then again on OK to exit.
Case 5: Delete Corrupt Temporary Files
As a final solution to resolving the 0x80004005 error, we will be deleting all the temporary files on our computers which shall also help get rid of any corrupt files that may be causing the error. To do so, we will be making use of the built-in Disk Cleanup application.
1. Press Windows key + S, search for Disk Cleanup, and press enter.
Alternatively, launch the run command, type cleanmgr, and press enter.

2. After a while of scanning, the application window listing various files to delete will appear.

3. Check the box next to Temporary Internet Files (Make sure only Temporary Internet Files are selected) and click on Clean up system files.

To manual delete all the temporary files:
Press Windows key + S, type %temp% in the search bar and press enter. The folder containing all the temporary files and folders will open up. Press Ctrl + A on your keyboard to select all the files and then press delete.

Once you are done deleting the temporary files, launch Recycle bin and delete the files from there too!
Recommended:
- Fix Windows 10 Update Error 0x80070422
- Fix Drives does not open on double click
- How to create a password reset disk in Windows 10
- Fix Windows 10 Store Error Code 0x80072efd
That’s it you have successfully learned How To Fix Error 0x80004005 on Windows 10 but if you still have any questions regarding this post then feel free to ask them in the comment’s section.