
Прочитано: 8 271
Вот наступил момент когда интересующие меня темы касательно PXE установки, как я думал когда столкнулся с текущими действиями ниже в этой заметки были разобраны. Я вогрузил сервис PXE + NFS + SAMBA на систему Ubuntu 18.04 Server amd64 которая по совместительству у меня выполняет функции Web+Mercurial + Dokuwiki на железе HP MicroServer Gen8. Вариант сетевой установки систем Ubuntu 18.04 Server & Desktop на любое мое железо проходит без проблем, а вот установка «Install Windows 7 Pro SP1 x64» на материнскую плату Gigabyte GA-970A-DS3P по сети (PXE) приводит к появлению ошибки.
Итак в настройках BIOS я выбрал, что включить загрузку по PXE выставил первым в списке загрузки что стоит сетевая карта, хотя можно и через F12 выбрать с чего грузиться первым.
Загружается образ winpe_amd64.iso, открывается консоль командной строки wpeinit и мигающий курсор, я как в статье указываю:
X:\windows\system32\wpeinit
X:\windows\system32\net use M: \\172.33.33.25\install\x64 и получаю
Системная ошибка 1231.
Сетевая папка недоступна. За информацией о разрешении проблем в сети обратитесь к справочной системе Windows.
В ходе анализа данной ошибки что только я не делал, переподнимал samba настройки, сервис pxe на Virtualbox дабы отладить, может что и в чем-то я опечатался когда воспроизводил все на боевой системе, думал что из-за того что мой сервис находится в другой подсети отлично от той к которой мои домашние сервисы подключены. Проверил настройки фаервола — разрешил: 69/udp, 139,445/tcp, 137,138/udp, 2049/tcp&udp
И все бестолку.
При установке на виртуалку (Virtualbox: W7Test) все было прекрасно, установка идет, а на материнскую плату нет.
И тут меня после продолжительного анализа на утро следующего дня приходит решение или понимание. Делаю ping до 127.0.0.1, ответ приходит, а делаю ping 172.33.33.25 — получаю:
PING: сбой передачи. General Failure. Дело в том, что образ winpe_amd64 не видит сетевую карту, у него нет драйверов и он не знает об оборудовании. Даже вызов taskmgr и вкладка сеть не показывает какое-либо оборудование.
Мне захотелось решить данную проблему — ведь я получу опыт.
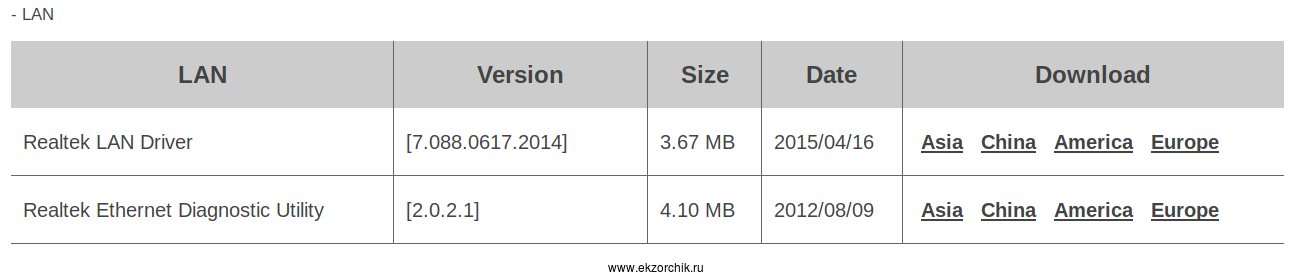
Захожу на официальный сайт через домашний ноутбук Lenovo E555 Ubuntu 18.04 Desktop amd64 браузера Mozilla Firefox и по конкретной модели материнской платы скачиваю пакет драйверов (LAN: Realtek LAN Driver) на сетевую подсистему: motherboard_driver_lan_realtek_8111_w7.exe, распаковываю их на USB Flash drive
ekzorchik@navy:~$ cd Documents/driver/
ekzorchik@navy:~/Documents/driver$ file motherboard_driver_lan_realtek_8111_w7.exe
motherboard_driver_lan_realtek_8111_w7.exe: PE32 executable (GUI) Intel 80386, for MS Windows
ekzorchik@navy:~/Documents/driver$ wine motherboard_driver_lan_realtek_8111_w7.exe
получаю каталог lan_w7 внутри него содержатся драйвера, копирую каталог с драйверами на сетевую карту на USB Flash Drive:
ekzorchik@navy:~/Documents/driver$ mkdir /media/ekzorchik/flashka/driver
ekzorchik@navy:~/Documents/driver$ cp lan_W7/WIN7/64/* /media/ekzorchik/flashka/driver/
ekzorchik@navy:~/Documents/driver$ ls /media/ekzorchik/flashka/driver
note.txt rt64win7.inf RtNicprop64.DLL
rt64win7.cat rt64win7.sys RTNUninst64.dll
ekzorchik@navy:~/Documents/driver$ umount /media/ekzorchik/flashka/
Теперь эту флешку вставляю в USB 2.0 материнской платы Gigabyte GA-970A-DS3P, т. к. USB 3.0 не работает.
Надеюсь Вы не закрыли консоль загруженного образа winpe_amd64.iso, проверяю, что данный образ видит мою флешку:
X:\windows\system32\diskpart
в ответ вижу
Том: 3Имя: FМетка: flashkaФС: fat32Тим: СменныйРазмер: 7635 Mb
Отлично, носитель определился, выхожу из консоли diskpart
DISKPART> exit
и теперь подгружаю драйвер сетевой карты:
X:\windows\system32\drvload f:\driver\rt64win7.inf и нажимаю Enter, ожидаю, спустя некоторое время получаю ответ:
DvrLoad: Успешно загружен f:\driver\rt64win7.inf
Проверяю, что теперь образ winpe_amd64.iso видит сеть:
ipconfig — сетевая карта получила адрес от DHCP сервис (у меня на базе Mikrotik).
Исходя из этого теперь проделывание действий по подключению samba ресурса проходит успешно:
X:\windows\system32\net use M: \\172.33.33.25\install\x64
Команда выполнена успешно.
Далее опираясь на свою заметку запускаю установку Windows 7 Pro SP1 amd64 через файл ответов и она проходит успешно.
Вот только когда система загрузилась, вижу что она не видит сетевой адаптер, опять вставляю USB носитель и указываю через «Диспетчер устройств», что драйвера на сетевой адаптер лежат на ней. Драйвера успешно устанавливаются.
По итогу я получил Windows 7 Pro SP1 amd64, конечные драйвера уже через браузер были выкачены и успешно установлены.
Итого из этой заметки я понял, что бываю общедоступные сетевые драйвера и установку образа на такую систему проходит без проблем. В ходе анализа текущей проблемы по этой заметке я пробывал на ноутбуке (Sony Vaio Model: PCG-5K3P) сделать net use M: и команда выдавала статус «Команда выполнена успешно».
Вывод: Нужно разобрать, как интегрировать драйвера в образ winpe_amd64 и распакованный образ который лежит на samba ресурсе. Это темы отдельных заметок.
А пока на этом у меня все, с уважением автор блога Олло Александр aka ekzorchik.
-
-
#1
при подключении выдает такую ошибку. порт открыт и ошибка эта. нет инета. ни с того ни с сего…….. с дровами все гуд……..
-
-
#3
абсолютно ничего не понял. простите. можно чуть поприземленней. если нет времени то лучше не пишите чнм ссылки кидать.
-
-
#4
alehas777 написал(а):
абсолютно ничего не понял.
Это плохо…..
alehas777 написал(а):
простите. можно чуть поприземленней.
Дык там и так описывается, способы решения при вашей ошибке…………
alehas777 написал(а):
если нет времени то лучше не пишите чнм ссылки кидать.
В следующий раз копипастом скину :facepalm:
Some Windows users are encountering the ‘Transmit error: code 1231‘ when trying to ping or trace a machine that is missing from a local workgroup. This problem is reported to occur on Windows 7, Windows 8.1, and Windows 10.
After investigating this particular issue thoroughly, it turns out that there are several different scenarios that might be causing this error code. Here’s a shortlist of potential culprits:
- Machine name contains lower case letters – Keep in mind that Windows 10 made some changes regarding the NETBIOS resolution that will essentially make machines containing lower case letters invisible in workgroups. In this case, you can fix this problem by renaming the problematic machines with upper case letters only.
- There’s a problem with the Network adapter – As it turns out, this problem can also occur due to a bad network adapter driver or a glitch that is causing it to miscommunicate data to a workgroup administrator. To fix this issue, you’ll need to reinstall the network adapter or replace it with the generic version.
- Network discovery is disabled – It’s a known fact that you will see this error if certain machines that are part of your workgroup don’t have the Network Discovery and Automatic Setup features enabled in their Network and Sharing Center. If this scenario is applicable, you’ll be able to fix this problem by making these modifications on every machine that’s triggering this error when pinged or traced.
- TCP / IP Inconsistency – Under certain circumstances, this problem can also be caused by an underlying TCP or IP glitch that is causing the machine to be unreachable by other computers that are part of that workgroup. In this case, doing a complete TCP/IP reset on every affected PC should take care of the issue for you.
- Windows 10 requirement – Keep in mind that on Windows 10, there’s a requirement stating that every machine that’s part of a workgroup must be upper-case only. However, you can resolve this requirement with a .bat script and avoid the error without renaming every involved machine manually.
Method 1: Renaming the Missing Machines
As it turns out, this problem is most likely occurring due to a NETBIOS resolution change that was implemented with a Windows 10 update that ended up making machines part of a workgroup CASE-SENSITIVE.
So if you have a workgroup ported over from an older Windows build (resulted from an upgrade), you might find yourself in a situation where machines that have names containing both lower and upper case letters will no longer be visible.
This can be achieved by accessing the machine containing lower and upper cases and changing the name of the PC to the upper-case only.
However, depending on your Windows version, the steps of doing so will be different. We’ve created 2 separate guides to accommodate every Windows user. Feel free to follow the sub-guide associated with the Windows version that you’re using.
A. Changing the Machine Name on Windows 10
- Press Windows key + R to open up a Run dialog box. Next, type ‘ms-settings:about‘ and press Enter to open up the About tab of the Settings app.
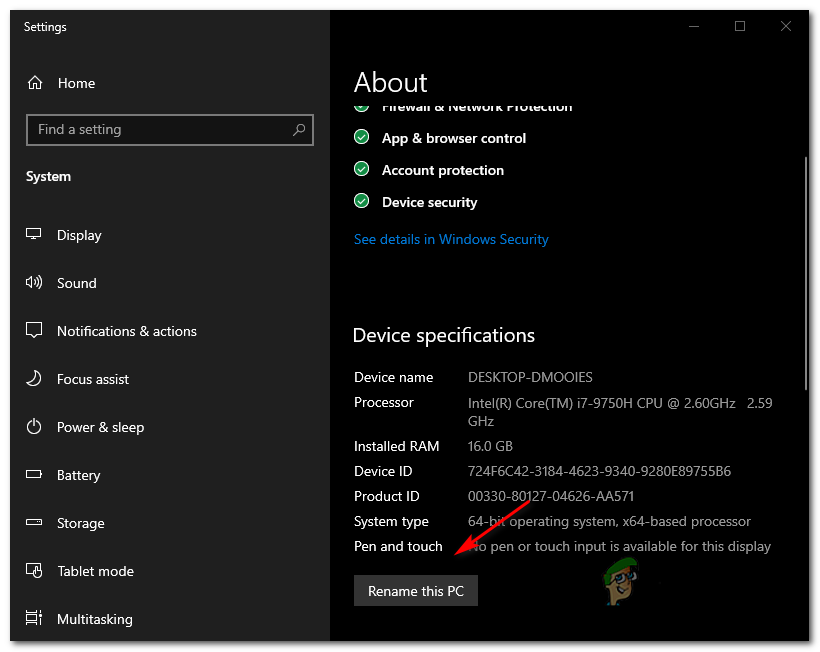
Accessing the About tab of the Settings app - Once you’re inside the About tab, move over to the right-hand section, scroll down to Device specifications and click on Rename this PC.

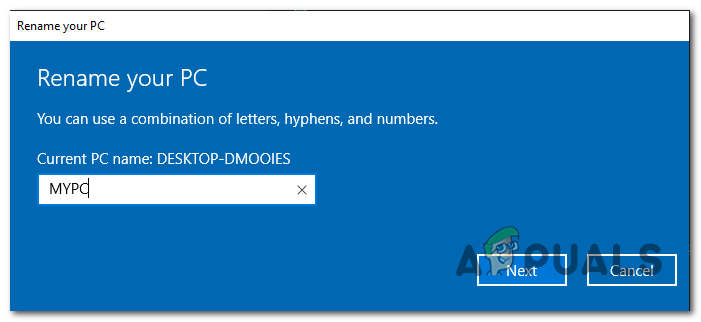
Renaming the PC on Windows 10 - Inside the Rename your PC, enter an upper case only name for your machine and hit Next.

Renaming the machine with uppercase letters only - Wait until the operation is complete, then click on Restart Now and wait for the next startup to complete.
B. Changing the Machine Name on Windows 7 and Windows 8.1
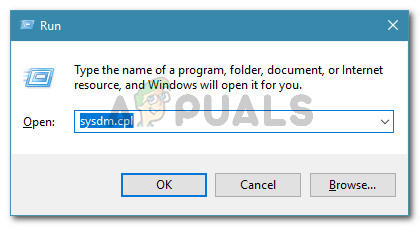
- Press Windows key + R to open up a Run dialog box. Next, type ‘sysdm.cpl‘ inside the text box, then press Enter to open up the System Properties screen.

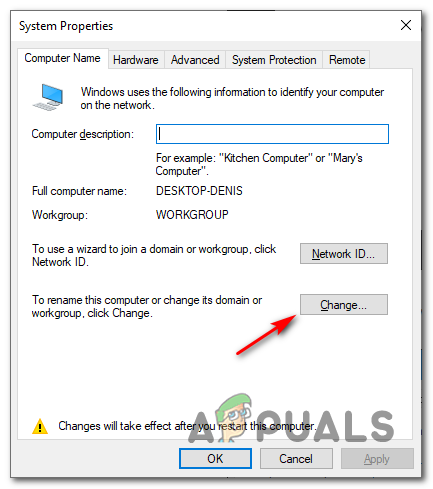
Run dialog: sysdm.cpl - Once you’re inside the System Properties screen, click on the Computer Name tab, then click on the Change button.

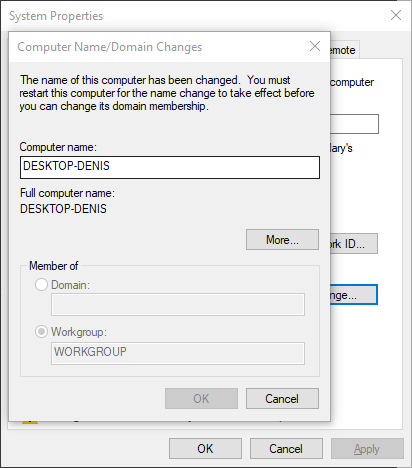
Changing the name on a Windows 7 and Windows 8.1 - Inside the Computer Name / Domain Changes window, change the text under Computer name to upper case letters only.

Changing the name of the machine on Windows 7 and Windows 8.1 - Restart your computer and wait for the next startup to complete.
Once you change the name of the machine to uppercase only, ping or retrace it once again and see if you’re still encountering the same Transmit error: code 1231.
If this problem is still occurring, move down to the next potential fix below.
Method 2: Reinstalling the Network Adapter
According to some affected users that managed to fix this problem, this issue can also occur due to a glitch with the network adapter that makes the machine invisible for the local workgroup.
If this scenario is applicable, you should be able to fix this problem by reinstalling the network adapter and ensuring that you install the latest driver version available.
In case you’re not sure how to do this, follow the instructions below to reinstall the Network adapter using the Device Manager utility:
- Start by ensuring you are connected to the Internet via an ethernet cable.
- Open a Run dialog by pressing Windows key + R. Next, type ‘devmgmt.msc’ and press Enter to open up Device Manager.
Running Device Manager - Inside Device Manager, scroll down through the list of installed devices and expand the drop-down menu associated with Network Adapters.
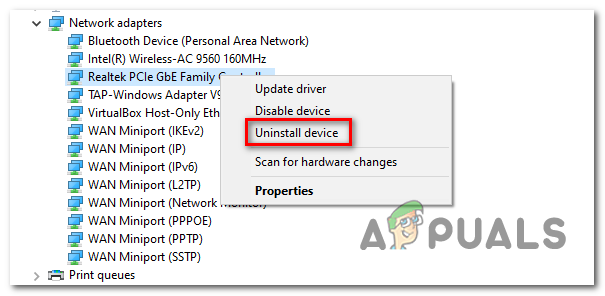
- From the Network Adapter drop-down menu, right-click on your default network adapter and choose Uninstall from the network menu.

Uninstalling the network adapter - Confirm the uninstallation attempt, then wait for the operation to complete.
- At the end of this procedure, internet access will be cut. When this happens, restart your computer in order to allow your OS time to install a generic equivalent.
- Once your computer boots back up and the generic network adapter driver is installed, Internet access should be restored.
- Ping or trace the machine that was previously triggering the error code and see if the issue is now resolved.
In case the same Transmit error: code 1231 issue is still occurring, move down to the next potential fix below.
Method 3: Enabling Network Discovery and Automatic Setup
As it turns out, the Transmit error: code 1231 can also occur in instances where computers part of the homegroup are not configured to be discovered over the network or Automatic Setup is not enabled.
If this scenario is applicable, you should be able to fix this problem by accessing the Advanced sharing settings on every involved computer and adjusting the default Network discovery behavior.
Here’s a quick guide on how to make this modification on Windows 7, Windows 8.1, and Windows 10:
Note: The steps below are universal and should work regardless of which Windows version that you’re using. Keep in mind that you need to repeat the steps below with every computer that’s part of the workgroup.
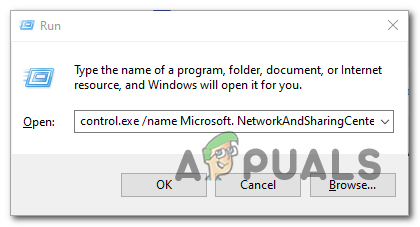
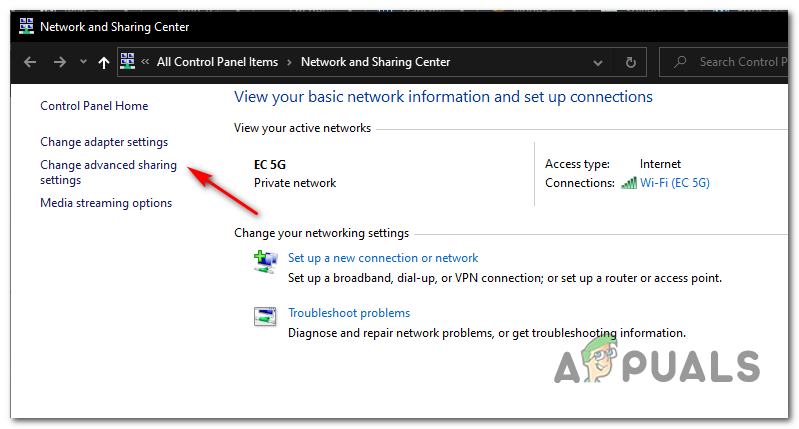
- Press Windows key + R to open up a Run dialog box. Next, type ‘control.exe /name Microsoft.NetworkAndSharingCenter‘ inside the run box to open up the Network and Sharing Center menu.
Opening the Network and Sharing Center using a Run command - Inside the Network and Sharing Center, click on Change advanced sharing center from the vertical menu on the left.

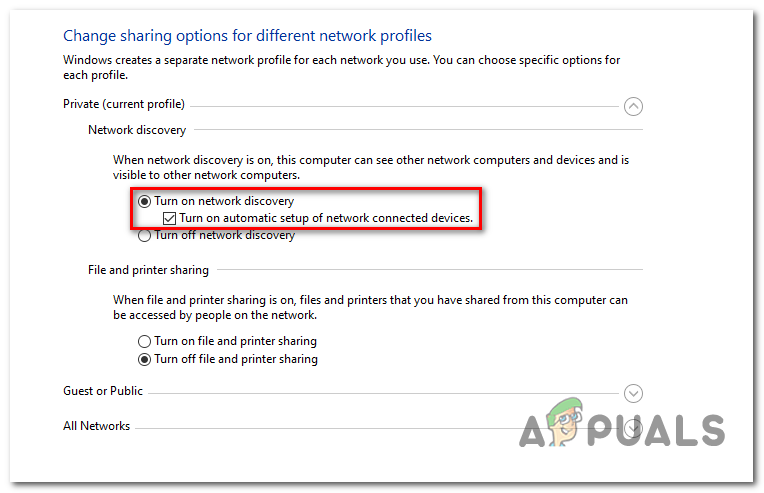
- Next, expand the profile that’s currently active and enable Turn on Network discovery.
- Once Network Discovery is enabled, check the box associated with Turn on automatic setup of network connected device.

Enabling Network Discovery and Automatic Setup - Save the changes you’ve just imposed, then go ahead and repeat this operation with every computer that’s part of your homegroup.
If the same problem is still occurring, move down to the next potential fix below.
Method 4: Doing a Complete TCP / IP reset
As it turns out, this problem is often time associated with a TCP / IP configuration problem. In most cases, this ends up being associated with a glitch having to do with the network adapter or it’s a classic case of a bad DNS range.
If this scenario is applicable, you should be able to fix this problem by doing a complete TCP / IP reset on every computer that’s part of the local workgroup.
This operation has been confirmed to be successful by a lot of affected users that were previously encountering the Transmit error: code 1231.
Here’s a quick step by step guide on performing a complete TCP / IP reset:
Note: The instructions below are universal and will work regardless of which Windows version you’re currently using.
- Press Windows key + R to open up a Run dialog box. Next, type ‘cmd’ inside the text box and press Ctrl + Shift + Enter to open up an elevated command prompt.
Type “cmd” into the Run dialog - Inside the elevated Command Prompt, type the following commands in order and press Enter after each one to do a complete TCP / IP reset:
ipconfig /flushdns
nbtstat -R
nbtstat -RR
netsh int reset all
netsh int ip reset
netsh winsock reset
- Once every command has been processed successfully, ensure that you repeat this method on every computer that’s part of your homegroup.
- Initiate the ping or trace attempt again and see if you’re still stuck with the same code 1231 transmit error.
If the same problem is still ongoing, move down to the next potential fix below.
Method 5: Creating a .bat script
If you want to avoid having to rename every computer that’s part of the workgroup to upper-case only, there’s one solution that will remove this requirement from Windows 10.
But in order to enforce it, you’ll need to create a .bat script that’s capable of modifying the way workgroups work on Windows 10.
If you are prepared to go this route, start following the instructions below to create a bat script that’s capable of resolving the Transmit error: code 1231:
- Press Windows key + R to open up a Run dialog box. Next, type ‘notepad.exe’ inside the text box and press Ctrl + Shift + Enter to open the Notepad utility with admin access.
Opening the Notepad utility with admin access Note: When prompted by the UAC (User Account Control), click Yes to grant admin access.
- Once you’ve successfully opened Notepad with administrative access, paste the following code inside the text box exactly as below:
sc.exe config lanmanworkstation depend= bowser/mrxsmb10/nsi
sc.exe config mrxsmb20 start= disabled
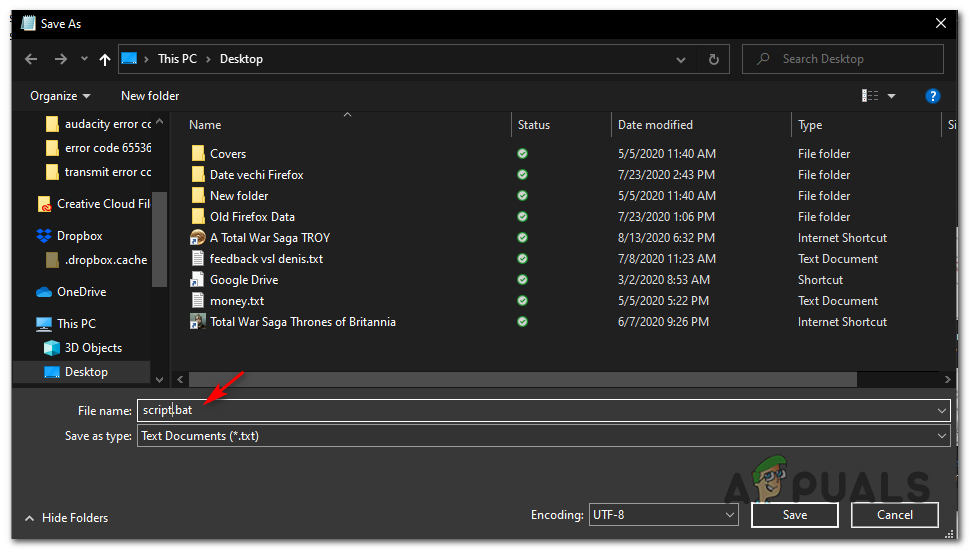
- Once the code is successfully added, use the ribbon bar at the top to click on File > Save As… from the newly appeared context menu.

Using the Save As menu - Choose a location where to save this script and name it however you want, but make sure that the name ends with the extension .bat before clicking Save.

Creating the script .bat file - Once the script is successfully created, open File Explorer and navigate to the location where you previously saved the .bat file.
- After you get to the location of the script, right-click on the file and choose Run as administrator from the newly appeared context menu.
Running as an Administrator - Wait until the operation is complete, then restart your computer and see if the problem is resolved after the next successful startup.

Kevin Arrows
Kevin Arrows is a highly experienced and knowledgeable technology specialist with over a decade of industry experience. He holds a Microsoft Certified Technology Specialist (MCTS) certification and has a deep passion for staying up-to-date on the latest tech developments. Kevin has written extensively on a wide range of tech-related topics, showcasing his expertise and knowledge in areas such as software development, cybersecurity, and cloud computing. His contributions to the tech field have been widely recognized and respected by his peers, and he is highly regarded for his ability to explain complex technical concepts in a clear and concise manner.
Updated: December 22, 2023
5 min to read
Windows
Windows users have reported encountering the Transmit Error Code 1231 while attempting to trace or ping a machine within a local workgroup. This error signifies a network connectivity problem, and its causes can vary. Let’s explore its implications and potential causes.
About the Transmit Error Code 1231
The Transmit Error Code 1231 is an error reported to occur among Windows 7, 8.1, 10, and 11 devices. With careful research and based on user experiences, it turns out that there are many potential culprits behind it. Some are as follows:
- The machine name uses lower case letters – It is worth noting that Microsoft made changes with Windows 10/11, particularly in the NETBIOS resolution. It essentially makes Windows machines with names containing lower case letters invisible in a workgroup. If this is the case, the fix should simply be renaming the problematic machine.
- A problem exists within the network adapter – A problem within the network adapter may cause the error code 1231 to appear. To fix this, you have to reinstall your network adapter or change it with a more generic version.
- Network discovery has been disabled – If your machine’s Automatic Setup and Network Discovery features are disabled, it is likely that you will see the Transmit Error Code 1231. In this scenario, the fix should be adjusting your Network and Sharing Center’s settings.
- Inconsistent TCP/IP – In some cases, the problem could be caused by an unreachable or inconsistent TCP/IP. Resetting the TCP/IP of the affected PC should resolve the problem in this case.
How to Fix Transmit Error Code 1231?
So, what should you do about the Transmit Error Code 1231? How do you fix it? Find out below.
Fix #1: Rename the missing machine
Microsoft has implemented a NETBIOS resolution change via a Windows 10/11 update that resulted in making machines part of a certain workgroup case-sensitive. So, if you have just updated your Windows version and your device’s name is using lower-case characters, then you may be affected.
To fix the problem, change the name of the PC to upper-case only. While it seems like an easy fix, the steps may vary depending on your Windows version. But fret not because we have created separate steps for each. See below.
For Windows 10/11 Devices:
- Press the Windows + R keys to launch the Run utility.
- Into the text field, input ms-settings:about and hit Enter. This should take you to the About section of the Settings app.
- Navigate to the right-hand section of the menu and scroll down to the Device Specifications section.
- Select Rename This PC.
- In the Rename Your PC pop-up menu, provide a new PC name that contains upper-case characters only.
- Hit Next.
- Wait for the process to complete.
- Click the Restart Now button and wait for the startup process to finish. Check if the error code persists.
For Windows 7 and 8.1 Devices:
- Press the Windows + R keys to launch the Run utility.
- Into the text field, input sysdm.cpl and hit Enter. This will open the System Properties window.
- While on this window, navigate to the Computer Name tab and hit the Change button.
- Next, change your Computer Name to upper-case letters only.
- Restart your PC to apply the changes.
Fix #2: Reinstall your network adapter
According to some affected users, the Transmit Error Code 1231 may show because of a glitch within the network adapter that causes the machine to become invisible in the local workgroup. In this scenario, the fix should simply be reinstalling the network adapter and making sure that the latest driver version is installed.
Follow the instructions below to reinstall the network adapter:
- Make sure you are connected to the internet using an ethernet cable. This will guarantee internet stability and prevent issues to arise in the future.
- Next, launch the Run utility by pressing the Windows + R keys. Into the text field, input devmgmt.msc and hit Enter. This will open Device Manager.
- While inside the Device Manager window, scroll down and check all the installed device drivers. Expand the drop-down menu next to Network Adapters.
- Right-click on your network adapter and select Uninstall.
- Confirm your action and wait for the process to complete.
- After the procedure, your internet access will be cut. If this happens, restart your PC.
- Once your PC reboots, a more generic network adapter driver will be installed. Your internet access will also be restored.
Fix #3: Reset your TCP/IP
An improper TCP/IP configuration can sometimes cause the Transmit Error Code 1231 to arise. If this is your problem, you can easily fix it by resetting your TCP/IP.
Here’s a quick guide on how to perform a complete TCP/IP reset:
- Press the Windows + R keys to open the Run utility.
- Into the text field, input cmd and hit the CTRL + Shift + Enter keys altogether to launch an elevated Command Prompt.
- Next, into the command line, input the following commands and hit Enter after each one of them.
- ipconfig /flushdns
- nbtstat -R
- nbtstat -RR
- netsh int reset all
- netsh int ip reset
- netsh winsock reset
- Once all commands are executed properly, repeat the steps for every device connected to the work- or homegroup.
- Ping the devices again and check if you still get the Transmit Error Code 1231.
Fix #4: Enable the Automatic Setup and Network Discovery features
The Transmit Error Code 1231 may also occur if the devices connected to the homegroup are invisible over the network or the Automatic Setup feature is disabled. If this is your problem, then you can fix it by just accessing the Advanced sharing settings of your PC and adjust the Network Discovery feature. Here’s a guide on how to do it:
- Press the Windows + R keys to launch the Run dialog box.
- Into the text field, type control.exe /name Microsoft.NetworkAndSharingCenter and hit Enter. This will take you to the Network and Sharing Center menu.
- Click Change Advanced Sharing Center.
- Expand on the active profile and make sure you enable the Turn on Network discovery feature.
- Next, tick the box next to the Turn on automatic setup of network connected device option.
- Save the changes.
Fix #5: Run a quick malware scan
Though rare, it is possible that a malware entity is causing the Transmit Error Code 1231 to appear. To address this, you can run a malware scan using Windows Defender or another, for example, third-party anti-malware program.
Summary
There you have it! Fixing the Transmit Error Code 1231 should be easy-peasy. You may try to rename your PC using upper-case characters or reset your TCP/IP configuration. But if none of the above solutions worked, feel free to get in touch with your workgroup’s IT personnel. They should be able to troubleshoot the issue for you.
Let us know if the solutions above worked, comment on your thoughts and experience below!
Give us some love and rate our post!
Описание: Указанное назначение недостижимо
Возможны причины появления ошибки и способы её устранения
1) Нет линка (на значке «подключение по локальной сети» надпись «сетевой кабель не подключен»).
— Проверяем включена ли Ваша сетевая карта.
Для Windows 7: Пуск – Панель управления – Сеть и интернет – Центр управления сетями и общим доступом – Изменение параметров адаптера
Для Windows XP: Пуск – Панель управления – Сетевые подключения
Если состояния подключения по локальной сети отключено – включаем двойным кликом левой кнопки мыши.
— «Подключение по локальной сети» зачеркнуто красным крестом и снизу подписано «Сетевой кабель не подключен», то проверить подключен ли сетевой кабель к компьютеру, если нет, то его переподключить. Если не помогло, то звонить в техническую поддержку.
— Проверяем получает ли сетевая карта адрес сети:
Для этого нажмите:
Пуск – Панель управления – Сеть и интернет – Центр управления сетями и общим доступом – Изменение параметров адаптера-Щелкаем правой кнопкой мыши по значку «Подключение по локальной сети» и выбираем состояние
В открывшемся окне нажимаем кнопку «Сведения»
В окне «Сведения о сетевом подключении» смотрим какой адрес вам пришел..Если он начинается на 169.. то звоним в техническую поддержку
2) Неправильные настройки локальной сети
— Проверяем настройки подключения по локальной сети. Подробнее об этом можно прочитать здесь: Настройки локальной сети
3) Блокирование антивирусной программой
— Убеждаемся, что фаервол или антивирус со встроенным фаерволом не блокируют соединение.