
What causes the error 0x80244018? How to fix the Windows update error 0x80244018? This post from MiniTool will show you how to fix the Windows error 0x80244018? In addition, you can visit MiniTool to find more Windows update errors and solutions.
What Causes the Windows Update Error 0x80244018?
Some Windows users complain that they encounter the error 0x80244018 when trying to apply the Windows update. The error 0x80244018 also comes with the error message WU_E_NO_USERTOKEN.
The error code 0x80244018 may be caused by various reasons. The Windows error 0x80244018 may be caused by the following reasons.
- The third-party application interferes the Windows update.
- The Windows Update is blocked by the VPN or proxy.
- The Background Intelligent Transfer Service is disabled.
- Windows Update component service is
- The system files are corrupted.
Hence, in the following section, we will show you how to fix the error 0x80244018.
6 Solutions to Windows Update Error 0x80244018?
In this section, we will show you the solutions to fix the Windows Update error 0x80244018.
Solution 1. Use Windows Update Troubleshooter
To fix the error 0x80244018, you can run Windows Update Troubleshooter first.
Now, here is the tutorial.
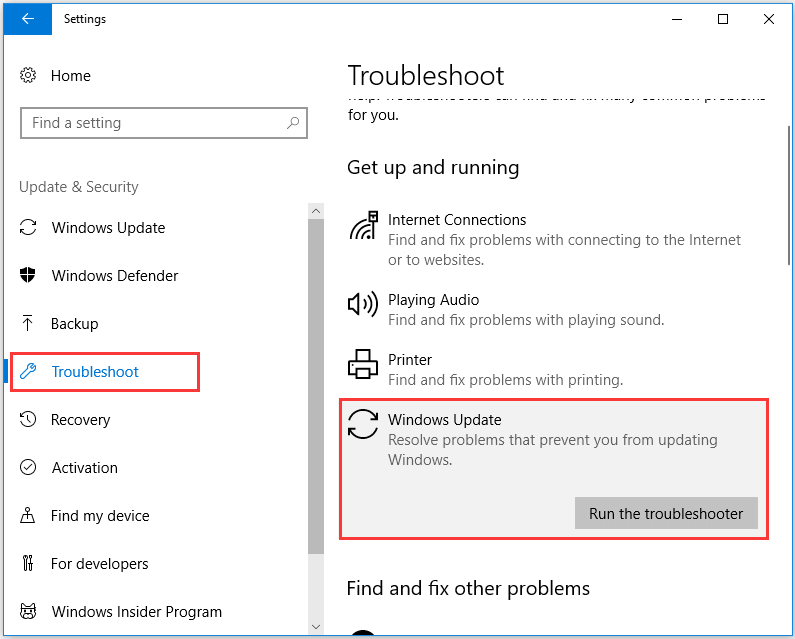
- Press Windows key and I key together to open Settings. Then choose Update & Security to continue.
- In the pop-up window, go to the Troubleshoot tab and scroll down to choose Windows Update.
- Then click the Run the Troubleshooter to continue.
After that, Windows Update troubleshooter will begin to detect problems on your computer. It may take some. If there is any problem on your computer, Windows Update Troubleshooter will detect them and repair them.
After all steps are finished, reboot your computer and run Windows update again to check whether the error 0x80244018 is solved.
If this solution is not effective, try other solutions.
Related article: 7 Fixes to Windows Update Error 0x80070002[Step-by-Step Guide]
Solution 2. Uninstall Third-Party Antivirus Software
The Windows Update error 0x80244018 also may be caused by the third-party antivirus software. So, in order to fix this Windows error 0x80244018, you can choose to uninstall the third-party antivirus software.
Now, here is the tutorial.
- Type Control Panel in the search box of Windows and choose the best-matched one.
- Then enter the main interface of Control Panel.
- In the pop-up window, choose Uninstall a program under Programs section.
- In the pop-up window, select the third-party antivirus software and right-click it. Then choose Uninstall to continue.
When the process is finished, you have uninstalled the third-party antivirus software. Then you can reboot your computer and run Windows Update again to check whether the error 0x80244018 is solved.
Solution 3. Force Starting the BITS Service
In order to fix the Windows Update error 0x80244018, you can choose to enable the Background Intelligent Transfer Service.
Now, here is the tutorial.
- Press Windows Key and R key together to open Run dialog, then type services.msc in the box and click OK to continue.
- In the pop-up window, scroll down to find the Background Intelligent Transfer Service.
- Right-click it to choose Properties.
- In the pop-up window, change the Startup type to the Automatic (Delayed Start) and change the Service Status to Running.
- Then click Apply and OK to confirm the changes.
When all steps are finished, reboot your computer and run Windows Update again to check whether the error 0x80244018 is solved.
If this solution does not take effect, try other solutions.
Solution 4. Disable Proxy Server or VPN Service
As we have mentioned in the above part, the Proxy server or VPN service may also cause the Windows error 0x80244018. So, in order to fix this Windows update error 0x80244018, you can choose to disable the Proxy server or VPN service.
Now, here is the tutorial.
- Press Windows key and R key together to open Run dialog, then type ms-settings:network-proxy in the box and click OK to continue.
- In the pop-up window, navigate to the Manual Proxy Setup and then change the toggle to Off under Use a proxy server.
When it is finished, reboot your computer and check whether the Windows update error 0x80244018 is solved.
Solution 5. Reset Windows Update Components
In order to fix the Windows error 0x80244018, you can choose to reset Windows Update components.
Now, here is the tutorial.
1. Type Command Prompt in the search box of Windows and choose the best-matched one. Right-click it to choose the Run as administrator.
2. In the pop-up window, type the following commands and hit Enter after each command.
- net stop wuauserv
- net stop cryptSvc
- net stop bits
- net stop msiserver
- ren C:\Windows\SoftwareDistribution SoftwareDistribution.old
- ren C:\Windows\System32\catroot2 catroot2.old
- net start wuauserv
- net start cryptSvc
- net start bits
- net start msiserver
After that, close the command line window and reboot your computer and check whether the Windows update error 0x80244018 is solved.
Solution 6. Run SFC and DISM Tools
If there are corrupted system files, you may also encounter the error 0x80244018. Hence, you can run SFC and DISM tools to check and repair corrupted system files on your computer.
Now, here is the tutorial.
- Open Command Prompt as administrator.
- In the Command Line window, type the command sfc /scannow and hit Enter to continue.
If the System File Checker cannot fix the corrupt system files, you can run DISM tool again.
- Open Command Prompt as administrator.
- Type the command dism /online /cleanup-image /restorehealth and hit Enter after each command.
When it is finished, reboot your computer and check whether the Windows update error 0x80244018 is solved.
Final Words
To sum up, this post has introduced what the error 0x80244018 is and how to fix it with 6 solutions. If you encountered the same Windows error, you can try these solutions. If you have any better solution to fix this Windows update error 0x80244018, you can share it on the comment zone.
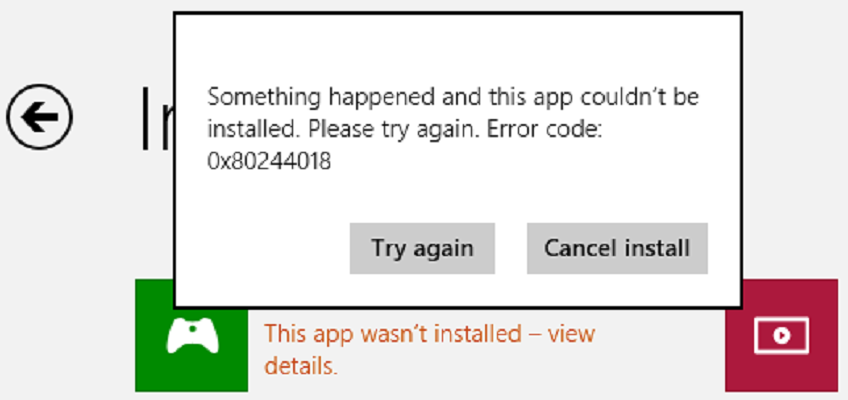
Error code 0x80244018 indicates your computer failed to install the latest Windows updates. Keeping your computer up-to-date is crucial if you want to access the latest features and keep threats at bay. If you get error code 0x80244018, wait for a few minutes, restart your computer, and try again. Maybe the update servers are too busy and can’t process your request. If the error persists, pursue the troubleshooting steps below.
Contents
- 1 How Do I Fix Update Error 0x80244018 on My Windows PC?
- 1.1 Run the Update Troubleshooter
- 1.2 Repair Your System Files
- 1.3 Restart the Windows Update Service
- 1.4 Restart the Update Service and Rename the SoftwareDistribution Folder
- 1.5 Delete the ThresholdOptedIn Registry Entry
- 1.6 Run the Windows Update Assistant
- 1.7 Disable Your Download Manager and Antivirus
- 1.8 Conclusion
Run the Update Troubleshooter
Windows 10 comes with a built-in update troubleshooter that you can run every time your machine fails to install the latest updates. The troubleshooter automatically detects and fixes the issues preventing you from updating your computer. Hopefully, it can fix error 0x80244018 as well.
Go to Update and Security, click on Troubleshoot in the left-hand pane, and select Additional troubleshooters. Then run the Update troubleshooter and check the results.
Repair Your System Files
Error code 0x80244018 indicates your system files could be damaged or corrupted. Repair them and check if you can install the latest updates.
- Press the Windows and X keys on your keyboard and select Command Prompt (Admin).
- Run the following commands one by one:
DISM /Online /Cleanup-Image /ScanHealthDISM /Online /Cleanup-Image /RestoreHealthsfc /scannow
- Restart your computer, and check if the update error persists.
Restart the Windows Update Service
Make sure the Windows Update service is running in the background. Try restarting it and check the results.
- Type services in the Windows search bar and double-click on the Services app.
- Scroll down to the Windows Update service.

- Right-click on it and restart it.
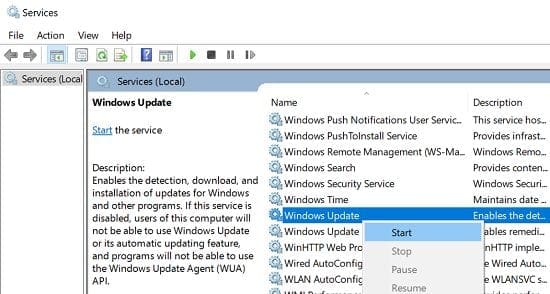
Repeat the same steps for the Background Intelligent Transfer Service, and the Cryptographic Service.
Restart the Update Service and Rename the SoftwareDistribution Folder
Launch Command Prompt with admin privileges again and run the following commands hitting Enter after each one:
net stop wuauservnet stop cryptSvcnet stop bitsnet stop msiserverren C:\Windows\SoftwareDistribution SoftwareDistribution.oldren C:\Windows\System32\catroot2 catroot2.oldnet start wuauservnet start cryptSvcnet start bitsnet start msiserver
Wait for the processes to complete, and then check for updates again.
Delete the ThresholdOptedIn Registry Entry
Launch the Registry Editor and navigate to Computer\HKEY_LOCAL_MACHINE\SOFTWARE\Microsoft\WindowsSelfHost\Applicability. Then remove the ThresholdOptedIn entry if it’s available on your computer.
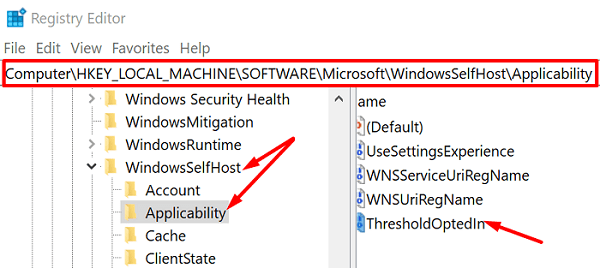
Restart your machine and check for updates again.
Run the Windows Update Assistant
If 0x80244018 is preventing you from installing a major feature update, use the Windows Update Assistant instead of running the built-in Windows Update service. Go to Microsoft’s official website and download the Update Assistant. Then run the executable and follow the onscreen steps to complete the update process.
Disable Your Download Manager and Antivirus
Are there any download managers installed on your computer? If there are, disable or uninstall them. As a quick reminder, download managers can sometimes interfere with the Microsoft Baseline Security Analyzer (MBSA). They can even prevent the analyzer from downloading the security update of Mssecure.cab.
Additionally, if you’re using a third-party antivirus, disable it while you’re updating your computer. Third-party security solutions may sometimes mistakenly flag your update files as “suspicious” and block them. Don’t forget to re-enable your antivirus when you’re done installing the updates.
Conclusion
If error code 0x80244018 is preventing you from updating your Windows computer, first run the Update Troubleshooter. Then run SFC and DISM to repair corrupted system files. If the issue persists, restart the Windows Update Service, and rename the SoftwareDistribution folder. Additionally, disable third-party download managers and antivirus tools.
Which of these solutions worked for you? Share your feedback in the comments below.
Ошибка 0x80244018 является одним из багов, с которым пользователям приходится бороться после выпуска обновления KB4038788 для операционной системы Windows 10. После установки данного обновления, оно может нарушить настройки Сетевого подключения или же вызвать проблемы с совместимостью обновлений Windows или приложений из Магазина.
Ошибка 0x80244018 появляется в Магазине Windows(или просто Windows Store), но она не мешает запуску приложений. Однако, она препятствует загрузке и установке любого приложения, что, согласитесь, довольно серьезная проблема для пользователей, использующих Магазин Windows ежедневно.
Методы решения ошибки 0x80244018
Метод №1 Создание папки AUInstallAgent и AppReadiness
Согласно пользователям, столкнувшихся с данной проблемой, использование системной утилиты SFC и очистка кэша Магазина Windows не дают положительного результата. В связи с этим, эксперты по данной ОС рекомендуют удалить и заново создать папку AppReadiness. Эта папка используется Windows Store для перемещения файлов, так что если там есть поврежденное обновление, вирус или стороннее ПО, то эту папку нужно восстанавливать вручную. Чтобы добиться этого, вам нужно сделать следующее:
- Откройте Мой компьютер и кликните на вкладку «Вид» в строке меню окна.
- Кликните на значок параметров, находящийся в дальнем правом углу окна.
- Далее перейдите во вкладку «Вид».
- Опуститесь в самый низ списка с дополнительными параметрами папок и найдите там параметр под именем «Скрывать защищенные системные файлы (рекомендуется)».
- Снимите галочку с этого параметра папок и подтвердите изменения, нажав на кнопки Применить и ОК.
- Теперь пройдите в директорию C:\\Windows.
- Нажмите на пустом месте в этой папке правой кнопкой мыши и выберите «Создать→ Новая папка».
- Назовите эту папку именем AUInstallAgent(к вам будет выполнен запрос на выдачу административных прав).
- Как только папка будет создана, перезагрузите компьютер и проверьте наличие ошибки 0x80244018.
Если проблема все еще присутствует, то снова перейдите в директорию C:\\Windows и создайте папку под именем AppReadiness. Снова перезапустите систему, и проверьте наличие проблемы в виде ошибки 0x80244018.
Метод №2 Проверка система на вирусы и вредоносное ПО
Вирусы вполне могут вызывать ошибку 0x80244018, которая отбирает у пользователей возможность по загрузке приложений или обновлений для них. Попробуйте провести сканирование своего компьютера на наличие вирусов. Если вы найдете что-то в системе, то избавьтесь от этого, а затем снова попробуйте загрузить или обновить что-либо.
Можете использовать либо антивирусное программное обеспечение от стороннего разработчика, либо системное решение в виде Защитника Windows. Также рекомендуем вам вспомнить, не устанавливали ли вы недавно какое-то ПО, которое могло оказаться виновником появления ошибки 0x80244018. Удалите его, чтобы проверить вероятность.
Метод №3 Удаление проблемного обновления
Если вы не нашли на своем компьютере никаких признаков вирусной угрозы, создание папок AUInstallAgent и AppReadiness было бесполезно, то почему бы не попробовать попросту удалить проблемное обновление для операционной системы Windows 10. Вы можете легко это выполнить с помощью Журнала обновлений Windows. Вот что вам нужно сделать:
- Нажмите правой кнопкой мыши на Пуск и выберите из контекстного меню пункт «Параметры».
- Перейдите в раздел «Обновление и безопасность».
- Нажмите на ссылку «Журнал обновлений».
- Теперь кликните на ссылку «Удалить обновления».
- Найдите в списке установленных обновлений то, которые вызывает ошибку 0x80244018 и удалите его, например, KB4038788.
- Перезагрузите компьютер.
Как только проблемное обновление будет удалено, пройдите в Магазин Windows 10 и попробуйте скачать или обновить что либо от туда. Вы убедитесь, что на этот раз все пройдет как по маслу и ошибки 0x80244018 не будет. Однако, если же она все еще присутствует, то в системе все остался какой-то триггер для нее. Попытайтесь воспользоваться вышеописанными шагами еще раз, чтобы найти этот триггер.
0x80244018 Windows Update Error is kind of or similar to HTTP status 403 issue. This stop code means server receives the request but fails to proceed and send the files. This issue commonly occurs while installing an update or a feature upgrade. However, to fix this problem is not a complex task. Following guideline will solve Windows Update error code 0x80244018 easily.
0x80244018 Windows Update Error in Windows 11/10 Solutions
Solution-1: Remove Antivirus tools
Since the 0x80244018 Windows Update error might be caused by third-party antivirus tools mostly, we need to step up to disable them first. If disabling doesn’t work then delete it. You should keep in mind that, only uninstallation will not solve the error permanently. You need to use the clean tool from the manufacturers’ website to remove traces. In the same way, the Proxy VPN is equally harmful, therefore, uninstall if your computer has any. Windows 10 has its own Windows Defender as a built-in feature. This is probably the best security practice rather than any other third party tool. Many users inform that when they remove Avira Security suite the error goes. Restart the computer after dealing with this third-party tools and try updating again. The error should be fixed in this way, in case, exists, proceed to the next method.
Solution-2: Disable Windows Defender Firewall
The main function of Windows Defender Firewall is to block harmful applications and network but sometimes it creates problems for updates that end up with the 0x80244018 error message. So the system will receive update normally when you disable this protection tool. In order to turn Off Firewall, follows:
Step-1: Go to the Search Box near the Start button on the taskbar and type Firewall and press Enter.
Step-2: Click the link “Turn Windows Defender Firewall on or off” in the left pane. Reach out to the Private network settings section and check the option Turn Off Windows Defender Firewall (“not recommended”). Select OK.
Step-3: Move on to the next, Public network settings section and do the same as above step.
Now try to download the update and if you accomplish successfully, then turn this On the Firewall again use the same procedure. If the error even doesn’t go in this way, you need to follow the next process.
Solution-3: Ensure BITS running on your device
BITS is an important component of Windows which delivers the updates. Errors 0x80244018 Windows Update Error appears when a malfunction occurs in this. Too ensure BITS is running properly, follow the below steps:
Step-1: Press Win+X and select run from the list of options. On the space of run, Type the text services.msc and click OK.
Step-2: From the list, look for the Background Intelligent Transfer Service in the Name column. Once you find out, put a right click on it and select Properties option.
Step-3: On a popup window, the system will show the properties of the service. In “Startup type” part, click on the dropdown and select “Automatic (Delayed Start)“.
Step-4: Move on to the Service status section and set it to Start.
Restart the computer and check for the existence of this error again. It persists see the next method to configure the proxy.
Solution-4: Checking the proxy server settings
Microsoft is releasing updates every now and then with an intention to make this one more productive as well as free from bugs. Unfortunately, users are being stumbled with so many errors. 0x80244018 Windows Update Error is one these that come across in recent days. Proxy server is an important cause to lead this type of problem. So disable it with the procedure below –
Step-1: Type inetcpl.cpl in Cortana search and press Enter.
Step-2: Click on the Connections tab and move on to the Local Area Network (LAN) settings portion.
Perform a click on LAN settings button to quickly open a pop up.
Step-5: In Proxy Server part on the same pop up, uncheck the dialog box entitled with Use a proxy server for your LAN.
Step-6: Now clock on the Ok button from the bottom of this page before closing it.
Therefore, the 0x80244018 Windows Update Error should be fixed using this resolution method.
Conclusion
Updating in Windows 11 and 10 is necessary as to improve the functionality as well as to experience the excellent features. But some of the issue like 0x80244018 Windows Update Error limits the users from downloading the updates. We have discussed some very effective solutions for the sake of resolving this annoying error. Hope you can solve your case using any one of these.
Error code 0x80244018 on Windows 10 /11 Update takes place when the client wishes to set up or deploy the new updates on windows11.The server receives the request of placing in updates. But usually, the server receives busy, and updating archives cannot achieve the server. This can be due to the reality of corrupt updating files, activation of antivirus software, or some mistaken settings of your device or system.

Reasons for this windows 10/11 update Error Code 0x80244018:
1. Interference of Third-party software
2. VPN or Proxy issue
3. Corrupt System Files
4. Disabled BIT service
5. The Background Intelligent Transfer Service is disabled.
6. Windows Update aspect provider
Uninstall Third-Party Antivirus Software
The Windows 10 Update error 0x80244018 can also moreover be about with the resource of the third-party antivirus software. So, in order to fix this Windows 11 error 0x80244018, you can select to uninstall the third-party antivirus software.
- 1. Firstly, Type Control Panel in the search discipline of Windows and choose the best-matched one.
- 2. Type the major interface of the Control Panel.
- 3. In the pop-up window, choose Uninstall a software beneath the Programs section.
In the pop-up window, select out the third-party antivirus software program software and right-press it. Then select Uninstall to continue.
When the method is finished, you have uninstalled the third-party antivirus software. Then you can reboot your machine and run Windows 10 Update as soon as extra to take a seem to be at whether or now not the windows 10 error code 0x80244018 is solved.
Chat with our tech expert now for instant support. Click here!
Disable Proxy Server
Press Windows key and R key jointly to open Run dialog, then kind Ms- settings: network-proxy in the container and click on OK to continue.
In the pop-up window, navigate to the Manual Proxy Setup and then alternate the toggle to Off under Use a proxy server.
When it is done, reboot your machine and test whether the Windows replace error 0x80244018 is solved.
SFC Scan to restore windows 11 update Error Code 0x80244018.

SFC SCAN is a command prompt line that we use to do this process. I will provide a clarification for the steps in the element on how to characterize this scan.
1. SFC scan to fix the broken or corrupt documents.
2. Firstly, Open Windows Terminal in Admin
3. Secondly, Type in SFC /scan now in the command prompt window
4. Next, Wait for the scan to finish. Perform SFC scan.
By following this method, you will get an extraordinary stop result pointing out that all problems are solved. If the System File Checker can’t fix the corrupt gadget files,
you can run the DISM machine again.
1.Firstly, Open Command Prompt as administrator.
2. Secondly, Type the command dims /online /clean-up-image /restore health and hit Enter after each and every command.
3. Finally, When it is finished, reboot your system, and take a seem to be at whether the Windows 11 update error 0x80244018 is solved.
Reset Windows 10 Update
Reset the Windows 10 Update factors through ability of executing the following guidelines in a command instant run as an administrator:
net end wuauserv
net quit cryptSvc
net cease bits
net quit msiserver
ren C:\Windows\
ren C:\Windows\System32\catroot2 catroot2.old
net begin wuauserv
net begin cryptSvc
net begin bits.
net begin msiserver
If these steps no longer resolve the issue, it is inspired that the consumer contact Microsoft assist for assistance.
If this trouble nevertheless exists in home windows 10 /11
In case we want to reset the Windows 10 / windows 11 run system. Follow the given steps how to reset the system.
Disclaimer: We propose you do the lower back up earlier than we proceed these steps, at some stage in reset Windows 11 and Windows 10 set up the potential that all your archives’ documents and settings will be displaced in the reset process.
Windows 10 _ reset your PC.
1.Firstly, Select Start > Settings > System > Recovery. Open Recovery settings.
2.Next, to Reset this PC, select Reset PC. Then select from the options and/or settings in the table below.
Windows 11 _ reset your PC.
1.Firstly, Select Start > Settings > System > Recovery. Open Recovery settings.
2. Next, to Reset this system, select Reset PC. Then choose from the options and/or settings in the table below.
Conclusion
You can also ask for computer repair Image support or some Recovery support, we also restore your system to a point when it was working fine without any problem . Feel free to chat with us for any help. A free assistance can be provided for all the basic troubleshooting without any additional resources.
Need help? Chat with our tech expert now for instant solutions and top-notch support. Click here to get started!