
Рекомендуем: Как избежать проблем с установкой Windows 10 October 2018 Update.
Некоторые пользователи сообщили, что обновление загружаться — снова и снова, после того, как оно достигает определённой пороговой точки. Журнал обновлений в некоторых случаях сообщает код ошибки 0x80240034, в котором указано, что попытка установки обновления не выполнена.
Если Центр обновления Windows не работает должным образом, хорошая мысль запустить Средство устранения неполадок обновлений Windows. Эта проблема не является новой, и подобные вещи продолжают происходить во время обновления Windows. Если вы столкнулись с проблемами при загрузке или установке обновлений, вот как вы можете это исправить.
ИСПРАВЛЕНИЕ: Windows 10 не удалось установить (0x80240034).
Когда обновление устанавливается многократно и не удается завершить установку, каждый раз, наиболее вероятной причиной этой проблемы является поврежденная база данных обновлений. Поврежденные компоненты Windows Update также могут способствовать возникновению подобной ситуации. В зависимости от истории обновлений вашей системы, для обоих элементов может потребоваться устранить неполадки перед загрузкой.
Чтобы исправить оба этих компонента, запустите средство устранения неполадок для Центра обновления Windows. Утилита автоматически исправит поврежденные элементы, а также устранит любые другие проблемы с Центром обновления Windows (например, проблемы с службами Windows Update).
«Центр обновления Windows» Устраните проблемы, мешающие обновлению Windows.
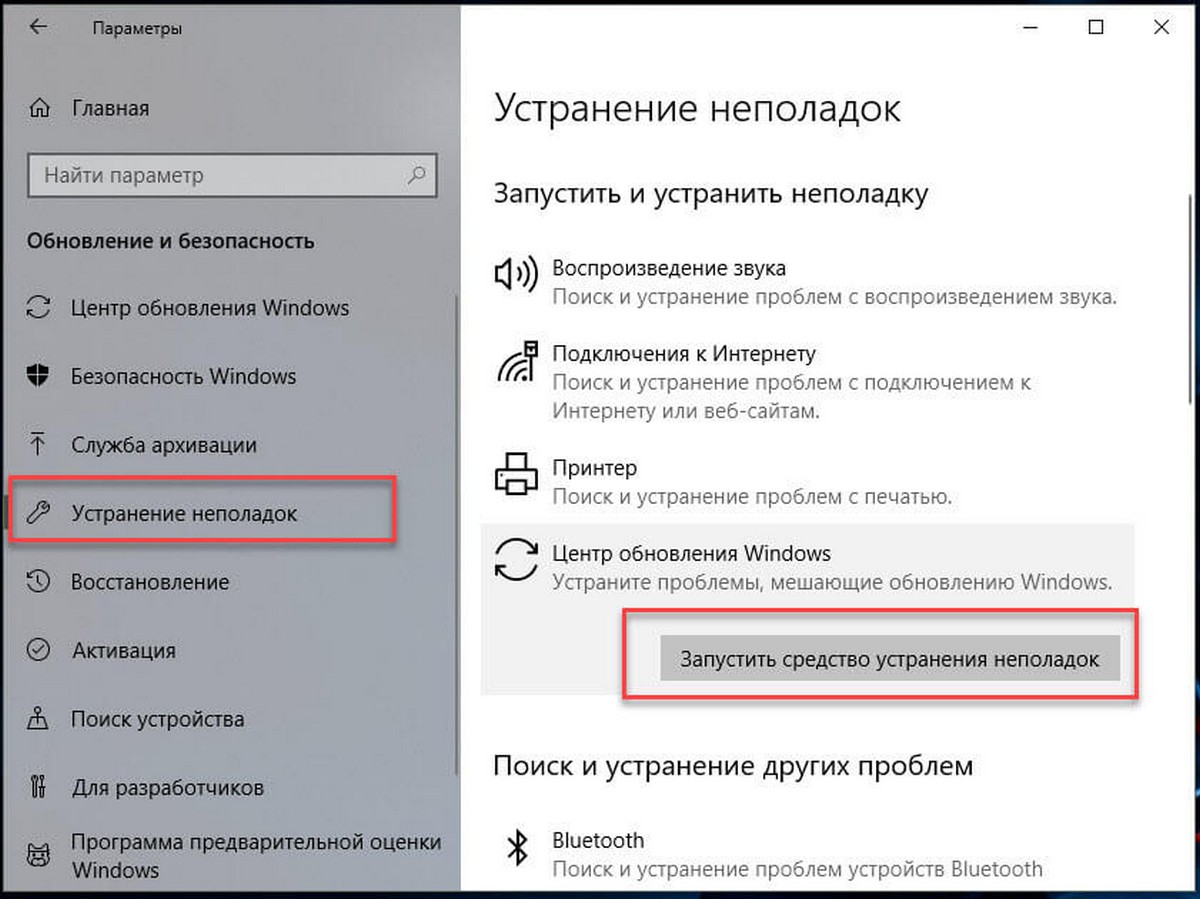
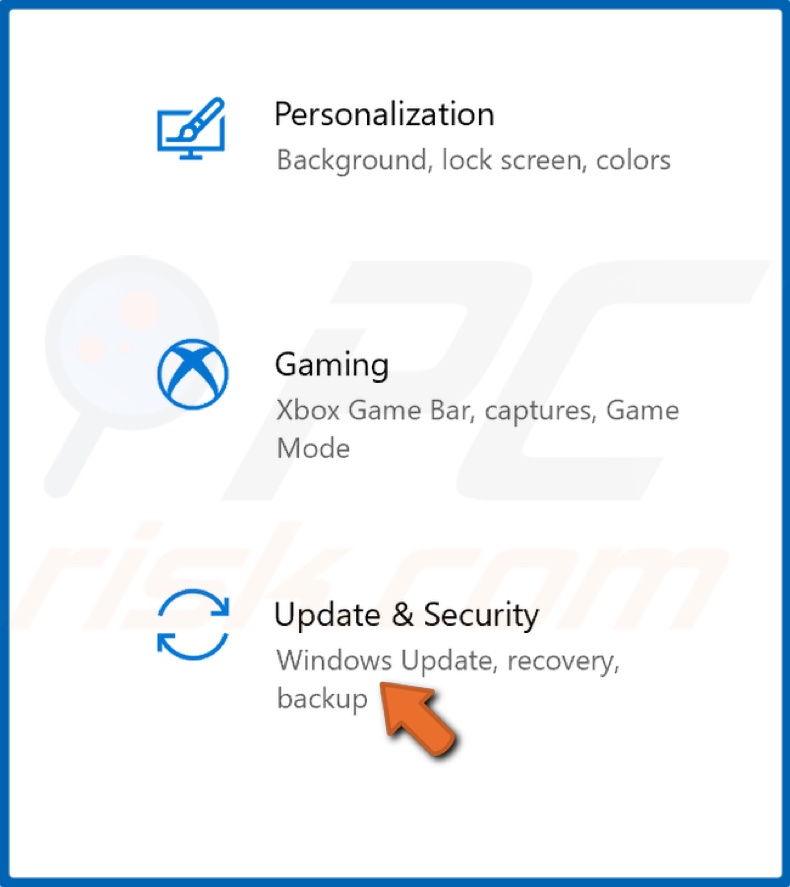
Нажмите сочетание клавиш Win + I чтобы перейти в приложение «Параметры».

Перейдите в раздел «Обновление и безопасность» → «Устранение неполадок».
На странице Устранение неполадок кликните мышкой «Центр обновления Windows» и нажмите кнопку «Запустить средство устранения неполадок».
После того как средство закончит работу, необходимо перезагрузить компьютер и попытаться установить обновление заново.
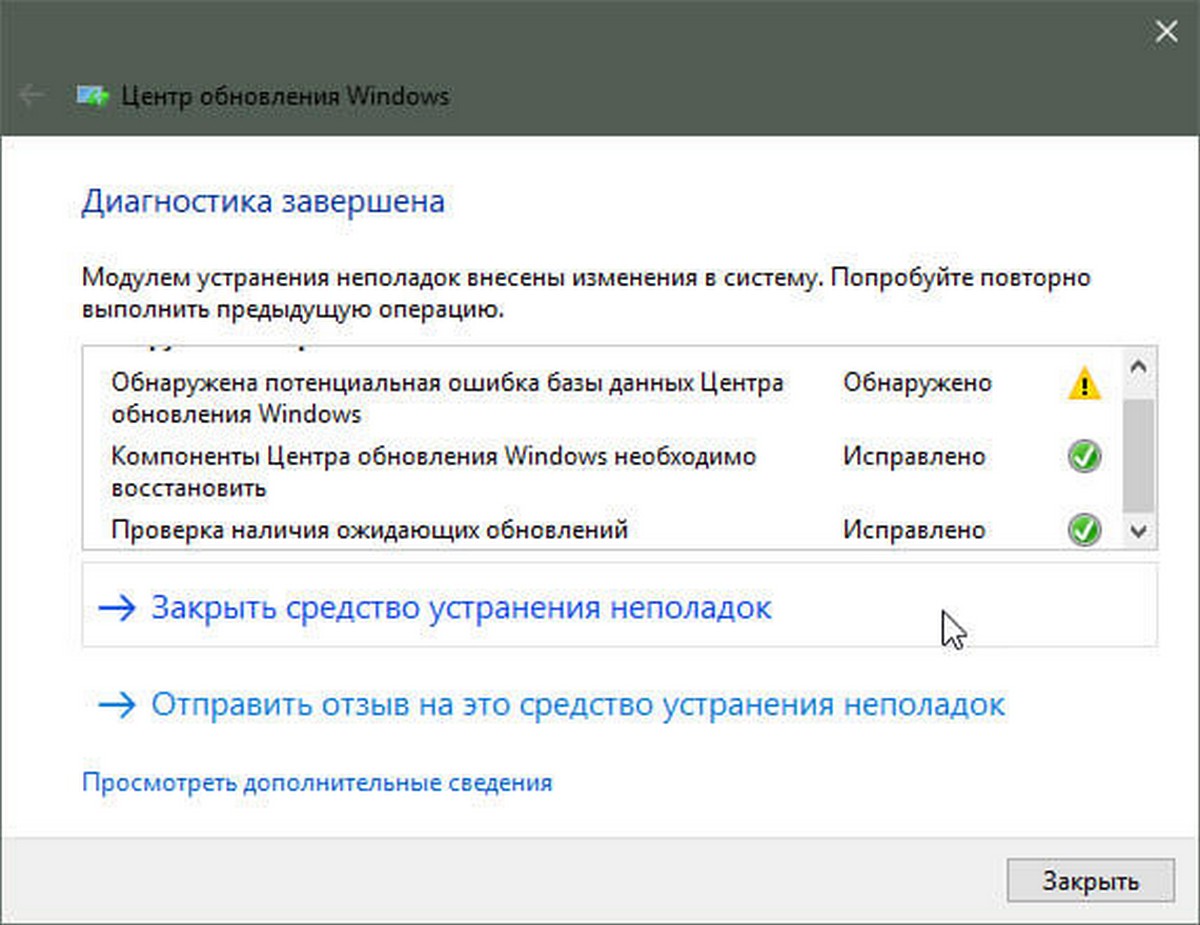
Теперь обновление пройдет как и должно.
В случае, если устранение неполадок не может исправить базу данных обновлений, вы можете вручную исправить ее, как указано ниже:
Использование командной строки
Откройте «Командную строку» или «PowerShell» и введите следующие команды поочередно, нажимая клавишу Enter.
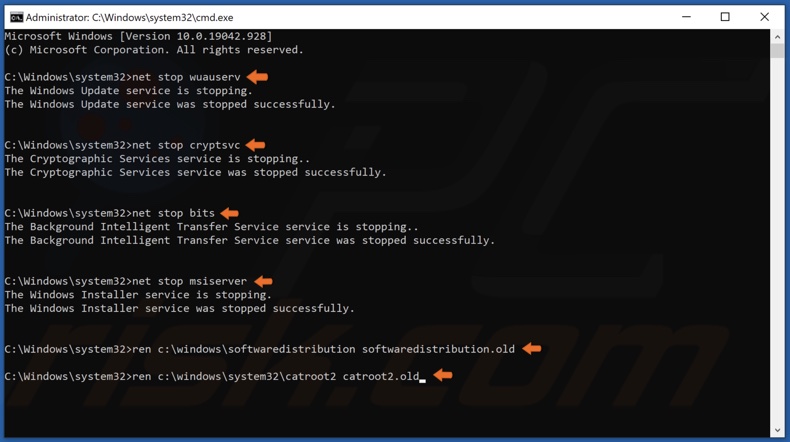
net stop wuauserv
net stop cryptSvc
net stop bits
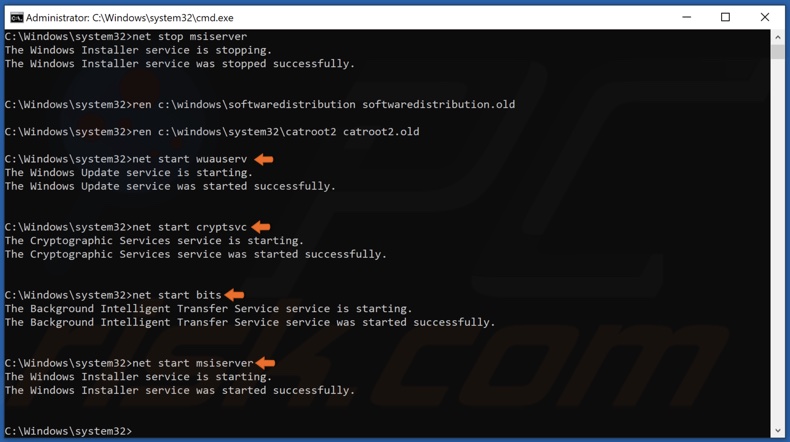
net stop msiserver
Ren C:\Windows\SoftwareDistribution SoftwareDistribution.old
Ren C:\Windows\System32\catroot2 Catroot2.old
net start wuauserv
net start cryptSvc
net start bits
net start msiserver
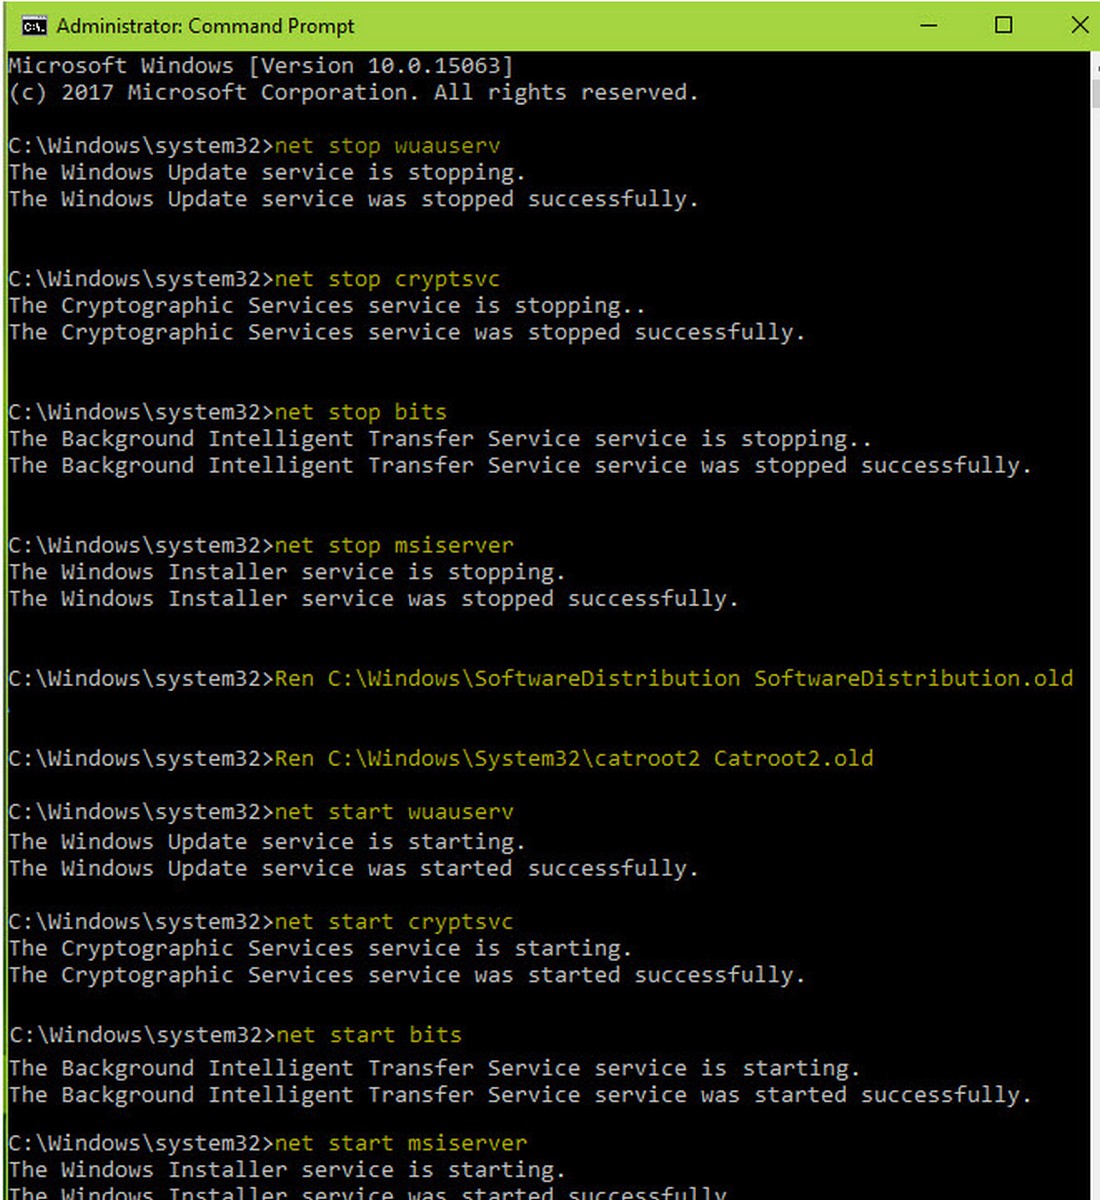
Закройте окно командной строки и перезагрузите компьютер.
После перезагрузки повторите попытку установки доступных вам обновлений Windows, теперь они должны работать нормально.
Если у вас все еще есть проблемы с получением обновлений в Центре обновления Windows, вы можете обновить систему с помощью файла ISO.
Windows Update is an essential process that keeps your operating system up-to-date and error-free. However, at times, while performing this task, you may get into some update-related error code and you can’t update your PC thereafter. In this post, we are going to discuss one such error code 0x80240034, what causes this issue, and how you may resolve it on Windows 11/10.
Windows Update Troubleshooter is the best tool to get rid of the Update Error 0x80240034. In case the error code persists even after this, you may initiate SFC and DISM Scans. These two utility programs check for file corruption within you system and resolve them.
Delete the stored cache inside the SoftwareDistribution and catroot2 folders and check if the update error resolves this way. Make sure to stop all update services before you may deleted the accumulated cache inside the Windows Cache folders.
If that doesn’t help as well, download the pending cumulative updates manually or download the Windows ISO visiting Microsoft Update Catalog.
Fix: Update Error 0x80240034 on Windows PC
To resolve the Windows Update Error 0x80240034, use the following workarounds –
- Run the Update Troubleshooter
- Scan the system file using SFC
- Perform DISM scan
- Download the pending updates manually
- Clear Windows Update Cache/Distribution Folder
- Reset the Updates Components
- Update Windows via ISO File
1] Run the Update Troubleshooter
Update Troubleshooter is the easiest way to repair the common Windows 10 Update regarding trouble. To fix the error code 0x80240034, try this built-in application as the primitive workaround. Here’s how to do it –
- Press Win and I shortcut to launch Settings.
- Here, select the Update & Security category.
- On the left pane, head over to the Troubleshoot option.
- Locate Windows Update on the corresponding right-hand side.
- Once found, click on it and select the Run the troubleshooter button.
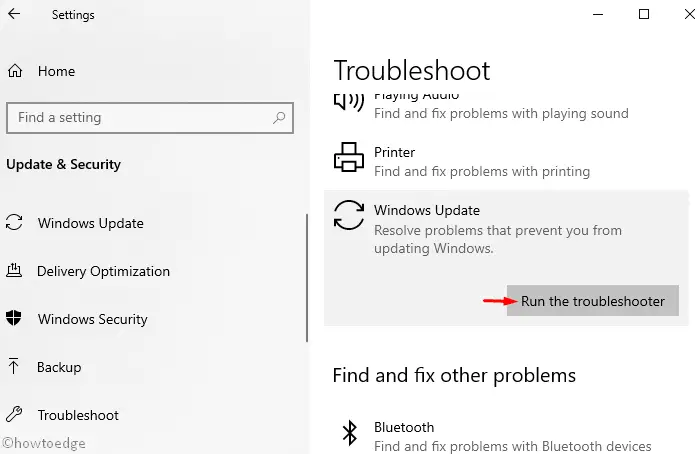
- Now follow the on-screen guide to complete the remaining steps.
- Once over, Restart your computer and install the pending updates.
2] Scan system files using SFC
The Update error 0x80240034 may occur due to the presence of corrupt system files. SFC is a great utility program that you may use to find and repair damaged or missing system files. Here’s how to scan system files using SFC –
- Jointly press Window & Q hotkey to start the search bar.
- Type cmd in the text box and right-click on the Command Prompt option.
- From the context menu select Run as Administrator.
- If User Account Control appears, hit Yes.
- Near blinking cursor of console area, type the following code and tap Enter.
sfc /scannow
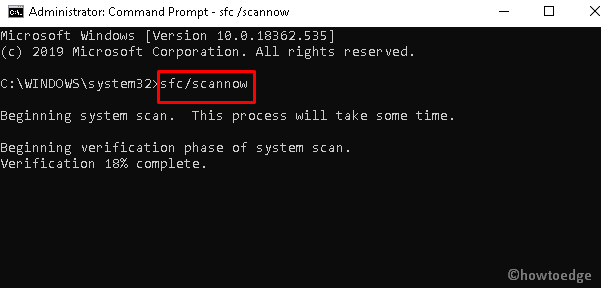
- Now keep patience until the scanning and repairing process is completed.
- Once over, Reboot the system and try to update your OS again.
3] Run DISM scan
Just like System File Checker, DISM is too a built-in tool of Windows 10 that one can use to scan and repair corrupt Windows images. Here are the essential steps –
- Press Win and R to launch the Run dialog.
- In the void area, type cmd and press Ctrl+Shift+Enter together to start the console as admin.
- You will receive the UAC prompt, tap Yes to permit access.
- Here, copy/paste the below code and press Enter –
dism.exe /Online /Cleanup-image /Restorehealth
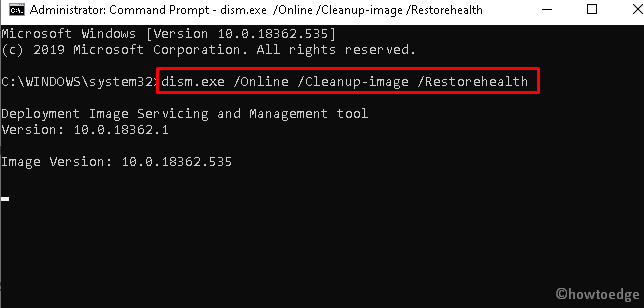
- Wait until the process reaches 100%.
- Once over, Reboot your system and install the pending updates again.
Note: In case, the above code can’t obtain the file online, perform the same using Windows installation media. To do this insert the USB or DVD having Windows 10 setup file and run the following code –
dism.exe /Online /Cleanup-Image /RestoreHealth /Source:C:/Repair/Source/Windows /LimitAccess
Here C:/Repair/Source/Windows signifies the location of the attached USB or DVD. Do change the same as this depends on your own setup.
4] Download and Install Pending updates manually
If you are still unable to install the pending patches due to update error 0x80240034, you should manually download the cumulative update. However, in order to do this, you must obtain the KB number by visiting the official website. To do so, use these steps –
- Visit the Microsoft Update Catalog website.
- Type the identified KB number in the search box and press the Enter key.
- A list of matching updates will appear, identify one of them as per your system’s architecture.
- Now, click the Download button as shown below –

- Next, click the setup file to install the latest Windows OS on your computer.
- Follow the on-screen instructions to complete the process.
5] Clear Windows Update Cache / Distribution Folder
The presence of unnecessary cache stored inside the Windows Software Distribution folder may also cause an error code 0x80240034 to appear while updating the existing OS. Hence, all you need is to delete such non-essential files following the below steps –
Note: Once the contents become corrupt, Windows cannot delete or re-download the items themselves. To fix this bug, you must re-download the files manually after clearing the data.
- Press Window key and S together to launch the search bar.
- Type Command Prompt near the blinking cursor.
- Right-click on the top result and choose Run as administrator.
- On the UAC prompt, press Yes to permit access.
- Next, run the following codes one after another followed by the Enter key-
net stop wuauserv
rmdir %windir%\SoftwareDistribution /S /Q
net start wuauserv

- Close all the running apps thereafter install the pending updates and see if it helps to resolve the error.
6] Reset the Windows Updates Components
If somehow any of the Updates components got corrupt, this may lead to the 0x80240034 error while installing cumulative updates. Resetting Update Components might work as a workaround to solve the error. Since this is an advanced method to fix the issue effectively, you should carefully run all the codes. Here’s how to proceed –
- Click the Start Menu and type cmd in the text bar.
- Right-click on Command Prompt and select Run as administrator.
- You will receive a UAC prompt, press Yes to grant permission.
- Now, run the following codes sequentially –
net stop wuauserv
net stop cryptSvc
net stop bits
net stop msiserver
rmdir %windir%SoftwareDistribution /S /Q
net start wuauserv
net start cryptSvc
net start bits
net start msiserver
- Make sure to press Enter at the end of each command line.
Once over, Restart your PC to confirm the above changes.
7] Update Windows via ISO File
If none of the above solutions resolve the update error 0x80240034, take the help of a Windows ISO file. This method uses the Windows Update client to install the pending patches, if available.
- Go to the Microsoft official website and click the Update Now button.

- Double Click the ISO setup file that you have recently downloaded.
- If the User Account Control window appears, press Yes to go ahead.
- Next, click the Update Now button again on the Windows 10 Update Assistant wizard.

- Tap Next to proceed ahead.
- After scanning the system performance, it will start updating the OS.
- Wait till the update process finishes.
- Follow the on-screen guide to complete the remaining steps.
- Lastly, Reboot your system to save the changes made so far.
Note: If this even doesn’t help, clean install the latest version of Windows 10. Before proceeding to perform a fresh installation, make sure to create backups of all important files and folders.
6 Ways to Fix Windows Update Error 0x80240034 on Windows 10
Updates are an essential part of the Windows 10 operating system. However, by checking for updates manually, you may see some updates failing to install, resulting in error 0x80240034. This article will help you fix this error.
What Causes Error 0x80240034?
- Firstly, error 0x80240034 may be caused by missing or corrupted system files. It may also occur due to a corrupted update file (WU_E_DOWNLOAD_FAILED).
- Secondly, error 0x80240034 may occur due to a driver or hardware conflict.
- Thirdly, error 0x80240034 may occur if the developer mode is enabled on your PC.
Sometimes, this error may occur due to the fault of Microsoft releasing a buggy update. Error 0x80240034 may also occur if your Internet connection or the connection to Microsoft’s update servers was interrupted.
In a case like that, there’s little you can do apart from trying to install the problematic update by downloading it from the Windows Update catalog manually.
Video on How to Fix Windows Update Error 0x80240034
Table of Contents:
- Introduction
- Solution 1. Run Windows Update Troubleshooter
- Solution 2. Use Windows 10 Update Assistant
- Solution 3. Clear Windows Update Cache Folder (Delete SoftwareDistribution Folder)
- Solution 4. Run Deployment Imaging and Servicing Management (DISM) Scan
- Solution 5. Run System File Checker (SFC) Scan
- Solution 6. Reset Windows Update Components
- Video on How to Fix Windows Update Error 0x80240034
Download Computer Malware Repair Tool
It is recommended to run a free scan with Combo Cleaner — a tool to detect viruses and malware on your device. You will need to purchase the full version to remove infections. Free trial available. Combo Cleaner is owned and operated by Rcs Lt, the parent company of PCRisk.com read more.
Solution 1. Run Windows Update Troubleshooter
Windows Update Troubleshooter was designed to fix various update-related issues, so try running it first before moving to more advanced solutions.
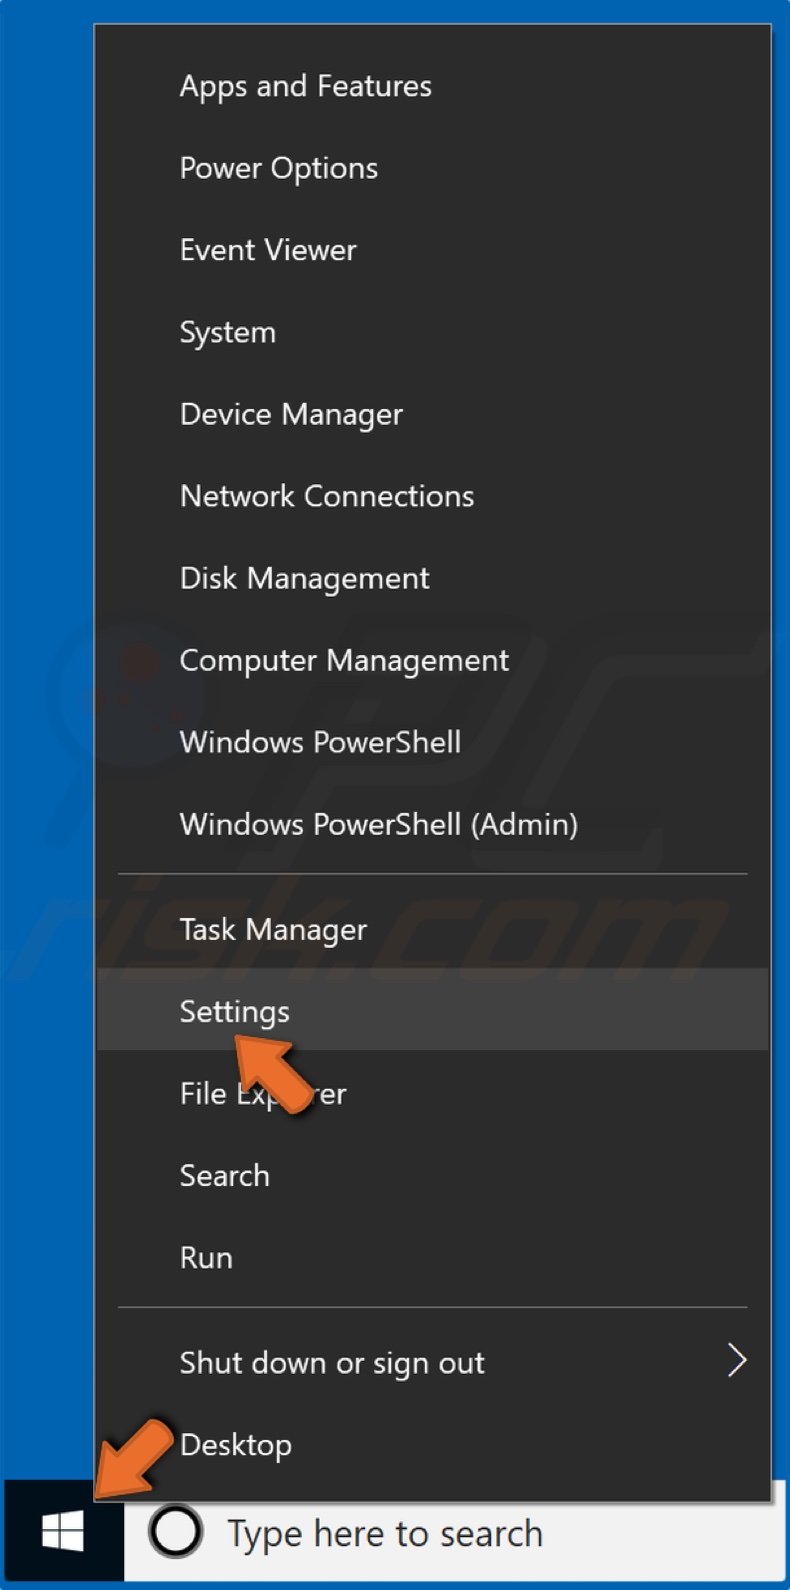
1. Right-click the Start Menu button and select Settings.
2. Select Update & Security.
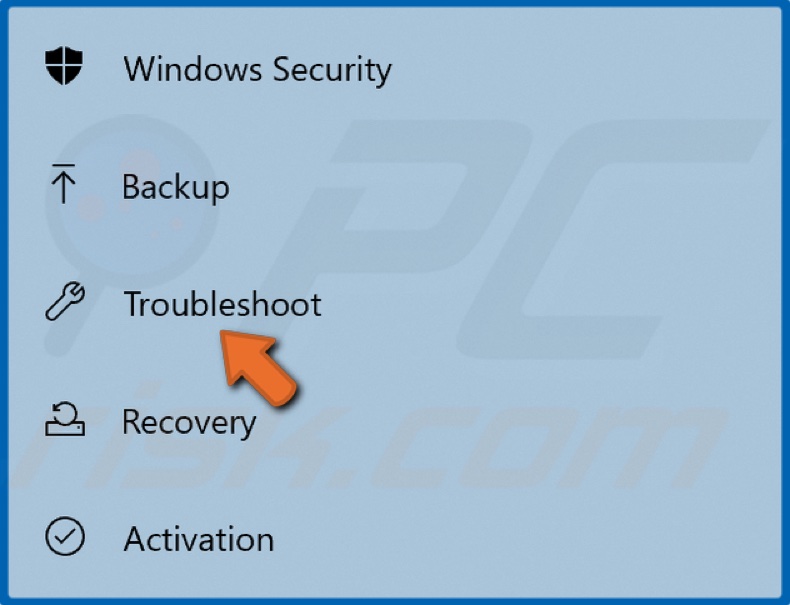
3. Select Troubleshoot in the left pane.
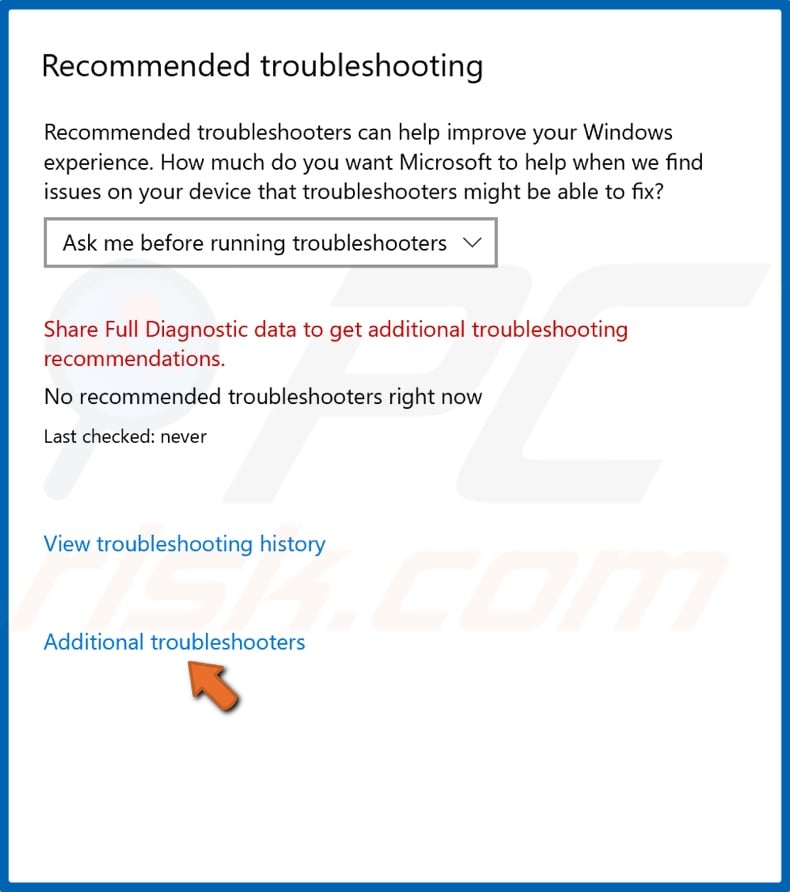
4. Click Additional troubleshooters in the right pane.
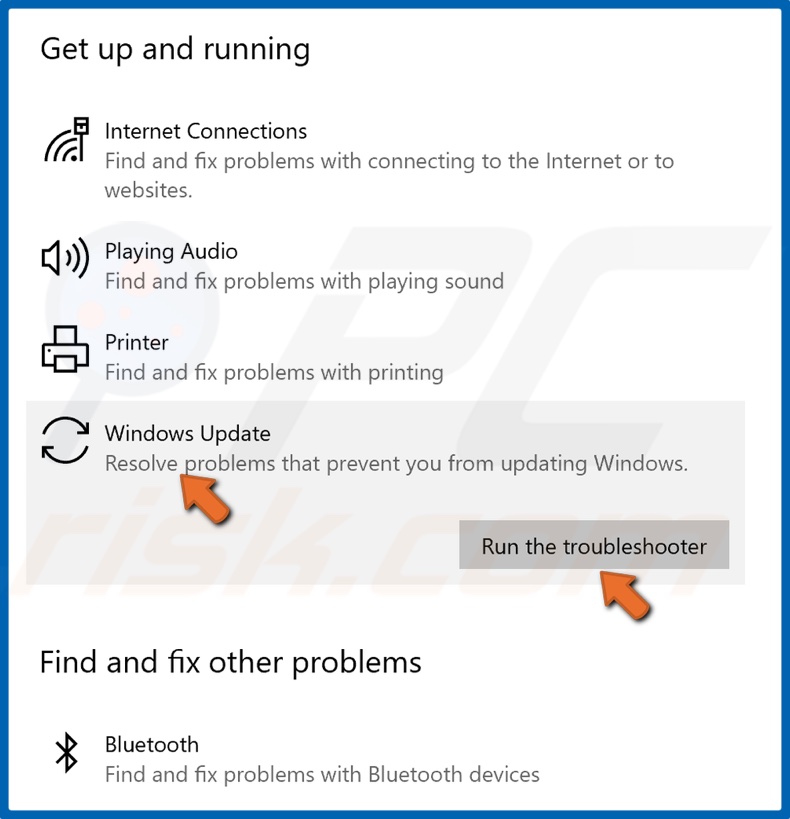
5. Select Windows Update and click Run the troubleshooter.
6. The troubleshooter will identify the issue and apply a fix automatically.
[Back to Table of Contents]
Solution 2. Use Windows 10 Update Assistant
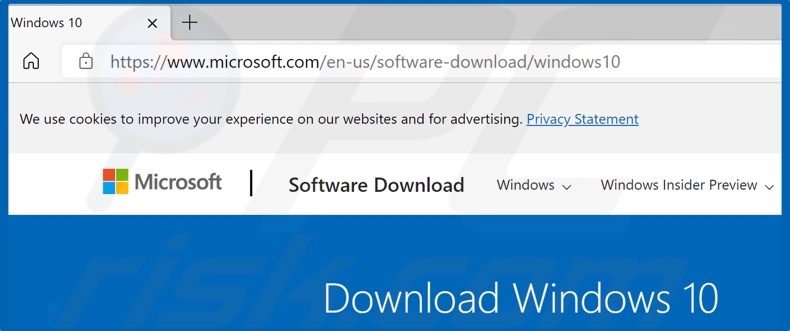
1. Open your web browser and go to the Windows 10 Update Assistant download page.
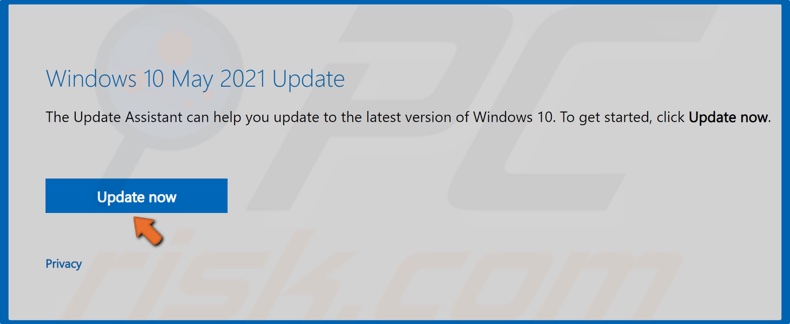
2. Click Update now to download the Windows 10 Update Assistant.
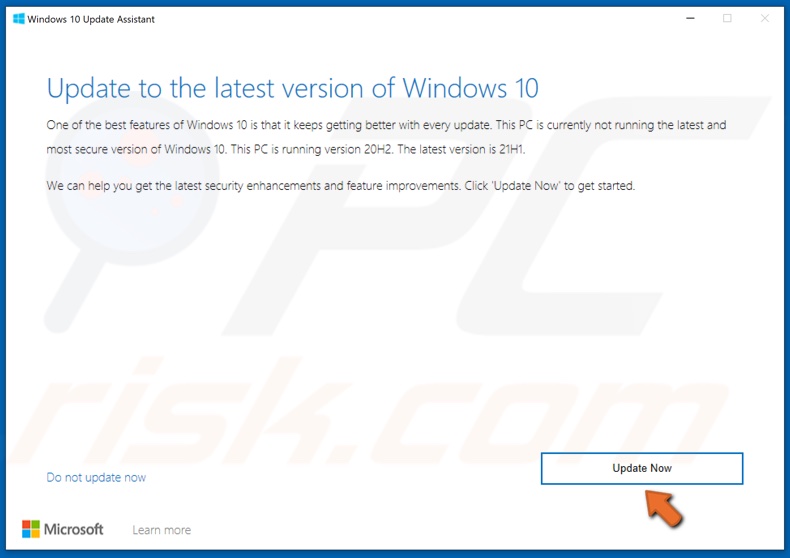
3. Run the Update Assistant.
4. Then, click Update Now.
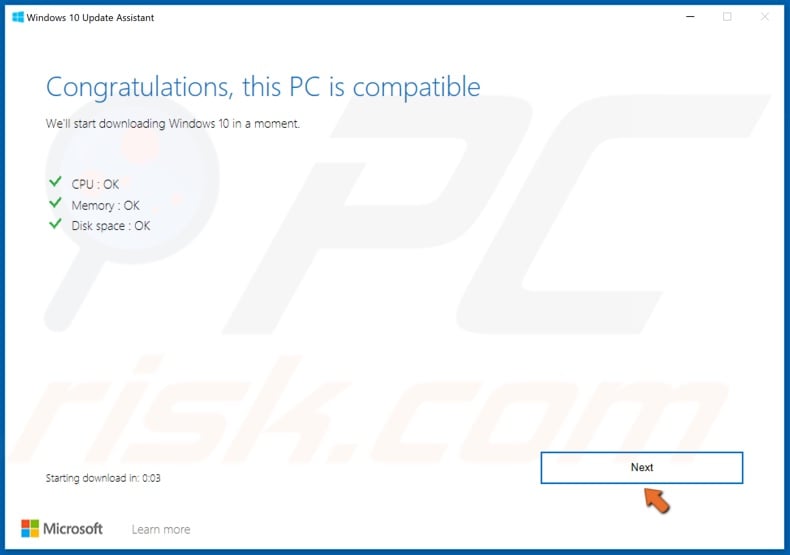
5. Click Next.
6. Allow Windows to update. The update process may take a while.
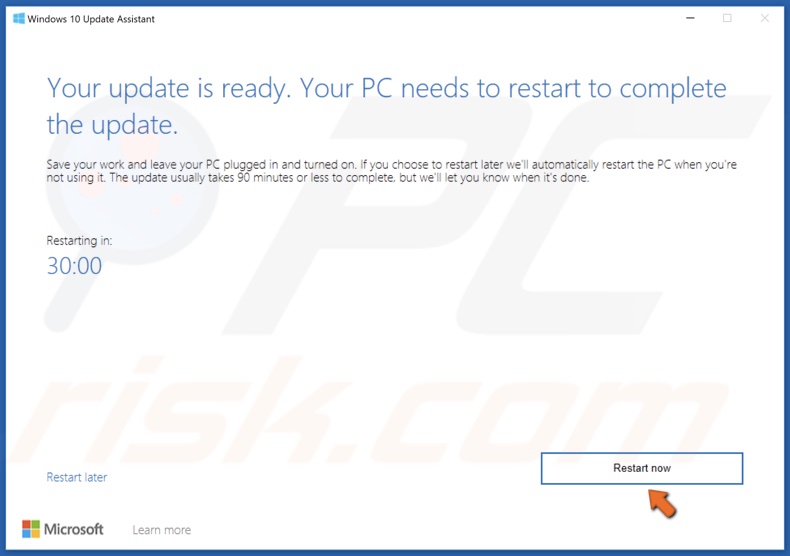
7. Click Restart now when prompted.
[Back to Table of Contents]
Solution 3. Clear Windows Update Cache Folder (Delete SoftwareDistribution Folder)
Since Windows can’t delete and re-download updates once they’re corrupted, you have to delete the contents of the cache (SoftwareDistribution) folder manually. Clearing the Windows Update cache requires you to stop the Windows Update Service (wuauserv) first. After stopping the service, you will delete all of the files inside the SoftwareDistribution Folder.
1. Hold down Windows+R keys to open Run.
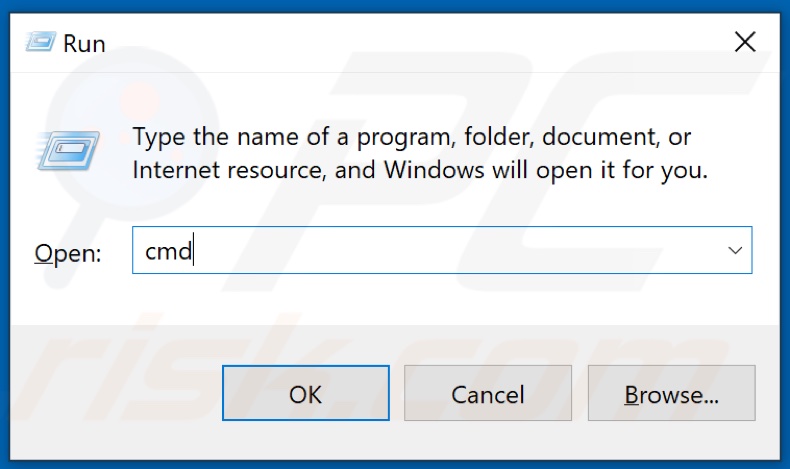
2. In the Run dialog, type in CMD and hold down Ctrl+Shift+Enter keys to open the elevated Command Prompt.
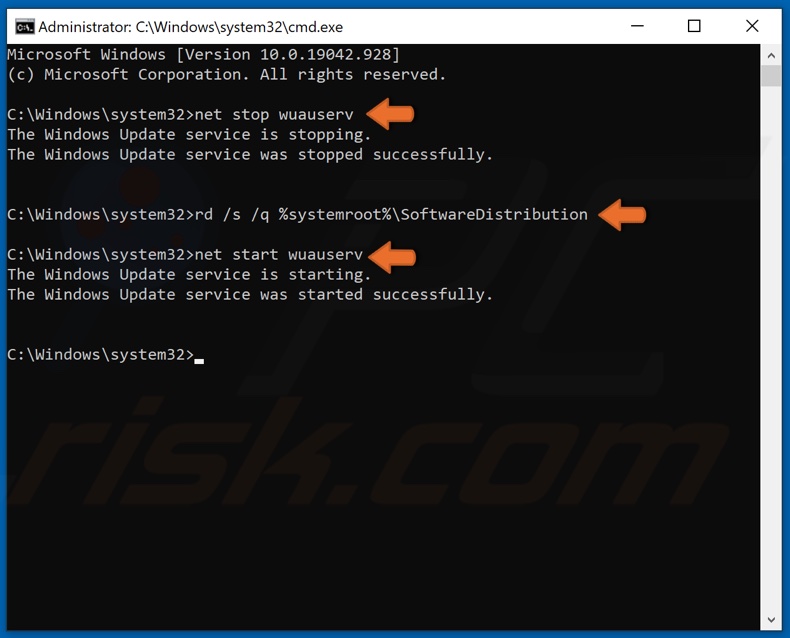
3. In the Command prompt window, type in net stop wuauserv and hit Enter.
4. Then, type in rd /s /q %systemroot%\SoftwareDistribution and hit Enter.
5. Lastly, type in net start wuauserv and hit Enter.
6. Close the Command Prompt and try updating Windows.
[Back to Table of Contents]
Solution 4. Run Deployment Imaging and Servicing Management (DISM) Scan
You can try running a DISM scan, which will identify and repair corrupted Windows system image files. As a result, repairing the image may fix error 0x80240034.
1. Hold down Windows+R keys to open Run.
2. In the Run dialog, type in CMD and hold down Ctrl+Shift+Enter keys to open the elevated Command Prompt.

3. Then, type in DISM /Online /Cleanup-Image /ScanHealth in the Command Prompt window, and hit Enter.
4. Lastly, type in DISM /Online /Cleanup-Image /RestoreHealth and hit Enter.
5. Restart your PC and try updating Windows.
[Back to Table of Contents]
Solution 5. Run System File Checker (SFC) Scan
Windows built-in System File Checker is a tool designed to identify corrupted or missing system files and then download new files from Microsoft. Therefore, running an SFC scan may fix error 0x80240034.
1. Hold down Windows+R keys to open Run.
2. In the Run dialog, type in CMD and hold down Ctrl+Shift+Enter keys to open the elevated Command Prompt.
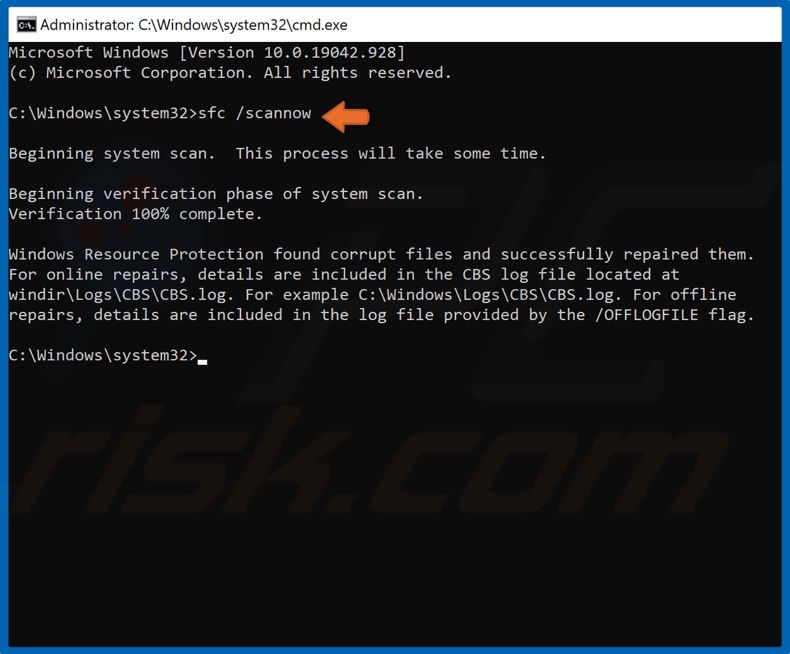
3. In the Command Prompt window, type in SFC /Scannow and hit Enter.
4. Restart your PC and try updating Windows.
[Back to Table of Contents]
Solution 6. Reset Windows Update Components
1. Hold down Windows+R keys to open Run.
2. In the Run dialog, type in CMD and hold down Ctrl+Shift+Enter keys to open the elevated Command Prompt.
3. In the Command Prompt window, type in the commands below, and hit Enter after entering each one:
- net stop wuauserv
- net stop cryptSvc
- net stop bits
- net stop msiserver
Then, you can rename the SoftwareDistribution and Catroot2 folders.
4. Type in ren C:\Windows\SoftwareDistribution SoftwareDistribution.old and hit Enter.
5. Then, type in ren C:\Windows\System32\catroot2 Catroot2.old and hit Enter.
6. Type in the commands listed below, and hit the Enter key after entering each one to restart the previously stopped services:
- net start wuauserv
- net start cryptSvc
- net start bits
- net start msiserver
7. Now try updating Windows.
[Back to Top]
Readers help support Windows Report. We may get a commission if you buy through our links.
Read our disclosure page to find out how can you help Windows Report sustain the editorial team. Read more
Several Windows 10 users who experience the error 0x80240034 reported that their Windows Update gets stuck at 1% and it fails entirely.
You can see the Windows Update error 0x80240034 when you view the update history which indicates that the update has failed, though downloading might be 100% complete.
You’ll find in this guide a few effective solutions that can be applied to fix the installerror 0x80240034 once and for all.
How can I fix the Windows Update error 0x80240034?
- Free up some space by deleting unnecessary files or apps
- Disconnect external hardware that you’re not using (peripherals, USB media)
- Use the Get help option in Settings
Now let’s get down to the actual solutions. Take them one by one, and don’t forget to restart your device after each to apply the changes.
1. Use Windows Update troubleshooter
-
1. Go to Start, type Settings and then hit the Enter key.
-
2. Head over to Update & Security and choose Troubleshoot.
-
3. Find Windows Update, and click Run the troubleshooter.

-
4. Follow the on-screen instructions to complete the troubleshooting process.
-
5. Once done, restart the computer for the changes to come into effect.
The built-in Windows Update troubleshooter effectively eliminates a lot of issues, and allows users to download updates that are throwing errors. And the best part, it’s all done automatically.

2. Run SFC
- Press Windows+Q and type cmd.
- From the search results, right-click Command Prompt and choose Run as Administrator.
- A new cmd window appears. Type sfc /scannow and then hit the Enter key.

- Wait until the scan and repair process is finished.

It can happen that the SFC command will not bring useful results to completely fix this. Yet, there are alternative methods, such as professional repair tools that scan the Windows OS and restore it automatically.
3. Run DISM
- Press Windows key + X and run Command Prompt (Admin).
- Copy and paste the following command on the command line:
dism.exe /Online /Cleanup-image /Restorehealth

- In case the DISM can’t obtain files online, try using your installation USB or DVD. Insert media and type the following command:
dism.exe /Online /Cleanup-Image /RestoreHealth /Source:C:/Repair/Source/Windows /LimitAccess
- Be sure to replace C:/Repair/Source/Windows with the path of your DVD or USB.

NOTE
Note: Please ensure that you replace the repair source path with your own.
4. Download the update manually
- Go to the Microsoft Update Catalog website.

- In the search box, type the update code in the search box and then hit the Enter key.
- From the list of matching updates, locate the update that uses the same architecture as your system.
- Click the Download button next to the update to download it.
- Once you download the update, run the setup file and follow the instructions.
- After the update is complete, restart your Windows PC.

5. Run a full system scan
Sometimes a malware infection can cause a 0x80240034 Windows update error. To fix the problem, we advise you to perform a full system scan with your antivirus.
In case you don’t have a reliable antivirus, we strongly recommend trying out a fast one that won’t interfere with your system in any way.
To find the most suitable choice in terms of antivirus protection, it is highly recommended to choose a professional solution from the best antivirus software for Windows 10.
6. Reset Windows Updates Components
- Open Win + X menu and select Command Prompt (Admin) from the list. You can do that by pressing the Windows Key + X shortcut.
- Once the Command Prompt opens, type the following commands:
net stop wuauservnet stop cryptSvcnet stop bitsnet stop msiserverrmdir %windir%SoftwareDistribution /S /Qnet start wuauservnet start cryptSvcnet start bitsnet start msiserver
- Hit the Enter key afterward and then check to see if the problem is resolved.
In addition, you can create a reset script using the steps outlined in our WUReset script guide.
- Recent Windows 11 update lets you disable profanity filter in voice typing
- Windows 11 KB5055627 update makes File Explorer more fluid
- A few keyboard settings are moving from Control Panel to Settings app in Windows 11
- Microsoft finally launches the controversial Recall feature after a long delay
- Details of Windows 11 25H2 spotted in the wild; likely to be a smaller update
Windows Update error 0x80240034 can be problematic, but we hope that you managed to fix it using one of our solutions.
We’d like to know if this article was helpful or if you have tried other solutions. Get in touch with us using the comments section.
Ivan Jenic
Windows Hardware Expert
Passionate about all elements related to Windows and combined with his innate curiosity, Ivan has delved deep into understanding this operating system, with a specialization in drivers and driver troubleshooting.
When he’s not tackling diverse driver-related problems, Ivan enjoys watching good movies and spending time hiking with his family and friends.