
При установке обновлений Windows 11 или 10 некоторые пользователи могут столкнуться с ошибкой установки 0x800f081f, при этом повторные попытке скачивания и установки обновления обычно не срабатывают.
В этой инструкции подробно о способах, которые могут помочь исправить ошибку и установить обновление, с которым возникла проблема. Обратите внимание: если ошибка появляется при установке .NET Framework, решения приведены в отдельной инструкции.
Очистка кэша обновлений и сброс компонентов Центра обновлений Windows

Как и при большинстве других ошибок Центра обновлений, первое, что следует попробовать выполнить в случае ошибки 0x800f081f — очистку кэша обновлений, для этого достаточно выполнить следующие действия:
- Запустите командную строку от имени администратора (как это сделать).
- По порядку введите следующие команды (если некоторые сообщат об ошибке, пропускаем и переходим к следующей):
net stop bits
net stop wuauserv
net stop appidsvc
net stop cryptsvc
ren C:\Windows\SoftwareDistribution SoftwareDistribution.old
ren C:\Windows\System32\catroot2 Catroot2.old
net start bits
net start wuauserv
net start appidsvc
net start cryptsvc
- Перезагрузите компьютер.
Выполнив перезагрузку, попробуйте снова скачать и установить обновление — возможно, в этот раз всё пройдёт исправно.
Если описанные шаги не привели к решению проблемы, попробуйте выполнить полный сброс компонентов Центра обновления Windows:
В ситуации, когда вышеописанные шаги не помогли, можно сделать предположение, что проблема не ограничивается Центром обновлений и его компонентами, возможно, её источник — сама Windows 11 или Windows 10, а точнее какие-то неполадки в её работе, об устранении которых — в следующем разделе.
Дополнительные варианты решения
Ошибка 0x800f081f может быть вызвана повреждением системных файлов Windows, чтобы восстановить их, запустите командную строку от имени администратора и по порядку выполните команды:
dism /online /cleanup-image /restorehealth
sfc /scannow
После чего перезагрузите компьютер и повторите установку обновления.
Если не помогло и это, можно попробовать такие варианты:
- Выполнить поиск обновления в официальном каталоге обновлений по его KB-номеру, скачать обновление и выполнить установку вручную.
- По некоторым сообщениям пользователей может сработать отключение компонентов .NET Framework в Win+R — appwiz.cpl — дополнительные компоненты, перезагрузка и повторное их включение.

- Если на компьютере присутствуют сторонние антивирусы, а также программы очистки места на диске или оперативной памяти в автоматическом режиме, попробуйте временно отключить их.
- Попробуйте откатить систему с использованием точек восстановления: нажмите клавиши Win+R на клавиатуре, введите rstrui и нажмите Enter, выберите недавнюю точку восстановления, когда всё работало исправно и попробуйте выполнить откат, а после него вновь установить доступные обновления.

- На всякий случай, выполните проверку компьютера на наличие вирусов и других вредоносных программ, но используя не тот антивирус, который у вас установлен, а другие варианты — KVRT, Kaspersky Recue Disk.


И, наконец, в крайнем случае можно попробовать выполнить «Обновление на месте» для исправления ошибок Windows и, с большой вероятностью, всех ошибок при установке обновлений.
DISM /Online /Cleanup-Image /RestoreHealth is one of the most commonly used command lines that can repair a damaged Windows system image. However, some of you may receive DISM error 0x800f081f while running it. If you are struggling with the same error, this guide on MiniTool Website might be helpful to you.
Deployment Image Servicing and Management (DISM) is a useful way to repair corrupted system images. Usually, it works together with System File Checker to scan and repair your computer and return it to a healthy work state.
However, like other inbuilt Windows tools, it goes wrong sometimes. Quite a few users complain that they encounter DISM error 0x800f081f when running the DISM /Online /Cleanup-Image /RestoreHealth command and receiving the following error messages.
- Error: 0x800f081f. The source files could not be found.
- Windows couldn’t find the required files to complete the requested changes. Make sure you’re connected to Internet, and try again. Error: 0x800f081f.
This error indicates that DISM cannot find the files required to fix the online Windows image in the default location. DISM error 0x800f081f can lead to other errors on your computer and prevents other processes from functioning properly, so you must take some measures to get rid of it as soon as it crops up.
# Suggestion: Back up Your Computer in Advance
As you can see, it is not easy to troubleshoot manually because you don’t know the exact reason for DISM failed error 0x800f081f. What’s more, you may make some mistakes during the troubleshooting process below if you are not proficient in computers. Any small changes may make huge differences or even cause severe consequences to your computer.
As a result, we sincerely advise you to back up your computer in advance. With a backup copy in hand, you can easily restore your system to a normal state. Some of you may assume that creating a backup of your system seems difficult. Don’t worry! With a piece of professional backup software – MiniTool ShadowMaker, everything will be easier.
This free tool is compatible with almost all Windows systems and allows you to create a file, folder, partition, disk, or system backup on your Windows PC. What’s more, it is very popular among the Windows community because of its one-click system backup solution. Without further ado, let’s see how it works!
Step 1. Download, install and launch this program.
MiniTool ShadowMaker TrialClick to Download100%Clean & Safe
Step 2. After launching it, hit Keep Trial to get a 30-day free trial and then go to the Backup page.
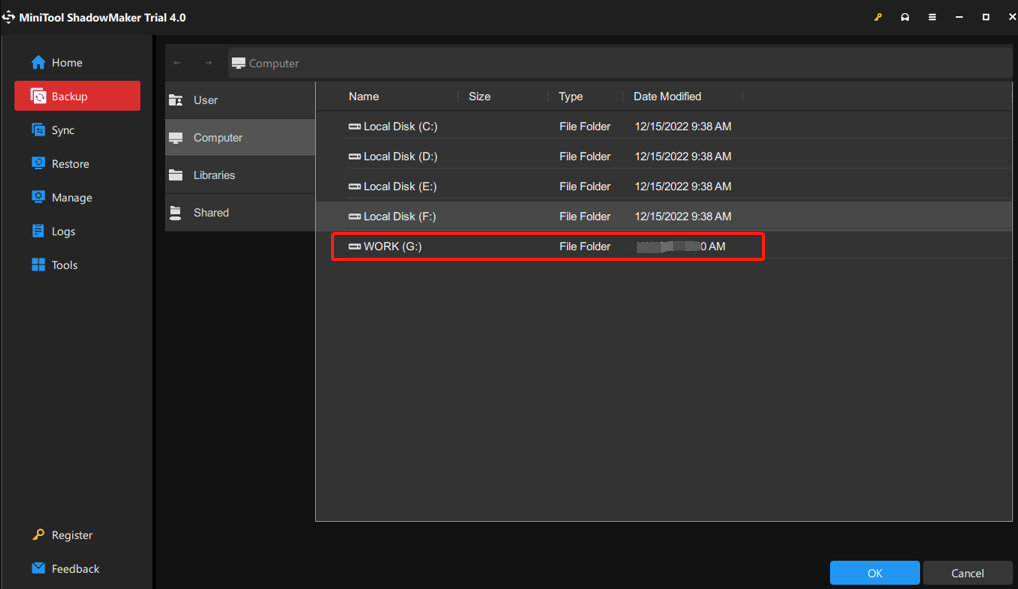
Step 3. On this page and you can see the system-required partitions are selected by default in SOURCE and you only need to choose a storage path for your backup in DESTINATION.
Tips:
Here, we recommend you to back up your system to a USB flash drive or an external drive.
Step 4. After making your decision, you can either hit Back Up Now to start the backup process or delay the backup task by hitting Back Up Later.
Then, go to Tools > Media Builder > WinPE-based media with MiniTool plug-in > USB Flash Disk to create a bootable drive. If your computer encounters some other radical changes such as black screen, Blue Screen of Death, or system crashes in the future, you can boot your computer from this USB flash drive and perform a system recovery with the system image that you backed up.
Tips:
As for backing up files, see this tutorial to get detailed instructions — How to Backup Files on Windows 10? Try These Top 4 Ways.
How to Fix DISM Error 0x800f081f on Windows 10/11?
Fix 1: Perform a Component Cleanup
You can clean up the image files and make everything run properly with the DISM component cleanup switch. Follow the steps below:
Step 1. Type cmd in the search bar to locate Command Prompt and right-click on it to choose Run as administrator.
Step 2. In the command window, run the following commands one by one and don’t forget to hit Enter after each command.
dism.exe /online /Cleanup-Image /StartComponentCleanup
sfc /scannow
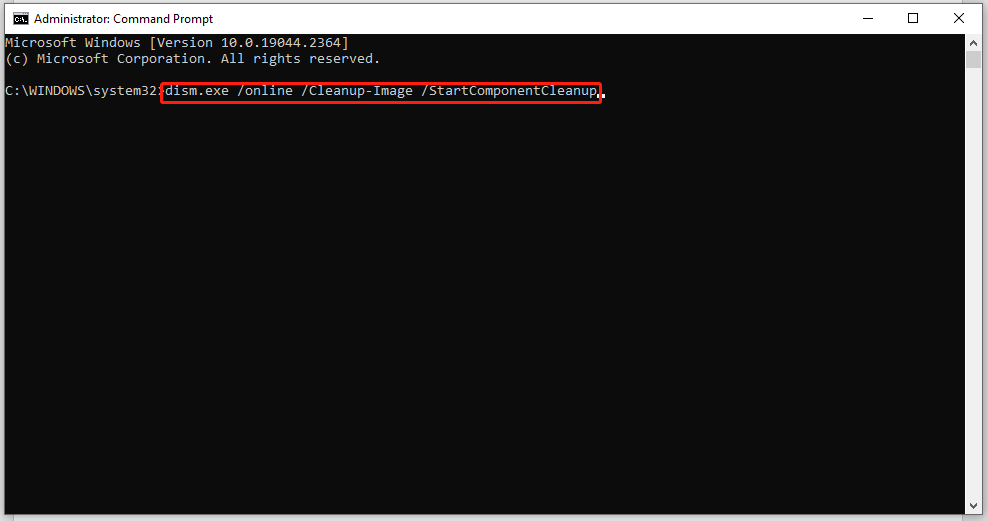
Step 3. When the two commands are complete, run Dism /Online /Cleanup-Image /RestoreHealth again to see if it works properly.
Fix 2: Run Windows Update Troubleshooter
As is known to all, Microsoft Windows Update Center triggers problems regularly and these problems can prevent you from implementing upgrades or improvements by downloading or installing new updates. In this case, Microsoft offers you a troubleshooting tool called Windows Update troubleshooter which can fix most errors including DISM Online Cleanup Image RestoreHealth error 0x800f081f.
Step 1. Press Win + I to open Windows Settings.
Step 2. In the settings menu, scroll down to find Update & Security and click on it.
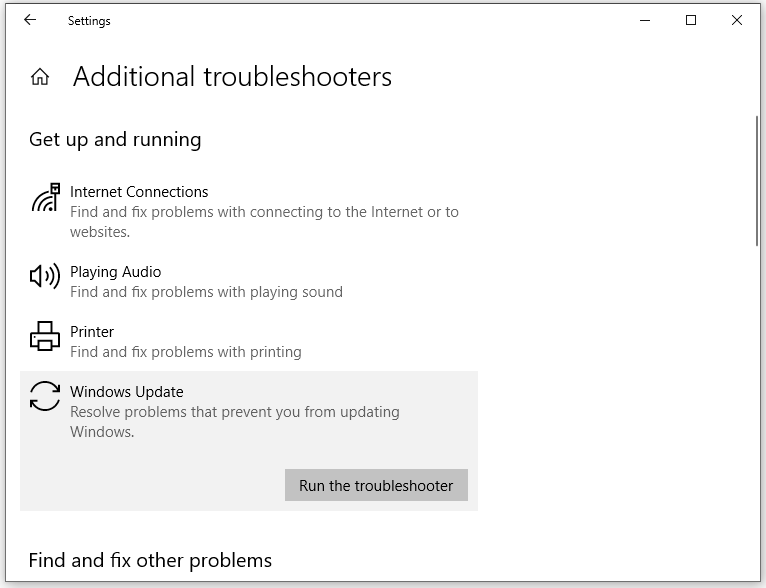
Step 3. Under the Troubleshoot tab, hit Additional troubleshooters.
Step 4. Under Get up and running, hit Windows Update and then press Run the troubleshooter. Once the troubleshooting process is done, it will show a message to inform you of the result.
Fix 3: Reinstall Microsoft .NET Framework 3.5
Since DISM error 0x800f081f is related to Microsoft .NET Framework 3.5, it is a good option to reinstall it.
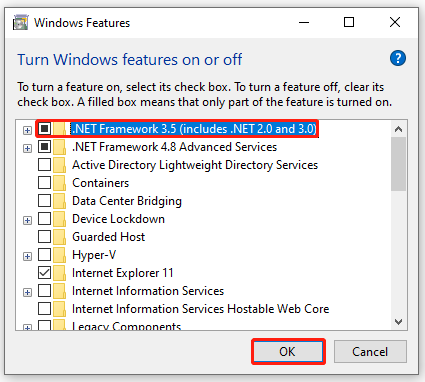
Step 1. Click Start and go to Control Panel.
Step 2. Hit Programs and Features > Turn Windows features on or off.
Step 3. Check .NET Framework 3.5 (includes .NET 2.0 and 3.0) and hit OK.
Fix 4: Get Source from Windows Image
Usually, the DISM /Online /Cleanup-Image /RestoreHealth command is used to fix problems by searching in Windows Update or WUSU to replace the corrupted files. If DISM cannot repair a file required by the Windows image, it will result in DISM error 0x800f081f the source files could not be found.
To address this error, you need to specify a valid Windows image file (install.wim) which contains all the files required during the repairing process. The install.wim file should be included in the source folder of Windows 10 Installation media.
Move 1: Download and mount the ISO file
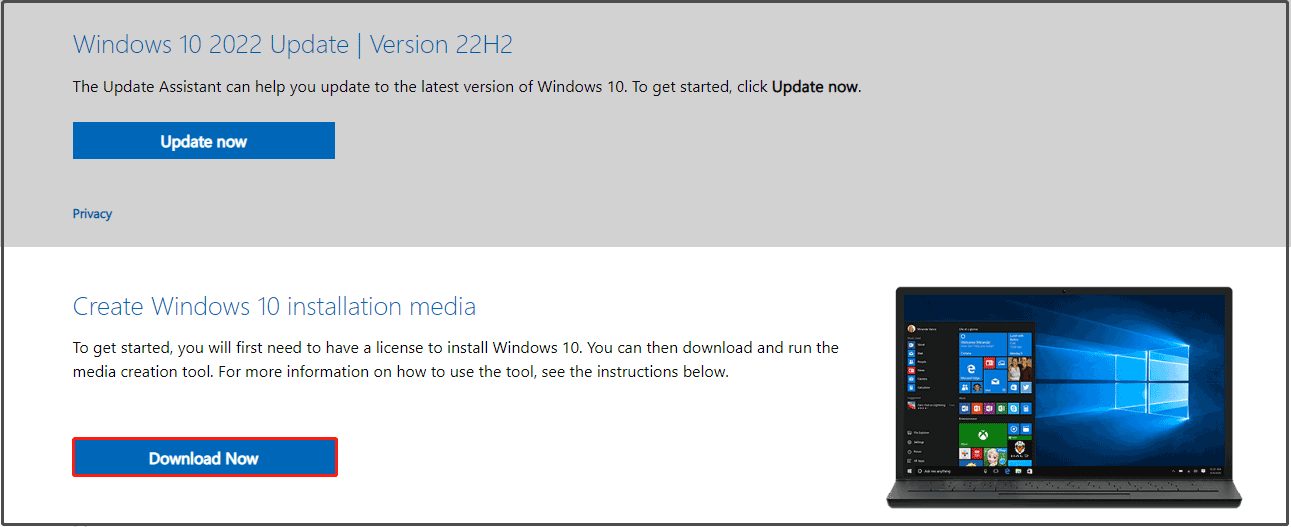
Step 1. Go to the Microsoft Software Download website and hit Download Now under Create Windows 10 installation media.
Step 2. Hit Accept to accept the license terms > tick Create installation media (USB flash drive, DVD, or ISO file) for another PC > hit Next > select Language, Architecture, and Edition > hit Next > tick ISO file > hit Next > choose a download location for Windows 10 ISO file > hit Save.

Step 3. Press Win + E to evoke File Explorer and then locate the Windows 10 ISO image file.
Step 4. Right-click on the ISO file and select Mount in the drop-down menu.
Step 5. After the mounting process is finished, go to This PC and you can see a virtual drive in the right-hand pane.
Move 2: Extract the install.wim file from the install.esd file
Step 1. From the mounted Windows ISO file, right-click on the install.esd file from the source folder to copy it to the root folder of drive C:.
Step 2. Launch Command Prompt as an administrator.
Step 3. Type cd\ to go to the root folder of drive C:.
Step 4. Type the following command and hit Enter to find which images are in the install.esd file.
dism /Get-WimInfo /WimFile:install.esd

Note down the index number according to the Windows 10 installed version.
Step 5. Run the following command to extract the install.wim file according to your Windows version. Don’t forget to replace the IndexNumber with the corresponding index number you noted down just now.
dism /export-image /SourceImageFile:install.esd /SourceIndex:IndexNumber /DestinationImageFile:install.wim /Compress:max /CheckIntegrity
Step 6. Now, you can find the exported install.win file on the drive C:.
Tips:
What if Windows Media Creation Tool is not working? Take it easy! Every problem has a fix. Follow this guide — Best Fixes for Windows 10/11 Media Creation Tool Not Working, and you will work it out.
Move 3: Run DISM Tools
Step 1. Launch Command Prompt as an administrator.
Step 2. Run the two commands below and hit Enter.
DISM /Online /Cleanup-Image /StartComponentCleanup
DISM /Online /Cleanup-Image /AnalyzeComponentStore.
Step 3. Run the following command to specify the C:\install.wim as the source of the known good files.
DISM /Online /Cleanup-Image /RestoreHealth /Source:WIM:c:\install.wim:1 /LimitAccess
Step 4. When this process is done, type sfc /scannow and hit Enter.
Fix 5: Perform an In-place Upgrade
The last method is performing an in-place upgrade. This process will reinstall the entire Windows core with the latest image from Microsoft. It may take a long time, please wait patiently.
Step 1. Download & Install Windows 10 Media Creation Tool on your computer and run it with administrative rights.
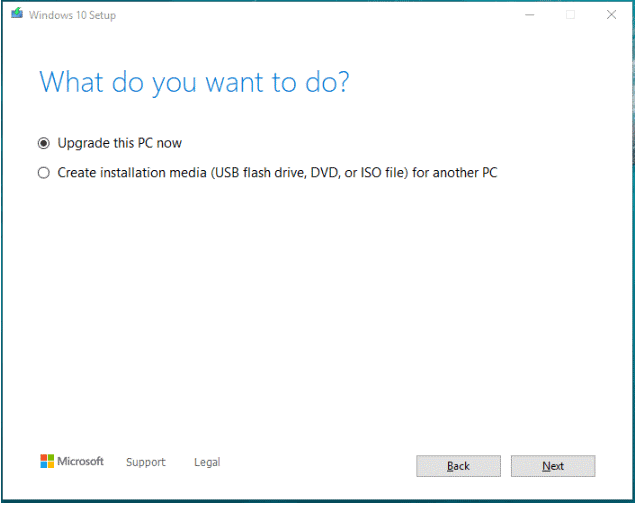
Step 2. Accept the license terms and tick Upgrade this PC now.
Step 3. Then, follow the prompts on the screen to complete the upgrade. After the completion, run Dism /Online /Cleanup-Image /RestoreHealth to see if DISM error 0x800f081f is gone.
Tips:
If you fail to run the DISM /Online /Cleanup-Image /RestoreHealth command without error code 0x800f081f, this guide might provide you with some feasible solutions — Best Fixes: DISM /online /cleanup-image /restorehealth Is Stuck.
What’s your opinion about the solutions mentioned in this guide? Which method do you prefer? Click here to share your ideas with your friends on Twitter.Click to Tweet
We Need Your Voice
That’s all about the causes and solutions to DISM error 0x800f081f. By now, we believe that you may manage to get rid of this error from your computer. Also, it is highly recommended to back up your system in advance with MiniTool ShadowMaker as a remedy in case that you encounter any severe changes on your system the next time.
Welcome to leave your joy and tell us which solution works for you in the comment zone. For more queries about our software, please feel free to contact us via [email protected].
DISM Error 0x800f081f FAQ
How do I fix error 0x800f081f?
Fix 1: Perform a Component Cleanup
Fix 2: Run Windows Update Troubleshooter
Fix 3: Reinstall Microsoft .NET Framework 3.5
Fix 4: Get Source from Windows Image
Fix 5: Perform an In-place Upgrade
How to fix DISM 0x800f081f error in Windows Server 2016?
To fix DISM 0x800f081f error in Windows Server 2016, you can:
- Run a component cleanup and then perform an SFC scan.
- Offer DISM a location that contains the files it needs to perform the image repair.
- Perform an in-place upgrade.
How do I fix corrupted DISM?
Fix 1: Check Antivirus or Security Programs
Fix 2: Run DISM Command in Clean Boot
Fix 3: Specify the Correct Location of the install.wim File
Fix 4: Uncheck install.wim Read-Only
Fix 5: Clean up System Image Components
Fix 6: Reset Windows Update Service
Fix 7: Run Windows Update Troubleshooter
Fix 8: Disable Proxy on Your Computer
|
Ошибка dism.exe 0x800f081f — Не удалось найти исходные файлы |
|||||
|
|||||
|
|||||
|
|||||
|
|||||
|
|||||
|
|||||
|
|||||
|
|||||
|
|||||
|
В связи с введением в действие Постановления Правительства Российской Федерации от 14.11.2023 № 1905 т.н. «о запрете популяризации VPN» с 1 марта 2024 года — любое обсуждение способов обхода блокировок и VPN на портале запрещено!
Deployment Image Servicing and Management (DISM) is a command-line tool which can be used to service and repair Windows Image. DISM can be used to service a Windows image (.wim) or a virtual hard disk (.vhd or .vhdx). The following DISM command is most commonly used: DISM /Online /Cleanup-Image /RestoreHealth. A few users are reporting that they are facing the DISM error 0x800f081f after running the above command and the error message states: Error 0x800f081f, The source files could be found. Use the “Source” option to specify the location of the files that are required to restore the feature. Let’s see how to Fix DISM Error 0x800f081f in Windows 10.

Table of Contents
The above error message clearly states that the DISM could not repair your computer because the file required to fix the Windows Image is missing from the source. So without wasting any time take the help of the below-listed solutions to fix it.
Method 1: Run DISM Cleanup Command
1. Open Command Prompt. The user can perform this step by searching for ‘cmd’ and then press Enter.

2.Type the following command into cmd and hit Enter:
dism.exe /online /Cleanup-Image /StartComponentCleanup
sfc /scannow

3.Once the above commands are finished processing, type DISM command into cmd and hit Enter:
Dism /Online /Cleanup-Image /restoreHealth

4. See if you’re able to Fix DISM Error 0x800f081f in Windows 10, if not then continue with the next method.
Also Read: Fix DISM Host Servicing Process High CPU Usage
Method 2: Specify the Correct DISM Source
1. Download Windows 10 Image using Windows Media Creation Tool.
2. Double-click on the MediaCreationTool.exe file to launch the application.
3. Accept License terms then select “Create installation media for another PC” and click Next.
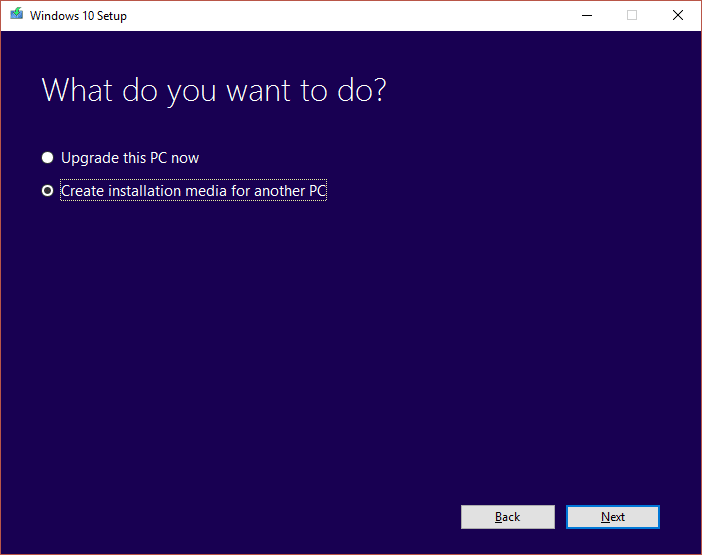
4. Now the language, edition, and architecture will automatically be selected according to your PC configuration but if you still want to set them yourself uncheck the option at the bottom saying “Use the recommended options for this PC.”

5. On “Choose which media to use” screen select ISO file and click Next.

6. Specify the download location and click Save.

7. Once the ISO file is download, right-click on it and select Mount.
Note: You need to download Virtual Clone Drive or Daemon tools to mount ISO files.
8. Open the mounted Windows ISO file from File Explorer and then navigate to sources folder.
9. Right-click on install.esd file under sources folder then select copy and paste it to C: drive.

10. Press Windows Key + X then select Command Prompt (Admin).
11. Type cd\ and hit Enter to go to the root folder of C: drive.

12. Now type the following command into cmd hit Enter:
dism /Get-WimInfo /WimFile:install.esd

13. A list of Indexes will be displayed, according to your version of Windows note down the index number. For example, if you have Windows 10 Education edition, then the index number will be 6.

14. Again type the following command into cmd and hit Enter:
dism /export-image /SourceImageFile:install.esd /SourceIndex:IndexNumber /DestinationImageFile:install.wim /Compress:max /CheckIntegrity
Important: Replace the IndexNumber according to your Windows 10 installed version.

15. In the example which we took on step 13, the command will be:
dism /export-image /SourceImageFile:install.esd /SourceIndex:5 /DestinationImageFile:install.wim /Compress:max /CheckIntegrity
16. Once the above command finished execution, you will find the install.wim file created on the C: drive.

17. Again open the Command Prompt with admin rights then type the following command one by one and hit Enter after:
DISM /Online /Cleanup-Image /StartComponentCleanup
DISM /Online /Cleanup-Image /AnalyzeComponentStore

18. Now type the DISM /RestoreHealth command with the Source Windows file:
DISM /Online /Cleanup-Image /RestoreHealth /Source:WIM:c:\install.wim:1 /LimitAccess

19. After that run System File Checker to complete the repair process:
Sfc /Scannow
Also Read: Fix Task Host Window Prevents Shut Down in Windows 10
Method 3: Run Windows Update Troubleshooter
1. Press Windows + I keys simultaneously to launch Settings.
2. Click on the Update & Security tile, as shown.

3. Go to Troubleshoot menu in the left pane.
4. Select Windows Update troubleshooter and click on Run the troubleshooter button shown highlighted below.

5. Wait for the troubleshooter to detect and fix the problem. Once the process is complete, click Apply this fix and restart your PC.
Method 4: Install Microsoft .NET Framework 3.5
Read our guide here to install .NET Framework version 3.5 and fix said issue with ease.

Recommended: How to Restore NTBackup BKF File on Windows 10
That’s it you have successfully Fixed DISM Error 0x800f081f in Windows 10 but if you still have any questions regarding this post then feel free to ask them in the comments section.
Ошибка DISM 0x800f081f или как исправить отсутствие исходных файлов для получения обновлений.
Сразу: статья сложная, как и сам процесс, и состоит из кучи нюансов. Второй абзац к прочтению обязателен. Основная команда для решения вопроса приведена в конце текущей статьи, которую я решил дополнить второй частью. Если вы поймёте содержимое команды “ремонта” – пропускайте абзацы, спустившись вниз. По ходу же я объясняю возможные причины проблемы и как запастись тем, что может помочь её разрешить. Итак, ошибка DISM 0x800f081f проявляет себя сразу после попытки пользователя “починить” образ установленной Windows 10 с помощью команды DISM /Online /Cleanup-Image /RestoreHealth. Ошибка проявляет себя дополнением типа
Не удалось найти исходные файлы. Укажите расположение файлов, необходимых для восстановления компонента с помощью параметра “Источник”…
Перед этим консоль cmd с запущенной DISM нередко подзависает на строке прогресса эдак на 60 – 70%%. Далее DISM отсылает нас на офсайт Microsoft и, как обычно, предлагает ознакомиться с логом инструмента. Чаще всего ситуация получает своё развитие с момента, когда Windows 10 отказывается получить последние обновления:

Ошибка может видоизменяться в том же окне настроек обновлений от сеанса к сеансу, но итог один: те или не скачиваются, либо не устанавливаются:


Причина ошибки DISM 0x800f081f. Вероятно, у вас не получится.
Флаг DISM /RestoreHealth, как уже указывалось в статье Как починить Windows 10 с помощью DISM, предназначен для исправления проблем с образом Windows 10, используя узел Windows Update. Но если DISM обнаружила, что необходимых для исправления ошибки файлов не хватает, она просит указать дополнительный (к Windows Update) источник. Такие проблемы возникают в тот момент, когда некоторые параметры системы оказываются тесно завязаны со доустановленными средами. И которые обновить с помощью средств WU уже нельзя – чаще всего просто по причине устаревания (когда более новая версия обновления какого-то компонента подменяет предыдущее или поглощает его). Для Windows, кстати, это обычное явление. По опыту скажу – чем более обновлена (читай – обременена) ваша “старая” версия обновлёнными функциями, тем меньше надежды на DISM. Увы. В некоторых случаях это просто неминуемая пичалька. Кроме того, если ваша Windows 10 стала таковой после Windows 7 или Windows 8, я вам вообще вряд ли помогу. Проблема усугубляется тем, что участились сообщения от пользователей о том, что скачиваемые образы Windows 10 врут о собственных версиях и бильдах. Это связано с тем, что последние версии Windows 10, начиная с 2004 по крайнюю на сегодня 22H2, идут с готовыми, но спящими (отложенными) настройками. Которые активируются и корректируются ИМЕННО с “ежеполугодичными” обновлениями. А вы не знали? И, возвращаясь к проблеме, обозначенной в шапке статьи, перед любыми манипуляциями удостоверьтесь, что запущенная от имени администратора команда
sfc /scannow
отработала и не нашла ошибок или всё починила. Она также хранит свои логи по адресу %windir%\logs\cbs\cbs.log, в котором можно посмотреть на проделанное. Так что (понимаю, что не до этого вам сейчас) есть смысл взглянуть на информацию о команде SFC. Также убедитесь в том, что вы попытались исправить ошибки в хранилище. Итак:
- хранилище компонентов Windows повреждено. Возможно, просто не хватает нескольких конкретных файлов и …
- … Windows не может залезть на сервера обновления, чтобы их восстановить.
- вы указываете на директорию с файлами восстановления, но там таких нет (кривой образ или не те функции).
- вы пытаетесь установить фишку, обращаясь к папке или файлам, на которые у вас нет доступа (часто снятия атрибута ТОЛЬКО ДЛЯ ЧТЕНИЯ должно хватить).
- набор файлов установки повреждён, не полный или содержит неверную (по отношении к уже установленной) версию установки.
Статья эта, как я уже говорил, дополнена второй частью “Причины ошибки DISM Не удалось найти исходные файлы.”, в которой я попробовал разобрать различные подходы к решению ошибки со стороны среды DISM, характерной для проблемы “Не удалось найти исходные файлы“. Настоятельно рекомендую прочесть, если в процессе работы по этой статье вы столкнётесь с другими ошибками.
Перед началом работ…
В консоли команд cmd от имени администратора наберите поэтапно:
net stop wuauserv
cd %systemroot%\SoftwareDistribution
ren Download Download.old
net start wuauserv
net stop bits
net start bits
net stop cryptsvc
cd %systemroot%\system32
ren catroot2 catroot2old
net start cryptsvc
Обходим WSUS
Проверьте, есть ли в реестре такой ключ:
HKEY_LOCAL_MACHINE\SOFTWARE\Policies\Microsoft\Windows\WindowsUpdate\AU
Есть? Параметр UseWUServer выводите в 0. Если ни ключа ни параметра нет, переходите к другому ключу:
HKEY_LOCAL_MACHINE\SOFTWARE\Policies\Microsoft\Windows\WindowsUpdate
параметр DisableWindowsUpdateAccess в 0 стой же перезагрузкой. Попробуйте DISM снова.
Что понадобится для дальнейшей работы, если не сработало?
- Валидный install.wim файл тех же версии, выпуска и языковой сборки Windows 10, что и ваша
- не менее 10 Гб свободного места на диске С:.

Напомню, что файл install.wim располагается по адресу
Скачанный_диск-или-папка\sources\install.wim
установочного устройства с файлами Windows 10. Скачать образ ISO и вытащить файл из него можно легально с помощью двух способов:
- (1) утилиты Media Creation Tool . Если не получилось, скачайте программу у меня:
Загрузить утилиту для скачивания ISO Windows10 с К76
- (2) утилиты создания загрузочной флешки Rufus.
Второй способ быстрее и абсолютно надёжен, но первый можно считать вполне официальным:


Чаще всего указанный файл install.wim “поставляется” в чистом виде; иногда – в составе почти одноимённого install.esd. Для монтирования образа я традиционно использую Daemon Tools, хотя прекрасно подойдёт и встроенный инструментарий в Windows 10 через Монтировать. У меня все образы идут с готовым для работы install.wim. Если у вас файл install.esd, читайте следующий абзац; если везёт, как и мне, переходите к следующему.
Какие ещё есть способы скачать образ Windows?
А как определить версию и сборку Windows?
Если у вас install.esd
- Очередной нюанс перед тем как начать: ESD файлы из установочного образа чаще всего нехотя воспринимаются средой DISM в качестве корректного источника. Посему сами “мелко-мягкие” разрабы советуют начать с конвертации ESD в WIM. У меня лично нет сколь-нибудь серьёзной статистики по этому поводу, но по отзыву некоторых юзеров использование ESD действительно возвращало ошибку, несмотря на верно выбранный образ и правильный синтаксис команды. Команда же(в той же DISM) для этого проста
dism /Export-Image /SourceImageFile:папка:\где\лежит\образISO\install.esd /SourceIndex:X /DestinationImageFile:папка:\где\будет\лежать\новыйISO\install.wim /Compress:Max /CheckIntegrity
Не получается? Воспользуйтесь программами PowerISO или утилитой не для слабонервных ESD2WIM-WIM2ESD.cmd. В первой можно конвертировать ESD в WIM и обратно в графическом интерфейсе программы. Во второй – придётся указывать на файл вручную.
- Если решили продолжить – продолжаем. Копируем install.esd файл в корень диска С – оттуда нам будет лучше с ним работать напрямую. Файл лежит в папке \sources смонтированного образа. Вы его не пропустите, т.к он самый большой.

ВНИМАНИЕ: все окна проводника Windows перед следующими командами закрыть.
- Теперь запускаем консоль cmd от имени администратора и командой
cd\
- Переходим в корень нашего диска. Смотрим состав перекочевавшего сюда файла:
dism /Get-WimInfo /WimFile:install.esd

В моём файле 6 выпусков (если вы скачали предложенными мною способами, у вас меньше или так же). Я использую вариант Windows 10 Pro. Вы можете узнать о своей тут же из консоли, набрав команду:
winver

- Моему выпуску в консоли присвоен индекс 4. Извлекаем нужный install.wim из install.esd:
dism /export-image /SourceImageFile:install.esd /SourceIndex:4 /DestinationImageFile:install.wim /Compress:max /CheckIntegrity

По окончании процесса распаковки вы должны увидеть файл install.wim в той же директории диска. Переходим к действиям в следующем абзаце, начиная с команды очистки хранилища компонентов.
Если у вас файл install.wim
Нам достаточно скопировать файл также как и в предыдущем абзаце – в корень диска С.
ВНИМАНИЕ: все окна проводника Windows закрыть.
После этого запускаем консоль cmd от имени администратора и проверяем список выпусков Windows:
cd\
dism /Get-WimInfo /WimFile:install.wim

Так как у меня установлена Windows 10 Pro, я чуть позже выберу индекс 4. Но для начала мне нужно очистить собственное хранилище компонентов от установленных ранее “обновлённых” файлов. В надежде, конечно, что эти “обновлённые” устаревшие файлы (вместе с другими) будут удалены:
DISM /Online /Cleanup-Image /StartComponentCleanup
А теперь следуем стандартной процедуре анализа состояния образа Windows 10 и применению исправления ошибок, как уже описывалось в статье Как починить Windows 10 с помощью DISM. Вводим поочерёдно:
DISM /Online /Cleanup-Image /AnalyzeComponentStore
DISM /Online /Cleanup-Image /RestoreHealth /Source:WIM:c:\install.wim:4 /LimitAccess
Ещё раз акцентирую внимание на индексе файла – у меня 4. Ждём окончания ремонта. И, как всегда по окончании работ, запускаем старую-добрую проверку системных файлов:
sfc /scannow
Пока всё. Ошибка DISM 0x800f081f вас не должна более побеспокоить. До появления следующей устаревшей версии какого-либо компонента. Успехов нам всем.
Просмотров: 2 164