
In this troubleshooting guide where we will address a common issue encountered by Windows 11 users and it is DISM error 0x800f081f. DISM (Deployment Image Servicing and Management) is a powerful command-line tool used to service Windows images, including repair operations. However, when attempting to run DISM and encountering error code 0x800f081f, it indicates that the tool is unable to locate the necessary files to complete the operation. In this article, we will provide step-by-step solutions to help you fix it.
Page Contents
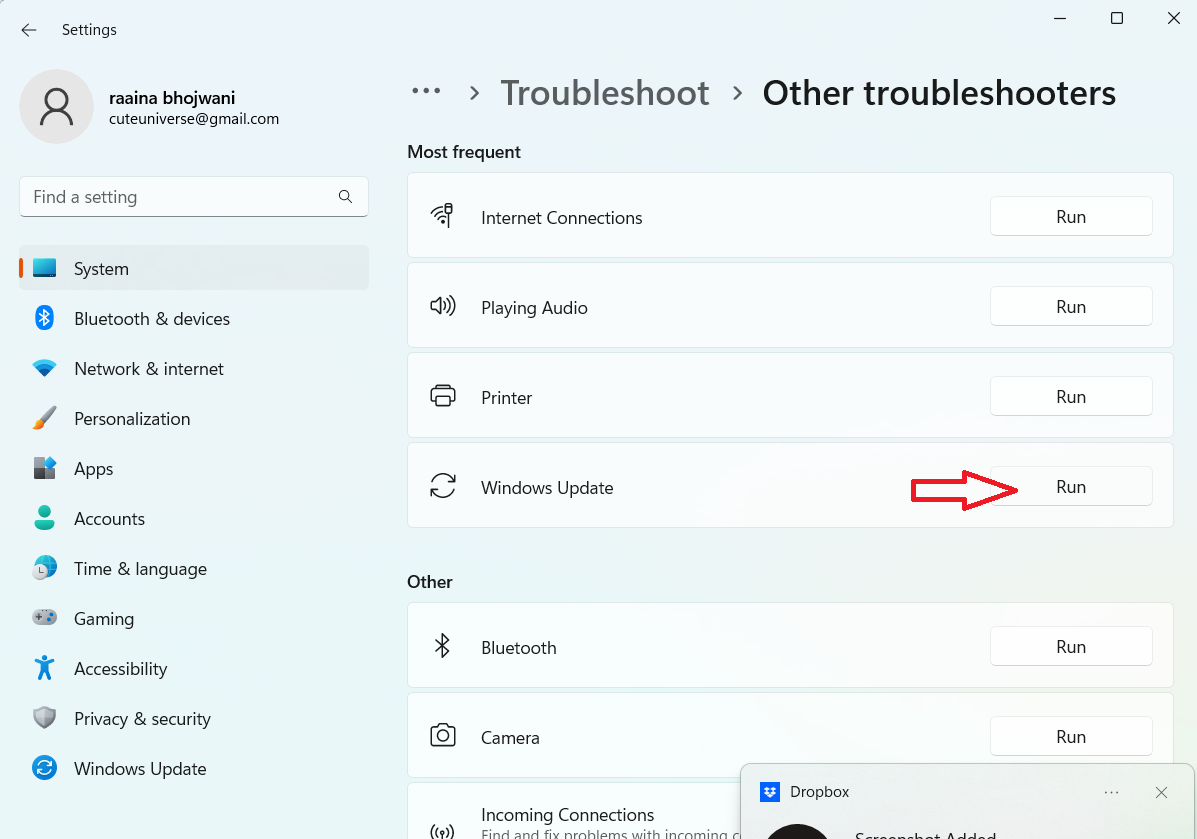
Fix 1: Run Windows Update Troubleshooter
1. Press the Win + I keys to open Settings.
2. Click System > Troubleshoot.

3. Click on Other troubleshooters.
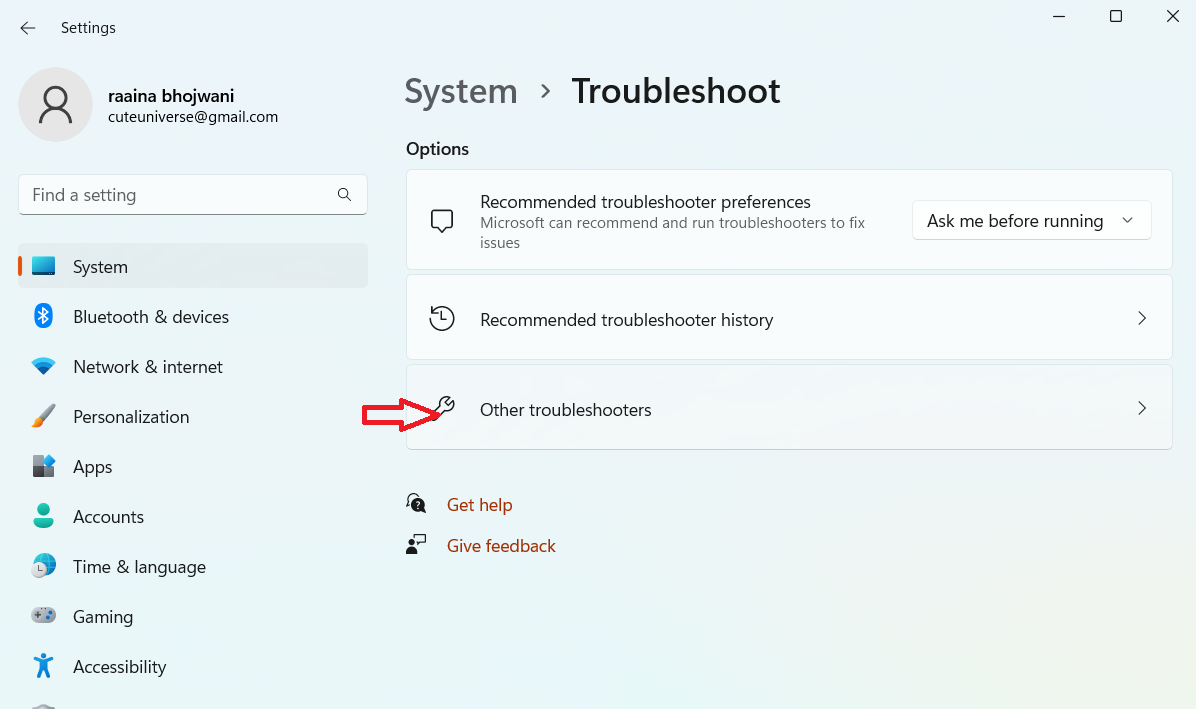
4. Click on the Run button next to Windows Update.
Fix 2: Perform an In-place Upgrade to latest version
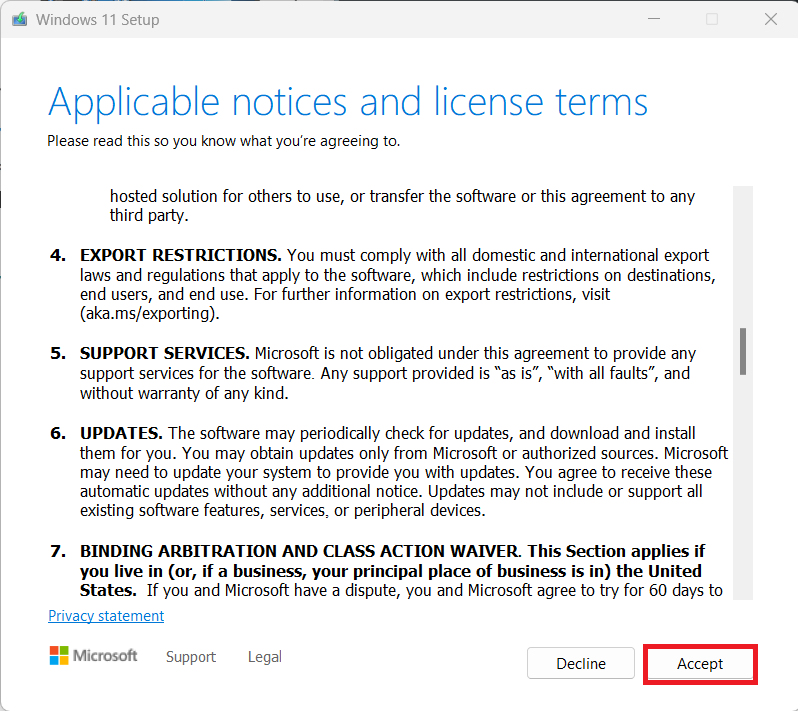
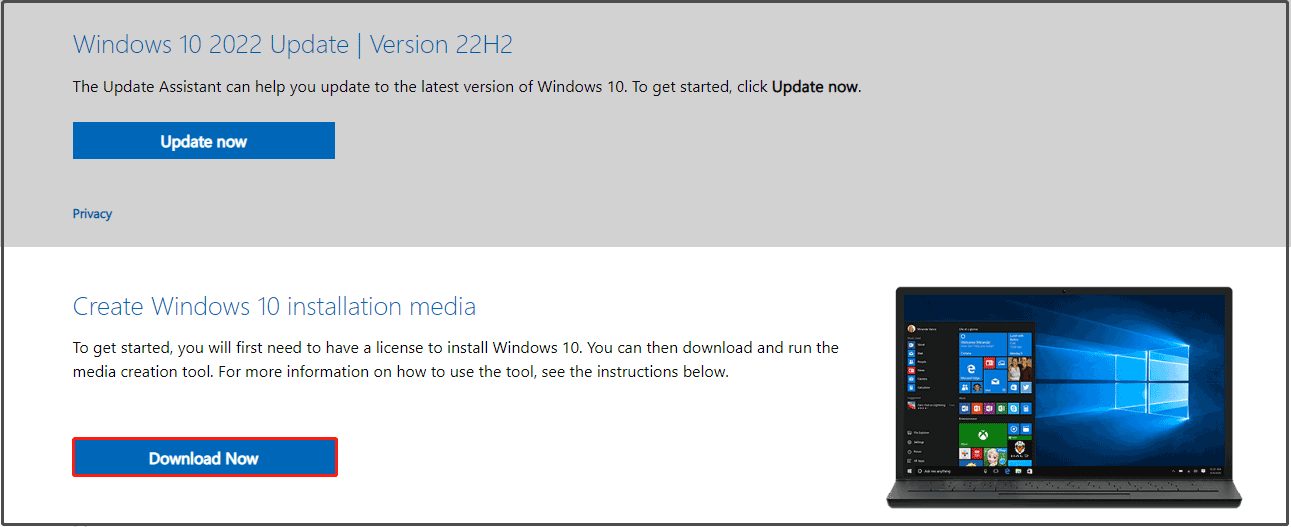
1. Download Windows 11 Media Creation Tool on your computer and execute/run it as an administrator.
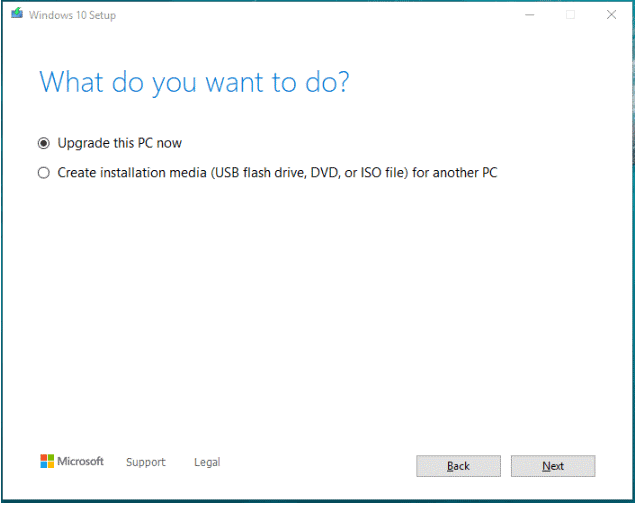
2. Accept the license terms and choose the “Upgrade this PC now” option when prompted.
3. Then execute DISM command in Command Prompt to check if DISM error 0x800f081f is resolved.
Fix 3: Get source from Windows Image to fix DISM error 0x800f081f on Windows 11
Part 1
1. Go to the Microsoft Software Download website (https://www.microsoft.com/en-us/software-download/windows11) and click on Create Windows 11 installation media.
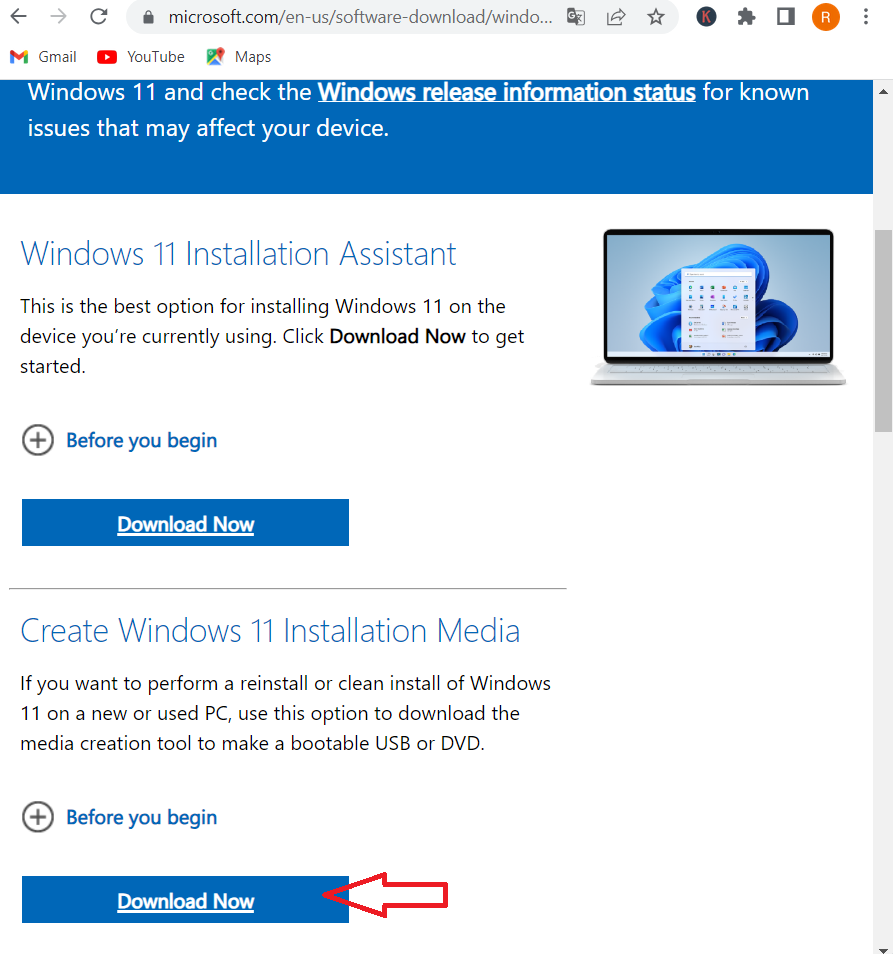
2. Click on Accept to agree with the license terms.
3. Choose the media – USB flash drive or ISO file > click Next.
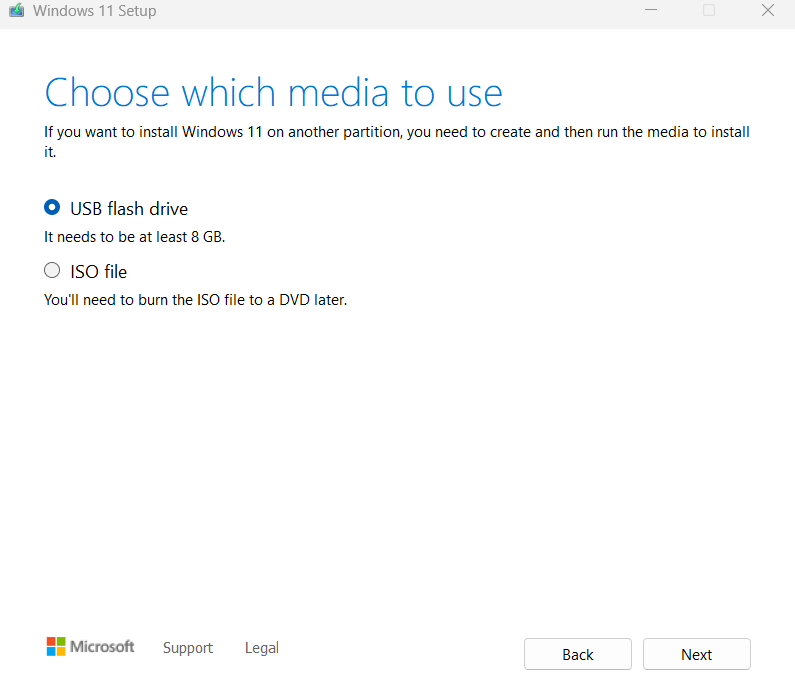
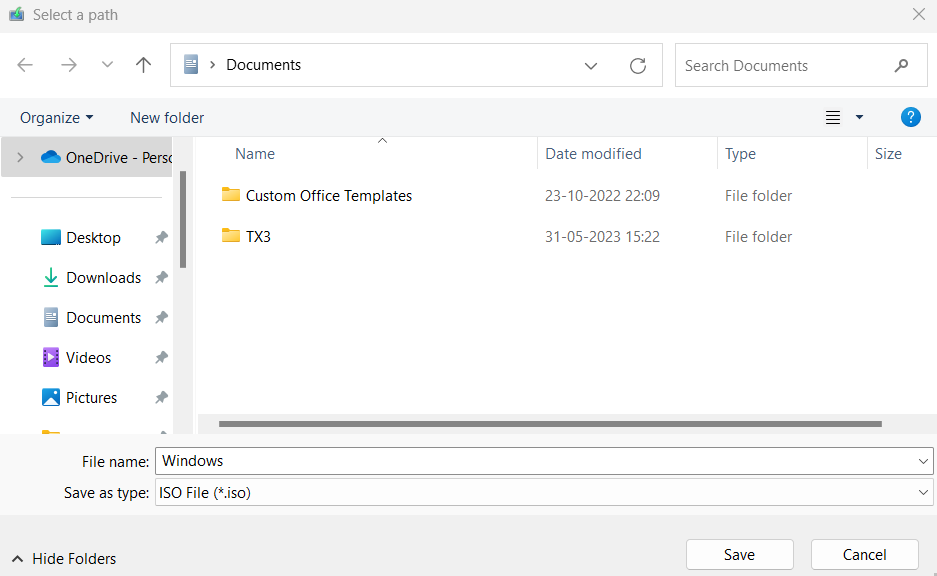
4. Select the download location on your computer > click Save.
5. Open Windows Explorer and find Windows 11 ISO image file.
6. Right-click on the file and choose Mount in the menu.
You can now see a virtual drive on This PC.
Part 2
1. From the mounted Windows ISO file, right-click on the install.esd file from the source folder to copy it to the root folder of drive C:
2. Open Command Prompt as administrator.
3. Type cd\ and press Enter.
4. Then type:
dism /Get-WimInfo /WimFile:install.esd
5. Press Enter.
6. Note down the index number as per the Windows 11 installed version.
7. Execute this command (replace the IndexNumber with the number you just noted down):
dism /export-image /SourceImageFile:install.esd /SourceIndex:IndexNumber /DestinationImageFile:install.wim /Compress:max /CheckIntegrity
Step 3:
1. Open Command Prompt as an administrator.
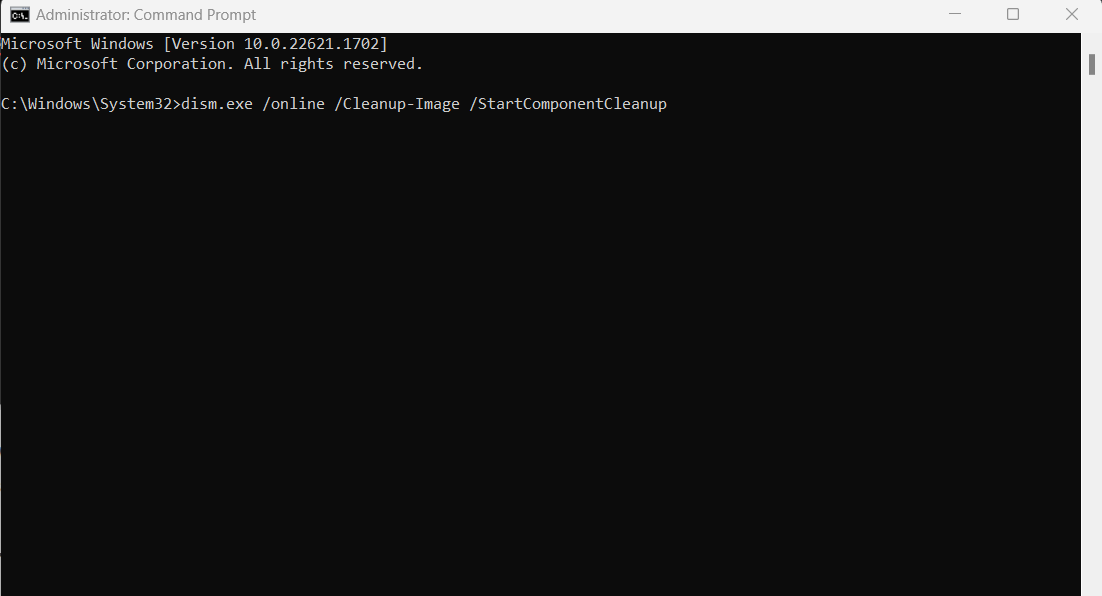
2. Run the two commands below and hit Enter.
DISM /Online /Cleanup-Image /StartComponentCleanup
DISM /Online /Cleanup-Image /AnalyzeComponentStore
3. Run the following command to specify the C:\install.wim as the source of the known good files.
DISM /Online /Cleanup-Image /RestoreHealth /Source:WIM:c:\install.wim:1 /LimitAccess
4. After this process completes, type sfc /scannow and hit Enter.
Fix 4: Perform a Component Cleanup
1. Run Command Prompt as administrator.
2. Execute the following commands. Press Enter after each command.
dism.exe /online /Cleanup-Image /StartComponentCleanup
sfc /scannow
Fix 5: Reinstall Microsoft .NET Framework 3.5
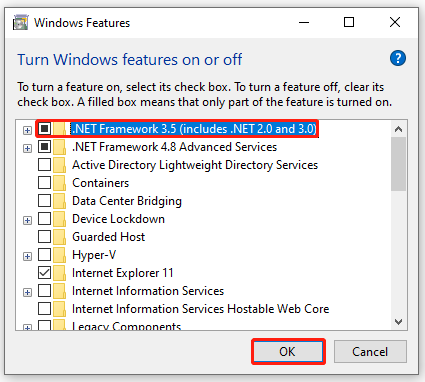
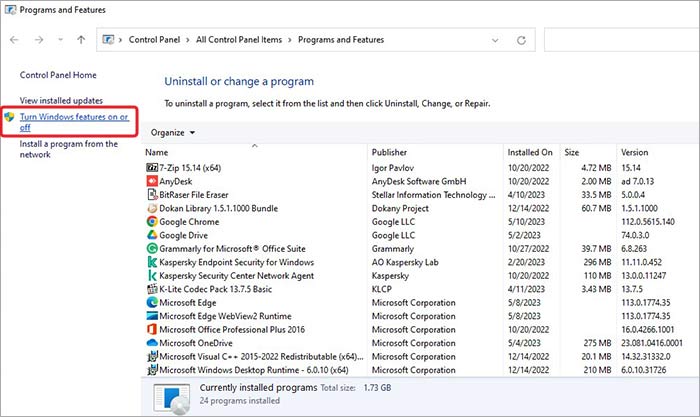
1. Open Control Panel.
2. Click on Programs > “Turn Windows features on or off” in Programs and Features.
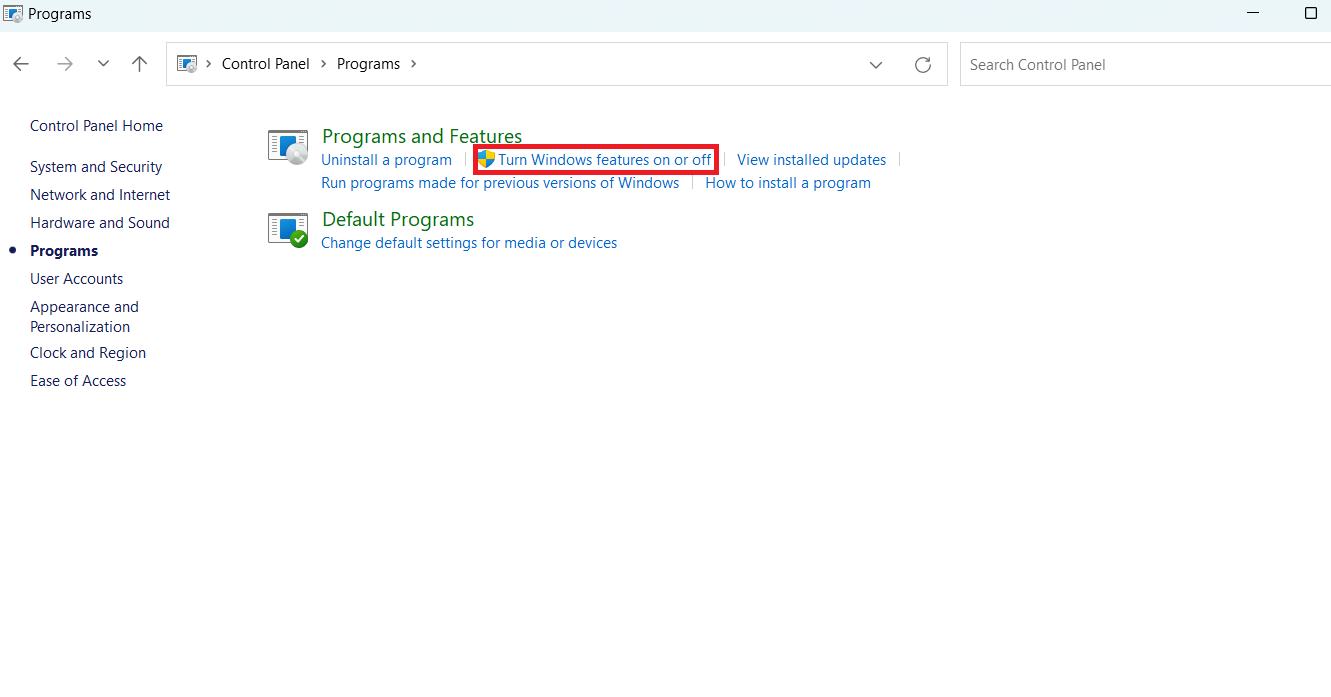
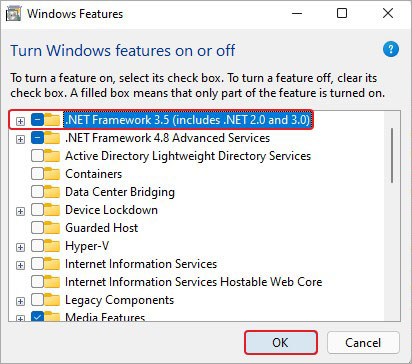
3. Uncheck .NET Framework 3.5 (includes .NET 2.0 and 3.0) and click OK.
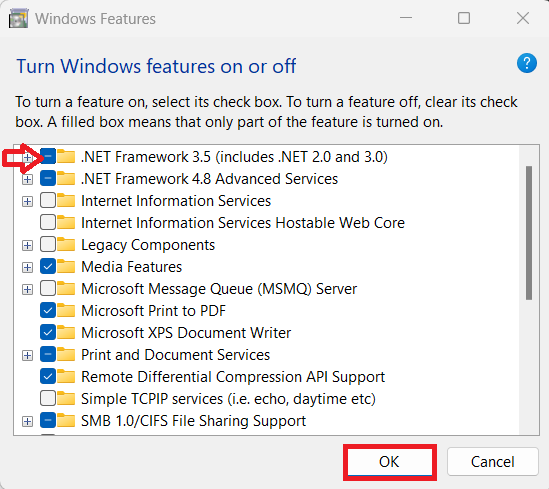
4. Restart your system and check the same option we unchecked in step 3.
That’s it!
RELATED ARTICLES
DISM /Online /Cleanup-Image /RestoreHealth is one of the most commonly used command lines that can repair a damaged Windows system image. However, some of you may receive DISM error 0x800f081f while running it. If you are struggling with the same error, this guide on MiniTool Website might be helpful to you.
Deployment Image Servicing and Management (DISM) is a useful way to repair corrupted system images. Usually, it works together with System File Checker to scan and repair your computer and return it to a healthy work state.
However, like other inbuilt Windows tools, it goes wrong sometimes. Quite a few users complain that they encounter DISM error 0x800f081f when running the DISM /Online /Cleanup-Image /RestoreHealth command and receiving the following error messages.
- Error: 0x800f081f. The source files could not be found.
- Windows couldn’t find the required files to complete the requested changes. Make sure you’re connected to Internet, and try again. Error: 0x800f081f.
This error indicates that DISM cannot find the files required to fix the online Windows image in the default location. DISM error 0x800f081f can lead to other errors on your computer and prevents other processes from functioning properly, so you must take some measures to get rid of it as soon as it crops up.
# Suggestion: Back up Your Computer in Advance
As you can see, it is not easy to troubleshoot manually because you don’t know the exact reason for DISM failed error 0x800f081f. What’s more, you may make some mistakes during the troubleshooting process below if you are not proficient in computers. Any small changes may make huge differences or even cause severe consequences to your computer.
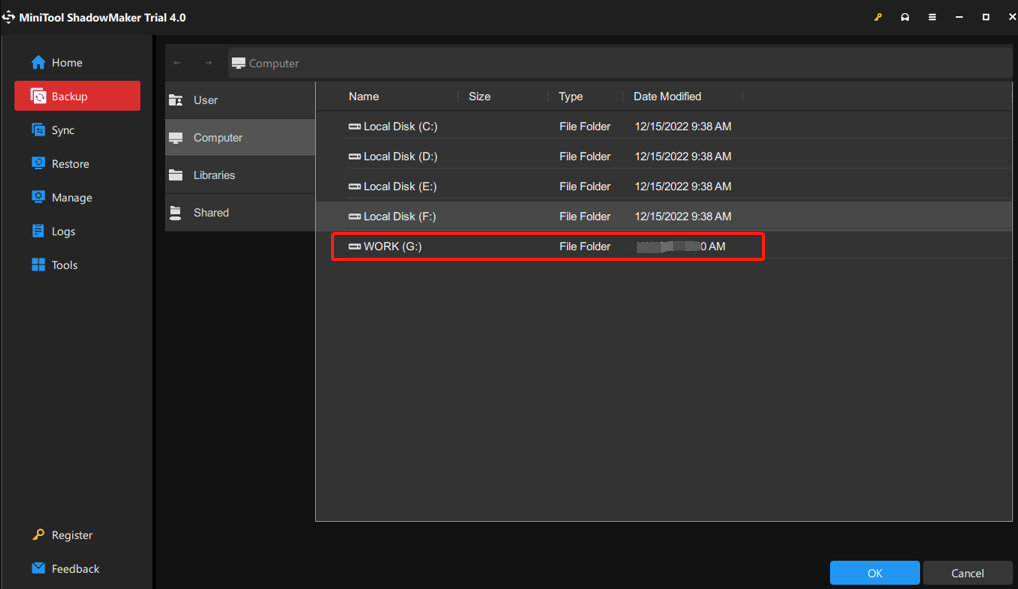
As a result, we sincerely advise you to back up your computer in advance. With a backup copy in hand, you can easily restore your system to a normal state. Some of you may assume that creating a backup of your system seems difficult. Don’t worry! With a piece of professional backup software – MiniTool ShadowMaker, everything will be easier.
This free tool is compatible with almost all Windows systems and allows you to create a file, folder, partition, disk, or system backup on your Windows PC. What’s more, it is very popular among the Windows community because of its one-click system backup solution. Without further ado, let’s see how it works!
Step 1. Download, install and launch this program.
MiniTool ShadowMaker TrialClick to Download100%Clean & Safe
Step 2. After launching it, hit Keep Trial to get a 30-day free trial and then go to the Backup page.
Step 3. On this page and you can see the system-required partitions are selected by default in SOURCE and you only need to choose a storage path for your backup in DESTINATION.
Tips:
Here, we recommend you to back up your system to a USB flash drive or an external drive.
Step 4. After making your decision, you can either hit Back Up Now to start the backup process or delay the backup task by hitting Back Up Later.
Then, go to Tools > Media Builder > WinPE-based media with MiniTool plug-in > USB Flash Disk to create a bootable drive. If your computer encounters some other radical changes such as black screen, Blue Screen of Death, or system crashes in the future, you can boot your computer from this USB flash drive and perform a system recovery with the system image that you backed up.
Tips:
As for backing up files, see this tutorial to get detailed instructions — How to Backup Files on Windows 10? Try These Top 4 Ways.
How to Fix DISM Error 0x800f081f on Windows 10/11?
Fix 1: Perform a Component Cleanup
You can clean up the image files and make everything run properly with the DISM component cleanup switch. Follow the steps below:
Step 1. Type cmd in the search bar to locate Command Prompt and right-click on it to choose Run as administrator.
Step 2. In the command window, run the following commands one by one and don’t forget to hit Enter after each command.
dism.exe /online /Cleanup-Image /StartComponentCleanup
sfc /scannow
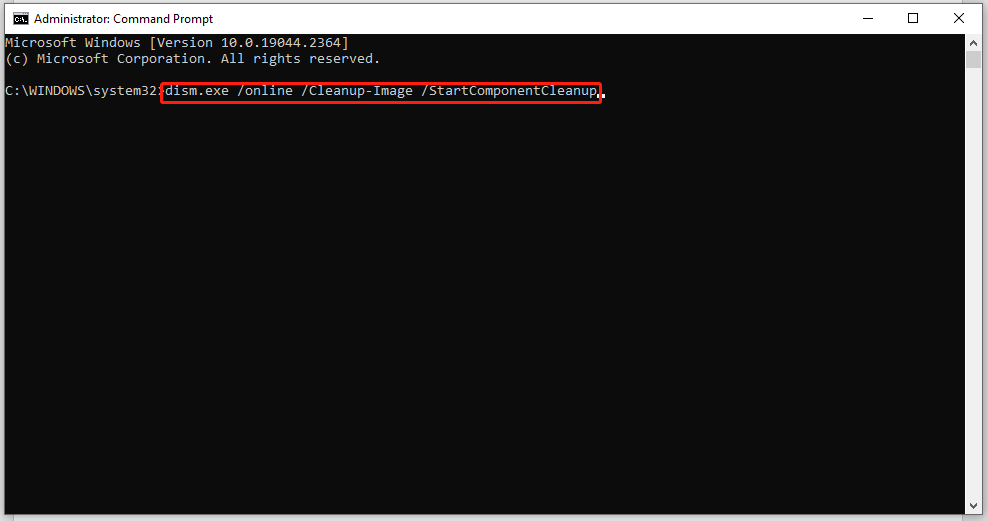
Step 3. When the two commands are complete, run Dism /Online /Cleanup-Image /RestoreHealth again to see if it works properly.
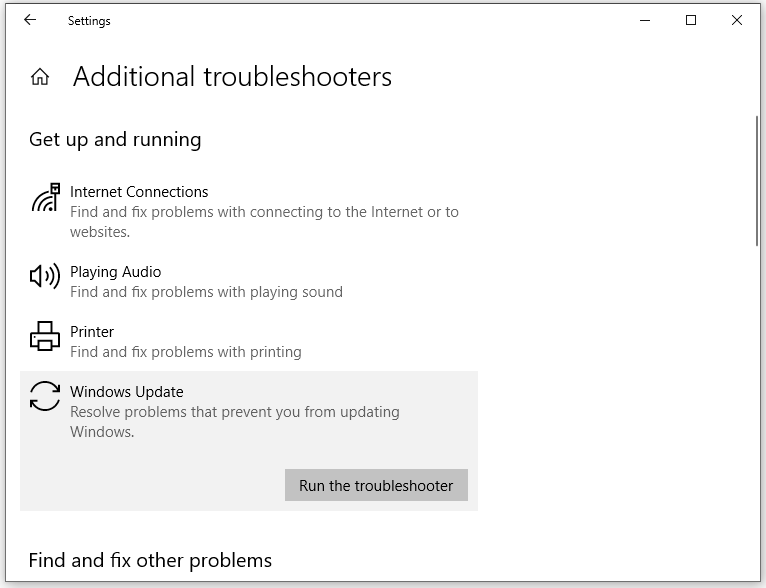
Fix 2: Run Windows Update Troubleshooter
As is known to all, Microsoft Windows Update Center triggers problems regularly and these problems can prevent you from implementing upgrades or improvements by downloading or installing new updates. In this case, Microsoft offers you a troubleshooting tool called Windows Update troubleshooter which can fix most errors including DISM Online Cleanup Image RestoreHealth error 0x800f081f.
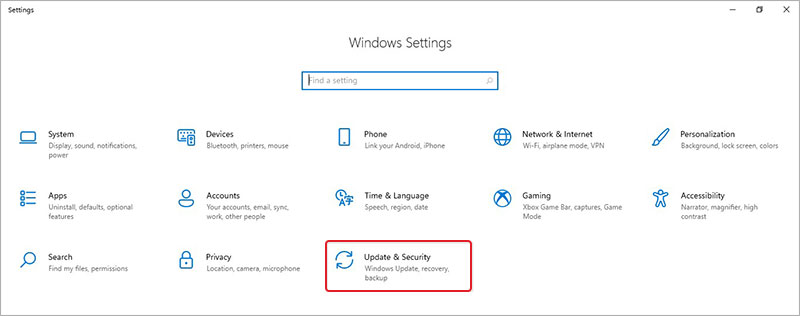
Step 1. Press Win + I to open Windows Settings.
Step 2. In the settings menu, scroll down to find Update & Security and click on it.
Step 3. Under the Troubleshoot tab, hit Additional troubleshooters.
Step 4. Under Get up and running, hit Windows Update and then press Run the troubleshooter. Once the troubleshooting process is done, it will show a message to inform you of the result.
Fix 3: Reinstall Microsoft .NET Framework 3.5
Since DISM error 0x800f081f is related to Microsoft .NET Framework 3.5, it is a good option to reinstall it.
Step 1. Click Start and go to Control Panel.
Step 2. Hit Programs and Features > Turn Windows features on or off.
Step 3. Check .NET Framework 3.5 (includes .NET 2.0 and 3.0) and hit OK.
Fix 4: Get Source from Windows Image
Usually, the DISM /Online /Cleanup-Image /RestoreHealth command is used to fix problems by searching in Windows Update or WUSU to replace the corrupted files. If DISM cannot repair a file required by the Windows image, it will result in DISM error 0x800f081f the source files could not be found.
To address this error, you need to specify a valid Windows image file (install.wim) which contains all the files required during the repairing process. The install.wim file should be included in the source folder of Windows 10 Installation media.
Move 1: Download and mount the ISO file
Step 1. Go to the Microsoft Software Download website and hit Download Now under Create Windows 10 installation media.
Step 2. Hit Accept to accept the license terms > tick Create installation media (USB flash drive, DVD, or ISO file) for another PC > hit Next > select Language, Architecture, and Edition > hit Next > tick ISO file > hit Next > choose a download location for Windows 10 ISO file > hit Save.

Step 3. Press Win + E to evoke File Explorer and then locate the Windows 10 ISO image file.
Step 4. Right-click on the ISO file and select Mount in the drop-down menu.
Step 5. After the mounting process is finished, go to This PC and you can see a virtual drive in the right-hand pane.
Move 2: Extract the install.wim file from the install.esd file
Step 1. From the mounted Windows ISO file, right-click on the install.esd file from the source folder to copy it to the root folder of drive C:.
Step 2. Launch Command Prompt as an administrator.
Step 3. Type cd\ to go to the root folder of drive C:.
Step 4. Type the following command and hit Enter to find which images are in the install.esd file.
dism /Get-WimInfo /WimFile:install.esd

Note down the index number according to the Windows 10 installed version.
Step 5. Run the following command to extract the install.wim file according to your Windows version. Don’t forget to replace the IndexNumber with the corresponding index number you noted down just now.
dism /export-image /SourceImageFile:install.esd /SourceIndex:IndexNumber /DestinationImageFile:install.wim /Compress:max /CheckIntegrity
Step 6. Now, you can find the exported install.win file on the drive C:.
Tips:
What if Windows Media Creation Tool is not working? Take it easy! Every problem has a fix. Follow this guide — Best Fixes for Windows 10/11 Media Creation Tool Not Working, and you will work it out.
Move 3: Run DISM Tools
Step 1. Launch Command Prompt as an administrator.
Step 2. Run the two commands below and hit Enter.
DISM /Online /Cleanup-Image /StartComponentCleanup
DISM /Online /Cleanup-Image /AnalyzeComponentStore.
Step 3. Run the following command to specify the C:\install.wim as the source of the known good files.
DISM /Online /Cleanup-Image /RestoreHealth /Source:WIM:c:\install.wim:1 /LimitAccess
Step 4. When this process is done, type sfc /scannow and hit Enter.
Fix 5: Perform an In-place Upgrade
The last method is performing an in-place upgrade. This process will reinstall the entire Windows core with the latest image from Microsoft. It may take a long time, please wait patiently.
Step 1. Download & Install Windows 10 Media Creation Tool on your computer and run it with administrative rights.
Step 2. Accept the license terms and tick Upgrade this PC now.
Step 3. Then, follow the prompts on the screen to complete the upgrade. After the completion, run Dism /Online /Cleanup-Image /RestoreHealth to see if DISM error 0x800f081f is gone.
Tips:
If you fail to run the DISM /Online /Cleanup-Image /RestoreHealth command without error code 0x800f081f, this guide might provide you with some feasible solutions — Best Fixes: DISM /online /cleanup-image /restorehealth Is Stuck.
What’s your opinion about the solutions mentioned in this guide? Which method do you prefer? Click here to share your ideas with your friends on Twitter.Click to Tweet
We Need Your Voice
That’s all about the causes and solutions to DISM error 0x800f081f. By now, we believe that you may manage to get rid of this error from your computer. Also, it is highly recommended to back up your system in advance with MiniTool ShadowMaker as a remedy in case that you encounter any severe changes on your system the next time.
Welcome to leave your joy and tell us which solution works for you in the comment zone. For more queries about our software, please feel free to contact us via [email protected].
DISM Error 0x800f081f FAQ
How do I fix error 0x800f081f?
Fix 1: Perform a Component Cleanup
Fix 2: Run Windows Update Troubleshooter
Fix 3: Reinstall Microsoft .NET Framework 3.5
Fix 4: Get Source from Windows Image
Fix 5: Perform an In-place Upgrade
How to fix DISM 0x800f081f error in Windows Server 2016?
To fix DISM 0x800f081f error in Windows Server 2016, you can:
- Run a component cleanup and then perform an SFC scan.
- Offer DISM a location that contains the files it needs to perform the image repair.
- Perform an in-place upgrade.
How do I fix corrupted DISM?
Fix 1: Check Antivirus or Security Programs
Fix 2: Run DISM Command in Clean Boot
Fix 3: Specify the Correct Location of the install.wim File
Fix 4: Uncheck install.wim Read-Only
Fix 5: Clean up System Image Components
Fix 6: Reset Windows Update Service
Fix 7: Run Windows Update Troubleshooter
Fix 8: Disable Proxy on Your Computer
При установке обновлений Windows 11 или 10 некоторые пользователи могут столкнуться с ошибкой установки 0x800f081f, при этом повторные попытке скачивания и установки обновления обычно не срабатывают.
В этой инструкции подробно о способах, которые могут помочь исправить ошибку и установить обновление, с которым возникла проблема. Обратите внимание: если ошибка появляется при установке .NET Framework, решения приведены в отдельной инструкции.
Очистка кэша обновлений и сброс компонентов Центра обновлений Windows

Как и при большинстве других ошибок Центра обновлений, первое, что следует попробовать выполнить в случае ошибки 0x800f081f — очистку кэша обновлений, для этого достаточно выполнить следующие действия:
- Запустите командную строку от имени администратора (как это сделать).
- По порядку введите следующие команды (если некоторые сообщат об ошибке, пропускаем и переходим к следующей):
net stop bits
net stop wuauserv
net stop appidsvc
net stop cryptsvc
ren C:\Windows\SoftwareDistribution SoftwareDistribution.old
ren C:\Windows\System32\catroot2 Catroot2.old
net start bits
net start wuauserv
net start appidsvc
net start cryptsvc
- Перезагрузите компьютер.
Выполнив перезагрузку, попробуйте снова скачать и установить обновление — возможно, в этот раз всё пройдёт исправно.
Если описанные шаги не привели к решению проблемы, попробуйте выполнить полный сброс компонентов Центра обновления Windows:
В ситуации, когда вышеописанные шаги не помогли, можно сделать предположение, что проблема не ограничивается Центром обновлений и его компонентами, возможно, её источник — сама Windows 11 или Windows 10, а точнее какие-то неполадки в её работе, об устранении которых — в следующем разделе.
Дополнительные варианты решения
Ошибка 0x800f081f может быть вызвана повреждением системных файлов Windows, чтобы восстановить их, запустите командную строку от имени администратора и по порядку выполните команды:
dism /online /cleanup-image /restorehealth
sfc /scannow
После чего перезагрузите компьютер и повторите установку обновления.
Если не помогло и это, можно попробовать такие варианты:
- Выполнить поиск обновления в официальном каталоге обновлений по его KB-номеру, скачать обновление и выполнить установку вручную.
- По некоторым сообщениям пользователей может сработать отключение компонентов .NET Framework в Win+R — appwiz.cpl — дополнительные компоненты, перезагрузка и повторное их включение.

- Если на компьютере присутствуют сторонние антивирусы, а также программы очистки места на диске или оперативной памяти в автоматическом режиме, попробуйте временно отключить их.
- Попробуйте откатить систему с использованием точек восстановления: нажмите клавиши Win+R на клавиатуре, введите rstrui и нажмите Enter, выберите недавнюю точку восстановления, когда всё работало исправно и попробуйте выполнить откат, а после него вновь установить доступные обновления.

- На всякий случай, выполните проверку компьютера на наличие вирусов и других вредоносных программ, но используя не тот антивирус, который у вас установлен, а другие варианты — KVRT, Kaspersky Recue Disk.


И, наконец, в крайнем случае можно попробовать выполнить «Обновление на месте» для исправления ошибок Windows и, с большой вероятностью, всех ошибок при установке обновлений.
Table of Contents:
How Do I Fix .NET Framework 3.5 Error Code 0x800f081f Easily?
What is error installing .NET Framework 0x800f081f? The error code 0x800f081f is a common error that occurs when trying to install or update .NET Framework on a Windows computer. This error typically indicates that the required files for the installation or update are not available or have been corrupted, making it impossible for the installation to complete successfully. Here is the error message that is associated with the error code:
«Windows couldn’t complete the requested changes. Windows couldn’t find required files to complete the requested changed. Make sure you’re connected to Internet, and try again. Error code: 0x800F081F»
There are several reasons why this error may occur, including:
- Incomplete or interrupted installation of .NET Framework.
- Corrupted or missing system files.
- Issues with the Windows update process.
- Damaged or corrupted .NET Framework installation files.
Here are some steps that can help you fix error code 0x800f081f when installing .NET Framework 3.5:
Method #1: Repair .NET Framework in Control Panel
Step 1. Type «Control Panel» in the searching box next to the Start menu. Then click the Control Panel app from the searching result.
Step 2. Click «Program and Features» on the Control Panel Window.
Step 3. Click «Turn Windows features on or off» to open the «Windows Features» window. Then unselect these two options «.NET Framework 3.5 (includes .NET 2.0 and 3.0)» and «.NET Framework 4.8 Advanced Services» and click «OK» button.
Step 4. Restart the computer.
Step 5. Open the «Windows Features» window again. This time select the two boxes «.NET Framework 3.5 (includes .NET 2.0 and 3.0)» and «.NET Framework 4.8 Advanced Services» and click OK button.

Method #2: Manually Download .NET Framework from Microsoft
Step 1. Go to the Microsoft .NET Framework download page and click the .NET version you want to install on your computer.
Step 2. Save the installer to somewhere on your computer.
Step 3. Run the installer and follow the onscreen wizard to finish installing the .NET SDK.
Method #3: Use the Group Policy Editor
Step 1. Open the Group Policy Editor by typing in «gpedit.msc» in the Start menu search bar.
Step 2. Go to Computer Configuration > Administrative Templates > System.
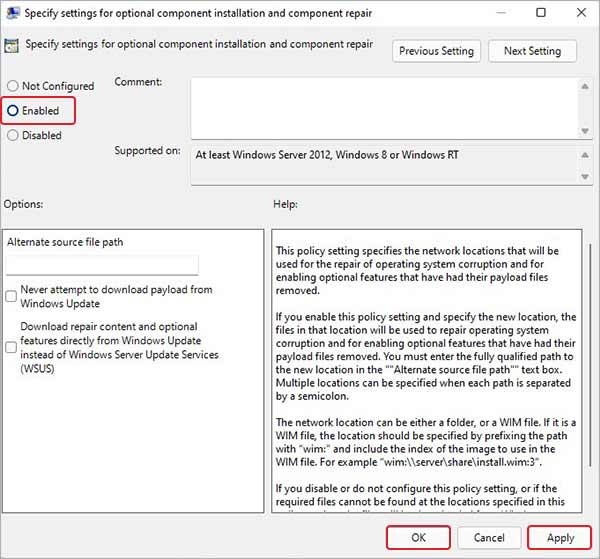
Step 3. Double-click «Specify settings for optional component installation and component repair» and select «Enabled.»
Step 4. Then select «Download repair content and optional features directly from Windows Update instead of Windows Server Update Services (WSUS)» and click OK.
Method #4: Use the DISM Command
DISM (Deployment Image Servicing and Management) is a Windows tool that can repair system files.
Step 1. Open Command Prompt as an administrator.
Step 2. Type in the following command and press Enter key.
Dism /online /enable-feature /featurename:NetFx3 /All /Source: [drive]:\sources\sxs /LimitAccess
Tip: The [drive] should be replaced with the letter of the drive containing the Windows installation files.
Method #5: Perform a Clean Boot
Third-party applications and services can cause issues with .NET Framework installation. A clean boot will start Windows with a minimal set of drivers and startup programs. Follow these steps to perform a clean boot.
Step 1. Search for «msconfig» in the Start menu, click on «System Configuration».
Step 2. Select «Selective startup» and uncheck «Load startup items».
Step 3. Restart your computer and try installing .NET Framework 3.5 again.
If none of these methods work, you may need to perform a system restore or reinstall Windows. It’s also important to ensure that your computer meets the minimum system requirements for .NET Framework 3.5.
How Do I Fix Error 0x800f081f When Installing Windows 11/10 Updates?
What is error installing Windows update 0x800f081f? The error code 0x800f081f is also a common error that occurs when trying to install Windows updates on a Windows computer. This error typically indicates that the required files for the update are not available or have been corrupted, making it impossible for the update to complete successfully. Here is the associated error message:
«There were some problems installing updates, but we’ll try again later. If you keep seeing this and want to search the web or contact support for information, this may help: (0x800f081f).»
Some common reasons for this error include:
- Missing or corrupted system files.
- Issues with the Windows update process or Windows Update service.
- Antivirus or firewall software blocking the update.
- Outdated or incompatible device drivers.
Here are some steps that can help you fix error 0x800f081f when installing Windows updates:
Method #1: Run Windows Update Troubleshooter
This is a built-in tool that can help identify and fix issues with Windows update. To run the troubleshooter, go through steps below:
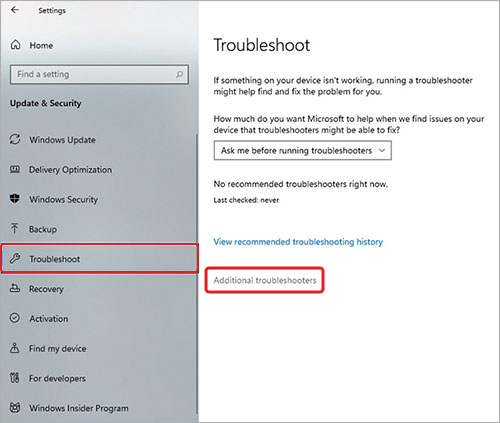
Step 1. Right-click the Start menu and click «Settings».
Step 2. Go to Update & Security > Troubleshoot > Additional Troubleshooters.
Step 3. Click the Windows Update section and click «Run the troubleshooter» button.
The pop-up window will check and detect possible problems that prevent you from updating Windows. Wait for the process to complete.
Method #2: Manually Download and Install Windows Updates
Sometimes, downloading and installing the update manually can help fix the error. To do this, go to the Microsoft Update Catalog website and search for the update using its KB number. Then download and install the update manually.
Method #3: Disable third party antivirus software temporarily.
Sometimes, antivirus software can interfere with Windows update and cause errors. Try disabling third-party antivirus software temporarily and see if the update installs successfully.
Moreover, you should also check the Internet connect. A poor or unstable internet connection can cause issues with Windows update. Ensure that your internet connection is stable and strong.
Method #4: Run SFC Scannow Command
If Windows update files are damaged or corrupted, it can cause errors during installation. Run the System File Checker tool (SFC) by opening the Command Prompt as an administrator and typing in «sfc /scannow» and press enter. Wait for the process to complete, and restart your computer.
How Do I Fix 0x800f081f DISM?
«Error: 0x800f081f
The source files could not be found.
Use the «Source» option to specify the location of the files that are required to restore the feature. For more information on specifying a source location, see http://go.microsoft.com/fwlink/?LinkId=243077.
The DISM log file can be found at C:\Windows\Logs\DISM\dism.log
0x800F081F — CBS_E_SOURCE_MISSING
Error code: 0x800F081F»
What does DISM 0x800f081f error mean? The error code 0x800f081f can occur when using the Deployment Image Servicing and Management (DISM) tool on a Windows computer. DISM is a command-line tool that can be used to service and repair Windows images, including the Windows Recovery Environment, Windows Setup, and Windows PE. The 0x800f081f DISM error usually indicates that the files required for the DISM operation are missing or corrupted. This error can occur when trying to repair a corrupted Windows image or when trying to add a feature or package to a Windows installation.
What causes 0x800f081f DISM issue? The specific causes of this error can include:
- Missing or corrupted system files: If the system files required by the DISM operation are missing or corrupted, the operation will fail, and you will receive the 0x800f081f error.
- Incomplete or corrupted Windows update: If a Windows update was not installed completely or was corrupted during the installation process, this can result in the DISM error code 0x800f081f.
- Corrupted Windows image: If the Windows image is corrupted, DISM will not be able to complete the requested operation and you will receive the error.
- Antivirus software interference: Sometimes, antivirus software can interfere with DISM and cause errors.
- Third-party applications or services: Third-party applications or services can also cause issues with DISM, especially if they are conflicting with the Windows system files required for the DISM operation.
How do f Fix 0x800f081f DISM error on Windows 11/10/8/7? Here are some steps that can help you fix 0x800f081f DISM error:
Method #1: Use the /source Option
If the required files are missing or corrupted, you can try using the /source option to specify the source location of the files.
Step 1. Insert the Windows installation media (DVD or USB drive) into your computer.
Step 2. Open Command Prompt as an administrator. Type «cmd» in the searching box and you can find Command Prompt. Then click «Run as administrator».
Step 3. Type the following command in Command Prompt and press Enter key.
dism /online /enable-feature /featurename:NetFx3 /All /LimitAccess /Source:[drive]:\sources\sxs
Tip: The [drive] should be replaced by the letter of the drive containing the Windows installation media.
Method #2: Manually Download the Missing Files
You can manually download the missing files from Microsoft’s website and install them on your computer. To do this:
Step 1. Go to the Microsoft Update Catalog website.
Step 2. Search for the missing update or component by its KB number.
Step 3. Download the appropriate version of the update for your system.
Step 4. Install the update on your computer.
Method #3: Use the System File Checker (SFC) tool
The SFC tool scans for and repairs corrupted system files. To run the SFC tool:
Step 1. Open an elevated Command Prompt (run as administrator).
Step 2. Type the command sfc /scannow and press Enter.
Step 3. Wait for the process to complete (it may take some time) and then restart your computer.
Extra Guide: How to Backup Windows 11/10/8/7?
It is important to back up Windows operating system. The operating system is a crucial component of our computer, as it manages all the hardware and software on your system. If your Windows operating system becomes corrupted or damaged, it can lead to a loss of data, software and system instability, and even prevent your computer from booting up.
Creating a backup of Windows operating system ensures that you can restore it to a previous state if anything goes wrong. This can be useful in situations such as a virus or malware infection, system failure, or hardware malfunction. Without a backup, you may lose important data or be unable to use your computer at all.
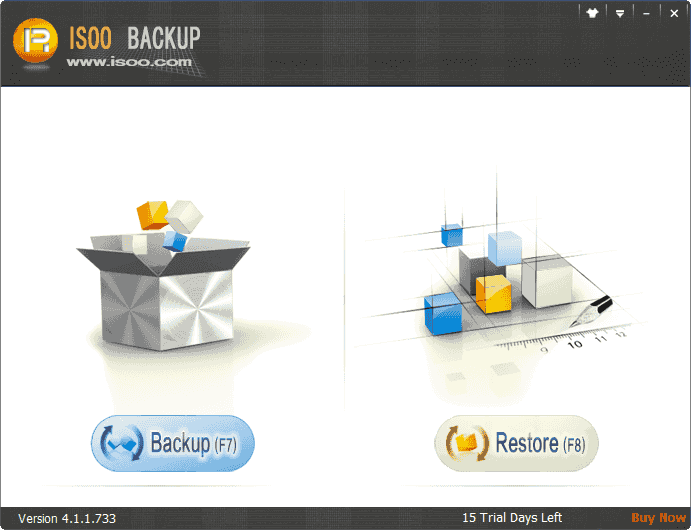
Isoo Backup is user friendly backup software which allows users to back up system files, installed software, customized settings, personal files, etc. It offers features such as differential backup and incremental backup. Moreover, it can create a bootable USB disk to help you deal with unbootable computer. The software supports to crate backup images for Windows 11/10/8/7 and Windows Servers.
Here are steps to create a backup for Windows 10 using Isoo Backup:
Step 1. Install and run Isoo Backup on the computer that you want to back up. Click «Backup» button on the home interface.
Step 2. View settings and click «Start» button.
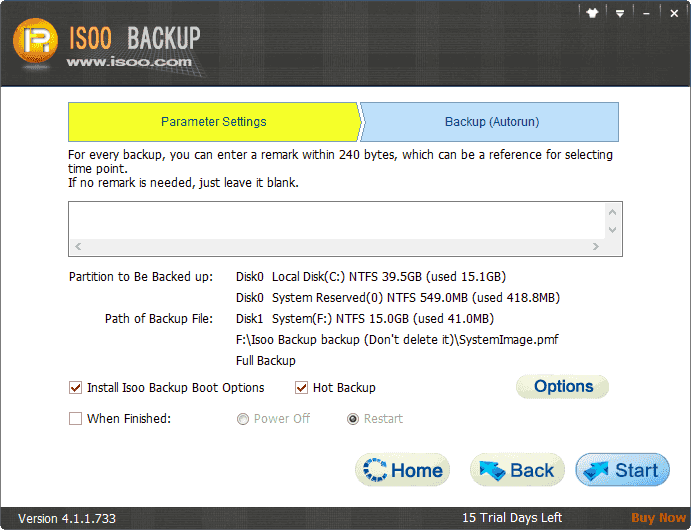
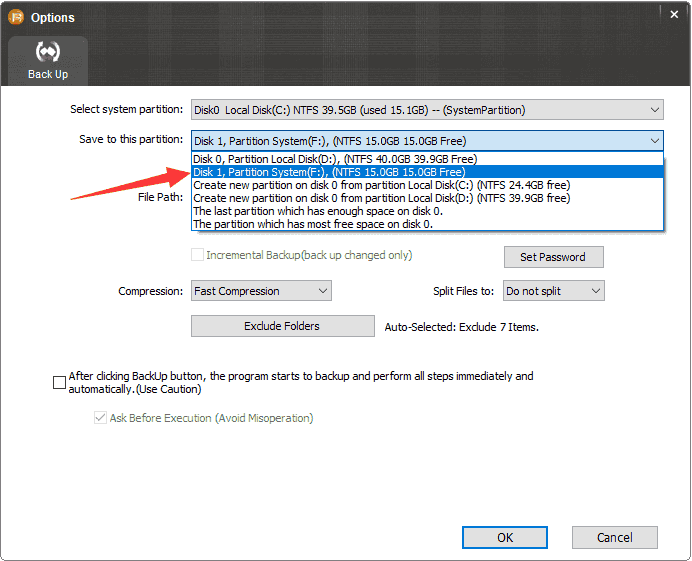
If you want to change the path for the backup file, click «Options» button to select a new location.
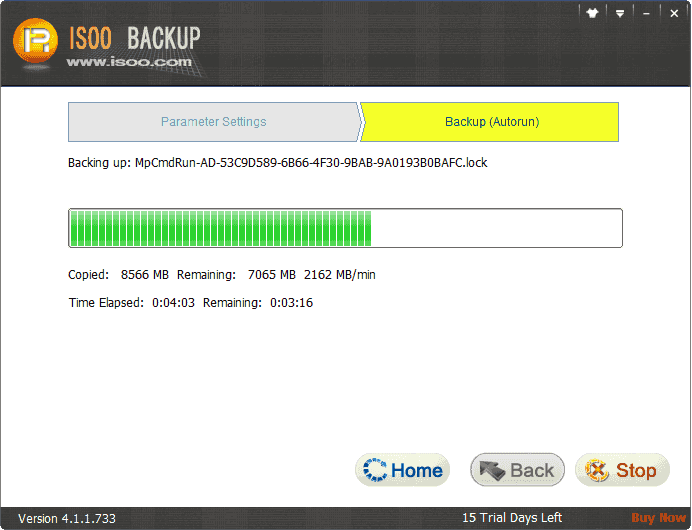
Step 3. Wait for the backup to finish.
The Final Words
The error code 0x800f081f can appear in different scenarios, for example when you install .NET framework, update Windows, run DISM commands, etc. This guide provides multiple fixes to the error, helping you work with computer smoothly. Fixing problems is just one aspect of using computer, to ensure data security, Windows backup and data backup should also be paid attention.
Frequently Asked Questions
1. How to fix DISM 0x800f081f error in Windows Server 2016?
The DISM error 0x800f081f usually indicates that the Windows image is damaged or that some files are missing. DISM (Deployment Image Servicing and Management) is a command-line tool that is built into Windows Server 2016. It is used for servicing and preparing Windows images, including the operating system and its components, drivers, and packages. Here are the steps to fix this error in Windows Server 2016:
Step 1. Run Command Prompt as administrator.
Step 2. Type following command one by one and Press Enter key after each command.
dism /online /cleanup-image /checkhealth
dism /online /cleanup-image /restorehealth
dism /online /cleanup-image /restorehealth /source:WIM:X:\sources\install.wim:1 /LimitAccess
dism /online /cleanup-image /checkhealth
2. How do I fix download error 0x800f081f?
If you’re experiencing download error 0x800f081f in Windows, it means that the system is unable to download the required files for an update or installation. Here are some solutions you can try to fix the error: check the Internet connection, run Windows update troubleshooter, check if there is enough free space, download the update manually, run commands like DISM, SFC in Command Prompt.
3. What is error code 0x80070003 on Windows 10 update?
The error code 0x80070003 on Windows 10 update is a common error that occurs when you try to update or upgrade your system to a newer version. This error typically indicates that some files required for the update are missing or corrupted. Here are some steps you can take to fix this error: Run the Windows Update troubleshooter, delete temporary files, check system errors, uninstall unnecessary software, and reset Windows Update components.
4. How do I fix Windows Update error 0x800703f1?
Windows Update error 0x800703f1 is an error that can occur when you try to install or update Windows 10. This error code indicates that there may be a problem with the installation of one or more updates. Here are some steps you can take to fix this error: restart computer, run Windows update troubleshooter, delete temporary files, disable third-party antivirus software, run SFC command, etc.
5. How to fix Windows Installer package problem for Windows 11?
If you’re having problems with a Windows Installer package in Windows 11, you can try the following steps to fix the issue:
- Make sure the Windows Installer service is running.
- Run the Windows Installer troubleshooter.
- Unregister and re-register the Windows Installer service.
- Check for updates.
- Install the package in compatibility mode.
6. How do I fix hard drive error in Windows 11?
If you have a hard drive error in Windows 11, here are some steps you can take to fix it:
- Check the hard drive’s physical connection to make sure it is properly connected.
- Run a virus scan to clear viruses and malware.
- Back up files and reformat the drive.
- Check and repair bad sectors to the hard drive using DiskGenius Free Edition.
7. How do I fix unspecified USB device in Windows 11?
If you have an unspecified USB device in Windows 11, here are some steps you can take to fix it: try the USB device on a different USB port, reinstall USB drivers, disable USB selective suspend, format the USB drive to a file system which is supported by Windows, assign a drive letter, check and repair bad sectors, or seek further assistance from a technical support professional or the manufacturer of the USB device.
8. How do I fix USB drive error in Windows 11?
If you’re experiencing USB driver errors in Windows 11, you can try the following steps to fix the issue. If none of these steps work, you may need to seek further assistance from a technical support professional.
- Restart computer and try connecting the USB device to a different USB port.
- Update USB drivers. Faulty drivers are likely to cause various issues.
- Scan the USB drive using antivirus software.
- Format the USB drive to make it readable again.
- Check if there are bad sectors on the USB drive using DiskGenius.
9. How do I fix 0x80240020 (- 2145124320)?
The error code 0x80240020 (-2145124320) is a Windows Update error that can occur when you try to download or install updates. Here are some steps you can take to fix this error: Run the Windows Update troubleshooter: The Windows Update troubleshooter can help identify and fix common issues with the Windows Update service. To run the troubleshooter, go to Settings > Update & Security > Troubleshoot > Additional troubleshooters > Windows Update > Run the troubleshooter.
10. How to repair VSS Windows 10?
VSS (Volume Shadow Copy Service) is a built-in Windows service that allows you to create backups of your system and files. If you are experiencing issues with VSS in Windows 10, here are some steps you can take to repair it:
Step 1. Open the Services app by pressing Windows key + R. Type services.msc and press Enter.
Step 2. Scroll down to «Volume Shadow Copy» and double-click it.
Step 3. Set the «Startup type» to «Automatic» and click «Start» if the service is not already running.
More Tutorials:
- Fix 0x80070002 in Windows update, installer, and Security Client
- How to Fix Error Code 0x80070570 in Windows 11/10/8/7? [4 Fixes]
- How to Fix Error Code 0x80004005 in Windows 11/10/8/7? [5 Fixes]
- The Type of The File System Is RAW. CHKDSK Is Not Available for RAW Drives
- Solved: The Volume Does Not Contain a Recognized File System
Windows 11 has come a long way since its debut back in 2021. Numerous updates and fixes later, however, the OS is still riddled with bugs that are coming to light every day. One such bug is the install error – 0x800F081F, which pops up while installing an OS update. The reasons behind this are many like corrupted system files, issues with the .NET framework, and more. Let’s read further and see what this issue is.
What is the 0x800F081F Install Error?
The 0x800F081F install error code is a common system error that first came into light when Windows 11 users were unable to install the Windows 11 (KB5016632) 2022-08 cumulative update.
Users encountering this error speculated that this error code originated due to unresolved bugs in the update. This error is generated due to issues with the .NET Framework or corrupt registry keys or system files. It has also affected many users running Windows 10 and Windows Server 2016. Here are some reasons that could cause your Windows 11/10 PC to show the 0x800F081F error code –
- Using the insider build
- Compatibility issues .NET Framework
- Damaged or missing registry keys
- Corrupt system files
- Buggy update
- Improperly installed OS update
- Corrupted user profile
Methods to Fix the Install Error 0x800F081F on Windows 11
Let’s look at some ways to get rid of the install error – 0x800F081F on your Windows 11 PC.
Method 1: Run Windows Update Troubleshooter
Sometimes, the updates that you are trying to install could be buggy or there could be an issue with the update wizard. In such a case, you can encounter the 0x800F081F error code on your computer screen. You can easily fix it by running the Update troubleshooter. Here are the steps to do so –
- Press WINDOWS + I to open Settings.

- Click on Update & Security and then click on Troubleshoot in the left pane.
- Click on Additional troubleshooters.
- Look for Windows Update in the list and click on it.
- Click on Run the troubleshooter and wait for it to finish the process.
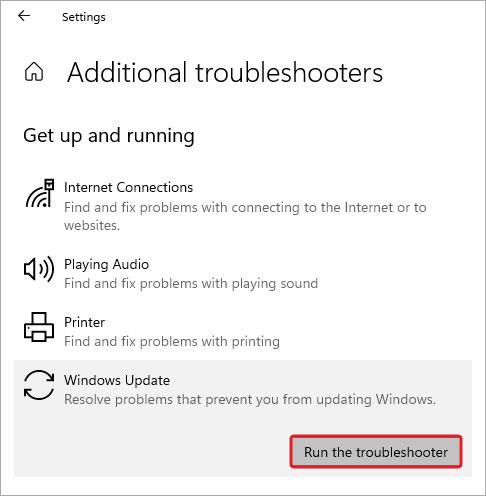
- Follow the instructions as prompted by the wizard.
Method 2: Edit Group Policy
This is another solution to fix the 0x800F081F error on your Windows 11 PC. Here, you can adjust the group policy settings that allow you to set up a Windows update configuration for the installation of optional components. Here’s what to do in this method –
- Press WINDOWS + R to launch RUN, type gpedit.msc and hit Enter.
- Expand the following in the left pane – Computer Configuration > Administrative Templates > System.
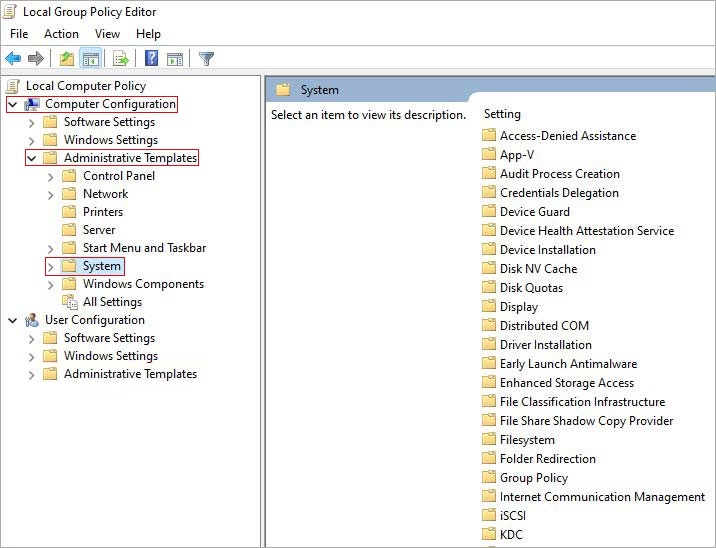
- Locate the Specific settings for optional component installation and component repair entry on the right-hand side pane.
- Right-click on it and click on Edit.
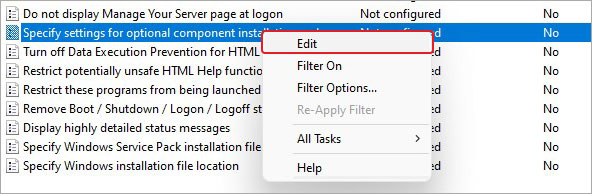
- Choose the Enabled option and then click on Apply and OK.
- Restart your computer.
Method 3: Use the DISM Command to Service Windows 11 OS Image
You can use the DISM or Deployment Image Servicing and Management to service and repair Windows images. You can run this to fix any issue with your Windows image that might be causing the 0x800F081F error to pop up on your Windows computer. To do this –
- Launch CMD with administrative rights.
- Type DISM.exe /Online /Cleanup-image /Restorehealth in the terminal and press Enter.
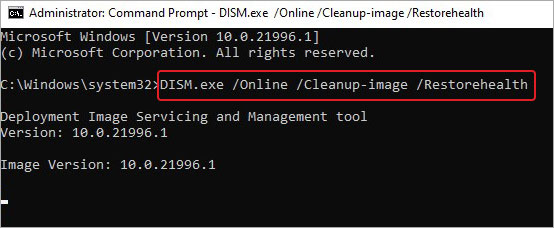
- Wait for it to finish.
- Once it is finished and the “The operation completed successfully.” message appears, close everything and reboot your PC.
Method 4: Perform SFC Scan
SFC or System File Checker is a tool that is used for scanning the system files for any data corruption. This tool replaces corrupted system files using a cached copy available locally on the computer itself. This is pretty easy to use –
- Launch the elevated Command Prompt and type in sfc /scannow.
- Press Enter.
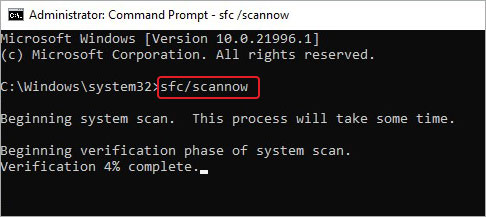
Wait for the scan to complete. Once it is done, restart your computer and see if this has fixed the issue.
Method 5: Remove WUServer and WIStatusServer from the Registry
Certain registry keys can sometimes interfere with the installation of updates and cause errors like the 0x800F081F to pop up. You can easily fix it by deleting the following registries from the system. However, you should first take a backup of these. Once you have taken a backup of these registries, follow the steps below carefully –
- Press WINDOWS + R and type regedit. Press Enter.
- In the address bar, paste the following address and press Enter – HKEY_LOCAL_MACHINE\SOFTWARE\Policies\Microsoft\Windows\WindowsUpdate
- Locate WUServer & WIStatusServer. Right-click on them and delete them.
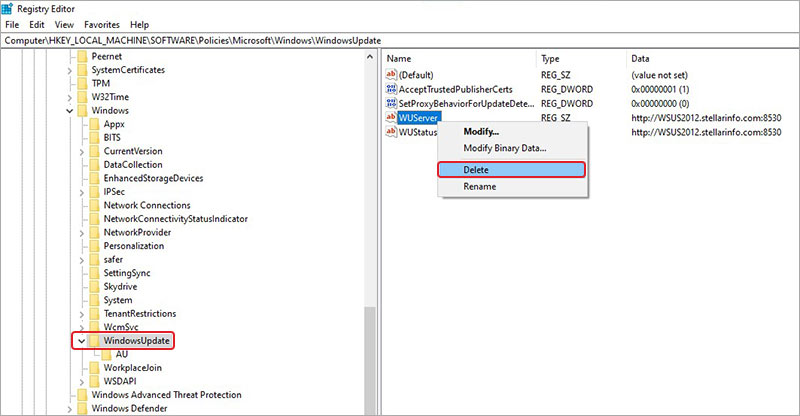
- Restart your computer.
Method 6: Reinstall Microsoft .NET Framework 3.5
The install error 0x800F081F is due to an issue with the Microsoft .NET Framework 3.5. In this case, you can reinstall Microsoft .NET Framework 3.5 to fix the issue at hand. To do so –
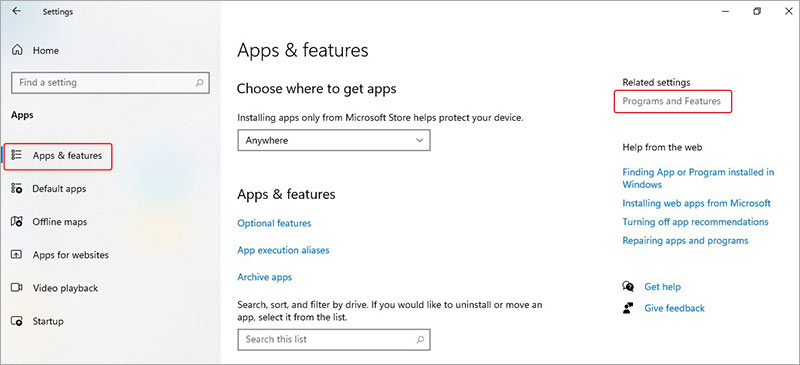
- Press WINDOWS + I to open Windows Settings.
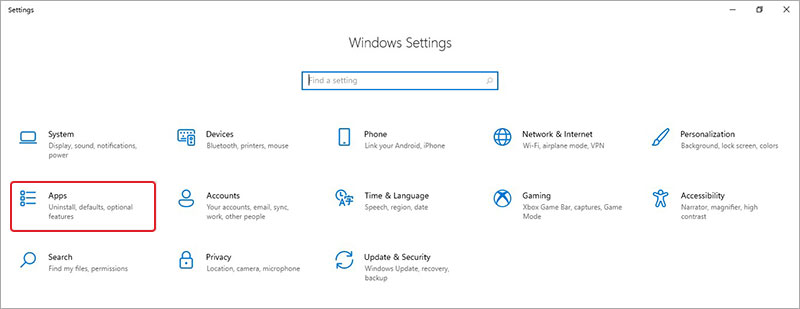
- Click on Apps and then Apps & features in the left pane.
- Locate Related settings and click on Programs and Features under it.
- In the next window, click on Turn Windows features on or off.
- Select the .NET Framework 3.5 (includes .NET 2.0 and 3.0) and click OK.
- Wait for the installation to finish.
Method 7: Manually Install Windows 11 Update
If you are unable to install Windows 11 update that is available in the updates, you can manually download it from the Microsoft Catalogue website and install it. Here are the steps to do this –
- Open the Microsoft Catalogue website.
- In the search bar, type in the KB number and press Search.

- Locate the correct update from the available list of update packages. Click on it.
- Click on Download.
- A download link will appear. Right-click on it and click on Save link as…
- Choose the location where you want to save it and click on Save.
- Once downloaded, go to the save location, and double-click on it to run.
- Follow the instructions as prompted by the installer.
Method 8: Reset Windows 11 without Losing Data
Resetting Windows 11 is the last resort you should employ if none of the above-mentioned methods work. However, you should take a complete backup of your data before proceeding with it. Carefully follow the steps below to reset your PC without losing data –
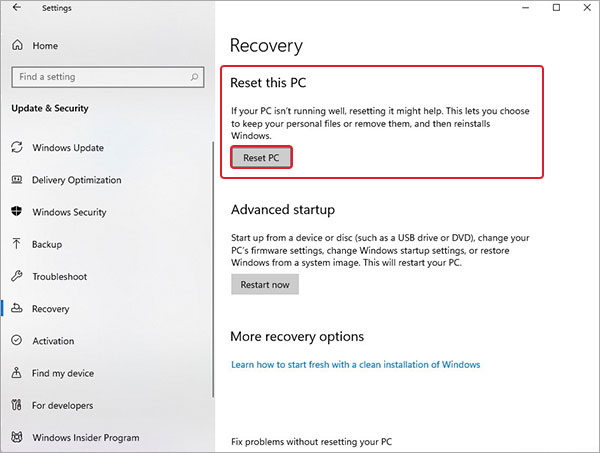
- Press WIN + I to open the Settings app.
- Click on Update & Security.
- Click Recovery in the left pane and then click on Reset PC under Reset this PC.
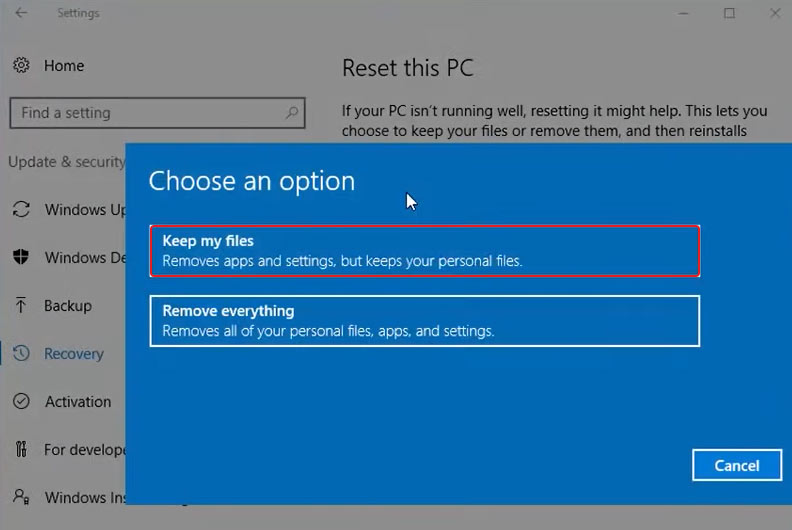
- A prompt will ask you to either Keep my files or Remove everything. Click on Keep my files and proceed further.
- In the next section, you will have to choose between Cloud download or Local reinstall. Carefully, select whatever you feel comfortable with.
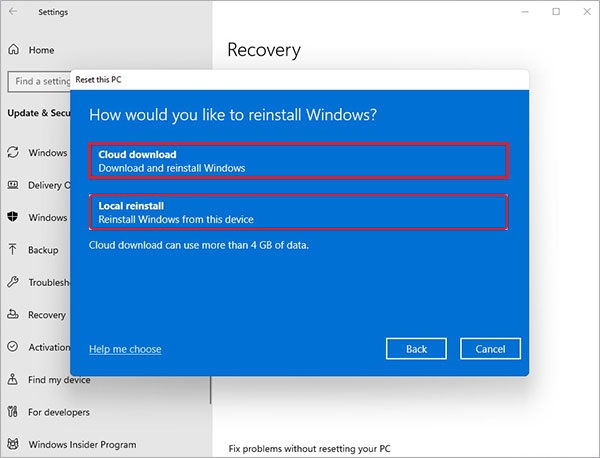
Note – Selecting cloud download will download a fresh image of Windows OS and remove any custom OS image that came preinstalled with the PC.
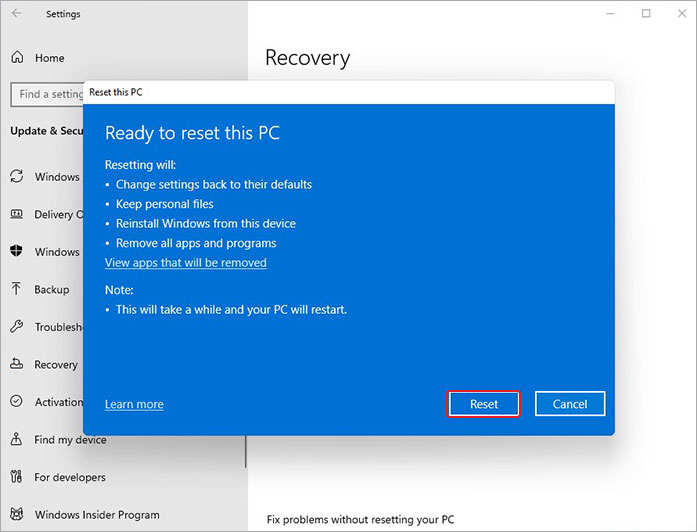
- Proceed with the wizard by carefully reading the reinstallation instructions listed on the Ready to reset this PC screen. Click Reset whenever you are ready.
What if This Error Leads to Data Loss?
Improperly working or installed Windows OS updates can cause errors like the 0x800F081F to pop up, which can lead to subsequent issues and even unexpected system crashes. Unexpected system crashes can cause inconvenience and even lead to unprecedented data losses.
If this error has caused your system to crash and become unbootable or lead to data loss, you should not worry as there is a way to retrieve your data.
Get a professional data recovery software like Stellar Data Recovery Professional to recover your lost data. This powerful software can help you recover your lost data from various devices like SD cards, HDDs, SSDs, and more. It supports recovery of various file types and can recover data lost in various cases like formatting, deletion, system crash, malware attack, and more.
Final Words
The Install error 0x800F081F is a system error code that affected many Windows 11 users trying to install a specific cumulative update. In this post, we learnt the reasons behind this error and discussed some methods to get rid of it. In the end, we also came across a software that can help you get your lost data back safely. We hope the methods mentioned in this post helped you resolve the error and install the updates smoothly.
FAQs
How do I fix Windows 11 update error?
You can fix the Windows 11 update error by :
- Making sure that there is ample storage space on your computer
- Running Windows update a few times
- Making sure that all device drivers are updated
- Repairing hard disk drive errors
Why does the Windows 11 cumulative update keep failing?
A. The error message “Windows 11 cumulative update failed to download and install” could be a result of insufficient space on the hard drive, corrupted system files, unstable internet, etc.
What is the 0x800F081F .NET error?
The 0x800F081F .NET error is a Microsoft .NET Framework-related error, which can occur due to corrupted or incomplete installation files, or insufficient permissions with the user or the source location specified by the path doesn’t contain any installation files.
Was this article helpful?
YES0
NO