
We usually give direct download links to Windows Updates on this blog, so users can install the updates manually on multiple systems, saving Internet bandwidth. Some users have reported that they encounter an error code 0x800b0101 when trying to install Windows Update using an MSU file.
The issue can be resolved by changing a few things, such as running Windows Update troubleshooter, changing the system date and time, and performing SFC and DISM scans. This will ensure the integrity of your system files and the accuracy of your system clock.
In this article, we will discuss all these topics in detail.
Table of Contents
Windows Update Standalone Installer 0x800b0101 Error

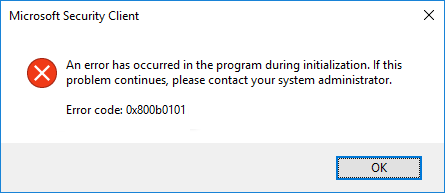
Users often encounter a prompt such as the above stating the following:
Windows Update Standalone Installer
Installer encountered an error: 0x800B0101
A required certificate is not within its validity period when verifying against the current system clock or the timestamp in the signified file.
This error occurs when you try to manually install a standalone Windows update package (.msu file).
An MSU file is installed using the Windows Update Standalone Installer (WUSA) utility. This utility is placed in the %windir%\System32 directory in Windows. If you do not install a Windows update, it throws an error with the relevant error code.
Fix Windows Update Standalone Installer Error 0x800b0101
We have listed the following methods you can mitigate this error in Windows. Since the issue can occur due to several different reasons, any one of these methods could work for you.
Run Windows Update Troubleshooter
Both Windows 11 and 10 come with a pre-installed troubleshooter for several different services and features of the OS. This troubleshooter can be executed automatically to check for Windows Update issues, and then suggest the necessary action to be taken.
To run this troubleshooter, navigate to the following:
Settings app >> System >> Troubleshoot >> Other troubleshooters
Click Run in front of Windows Update.

The troubleshooter will now launch. It will then display any identified issues and ask you to take the appropriate action(s). It is recommended that you perform the necessary actions and see whether the issue is resolved.
Correct System Date and Time
The error message claims it is having trouble verifying the timestamp for the associated certificate. It may be possible that your system’s time or date is out of sync and needs to be corrected. Follow the steps below to do so:
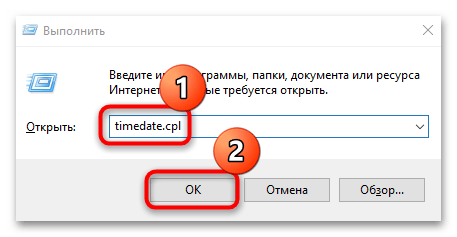
- Open the Date and Time settings by typing in timedate.cpl in Run.
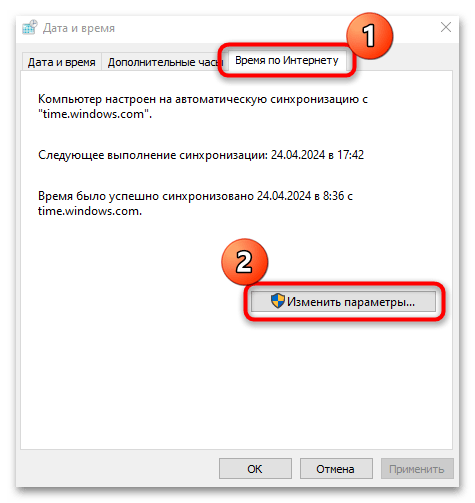
- From the window, switch to the Internet Time tab, and then click Change settings.

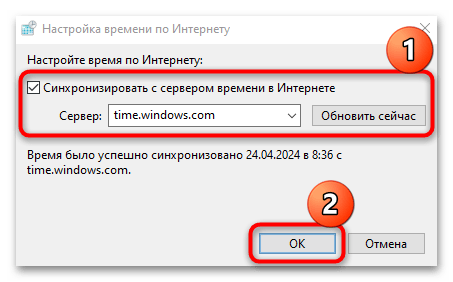
- From the Internet Time Settings pop-up, check the box next to “Synchronize with an Internet Time Server,” select time.windows.com from the drop-down menu, and then click Update now. Click OK when done.
- Back in the Date and Time window, click Apply and Ok.


Now restart your computer and try reinstalling the Windows update.
Clear Software Distribution folder
The Software Distribution folder can be found in C:\Windows. This folder contains temporary files within a sub-folder (download) that are required to install a Windows update. Quite often, a Windows update fails to install and experiences an error code because of these corrupted files. In this case, these temporary files need to be removed, and the update process needs to be started from the top.
Navigate to the following location using File Explorer:
C:\Windows\SoftwareDistribution\Download
Now, select all the items by using the Ctrl + A shortcut keys. Then delete all selected items using the Del key while holding down on the Shift key to remove them permanently.

Once removed, restart the computer and try reinstalling the Windows update.
Scan for Corrupted System Files
Windows comes with a built-in tool to fix system files that may have been corrupted. This tool is the System File Checker (SFC), which automatically repairs corrupted system files that may be redundantly available on your PC, or have just gone missing. What it does is replace any damaged or missing files.
Perform the following to run the tool:
- Launch Windows PowerShell with administrative privileges and then enter the following command:
sfc /scannow - Now allow some time for the command to fully run and scan your PC, and make any fixes if possible along the way.

- Restart the computer.

Once done, check if you can now install the Windows update. If not, perform the next step to rule out system file corruption.
Repair Windows image
Deployment Image Servicing and Management (DISM) also fixes your Operating System automatically, like the SFC scan.
To begin the scan, launch Command Prompt with administrative privileges and enter the following 3 commands, one after the other:
DISM.exe /Online /Cleanup-image /Scanhealth
DISM.exe /Online /Cleanup-image /Checkhealth
DISM.exe /Online /Cleanup-image /Restorehealth

It can take a few minutes for the commands to execute completely. Do not close the Command Prompt and allow them ample time to run.
Once completed, check to see if the issue has been resolved.
Remove Expired Certificates
Digital certificates are used to authenticate software that is who they claim to be, not an imposter. Each certificate is valid until a certain time, after which they expire and need to be renewed (usually automatically). However, expired and faulty certificates can cause the Windows Update Standalone Installer to fail and throw an error.
In that case, the certificate needs to be removed. Follow the steps below to remove expired certificates:
We suggest you create a system restore point if a critical system certificate is removed.
- Open the Certificate Management Console by typing in certlm.msc in Run.
- From the left pane, navigate to the following:
Certificates - Local Computer >> Trusted Root Certification Authorities >> Certificates - Now, in the right pane, look for the expired certificate (using the Expiration Date column), right-click it, and then click Delete from the context menu.

- Repeat the last step until all expired certificates are removed.
- Restart the computer.

Once the computer restarts, check to see if the issue has been resolved.
Closing Words
There are a bunch of errors and error codes associated with Windows updates. Most of them, however, are solved by certain troubleshooting techniques. Applying these methods can save you from repairing, resetting, or redoing your entire operating system.
That is why we strongly recommend that you implement all of the methods given above to try and mitigate the issue.
Recently, a few users complained of not being able to update their Windows using Update Standalone Installer on account of an error code 0X800B0101. Though this issue is restricted to Windows 10, it may occur on Windows 11 as well. When you encounter this issue on your PC, you may receive an error message as well.
The error message resembles the following –
Windows Update Standalone InstallerInstaller encountered an error: 0x800B0101A required certificate is not within its validity period when verifying against the current system clock or the timestamp in the signified file.

Why do Windows updates fail on error 0X800B0101?
After looking into this particular issue thoroughly, we came to know that this is an update-related issue and may occur because of the following reasons –
- Incorrect Date & Time
- Hardware or driver conflicts
- Installed a corrupted update or application
- Presence of pending.xml files
- Corrupt Windows Cache folders
If you are getting an error code 0X800B0101 while updating Windows, check if the date & time are correct on your PC. In case “Date & time” does not match the locale where you live, configure this immediately. Restart your device and check if you can now update Windows 11/10 without getting into any glitches.
If the error persists even after correcting the date & time, go through the below set of solutions sequentially –
1] Run Windows Update Troubleshooter
Whenever you get into any update-related issue on your PC, troubleshoot Windows using an in-built tool “Update Troubleshooter”. You may access and run this tool by following the steps outlined below –
- Press Win + I to open Settings.
- Select “System > Troubleshoot > Other troubleshooters” in Windows 11.
- On the next screen, click the Run button beside Windows update.

- When the troubleshooter window pops in, hit Next and follow the on-screen instructions.
Note: If you are on Windows 10, press Win + I, and follow this route instead –
Settings (Win + I) > Update & Security > Troubleshoot > Additional troubleshooters
- On the next screen, click to expand Windows update and hit the option – Run the troubleshooter.

This program will run to find any issues that exist inside your computer and resolve them.
2] Uninstall Third-party apps
If you have lately installed some third-party application on your PC and this error starts appearing afterward, you must have installed a conflicting app. What you can do now is open the Control Panel and remove all recent programs from your device.
There remain some residual or leftover files even after uninstalling programs from your system. To get rid of such files in Windows, reboot your PC once. Sign back into your device and check if the error 0X800B0101 is resolved by now.
3] Run SFC and DISM scans
There’s one more problem with installing third-party apps on the computer. A problematic app is known to cause problems as it interferes with the core system files and makes them corrupt. To fix this issue, you may try performing SFC and DISM scans. Here’s how to do this –
- First of all, right-click on the Windows icon and select Windows Terminal (Admin).
- If you are still on the Windows 10 operating system, select Windows PowerShell (Admin) instead.
- On the elevated console, type the following, and press Enter.
sfc /scannow
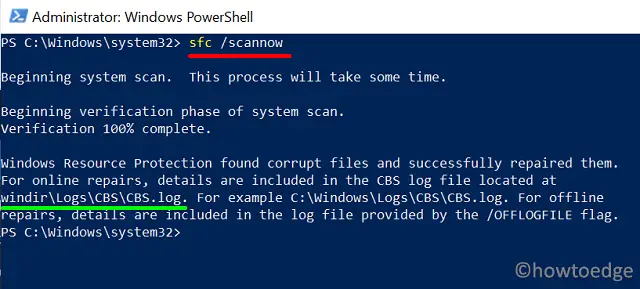
- Wait for 10-15 minutes while the SFC scan reaches 100%.
- Next, run the DISM code to find and fix any problem with Windows 11/10 Image.
Dism /Online /Cleanup-Image /ScanHealth

- The DISM scan also takes 15-20 minutes, so wait patiently.
4] Clear Pending .XML file
The presence of pending.xml files may also cause this exception error 0X800B0101 in Windows. To solve this issue, you may rename the pending.xml file to something pending.old.
To do this, open Command Prompt as an administrator and execute the code below
Ren c:\windows\winsxs\pending.xml pending.old
Restart your PC and check if this resolves the issue that you were dealing with before.
5] Repair outdated drivers to fix Error 0X800B0101
If you haven’t installed any driver updates for a long time on your computer, errors like 0X800B0101 are bound to occur at one time or another. What you can do now is download and install optional updates and see if it resolves the issue.
6] Purge Windows Cache folders
SoftwareDistribution and Catrrot2 are two cache folders that contain all the essential information of recent updates. It is supposed for us to purge these folders frequently. If you haven’t cleared these folders for a long time, try purging them for once. Here’s how this process goes –
- Launch the Run dialog by pressing Win + R.
- Type “
services.msc” and press Enter to open the Services window. - Scroll down to Windows update, right-click over it, and hit Stop.
- Next, stop these services as well – Background Intelligent Transfer Service and Cryptographic Services.
- After you stop these services successfully, purge the Windows Cache folders. You may find these folders at the below location –
SoftwareDistribution - C:\Windows
Catroot2 - C:\Windows\System32

- After you reach out to the respective folder, press Ctrl + A to select all items.
- Use Ctrl + X to cut all the selected items and paste them (Ctrl + V) at some other location.
- Alternatively, you may also rename these folders to
SoftwareDistribution.oldandCatroot2.oldas well. - After purging or renaming the Windows cache folders, restart all the services that you stopped earlier.
Reboot your PC next so that the changes made come into effect from the next login.
How do I update Windows 11/10?
The best way to update Windows 11/10 is through the update section under Settings. You may access the Settings page by clicking Win + I. After that, click Update & Security and hit Check for updates.
If this doesn’t display any pending updates, you may check the Windows update history page for the latest cumulative updates. Following this way, you need to manually download the pending updates and install them on your computer.
Уведомление о неисправности с кодом 0x800b0101 может появляться в нескольких разнородных случаях. Корень причины — ОС считает небезопасным исполняемое действие и блокирует его. Исправление проблемы зависит от условий, в которых она наблюдается.
Решения для ошибки 0x800b0101
№1: если во время входа в аккаунт Microsoft
Измените время на устройстве на корректные значения. Во избежания подобных сбоев в дальнейшем — активируйте синхронизацию времени с сервером в Интернете.
№2: если при обновлении System Center 2012
Необходимо установить официальное исправление от Microsoft, для более детальной информации посетите эту страничку. Если у вас Windows 7, то качать нужно это обновление (KB2749655), а если более новые версии — вот это (KB2756872).
i keep getting this error message and dont know how to fix it.
Posted on Apr 24, 2012 3:22 PM
Posted on Apr 26, 2012 8:36 PM
I had this same issue restoring my ipod…. My fix came to me in a WEIRD way, apparently if your system DATE and TIME are not in sync with «real time» itunes says SCREW YOU…. I went into my date and time settings «WINDOWS 7» and clicked on «INTERNET TIME» and changed the settings. Ran my recovery again on my ipod, and BAM!!! 🙂 worked. No more 0x800b0101 error message.
Hope this helped you
how to fix error 0x800b0101
Все способы:
- Способ 1: Проверка даты и времени
- Способ 2: Встроенное средство устранения неполадок
- Способ 3: Утилиты SFC и DISM
- Способ 4: Очистка данных в кеше обновлений
- Способ 5: Ручное обновление
- Вопросы и ответы: 0
Способ 1: Проверка даты и времени
Чаще всего с ошибкой 0x800b0101 пользователи сталкиваются, если на компьютере установлены неверные значения даты и времени. В этом случае решение довольно простое – нужно вручную отредактировать эти параметры.
- Используйте сочетание клавиш «Win + R», чтобы вызвать окно «Выполнить», затем введите в поле запрос
timedate.cplи нажмите на кнопку «ОК». - В появившемся окне перейдите на вкладку «Время по Интернету» и кликните по кнопке «Изменить параметры».
- Убедитесь, что в поле «Сервер» установлено значение
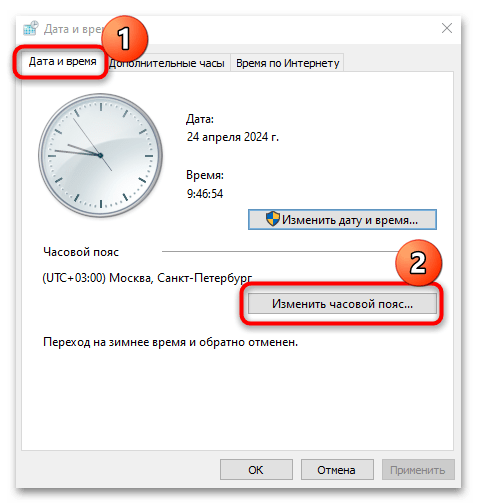
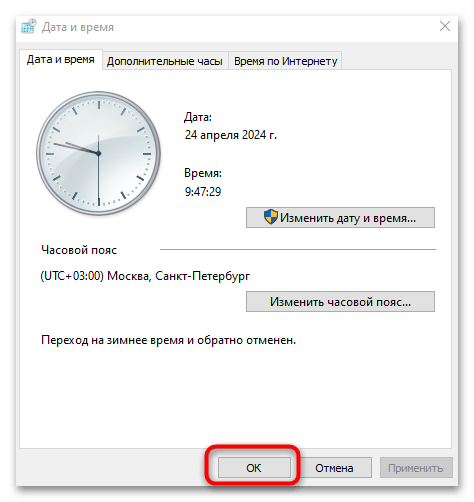
time.windows.com. Если нет, тогда выставьте его и подтвердите новые параметры, нажав на кнопку «ОК». - Далее в окне «Дата и время» переключитесь на одноименную вкладку и проверьте часовой пояс, который соответствует вашему региону. Если он неверен, нажмите на «Изменить часовой пояс» и из выпадающего меню выберите нужное значение, сохраните настройки.
- Снова сохраните изменения, нажав на «ОК», если они были внесены.
После потребуется перезагрузить компьютер. Если все дело в сбитых настройках времени, тогда обновление должно завершиться успешно. Также можете обратиться к нашему отдельному материалу с дополнительными способами смены даты и времени на компьютере с Windows 10.
Подробнее: Изменение времени в ОС Windows 10
Если через некоторое время параметры снова беспричинно сбиваются, следует заменить батарейку-«таблетку» CR2032, установленную на материнскую плату. Это необходимо сделать потому, что именно она отвечает за правильные дату и время, даже если устройство выключено. С годами она разряжается и базовые параметры ПК, хранящиеся на одном из чипов и зависящие от энергии, сбиваются.
Читайте также: Как разобрать компьютер / ноутбук
Способ 2: Встроенное средство устранения неполадок
Как правило, ошибка под кодом 0x800b0101 появляется во время обновления операционной системы. Если это происходит при использовании автоматизированного средства «Центр обновления Windows», можно прибегнуть к помощи встроенного инструмента, которое предназначено для поиска и устранения неполадок, связанных с ним:
- Нажмите на кнопку «Пуск» и выберите запуск штатных «Параметров».
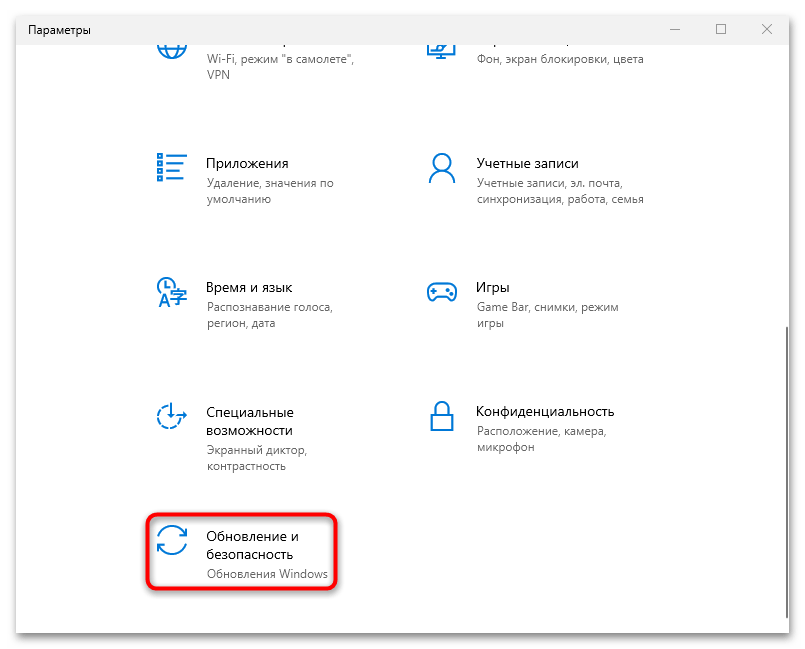
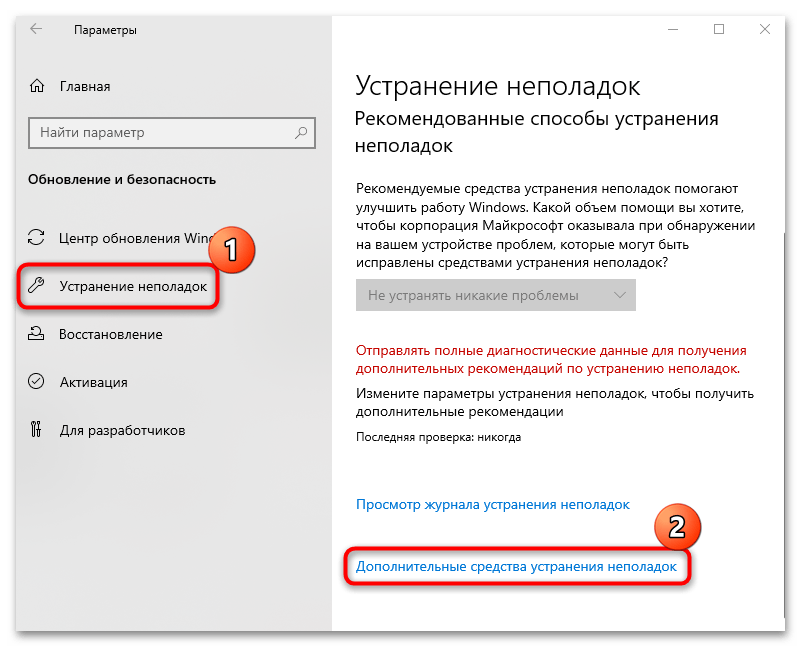
- Перейдите в раздел «Обновление и безопасность».
- Далее выберите вкладку «Устранение неполадок» на панели слева, а в основной части окна кликните по строке «Дополнительные средства устранения неполадок».
- В списке найдите строку «Центр обновления Windows», щелкните по ней, затем выберите запуск средства устранения неполадок.
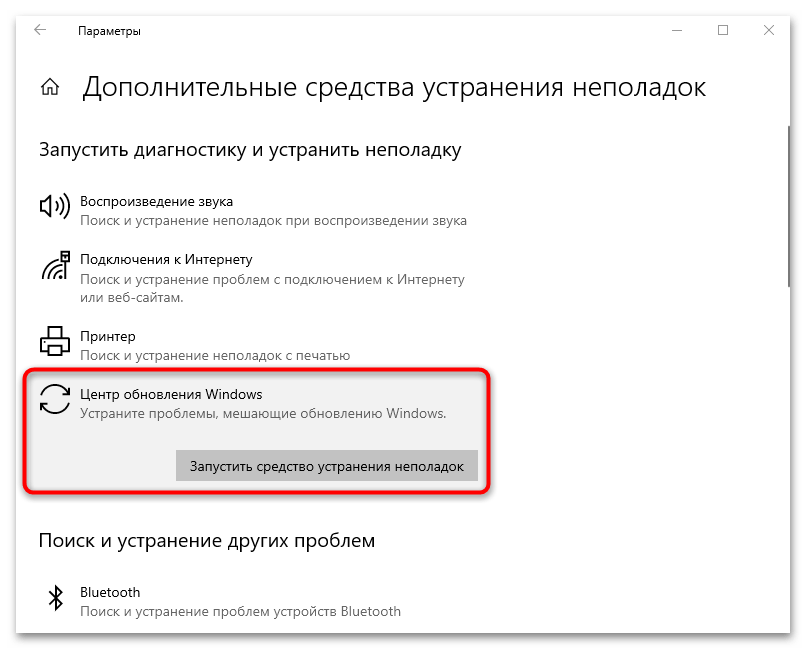
Начнется поиск проблем, которые могут быть причиной появления рассматриваемой ошибки при установке апдейтов через «Центр обновления Windows». В некоторых случаях, в зависимости от характера и причины неполадки, могут потребоваться дополнительные действия со стороны пользователя, где достаточно следовать инструкциям пошагового мастера. В остальных случаях исправление ситуации происходит автоматически.
Способ 3: Утилиты SFC и DISM
При повреждении файловой системы, а именно файлов и их хранилища, и также при обновлении Windows 10 могут появляться различные ошибки, включая 0x800b0101. В операционных системах от Microsoft реализованы специальные утилиты для восстановления целостности системы – SFC и DISM. Применяются они посредством специальных команд, выполненных в консольной оболочке:
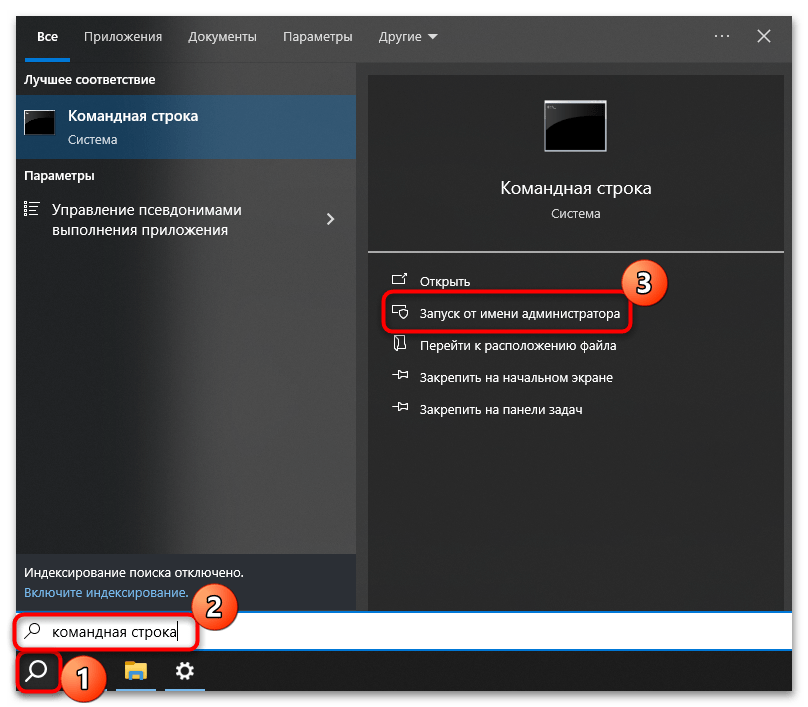
- С помощью строки системного поиска найдите консоль «Командная строка», введя соответствующий запрос, затем нажмите на строку «Запуск от имени администратора».
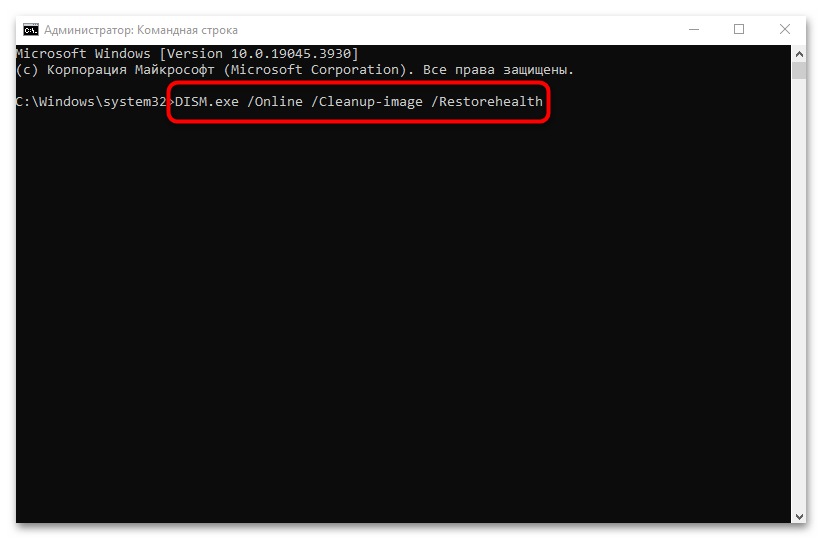
- Вставьте команду
DISM.exe /Online /Cleanup-image /Restorehealthи нажмите на клавишу «Enter». - Следует отметить, что утилита DISM обращается к «Центру обновления Windows» для получения файлов, которые смогут устранить неполадки. Если же поврежден сам компонент («Центр обновления»), тогда придется воспользоваться другой командой, но предварительно нужно создать накопитель с источником восстановления, то есть оригинальным образом Windows. Затем подсоедините его, если это флешка, или используйте привод для оптического накопителя.
Подробнее: Руководство по созданию загрузочной флешки / диска с Windows 10
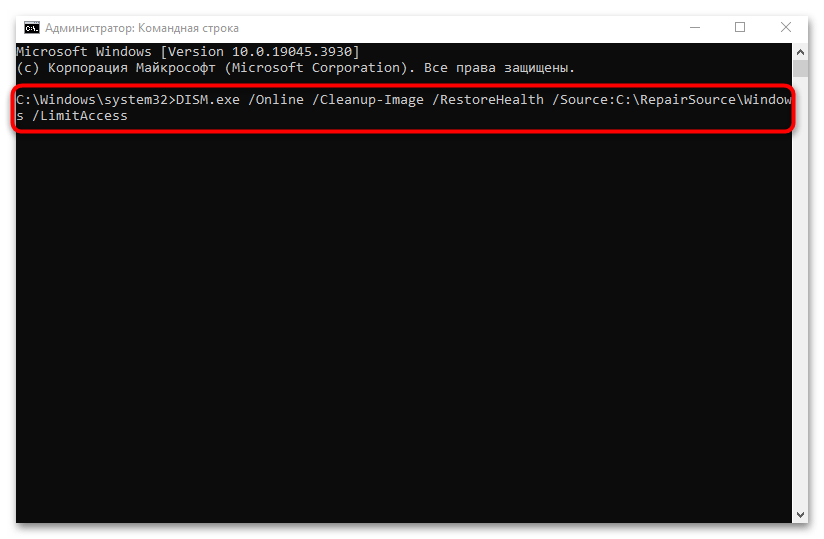
- Что касается самой команды, то введите следующее:
DISM.exe /Online /Cleanup-Image /RestoreHealth /Source:C:\RepairSource\Windows /LimitAccess, где под «C:\RepairSource\Windows» подразумевается ваш путь к источнику восстановления.Уточним, что вам понадобится указать путь до файла «install.wim» или «install.esd», записанного на флешку/диск. Путь определяется так: откройте «Проводник», нажмите ПКМ по флешке или диску и выберите пункт «Открыть в новом окне» — это позволит просмотреть записанные на носитель файлы. Перейдите в папку «sources» и посмотрите формат файла «install» — «.wim» или «.esd». Затем через адресную строку вверху окна скопируйте путь, вернитесь в консоль, вставьте его и допишите название файла «install» с форматом. К примеру, должно получиться:
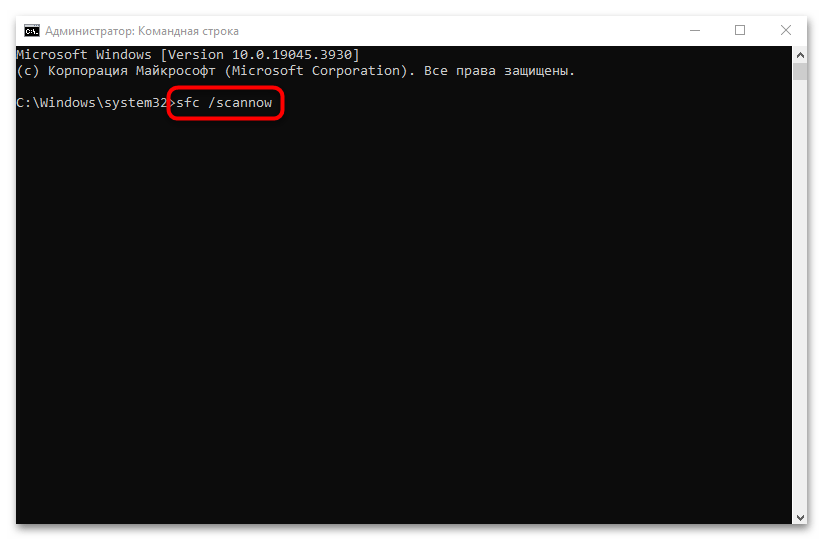
E:\sources\install.wim - После проверки хранилища программных компонентов также можно использовать утилиту System File Checker для проверки и восстановления целостности системных файлов. Для этого выполните команду
sfc /scannow.
После сканирования закройте «Командную строку» и проверьте, устранена ли ошибка при обновлении через «Центр обновления Windows».
Способ 4: Очистка данных в кеше обновлений
Если ранее были скачаны файлы обновлений, но с ошибками или повреждениями, может происходить конфликт между программными компонентами, поэтому стоит очистить папки с кешем апдейтов. Делается это как вручную, так и с помощью «Командной строки». Так как второй вариант проще, разберем его:
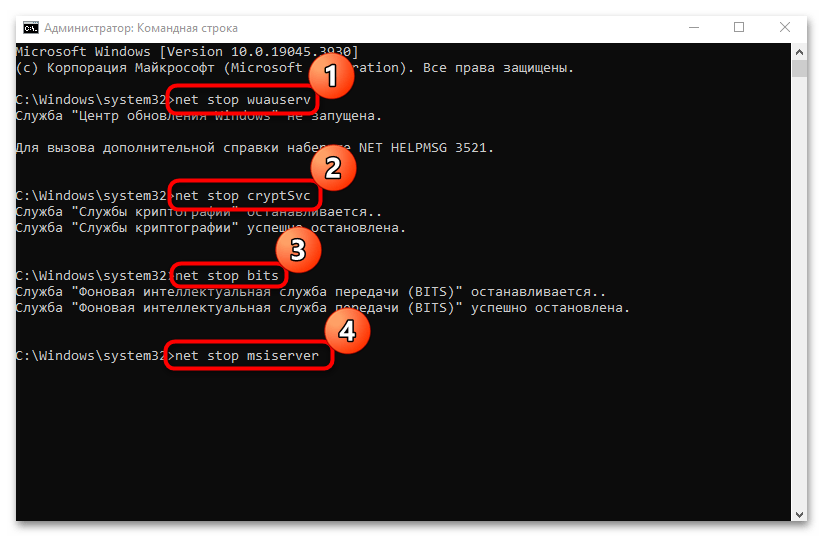
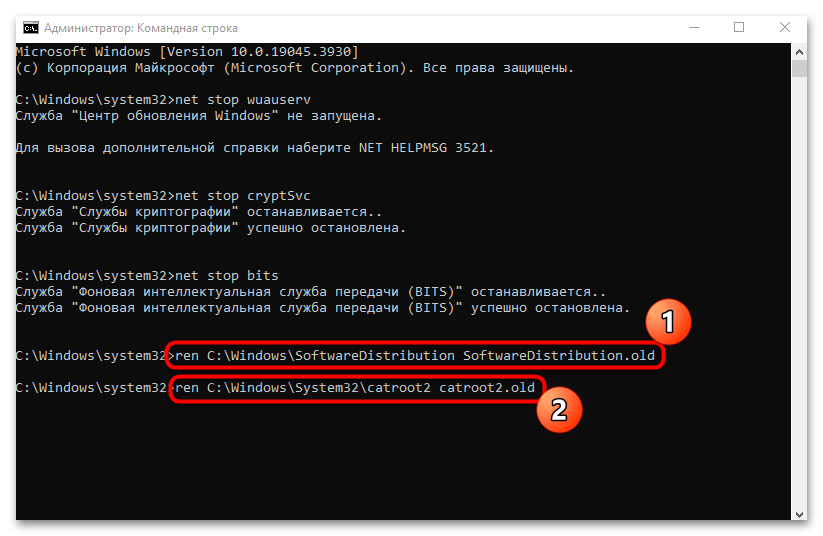
- Запустите консоль «Командная строка» с расширенными правами так же, как было показано ранее. Затем с помощью команд отключите «Центр обновления Windows» и несколько связанных с ним служб, поочередно выполнив следующие команды:
net stop wuauserv
net stop cryptSvc
net stop bits
net stop msiserver - Следующие команды предназначены для изменения имени каталогов с кешем: система создаст новые автоматически, а старые (с припиской «.old») можно будет удалить, если обновление в итоге пройдет успешно. Поочередно введите следующие команды, нажимая после каждой на клавишу «Enter»:
ren C:\Windows\SoftwareDistribution SoftwareDistribution.old
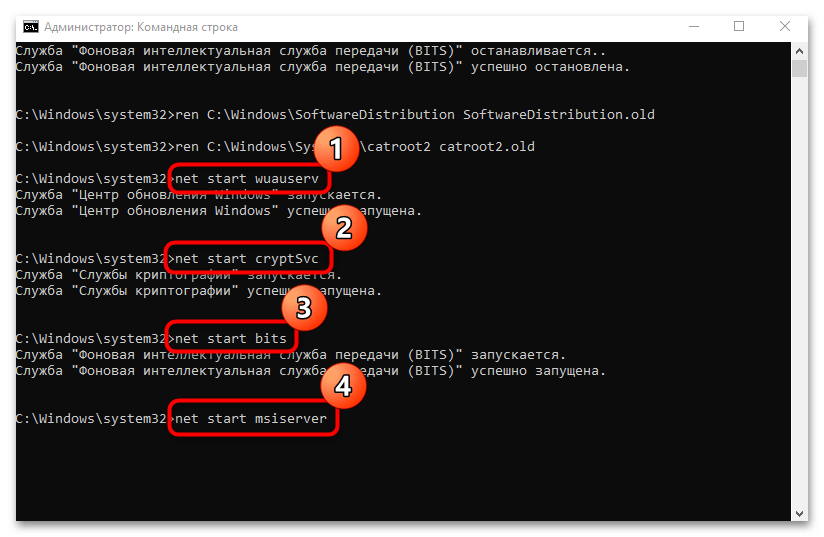
ren C:\Windows\System32\catroot2 catroot2.old - Теперь потребуется запустить службы и сам «Центр обновления Windows», работу которых мы остановили на Шаге 1/ Используйте команды:
net start wuauserv
net start cryptSvc
net start bits
net start msiserver
После того как все процессы, необходимые для автоматического обновления, будут вновь активны, перезагрузите компьютер и выполните повторную загрузку и инсталляцию апдейтов.
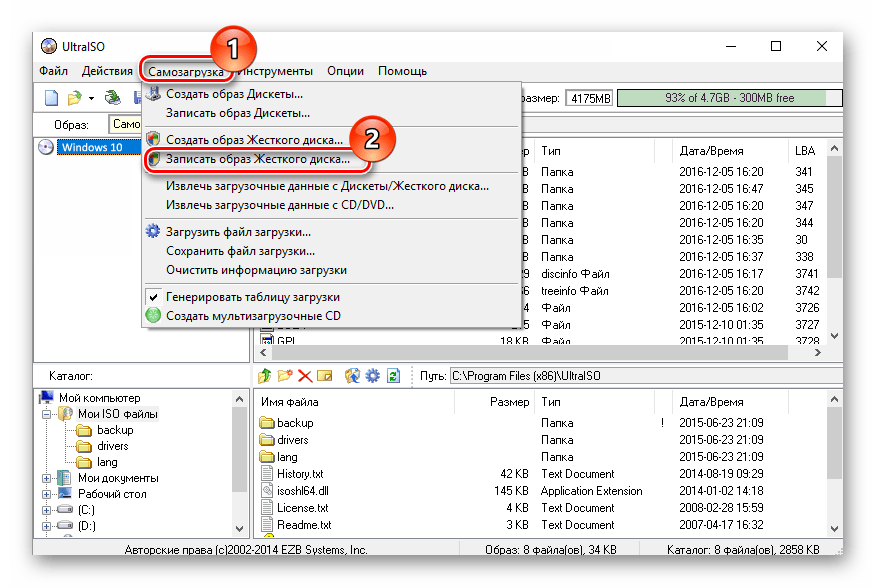
Способ 5: Ручное обновление
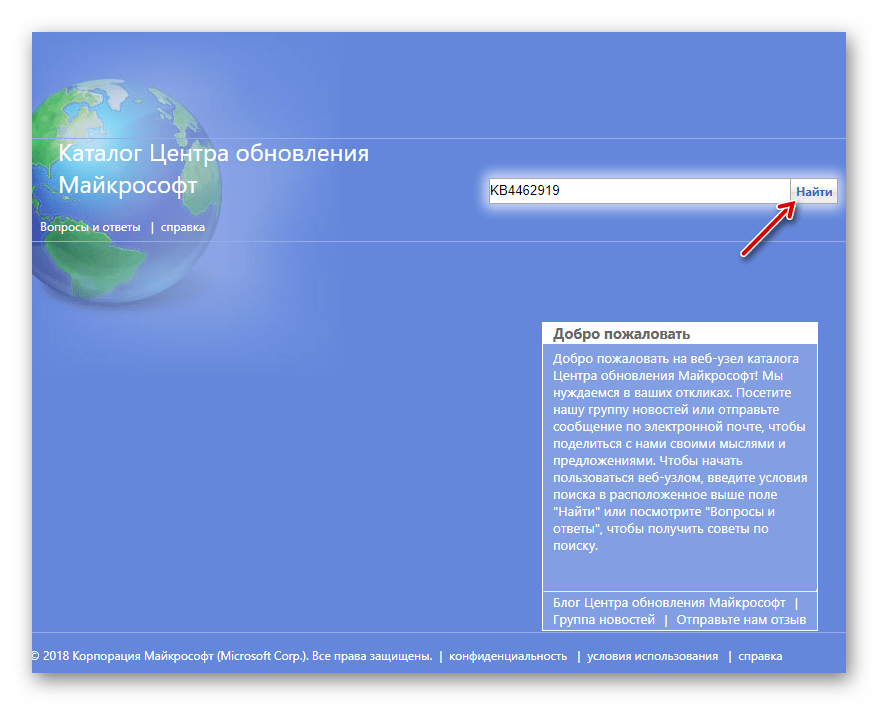
Если ни один способ не помог, можно попробовать обойти рассматриваемую ошибку, скачав проблемное обновление вручную. Не всегда это позволяет избежать возможных проблем с автоматическими обновлениями в дальнейшем, но в некоторых апдейтах могут содержаться исправления, с помощью которых подобная ошибка не появится вновь.
Чтобы вручную обновить операционную систему, потребуется посетить «Каталог Центра обновления Майкрософт» на официальном сайте этой компании, отыскать проблемный апдейт, скачать его и инсталлировать самостоятельно. Ранее мы писали об этом более детально в отдельном руководстве.
Подробнее: Устанавливаем обновления для Windows 10 вручную
Наша группа в TelegramПолезные советы и помощь